 trufflesecurity/trufflehog
查找、验证和分析泄露的凭证
<p align="center">
<img alt="GoReleaser Logo" src="https://assets.kitploit.com/production/public/readmes/3815/31dbdb577b88b3a967e2c18f9b0f3d4a7031dafe7e392c51320178aba6352603.png" height="140" />
<h2 align="center">TruffleHog</h2>
<p align="center">查找泄露的凭据。</p>
</p>
---
<div align="center">
[](https://goreportcard.com/report/github.com/trufflesecurity/trufflehog/v3)
[](/LICENSE)
[](/pkg/detectors)
</div>
---
# :mag_right: _正在扫描_
<div align="center">
<img src="https://raw.githubusercontent.com/trufflesecurity/trufflehog/HEAD/assets/scanning_logos.svg">
**……以及更多**
要了解有关 TruffleHog 及其功能和能力的更多信息,请访问我们的[产品页面](https://trufflesecurity.com/trufflehog?gclid=CjwKCAjwouexBhAuEiwAtW_Zx5IW87JNj97Ci7heFnA5ar6-DuNzT2Y5nIl9DuZ-FOUqx0Qg3vb9nxoClcEQAvD_BwE)。
</div>
# :globe_with_meridians: TruffleHog 企业版
您是否有兴趣持续监控 **Git、Jira、Slack、Confluence、Microsoft Teams、Sharepoint(以及更多)** 中的凭据?我们有一款企业级产品可以帮到您!请访问 <https://trufflesecurity.com/trufflehog-enterprise> 了解更多信息。
我们将企业版产品的收入用于资助更多出色的开源项目,让整个社区都能从中受益。
</div>
# 什么是 TruffleHog 🐽
TruffleHog 是最强大的机密**发现、分类、验证**和**分析**工具。在此语境下,机密指的是机器用于向另一台机器进行身份验证的凭据。这包括 API 密钥、数据库密码、私有加密密钥等。
## 发现 🔍
TruffleHog 可以在许多地方查找机密,包括 Git、聊天记录、wiki、日志、API 测试平台、对象存储、文件系统等。
## 分类 📁
TruffleHog 可对 800 多种机密类型进行分类,并将其映射回所属的具体身份。它是 AWS 机密?Stripe 机密?Cloudflare 机密?Postgres 密码?SSL 私钥?有时仅凭观察很难判断,因此 TruffleHog 会对其发现的所有内容进行分类。
## 验证 ✅
对于 TruffleHog 能够分类的每一种机密,它还可以登录以确认该机密是否仍然有效。这一步对于判断是否存在当前活跃的危险至关重要。
## 分析 🔬
对于约 20 种最常见的泄露凭据类型,TruffleHog 不会只发送一个请求来检查机密能否登录,而是可以发送多个请求,以了解有关该机密的全部信息。是谁创建的?它可以访问哪些资源?它对这些资源拥有哪些权限?
# :loudspeaker: 加入我们的社区
有疑问?有反馈?加入 Slack 或 Discord,与我们交流。
加入我们的 [Slack 社区](https://join.slack.com/t/trufflehog-community/shared_invite/zt-pw2qbi43-Aa86hkiimstfdKH9UCpPzQ)
加入 [Secret Scanning Discord](https://discord.gg/8Hzbrnkr7E)
# :tv: 演示

```bash
docker run --rm -it -v "$PWD:/pwd" trufflesecurity/trufflehog:latest github --org=trufflesecurity
```
# :floppy_disk: 安装
有多种选项可供你选择:
### MacOS 用户
```bash
brew install trufflehog
```
### Docker:
<sub><i>_在执行以下命令前,请确保 Docker 引擎正在运行:_</i></sub>
#### Unix
```bash
docker run --rm -it -v "$PWD:/pwd" trufflesecurity/trufflehog:latest github --repo https://github.com/trufflesecurity/test_keys
```
#### Windows 命令提示符
```bash
docker run --rm -it -v "%cd:/=\%:/pwd" trufflesecurity/trufflehog:latest github --repo https://github.com/trufflesecurity/test_keys
```
#### Windows PowerShell
```bash
docker run --rm -it -v "${PWD}:/pwd" trufflesecurity/trufflehog github --repo https://github.com/trufflesecurity/test_keys
```
#### M1 和 M2 Mac
```bash
docker run --platform linux/arm64 --rm -it -v "$PWD:/pwd" trufflesecurity/trufflehog:latest github --repo https://github.com/trufflesecurity/test_keys
```
### 二进制发布版本
```bash
Download and unpack from https://github.com/trufflesecurity/trufflehog/releases
```
### 从源码编译
```bash
git clone https://github.com/trufflesecurity/trufflehog.git
cd trufflehog; go install
```
### 使用安装脚本
```bash
curl -sSfL https://raw.githubusercontent.com/trufflesecurity/trufflehog/main/scripts/install.sh | sh -s -- -b /usr/local/bin
```
### 使用安装脚本,验证校验和签名(需要安装 cosign)
```bash
curl -sSfL https://raw.githubusercontent.com/trufflesecurity/trufflehog/main/scripts/install.sh | sh -s -- -v -b /usr/local/bin
```
### 使用安装脚本安装特定版本
```bash
curl -sSfL https://raw.githubusercontent.com/trufflesecurity/trufflehog/main/scripts/install.sh | sh -s -- -b /usr/local/bin <ReleaseTag like v3.56.0>
```
# :closed_lock_with_key: 验证构建产物
所有构建产物都会生成校验和,生成的校验和文件使用 cosign 进行签名。
验证签名需要以下工具:
- [Cosign](https://docs.sigstore.dev/cosign/system_config/installation/)
验证步骤如下:
1. 下载你需要的构建产物文件,以及 [releases](https://github.com/trufflesecurity/trufflehog/releases) 页面中的以下文件。
- trufflehog\_{version}\_checksums.txt
- trufflehog\_{version}\_checksums.txt.pem
- trufflehog\_{version}\_checksums.txt.sig
2. 验证签名:
```shell
cosign verify-blob <path to trufflehog_{version}_checksums.txt> \
--certificate <path to trufflehog_{version}_checksums.txt.pem> \
--signature <path to trufflehog_{version}_checksums.txt.sig> \
--certificate-identity-regexp 'https://github\.com/trufflesecurity/trufflehog/\.github/workflows/.+' \
--certificate-oidc-issuer "https://token.actions.githubusercontent.com"
```
3. 一旦确认签名有效,你就可以继续验证 SHA256 校验和是否与下载的构件一致:
```shell
sha256sum --ignore-missing -c trufflehog_{version}_checksums.txt
```
将 `{version}` 替换为已下载文件的版本
或者,如果您使用的是安装脚本,请传入 `-v` 选项以执行签名验证。
这需要事先安装 Cosign 二进制文件,然后再运行安装脚本。
# :rocket: 快速开始
## 1:仅扫描仓库中已验证的密钥
命令:
```bash
trufflehog git https://github.com/trufflesecurity/test_keys --results=verified
```
预期输出:
```
🐷🔑🐷 TruffleHog. Unearth your secrets. 🐷🔑🐷
Found verified result 🐷🔑
Detector Type: AWS
Decoder Type: PLAIN
Raw result: AKIAYVP4CIPPERUVIFXG
Line: 4
Commit: fbc14303ffbf8fb1c2c1914e8dda7d0121633aca
File: keys
Email: counter <[email protected]>
Repository: https://github.com/trufflesecurity/test_keys
Timestamp: 2022-06-16 10:17:40 -0700 PDT
...
```
## 2:扫描 GitHub 组织,仅查找已验证的密钥
```bash
trufflehog github --org=trufflesecurity --results=verified
```
## 3:扫描 GitHub 组织,排除已归档的仓库
```bash
trufflehog github --org=trufflesecurity --exclude-archived
```
## 4:仅扫描 GitHub 仓库中已验证的密钥并获取 JSON 输出
命令:
```bash
trufflehog git https://github.com/trufflesecurity/test_keys --results=verified --json
```
预期输出:
```
{"SourceMetadata":{"Data":{"Git":{"commit":"fbc14303ffbf8fb1c2c1914e8dda7d0121633aca","file":"keys","email":"counter \[email protected]\u003e","repository":"https://github.com/trufflesecurity/test_keys","timestamp":"2022-06-16 10:17:40 -0700 PDT","line":4}}},"SourceID":0,"SourceType":16,"SourceName":"trufflehog - git","DetectorType":2,"DetectorName":"AWS","DecoderName":"PLAIN","Verified":true,"Raw":"AKIAYVP4CIPPERUVIFXG","Redacted":"AKIAYVP4CIPPERUVIFXG","ExtraData":{"account":"595918472158","arn":"arn:aws:iam::595918472158:user/canarytokens.com@@mirux23ppyky6hx3l6vclmhnj","user_id":"AIDAYVP4CIPPJ5M54LRCY"},"StructuredData":null}
...
```
TruffleHog 也可以使用 `--sarif` 代替 `--json` 来输出 [SARIF](https://docs.oasis-open.org/sarif/sarif/v2.1.0/sarif-v2.1.0.html)。GitHub 代码扫描原生支持 SARIF,因此上传后可在拉取请求差异中内联展示发现结果,并在仓库的 Security 标签页中显示,同时跨扫描将发现结果跟踪为新增/已修复,而不是每次运行都报告同一条结果——有关如何上传,请参阅下方的 [TruffleHog Github Action](#octocat-trufflehog-github-action) 部分。请注意,与其他输出格式不同,SARIF 结果会在整个扫描过程中缓冲在内存中,并在结束时写出,因为 SARIF 需要单个 JSON 文档而非流——对于典型扫描来说没问题,但产生大量结果的扫描将按比例使用更多内存。
## 5:扫描 GitHub 仓库及其 Issues 和 Pull Requests
```bash
trufflehog github --repo=https://github.com/trufflesecurity/test_keys --issue-comments --pr-comments
```
## 6:扫描 S3 存储桶以获取高置信度结果(已验证 + 未知)
```bash
trufflehog s3 --bucket=<bucket name> --results=verified,unknown
```
## 7:使用 IAM Roles 扫描 S3 存储桶
```bash
trufflehog s3 --role-arn=<iam role arn>
```
## 8:在 Docker 中使用 SSH 认证扫描 Github 仓库
```bash
docker run --rm -v "$HOME/.ssh:/root/.ssh:ro" trufflesecurity/trufflehog:latest git ssh://github.com/trufflesecurity/test_keys
```
## 9:扫描单个文件或目录
```bash
trufflehog filesystem path/to/file1.txt path/to/file2.txt path/to/dir
```
## 10:扫描本地 git 仓库
克隆该 git 仓库。例如 [test keys](https://github.com/trufflesecurity/trufflehog/blob/main/git%40github.com%3Atrufflesecurity/test_keys.git) 仓库。
```bash
git clone [email protected]:trufflesecurity/test_keys.git
```
从父目录(git 仓库之外)运行 trufflehog。
```bash
trufflehog git file://test_keys --results=verified,unknown
```
为防止本地扫描中恶意的 git 配置(参见 CVE-2025-41390),TruffleHog 在扫描前会将本地 git 仓库克隆到临时目录。这遵循了 [Git 的安全最佳实践](https://git-scm.com/docs/git#_security)。如果你想指定克隆仓库的自定义路径(而不是 tmp),可以使用 `--clone-path` 标志。如果你想跳过本地克隆过程并直接扫描仓库(仅对受信任的仓库执行此操作),可以使用 `--trust-local-git-config` 标志。
## 11:仅扫描 GCS 存储桶中的已验证密钥
```bash
trufflehog gcs --project-id=<project-ID> --cloud-environment --results=verified
```
## 12:仅扫描 Docker 镜像中的已验证密钥
多次使用 `--image` 标志可扫描多个镜像。
```bash
# to scan from a remote registry
trufflehog docker --image trufflesecurity/secrets --results=verified
# to scan from the local docker daemon
trufflehog docker --image docker://new_image:tag --results=verified
# to scan from an image saved as a tarball
trufflehog docker --image file://path_to_image.tar --results=verified
```
## 13:在 CI 中扫描
将 `--since-commit` 标志设置为人们合并到的默认分支(例如 "main")。将 `--branch` 标志设置为你的 PR 的分支名称(例如 "feature-1")。根据你使用的 CI/CD 平台,该值可以动态获取(例如 [Circle CI 中的 CIRCLE_BRANCH](https://circleci.com/docs/variables/) 和 [Travis CI 中的 TRAVIS_PULL_REQUEST_BRANCH](https://docs.travis-ci.com/user/environment-variables/))。如果在 CI/CD 工作流期间仓库已被克隆且目标分支已检出,那么 `--branch HEAD` 应该就足够了。如果发现有效凭据,`--fail` 标志将返回 183 错误代码。
```bash
trufflehog git file://. --since-commit main --branch feature-1 --results=verified,unknown --fail
```
## 14:扫描 Postman 工作区
多次使用 `--workspace-id`、`--collection-id`、`--environment` 标志以扫描多个目标。
```bash
trufflehog postman --token=<postman api token> --workspace-id=<workspace id>
```
## 15:扫描 Jenkins 服务器
```bash
trufflehog jenkins --url https://jenkins.example.com --username admin --password admin
```
## 16:扫描 Elasticsearch 服务器
### 扫描本地集群
使用 TruffleHog 对本地集群进行身份验证有两种方式:(1) 用户名和密码,(2) 服务令牌。
#### 使用用户名和密码连接本地集群
```bash
trufflehog elasticsearch --nodes 192.168.14.3 192.168.14.4 --username truffle --password hog
```
#### 使用服务令牌连接到本地集群
```bash
trufflehog elasticsearch --nodes 192.168.14.3 192.168.14.4 --service-token ‘AAEWVaWM...Rva2VuaSDZ’
```
### 扫描 Elastic Cloud 集群
要扫描 Elastic Cloud 上的集群,你需要一个 Cloud ID 和 API key。
```bash
trufflehog elasticsearch \
--cloud-id 'search-prod:dXMtY2Vx...YjM1ODNlOWFiZGRlNjI0NA==' \
--api-key 'MlVtVjBZ...ZSYlduYnF1djh3NG5FQQ=='
```
## 17. 扫描 GitHub 仓库中的跨 Fork 对象引用和已删除提交
以下命令将枚举 GitHub 仓库中已删除和隐藏的提交,然后扫描其中是否包含机密信息。这是一项 alpha 版本功能。
```bash
trufflehog github-experimental --repo https://github.com/<USER>/<REPO>.git --object-discovery
```
除了正常的 TruffleHog 输出之外,`--object-discovery` 标志会在新建的 `$HOME/.trufflehog` 目录中创建两个文件:`valid_hidden.txt` 和 `invalid.txt`。这些文件用于在提交枚举过程中跟踪状态,同时也为用户提供所有隐藏和已删除提交的完整列表(`valid_hidden.txt`)。如果你希望在扫描后自动删除这些文件,请添加 `--delete-cached-data` 标志。
**注意**:使用此方法枚举仓库中所有有效提交需要 20 分钟到几个小时不等,具体取决于仓库的大小。我们添加了进度条,以便让你随时了解枚举将花费多长时间。实际的密钥扫描运行速度极快。
有关跨 Fork 对象引用的更多信息,请[阅读我们的博客文章](https://trufflesecurity.com/blog/anyone-can-access-deleted-and-private-repo-data-github)。
## 18. 扫描 Hugging Face
### 扫描 Hugging Face 模型、数据集、Space 或 Bucket
```bash
trufflehog huggingface \
--model <model_id> \
--dataset <dataset_id> \
--space <space_id> \
--bucket <bucket_id>
```
### 扫描属于 Hugging Face 组织或用户的所有模型、数据集、空间和存储桶
```bash
trufflehog huggingface --org <orgname> --user <username>
```
(可选)在扫描组织或用户时,你可以使用 `--skip-all-models`、`--skip-all-datasets`、`--skip-all-spaces`、`--skip-all-buckets` 跳过整类资源,或使用 `--ignore-models <model_id>`、`--ignore-datasets <dataset_id>`、`--ignore-spaces <space_id>`、`--ignore-buckets <bucket_id>` 跳过特定资源。
### 扫描讨论和 PR 评论
```bash
trufflehog huggingface --model <model_id> --include-discussions --include-prs
```
## 19. 扫描标准输入
```bash
aws s3 cp s3://example/gzipped/data.gz - | gunzip -c | trufflehog stdin
```
# :question: 常见问题
- 我只看到 `🐷🔑🐷 TruffleHog. Unearth your secrets. 🐷🔑🐷` 然后程序就退出了,这是怎么回事?
- 这意味着没有检测到任何密钥
- 为什么我扫描 GitHub 组织时扫描耗时很长
- 未认证的 GitHub 扫描存在速率限制。为了提高速率限制,请使用 `--token` 标志并附带个人访问令牌
- 它显示某个私钥已被验证,这是什么意思?
- 已验证的结果意味着 TruffleHog 通过针对该服务的 API 进行测试,确认了该凭据是有效的。对于私钥,我们已确认该密钥可用于 SSH 或 SSL 身份验证。查看我们的 Driftwood 博客文章了解更多信息 [博客文章](https://trufflesecurity.com/blog/driftwood-know-if-private-keys-are-sensitive/)
- 有没有一种简单的方法可以忽略特定的密钥?
- 如果被扫描的源[支持行号](https://github.com/trufflesecurity/trufflehog/blob/d6375ba92172fd830abb4247cca15e3176448c5d/pkg/engine/engine.go#L358-L365),那么你可以在包含该密钥的行上添加 `trufflehog:ignore` 注释来忽略该密钥。
- 我能找到包含 `trufflehog:ignore` 的密钥吗?
- 传入 `--no-ignore-tag` 即可在结果所在行带有 `trufflehog:ignore` 注释时仍然报告结果。这对于审查之前已接受的发现很有用。
# :newspaper: v3 有哪些新特性?
TruffleHog v3 是用 Go 完全重写的版本,包含许多强大的新功能。
- 我们**新增了 700 多个凭据检测器,支持针对各自 API 的主动验证**。
- 我们还新增了对**扫描 GitHub、GitLab、Docker、文件系统、S3、GCS、Circle CI 和 Travis CI 的原生支持**。
- 使用我们的 [Driftwood](https://trufflesecurity.com/blog/driftwood) 技术,**即时验证私钥**,对照数百万 GitHub 用户和**数十亿** TLS 证书。
- 扫描二进制文件、文档和其他文件格式
- 可作为 GitHub Action 和 pre-commit 钩子使用
## 什么是凭据验证?
对于检测到的每一个潜在凭据,我们都精心实现了针对我们认为其所属 API 的程序化验证。验证可消除误报,并提供三种结果状态:
- **verified**(已验证):通过 API 测试确认凭据有效且处于活动状态
- **unverified**(未验证):检测到凭据但未确认其有效(可能无效、已过期或验证被禁用)
- **unknown**(未知):尝试验证但因错误而失败,例如网络或 API 故障
例如,[AWS 凭据检测器](https://github.com/trufflesecurity/trufflehog/blob/main/pkg/detectors/aws/access_keys/accesskey.go)会针对 AWS API 执行 `GetCallerIdentity` API 调用,以验证 AWS 凭据是否处于活动状态。
# :memo: 用法
TruffleHog 为每种你可能想要扫描的数据源都提供了一个子命令:
- git
- github
- gitlab
- huggingface
- docker
- s3
- filesystem(文件和目录)
- syslog
- circleci
- travisci
- gcs(Google Cloud Storage)
- postman
- jenkins
- elasticsearch
- stdin
- multi-scan
每个子命令都可以带有选项,你可以通过向该子命令传入 `--help` 标志来查看这些选项:
```
$ trufflehog git --help
usage: TruffleHog [<flags>] <command> [<args> ...]
TruffleHog is a tool for finding credentials.
Flags:
-h, --[no-]help Show context-sensitive help (also try --help-long and --help-man).
--log-level=0 Logging verbosity on a scale of 0 (info) to 5 (trace). Can be
disabled with "-1".
--[no-]profile Enables profiling and sets a pprof and fgprof server on :18066.
-j, --[no-]json Output in JSON format.
--[no-]json-legacy Use the pre-v3.0 JSON format. Only works with git, gitlab,
and github sources.
--[no-]github-actions Output in GitHub Actions format.
--[no-]sarif Output in SARIF format for upload to GitHub code scanning (e.g.
via github/codeql-action/upload-sarif).
--concurrency=12 Number of concurrent workers.
--[no-]no-verification Don't verify the results.
--results=RESULTS Specifies which type(s) of results to output: verified (confirmed
valid by API), unknown (verification failed due to error),
unverified (detected but not verified), filtered_unverified
(unverified but would have been filtered out). Defaults to
verified,unverified,unknown.
--[no-]no-color Disable colorized output
--[no-]allow-verification-overlap
Allow verification of similar credentials across detectors
--[no-]filter-unverified Only output first unverified result per chunk per detector if there
are more than one results.
--filter-entropy=FILTER-ENTROPY
Filter unverified results with Shannon entropy. Start with 3.0.
--config=CONFIG Path to configuration file.
--[no-]print-avg-detector-time
Print the average time spent on each detector.
--[no-]no-update Don't check for updates.
--[no-]fail Exit with code 183 if results are found.
--[no-]fail-on-scan-errors
Exit with non-zero error code if an error occurs during the scan.
--verifier=VERIFIER ... Set custom verification endpoints.
--[no-]custom-verifiers-only
Only use custom verification endpoints.
--detector-timeout=DETECTOR-TIMEOUT
Maximum time to spend scanning chunks per detector (e.g., 30s).
--archive-max-size=ARCHIVE-MAX-SIZE
Maximum size of archive to scan. (Byte units eg. 512B, 2KB, 4MB)
--archive-max-depth=ARCHIVE-MAX-DEPTH
Maximum depth of archive to scan.
--archive-timeout=ARCHIVE-TIMEOUT
Maximum time to spend extracting an archive.
--include-detectors="all" Comma separated list of detector types to include. Protobuf name or
IDs may be used, as well as ranges.
--exclude-detectors=EXCLUDE-DETECTORS
Comma separated list of detector types to exclude. Protobuf name
or IDs may be used, as well as ranges. IDs defined here take
precedence over the include list.
--[no-]no-verification-cache
Disable verification caching
--[no-]force-skip-binaries
Force skipping binaries.
--[no-]force-skip-archives
Force skipping archives.
--[no-]skip-additional-refs
Skip additional references.
--user-agent-suffix=USER-AGENT-SUFFIX
Suffix to add to User-Agent.
--[no-]version Show application version.
Commands:
help [<command>...]
Show help.
git [<flags>] <uri>
Find credentials in git repositories.
github [<flags>]
Find credentials in GitHub repositories.
github-experimental --repo=REPO [<flags>]
Run an experimental GitHub scan. Must specify at least one experimental sub-module to run:
object-discovery.
gitlab --token=TOKEN [<flags>]
Find credentials in GitLab repositories.
filesystem [<flags>] [<path>...]
Find credentials in a filesystem.
s3 [<flags>]
Find credentials in S3 buckets.
gcs [<flags>]
Find credentials in GCS buckets.
syslog --format=FORMAT [<flags>]
Scan syslog
circleci --token=TOKEN
Scan CircleCI
docker [<flags>]
Scan Docker Image
travisci --token=TOKEN
Scan TravisCI
postman [<flags>]
Scan Postman
elasticsearch [<flags>]
Scan Elasticsearch
jenkins --url=URL [<flags>]
Scan Jenkins
huggingface [<flags>]
Find credentials in HuggingFace datasets, models, spaces and buckets.
stdin
Find credentials from stdin.
multi-scan
Find credentials in multiple sources defined in configuration.
json-enumerator [<path>...]
Find credentials from a JSON enumerator input.
analyze
Analyze API keys for fine-grained permissions information.
```
例如,要扫描一个 `git` 仓库,请从以下内容开始
```
trufflehog git https://github.com/trufflesecurity/trufflehog.git
```
## 配置
TruffleHog 支持通过 `--config` 标志提供的配置文件来定义[自定义正则检测器](#custom-regex-detector-alpha)和多个源。正则检测器可用于任何子命令,而配置中定义的源仅用于 `multi-scan` 子命令。
源的配置格式可在 Truffle Security 的[源配置文档页面](https://trufflesecurity.com/docs/connect-sources)上找到。
GitHub 源配置示例及[选项参考](https://docs.trufflesecurity.com/github#Fvm1I):
```yaml
sources:
- connection:
'@type': type.googleapis.com/sources.GitHub
repositories:
- https://github.com/trufflesecurity/test_keys.git
unauthenticated: {}
name: example config scan
type: SOURCE_TYPE_GITHUB
verify: true
```
你可以在 `sources` 键下定义多个连接(见上文),TruffleHog 将并发扫描所有来源。
要仅查看某一个来源的调试日志,请为其添加 `debug: true`。该来源会写入其所有调试日志,而其他所有来源保持正常的日志级别。当众多来源中有一个出现异常时,这非常有用:
```yaml
sources:
- connection:
'@type': type.googleapis.com/sources.GitHub
repositories:
- https://github.com/trufflesecurity/test_keys.git
unauthenticated: {}
name: example config scan
type: SOURCE_TYPE_GITHUB
debug: true
```
若要为每个源开启调试日志,请改用 `--log-level=5`。
## S3
S3 源除了支持 IAM 用户外,还支持通过代入 IAM 角色进行扫描。这使得用户能够更轻松地扫描多个 AWS 账户,而无需为每个账户依赖硬编码的凭据。
TruffleHog 最初使用的 IAM 身份需要作为主体,在每个待代入 IAM 角色的[信任策略](https://aws.amazon.com/blogs/security/how-to-use-trust-policies-with-iam-roles/)中拥有 `AssumeRole` 权限。
要使用本地设置的凭据扫描特定存储桶,或在 EC2 实例上使用实例元数据扫描:
```bash
trufflehog s3 --bucket=<bucket-name>
```
要使用代入角色扫描特定存储桶:
```bash
trufflehog s3 --bucket=<bucket-name> --role-arn=<iam-role-arn>
```
可以将多个角色作为单独的参数传入。以下命令将尝试扫描每个角色在 S3 API 中有权限列出的所有存储桶:
```bash
trufflehog s3 --role-arn=<iam-role-arn-1> --role-arn=<iam-role-arn-2>
```
### 将扫描范围缩小到特定对象
大型存储桶中通常存放着不值得扫描的数据,例如归档文件、媒体文件和构建产物。有两组标志可以将这些对象排除在扫描之外。两者都会在下载对象之前与对象键进行匹配,因此被跳过的对象不会产生任何 GET 请求开销。
仅扫描位于一个或多个键前缀下的对象:
```bash
trufflehog s3 --bucket=<bucket-name> --include-prefix=infra/ --include-prefix=services/
```
跳过某个键前缀下的对象:
```bash
trufflehog s3 --bucket=<bucket-name> --exclude-prefix=projects/archived/
```
两个前缀标志可以一起使用,以扫描一个子树同时排除其中一部分。匹配排除前缀的对象始终会被跳过,即使它同时也匹配包含前缀:
```bash
trufflehog s3 --bucket=<bucket-name> --include-prefix=src/ --exclude-prefix=src/vendor/
```
前缀按字面匹配,而非作为通配符匹配,且不受路径边界限制。`--include-prefix=log` 会同时匹配 `logs/app.txt` 和 `logs-archive/app.txt`。
文件扩展名单独过滤。书写时不要带前导点:
```bash
trufflehog s3 --bucket=<bucket-name> --exclude-extension=zip --exclude-extension=mp4
```
```bash
trufflehog s3 --bucket=<bucket-name> --include-extension=tf --include-extension=yaml
```
与前缀标志不同,`--include-extension` 和 `--exclude-extension` 不能组合使用,因为指定要扫描的扩展名本身就已经排除了其他所有扩展名。同时使用两者会在启动时失败。
扩展名匹配不区分大小写,因此 `--exclude-extension=zip` 也会跳过 `BACKUP.ZIP`。如果某个对象的键完全没有扩展名,例如 `Makefile`,则不会匹配任何条目:当设置了 `--include-extension` 时它会被跳过,而当仅设置了 `--exclude-extension` 时它会被保留。
使用 `--include-extension` 时需要注意两点。点文件会被视为全部都是扩展名,因此 `.env` 的扩展名是 `env`,任何未包含 `env` 的包含列表都会跳过存储桶中的每个 `.env` 文件。由于 `.env` 文件是存放密钥的常见位置,除非你确实想跳过它们,否则请添加 `--include-extension=env`。另外,只有最后一个扩展名会被计入,因此 `backup.tar.gz` 的扩展名是 `gz`:`--exclude-extension=tar.gz` 不会匹配任何内容,而 `--exclude-extension=gz` 则有效。
这些标志也仅适用于对象键,而不适用于归档文件内部的文件。`--exclude-extension=mp4` 会跳过存储桶中的 `clip.mp4`,但不会跳过打包在 `media.zip` 内的 `clip.mp4`。排除 `zip` 则会完全跳过该归档文件。
TruffleHog 要求 S3 仅列出包含前缀下的键,因此覆盖大型存储桶一小部分的前缀会被快速列出。排除前缀和扩展名是在列出之后应用的,因此它们能降低下载对象的成本,但无法降低列出对象的成本。
前缀和扩展名会一起应用。一个对象必须同时通过两者才会被扫描,因此下面的命令会扫描 `src/main.tf`,但会同时跳过 `src/bundle.zip` 和 `docs/guide.tf`:
```bash
trufflehog s3 --bucket=<bucket-name> --include-prefix=src/ --exclude-extension=zip
```
这些标志用于缩小存储桶内的对象范围。要缩小扫描哪些存储桶,请使用 `--bucket` 或 `--ignore-bucket`,与前缀标志不同,这两个标志不能同时使用。
退出码:
- 0:未发现错误,也未发现结果。
- 1:遇到错误。部分来源可能未完成扫描。
- 183:未遇到错误,但发现了结果。仅在使用 `--fail` 标志时才会返回。
## :octocat: TruffleHog Github Action
### 常规用法
```
on:
push:
branches:
- main
pull_request:
jobs:
test:
runs-on: ubuntu-latest
steps:
- name: Checkout code
uses: actions/checkout@v4
with:
fetch-depth: 0
- name: Secret Scanning
uses: trufflesecurity/trufflehog@main
with:
extra_args: --results=verified,unknown
```
在上面的示例配置中,我们正在扫描所有 PR 和推送到 `main` 的提交中的实时密钥。仅扫描所引用提交中的代码更改。如果您想扫描整个分支,请参阅下面的“高级用法”部分。
### 浅克隆
如果您将 TruffleHog 集成到独立工作流中,并且没有与 TruffleHog 一起运行任何其他 CI/CD 工具,那么我们建议使用[浅克隆](https://git-scm.com/docs/git-clone#Documentation/git-clone.txt---depthltdepthgt)来加速您的工作流。以下是如何操作的示例:
```
...
- shell: bash
run: |
if [ "${{ github.event_name }}" == "push" ]; then
echo "depth=$(($(jq length <<< '${{ toJson(github.event.commits) }}') + 2))" >> $GITHUB_ENV
echo "branch=${{ github.ref_name }}" >> $GITHUB_ENV
fi
if [ "${{ github.event_name }}" == "pull_request" ]; then
echo "depth=$((${{ github.event.pull_request.commits }}+2))" >> $GITHUB_ENV
echo "branch=${{ github.event.pull_request.head.ref }}" >> $GITHUB_ENV
fi
- uses: actions/checkout@v3
with:
ref: ${{env.branch}}
fetch-depth: ${{env.depth}}
- uses: trufflesecurity/trufflehog@main
with:
extra_args: --results=verified,unknown
...
```
根据事件类型(push 或 PR),我们计算存在的提交数量。然后加 2,以便能够引用代码更改之前的基线提交。我们将该整数值连同相关分支一起传递给 checkout action 中的 `fetch-depth` 标志。现在我们的检出过程应该会短得多。
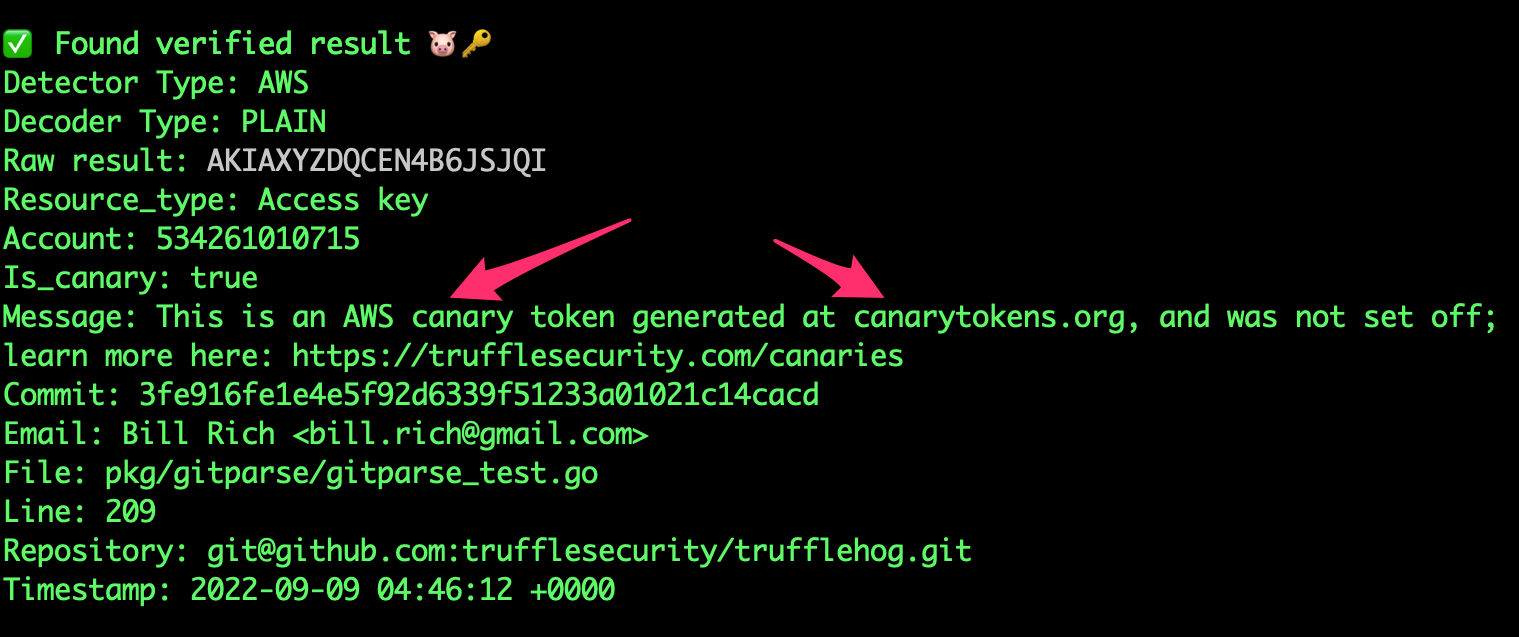
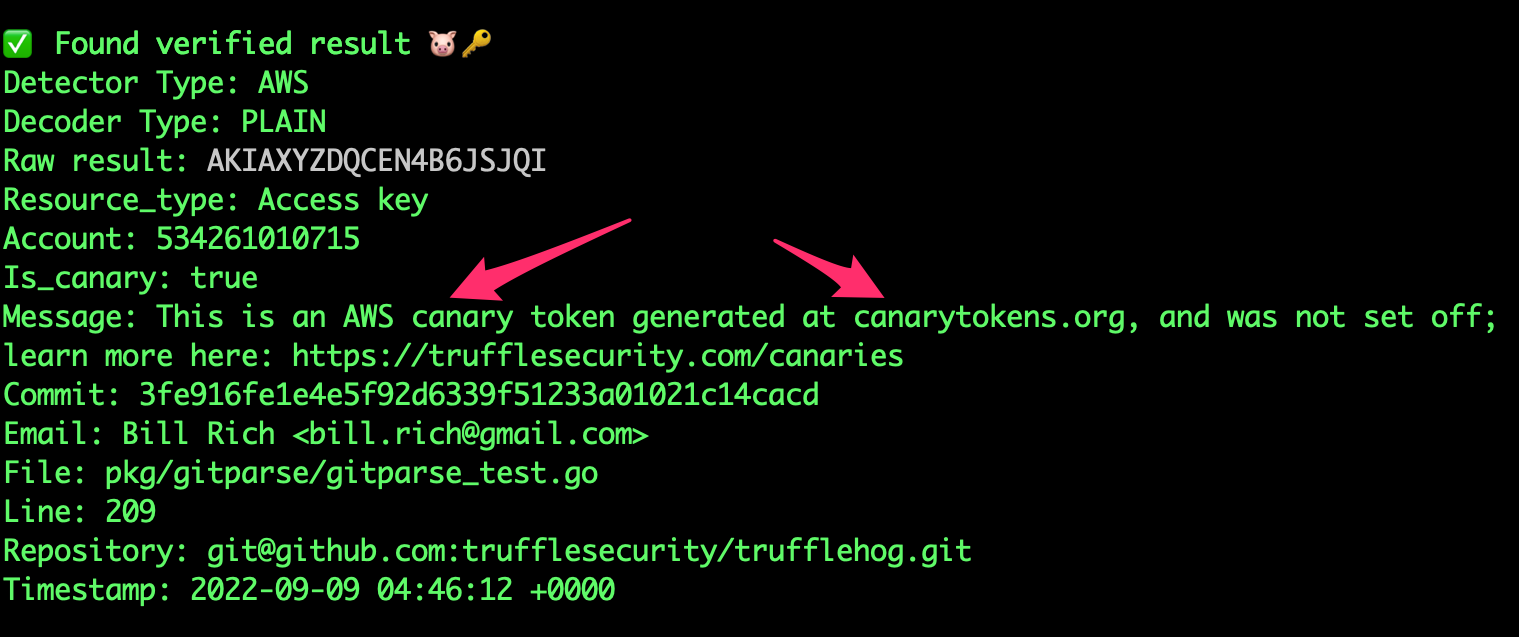
### Canary 检测
TruffleHog 静态检测 [https://canarytokens.org/](https://canarytokens.org/)。
### 高级用法
```yaml
- name: TruffleHog
uses: trufflesecurity/trufflehog@main
with:
# Repository path
path:
# Start scanning from here (usually main branch).
base:
# Scan commits until here (usually dev branch).
head: # optional
# Extra args to be passed to the trufflehog cli.
extra_args: --log-level=2 --results=verified,unknown
```
---
[Read more](https://github.com/trufflesecurity/trufflehog)