 shadowy-pycoder/go-http-proxy-to-socks
CLI MITM代理,将SOCKS4/SOCKS5转换为HTTP/HTTPS/HTTP2/HTTP3代理,具有透明TCP/UDP重定向、ARP/NDP/DNS欺骗、流量嗅探和数据包捕获功能。纯Go实现,无需libpcap。

# GoHPTS - 用 Go 编写的 HTTP(S) 和 TCP/UDP 透明代理到 SOCKS4/SOCKS5 代理(链)
[](https://www.gnu.org/licenses/gpl-3.0)
[](https://pkg.go.dev/github.com/shadowy-pycoder/go-http-proxy-to-socks)








## 目录
- [简介](#introduction)
- [特性](#features)
- [安装](#installation)
- [用法](#usage)
- [通过 CLI 标志配置](#configuration-via-cli-flags)
- [通过 YAML 文件配置](#configuration-via-yaml-file)
- [透明代理](#transparent-proxy)
- [redirect(通过 NAT 和 SO_ORIGINAL_DST)](#redirect-via-nat-and-so_original_dst)
- [redirect 模式的自动配置](#auto-configuration-for-redirect-mode)
- [tproxy(通过 MANGLE 和 IP_TRANSPARENT)](#tproxy-via-mangle-and-ip_transparent)
- [tproxy 模式的自动配置](#auto-configuration-for-tproxy-mode)
- [UDP 支持](#udp-support)
- [Android 支持](#android-support)
- [YAML 配置](#yaml-configuration)
- [流量嗅探](#traffic-sniffing)
- [JSON 格式](#json-format)
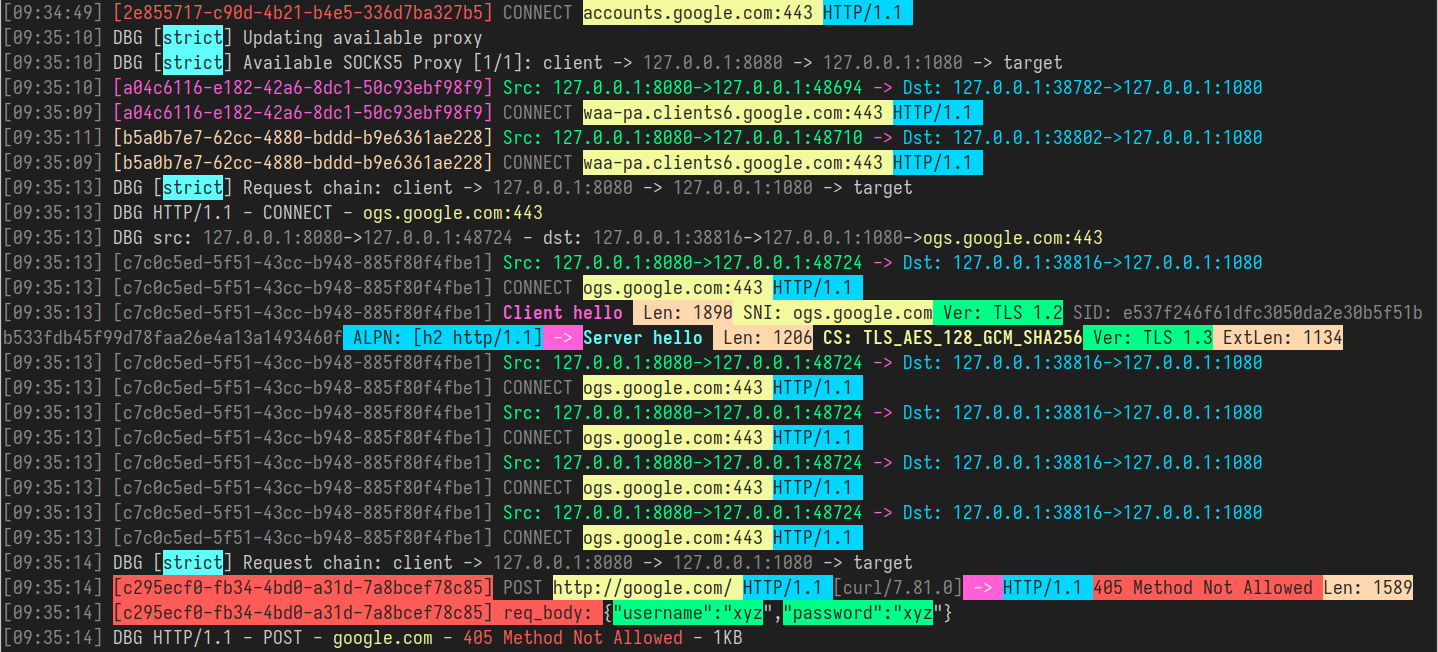
- [彩色格式](#colored-format)
- [HTTP2 和 HTTP3 支持](#http2-and-http3-support)
- [使用自签名证书的示例设置](#example-setup-using-self-signed-certificate)
- [测试连接](#test-connection)
- [在浏览器中测试连接](#test-connection-in-a-browser)
- [IPv4 和 IPv6 支持](#ipv4-and-ipv6-support)
- [ARP 欺骗](#arp-spoofing)
- [NDP 欺骗](#ndp-spoofing)
- [DNS 欺骗](#dns-spoofing)
- [数据包捕获](#packet-capture)
- [网络命名空间](#network-namespaces)
- [演练环境设置](#playground-setup)
- [用法示例](#usage-examples)
- [混合服务器](#mixed-server)
- [链接](#links)
- [贡献](#contributing)
- [许可证](#license)
## 简介
[[返回]](#table-of-contents)
`GoHPTS` CLI 工具是 HTTP 客户端与 SOCKS5 代理服务器或多个服务器(链)之间的桥梁。它在本地作为 HTTP 代理监听,接受标准 HTTP
或 HTTPS(通过 CONNECT)请求,并通过 SOCKS5 代理转发连接。灵感来自 [http-proxy-to-socks](https://github.com/oyyd/http-proxy-to-socks) 和 [Proxychains](https://github.com/rofl0r/proxychains-ng)
可能的用例:你需要通过 Postman 连接到外部 API,但该 API 只能从某个远程服务器访问。
以下命令将帮助你完成这样的任务:
通过 `ssh` 创建 SOCKS5 代理服务器:```shell
ssh <remote server> -D 1080 -Nf
```
使用 `gohpts` 创建 HTTP 到 SOCKS5 的连接```shell
gohpts -s :1080 -l :8080
```
在 Postman 的代理配置中指定 http 服务器
## 功能特性
[[返回]](#table-of-contents)
- **代理链功能**\
支持 SOCKS4/SOCKS5 代理的 `strict`、`dynamic`、`random`、`round_robin` 链
- **透明代理**\
支持 `redirect` (SO_ORIGINAL_DST) 和 `tproxy` (IP_TRANSPARENT) 模式
- **IPv4 和 IPv6 支持**\
可在 `IPv4-only`、`IPv6-only` 或 `dual stack` 模式下运行
- **TCP 和 UDP 透明代理**\
`tproxy` 和 `tlocal` (IP_TRANSPARENT) 处理 TCP 和 UDP 流量
- **流量嗅探**\
代理能够解析 HTTP 头、TLS 握手、DNS 消息等
- **ARP 欺骗**\
使用 ARP 欺骗方法代理整个子网
- **NDP 欺骗**\
使用路由器/邻居通告和 RDNSS 注入代理 IPv6 连接。
- **DNS 欺骗**\
通过 DNS 记录操纵将客户端重定向到任意域
- **数据包捕获**\
将流量捕获到 txt/pcap/pcapng 文件并使用 Wireshark 分析
- **DNS 泄漏保护**\
DNS 解析在 SOCKS5 服务器端进行。
- **CONNECT 方法支持**\
支持 HTTP CONNECT 隧道,启用 HTTPS 和其他基于 TCP 的协议。
- **HTTP2/HTTP3 支持**\
支持现代 HTTP/2 和 HTTP/3 传输,通过 TLS 1.3 实现高效的多路复用连接
- **网络命名空间支持**\
支持用于监听套接字和出站连接的自定义 Linux 网络命名空间
- **尾部标头支持**\
处理 HTTP 尾部标头
- **分块传输编码**\
处理分块和流式响应
- **SOCKS5 身份验证支持**\
支持 SOCKS5 代理的用户名/密码身份验证。
- **HTTP 身份验证支持**\
支持 HTTP 代理服务器的用户名/密码身份验证。
- **轻量且快速**\
以最小开销和高效请求处理为设计目标。
- **跨平台**\
兼容所有主流操作系统。
## 安装
[[返回]](#table-of-contents)
- Arch Linux/CachyOS/EndeavourOS ```shell
yay -S gohpts
```
或使用 `paru`: ```shell
paru -S gohpts
```
- 从 [Releases](https://github.com/shadowy-pycoder/go-http-proxy-to-socks/releases) 页面下载适用于你平台的二进制文件: ```shell
GOHPTS_RELEASE=v1.15.6; wget -v https://github.com/shadowy-pycoder/go-http-proxy-to-socks/releases/download/$GOHPTS_RELEASE/gohpts-$GOHPTS_RELEASE-linux-amd64.tar.gz -O gohpts && tar xvzf gohpts && mv -f gohpts-$GOHPTS_RELEASE-linux-amd64 gohpts && ./gohpts -h
```
- 使用 `go install` 命令安装(需要 Go [1.26](https://go.dev/doc/install) 或更高版本): ```shell
CGO_ENABLED=0 go install -ldflags "-s -w" -trimpath github.com/shadowy-pycoder/go-http-proxy-to-socks/cmd/gohpts@latest
```
这会将 `gohpts` 二进制文件安装到你的 `$GOPATH/bin` 目录中。
- 从源码构建: ```shell
git clone https://github.com/shadowy-pycoder/go-http-proxy-to-socks.git
cd go-http-proxy-to-socks
make build
./bin/gohpts
```
- 在 docker 中运行: ```shell
docker run -it --privileged --network host -v "$PWD/gohpts.yaml:/config.yaml" shadowypycoder/gohpts:latest -f config.yaml
```
## 用法
[[返回]](#table-of-contents)```shell
gohpts -h
_____ _ _ _____ _______ _____
/ ____| | | | | __ \__ __/ ____|
| | __ ___ | |__| | |__) | | | | (___
| | |_ |/ _ \| __ | ___/ | | \___ \
| |__| | (_) | | | | | | | ____) |
\_____|\___/|_| |_|_| |_| |_____/
GoHPTS: HTTP(S) Proxy to SOCKS4/SOCKS5 proxy by shadowy-pycoder
GitHub: https://github.com/shadowy-pycoder/go-http-proxy-to-socks
Codeberg: https://codeberg.org/shadowy-pycoder/go-http-proxy-to-socks
Usage: gohpts [OPTIONS]
OPTIONS:
General:
-h Show this help message and exit
-v Show version and build information
-D Run as a daemon (provide -logfile to see logs)
-I Display list of network interfaces and exit
-f Path to proxy configuration file in YAML format
Proxy:
-l Address of HTTP proxy server (Default: "127.0.0.1:8080" for IPv4, "[::1]:8080" for IPv6)
-s Address of SOCKS proxy server (Default: "127.0.0.1:1080" for IPv4 "[::1]:1080" for IPv6)
-c Path to certificate PEM encoded file
-k Path to private key PEM encoded file
-U User for HTTP proxy (basic auth). This flag invokes prompt for password (not echoed to terminal)
-u User for SOCKS proxy authentication. This flag invokes prompt for password (not echoed to terminal)
-i Bind proxy to specific network interface (either by interface name or index)
-4 Force IPv4 stack for TCP and UDP (Default: dual stack)
-6 Force IPv6 stack for TCP and UDP (Default: dual stack)
-socks4 Use SOCKS4/SOCKS4a protocol for upstream proxy and mixed server (default: SOCKS5/SOCKS5h)
-nohttp Disable HTTP proxy server
-nosocks Disable SOCKS upstream proxy
-dns Use custom DNS server (Example: "8.8.8.8" or "2001:4860:4860::8888")
-mixed Accept SOCKS connections on HTTP proxy server address
Logs:
-d Show logs in DEBUG mode
-j Show logs in JSON format
-logfile Log file path (Default: stdout)
-nocolor Disable colored output for logs (no effect if -j flag specified)
-pprof Address of pprof server with profiling data
Sniffing:
-sniff Enable traffic sniffing for HTTP and TLS
-snifflog Sniffed traffic log file path (Default: the same as -logfile)
-body Collect request and response body for HTTP traffic (credentials, tokens, etc)
TProxy:
-T Address of transparent proxy server
-Tu Address of transparent UDP proxy server
-M Transparent proxy mode: (redirect, tproxy, tlocal)
-w Number of instances of transparent proxy server (Default: number of CPU cores)
-wu Number of instances of transparent UDP proxy server (Default: number of CPU cores)
-auto Automatically setup iptables and kernel parameters for transparent proxy (requires elevated privileges)
-mark Set mark for each packet sent through transparent proxy (Default: redirect 0, tproxy 100, tlocal 100)
-A Comma separated list of allowed ip addresses for proxying (Example: "8.8.8.8,2001:4860:4860::8888,192.168.1.0/24")
-P Comma separated list of ports to ignore when proxying traffic (Example: "22,80,443,9092")
-dump Dump iptables rules and other system settings generated by -auto flag
Spoofing:
-arpspoof Enable ARP spoof proxy for selected targets (Example: "targets 10.0.0.1,10.0.0.5-10,192.168.1.*,192.168.10.0/24;fullduplex false;debug true;interval 10s")
-ndpspoof Enable NDP spoof proxy for selected targets (Example: "ra true;na true;targets fe80::3a1c:7bff:fe22:91a4;fullduplex false;debug true;interval 10s")
Packet Capture:
-pcap Enable packet capture (Example: "promisc true;expr ip proto tcp;snaplen 65535;timeout 10s;packet_count 100;packet_buffer 8192;exts txt,pcap,pcapng")
Namespaces:
-in-netns Name or path of network namespace for inbound listeners (Default: default namespace)
-out-netns Name or path of network namespace for outbound connections (Default: default namespace)
```
### 通过 CLI 标志进行配置
[[返回]](#table-of-contents)```shell
gohpts -s 1080 -l 8080 -d -j
```
输出:```shell
{"level":"info","time":"2025-05-28T06:15:18+00:00","message":"SOCKS5 Proxy: :1080"}
{"level":"info","time":"2025-05-28T06:15:18+00:00","message":"HTTP Proxy: :8080"}
{"level":"debug","time":"2025-05-28T06:15:22+00:00","message":"HTTP/1.1 - CONNECT - www.google.com:443"}
```
指定 SOCKS5 代理服务器的用户名和密码:```shell
gohpts -s 1080 -l 8080 -d -j -u user
SOCKS5 Password: #you will be prompted for password input here
```
指定 HTTP 代理服务器的用户名和密码:```shell
gohpts -s 1080 -l 8080 -d -j -U user
HTTP Password: #you will be prompted for password input here
```
当同时存在 `-u` 和 `-U` 时,系统会提示你两次
通过 TLS 连接运行 http 代理```shell
gohpts -s 1080 -l 8080 -c "path/to/certificate" -k "path/to/private/key"
```
以守护进程方式运行 proxy(需要 logfile 来记录输出,否则你将看不到任何内容)```shell
gohpts -D -logfile /tmp/gohpts.log
```
## 使用示例
### 基本用法
```bash
# 扫描单个目标
python3 cve_2025_55182.py -t https://target.example.com
# 使用代理扫描
python3 cve_2025_55182.py -t https://target.example.com -p http://127.0.0.1:8080
# 从文件扫描多个目标
python3 cve_2025_55182.py -f targets.txt
# 使用自定义超时和线程数扫描
python3 cve_2025_55182.py -f targets.txt -T 15 -c 20
# 使用自定义回调域名扫描
python3 cve_2025_55182.py -t https://target.example.com -d your-callback.com
# 详细输出
python3 cve_2025_55182.py -t https://target.example.com -v
```
### 命令行选项
```
选项:
-h, --help 显示此帮助信息并退出
-t TARGET, --target TARGET
单个目标 URL
-f FILE, --file FILE 包含目标 URL 的文件(每行一个)
-p PROXY, --proxy PROXY
用于请求的代理 URL
-T TIMEOUT, --timeout TIMEOUT
请求超时时间(秒,默认:10)
-c CONCURRENCY, --concurrency CONCURRENCY
并发线程数(默认:10)
-d DOMAIN, --domain DOMAIN
用于 payload 的自定义回调域名
-v, --verbose 启用详细输出
```
### 输出示例
```
[+] 正在扫描 https://target.example.com
[+] 目标存在漏洞:https://target.example.com
[+] 已发送回调至:your-callback.com
```
## 工作原理
1. **目标验证**:脚本首先验证目标是否可访问,并检查其是否运行 Next.js。
2. **Payload 生成**:生成一个包含回调域名和唯一标识符的恶意 payload。
3. **漏洞利用**:将 payload 发送到存在漏洞的端点,触发服务器端请求。
4. **回调验证**:监控回调域名以确认漏洞利用是否成功。
5. **结果报告**:报告目标是否易受攻击。
## 受影响版本
- Next.js 15.x(15.0.0 至 15.5.6 之前)
- Next.js 14.x(14.0.0 至 14.2.34 之前)
- Next.js 13.x(13.0.0 至 13.5.10 之前)
- Next.js 12.x(12.0.0 至 12.3.6 之前)
- Next.js 11.x(11.0.0 至 11.1.3 之前)
## 缓解措施
1. **升级 Next.js**:升级到已修复的版本(15.5.7、14.2.35、13.5.11、12.3.7 或 11.1.4)。
2. **网络分段**:限制服务器端请求访问内部资源。
3. **输入验证**:验证并清理所有用户提供的输入。
4. **监控**:监控出站请求和异常活动。
## 免责声明
本工具仅供教育和授权安全测试目的使用。未经授权访问计算机系统是非法的。请务必获得适当授权后再使用此工具。
## 参考资料
- [CVE-2025-55182](https://nvd.nist.gov/vuln/detail/CVE-2025-55182)
- [Next.js 安全公告](https://github.com/vercel/next.js/security/advisories)
- [SSRF 预防备忘单](https://cheatsheetseries.owasp.org/cheatsheets/Server_Side_Request_Forgery_Prevention_Cheat_Sheet.html)
## 许可证
本项目采用 MIT 许可证 - 详情请参阅 [LICENSE](https://github.com/shadowy-pycoder/go-http-proxy-to-socks/blob/main/LICENSE) 文件。
## 贡献
欢迎贡献!请随时提交 Pull Request。
## 作者
- [Your Name](https://github.com/yourusername)
## 致谢
- 感谢 Next.js 团队对安全问题的快速响应
- 感谢安全社区对漏洞的负责任披露```shell
# output
gohpts pid: <pid>
```
## 漏洞利用
- 使用 `--exploit` 标志运行工具以启用漏洞利用模式。
- 该工具将尝试利用已识别的漏洞。
## 示例
```bash
python3 cve_2025_29972.py --target https://example.com --exploit
```
## 免责声明
本工具仅用于教育和道德测试目的。未经授权使用此工具攻击目标属于违法行为。作者对任何滥用行为不承担责任。```shell
# kill the process
kill <pid>
#or
kill $(pidof gohpts)
```
`-u` 和 `-U` 标志在守护进程模式下不起作用(因此也无法用于身份验证),但你可以提供一个配置文件(见下文)
### 通过 YAML 文件进行配置
[[返回]](#table-of-contents)
当你希望预先配置代理而不必过多操作 CLI,或者只是需要针对不同需求使用多个配置文件时,配置文件非常有用。
以 SOCKS5 代理链模式运行 HTTP 代理(通过 YAML 配置文件指定服务器设置)```shell
gohpts -f "~/gohtps.yaml" -d -j
```
配置示例:```yaml
# bind proxy to specific network interface (either by interface name or index)
interface: "eth0" # if specified, overrides http server IP address
disable_http: false # disable http proxy (default: false)
disable_socks: false # disable upstream socks proxy (default: false)
# if ipv4 and ipv6 are both false or both true, dual stack is assumed
ipv4: false # this must be enabled for arpspoof (default: false)
ipv6: false # this must be enabled for ndpspoof (default: false)
socks4: false # use SOCKS4/SOCKS4a protocol (tcp only protocol, no udp tproxy or http3 possible) (default: false)
dns: 8.8.8.8 # custom DNS server (used in direct dialer, namespaces, spoofing)
http_server:
address: 127.0.0.1:8080
# username and password for adding basic authentication (comment out to disable auth)
username: username
password: password
# list of socks5 proxy
# if proxy_chain is disabled, uses first server in a list as upstream
proxy_list:
- address: 127.0.0.1:1080
- address: 127.0.0.1:1081
- address: :1082 # empty host means localhost
proxy_chain:
enabled: false
# Explanations for chains taken from /etc/proxychains4.conf
# strict - Each connection will be done via chained proxies
# all proxies chained in the order as they appear in the list
# all proxies must be online to play in chain
# dynamic - Each connection will be done via chained proxies
# all proxies chained in the order as they appear in the list
# at least one proxy must be online to play in chain
# (dead proxies are skipped)
# random - Each connection will be done via random proxy
# (or proxy chain, see chain_len) from the list.
# this option is good to test your IDS :)
# round_robin - Each connection will be done via chained proxies
# of chain_len length
# all proxies chained in the order as they appear in the list
# at least one proxy must be online to play in chain
# (dead proxies are skipped).
# the start of the current proxy chain is the proxy after the last
# proxy in the previously invoked proxy chain.
# if the end of the proxy chain is reached while looking for proxies
# start at the beginning again.
# These semantics are not guaranteed in a multithreaded environment.
type: strict # dynamic, strict, random, round_robin
length: 2 # maximum number of proxy in a chain (works only for random chain and round_robin chain)
logging:
debug: true
json: false
# defaults to standard output
#logfile: /tmp/gohpts.log
# use colored output in logs (no effect if json enabled)
nocolor: false
# profiling data
pprof: 127.0.0.1:8081
```
你可以通过提供相应的 CLI 标志来覆盖配置文件中指定的几乎所有设置:```shell
gohpts -l :6969 -f "~/gohtps.yaml" -nocolor
```
Proxy 会采用 `~/gohpts.yaml` 中指定的所有设置,但在 `127.0.0.1:6969` 上启动 HTTP 服务器,而不是 `127.0.0.1:8080`,并且还会禁用日志中的彩色输出。
某些设置(例如 proxy_chain 和 dns 过滤器)只能通过文件进行配置。
完整版本的配置可以在这里找到:[example_gohpts.yaml](https://github.com/shadowy-pycoder/go-http-proxy-to-socks/blob/main/resources/example_gohpts.yaml)
要了解有关代理链的更多信息,请访问 [Proxychains Github](https://github.com/rofl0r/proxychains-ng)
## 透明代理
[[返回]](#table-of-contents)
> 也称为 `拦截代理`、`内联代理` 或 `强制代理`,透明代理会拦截正常的应用层通信,而无需任何特殊的客户端配置。客户端无需知道代理的存在。透明代理通常位于客户端和互联网之间,代理执行网关或路由器的部分功能
>
> -- _来自 [Wiki](https://en.wikipedia.org/wiki/Proxy_server)_
此功能仅在 Linux 系统和 Android(arm64)上可用,并且需要额外设置(`iptables`、ip route 等)
`-T address` 标志指定透明代理服务器的地址
有三种模式 `redirect`、`tproxy` 和 `tlocal`(与 `tproxy` 相同,但还会拦截本地流量),可以通过 `-M` 标志指定
### `redirect`(通过 _NAT_ 和 _SO_ORIGINAL_DST_)
[[返回]](#table-of-contents)
在此模式下,代理通过 `iptables` 的 `nat` 表和 `REDIRECT` 目标进行。传入数据包的主机地址会变为正在运行的 `redirect` 透明代理的地址,但它还包含可以通过 `getsockopt(SO_ORIGINAL_DST)` 获取的原始目标地址
要在此模式下运行 `GoHPTS`,请使用 `-T` 标志和 `-M redirect`
### 示例
[[返回]](#table-of-contents)```shell
# run the proxy
gohpts -s 1080 -T 1090 -M redirect -d
```
[无输入内容]```shell
# run socks5 server on 127.0.0.1:1080
ssh remote -D 1080 -Nf
```
设置你的操作系统:```shell
# commands below require elevated privileges (you can run it with `sudo -i`)
#enable ip forwarding
sysctl -w net.ipv4.ip_forward=1
# create `GOHPTS` nat chain
iptables -t nat -N GOHPTS
# set no redirection rules for local, http proxy, ssh and redirect proxy itself
iptables -t nat -A GOHPTS -d 127.0.0.0/8 -j RETURN
iptables -t nat -A GOHPTS -p tcp --dport 8080 -j RETURN
iptables -t nat -A GOHPTS -p tcp --dport 1090 -j RETURN
iptables -t nat -A GOHPTS -p tcp --dport 22 -j RETURN
# redirect traffic to transparent proxy
iptables -t nat -A GOHPTS -p tcp -j REDIRECT --to-ports 1090
# setup prerouting by adding our proxy
iptables -t nat -A PREROUTING -p tcp -j GOHPTS
# intercept local traffic for testing
iptables -t nat -A OUTPUT -p tcp -j GOHPTS
```
测试连接:```shell
#traffic should be redirected via 127.0.0.1:1090
curl http://example.com
```
## 使用示例
### 基本用法
```bash
# 扫描单个目标
python3 cve_2025_55182.py -t https://target.example.com
# 扫描多个目标
python3 cve_2025_55182.py -f targets.txt
# 使用代理
python3 cve_2025_55182.py -t https://target.example.com -p http://127.0.0.1:8080
# 详细输出
python3 cve_2025_55182.py -t https://target.example.com -v
```
### 高级用法
```bash
# 自定义超时和线程数
python3 cve_2025_55182.py -f targets.txt --timeout 15 --threads 20
# 保存结果到文件
python3 cve_2025_55182.py -f targets.txt -o results.txt
# 使用自定义 User-Agent
python3 cve_2025_55182.py -t https://target.example.com -A "Mozilla/5.0 (Custom)"
```
## 命令行参数
| 参数 | 描述 | 默认值 |
|------|------|--------|
| `-t, --target` | 单个目标 URL | - |
| `-f, --file` | 包含目标 URL 的文件 | - |
| `-p, --proxy` | 用于请求的代理 | - |
| `-o, --output` | 输出文件 | - |
| `-v, --verbose` | 启用详细输出 | False |
| `--timeout` | 请求超时时间(秒) | 10 |
| `--threads` | 并发线程数 | 10 |
| `-A, --user-agent` | 自定义 User-Agent | 默认 UA |
## 输出示例
```
[+] 正在扫描: https://target.example.com
[+] 目标存在漏洞: CVE-2025-55182
[+] 载荷: /api/v1/../../etc/passwd
[+] 响应时间: 0.45s
[+] 状态码: 200
```
## 免责声明
本工具仅供教育和安全研究目的使用。未经授权访问系统是违法的。请务必在测试前获得适当授权。
## 参考资料
- [CVE-2025-55182](https://nvd.nist.gov/vuln/detail/CVE-2025-55182)
- [安全公告](https://example.com/advisory)
## 许可证
本项目采用 MIT 许可证 - 详情请参阅 [LICENSE](https://github.com/shadowy-pycoder/go-http-proxy-to-socks/blob/main/LICENSE) 文件。```shell
#traffic should be redirected via 127.0.0.1:8080
curl --proxy http://127.0.0.1:8080 http://example.com
```
撤销所有操作:```shell
sysctl -w net.ipv4.ip_forward=0
iptables -t nat -D PREROUTING -p tcp -j GOHPTS
iptables -t nat -D OUTPUT -p tcp -j GOHPTS
iptables -t nat -F GOHPTS
iptables -t nat -X GOHPTS
```
### `redirect` 模式的自动配置
[[返回]](#table-of-contents)
要自动配置系统,请运行以下命令:```shell
sudo env PATH=$PATH gohpts -d -T 8888 -M redirect -auto
```
请注意,自动配置需要 `sudo` 权限且非常通用,可能不适合您的需求。
您可以选择指定 `-mark <value>` 以防止可能的代理循环```shell
sudo env PATH=$PATH gohpts -d -T 8888 -M redirect -auto -mark 100
```
### `tproxy`(通过 _MANGLE_ 和 _IP_TRANSPARENT_)
[[返回]](#table-of-contents)
在此模式下,代理通过 `iptables` 的 `mangle` 表和 `TPROXY` 目标实现。透明代理看到的目标地址保持原样,不会被内核重写。为此,代理需使用套接字选项 `IP_TRANSPARENT` 进行绑定,`iptables` 使用 TPROXY 目标拦截流量,路由规则将标记的数据包导向本地代理,而不改变其原始目标地址。
此模式需要提升权限才能运行 `GoHPTS`。你可以通过运行以下命令来实现:```shell
sudo setcap 'cap_net_admin+ep' ~/go/bin/gohpts
```
要在此模式下运行 `GoHPTS`,请使用 `-T` 标志并配合 `-M tproxy`
### 示例
[[返回]](#table-of-contents)```shell
# run the proxy
gohpts -s 1080 -T 0.0.0.0:1090 -M tproxy -d
```
## 漏洞利用
- 使用 `--exploit` 标志运行工具以启用漏洞利用模式。
- 该工具将尝试利用已识别的漏洞。
## 示例
```bash
python3 cve_2025_29991.py --target https://example.com --exploit
```
## 免责声明
本工具仅用于教育和道德测试目的。未经授权使用此工具攻击目标属于违法行为。作者对任何滥用行为不承担责任。```shell
# run socks5 server on 127.0.0.1:1080
ssh remote -D 1080 -Nf
```
设置你的操作系统:```shell
ip netns add ns-client
ip link add dev veth0 type veth peer name veth1 netns ns-client
ip addr add 10.0.0.1/24 dev veth0
ip link set dev veth0 up
ip netns exec ns-client ip addr add 10.0.0.2/24 dev veth1
ip netns exec ns-client ip link set dev lo up
ip netns exec ns-client ip link set dev veth1 up
ip netns exec ns-client ip route add default via 10.0.0.1
sysctl -w net.ipv4.ip_forward=1
iptables -t mangle -A PREROUTING -i veth0 -p tcp -j TPROXY --on-port 1090 --tproxy-mark 0x1/0x1
ip rule add fwmark 1 lookup 100
ip route add local 0.0.0.0/0 dev lo table 100
```
测试连接:```shell
ip netns exec ns-client curl http://1.1.1.1
```
撤销所有操作:```shell
sysctl -w net.ipv4.ip_forward=0
iptables -t mangle -F
ip rule del fwmark 1 lookup 100
ip route flush table 100
ip netns del ns-client
```
### `tproxy` 模式的自动配置
[[返回]](#table-of-contents)
要自动配置您的系统,请运行以下命令(例如,在单独的虚拟机上):```shell
ssh remote -D 1080 -Nf
sudo env PATH=$PATH gohpts -d -T 8888 -M tproxy -auto -mark 100
```
在你的主机上运行以下命令:```shell
ip route show default > /tmp/default-route.txt
ip route add 0.0.0.0/1 via 192.168.0.1 # change with ip of your VM
ip route add 128.0.0.0/1 via 192.168.0.1
```
测试连接:```shell
curl http://example.com #check logs on your VM
```
撤销所有操作:```shell
ip route del 0.0.0.0/1 via 192.168.0.1 2>/dev/null || true
ip route del 128.0.0.0/1 via 192.168.0.1 2>/dev/null || true
if [[ -f /tmp/default-route.txt ]]; then
eval $(awk '{print "ip route add "$0}' /tmp/default-route.txt)
rm -f /tmp/default-route.txt
else
echo "Something went wrong"
fi
```
### UDP 支持
[[返回]](#table-of-contents)
`GoHPTS` 具有 UDP 支持,可在 `tproxy` 和 `tlocal` 模式下启用。要使此设置正常工作,您需要连接到能够提供 UDP 连接(`UDP ASSOCIATE`)的 socks5 服务器。例如,您可以使用 [https://github.com/wzshiming/socks5](https://github.com/wzshiming/socks5) 在某个远程或本地机器上部署支持 UDP 的 socks5 服务器。一旦您有了要连接的服务器,请运行以下命令:```shell
sudo env PATH=$PATH gohpts -s remote -Tu :8989 -M tproxy -auto -mark 100 -d
```
此命令将配置你的操作系统并在 `0.0.0.0:8989` 地址上设置服务器。
要在本地测试它,你可以将 UDP 透明代理与 `-arpspoof` 标志结合使用。例如:
1. 在你的系统上设置一个虚拟机,使用任何支持 `tproxy` 的 Linux 发行版(例如 Kali Linux)。
2. 启用 `bridged` 网络,以便虚拟机可以访问你的宿主机。
3. 将 `gohpts` 二进制文件移动到虚拟机中(例如通过 `ssh`),或者如果操作系统/架构不同,则在虚拟机中构建它。
4. 在你的虚拟机上运行以下命令:```shell
# Do not forget to replace <socks5 server> and <your host> with actual addresses
sudo ./gohpts -s <socks5 server> -T 8888 -Tu :8989 -M tproxy -sniff -body -auto -mark 100 -d -arpspoof "targets <your host>;fullduplex true;debug false"
```
5. 在宿主机上检查连接,流量应经过 Kali 机器。
### Android 支持
[[返回]](#table-of-contents)
透明代理可在具有 root 权限的 Android 设备(arm64)上启用。你可以安装 [Termux](https://github.com/termux/termux-app) 并在其中将 `GoHPTS` 作为 CLI 工具运行:```shell
# you need to root your device first
pkg install tsu iproute2
# Android support added in v1.10.2
GOHPTS_RELEASE=v1.10.2; wget -v https://github.com/shadowy-pycoder/go-http-proxy-to-socks/releases/download/$GOHPTS_RELEASE/gohpts-$GOHPTS_RELEASE-android-arm64.tar.gz -O gohpts && tar xvzf gohpts && mv -f gohpts-$GOHPTS_RELEASE-android-arm64 gohpts && ./gohpts -h
# use your phone as router for LAN devices redirecting their traffic to remote socks5 server
sudo ./gohpts -s remote -T 8888 -Tu :8989 -M tproxy -sniff -body -auto -mark 100 -d -arpspoof "fullduplex true;debug false"
```
### YAML 配置
[[返回]](#table-of-contents)```yaml
transparent_proxy:
tcp:
enabled: true
address: 0.0.0.0:8888
# number of instances of transparent proxy server (Default: number of CPU cores)
workers: 1
udp:
enabled: true
address: 0.0.0.0:8889
# number of instances of transparent UDP proxy server (Default: number of CPU cores)
workers: 1
mode: "tproxy" # available modes are "redirect", "tproxy" and "tlocal" (udp requires tproxy or tlocal mode)
# automatically setup iptables and kernel parameters for transparent proxy (requires elevated privileges)
auto: true
# dump iptables rules and other system settings generated by auto setting
dump_rules: false
# list of ports to ignore when proxying traffic (Example: [22,80,443,9092])
ignored_ports: []
# set mark for each packet sent through transparent proxy (Default: redirect 0, tproxy 100, tlocal 100)
mark: 100
```
## 流量嗅探
[[返回]](#table-of-contents)
<p align="center"><img alt="MrGopher" src="https://assets.kitploit.com/production/public/readmes/11401/ac38691c0f511a6265baf784c236e4ca9557e6c2b7744271f09b1b657af92ca7.png"/>
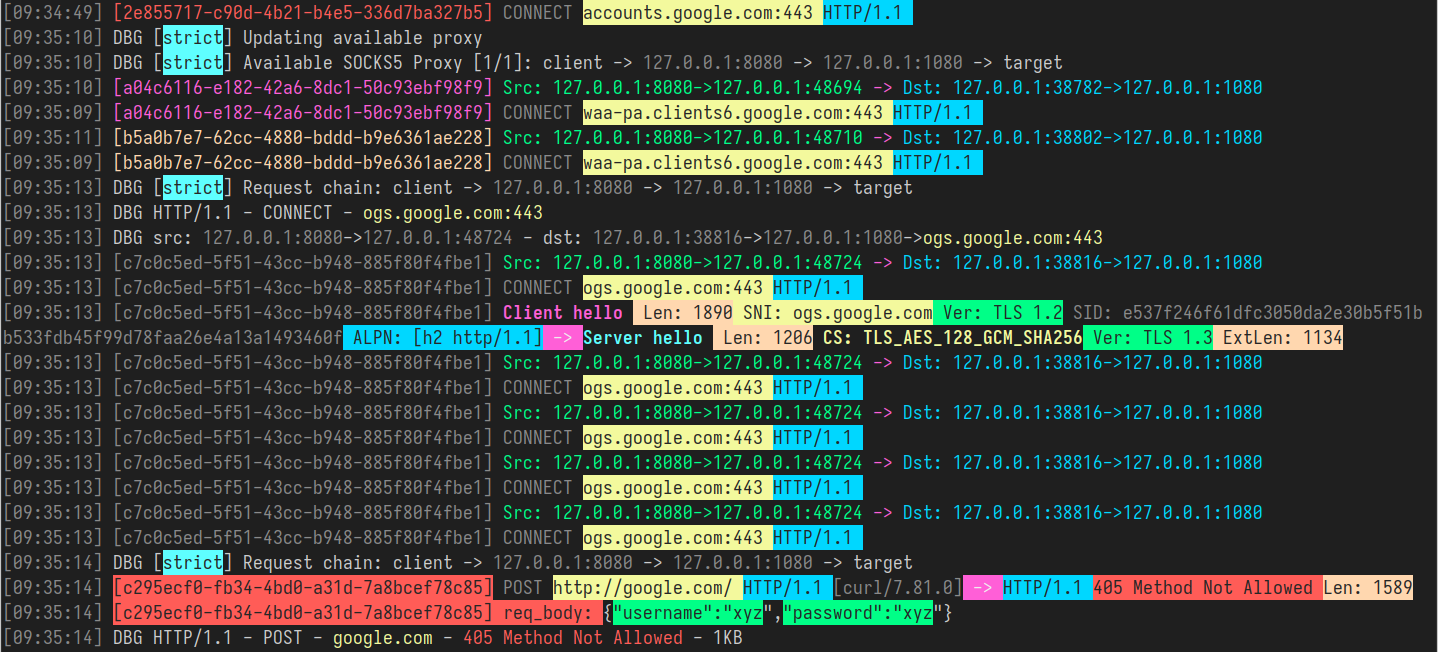
`GoHPTS` 代理允许捕获和监控通过该服务的流量。此过程称为 `流量嗅探`、`数据包嗅探` 或简称 `嗅探`。具体而言,代理会尝试识别流量是明文(HTTP)还是 TLS 流量,识别完成后,它会解析请求/响应元数据并将其写入文件或控制台。对于 `GoHTPS` 代理,解析后的元数据如下所示(TLS 握手):
### JSON 格式
[[返回]](#table-of-contents)```json
[
{
"connection": {
"tproxy_mode": "redirect",
"src_local": "127.0.0.1:8888",
"src_remote": "192.168.0.107:51142",
"dst_local": "127.0.0.1:56256",
"dst_remote": "127.0.0.1:1080",
"original_dst": "216.58.209.206:443"
}
},
{
"tls_request": {
"sni": "www.youtube.com",
"type": "Client hello (1)",
"version": "TLS 1.2 (0x0303)",
"session_id": "2670a6779b4346e5e84d46890ad2aaf7a53b08adcfe0c9f6868c2d9882242e39",
"cipher_suites": [
"TLS_AES_128_GCM_SHA256 (0x1301)",
"TLS_CHACHA20_POLY1305_SHA256 (0x1303)",
"TLS_AES_256_GCM_SHA384 (0x1302)",
"TLS_ECDHE_ECDSA_WITH_AES_128_GCM_SHA256 (0xc02b)",
"TLS_ECDHE_RSA_WITH_AES_128_GCM_SHA256 (0xc02f)",
"TLS_ECDHE_ECDSA_WITH_CHACHA20_POLY1305_SHA256 (0xcca9)",
"TLS_ECDHE_RSA_WITH_CHACHA20_POLY1305_SHA256 (0xcca8)",
"TLS_ECDHE_ECDSA_WITH_AES_256_GCM_SHA384 (0xc02c)",
"TLS_ECDHE_RSA_WITH_AES_256_GCM_SHA384 (0xc030)",
"TLS_ECDHE_ECDSA_WITH_AES_256_CBC_SHA (0xc00a)",
"TLS_ECDHE_ECDSA_WITH_AES_128_CBC_SHA (0xc009)",
"TLS_ECDHE_RSA_WITH_AES_128_CBC_SHA (0xc013)",
"TLS_ECDHE_RSA_WITH_AES_256_CBC_SHA (0xc014)",
"TLS_RSA_WITH_AES_128_GCM_SHA256 (0x9c)",
"TLS_RSA_WITH_AES_256_GCM_SHA384 (0x9d)",
"TLS_RSA_WITH_AES_128_CBC_SHA (0x2f)",
"TLS_RSA_WITH_AES_256_CBC_SHA (0x35)"
],
"extensions": [
"server_name (0)",
"extended_master_secret (23)",
"renegotiation_info (65281)",
"supported_groups (10)",
"ec_point_formats (11)",
"session_ticket (35)",
"application_layer_protocol_negotiation (16)",
"status_request (5)",
"delegated_credential (34)",
---
[Read more](https://github.com/shadowy-pycoder/go-http-proxy-to-socks)