
Skip to content
KitploitKITPLOIT
도구블로그
제출
도구블로그
제출

해킹, 침투 테스트 및 사이버 보안 도구를 당신의 보안 무기고에!

Kitploit은 해킹, 사이버 보안 및 침투 테스트 도구 디렉토리입니다. 최신 프로젝트 업데이트를 발견하여 취약점을 찾고, 시스템을 분석하고, 테스트를 자동화하고, 보안을 강화하세요.

··피드·문의·개인정보·© 2026 Kitploit

도구 디렉토리

카테고리

모든 카테고리 보기
Loading categories
go-http-proxy-to-socks — SOCKS4/SOCKS5를 HTTP/HTTPS/HTTP2/HTTP3 프록시로 변환하고 투명 TCP/UDP 리디렉션, ARP/NDP/DNS 스푸핑, 트래픽 스니핑 및 패킷 캡처를 지원하는 CLI MITM 프록시입니다. 순수 Go로 작성되었으며 libpcap이 필요하지 않습니다. | Kitploit
도구/GitHubGitHub/shadowy-pycoder/
go-http-proxy-to-socks
Packet Sniffing & AnalysisWeb Proxies & InterceptionIDS/IPS EvasionNetwork SecurityPenetration TestingUtilities & FrameworksDNS FuzzingRed TeamingDNS Analysis
GitHubshadowy-pycoder/go-http-proxy-to-socks

go-http-proxy-to-socks

SOCKS4/SOCKS5를 HTTP/HTTPS/HTTP2/HTTP3 프록시로 변환하고 투명 TCP/UDP 리디렉션, ARP/NDP/DNS 스푸핑, 트래픽 스니핑 및 패킷 캡처를 지원하는 CLI MITM 프록시입니다. 순수 Go로 작성되었으며 libpcap이 필요하지 않습니다.

저장소 보기
6931개월 전Kitploit 검토 완료

인기

모두 보기 →

커뮤니티에서 가장 많이 사용되는 도구를 찾아보세요.

모든 도구 탐색

도구 컬렉션을 둘러보세요

모든 도구 보기 →
공유

GoHPTS - HTTP(S) 및 TCP/UDP 투명 프록시를 SOCKS4/SOCKS5 프록시(체인)로 변환 (Go로 작성)

License: GPL v3 Go Reference GitHub go.mod Go version AUR Version AUR Last Modified AUR Maintainer Docker Pulls GitHub Release

GitHub Downloads (all assets, all releases)
GitHub Downloads (all assets, latest release)

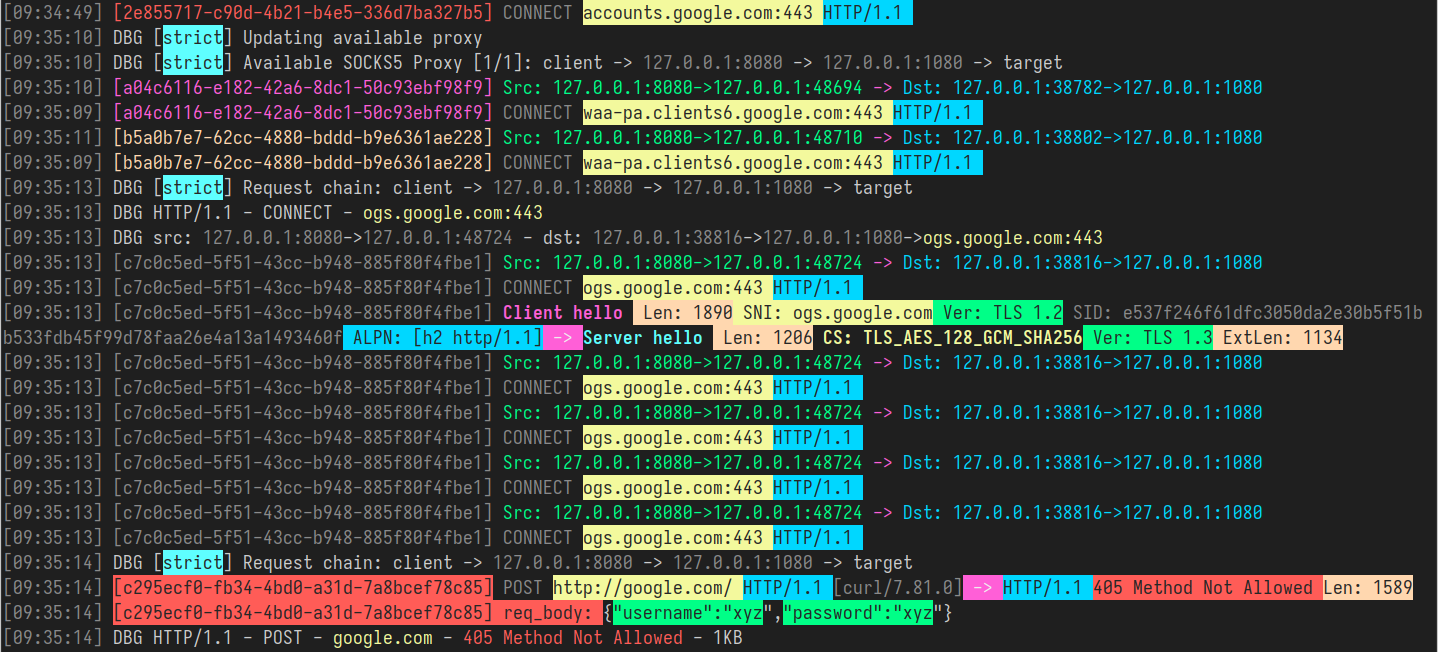
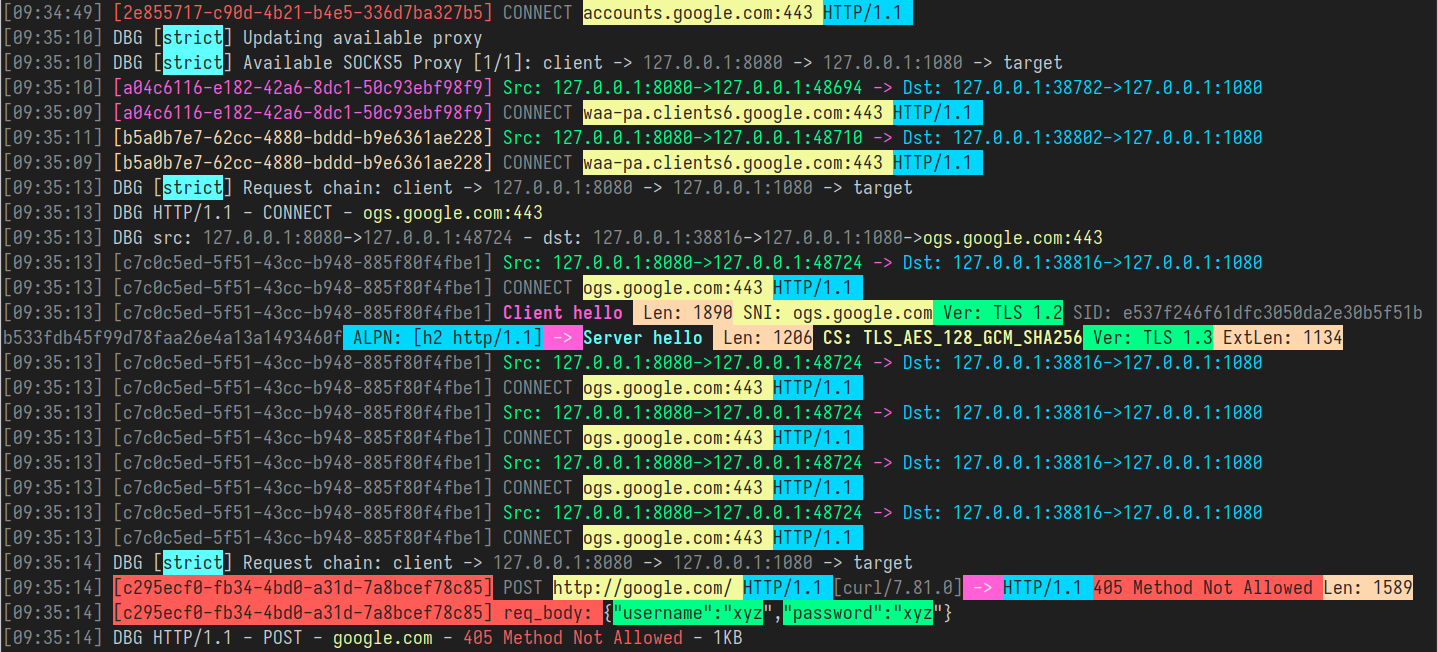
GoHPTS - 색상 예시

목차

  • 소개
  • 기능
  • 설치
  • 사용법
    • CLI 플래그를 통한 설정
    • YAML 파일을 통한 설정
  • 투명 프록시
    • redirect (NAT 및 SO_ORIGINAL_DST 사용)
    • redirect 모드 자동 설정
    • tproxy (MANGLE 및 IP_TRANSPARENT 사용)
    • tproxy 모드 자동 설정
    • UDP 지원
    • Android 지원
    • YAML 설정
  • 트래픽 스니핑
    • JSON 형식
    • 컬러 형식
  • HTTP2 및 HTTP3 지원
    • 자체 서명 인증서를 사용한 예제 설정
    • 연결 테스트
    • 브라우저에서 연결 테스트
  • IPv4 및 IPv6 지원
  • ARP 스푸핑
  • NDP 스푸핑
  • DNS 스푸핑
  • 패킷 캡처
  • 네트워크 네임스페이스
    • 플레이그라운드 설정
    • 사용 예제
  • 혼합 서버
  • 링크
  • 기여하기
  • 라이선스

소개

[위로]

GoHPTS CLI 도구는 HTTP 클라이언트와 SOCKS5 프록시 서버(또는 여러 서버 체인) 사이의 브리지 역할을 합니다. 로컬에서 HTTP 프록시로 수신 대기하며, 표준 HTTP 또는 HTTPS(CONNECT 사용) 요청을 받아 SOCKS5 프록시를 통해 연결을 전달합니다. http-proxy-to-socks 및 Proxychains에서 영감을 받았습니다.

사용 사례: Postman을 통해 외부 API에 연결해야 하는데, 해당 API가 특정 원격 서버에서만 접근 가능한 경우. 다음 명령어를 사용하면 이러한 작업을 수행할 수 있습니다:

ssh를 통해 SOCKS5 프록시 서버 생성:```shell ssh -D 1080 -Nf

root@kitploit:~
`gohpts`로 HTTP-to-SOCKS5 연결을 생성합니다```shell
gohpts -s :1080 -l :8080

Postman의 프록시 구성에서 HTTP 서버 지정

기능

[뒤로]

  • 프록시 체인 기능
    strict, dynamic, random, round_robin 체인의 SOCKS4/SOCKS5 프록시 지원

  • 투명 프록시
    redirect (SO_ORIGINAL_DST) 및 tproxy (IP_TRANSPARENT) 모드 지원

  • IPv4 및 IPv6 지원
    IPv4 전용, IPv6 전용 또는 듀얼 스택 모드로 작동

  • TCP 및 UDP 투명 프록시
    tproxy 및 tlocal (IP_TRANSPARENT)이 TCP 및 UDP 트래픽 처리

  • 트래픽 스니핑
    프록시가 HTTP 헤더, TLS 핸드셰이크, DNS 메시지 등을 파싱 가능

  • ARP 스푸핑
    ARP 스푸핑 방식으로 전체 서브넷 프록시

  • NDP 스푸핑
    라우터/네이버 광고 및 RDNSS 주입을 사용한 IPv6 연결 프록시

  • DNS 스푸핑
    DNS 레코드 조작을 통해 클라이언트를 임의 도메인으로 리디렉션

  • 패킷 캡처
    트래픽을 txt/pcap/pcapng 파일로 캡처하고 Wireshark로 분석

  • DNS 누출 방지
    DNS 확인이 SOCKS5 서버 측에서 수행됨

  • CONNECT 메서드 지원
    HTTP CONNECT 터널링 지원, HTTPS 및 기타 TCP 기반 프로토콜 활성화

  • HTTP2/HTTP3 지원
    최신 HTTP/2 및 HTTP/3 전송 지원, TLS 1.3을 통한 효율적인 다중화 연결 가능

  • 네트워크 네임스페이스 지원
    수신 소켓 및 아웃바운드 연결을 위한 사용자 정의 Linux 네트워크 네임스페이스 지원

  • 트레일러 헤더 지원
    HTTP 트레일러 헤더 처리

  • 청크 전송 인코딩
    청크 및 스트리밍 응답 처리

  • SOCKS5 인증 지원
    SOCKS5 프록시에 대한 사용자 이름/비밀번호 인증 지원

  • HTTP 인증 지원
    HTTP 프록시 서버에 대한 사용자 이름/비밀번호 인증 지원

  • 경량 및 빠른 속도
    최소한의 오버헤드와 효율적인 요청 처리로 설계

  • 크로스 플랫폼
    모든 주요 운영 체제와 호환

설치

[뒤로]

  • Arch Linux/CachyOS/EndeavourOS ```shell yay -S gohpts
    root@kitploit:~

또는 paru 사용: ```shell paru -S gohpts

root@kitploit:~
- 귀하의 플랫폼에 맞는 바이너리를 [Releases](https://github.com/shadowy-pycoder/go-http-proxy-to-socks/releases) 페이지에서 다운로드하세요:  ```shell
GOHPTS_RELEASE=v1.15.5; wget -v https://github.com/shadowy-pycoder/go-http-proxy-to-socks/releases/download/$GOHPTS_RELEASE/gohpts-$GOHPTS_RELEASE-linux-amd64.tar.gz -O gohpts && tar xvzf gohpts && mv -f gohpts-$GOHPTS_RELEASE-linux-amd64 gohpts && ./gohpts -h
  • go install 명령어를 사용하여 설치 (Go 1.26 또는 그 이상 필요): ```shell CGO_ENABLED=0 go install -ldflags "-s -w" -trimpath github.com/shadowy-pycoder/go-http-proxy-to-socks/cmd/gohpts@latest
    root@kitploit:~

이 명령은 gohpts 바이너리를 $GOPATH/bin 디렉토리에 설치합니다.

  • 소스에서 빌드: ```shell git clone https://github.com/shadowy-pycoder/go-http-proxy-to-socks.git cd go-http-proxy-to-socks make build ./bin/gohpts
    root@kitploit:~
  • Docker에서 실행: ```shell docker run -it --privileged --network host -v "$PWD/gohpts.yaml:/config.yaml" shadowypycoder/gohpts:latest -f config.yaml
    root@kitploit:~

사용법

[뒤로]```shell gohpts -h


/ | | | | | __ _ / ____| | | __ ___ | || | |) | | | | (__ | | |_ |/ _ | __ | / | | _
| |__| | (
) | | | | | | | ) | _|_/|| ||| || |___/

GoHPTS: HTTP(S) Proxy to SOCKS4/SOCKS5 proxy by shadowy-pycoder GitHub: https://github.com/shadowy-pycoder/go-http-proxy-to-socks Codeberg: https://codeberg.org/shadowy-pycoder/go-http-proxy-to-socks

Usage: gohpts [OPTIONS] OPTIONS: General: -h Show this help message and exit -v Show version and build information -D Run as a daemon (provide -logfile to see logs) -I Display list of network interfaces and exit -f Path to proxy configuration file in YAML format

Proxy: -l Address of HTTP proxy server (Default: "127.0.0.1:8080" for IPv4, "[::1]:8080" for IPv6) -s Address of SOCKS proxy server (Default: "127.0.0.1:1080" for IPv4 "[::1]:1080" for IPv6) -c Path to certificate PEM encoded file -k Path to private key PEM encoded file -U User for HTTP proxy (basic auth). This flag invokes prompt for password (not echoed to terminal) -u User for SOCKS proxy authentication. This flag invokes prompt for password (not echoed to terminal) -i Bind proxy to specific network interface (either by interface name or index) -4 Force IPv4 stack for TCP and UDP (Default: dual stack) -6 Force IPv6 stack for TCP and UDP (Default: dual stack) -socks4 Use SOCKS4/SOCKS4a protocol for upstream proxy and mixed server (default: SOCKS5/SOCKS5h) -nohttp Disable HTTP proxy server -nosocks Disable SOCKS upstream proxy -dns Use custom DNS server (Example: "8.8.8.8" or "2001:4860:4860::8888") -mixed Accept SOCKS connections on HTTP proxy server address

Logs: -d Show logs in DEBUG mode -j Show logs in JSON format -logfile Log file path (Default: stdout) -nocolor Disable colored output for logs (no effect if -j flag specified) -pprof Address of pprof server with profiling data

Sniffing: -sniff Enable traffic sniffing for HTTP and TLS -snifflog Sniffed traffic log file path (Default: the same as -logfile) -body Collect request and response body for HTTP traffic (credentials, tokens, etc)


TProxy: -T Address of transparent proxy server -Tu Address of transparent UDP proxy server -M Transparent proxy mode: (redirect, tproxy, tlocal) -w Number of instances of transparent proxy server (Default: number of CPU cores) -wu Number of instances of transparent UDP proxy server (Default: number of CPU cores) -auto Automatically setup iptables and kernel parameters for transparent proxy (requires elevated privileges) -mark Set mark for each packet sent through transparent proxy (Default: redirect 0, tproxy 100, tlocal 100) -P Comma separated list of ports to ignore when proxying traffic (Example: "22,80,443,9092") -dump Dump iptables rules and other system settings generated by -auto flag

Spoofing: -arpspoof Enable ARP spoof proxy for selected targets (Example: "targets 10.0.0.1,10.0.0.5-10,192.168.1.*,192.168.10.0/24;fullduplex false;debug true;interval 10s") -ndpspoof Enable NDP spoof proxy for selected targets (Example: "ra true;na true;targets fe80::3a1c:7bff:fe22:91a4;fullduplex false;debug true;interval 10s")

Packet Capture: -pcap Enable packet capture (Example: "promisc true;expr ip proto tcp;snaplen 65535;timeout 10s;packet_count 100;packet_buffer 8192;exts txt,pcap,pcapng")

Namespaces: -in-netns Name or path of network namespace for inbound listeners (Default: default namespace) -out-netns Name or path of network namespace for outbound connections (Default: default namespace)

root@kitploit:~
### CLI 플래그를 통한 구성

[[뒤로]](#table-of-contents)```shell
gohpts -s 1080 -l 8080 -d -j

출력:```shell {"level":"info","time":"2025-05-28T06:15:18+00:00","message":"SOCKS5 Proxy: :1080"} {"level":"info","time":"2025-05-28T06:15:18+00:00","message":"HTTP Proxy: :8080"} {"level":"debug","time":"2025-05-28T06:15:22+00:00","message":"HTTP/1.1 - CONNECT - www.google.com:443"}

root@kitploit:~
SOCKS5 프록시 서버의 사용자 이름과 비밀번호를 지정하십시오:```shell
gohpts -s 1080 -l 8080 -d -j -u user
SOCKS5 Password: #you will be prompted for password input here

HTTP 프록시 서버의 사용자 이름과 비밀번호를 지정하십시오:```shell gohpts -s 1080 -l 8080 -d -j -U user HTTP Password: #you will be prompted for password input here

root@kitploit:~
`-u`와 `-U`가 모두 존재하면 두 번 프롬프트가 표시됩니다

TLS 연결을 통해 HTTP 프록시 실행```shell
gohpts -s 1080 -l 8080 -c "path/to/certificate" -k "path/to/private/key"

프록시를 데몬으로 실행 (로그 출력을 위해 로그 파일이 필요합니다. 그렇지 않으면 아무것도 볼 수 없습니다)```shell gohpts -D -logfile /tmp/gohpts.log

root@kitploit:~
(empty)```shell
# output
gohpts pid: <pid>
  • 허위 긍정률 – 추출된 관심사 중에서 사용자가 관심을 보이지 않을 비율입니다.
  • 재현율 – 감시 대상이 되는 사용자 중에서 관심 활동을 보일 것으로 추정되는 사용자의 비율입니다.
  • 속도 및 확장성 – 초당 관심을 분석할 수 있는 정도와 그룹 크기입니다.```shell

kill the process

kill #or kill $(pidof gohpts)

root@kitploit:~
`-u` 및 `-U` 플래그는 데몬 모드에서 작동하지 않으며 (따라서 인증도 작동하지 않음), 구성 파일을 제공할 수 있습니다 (아래 참조).

### YAML 파일을 통한 구성

[[Back]](#table-of-contents)

구성 파일은 CLI를 너무 많이 건드리지 않고 프록시를 사전 구성하거나 다양한 요구 사항에 대해 여러 프로필을 원할 때 유용합니다.

SOCKS5 프록시 체인 모드에서 HTTP 프록시 실행 (YAML 구성 파일을 통해 서버 설정 지정)```shell
gohpts -f "~/gohtps.yaml" -d -j

구성 예시:```yaml

bind proxy to specific network interface (either by interface name or index)

interface: "eth0" # if specified, overrides http server IP address disable_http: false # disable http proxy (default: false) disable_socks: false # disable upstream socks proxy (default: false)

if ipv4 and ipv6 are both false or both true, dual stack is assumed

ipv4: false # this must be enabled for arpspoof (default: false) ipv6: false # this must be enabled for ndpspoof (default: false) socks4: false # use SOCKS4/SOCKS4a protocol (tcp only protocol, no udp tproxy or http3 possible) (default: false) dns: 8.8.8.8 # custom DNS server (used in direct dialer, namespaces, spoofing)

http_server: address: 127.0.0.1:8080

username and password for adding basic authentication (comment out to disable auth)

username: username password: password

list of socks5 proxy

if proxy_chain is disabled, uses first server in a list as upstream

proxy_list:

  • address: 127.0.0.1:1080
  • address: 127.0.0.1:1081
  • address: :1082 # empty host means localhost

proxy_chain: enabled: false

Explanations for chains taken from /etc/proxychains4.conf

strict - Each connection will be done via chained proxies

all proxies chained in the order as they appear in the list

all proxies must be online to play in chain

dynamic - Each connection will be done via chained proxies

all proxies chained in the order as they appear in the list

at least one proxy must be online to play in chain

(dead proxies are skipped)

random - Each connection will be done via random proxy

(or proxy chain, see chain_len) from the list.

this option is good to test your IDS :)

round_robin - Each connection will be done via chained proxies

of chain_len length

all proxies chained in the order as they appear in the list

at least one proxy must be online to play in chain

(dead proxies are skipped).

the start of the current proxy chain is the proxy after the last

proxy in the previously invoked proxy chain.

if the end of the proxy chain is reached while looking for proxies

start at the beginning again.

These semantics are not guaranteed in a multithreaded environment.

type: strict # dynamic, strict, random, round_robin length: 2 # maximum number of proxy in a chain (works only for random chain and round_robin chain)

logging: debug: true json: false

defaults to standard output

#logfile: /tmp/gohpts.log

use colored output in logs (no effect if json enabled)

nocolor: false

profiling data

pprof: 127.0.0.1:8081

root@kitploit:~
구성 파일에 지정된 거의 모든 설정을 해당 CLI 플래그를 제공하여 재정의할 수 있습니다:```shell
gohpts -l :6969 -f "~/gohtps.yaml" -nocolor

Proxy는 ~/gohpts.yaml에 지정된 모든 설정을 가져오지만 127.0.0.1:8080 대신 127.0.0.1:6969에서 http 서버를 실행하며 로그의 컬러 출력도 비활성화합니다.

일부 설정(예: proxy_chain 및 dns 필터)은 파일을 통해서만 구성할 수 있습니다.

전체 구성 파일은 다음에서 확인할 수 있습니다: example_gohpts.yaml

프록시 체인에 대해 더 알아보려면 Proxychains Github를 방문하세요.

투명 프록시

[Back]

투명 프록시는 인터셉팅 프록시, 인라인 프록시, 또는 강제 프록시라고도 알려져 있으며, 특별한 클라이언트 구성 없이 일반적인 애플리케이션 계층 통신을 가로챕니다. 클라이언트는 프록시의 존재를 알 필요가 없습니다. 투명 프록시는 일반적으로 클라이언트와 인터넷 사이에 위치하며, 게이트웨이나 라우터의 일부 기능을 수행합니다.

-- 출처: Wiki

이 기능은 Linux 시스템 및 Android(arm64)에서만 사용 가능하며 추가 설정(iptables, ip route 등)이 필요합니다.

-T address 플래그는 투명 프록시 서버의 주소를 지정합니다.

-M 플래그로 지정할 수 있는 세 가지 모드인 redirect, tproxy, tlocal(tproxy와 같지만 로컬 트래픽도 가로챔)이 있습니다.

redirect (NAT 및 SO_ORIGINAL_DST 사용)

[Back]

이 모드에서 프록시는 iptables nat 테이블과 REDIRECT 대상을 사용하여 수행됩니다. 들어오는 패킷의 호스트는 실행 중인 redirect 투명 프록시의 주소로 변경되지만, getsockopt(SO_ORIGINAL_DST)로 검색할 수 있는 원래 목적지도 포함합니다.

이 모드에서 GoHPTS를 실행하려면 -M redirect와 함께 -T 플래그를 사용합니다.

예제

[Back]```shell

run the proxy

gohpts -s 1080 -T 1090 -M redirect -d

root@kitploit:~
입력:```shell
# run socks5 server on 127.0.0.1:1080
ssh remote -D 1080 -Nf

운영 체제 설정:```shell

commands below require elevated privileges (you can run it with sudo -i)

#enable ip forwarding sysctl -w net.ipv4.ip_forward=1

create GOHPTS nat chain

iptables -t nat -N GOHPTS

set no redirection rules for local, http proxy, ssh and redirect proxy itself

iptables -t nat -A GOHPTS -d 127.0.0.0/8 -j RETURN iptables -t nat -A GOHPTS -p tcp --dport 8080 -j RETURN iptables -t nat -A GOHPTS -p tcp --dport 1090 -j RETURN iptables -t nat -A GOHPTS -p tcp --dport 22 -j RETURN

redirect traffic to transparent proxy

iptables -t nat -A GOHPTS -p tcp -j REDIRECT --to-ports 1090

setup prerouting by adding our proxy

iptables -t nat -A PREROUTING -p tcp -j GOHPTS

intercept local traffic for testing

iptables -t nat -A OUTPUT -p tcp -j GOHPTS

root@kitploit:~
연결 테스트:```shell
#traffic should be redirected via 127.0.0.1:1090
curl http://example.com

KeePass의 RPN 모듈 기본적으로 KeePass는 일반적인 암호 생성 기능을 제공합니다. 암호 생성을 위한 규칙을 만들 수 있지만, 규칙은 다소 제한적입니다. RPN 모듈은 HP-15C 계산기와 같은 표현식을 사용하여 암호를 생성할 수 있는 기능을 추가합니다.

예를 들어 15C 암호 생성기 표현식 2 3 4×+는 14자 길이의 암호를 생성합니다.

2 3 4×+는 RPN을 사용하는 표현식입니다. 2, 3, 4, ×, +로 구성됩니다. 평가는 다음과 같이 진행됩니다:

  1. 2가 스택에 추가됩니다. 스택: [2].
  2. 3이 스택에 추가됩니다. 스택: [2,3].
  3. 4가 스택에 추가됩니다. 스택: [2,3,4].
  4. ×는 상위 두 항목 3과 4를 가져와 곱한 후 결과 12를 스택에 다시 푸시합니다. 스택: [2,12].
  5. +는 상위 두 항목 2와 12를 가져와 더한 후 결과 14를 스택에 다시 푸시합니다. 스택: [14]. 스택 크기는 1이며, 최상위 값 14가 생성된 암호의 길이가 됩니다.```shell #traffic should be redirected via 127.0.0.1:8080 curl --proxy http://127.0.0.1:8080 http://example.com
root@kitploit:~
모든 것을 되돌리기:```shell
sysctl -w net.ipv4.ip_forward=0
iptables -t nat -D PREROUTING -p tcp -j GOHPTS
iptables -t nat -D OUTPUT -p tcp -j GOHPTS
iptables -t nat -F GOHPTS
iptables -t nat -X GOHPTS

redirect 모드에 대한 자동 구성

[Back]

시스템을 자동으로 구성하려면 다음 명령을 실행하십시오:```shell sudo env PATH=$PATH gohpts -d -T 8888 -M redirect -auto

root@kitploit:~
참고하세요, 자동 구성은 `sudo`가 필요하며 매우 일반적이므로 사용자의 요구에 적합하지 않을 수 있습니다.

선택적으로 `-mark <value>`를 지정하여 가능한 프록시 루프를 방지할 수 있습니다.```shell
sudo env PATH=$PATH gohpts -d -T 8888 -M redirect -auto -mark 100

tproxy (via MANGLE 및 IP_TRANSPARENT)

[뒤로]

이 모드에서는 프록시가 iptables mangle 테이블과 TPROXY 대상을 사용하여 수행됩니다. 투명 프록시는 대상 주소를 그대로 보며, 커널에 의해 다시 쓰여지지 않습니다. 이 기능이 작동하려면 프록시가 소켓 옵션 IP_TRANSPARENT로 바인딩하고, iptables가 TPROXY 대상을 사용하여 트래픽을 가로채며, 라우팅 규칙이 표시된 패킷을 원래 대상 주소를 변경하지 않고 로컬 프록시로 보내도록 지시합니다.

이 모드는 GoHPTS를 실행하기 위해 상승된 권한이 필요합니다. 다음 명령어를 실행하여 이를 수행할 수 있습니다:```shell sudo setcap 'cap_net_admin+ep' ~/go/bin/gohpts

root@kitploit:~
이 모드에서 `GoHPTS`를 실행하려면 `-T` 플래그를 `-M tproxy`와 함께 사용합니다.

### 예제

[[뒤로]](#table-of-contents)```shell
# run the proxy
gohpts -s 1080 -T 0.0.0.0:1090 -M tproxy -d

Usage

root@kitploit:~
python3 main.py -u http://example.com
``````shell
# run socks5 server on 127.0.0.1:1080
ssh remote -D 1080 -Nf

운영 체제를 설정하세요:```shell ip netns add ns-client ip link add dev veth0 type veth peer name veth1 netns ns-client ip addr add 10.0.0.1/24 dev veth0 ip link set dev veth0 up ip netns exec ns-client ip addr add 10.0.0.2/24 dev veth1 ip netns exec ns-client ip link set dev lo up ip netns exec ns-client ip link set dev veth1 up ip netns exec ns-client ip route add default via 10.0.0.1 sysctl -w net.ipv4.ip_forward=1

iptables -t mangle -A PREROUTING -i veth0 -p tcp -j TPROXY --on-port 1090 --tproxy-mark 0x1/0x1

ip rule add fwmark 1 lookup 100 ip route add local 0.0.0.0/0 dev lo table 100

root@kitploit:~
연결 테스트:```shell
ip netns exec ns-client curl http://1.1.1.1

모든 작업 취소:```shell sysctl -w net.ipv4.ip_forward=0 iptables -t mangle -F ip rule del fwmark 1 lookup 100 ip route flush table 100 ip netns del ns-client

root@kitploit:~
### `tproxy` 모드 자동 구성

[[뒤로]](#table-of-contents)

시스템을 자동으로 구성하려면, 다음 명령을 실행하세요 (예: 별도의 VM에서):```shell
ssh remote -D 1080 -Nf
sudo env PATH=$PATH gohpts -d -T 8888 -M tproxy -auto -mark 100

다음을 호스트에서 실행하십시오:```shell ip route show default > /tmp/default-route.txt

ip route add 0.0.0.0/1 via 192.168.0.1 # change with ip of your VM ip route add 128.0.0.0/1 via 192.168.0.1

root@kitploit:~
연결 테스트:```shell
curl http://example.com #check logs on your VM

모든 것을 실행 취소:```shell ip route del 0.0.0.0/1 via 192.168.0.1 2>/dev/null || true ip route del 128.0.0.0/1 via 192.168.0.1 2>/dev/null || true

if [[ -f /tmp/default-route.txt ]]; then eval $(awk '{print "ip route add "$0}' /tmp/default-route.txt) rm -f /tmp/default-route.txt else echo "Something went wrong" fi

root@kitploit:~
### UDP 지원

[[뒤로]](#table-of-contents)

`GoHPTS`는 UDP를 지원하며, `tproxy` 및 `tlocal` 모드에서 활성화할 수 있습니다. 이 설정이 작동하려면 UDP 연결(`UDP ASSOCIATE`)을 제공할 수 있는 socks5 서버에 연결해야 합니다. 예를 들어, [https://github.com/wzshiming/socks5](https://github.com/wzshiming/socks5)를 사용하여 원격 또는 로컬 머신에 UDP를 지원하는 socks5 서버를 배포할 수 있습니다. 연결할 서버가 준비되면 다음 명령을 실행하세요:```shell
sudo env PATH=$PATH gohpts -s remote -Tu :8989 -M tproxy -auto -mark 100 -d

이 명령은 운영 체제를 구성하고 서버를 0.0.0.0:8989 주소에 설정합니다.

로컬에서 테스트하려면 UDP 투명 프록시를 -arpspoof 플래그와 결합할 수 있습니다. 예를 들어:

  1. 시스템에 tproxy를 지원하는 Linux 배포판(예: Kali Linux)으로 VM을 설정하세요.
  2. VM이 호스트 머신에 접근할 수 있도록 bridged 네트워크를 활성화하세요.
  3. gohpts 바이너리를 VM으로 이동(예: ssh를 통해)하거나 OS/아키텍처가 다른 경우 그곳에서 빌드하세요.
  4. VM에서 다음 명령을 실행하세요:
root@kitploit:~
# Do not forget to replace <socks5 server> and <your host> with actual addresses
sudo ./gohpts -s <socks5 server> -T 8888 -Tu :8989 -M tproxy -sniff -body -auto -mark 100 -d -arpspoof "targets <your host>;fullduplex true;debug false"
```
5. 호스트 머신에서 연결을 확인하세요. 트래픽이 Kali 머신을 통해 전달되어야 합니다.

### Android 지원

[[뒤로]](#table-of-contents)

투명 프록시는 루트 액세스 권한이 있는 Android 기기(arm64)에서 활성화할 수 있습니다. [Termux](https://github.com/termux/termux-app)를 설치하고 CLI 도구로 `GoHPTS`를 실행하면 됩니다:```shell
# you need to root your device first
pkg install tsu iproute2
# Android support added in v1.10.2
GOHPTS_RELEASE=v1.10.2; wget -v https://github.com/shadowy-pycoder/go-http-proxy-to-socks/releases/download/$GOHPTS_RELEASE/gohpts-$GOHPTS_RELEASE-android-arm64.tar.gz -O gohpts && tar xvzf gohpts && mv -f gohpts-$GOHPTS_RELEASE-android-arm64 gohpts && ./gohpts -h
# use your phone as router for LAN devices redirecting their traffic to remote socks5 server
sudo ./gohpts -s remote -T 8888 -Tu :8989 -M tproxy -sniff -body -auto -mark 100 -d -arpspoof "fullduplex true;debug false"
```
### YAML 구성

[[Back]](#table-of-contents)```yaml
transparent_proxy:
  tcp:
    enabled: true
    address: 0.0.0.0:8888
    # number of instances of transparent proxy server (Default: number of CPU cores)
    workers: 1
  udp:
    enabled: true
    address: 0.0.0.0:8889
    # number of instances of transparent UDP proxy server (Default: number of CPU cores)
    workers: 1
  mode: "tproxy" # available modes are "redirect", "tproxy" and "tlocal" (udp requires tproxy or tlocal mode)
  # automatically setup iptables and kernel parameters for transparent proxy (requires elevated privileges)
  auto: true
  # dump iptables rules and other system settings generated by auto setting
  dump_rules: false
  # list of ports to ignore when proxying traffic (Example: [22,80,443,9092])
  ignored_ports: []
  # set mark for each packet sent through transparent proxy (Default: redirect 0, tproxy 100, tlocal 100)
  mark: 100
```
## 트래픽 스니핑

[[뒤로]](#table-of-contents)

<p align="center"><img alt="MrGopher" src="https://assets.kitploit.com/production/public/readmes/11401/ac38691c0f511a6265baf784c236e4ca9557e6c2b7744271f09b1b657af92ca7.png"/>

`GoHPTS` 프록시는 서비스를 통과하는 트래픽을 캡처하고 모니터링할 수 있게 해줍니다. 이 과정을 `트래픽 스니핑`, `패킷 스니핑` 또는 간단히 `스니핑`이라고 합니다. 특히 프록시는 평문(HTTP) 트래픽인지 TLS 트래픽인지 식별하려고 시도하며, 식별이 완료되면 요청/응답 메타데이터를 파싱하여 파일이나 콘솔에 기록합니다. `GoHTPS` 프록시의 경우 파싱된 메타데이터는 다음과 같습니다(TLS 핸드셰이크):

### JSON 형식

[[뒤로]](#table-of-contents)```json
[
  {
    "connection": {
      "tproxy_mode": "redirect",
      "src_local": "127.0.0.1:8888",
      "src_remote": "192.168.0.107:51142",
      "dst_local": "127.0.0.1:56256",
      "dst_remote": "127.0.0.1:1080",
      "original_dst": "216.58.209.206:443"
    }
  },
  {
    "tls_request": {
      "sni": "www.youtube.com",
      "type": "Client hello (1)",
      "version": "TLS 1.2 (0x0303)",
      "session_id": "2670a6779b4346e5e84d46890ad2aaf7a53b08adcfe0c9f6868c2d9882242e39",
      "cipher_suites": [
        "TLS_AES_128_GCM_SHA256 (0x1301)",
        "TLS_CHACHA20_POLY1305_SHA256 (0x1303)",
        "TLS_AES_256_GCM_SHA384 (0x1302)",
        "TLS_ECDHE_ECDSA_WITH_AES_128_GCM_SHA256 (0xc02b)",
        "TLS_ECDHE_RSA_WITH_AES_128_GCM_SHA256 (0xc02f)",
        "TLS_ECDHE_ECDSA_WITH_CHACHA20_POLY1305_SHA256 (0xcca9)",
        "TLS_ECDHE_RSA_WITH_CHACHA20_POLY1305_SHA256 (0xcca8)",
        "TLS_ECDHE_ECDSA_WITH_AES_256_GCM_SHA384 (0xc02c)",
        "TLS_ECDHE_RSA_WITH_AES_256_GCM_SHA384 (0xc030)",
        "TLS_ECDHE_ECDSA_WITH_AES_256_CBC_SHA (0xc00a)",
        "TLS_ECDHE_ECDSA_WITH_AES_128_CBC_SHA (0xc009)",
        "TLS_ECDHE_RSA_WITH_AES_128_CBC_SHA (0xc013)",
        "TLS_ECDHE_RSA_WITH_AES_256_CBC_SHA (0xc014)",
        "TLS_RSA_WITH_AES_128_GCM_SHA256 (0x9c)",
        "TLS_RSA_WITH_AES_256_GCM_SHA384 (0x9d)",
        "TLS_RSA_WITH_AES_128_CBC_SHA (0x2f)",
        "TLS_RSA_WITH_AES_256_CBC_SHA (0x35)"
      ],
      "extensions": [
        "server_name (0)",
        "extended_master_secret (23)",
        "renegotiation_info (65281)",
        "supported_groups (10)",
        "ec_point_formats (11)",
        "session_ticket (35)",
        "application_layer_protocol_negotiation (16)",
        "status_request (5)",
        "delegated_credential (34)",
        "signed_certificate_timestamp (18)",
        "key_share (51)",
        "supported_versions (43)",
        "signature_algorithms (13)",
        "psk_key_exchange_modes (45)",
        "record_size_limit (28)",
        "compress_certificate (27)",
        "encrypted_client_hello (65037)"
      ],
      "alpn": ["h2", "http/1.1"]
    }
  },
  {
    "tls_response": {
      "type": "Server hello (2)",
      "version": "TLS 1.2 (0x0303)",
      "session_id": "2670a6779b4346e5e84d46890ad2aaf7a53b08adcfe0c9f6868c2d9882242e39",
      "cipher_suite": "TLS_AES_128_GCM_SHA256 (0x1301)",
      "extensions": ["key_share (51)", "supported_versions (43)"],
      "supported_version": "TLS 1.3 (0x0304)"
    }
  }
]
```
그리고 curl을 이용한 HTTP 요청:```json
[
  {
    "connection": {
      "tproxy_mode": "redirect",
      "src_local": "127.0.0.1:8888",
      "src_remote": "192.168.0.107:45736",
      "dst_local": "127.0.0.1:37640",
      "dst_remote": "127.0.0.1:1080",
      "original_dst": "96.7.128.198:80"
    }
  },
  {
    "http_request": {
      "host": "example.com",
      "uri": "/",
      "method": "GET",
      "proto": "HTTP/1.1",
      "header": {
        "Accept": ["*/*"],
        "My": ["Header"],
        "User-Agent": ["curl/7.81.0"]
      }
    }
  },
  {
    "http_response": {
      "proto": "HTTP/1.1",
      "status": "200 OK",
      "content-length": 1256,
      "header": {
        "Cache-Control": ["max-age=2880"],
        "Connection": ["keep-alive"],
        "Content-Length": ["1256"],
        "Content-Type": ["text/html"],
        "Date": ["Tue, 17 Jun 2025 14:43:24 GMT"],
        "Etag": ["\"84238dfc8092e5d9c0dac8ef93371a07:1736799080.121134\""],
        "Last-Modified": ["Mon, 13 Jan 2025 20:11:20 GMT"]
      }
    }
  }
]
```
사용법은 일반 플래그와 함께 `-sniff` 플래그를 지정하는 것만큼 간단합니다.```shell
gohpts -d -T 8888 -M redirect -sniff -j
```
스니핑한 트래픽을 기록할 파일을 지정할 수도 있습니다:```shell
gohpts -sniff -snifflog ~/sniff.log -j
```
### 컬러 포맷

[[Back]](#table-of-contents)

위 그림에서 컬러 출력의 예를 볼 수 있습니다. 이 모드에서 `GoHPTS`는 TLS 핸드셰이크, HTTP 메타데이터, 로그인/비밀번호처럼 보이는 항목 또는 다양한 유형의 인증 및 비밀 토큰과 같은 중요한 정보를 강조 표시하려고 시도합니다. 출력은 JSON에 비해 제한적이지만 사람이 읽기에는 훨씬 쉽습니다.

이 모드에서 `GoHPTS`를 실행하려면 다음 플래그를 사용합니다:```shell
gohpts -sniff -body
```
스니핑을 투명 모드와 결합할 수 있습니다:```shell
./gohpts -T 8888 -M redirect -sniff -body
```
색상을 비활성화하려면 `-nocolor`를 추가하세요:```shell
gohpts -sniff -body -nocolor
```
## HTTP2 및 HTTP3 지원

[[Back]](#table-of-contents)

`GoHPTS` 프록시는 동일한 서버 주소와 TLS 인증서를 사용하여 HTTP/1.1, HTTP/2, HTTP/3 요청을 처리합니다. 이를 통해 클라이언트가 설정을 변경하지 않고도 사용 가능한 최적의 프로토콜을 자동으로 선택할 수 있습니다. TLS 인증서는 여러 방법으로 얻을 수 있습니다: 클라우드 제공업체(Google, AWS, Cloudflare), Let's Encrypt의 무료 인증서, 또는 `openssl`(Linux/macOS)이나 `New-SelfSignedCertificate`(Windows)를 사용하여 자체 서명 인증서를 생성할 수 있습니다.

### 자체 서명 인증서를 사용한 예제 설정

[[Back]](#table-of-contents)

- `key.pem` 및 `cert.pem` 파일 생성:  ```shell
  openssl req -x509 -newkey rsa:2048 \
  -keyout key.pem \
  -out cert.pem \
  -sha256 \
  -days 365 \
  -nodes \
  -subj "/C=XX/ST=StateName/L=CityName/O=CompanyName/OU=CompanySectionName/CN=127.0.0.1" \
  -addext "subjectAltName=IP:127.0.0.1"
  ```
- UDP ASSOCIATE 지원이 있는 socks5 서버 준비  ```shell
  git clone https://github.com/wzshiming/socks5.git && cd socks5
  go build -o socks5_server ./cmd/socks5/main.go
  ./socks5_server -a 0.0.0.0:1080
  ```
- 다른 터미널을 열고 `GoHPTS` 프록시를 설치하십시오:  ```shell
  go install github.com/shadowy-pycoder/go-http-proxy-to-socks/cmd/gohpts@latest
  ```
[설치](#installation) 섹션에 설명된 다른 방법을 사용할 수 있습니다.

- 마지막으로:
  1. 프록시에 대한 최소 구성 파일을 만드세요.  ```yaml
  # gohpts_config.yaml
  http_server:
    address: 127.0.0.1:8080
    cert_file: ./cert.pem
    key_file: ./key.pem

  proxy_list:
    - address: 127.0.0.1:1080

  logging:
    debug: true

  sniffing:
    enabled: true
    body: true
  ```
프록시 실행:  ```shell
  gohpts -f ./gohpts_config.yaml
  ```
2. 또는 명령줄 인수를 선호하는 경우:  ```shell
  gohpts -l :8080 -s 1080 -c ./cert.pem -k ./key.pem -d -sniff -body
  ```
다음과 같은 내용이 표시되어야 합니다:  ```shell
    [15:20:32] INF SOCKS5 Proxy: 127.0.0.1:1080
    [15:20:32] INF HTTPS Proxy: 127.0.0.1:8080
    [15:20:32] INF HTTP3 Proxy (QUIC): 127.0.0.1:8080
  ```
### 연결 테스트

[[Back]](#table-of-contents)

- HTTP/2 프록시 서버의 경우 `curl`을 사용할 수 있습니다:  ```shell
    curl -Nvk --http2 --proxy-insecure --proxy-http2 --proxy https://localhost:8080 "https://stream.wikimedia.org/v2/stream/recentchange"
  ```
`Ctrl+C`를 눌러 스트리밍을 중지하세요.

- HTTP/3의 경우 (글을 쓰는 시점에서) `curl`이 HTTP3 프록시를 지원하지 않기 때문에 다릅니다. 그래서 테스트 목적으로 제가 만든 맞춤 클라이언트를 사용하겠습니다.

  [간단한 HTTP3 to SOCKS5 프록시 예제](https://github.com/shadowy-pycoder/http3-socks-proxy)를 다운로드하여 설치하세요:  ```shell
  git clone https://github.com/shadowy-pycoder/http3-socks-proxy.git && cd http3-socks-proxy
  make
  ```
다음 명령을 실행하세요:  ```shell
  ./bin/client -a 127.0.0.1:8080 www.google.com
  ```
HTML 페이지처럼 보이는 알 수 없는 텍스트가 표시됩니다.

  `GoHPTS` 프록시가 있는 터미널 탭으로 이동하여 로그를 확인하면 모든 요청이 표시됩니다.

### 브라우저에서 연결 테스트

[[Back]](#table-of-contents)

- 브라우저용 올바른 자체 서명 인증서를 생성합니다:  ```shell
  git clone https://github.com/shadowy-pycoder/go-http-proxy-to-socks.git
  cd go-http-proxy-to-socks
  cp ./resources/makecert.sh makecert.sh && chmod +x makecert.sh
  ./makecert.sh
  ```
더 많은 정보는 여기에서 확인할 수 있습니다: [브라우저에서 신뢰할 수 있는 자체 서명 SSL 인증서 만들기](https://medium.com/@tbusser/creating-a-browser-trusted-self-signed-ssl-certificate-2709ce43fd15)

- 새로 생성된 `rootCA.crt`를 시스템 신뢰 저장소에 추가합니다:
  1. Debian/Ubuntu:  ```shell
  sudo cp rootCA.crt /usr/local/share/ca-certificates/rootCA.crt
  sudo update-ca-certificates
  ```
2. Arch Linux/CachyOS/EndeavourOS:  ```shell
  sudo trust anchor rootCA.crt
  ```
- 프록시를 실행하려면 `server.crt`와 `server.key`를 사용하세요:  ```shell
  gohpts -l :8080 -s 1080 -c ./server.crt -k ./server.key -d -sniff -body
  ```
- 브라우저를 실행하고 아무 웹사이트로 이동하세요:  ```shell
  chromium --proxy-server="https://127.0.0.1:8080"
  ```
## IPv4 및 IPv6 지원

[[뒤로]](#table-of-contents)

네트워크 계층 처리 측면에서, `GoHPTS`는 `듀얼 스택`, `IPv4 전용`, `IPv6 전용`의 세 가지 모드로 작동할 수 있습니다. 사용자는 `-4` 및 `-6` 플래그를 지정하여 모드를 제어할 수 있습니다. 플래그 중 하나가 설정되면 프록시는 해당 모드로 시작되며, 두 플래그가 모두 있거나 모두 생략되면 `듀얼 스택`으로 간주됩니다. "전용" 모드에서는 특정 버전의 IP 주소만 허용되며, 모든 도메인은 (가능한 경우) 특정 IP 버전으로 확인되고, 모든 수신 주소는 동일한 버전을 사용해야 합니다.

`IPv4 전용` 모드를 활성화하려면 `-4` 플래그를 추가하기만 하면 됩니다:```shell
sudo ./gohpts -sniff -body -d -4
```
IPv4 모드에서 프록시를 테스트하려면 모든 Linux VM을 사용할 수 있습니다:

1. 가상 머신에서:```shell
# add your host machine as gateway for VM
export GATEWAY="<host IPv4 address>"
ip route add 0.0.0.0/1 via "$GATEWAY"
ip route add 128.0.0.0/1 via "$GATEWAY"
```
2. 호스트에서:```shell
# run proxy on your host
sudo ./gohpts -T 8888 -Tu 8889 -M tproxy -sniff -body -auto -d -4
```
3. 가상 머신에서 아무 웹사이트에 접속하고 프록시 로그에서 트래픽을 확인하세요

`IPv6-only` 모드를 활성화하려면 `-6` 플래그를 추가하면 됩니다. 예를 들어 투명 프록시를 사용할 때:```shell
sudo ./gohpts -T 8888 -M redirect -sniff -body -auto -mark 100 -d -6
```
이것이 작동하려면, 귀하의 ISP와 원격 socks5 프록시가 활성 IPv6 지원을 해야 합니다. [https://test-ipv6.com/](https://test-ipv6.com/)을 방문하여 IPv6 주소에 접근할 수 있는지 확인할 수 있습니다. IPv6 모드에서 프록시를 테스트하려면 모든 Linux VM을 사용할 수 있습니다:
1. 가상 머신에서:```shell
# add your host machine as gateway IPv6 for VM
export GATEWAY6="<host IPv6 address>"
ip -6 route add ::/1 via "$GATEWAY6" dev eth0
ip -6 route add 8000::/1 via "$GATEWAY6" dev eth0
```
2. 호스트에서:```shell
# run proxy on your host
sudo ./gohpts -T 8888 -Tu 8889 -M tproxy -sniff -body -auto -d -6
```
3. 가상 머신에서 아무 웹사이트에 방문하여 프록시 로그에서 트래픽을 확인하세요.

## ARP 스푸핑

[[뒤로]](#table-of-contents)

`GoHPTS`에는 내장 ARP 스푸퍼가 있어 LAN에 있는 모든 TCP 통신 장치가 프록시 서버를 사용하여 인터넷에 연결하도록 할 수 있습니다.
이는 `-arpspoof` 플래그를 세미콜론으로 구분된 여러 매개변수와 함께 추가하여 수행합니다.

예시:```shell
ssh remote -D 1080 -Nf
sudo env PATH=$PATH gohpts -d -T 8888 -M tproxy -sniff -body -auto -mark 100 -arpspoof "targets 192.168.10.0/24;fullduplex true;debug true"
```
프록시는 서브넷 `192.168.10.0/24`의 장치를 스캔하고 ARP 패킷을 보내 게이트웨이인 것처럼 가장합니다. `fullduplex`가 true이면 프록시는 게이트웨이에도 ARP 패킷을 보내서 우리 프록시가 서브넷의 각 IP를 가지고 있다고 믿게 만듭니다.

프록시가 `Ctrl+C`로 중지되면 자동으로 모든 대상의 스푸핑을 해제합니다.

`GoHPTS`는 [Bettercap](https://github.com/bettercap/bettercap)과 같은 도구와 함께 사용하여 ARP 스푸핑된 트래픽을 프록시할 수도 있습니다.

프록시 실행:```shell
ssh remote -D 1080 -Nf
sudo env PATH=$PATH gohpts -d -T 8888 -M tproxy -sniff -body -auto -mark 100
```
`bettercap`을(를) 이 명령어로 실행하세요 (참조: [문서](https://www.bettercap.org/)):```shell
sudo bettercap -eval "net.probe on;net.recon on;set arp.spoof.fullduplex true;arp.spoof on"
```
프록시 로그에서 LAN의 다른 장치로부터 오는 트래픽을 확인하세요

arpspoof 옵션에 대한 자세한 내용은 `gohpts -h` 및 [https://github.com/shadowy-pycoder/arpspoof](https://github.com/shadowy-pycoder/arpspoof)를 참조하세요

## NDP 스푸핑

[[돌아가기]](#table-of-contents)

`GoHPTS`는 Router Advertisement(RA) 및 Neighbor Advertisement(NA) 패킷을 사용하여 IPv6 네트워크에서 NDP 스푸핑을 수행하는 기능을 내장하고 있습니다. 또한 RA 패킷에 RDNSS 옵션을 포함시켜 영향을 받는 클라이언트의 IPv6 네임서버로 호스트를 설정합니다. 투명 프록시 모드(TCP/UDP)와 결합하면 NDP 스푸핑을 통해 `gohpts`가 로컬 네트워크의 클라이언트 트래픽을 프록시할 수 있습니다. [ARP 스푸핑](#arp-spoofing)의 경우와 마찬가지로 단일 `-ndpspoof` 플래그로 ndp 스푸프 옵션을 설정할 수 있습니다:

예시:```shell
sudo env PATH=$PATH gohpts -d -T 8888 -M tproxy -sniff -body -auto -mark 100 -ndpspoof "ra true;na true;targets fe80::3a1c:7bff:fe22:91a4;fullduplex false;debug true"
```
`ndpspoof`의 옵션에 대한 자세한 내용은 `gohpts -h` 및 [https://github.com/shadowy-pycoder/ndpspoof](https://github.com/shadowy-pycoder/ndpspoof)를 참조하십시오.

`rdnss`, `gateway`, `interface`와 같은 일부 옵션은 프록시로 제대로 작동하기 위해 `gohpts` 자체에 의해 자동으로 설정됩니다.

`gohpts`는 모든 연결을 업스트림 SOCKS5 서버를 통해 프록시 처리하므로, IPv4/IPv6 및 TCP/UDP를 지원하는 작동 중인 서버가 있어야 합니다. 당연히 원격 머신(예: VPS)도 IPv6 연결이 작동해야 합니다. 말할 필요도 없이, `gohpts`가 실행되는 머신은 IPv6를 지원하는 네트워크의 일부여야 합니다.

NDP 스푸핑이 올바르게 작동하기 위한 예제 설정:

1. VPS에 연결```shell
ssh [email protected]
```
2. 의존성 설치```shell
GO_VERSION=$(curl 'https://go.dev/VERSION?m=text' | head -n1)
cd ~/Downloads/ && wget https://go.dev/dl/$GO_VERSION.linux-amd64.tar.gz
sudo rm -rf /usr/local/go && sudo tar -C /usr/local -xzf $GO_VERSION.linux-amd64.tar.gz
```
3. SOCKS5 서버 설정 (방화벽 규칙이 사용 중인 포트를 차단하지 않는지 확인하십시오)```shell
git clone https://github.com/wzshiming/socks5.git && cd socks5
go build -o ./bin/socks5_server ./cmd/socks5/*.go
./bin/socks5_server -a :3000
```
4. 호스트 머신으로 돌아가서 `gohpts`를 설치하세요 ([Installation](#installation) 참조)

5. `gohtps` 실행:```shell
gohpts -s 203.0.113.10:3000 -T 8888 -Tu 8889 -M tproxy -sniff -body -auto -mark 100 -arpspoof "fullduplex true;debug true" -ndpspoof "ra true;debug true" -4 -6 -d
```
6. 다른 기기(휴대폰, 태블릿 등)를 가져와 동일한 네트워크에 연결하세요. 인터넷에 접속해 호스트 머신에 트래픽이 나타나는지 확인하세요. 온라인 도구를 사용해 공인 IP 주소를 확인하세요(이 경우 VPS 주소 `203.0.113.10` 또는 전역 IPv6 주소와 일치해야 함)

7. Ctrl+C를 눌러 프록시를 중지하세요

8. 성공!

## DNS 스푸핑

[[Back]](#table-of-contents)

DNS 레코드를 변경하여 DNS 필터를 적용하고 대상을 스푸핑하려면 `GoHPTS`를 실행하는 호스트가 LAN 기기의 기본 게이트웨이가 되어야 합니다. 이를 위해 UDP가 활성화된 투명 프록시를 실행하고 ARP/NDP 스푸핑을 함께 실행하여 대상이 사용자의 DNS 서버를 사용하게 만드세요.

`GoHPTS`가 생성한 DNS 응답은 라우터나 신뢰할 수 있는 DNS 서버(Google, Cloudflare)에서 오는 일반 패킷처럼 보이므로 클라이언트는 사용자가 지정한 내용으로 캐시를 업데이트합니다. 단, 이는 "표준" 암호화되지 않은 DNS 트래픽에만 작동하며(`DOT`/`DOH`는 필터링되거나 스푸핑되지 않음) 명심하세요.

DNS 필터와 스푸핑할 도메인은 yaml 파일 구성의 `dns_filter` 섹션에서 설정할 수 있습니다. 모든 목록은 URL, 파일 경로 및 일반적으로 hosts 파일에서 찾을 수 있는 항목과 유사한 항목을 허용합니다. [https://en.wikipedia.org/wiki/Hosts\_(file)](https://github.com/shadowy-pycoder/go-http-proxy-to-socks/blob/HEAD/%3Chttps:/en.wikipedia.org/wiki/Hosts_(file)>)을 참조하세요.

예시:```yaml
# dns filters require udp transparent proxy and arpspoof/ndpspoof
# filters accept hosts like entries (use either links, file paths or just plain comma separated lists
dns_filter:
  enabled: true
  whitelist: ["/tmp/whitelisted_domains.txt", "example.com", "*.google.com"] # ip is optional, domains can start with *. to match all subdomains
  blacklist:
    ["https://raw.githubusercontent.com/StevenBlack/hosts/master/hosts"]
  blacklist_all: false # block all non whitelisted domains
  spooflist: ["127.0.0.1 example.com"] # ip address is required here
```
사용 사례:

- 모든 LAN 장치를 위한 광고 및 추적기 차단
- 특정 웹사이트 카테고리 차단을 통한 자녀 보호
- 알려진 피싱 및 악성 도메인 차단
- 분석을 위한 트래픽 리디렉션
- 리디렉션을 통한 자격 증명 수집
- 트래픽 하이재킹 및 조작 (광고, 스크립트, 추적 삽입)
- 감시 및 프로파일링

이 설정을 위한 최소 구성:```yaml
# gohpts_dns_spoof.yaml
proxy_list:
  - address: 127.0.0.1:1080 # point to socks5 server supporting TCP/UDP

sniffing:
  enabled: true
  body: true

transparent_proxy:
  tcp:
    enabled: true
    address: 0.0.0.0:8888
  udp:
    enabled: true
    address: 0.0.0.0:8889
  mode: "tproxy"
  auto: true

arpspoof:
  enabled: true
  settings: "fullduplex 1;debug 1;interval 1s"

dns_filter:
  enabled: true
  whitelist: []
  blacklist: [
      "https://raw.githubusercontent.com/StevenBlack/hosts/master/hosts",
    ] # list of domains to filter
  blacklist_all: true
  # all requests for example.com will be redirected to 0.0.0.0 address
  spooflist: ["0.0.0.0 example.com"]
```
실행:```shell
sudo ./gohpts -f ./gohpts_dns_spoof.yaml
```
더 많은 정보는 여기에서 찾을 수 있습니다: [https://en.wikipedia.org/wiki/DNS_spoofing](https://en.wikipedia.org/wiki/DNS_spoofing)

## 패킷 캡처

[[뒤로]](#table-of-contents)

트래픽은 pcap, pcapng 또는 사용자 정의 txt 형식으로 캡처한 후 Wireshark, tcpdump 등 다양한 도구를 사용하여 분석할 수 있습니다.

먼저, `GoHPTS` 실행 파일이 원시 패킷을 캡처할 수 있도록 상승된 권한을 가지고 있는지 확인하세요. 두 가지 옵션이 있습니다:

- 프록시에 원시 트래픽 액세스 권한을 부여하려면 `sudo setcap cap_net_raw+ep ~/go/bin/gohpts`를 한 번 실행하세요.
- CLI에서 `-pcap` 플래그를 지정하거나 파일 구성에서 `pcap.enabled`를 지정해야 할 때 `sudo`로 프록시를 실행하세요.

CLI를 사용하여 프록시 구성:```shell
gohpts -pcap "promisc true;timeout 10s;exts txt,pcap,pcapng"
```
설정 파일:```yaml
pcap:
  enabled: true
  settings: "promisc true;expr ip proto tcp;snaplen 65535;timeout 10s;packet_count 100;packet_buffer 8192;exts txt,pcap,pcapng"
```
These commands produce three packet capture files with corresponding formats that later can be analyzed by various tools.

For more information about pcap options see `gohpts -h` and [https://github.com/shadowy-pycoder/mshark](https://github.com/shadowy-pycoder/mshark)

## 네트워크 네임스페이스

[[뒤로]](#table-of-contents)

기본적으로 `GoHPTS` 프록시는 단일 네트워크 네임스페이스 내에서 실행되지만, 이는 재정의될 수 있습니다. `GoHPTS`에 의해 생성된 리스닝 소켓(예: HTTP 서버 또는 투명 프록시 서버)과 아웃바운드 소켓(소크스 프록시 또는 직접 다이얼러)은 Linux/Android [network_namespaces (7)](https://man7.org/linux/man-pages/man7/network_namespaces.7.html)로 격리될 수 있습니다. 프록시 프로세스를 시작할 때 사용자는 소켓을 생성할 격리된 환경을 제어하기 위해 `-in-netns`(리스너) 및 `-out-netns`(다이얼러) 플래그를 네트워크 네임스페이스의 이름 또는 경로와 함께 지정할 수 있습니다. 현재(기본) 네임스페이스에서 리스너 또는 다이얼러를 생성하려면 해당 플래그를 생략하면 됩니다. 호스트 네임스페이스를 명시적으로 지정하려면 `/proc/1/ns/net` 경로를 사용할 수 있습니다. 이를 통해 프록시가 시스템 네임서버를 올바르게 식별할 수 있습니다.

`GoHPTS`는 `/etc/netns/NAME/` 디렉토리에 위치한 파일을 통해 네트워크 구성을 제공하는 [ip-netns (8)](https://man7.org/linux/man-pages/man8/ip-netns.8.html) 규칙을 지원합니다. 따라서 `ns1` 네트워크 네임스페이스에 대한 사용자 정의 네임서버를 지정하려면 다음과 같이 합니다:```shell
sudo mkdir -p /etc/netns/ns1
sudo tee /etc/netns/ns1/resolv.conf << EOF
nameserver 8.8.8.8
nameserver 2001:4860:4860:0:0:0:0:8888
EOF
```
구성 파일이 발견되지 않으면, Google DNS 서버가 도메인 이름을 확인하는 데 사용됩니다.

시스템에 [systemd-resolved.service (8)](https://man7.org/linux/man-pages/man8/systemd-resolved.service.8.html)가 활성화되어 있다면, 사용자 정의 네트워크 네임스페이스를 통해 쿼리를 수행할 때 일시적으로 비활성화하는 것이 좋습니다:```shell
sudo ip netns exec ns1 unshare --mount bash -c '
    mount --bind /dev/null /run/systemd/resolve/io.systemd.Resolve
    curl -Nvk https://example.com'
```
또는 특정 쉘 인스턴스에 대해 지속적으로 만들려면:```shell
sudo ip netns exec ns1 unshare --mount bash -c '
    mount --bind /dev/null /run/systemd/resolve/io.systemd.Resolve
    exec bash --login'
```
### 플레이그라운드 설정

[[뒤로]](#table-of-contents)

- UDP ASSOCIATE 지원 socks5 서버 실행  ```shell
  git clone https://github.com/wzshiming/socks5.git && cd socks5
  go build -o socks5_server ./cmd/socks5/main.go
  ./socks5_server -a 0.0.0.0:1080
  ```
- [Simple HTTP3 to SOCKS5 proxy example](https://github.com/shadowy-pycoder/http3-socks-proxy)를 다운로드하고 설치하세요:  ```shell
  git clone https://github.com/shadowy-pycoder/http3-socks-proxy.git
  cd http3-socks-proxy
  make
  ```
- 리포지토리를 클론하고 컴파일하세요  ```shell
  git clone https://github.com/shadowy-pycoder/go-http-proxy-to-socks.git
  cd go-http-proxy-to-socks
  make
  ```
- `key.pem` 및 `cert.pem` 파일을 생성하세요:  ```shell
  openssl req -x509 -newkey rsa:2048 \
  -keyout key.pem \
  -out cert.pem \
  -sha256 \
  -days 365 \
  -nodes \
  -subj "/C=XX/ST=StateName/L=CityName/O=CompanyName/OU=CompanySectionName/CN=127.0.0.1" \
  -addext "subjectAltName=IP:127.0.0.1"
  ```
- 네트워크 네임스페이스 `ns1`을(를) 생성하고 veth 네트워크를 구성합니다  ```shell
  sudo ip netns add ns1
  sudo ip link add dev veth0 type veth peer name veth1 netns ns1
  sudo ip addr add 10.0.0.1/24 dev veth0
  sudo ip -6 addr add fd12:3456:789a::1/64 dev veth0
  sudo ip link set dev veth0 up
  sudo ip netns exec ns1 ip addr add 10.0.0.2/24 dev veth1
  sudo ip netns exec ns1 ip -6 addr add fd12:3456:789a::2/64 dev veth1
  sudo ip netns exec ns1 ip link set dev lo up
  sudo ip netns exec ns1 ip link set dev veth1 up
  ```
- `wlan0`의 IP 주소를 확인하여 로컬 SOCKS5에 연결할 수 있도록 합니다.  ```shell
  WLAN_IP=$(ip -4 -c=never route get 8.8.8.8 | awk '{print $7}' | tr -d '\n')
  ```
### 사용 예시

[[뒤로]](#table-of-contents)

1. **HTTP 프록시 - `ns1` 내 프록시 리스너 (기본 경로 없음, 인터넷 접속 불가), 호스트의 아웃바운드 소켓**

   프록시 실행:   ```shell
   sudo ./bin/gohpts -s 0.0.0.0:1080 -l :8083 -4 -6 -d -sniff -body -in-netns ns1
   ```
다음을 통해 요청을 보냅니다 `ns1`   ```shell
   sudo ip netns exec ns1 curl -Nv --proxy http://127.0.0.1:8083 https://example.com
   ```
요청이 성공해야 함

2. **HTTP2 프록시 - `ns1`의 프록시 리스너 (기본 경로 없음, 인터넷 액세스 없음), 호스트의 아웃바운드 소켓**

   프록시 실행:   ```shell
   sudo ./bin/gohpts -s 0.0.0.0:1080 -l :8083 -4 -6 -d -sniff -body -in-netns ns1 -c ./cert.pem -k ./key.pem
   ```
`ns1`을 통해 요청하세요   ```shell
   sudo ip netns exec ns1 curl -Nvk --http2 --proxy-insecure --proxy-http2 --proxy https://127.0.0.1:8083 https://example.com
   ```
요청이 성공해야 합니다

3. **HTTP3 프록시 - `ns1`의 프록시 리스너 (기본 경로 없음, 인터넷 접근 없음), 호스트의 아웃바운드 소켓**

   프록시 실행:   ```shell
   sudo ./bin/gohpts -s 0.0.0.0:1080 -l :8083 -4 -6 -d -sniff -body -in-netns ns1 -c ./cert.pem -k ./key.pem
   ```
`ns1`를 통해 요청하세요   ```shell
   sudo ip netns exec ns1 ./http3-socks-proxy/bin/client -a 127.0.0.1:8083 www.google.com
   ```
요청이 성공해야 합니다

4. **리디렉션 투명 프록시 (`-M redirect`) - `ns1`의 프록시 리스너 (기본 경로, 인터넷 접근 불가), 호스트의 아웃바운드 소켓**

   프록시 실행:   ```shell
   sudo ./bin/gohpts -s 0.0.0.0:1080 -l :8083 -4 -6 -d -sniff -body -in-netns ns1 -nohttp -M redirect -T :8888 -auto
   ```
`ns1`을 통해 요청하세요   ```shell
   sudo ip netns exec ns1 curl -Nv https://example.com
   ```
요청이 실패해야 함

   `ns1`에 기본 경로 추가   ```shell
   sudo ip netns exec ns1 ip route add default via 10.0.0.1
   sudo ip netns exec ns1 ip -6 route add default via fd12:3456:789a::1
   ```
다시 시도하세요   ```shell
   sudo ip netns exec ns1 curl -Nv https://example.com
   ```
이제 요청이 성공할 것입니다.

5. **HTTP 프록시 - 호스트의 프록시 리스너, `ns1`의 아웃바운드 소켓 (기본 경로, 인터넷 액세스)**

   `ns1`이 `wlan0`을 통해 인터넷에 연결할 수 있도록 NAT 규칙 추가   ```shell
   sudo iptables -t nat -A POSTROUTING -s 10.0.0.0/24 -o wlan0 -j MASQUERADE
   sudo ip6tables -t nat -A POSTROUTING -s fd12:3456:789a::/64 -o wlan0 -j MASQUERADE
   ```
프록시 실행:   ```
   sudo ./bin/gohpts -s :1080 -l :8083 -4 -6 -d -sniff -body -out-netns ns1 -i wlan0
   ```
호스트를 통해 요청 보내기   ```shell
   curl -Nv --proxy http://$WLAN_IP:8083 https://example.com
   ```
요청이 성공해야 합니다

6. **HTTP3 프록시 - 호스트의 프록시 리스너, `ns1` 내의 아웃바운드 소켓 (기본 라우트, 인터넷 접속)**

   프록시 실행:   ```
   sudo ./bin/gohpts -s :1080 -l :8083 -4 -6 -d -sniff -body -out-netns ns1 -i wlan0 -c ./cert.pem -k ./key.pem
   ```
호스트를 통해 요청하기   ```shell
   ./http3-socks-proxy/bin/client -a $WLAN_IP:8083 www.google.com
   ```
요청이 성공해야 합니다

7. **투명 프록시 리디렉션 - 호스트의 프록시 리스너, `ns1`의 아웃바운드 소켓 (기본 경로, 인터넷 액세스)**

   프록시 실행 (`-auto`는 제 로컬 socks5 서버에서 작동하지 않으므로 원격 서버를 사용합니다):   ```
   sudo ./bin/gohpts -s <remote> -4 -6 -d -sniff -body -out-netns ns1 -nohttp -M redirect -T :8888 -auto
   ```
호스트를 통해 요청   ```shell
   curl -Nv https://example.com
   ```
요청이 성공해야 합니다

8. **HTTP 프록시 - LAN (`ns2` (프록시 리스너), `ns3`, `ns4`), `ns1`의 아웃바운드 소켓 (기본 경로, 인터넷 접근)**

   LAN 생성   ```shell
   sudo ip link add br0 type bridge
   sudo ip addr add 10.0.1.1/24 dev br0
   sudo ip -6 addr add fd12:3456:789b::1/64 dev br0
   sudo ip link set br0 up

   sudo ip netns add ns2
   sudo ip link add veth2 type veth peer name veth3 netns ns2
   sudo ip link set veth2 master br0
   sudo ip link set veth2 up
   sudo ip netns exec ns2 ip addr add 10.0.1.2/24 dev veth3
   sudo ip netns exec ns2 ip -6 addr add fd12:3456:789b::2/64 dev veth3
   sudo ip netns exec ns2 ip link set lo up
   sudo ip netns exec ns2 ip link set veth3 up
   sudo ip netns exec ns2 ip route add default via 10.0.1.1
   sudo ip netns exec ns2 ip -6 route add default via fd12:3456:789b::1

   sudo ip netns add ns3
   sudo ip link add veth4 type veth peer name veth5 netns ns3
   sudo ip link set veth4 master br0
   sudo ip link set veth4 up
   sudo ip netns exec ns3 ip addr add 10.0.1.3/24 dev veth5
   sudo ip netns exec ns3 ip -6 addr add fd12:3456:789b::3/64 dev veth5
   sudo ip netns exec ns3 ip link set lo up
   sudo ip netns exec ns3 ip link set veth5 up
   sudo ip netns exec ns3 ip route add default via 10.0.1.1
   sudo ip netns exec ns3 ip -6 route add default via fd12:3456:789b::1

   sudo ip netns add ns4
   sudo ip link add veth6 type veth peer name veth7 netns ns4
   sudo ip link set veth6 master br0
   sudo ip link set veth6 up
   sudo ip netns exec ns4 ip addr add 10.0.1.4/24 dev veth7
   sudo ip netns exec ns4 ip -6 addr add fd12:3456:789b::4/64 dev veth7
   sudo ip netns exec ns4 ip link set lo up
   sudo ip netns exec ns4 ip link set veth7 up
   sudo ip netns exec ns4 ip route add default via 10.0.1.1
   sudo ip netns exec ns4 ip -6 route add default via fd12:3456:789b::1
   ```
프록시 실행:   ```
   sudo ./bin/gohpts -s $WLAN_IP:1080 -l 0.0.0.0:8083 -4 -6 -d -sniff -body -in-netns ns2 -out-netns ns1
   ```
요청하기   ```shell
   curl -Nv --proxy http://10.0.1.2:8083 http://example.com
   sudo ip netns exec ns2 curl -Nv --proxy http://10.0.1.2:8083 https://example.com
   sudo ip netns exec ns3 curl -Nv --proxy http://10.0.1.2:8083 https://example.com
   sudo ip netns exec ns4 curl -Nv --proxy http://10.0.1.2:8083 https://example.com
   ```
모든 요청이 성공해야 합니다

9. **HTTP3 프록시 - LAN (`ns2` (프록시 리스너), `ns3`, `ns4`), 아웃바운드 소켓은 `ns1` (기본 경로, 인터넷 액세스)**

   프록시 실행:   ```
   sudo ./bin/gohpts -s $WLAN_IP:1080 -l 0.0.0.0:8083 -4 -6 -d -sniff -body -in-netns ns2 -out-netns ns1 -c ./cert.pem -k ./key.pem
   ```
요청하기   ```shell
   ./http3-socks-proxy/bin/client -a 10.0.1.2:8083 www.google.com
   sudo ip netns exec ns2 ./http3-socks-proxy/bin/client -a 10.0.1.2:8083 www.google.com
   sudo ip netns exec ns3 ./http3-socks-proxy/bin/client -a 10.0.1.2:8083 www.google.com
   sudo ip netns exec ns4 ./http3-socks-proxy/bin/client -a 10.0.1.2:8083 www.google.com
   ```
모든 요청이 성공해야 합니다.

10. **투명 프록시 리다이렉트 - LAN (`ns2` (프록시 리스너), `ns3`, `ns4`), `ns1`의 아웃바운드 소켓 (기본 경로, 인터넷 액세스)**

    프록시 실행:

    ```shell
    sudo ./bin/gohpts -s $WLAN_IP:1080 -4 -6 -d -sniff -body -in-netns ns2 -out-netns ns1 -nohttp -M redirect -T :8888 -auto
    ```

    요청 보내기:

    ```shell
    sudo ip netns exec ns2 curl -Nv https://example.com
    ```

    `ns3` 및 `ns4`의 요청은 실패합니다.

11. **`IP_TRANSPARENT` (arp/ndp 스푸핑 활성화)를 사용한 투명 프록시 - LAN (`ns2` (프록시 리스너), `ns3`, `ns4`), `ns1`의 아웃바운드 소켓 (기본 경로, 인터넷 액세스)**

    프록시 실행:

    ```shell
    sudo ./bin/gohpts -s $WLAN_IP:1080 -4 -6 -d -sniff -body -in-netns ns2 -out-netns ns1 -nohttp -M tproxy -T :8888 -auto -arpspoof "fullduplex 1;debug 1;interval 1s" -ndpspoof "ra true;interval 10s;debug 1"
    ```

    이제 `ns3` 및 `ns4`의 이전 요청이 작동해야 합니다.

    ```
    sudo ip netns exec ns3 curl -Nv https://example.com
    sudo ip netns exec ns4 curl -Nv https://example.com
    ```

12. **HTTP3 프록시 - `ns1`의 프록시 리스너, 호스트의 아웃바운드 소켓, `-nosocks` 플래그**

    프록시 실행:

    ```shell
    sudo ./bin/gohpts -l 0.0.0.0:8083 -4 -6 -d -sniff -body -in-netns ns1 -c ./cert.pem -k ./key.pem -nosocks
    ```

    요청 보내기:

    ```shell
    ./http3-socks-proxy/bin/client -a 10.0.0.2:8083 www.google.com
    ```

    요청이 성공해야 합니다.

13. **HTTP3 프록시 - 호스트의 프록시 리스너, `ns1`의 아웃바운드 소켓, `-nosocks` 플래그**

    프록시 실행:

    ```shell
    sudo ./bin/gohpts -l 0.0.0.0:8083 -4 -6 -d -sniff -body -out-netns ns1 -c ./cert.pem -k ./key.pem -nosocks
    ```

    요청 보내기:

    ```shell
    ./http3-socks-proxy/bin/client -a 127.0.0.1:8083 www.google.com
    ```

    요청이 실패해야 합니다.

    `FORWARD` 체인에 규칙 추가:

    ```shell
    sudo iptables -A FORWARD -i wlan0 -o veth0 -m conntrack --ctstate RELATED,ESTABLISHED -j ACCEPT
    sudo iptables -A FORWARD -i veth0 -o wlan0 -j ACCEPT

    sudo ip6tables -A FORWARD -i veth0 -j ACCEPT
    sudo ip6tables -A FORWARD -o veth0 -m conntrack --ctstate RELATED,ESTABLISHED -j ACCEPT
    ```

    요청 보내기:

    ```shell
    ./http3-socks-proxy/bin/client -a 127.0.0.1:8083 www.google.com
    ```

    요청이 성공해야 합니다.

## 혼합 서버

[[뒤로]](#table-of-contents)

`GoHPTS`는 HTTP 서버와 동일한 주소에서 SOCKS 연결을 수신하도록 구성할 수 있습니다. 추가 SOCKS 서버를 시작하려면 `-mixed` 플래그를 추가하기만 하면 됩니다. 이를 통해 `GoHPTS`는 `HTTP-to-SOCKS` 프록시뿐만 아니라 `SOCKS-to-SOCKS` 프록시로도 작동할 수 있습니다. 로컬 SOCKS5 서버는 `UDP ASSOCIATE` 명령을 지원하므로 기술적으로 사용자는 이 혼합 서버로 UDP 데이터그램을 보낼 수 있습니다.

프록시 실행:```shell
gohpts -s :1080 -l :8080 -mixed
```
연결 테스트:```shell
curl -Nv --proxy socks5://127.0.0.1:8080 "https://example.com"
```
또는 업스트림 SOCKS 프록시를 비활성화하고 `-nosocks`를 추가하여 직접 연결합니다:```shell
gohpts -l :8080 -mixed -nosocks
```
연결 테스트:```shell
curl -Nv --proxy socks5://127.0.0.1:8080 "https://example.com"
```
대신 SOCKS4 프로토콜을 사용하려면 `-socks4` 플래그를 추가하세요:```shell
# :1080 should be a socks4 server
gohpts -s :1080 -l :8080 -mixed -socks4
```
연결 테스트:```shell
curl -Nv --proxy socks4://127.0.0.1:8080 "https://example.com"
```
## 링크

[[Back]](#table-of-contents)

투명 프록시에 대해 더 알아보려면 다음 링크를 방문하세요:

- [Linux 커널의 투명 프록시 지원](https://docs.kernel.org/networking/tproxy.html)
- [Gost의 투명 프록시 튜토리얼](https://latest.gost.run/en/tutorials/redirect/)
- [간단한 tproxy 예제](https://github.com/FarFetchd/simple_tproxy_example)
- [Golang TProxy](https://github.com/KatelynHaworth/go-tproxy)
- [eBPF와 Go를 사용한 투명 프록시 구현](https://medium.com/all-things-ebpf/building-a-transparent-proxy-with-ebpf-50a012237e76)
- [https://github.com/heiher/hev-socks5-tproxy](https://github.com/heiher/hev-socks5-tproxy)

  `socks5` 프록시 (`UDP ASSOCIATE` 지원):

- [https://github.com/wzshiming/socks5](https://github.com/wzshiming/socks5)
- [https://github.com/things-go/go-socks5](https://github.com/things-go/go-socks5)
- [https://github.com/0990/socks5](https://github.com/0990/socks5)
- [https://github.com/dizda/fast-socks5](https://github.com/dizda/fast-socks5)
- [https://github.com/semigodking/redsocks](https://github.com/semigodking/redsocks)
- [https://github.com/ginuerzh/gost](https://github.com/ginuerzh/gost)

IPv4/IPv6 네트워크 보안:

- [https://caster0x00.com/legless/](https://caster0x00.com/legless/)
- [https://caster0x00.com/intercept/](https://caster0x00.com/intercept/)
- [https://www.prosec-networks.com/en/blog/ipv6-mitm/](https://www.prosec-networks.com/en/blog/ipv6-mitm/)

## 기여하기

[[Back]](#table-of-contents)

개발자이신가요?

- 리포지토리 포크하기
- 기능 브랜치 생성: `git switch -c my-new-feature`
- 변경 사항 커밋: `git commit -am 'Add some feature'`
- 브랜치에 푸시: `git push origin my-new-feature`
- 풀 리퀘스트 제출

## 라이선스

[[Back]](#table-of-contents)

GPLv3
도구 다운로드