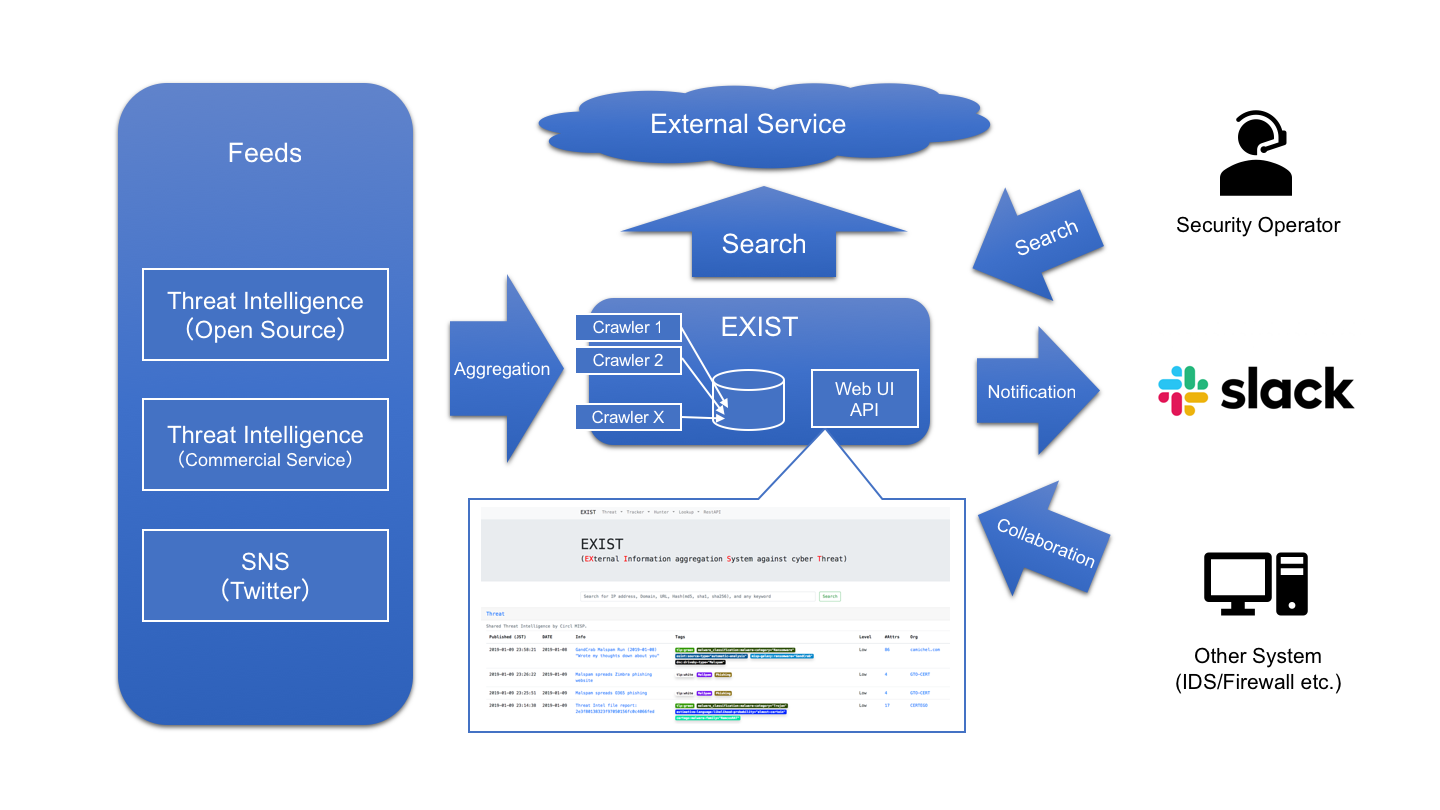

EXIST는 사이버 위협 인텔리전스를 집계·분석하는 웹 애플리케이션입니다.
⚠️ 이 저장소는 유지보수되지 않으며 보관되었습니다. 보안 문제는 수정되지 않습니다.
EXIST는 CTI(사이버 위협 인텔리전스)를 수집하고 분석하기 위한 웹 애플리케이션입니다.
EXIST는 다음 소프트웨어로 작성되었습니다.
EXIST는 보안 운영자가 관련 지표를 기반으로 사고를 조사할 수 있도록 CTI를 수집하는 웹 애플리케이션입니다.
EXIST는 여러 CTI 서비스와 Twitter의 API 및 피드를 통해 자동으로 데이터를 가져옵니다. 웹 인터페이스와 API를 통해 지표를 교차 검색할 수 있습니다.
클라이언트의 네트워크 동작을 기록하는 서버(예: DNS 및 HTTP 프록시 서버 로그 등)가 있다면 EXIST의 데이터와 상관 관계를 분석하여 로그를 분석할 수 있습니다. API를 사용하여 프로그램을 구현하면 자동화된 CTI 기반 보안 운영 센터를 실현할 수 있습니다.
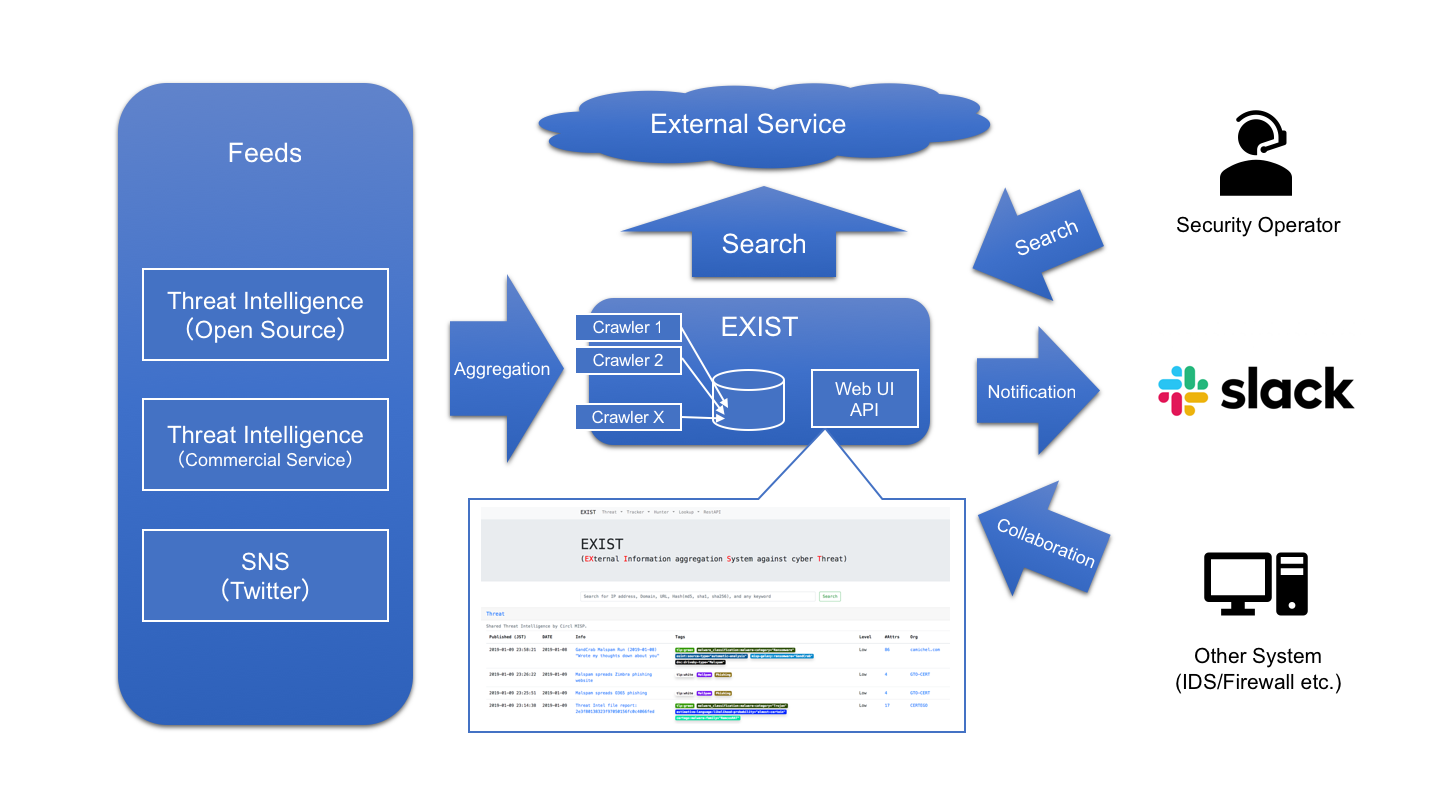
검색 양식에 도메인을 입력하기만 하면 됩니다.
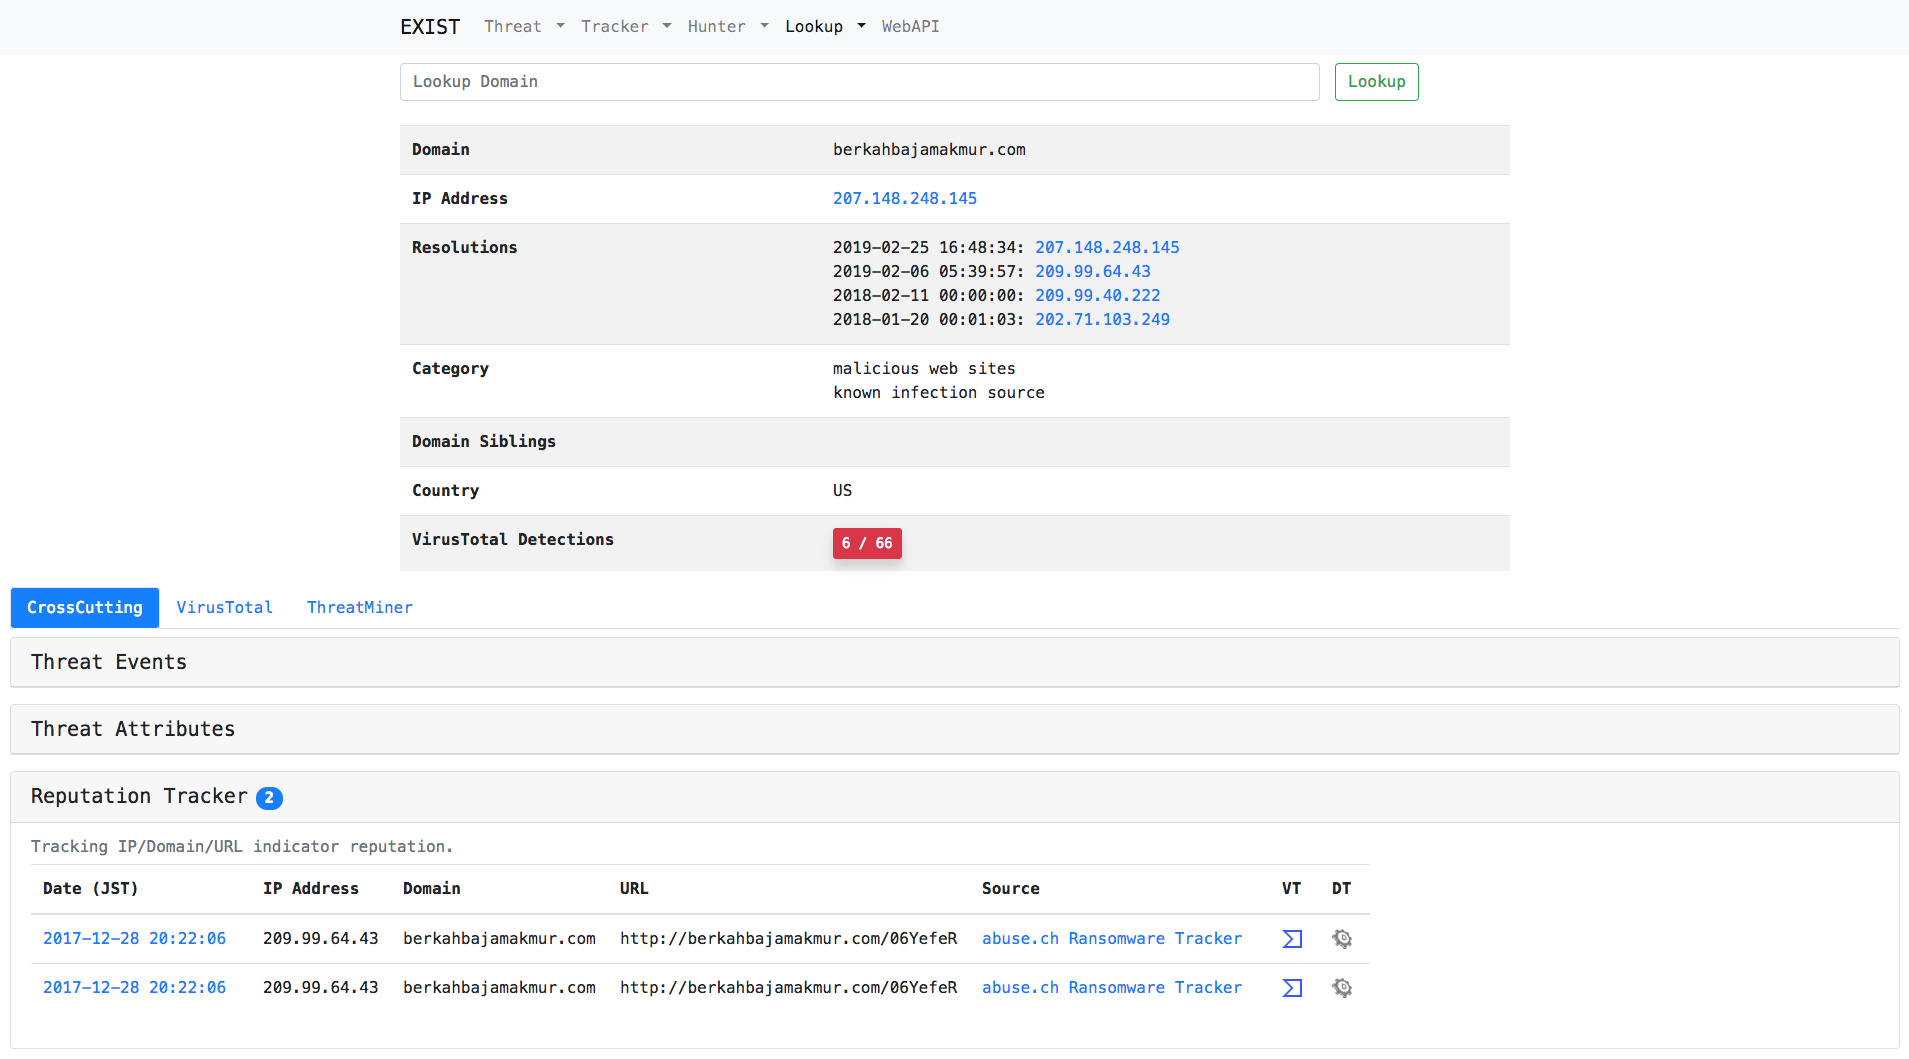
검색 양식에 URL을 입력하기만 하면 됩니다.
Threat Hunter 또는 Twitter Hunter에 키워드를 추가하기만 하면 됩니다.

Tracker는 여러 CTI 서비스의 데이터 피드를 자동으로 수집합니다.
Hunter를 사용하면 여러 CTI 서비스와 Twitter에서 데이터를 수집하기 위한 쿼리를 설정할 수 있습니다.
Lookup은 여러 인터넷 서비스(예: whois)에서 특정 정보(예: IP 주소, 도메인)와 관련된 정보를 검색합니다.
twitter tracker에서 트윗에 주석을 달기 위한 도구입니다.
EXIST 데이터베이스에 저장된 데이터를 Web API로 제공합니다.
그 후에는 CentOS 7 또는 Ubuntu 18.04 LTS 환경을 가정합니다. 다른 환경에 배포할 때는 직접 판단하십시오.
$ sudo pip install -r requirements.txt
$ curl -sS https://downloads.mariadb.com/MariaDB/mariadb_repo_setup | sudo bash
$ sudo yum install MariaDB-server MariaDB-client
$ sudo apt install mariadb-server mariadb-client
$ sudo systemctl start mariadb
$ sudo systemctl enable mariadb
.env 파일을 생성합니다. 그리고 DB 설정에 맞게 편집합니다.Django용 시크릿 키는 .env 파일에 작성해야 합니다.
먼저 키 생성기를 실행합니다:
$ python keygen.py
(예시)> 70mm6h)()h3r&*b9xq$e52=-7($p=5983gfoyz%$d-j-gd7u5@
그리고 시크릿 키를 .env 파일에 작성합니다:
...
# EXIST Application Settings
EXIST_SECRET_KEY="70mm6h)()h3r&*b9xq$e52=-7($p=5983gfoyz%$d-j-gd7u5@"
...
$ python manage.py makemigrations exploit reputation threat threat_hunter twitter twitter_hunter news news_hunter vuln
$ python manage.py migrate
Reputation Tracker는 Celery 캐시 서버 백엔드로 redis를 사용합니다.
$ sudo yum install redis
$ sudo systemctl start redis
$ sudo systemctl enable redis
$ sudo apt install redis-server
$ sudo systemctl start redis-server
$ sudo systemctl enable redis-server
Reputation Tracker는 비동기 작업 작업 큐로 Celery를 사용합니다.
# Name of nodes to start
# here we have a single node
CELERYD_NODES="w1"
# or we could have three nodes:
#CELERYD_NODES="w1 w2 w3"

# Absolute or relative path to the 'celery' command:
CELERY_BIN="/path/to/your/celery"

# App instance to use
# comment out this line if you don't use an app
CELERY_APP="intelligence"
# or fully qualified:
#CELERY_APP="proj.tasks:app"

# How to call manage.py
CELERYD_MULTI="multi"

# Extra command-line arguments to the worker
CELERYD_OPTS="--time-limit=300 --concurrency=8"

# - %n will be replaced with the first part of the nodename.
# - %I will be replaced with the current child process index
# and is important when using the prefork pool to avoid race conditions.
CELERYD_PID_FILE="/var/run/celery/%n.pid"
CELERYD_LOG_FILE="/var/log/celery/%n%I.log"
CELERYD_LOG_LEVEL="INFO"
/etc/systemd/system/celery.service에 Celery 서비스 관리 스크립트를 생성합니다. 또한 EnvironmentFile에 Celery 설정 경로를 설정해야 합니다.[Unit]
Description=Celery Service
After=network.target
[Service]
Type=forking
User=YOUR_USER
Group=YOUR_GROUP
EnvironmentFile=/etc/sysconfig/celery
WorkingDirectory=/path/to/your/exist
ExecStart=/bin/sh -c '${CELERY_BIN} multi start ${CELERYD_NODES} \
-A ${CELERY_APP} --pidfile=${CELERYD_PID_FILE} \
--logfile=${CELERYD_LOG_FILE} --loglevel=${CELERYD_LOG_LEVEL} ${CELERYD_OPTS}'
ExecStop=/bin/sh -c '${CELERY_BIN} multi stopwait ${CELERYD_NODES} \
--pidfile=${CELERYD_PID_FILE}'
ExecReload=/bin/sh -c '${CELERY_BIN} multi restart ${CELERYD_NODES} \
-A ${CELERY_APP} --pidfile=${CELERYD_PID_FILE} \
--logfile=${CELERYD_LOG_FILE} --loglevel=${CELERYD_LOG_LEVEL} ${CELERYD_OPTS}'
[Install]
WantedBy=multi-user.target
$ sudo mkdir /var/log/celery; sudo chown YOUR_USER:YOUR_GROUP /var/log/celery
$ sudo mkdir /var/run/celery; sudo chown YOUR_USER:YOUR_GROUP /var/run/celery
#Type  Path               Mode  UID        GID         Age  Argument
d      /var/run/celery    0755  YOUR_USER  YOUR_GROUP  -
$ sudo systemctl start celery.service
$ sudo systemctl enable celery.service
$ python manage.py runserver 0.0.0.0:8000
참고: 프로덕션 환경에서 실행할 때는 Nginx와 uWSGI를 사용하는 것을 권장합니다.
데이터베이스에 피드를 삽입하는 스크립트는 scripts/insert2db/*/insert2db.py입니다.
$ python scripts/insert2db/reputation/insert2db.py
$ python scripts/insert2db/twitter/insert2db.py
$ python scripts/insert2db/exploit/insert2db.py
$ python scripts/insert2db/threat/insert2db.py
$ python scripts/insert2db/news/insert2db.py
$ python scripts/insert2db/vuln/insert2db.py
참고: 정보 수집을 자동화하려면 cron에 작성하세요.
Twitter Hunter는 특정 키워드와 사용자 ID가 포함된 트윗을 감지할 수 있습니다. 필요한 경우 Slack에 알릴 수도 있습니다.
Threat Hunter는 특정 키워드가 포함된 위협 이벤트를 감지할 수 있습니다. 필요한 경우 Slack에 알릴 수도 있습니다.

