
 0xballpoint/load
Lord Of Active Directory - Active Directory vulnerabile automatica su AWS


Basato su AWS-Redteam-Lab e OCD GOAD
Il prezzo per eseguire il lab per 125 ore in un mese è di circa 14$. Con il Free Tier ottieni 750 ore di EC2 al mese, ci sono 6 macchine, quindi 125 ore. Ma ottieni solo 30 GB di storage. Quindi ti serve storage per le altre 5 VM: 30 GB * 5 = 150 GB = 14$ / mese
Proprio come il progetto GOAD, l'installazione è in due parti:
Finora il lab è stato testato solo su una macchina linux, ma dovrebbe funzionare anche su macOS. Ansible ha alcuni problemi con host Windows, quindi non ne so nulla.
Per far funzionare correttamente il setup devi installare:
Se vuoi eseguire il provisioning da un container docker, puoi lanciare il seguente comando per preparare il container
sudo docker build -t loadansible .
Se vuoi eseguire ansible dal tuo host, dovresti lanciare i seguenti comandi:
sudo apt install git
git clone [email protected]:0xBallpoint/LOAD.git
cd LOAD/ansible
sudo apt install python3.8-venv
python3.8 -m virtualenv .venv
source .venv/bin/activate
ansible e pywinrm nel .venv
python3 -m pip install --upgrade pip
python3 -m pip install ansible-core==2.12.6
python3 -m pip install pywinrm
ansible-galaxy install -r requirements.yml
Devi installare Terraform seguendo la loro guida sul sito hashicorp.com
Se vuoi installare Terraform manualmente su Linux:
sudo apt-get update && sudo apt-get install -y gnupg software-properties-common

# Install the HasiCorp GPG key
wget -O- https://apt.releases.hashicorp.com/gpg | \
    gpg --dearmor | \
    sudo tee /usr/share/keyrings/hashicorp-archive-keyring.gpg

# Verify the key's fingerprint
gpg --no-default-keyring \
    --keyring /usr/share/keyrings/hashicorp-archive-keyring.gpg \
    --fingerprint
# It must match E8A0 32E0 94D8 EB4E A189 D270 DA41 8C88 A321 9F7B (from https://www.hashicorp.com/security)

# Add the official HashiCorp repository to your system
echo "deb [signed-by=/usr/share/keyrings/hashicorp-archive-keyring.gpg] \
    https://apt.releases.hashicorp.com $(lsb_release -cs) main" | \
    sudo tee /etc/apt/sources.list.d/hashicorp.list

# Update, install, verify
sudo apt update
sudo apt install terraform
terraform -help
Avrai bisogno della AWS CLI per configurare le tue chiavi di accesso su AWS. Dovresti seguire la guida all'installazione sul loro sito docs.aws.amazon.com
Per Linux:
curl "https://awscli.amazonaws.com/awscli-exe-linux-x86_64.zip" -o "awscliv2.zip"
unzip awscliv2.zip
sudo ./aws/install
Il dominio predefinito sarà middle-earth.local, sulla subnet 10.0.1.0/24 e a ogni macchina sono state allocate solo 1 CPU e 1024 MB di memoria (t2.micro). Se vuoi modificare alcune di queste impostazioni di prestazioni, puoi modificare il file: terraform/ami-instance.tf
Per avere il lab attivo e funzionante, questi sono i comandi che devi eseguire:
pwd
/opt/LOAD  # place yourself in the LOAD folder (where you cloned the project)
cd terraform # start with AWS configuration
I passaggi successivi mostrano come configurare le tue VM su AWS:
Copia var.tf.example in var.tf e modifica i valori:
Nella tua console AWS, dovresti creare un utente terraform e ottenere le tue chiavi AWS:
terraformAccess key - Programmatic accessAccess key ID e Secret access keyAggiungi le chiavi sulla tua macchina con la AWS CLI:
aws configure --profile terraform
    AWS Access Key ID [None]: <access_key_id>
    AWS Secret Access Key [None]: <secret_access_key>
cd LOAD
ssh-keygen -t rsa -N "" -b 2048 -C "TerraformKey" -f ./terraform/keys/TerraformKey.pem
terraform init
terraform apply
Se vuoi distruggere il tuo lab:
terraform destroy
Ogni volta che le tue istanze EC2 si avviano, devi cambiare il loro IP pubblico nel file ansible/hosts. Aggiungi l'output di questo comando alla fine del file:
aws ec2 describe-instances --profile terraform --region eu-central-1 --query "Reservations[*].Instances[*].{Name:Tags[?Key=='Name'].Value|[],PublicIP:PublicIpAddress}" --filters "Name=instance-state-name,Values=running" --output text |tac |awk 'NR%2 ==0 {print $0}; NR%2 != 0 {print "["tolower(substr($2,5))"]"};'
Per configurare le VM usa il comando ansible-playbook. Tempo di esecuzione abituale: 1h30
ansible-playbook main.yml # this will configure the vms in order to play ansible when the vms are ready
Per eseguire il provisioning dal container docker, esegui (dovresti essere nella stessa cartella del Dockerfile. Non ancora testato):
sudo docker run -ti --rm --network host -h loadansible -v $(pwd):/load -w /load/ansible loadansible ansible-playbook main.yml
A volte può verificarsi un errore durante l'installazione. Nella maggior parte dei casi, puoi semplicemente eseguire di nuovo il playbook e dovrebbe funzionare. Per eseguire i playbook uno alla volta:
# The main.yml playbook is build in multiples parts. each parts can be re-run independently but the play order must be keep in cas you want to play one by one :

ansible-playbook prepare.yml         # updates, passwords, dns settings...
ansible-playbook ad-servers.yml      # create servers configuration
ansible-playbook ad-trusts.yml       # create the trust relationships
ansible-playbook ad-data.yml         # import the ad datas : users/groups...
ansible-playbook ad-groups.yml       # set the rights and the group domains relations
ansible-playbook servers.yml         # create IIS and MSSQL
ansible-playbook adcs.yml            # add adcs and adcs templates
ansible-playbook ad-acl.yml          # set ACL
ansible-playbook linux.yml           # configure linux entrypoint with GLPI

ansible-playbook security.yml        # enable or disable windows defender here
ansible-playbook vulnerabilities.yml # specifics vulns linked to the scenario are here

# You can also install wireguard VPN on the linux host, for that check the VPN paragraph
Se vuoi eseguire solo una parte specifica di un playbook, puoi usare i tag (metti sempre data come tag):
ansible-playbook servers.yml
ansible-playbook servers.yml --tags data,iis
ansible-playbook linux.yml --tags data,glpi
Alcuni comandi per aiutarti a gestire il tuo lab AWS (è brutto ma funziona):
# aws cli profile : terraform
# region : eu-central-1

# Disable instance metadata
for i in $(aws ec2 --profile terraform --region eu-central-1 describe-instances --filters "Name=tag:Name,Values=lab-*" --query 'Reservations[].Instances[].InstanceId' |cut -d '"' -f2); do aws ec2 --profile terraform --region eu-central-1 modify-instance-metadata-options --http-endpoint disabled --instance-id $i --output json --no-cli-pager;done

# Start instances
aws ec2 --profile terraform --region eu-central-1 start-instances --instance-ids `aws ec2 --profile terraform --region eu-central-1 describe-instances --filters "Name=tag:Name,Values=lab-*" "Name=instance-state-name,Values=stopping,stopped" --query 'Reservations[].Instances[].InstanceId' --output text`

# Get running instance and output it to ansible format
aws ec2 describe-instances --profile terraform --region eu-central-1 --query "Reservations[*].Instances[*].{Name:Tags[?Key=='Name'].Value|[],PublicIP:PublicIpAddress}" --filters "Name=instance-state-name,Values=running" --output text |tac |awk 'NR%2 ==0 {print $0}; NR%2 != 0 {print "["tolower(substr($2,5))"]"};'
Opzionalmente, puoi aggiungere un server VPN sull'host Linux e configurare tutti i client che vuoi. Inizia generando le chiavi per il server VPN e modifica il numero di client:
apt install wireguard

# generate wireguard keys
privkey=$(wg genkey) sh -c 'echo "
    server_privkey: $privkey
    server_pubkey: $(echo $privkey | wg pubkey)"'

# encrypt server_privkey with ansible-vault and
ansible-vault encrypt_string --ask-vault-password --stdin-name server_privkey

# Add the result to group_vars/all.yml
# You can change the number of client configuration files it will create. By default it creates 6 clients.
Esegui il playbook VPN con questo comando (cambierà le chiavi dei client ogni volta che esegui il comando):
ansible-playbook --ask-vault-password vpn.yml
Se ricevi questo errore Timeout (12s) waiting for privilege escalation prompt, esegui di nuovo il comando.
Troverai il tuo file di configurazione client in ansible/wireguard/lab_client[0-9].conf.
Per connetterti alla VPN, devi copiare i file client con la chiave privata sul tuo host locale in /etc/wireguard/.
Avvii la connessione VPN per il primo client con:
sudo wg-quick up lab_client1
Otterrai un IP in 10.0.20.0/24
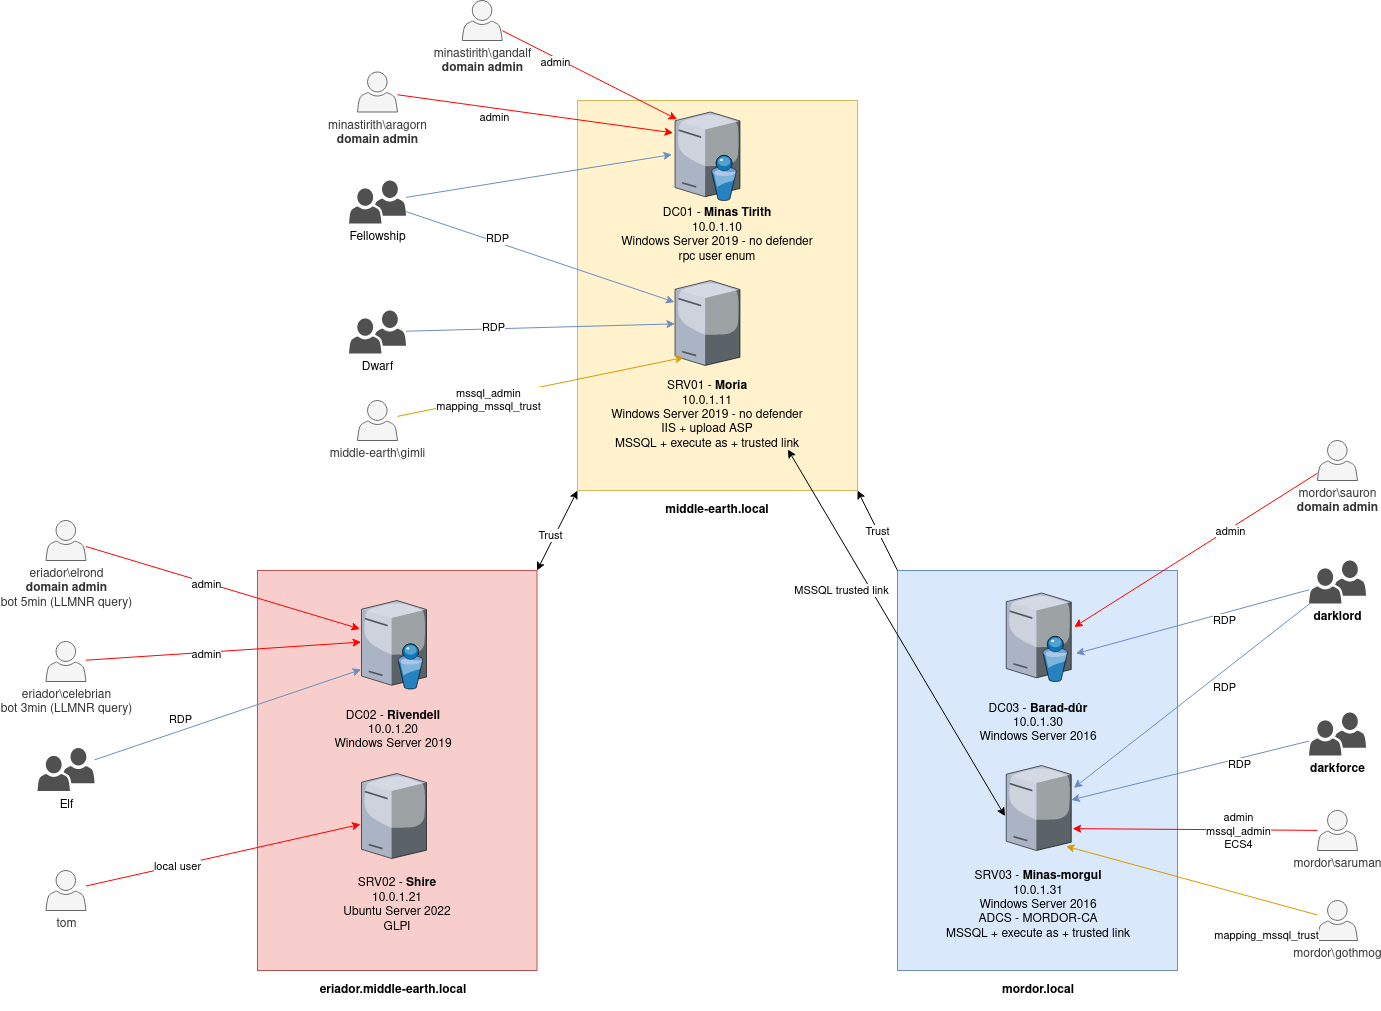
SHIRE (srv02)
    - GLPI SQLi
    - GLPI-htmlawed-CVE-2022-35914

USERS
    - privesc user with vulnerable crontab
    - privesc root with password in bash_history and sudo nopasswd for /bin/systemctl
RIVENDELL (dc02)
    - anonymous RPC (enum users, pass pol, groups / rpcclient)
    - brute force users names

ELF
    - celebrian    Responder crack hash (bot 3min)
    - elrond:      Responder with NTLM relay domain admin (bot 5min)

HOBBIT
    - bilbo:       password in description
    - pippin:      ASREPROAST
    - merry:       Constrained delegation with protocol transition / Kerberoasting
    - froddo:
    - sam:
MINAS-TIRITH(dc01)
    - Open share RW, LNK exploit
    - khamul.easterling : Open backup share, with GPO with cpassword, password increment

MORIA (srv01)
    - MSSQL trusted link : donPapi to get sql_svc password
    - mitm6 SRV01 -> DC01

MEN
    - denethor:    DOMAIN ADMIN
    - theoden:     ACL self-self-membership-on-group DOMAIN ADMIN
    - faramir:     ACL genericwrite-on-user Denethor
    - boromir:     ACL genericall-on-user Denethor
                   ACL forcechangepassword on Faramir
                   WriteDACL MEN

FELLOWSHIP
    - legolas:     execute as user on MSSQL
                   KERBEROASTING
    - gimli:       ACL genericall-on-computer MORIA
                   ACL writeproperty-self-membership DOMAIN ADMIN
    - aragorn:     execute as login on mssql / administrator
    - gandalf:     mssql admin
                   group cross domain
                   mssql trusted link
                   ACL writeproperty-self-membership Domain Admins #TODO change for someone who is not administrator, he has DCSYNC (administrator?)

ENTS
    - treebeard:   ACL writeproperty-on-group DOMAIN ADMIN
    - skinbark:    ACL genericall-on-group DOMAIN ADMIN
    - ginglas:     ACL write owner on group DOMAIN ADMIN
BARAD-DUR (dc03)
    - Coerced DC + ntlmrelayx to ldaps
    - ADCS ESC1, ESC2, ESC3, ESC4, ESC8
    - NTLM downgrade attack

MINAS-MORGL (srv03)
    - IIS upload webshell
    - Privilege escalation Windows 2016 : SeImpersontePrivilege

DARKFORCE
    - sauron:     domain admin MORDOR
    - saruman:    mssql admin / GenericAll on gothmog (shadow credentials) / GenericAll on ECS4
    - balrog:

PRISONER
    - gollum:     mssql trusted link
                  password spray -> user=pwd
ORC
    - gothmog:    DOMAIN ADMIN
    - lurtz:
    - ugluk:
    - guritz:

NAZGUL
    - angmar:
