Skip to content
KitploitKITPLOIT
工具博客
提交
工具博客
提交

黑客、渗透测试和网络安全工具,武装您的安全武器库!

Kitploit 是一个黑客、网络安全和渗透测试工具的目录。发现最新的项目更新,查找漏洞、分析系统、自动化测试并加强你的安全。

··订阅源·联系·隐私·© 2026 Kitploit

工具目录

分类

查看所有分类
Loading categories
doppelganger_assistant — 卡片计算器及Proxmark3插件,用于写入和/或模拟Doppelgänger Community、Pro、Stealth 和 MFAS 所支持的每一种卡类型。 | Kitploit
工具/GitHubGitHub/tweathers-sec/doppelganger_assistant
嵌入式系统安全加密/解密工具RFID/NFC工具信息收集硬件黑客渗透测试实用工具与框架红队

最受欢迎

查看全部 →

发现我们社区最常用的工具。

探索所有工具

浏览我们的工具集合

查看所有工具 →
分享
GitHub
tweathers-sec/doppelganger_assistant

doppelganger_assistant

卡片计算器及Proxmark3插件,用于写入和/或模拟Doppelgänger Community、Pro、Stealth 和 MFAS 所支持的每一种卡类型。

查看仓库网站
32298个月前Kitploit 审核通过

Doppelgänger Assistant

一款专业的GUI应用程序,用于计算卡片数据并自动执行Proxmark3针对Doppelgänger Core和Stealth所支持的所有卡片类型的操作。该工具通过提供具有双输出显示、视觉分隔符和一键剪贴板复制的直观界面,简化了物理渗透测试中的卡片写入流程,无需记忆复杂的Proxmark3语法或翻阅笔记。
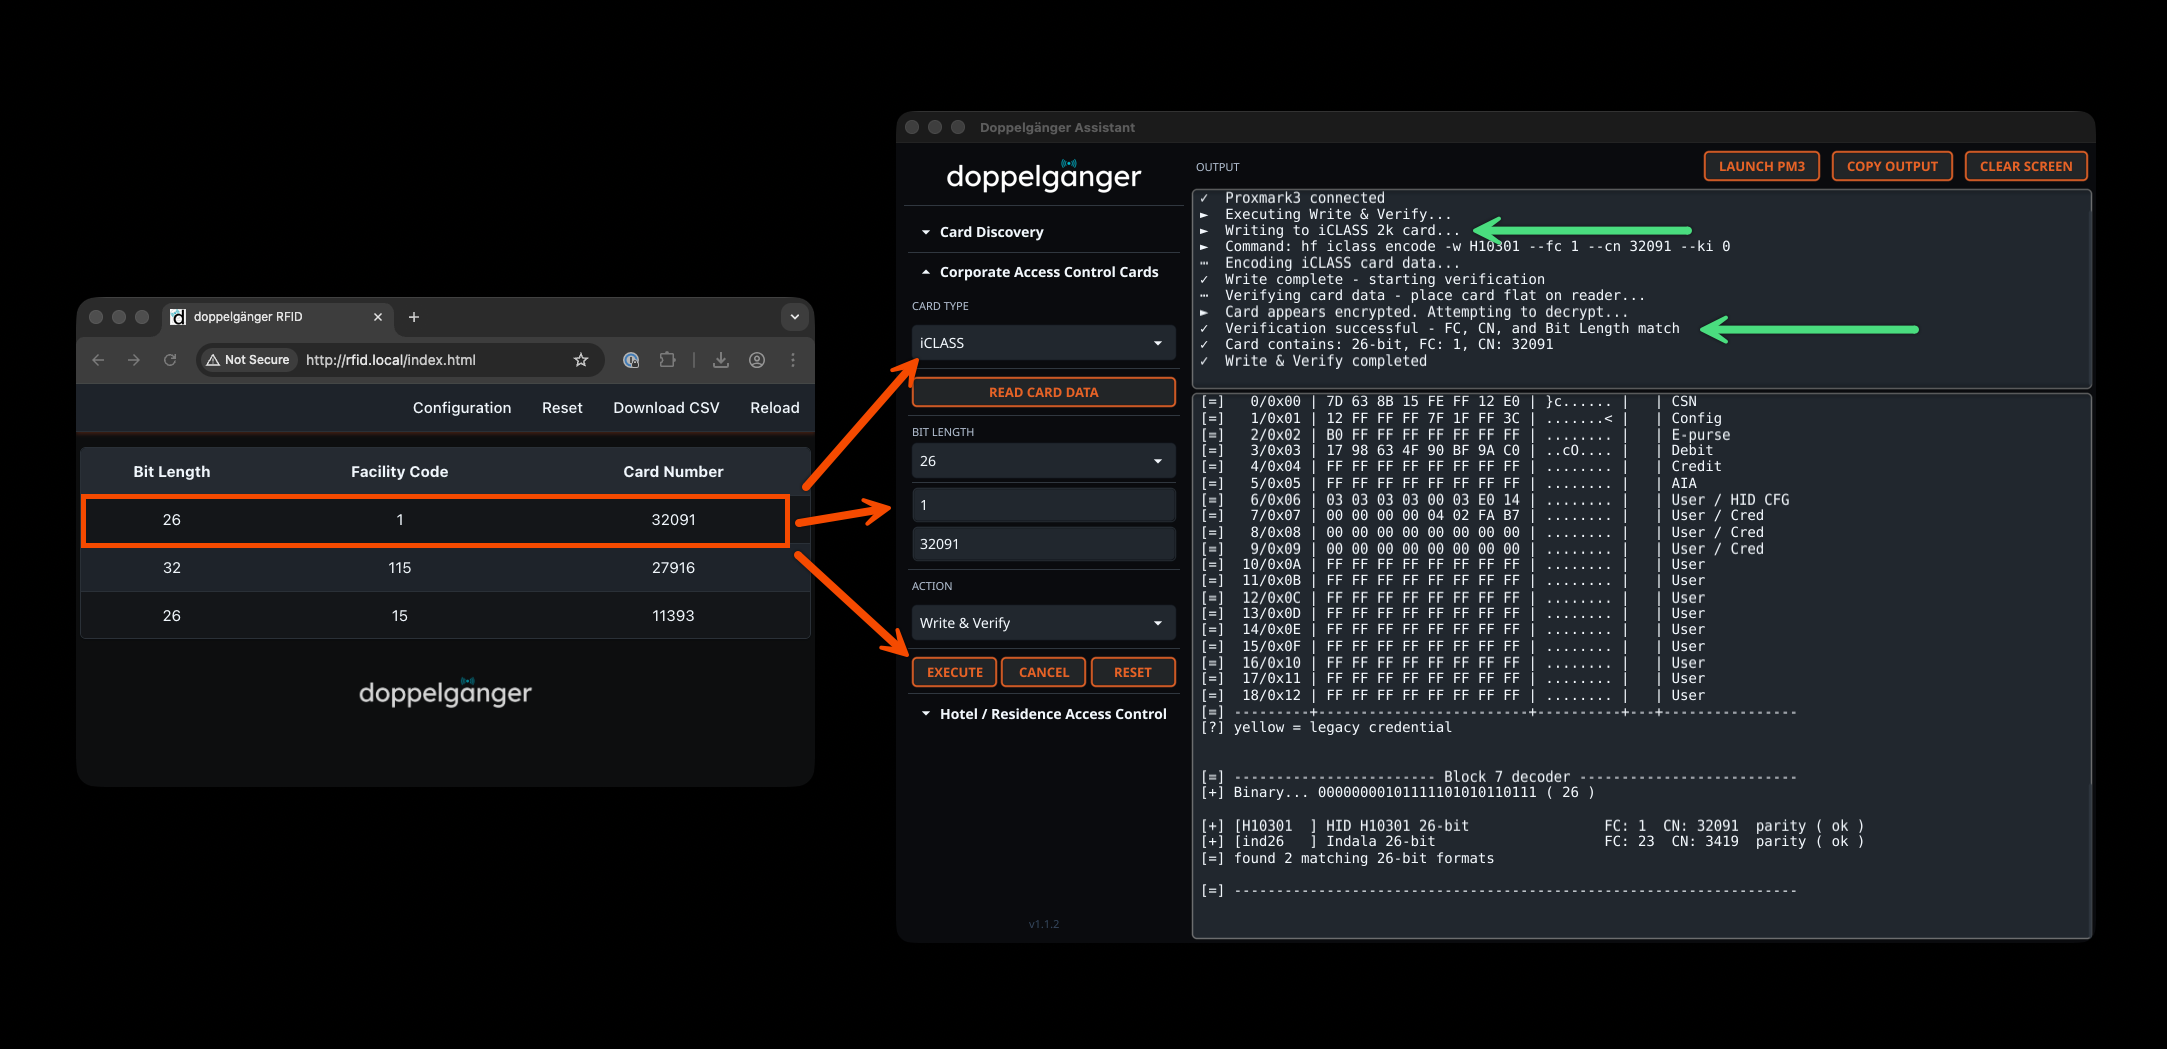
Doppelgänger Assistant 图形用户界面

功能特性

  • 现代化GUI界面:直观的双列布局,带有专用状态和命令输出显示
  • 卡片操作:自动生成并执行用于写入、验证和模拟卡片的Proxmark3命令
  • 直接执行:在GUI中直接对Proxmark3执行写入、验证和模拟操作
  • 跨平台:支持macOS、Linux和Windows(通过WSL)
  • 卡片发现:自动检测卡片类型并读取卡片数据
  • 酒店门禁:完整的MIFARE卡片恢复与分析工具
  • 终端集成:在独立的终端窗口中启动Proxmark3

快速安装(推荐)

自动安装程序将安装Doppelganger Assistant、所需依赖项以及最新的Iceman分支版Proxmark3。安装过程中,系统会提示您选择Proxmark3设备类型以实现最佳配置。

macOS```sh

/bin/bash -c "$(curl -fsSL https://raw.githubusercontent.com/tweathers-sec/doppelganger_assistant/main/installers/doppelganger_install_macos.sh)"

root@kitploit:~
### Linux```bash
curl -sSL https://raw.githubusercontent.com/tweathers-sec/doppelganger_assistant/main/installers/doppelganger_install_linux.sh | sudo bash

Windows(WSL)

以管理员身份打开 PowerShell 并运行:```powershell irm https://raw.githubusercontent.com/tweathers-sec/doppelganger_assistant/main/installers/doppelganger_install_windows.ps1 | iex

root@kitploit:~
**注意:**安装程序会提示您在 **Ubuntu 24.04 LTS (Noble)**(推荐)或 **Kali Linux** 之间进行选择。它将自动检测现有安装并提示您更新。如果需要重启以启用 WSL 功能,您将收到提示。重启后只需再次运行相同的命令即可。

⚠️ 重要提示:WSL2 不支持在嵌套虚拟机中运行。安装程序会自动检测并阻止在此类环境中安装。要继续,请在物理硬件上安装。

## Doppelgänger Assistant 的功能

Doppelgänger Assistant 提供了完整的卡片分析和克隆工作流程,从初始检测到成功的写入操作。该应用程序自动识别卡片技术、提取凭证数据、恢复加密密钥,并带有验证功能写入克隆卡片。

### 智能卡片检测

卡片发现功能自动扫描低频和高频芯片,识别双芯片卡,并确定具体卡片技术,包括 HID Prox、iCLASS、PicoPass、MIFARE 等。结果包含已解码的 Wiegand 数据,包括设施代码和卡号(如可用)。
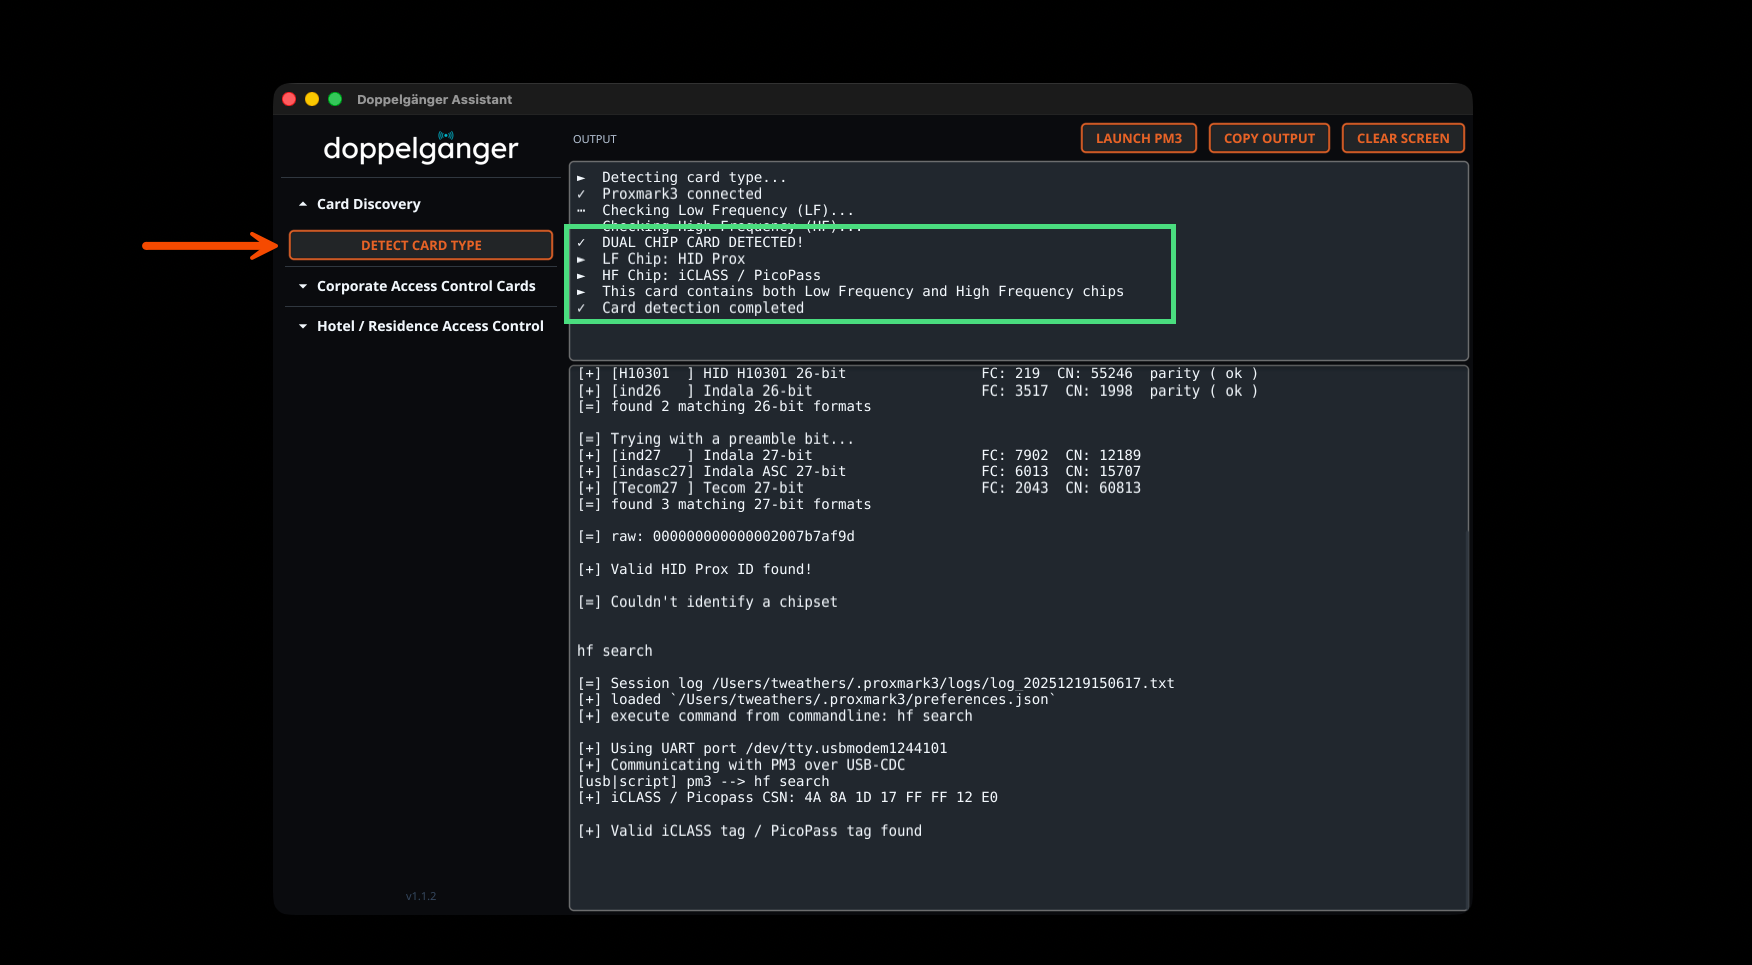
![Card Discovery](https://raw.githubusercontent.com/tweathers-sec/doppelganger_assistant/main/img/assistant_detect_card_type.png)

### 酒店门卡分析

酒店门禁控制区域提供了针对基于 MIFARE 的酒店钥匙系统的专用工具。卡片信息检索会自动识别 Saflok 酒店钥匙卡,并显示详细信息,包括 UID、卡片类型、魔术功能以及 PRNG 检测。原始的 Proxmark3 输出包含完整的 Saflok 元数据(如可用)。
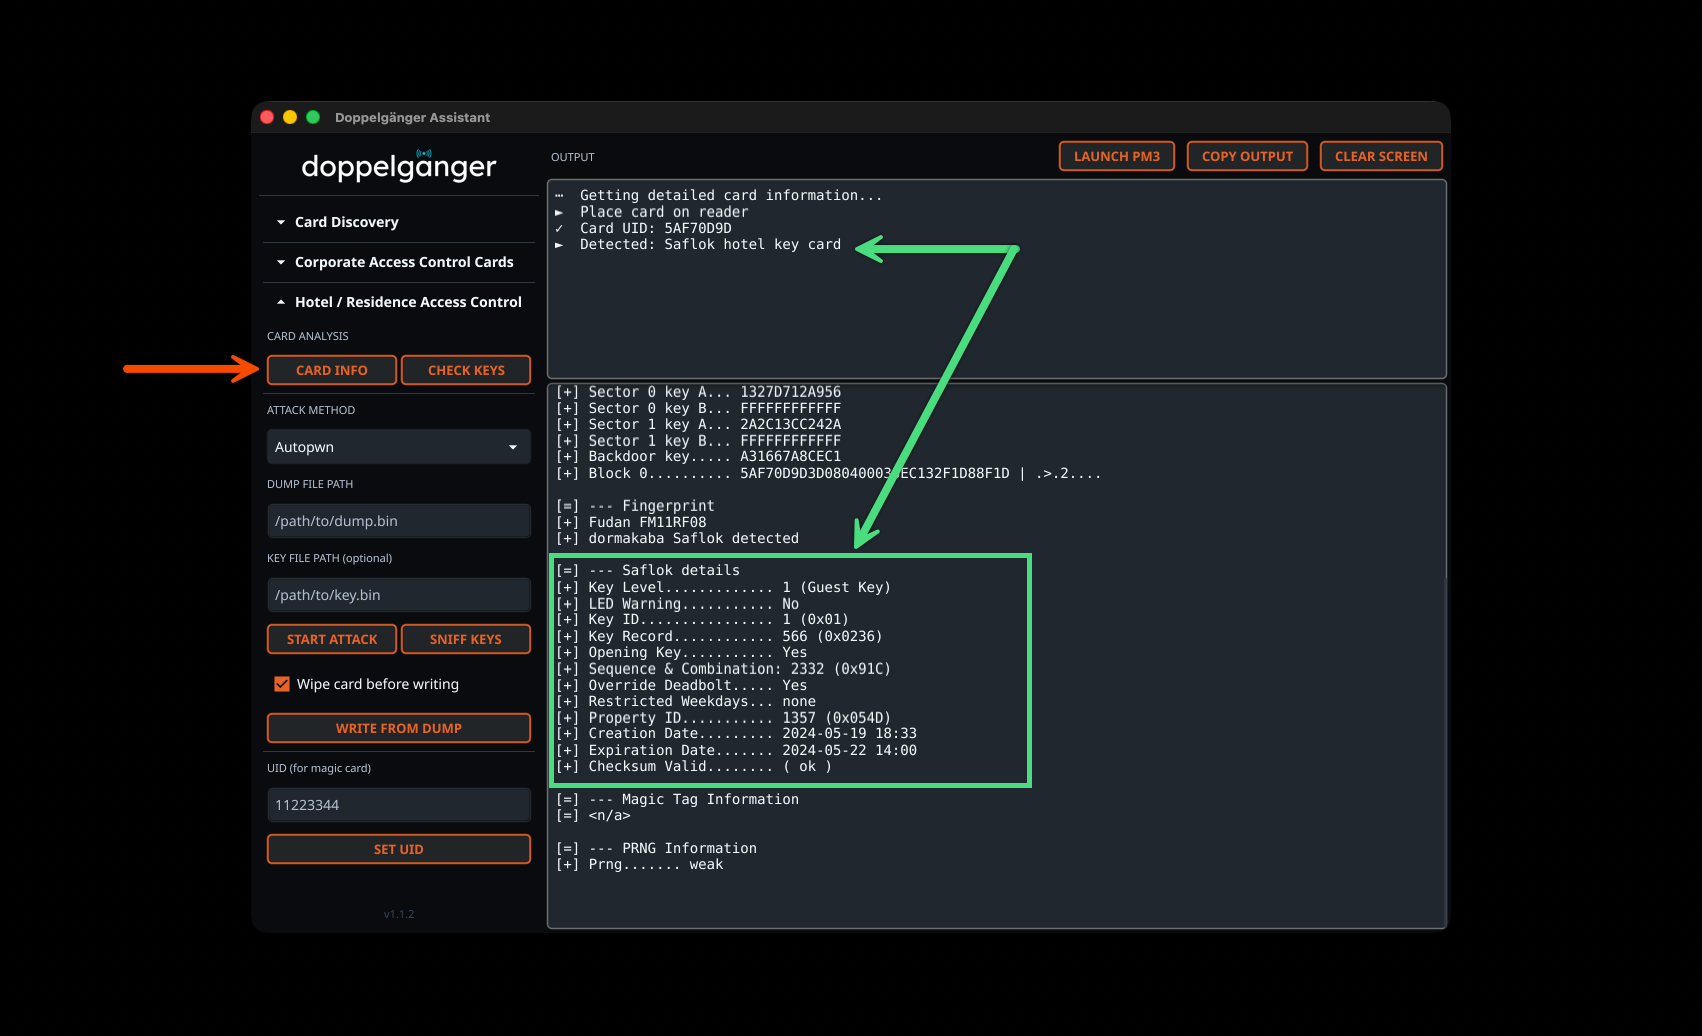
![Saflok Hotel Key Detection](https://raw.githubusercontent.com/tweathers-sec/doppelganger_assistant/main/img/assistant_detect_hotel_key.png)

### 自动密钥恢复

MIFARE 攻击工具包括多种恢复方法:Autopwn(自动多方法)、Darkside、Nested、Hardnested、Static Nested、Bruteforce 和 NACK 漏洞测试。Autopwn 根据卡片特性自动选择最佳攻击方法。结果以全面的恢复摘要显示,包含恢复的扇区数、找到的密钥总数、使用的恢复方法以及自动生成的转储文件,用于立即克隆卡片。
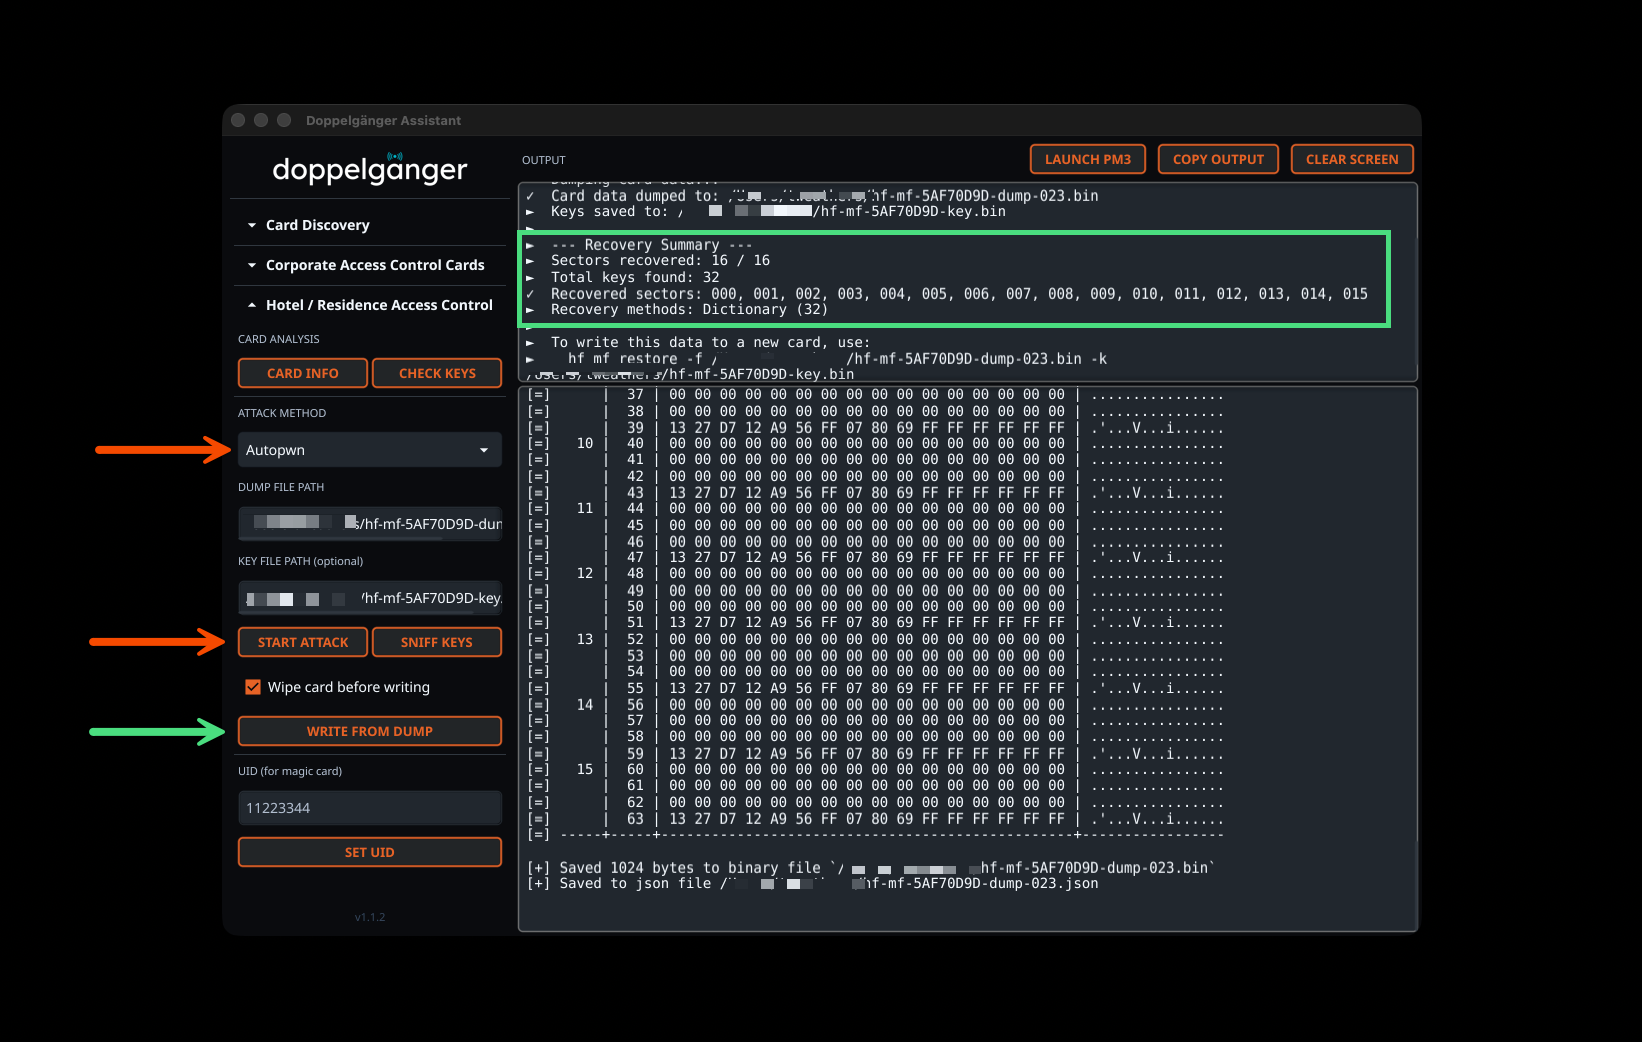
![MIFARE Autopwn](https://raw.githubusercontent.com/tweathers-sec/doppelganger_assistant/main/img/assistant_mifare_autopwn.png)

### 企业门禁卡操作

企业门禁控制区域支持读取和写入 iCLASS、PicoPass、AWID、HID Prox、Indala、Avigilon 及其他企业卡片技术。卡片数据会自动从 Proxmark3 输出中解析,提取设施代码、卡号、位长度、格式类型(H10301、C1k35s 等)、CSN 值和原始十六进制数据。集成的工作流程可立即写入空白卡,并可选择性进行验证。
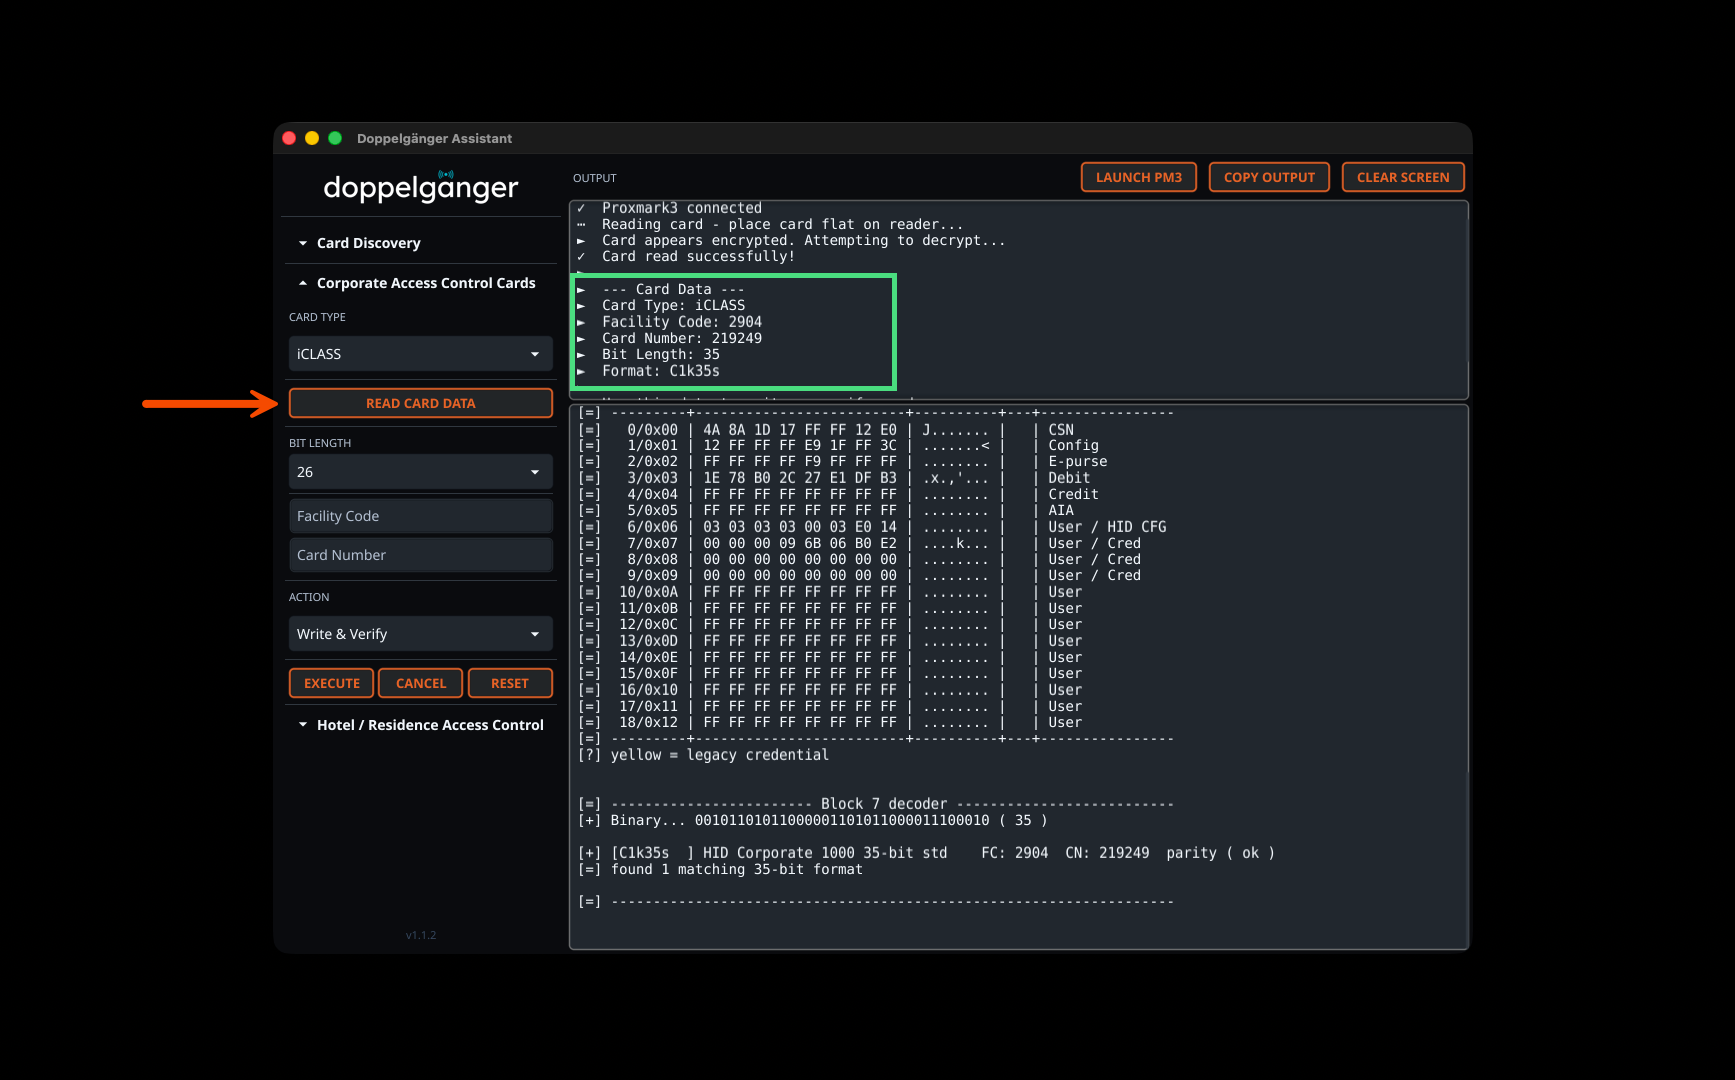
![iCLASS Card Reading](https://raw.githubusercontent.com/tweathers-sec/doppelganger_assistant/main/img/assistant_read_corporate_card.png)

### 完整克隆工作流程

Doppelgänger Assistant 与 Doppelgänger RFID 硬件和 Proxmark3 设备无缝集成。使用 Doppelgänger 读取器捕获的凭证可直接导入 GUI 进行分析和写入。该应用程序支持从多个制造商读取卡片、解析来自 Web 界面的数据,并执行带有实时状态更新和验证的写入操作。

![Integrated Write Workflow](https://raw.githubusercontent.com/tweathers-sec/doppelganger_assistant/main/img/assistant_gui_write.png)

## 更新日志

### 版本 1.1.2(2025 年 12 月 18 日)

**新功能:**
* 添加了“启动 PM3”按钮,可在独立终端窗口中打开 Proxmark3
* 添加了卡片发现区域,支持自动卡片类型检测
* 为所有支持的卡片类型添加了“读取卡片数据”功能
* 添加了酒店/居住区门禁控制区域,包含 MIFARE 工具
* 添加了双芯片卡片检测,适用于同时具有低频和高频功能的卡片
* 添加了检测到 MIFARE 卡片时的自动卡片信息检索功能

**改进:**
* 改进了卡片检测,可显示具体的 MIFARE 类型和魔术功能
* 增强了卡片验证,提供更清晰的验证成功消息
* 在整个应用程序中优化了错误处理和用户反馈
* 改进了 iCLASS 卡片读取,支持自动解密

### 版本 1.1.1

* 初始版本,包含核心卡片写入、验证和模拟功能
* 支持 PROX、iCLASS、AWID、Indala、Avigilon、EM4100、PIV 和 MIFARE 卡片

## Doppelgänger 设备

您可以从 [Physical Exploitation Store](https://store.physicalexploit.com/) 购买 Stealth 读取器、Doppelgänger Dev Board 或全组装远距离读取器。关于开源固件,请查看 [Doppelgänger Core](https://github.com/mwgroup-io/Doppelganger_Core)。

## 支持的 Proxmark3 设备

Doppelgänger Assistant 与 [Iceman Proxmark3 分支](https://github.com/RfidResearchGroup/proxmark3) 兼容,并支持以下设备类型:

* **Proxmark3 RDV4** - 带或不带 Blueshark 蓝牙附件
* **Proxmark3 Easy (512KB)** - 通用平台支持

安装时会提示您选择设备类型以便进行最佳配置。

## 企业 PACS 卡片类型

以下是基于 Doppelgänger 固件的官方支持的企业 PACS 卡片类型。酒店/Mifare 钥匙卡支持于版本 1.1.2 添加,包括密钥恢复和克隆功能。请注意,酒店钥匙卡 / 详细的 Mifare 分析与使用 Doppelgänger 产品捕获的数据不完全对应。这只是为支持物理渗透测试工作而增加的功能,目前仍在完善中。

| Card Types                  | Core | Stealth | FC Range    | CN Range        |
| --------------------------- | ---- | ------- | ----------- | --------------- |
| Keypad PIN Codes            |      | X       | N/A         | N/A             |
| HID H10301 26-bit           | X    | X       | 0–255       | 0–65,535        |
| Indala 26-bit               | X    | X       | 0–255       | 0–65,535        |
| Indala 27-bit               | X    | X       | 0–4,095     | 0–8,191         |
| 2804 WIEGAND 28-bit         | X    | X       | 0–255       | 0–16,383        |
| Indala 29-bit               | X    | X       | 0–4,095     | 0–32,767        |
| ATS Wiegand 30-bit          | X    | X       | 0–2,047     | 0–32,767        |
| HID ADT 31-Bit              | X    | X       | 0–15        | 0–8,388,607     |
| EM4102 / Wiegand 32-bit     | X    | X       | 0–32,767    | 0–65,535        |
| HID D10202 33-bit           | X    | X       | 0–127       | 0–16,777,215    |
| HID H10306 34-bit           | X    | X       | 0–65,535    | 0–65,535        |
| HID Corporate 1000 35-bit   | X    | X       | 0–4,095     | 0–1,048,575     |
| HID Simplex 36-bit (S12906) | X    | X       | 0–255       | 0–65,535        |
| HID H10304 37-bit           | X    | X       | 0–65,535    | 0–524,287       |
| HID H800002 46-bit          | X    | X       | 0–16,383    | 0–1,073,741,823 |
| HID Corporate 1000 48-bit   | X    | X       | 0–4,194,303 | 0–8,388,607     |
| AWID 50-bit                 | X    | X       | 0–65,535    | 0–8,388,607     |
| Avigilon 56-bit             | X    | X       | 0–1,048,575 | 0–4,194,303     |
| C910 PIVKey                 | X    | X       | N/A         | N/A             |
| MIFARE (Various Types)      | X    | X       | N/A         | N/A             |

支持的技术包括:

* iCLASS(Legacy/SE/Seos) *注意:捕获的 SE 和 Seos 卡片只能写入 iCLASS 2k 卡片*
* PROX
* Indala
* AWID
* Avigilon
* EM4102
* PIV(仅 UID - 因为这是通过读取器 Wiegand 输出提供的数据)
* MIFARE(仅 UID - 因为这是通过读取器 Wiegand 输出提供的数据)

## 详细安装说明

### MacOS 手动安装

1. 从 [发布页面](https://github.com/tweathers-sec/doppelganger_assistant/releases) 下载适合您架构的 DMG 文件:
   - Apple Silicon(M1/M2/M3):`doppelganger_assistant_darwin_arm64.dmg`
   - Intel:`doppelganger_assistant_darwin_amd64.dmg`

2. 打开 DMG 文件,将 `doppelganger_assistant.app` 拖到您的 `/Applications` 文件夹中

3. 移除隔离属性:   ```sh
   xattr -cr /Applications/doppelganger_assistant.app
  1. 通过添加到您的 shell 配置文件(~/.zshrc 或 ~/.zprofile)来创建命令行别名: ```sh alias doppelganger_assistant='/Applications/doppelganger_assistant.app/Contents/MacOS/doppelganger_assistant'
    root@kitploit:~
  2. 重新加载你的 shell: ```sh source ~/.zshrc
    root@kitploit:~

手动Linux安装

选项1:使用.deb包 (Debian/Ubuntu/Kali - 推荐)

  1. 安装依赖项: ```sh sudo apt update && sudo apt upgrade -y sudo apt install libgl1 xterm wget -y

    root@kitploit:~
  2. 下载并安装适用于你架构的 .deb 包: ```sh

    For x86_64/amd64 systems:

    wget https://github.com/tweathers-sec/doppelganger_assistant/releases/latest/download/doppelganger_assistant_linux_amd64.deb sudo dpkg -i doppelganger_assistant_linux_amd64.deb

    For ARM64 systems:

    wget https://github.com/tweathers-sec/doppelganger_assistant/releases/latest/download/doppelganger_assistant_linux_arm64.deb sudo dpkg -i doppelganger_assistant_linux_arm64.deb

    root@kitploit:~
  3. 修复任何缺失的依赖项(如果需要): ```sh sudo apt-get install -f -y

    root@kitploit:~

选项2:使用 tar.xz 归档(其他发行版)

  1. 安装依赖: ```sh sudo apt update && sudo apt upgrade -y sudo apt install libgl1 xterm make git wget -y

    root@kitploit:~
  2. 下载并安装适用于你的架构的版本: ```sh

    For x86_64/amd64 systems:

    wget https://github.com/tweathers-sec/doppelganger_assistant/releases/latest/download/doppelganger_assistant_linux_amd64.tar.xz

    For ARM64 systems:

    wget https://github.com/tweathers-sec/doppelganger_assistant/releases/latest/download/doppelganger_assistant_linux_arm64.tar.xz

    Extract and install:

    tar xvf doppelganger_assistant_linux_*.tar.xz cd doppelganger_assistant sudo make install cd .. rm -rf doppelganger_assistant

    root@kitploit:~

要启动 Doppelganger 助手图形界面:```sh doppelganger_assistant

root@kitploit:~
### 手动Windows(WSL)安装

1. **启用WSL并安装Linux发行版**。以管理员身份打开PowerShell:   ```powershell
   # For Ubuntu 24.04 LTS (recommended):
   wsl --install -d Ubuntu-24.04
   
   # OR for Kali Linux:
   wsl --install -d kali-linux
  1. 重启 Windows。重启后,WSL 将完成设置。系统提示时,为你的 Linux 环境创建一个用户名和密码。

  2. 安装 Doppelganger Assistant (在 WSL 内部): ```sh sudo apt update && sudo apt upgrade -y sudo apt install libgl1 xterm wget -y

    For x86_64/amd64 systems:

    wget https://github.com/tweathers-sec/doppelganger_assistant/releases/latest/download/doppelganger_assistant_linux_amd64.deb sudo dpkg -i doppelganger_assistant_linux_amd64.deb

    For ARM64 systems:

    wget https://github.com/tweathers-sec/doppelganger_assistant/releases/latest/download/doppelganger_assistant_linux_arm64.deb sudo dpkg -i doppelganger_assistant_linux_arm64.deb

    root@kitploit:~
  3. 安装 Proxmark3 依赖项: ```sh sudo apt install --no-install-recommends -y git ca-certificates build-essential pkg-config
    libreadline-dev gcc-arm-none-eabi libnewlib-dev qtbase5-dev
    libbz2-dev liblz4-dev libbluetooth-dev libpython3-dev libssl-dev libgd-dev

    root@kitploit:~
  4. 克隆并构建 Proxmark3: ```sh mkdir -p ~/src && cd ~/src git clone https://github.com/RfidResearchGroup/proxmark3.git cd proxmark3

    Configure for your Proxmark3 device type:

    cp Makefile.platform.sample Makefile.platform

    Edit Makefile.platform for your device:

启动 Doppelganger Assistant:```sh doppelganger_assistant

root@kitploit:~
## 更新

### 更新 Windows (WSL) 安装

#### 自动更新(推荐)

从安装目录运行更新脚本:```powershell
powershell -ExecutionPolicy Bypass -File C:\doppelganger_assistant\wsl_update.ps1

或者直接从GitHub下载并运行:```powershell powershell -ExecutionPolicy Bypass -Command "irm https://raw.githubusercontent.com/tweathers-sec/doppelganger_assistant/main/scripts/wsl_update.ps1 | iex"

root@kitploit:~
更新脚本将:
- 下载最新的 Doppelganger Assistant 二进制文件
- 从仓库更新所有脚本和安装程序
- 从源码更新并重建 Proxmark3
- 保留您的 WSL 配置和设置

### 更新 macOS 或 Linux 安装

重新运行安装程序脚本。它将检测现有安装并提示您进行更新:

**macOS:**```bash
bash <(curl -fsSL https://raw.githubusercontent.com/tweathers-sec/doppelganger_assistant/main/installers/doppelganger_install_macos.sh)

Linux:```bash bash <(curl -fsSL https://raw.githubusercontent.com/tweathers-sec/doppelganger_assistant/main/installers/doppelganger_install_linux.sh)

root@kitploit:~
## 卸载

### 从 Windows (WSL) 卸载

#### 自动卸载(推荐)

从 GitHub 直接下载并运行卸载程序:```powershell
powershell -ExecutionPolicy Bypass -Command "irm https://raw.githubusercontent.com/tweathers-sec/doppelganger_assistant/main/scripts/uninstall.ps1 | iex"

手动卸载

如果你已经安装了 Doppelganger Assistant,请运行卸载脚本:```powershell powershell -ExecutionPolicy Bypass -File C:\doppelganger_assistant\uninstall.ps1

root@kitploit:~
卸载程序将:
- 停止并注销 WSL 发行版(Kali-doppelganger_assistant 或 Ubuntu-doppelganger_assistant)
- 删除 `C:\doppelganger_assistant` 中的所有文件
- 删除桌面快捷方式
- 卸载 usbipd(如果再次运行安装程序,它将被重新安装)

**注意:** 脚本会自动将自身移动到临时目录,以确保安装目录被彻底清除。

### 从 macOS 卸载

要从 macOS 卸载:```bash
sudo rm -rf /Applications/doppelganger_assistant.app
sudo rm /usr/local/bin/doppelganger_assistant

从Linux卸载

如果通过.deb包安装:```bash sudo apt remove doppelganger-assistant

root@kitploit:~
**如果通过 tar.xz 存档安装:**```bash
sudo rm /usr/local/bin/doppelganger_assistant
rm -f ~/.local/share/applications/doppelganger_assistant.desktop
rm -f ~/Desktop/doppelganger_assistant.desktop
sudo rm /usr/share/pixmaps/doppelganger_assistant.png

开发

从源代码构建

从源代码构建 Doppelganger Assistant:```bash

Clone the repository

git clone https://github.com/tweathers-sec/doppelganger_assistant.git cd doppelganger_assistant

Build for current platform

./build.sh

Build for all platforms (requires Docker)

./build_all.sh

root@kitploit:~
### 项目结构

- **`src/`** - 包含所有 Go 源代码和模块文件
- **`installers/`** - 平台特定的安装脚本
- **`scripts/`** - 用于 WSL 和 Windows 设置的实用脚本
- **`build.sh`** - 单平台构建脚本
- **`build_all.sh`** - 使用 fyne-cross 的多平台构建脚本

### 贡献

1. Fork 仓库
2. 创建功能分支
3. 在 `src/` 目录中进行更改
4. 使用 `./build.sh` 测试你的更改
5. 提交 Pull Request

## 使用方法

### 启动 GUI

运行应用程序时,Doppelgänger 助手 GUI 默认启动:```sh
doppelganger_assistant

或者显式地以GUI模式启动:```sh doppelganger_assistant -g

root@kitploit:~
### GUI 工作流程

1. **选择卡类型**:从 PROX、iCLASS、AWID、Indala、Avigilon、EM4100、PIV 或 MIFARE 中选择
2. **选择位长度**:为你的卡类型选择适当的位长度(根据卡类型自动过滤)
3. **输入卡数据**:根据所选卡类型输入设施码、卡号、十六进制数据或 UID
4. **选择操作**:
   - **仅生成**:显示用于手动执行的 Proxmark3 命令,不进行写入
   - **写入并验证**:将卡数据写入空白卡并验证结果
   - **模拟卡**:使用你的 Proxmark3 设备模拟该卡
5. **执行**:点击“EXECUTE”按钮运行操作
6. **监控输出**:
   - **状态输出**(上方面板):彩色状态消息,显示操作进度
   - **命令输出**(下方面板):详细的 Proxmark3 命令结果,带视觉分隔符
7. **复制结果**:点击“COPY OUTPUT”将所有命令结果复制到剪贴板
8. **重置**:点击“RESET”清除所有字段并重新开始

双输出面板在状态更新和命令结果之间提供了清晰的分隔,视觉分隔符(例如 `|----------- WRITE #1 -----------|`)使得区分多次写入尝试或验证步骤变得简单。

### 视频演示

以下是使用过程的快速视频演示:

[![Doppelgänger Assistant 演示](https://assets.kitploit.com/production/public/readmes/41553/df510930c22aac9f0d36a9f7cb3e9e0adfee2d397883b97b899ac1d60e0c913d.jpg)](https://youtu.be/RfWKgS-U8ws)

### 命令行使用示例

#### 生成写入 iCLASS 卡的命令

此命令将生成对 iCLASS(Legacy/SE/Seos)卡数据进行编码并写入 iCLASS 2k 卡所需的命令:```sh
doppelganger_assistant -t iclass -bl 26 -fc 123 -cn 4567

[>>] Writing to iCLASS 2k card...
[>>] Command: hf iclass encode -w H10301 --fc 123 --cn 4567 --ki 0

写入iCLASS卡数据并进行验证

通过添加 -w(写入)和 -v(验证)标志,应用程序将使用您的Proxmark3来写入并验证卡数据:```sh doppelganger_assistant -t iclass -bl 26 -fc 123 -cn 4567 -w -v

|----------- WRITE -----------| [..] Encoding iCLASS card data... [>>] Command: hf iclass encode -w H10301 --fc 123 --cn 4567 --ki 0

[=] Session log /Users/user/.proxmark3/logs/log_20250105120000.txt [+] loaded /Users/user/.proxmark3/preferences.json [+] execute command from commandline: hf iclass encode -w H10301 --fc 123 --cn 4567 --ki 0 [+] Using UART port /dev/tty.usbmodem101 [+] Communicating with PM3 over USB-CDC [+] Encoding successful

[OK] Write complete - starting verification

|----------- VERIFICATION -----------| [..] Verifying card data - place card flat on reader...

[=] Session log /Users/user/.proxmark3/logs/log_20250105120005.txt [+] execute command from commandline: hf iclass rdbl --blk 7 --ki 0 [+] Using key[0] AE A6 84 A6 DA B2 32 78 [+] block 7/0x07 : 00 00 00 00 06 F6 23 AE

[OK] Verification successful - Block 7: 00 00 00 00 06 F6 23 AE [OK] Card contains: 26-bit, FC: 123, CN: 4567

root@kitploit:~
#### 模拟PIV/MF卡

使用Doppelgänger(Core和Stealth)提供的UID,您可以使用Proxmark3模拟精确的韦根信号。```sh
doppelganger_assistant -uid 5AF70D9D -s -t piv
 
Handling PIV card... 
 
Simulating the PIV card on your Proxmark3: 
 
Executing command: hf 14a sim -t 3 --uid 5AF70D9D 
  
[=] Session log /Users/tweathers/.proxmark3/logs/log_20240614152754.txt
[+] loaded `/Users/tweathers/.proxmark3/preferences.json`
[+] execute command from commandline: hf 14a sim -t 3 --uid 5AF70D9D

[+] Using UART port /dev/tty.usbmodem2134301

多次写入 HID Prox 卡

LF 卡(Prox、AWID、Indala、Avigilon、EM)会自动执行 5 次写入尝试,并带有可视化分隔符:```sh doppelganger_assistant -t prox -bl 46 -fc 123 -cn 4567 -w

[..] Writing Prox card (5 attempts)...

|----------- WRITE #1 -----------| [+] Using UART port /dev/tty.usbmodem101 [+] Communicating with PM3 over USB-CDC [+] Wrote block successfully [..] Move card slowly... Write attempt #1 complete

|----------- WRITE #2 -----------| [+] Using UART port /dev/tty.usbmodem101 [+] Communicating with PM3 over USB-CDC [+] Wrote block successfully [..] Move card slowly... Write attempt #2 complete

|----------- WRITE #3 -----------| ... (continues for all 5 attempts)

[OK] All 5 write attempts complete

root@kitploit:~
#### 写入 Avigilon 56位卡

Avigilon卡与其他低频卡一样,需要尝试5次来写入:```sh
doppelganger_assistant -t avigilon -bl 56 -fc 118 -cn 1603 -w

[..] Writing Avigilon card (5 attempts)...

|----------- WRITE #1 -----------|
[+] Using UART port /dev/tty.usbmodem101
[+] Communicating with PM3 over USB-CDC
lf hid clone -w Avig56 --fc 118 --cn 1603
[..] Move card slowly... Write attempt #1 complete

... (continues for all 5 attempts)

模拟 Avigilon 卡片

使用 Avigilon 卡片数据,你可以用 Proxmark3 模拟精确的信号:```sh doppelganger_assistant -t avigilon -bl 56 -fc 118 -cn 1603 -s

Simulating the Avigilon card on your Proxmark3:

Executing command: lf hid sim -w Avig56 --fc 118 --cn 1603

Simulation is in progress... If your Proxmark3 has a battery, you can remove the device and the simulation will continue.

To end the simulation, press the pm3 button.

root@kitploit:~
## 法律声明

本应用程序仅限于专业渗透测试及授权安全评估使用。未经授权或非法使用/持有本软件的责任完全由用户自行承担。Mayweather Group LLC、Practical Physical Exploitation 及其创建者不对本软件的非法使用承担任何责任。

## 许可证

[![License: CC BY-NC-ND 4.0](https://img.shields.io/badge/License-CC%20BY--NC--ND%204.0-lightgrey.svg)](https://creativecommons.org/licenses/by-nc-nd/4.0/)

本作品采用 [Creative Commons Attribution-NonCommercial-NoDerivatives 4.0 International License](https://creativecommons.org/licenses/by-nc-nd/4.0/) 进行许可。

**您可以自由地:**
* **分享** — 以任何媒介或格式复制和重新分发本材料

**遵守以下条款:**
* **署名** — 您必须给出适当的署名,提供指向许可证的链接,并标明是否进行了修改。
* **非商业性使用** — 您不得将本材料用于商业目的。
* **禁止演绎** — 如果您对本材料进行再混合、转换或基于本材料进行创作,您不得分发修改后的作品。

完整许可证文本请参见 [LICENSE](https://github.com/tweathers-sec/doppelganger_assistant/blob/main/LICENSE) 文件。

## 支持

如需专业支持与文档,请访问:
* [Practical Physical Exploitation 文档](https://docs.physicalexploit.com/)
* [GitHub Issues](https://github.com/tweathers-sec/doppelganger_assistant/issues)
* [专业商店](https://store.physicalexploit.com/)

## 致谢

由 Travis Weathers ([@tweathers-sec](https://github.com/tweathers-sec)) 开发  
版权所有 © 2025 Mayweather Group, LLC

---

*本软件与 [Doppelgänger Core](https://github.com/mwgroup-io/Doppelganger_Core) 及 Doppelgänger 硬件设备配合使用。*
下载工具

- For RDV4 with Blueshark: Uncomment PLATFORM=PM3RDV4 and PLATFORM_EXTRAS=BTADDON

- For RDV4 without Blueshark: Uncomment PLATFORM=PM3RDV4 only

- For Proxmark3 Easy (512KB): Uncomment PLATFORM=PM3GENERIC and PLATFORM_SIZE=512

nano Makefile.platform

Build and install

make clean && make -j$(nproc) sudo make install PREFIX=/usr/local

root@kitploit:~
  • 安装 USBipd(以管理员身份运行 Windows PowerShell): ```powershell winget install --interactive --exact dorssel.usbipd-win

    root@kitploit:~
  • 将 Proxmark3 连接到 WSL(从 Windows 的 cmd.exe 或 PowerShell 以管理员身份运行): ```powershell usbipd list # List USB devices - find your Proxmark3 (VID: 9ac4) usbipd bind --busid 9-1 # Replace 9-1 with your Proxmark3's busid usbipd attach --wsl --busid 9-1 # Attach to WSL

    root@kitploit:~