
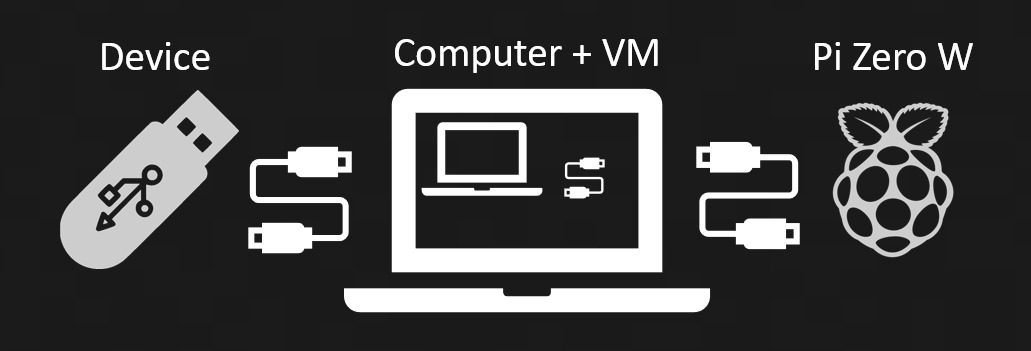
a. 仅设备测试
b. 最小agfs中间人配置
a. Linux
AutoGadgetFS是一个开源框架,允许用户无需深入了解USB协议即可评估USB设备及其相关主机/驱动/软件。该工具使用Python3编写,并利用RabbitMQ和WiFi接入,使研究人员能够从全球任何地方进行远程USB安全评估。通过利用ConfigFS,AutoGadgetFS允许用户快速克隆和仿真设备,无需深入研究每个实现的细节。该框架还允许用户在其基础上创建自己的模糊测试器。
<div style="text-align:center"><img src="https://raw.githubusercontent.com/ehabhussein/AutoGadgetFS/master/screenshots/devtest.jpeg" width="450" height="187" /></div>
<a name="MMITM"/>```bash
Minimal agfs in the middle setup:
```bash Complete agfs in the middle setup with debugging support:
<div style="text-align:center"><img src="https://raw.githubusercontent.com/ehabhussein/AutoGadgetFS/master/screenshots/scenario2.jpeg"/></div>
---
<a name="Usbdev"/>
### USB 设备类支持:
[✔️] USB HID 设备完全支持(中间人攻击)
[⚠️] 仅设备测试 .. 所有 USB 设备(无中间人攻击)
[⏳] 未来版本... 所有 USB 设备(中间人攻击)
---
<a name="Caps"/>
### 功能:
1. 轻松查找、选择并附加到 USB 设备。
1. 模拟任意 USB HID 设备。
1. 对 HID 设备执行 AGFS 中间人嗅探(将通信保存到磁盘)。
1. 设备嗅探(任意设备)。
1. 多种模糊测试器,可对设备或主机进行模糊测试。
1. 随机模糊测试器(固定或随机长度的数据包)。
1. 从之前 USB 通信中学习的智能模糊测试器。
1. 描述模糊测试器,指示模糊测试器对哪些字节进行模糊测试,其余数据包保持不变。
1. Gadget 模糊测试器。
1. 顺序模糊测试器。
1. 控制传输枚举器。
1. 从文件重放数据包。
1. 从保存的 USBLyzer 捕获中重放数据包。
1. 可视化方式呈现数据包,便于逆向分析通信。
1. 设备处于 DFU 模式或设备泄露信息时的警报。
1. USB 设备和主机可以位于互联网上的任何位置。
1. 监控接口的突然变化。
---
<a name="Road"/>
### 路线图:
1. 嗅探设备的控制传输请求并回复它们。
1. MITM 并模拟所有类型的设备。
1. 基于控制台/QT 的界面。
1. 在 RPI zero W 上支持更多接口/端点。
1. 支持更多开发板,如 GreatFET。
1. 迁移到自定义开发板。
1. 努力使树莓派完全支持所有接口的 USB 设备模拟。
1. 通过序列号关联发送和接收的数据包。
---
<a name="Installation"/>
### 安装:
<a name="Linux"/>
### Linux 机器:
* 注意:由于 USB 穿透问题,不支持 WSL/WSL2。
* 安装 Python3、ipython3、git、pip 和 rabbitMQ 服务器
```bash
sudo apt install python3 ipython3 git python3-pip rabbitmq-server dfu-util
sudo service rabbitmq-server start
```
* 克隆仓库
```bash
git clone https://github.com/ehabhussein/AutoGadgetFS
cd AutoGadgetFS
```
* 安装依赖项
```bash
sudo -H pip3 install -r requirements.txt
```
* 降级 prompt toolkit 以获得更好的 ipython 体验:
```bash
sudo python3 -m pip install prompt-toolkit~=2.0
```
* 启用 rabbitMQ 的 Web 界面
```bash
sudo rabbitmq-plugins enable rabbitmq_management
http://localhost:15672/ 访问 Web 界面
```
* 使用凭据 *guest:guest* 登录 Web 界面
* 注意:如果你不是在 `localhost` 上安装 rabbitMQ,请添加以下用户并以此登录:
```bash
sudo rabbitmqctl add_user autogfs usb4ever
sudo rabbitmqctl set_user_tags autogfs administrator
```
* 上传 rabbitMQ 配置文件
* 在概览标签页中滚动到底部以导入定义
* 上传位于 *rabbitMQbrokerconfig/rabbitmq-Config.json* 的文件
```bash
sudo service rabbitmq-server restart
```
* 测试安装
```python
sudo ipython3
Python 3.7.7 (default, Apr 1 2020, 13:48:52)
Type 'copyright', 'credits' or 'license' for more information
IPython 7.9.0 -- An enhanced Interactive Python. Type '?' for help.
In [1]: import libagfs
In [2]: x = libagfs.agfs()
***************************************
AutoGadgetFS: USB testing made easy
***************************************
Enter IP address of the rabbitmq server: 127.0.0.1
In [3]: exit
sudo `python3` agfsconsole.py
***************************************
AutoGadgetFS: USB testing made easy
***************************************
Enter IP address of the rabbitmq server: 127.0.0.1
Give your project a name?!:
``` ```
* Patch Pyusb langID ( Not needed unless you get pyusb errors for langID ):
* Edit the file `/usr/local/lib/python3/dist-packages/usb/util.py`
* make changes to the `def get_string` method to look like below:
```python
if 0 == len(langids):
return "Error Reading langID"
#raise ValueError("The device has no langid")
if langid is None:
langid = langids[0]
elif langid not in langids:
return "Error Reading langID"
#raise ValueError("The device does not support the specified langid")
```
* If you prefer to use `patch` apply the following patch to the file: `AutoGadgetFS/pyusb_patches/pyusb_langid.patch`
---
<a name="Rasp"/>
### Raspberry Pi Zero W:
* Obtain a copy of [Raspian Lite Edition](https://downloads.raspberrypi.org/raspios_lite_armhf_latest)
* Burn the Image to the SD card using [BalenaEtcher](https://www.balena.io/etcher/)
* Mount the SD card on your machine and make the following changes:
* In the `/path/to/sdcard/boot/config.txt` file add to the very end of the file:
```bash
enable_uart=1
dtoverlay=dwc2
```
* In the `/path/to/sdcard/boot/cmdline.txt` add right after `rootwait`
```bash
modules-load=dwc2
```
* it should look like this make sure its on the same line:
```bash
console=serial0,115200 console=tty1 root=PARTUUID=6c586e13-02 rootfstype=ext4 elevator=deadline fsck.repair=yes rootwait modules-load=dwc2
```
* Enable ssh:
* in the `/path/to/sdcard/boot` directory create an empty file name ssh:
```bash
sudo touch /path/to/sdcard/boot/ssh
```
* Enable Wifi:
* in the `/path/to/sdcard/boot` directory create an file named `wpa_supplicant.conf`:
```bash
sudo vim /path/to/sdcard/boot/wpa_supplicant.conf
```
* Add the following contents:
```bash
ctrl_interface=DIR=/var/run/wpa_supplicant GROUP=netdev
update_config=1
country=US
network={
ssid="<your wifi SSID>"
psk="<your wifi password>"
key_mgmt=WPA-PSK
}
```
* Unmount the SD card and place it back into the Raspberry Pi Zero and power it on.
* Copy the content of `AutogadgetFS/Pizero/` to the Pi zero: `username: pi` & `password: raspberry`
```bash
cd AutogadgetFS/Pizero/
scp gadgetfuzzer.py removegadget.sh requirements.txt router.py pi@<pi-ipaddress>:/home/pi
```
* SSH into the PI Zero and setup requirements for AutoGadgetFS:
```bash
ssh pi@<pi-ip-address>
chmod +x removegadget.sh
sudo apt update
sudo apt install python3 python3-pip
sudo -H pip3 install -r requirements.txt
```
* Upgrading the latest kernel and adding modules (* This step is optional for the current release):
( This will take a very long time compiling on the Pi Zero, unless you choose to cross compile the kernel see [Compiling options](https://www.raspberrypi.org/documentation/linux/kernel/building.md))
```bash
sudo bash
apt install git bc bison flex libssl-dev make libncurses5-dev screen
screen
mkdir Downloads
cd Downloads/
git clone --depth=1 https://github.com/raspberrypi/linux
cd linux/
make bcmrpi_defconfig
make menuconfig
```
* Enable the Modules and save the config:
<div style="text-align:center"><img src="https://raw.githubusercontent.com/ehabhussein/AutoGadgetFS/master/screenshots/allgadgets.png"/></div>
<div style="text-align:center"><img src="https://raw.githubusercontent.com/ehabhussein/AutoGadgetFS/master/screenshots/allgadgets2.png"/></div>
<div style="text-align:center"><img src="https://raw.githubusercontent.com/ehabhussein/AutoGadgetFS/master/screenshots/allgadgets3.png"/></div>
<div style="text-align:center"><img src="https://raw.githubusercontent.com/ehabhussein/AutoGadgetFS/master/screenshots/allgadgets4.png"/></div>
* Build and use the kernel:
```bash
make zImage modules dtbs
make modules_install
cp arch/arm/boot/dts/*.dtb /boot/
cp arch/arm/boot/dts/overlays/*.dtb* /boot/overlays/
cp arch/arm/boot/dts/overlays/README /boot/overlays/
cp arch/arm/boot/zImage /boot/kernel.img
reboot
```
#### And you're done!
---
<a name="Tutorial"/>
### AutoGadgetFS tutorial:
[Click to visit the tutorial](https://docs.agfs.io/)
---
<a name="Screens"/>
### Screenshots:
##### Man in the Middle:
<div style="text-align:center"><img src="https://raw.githubusercontent.com/ehabhussein/AutoGadgetFS/master/screenshots/mitm.png" /></div>
#### USB device fuzzing:
<div style="text-align:center"><img src="https://raw.githubusercontent.com/ehabhussein/AutoGadgetFS/master/screenshots/devfuzzer.png" /></div>
#### Host side fuzzing with code covereage:
<div style="text-align:center"><img src="https://raw.githubusercontent.com/ehabhussein/AutoGadgetFS/master/screenshots/codecov.png" /></div>
#### Fuzzer based on a selection of bytes:
<div style="text-align:center"><img src="https://raw.githubusercontent.com/ehabhussein/AutoGadgetFS/master/screenshots/selectivefuzz.png" /></div>
#### Smart fuzzer based on learning traffic:
```python
In [44]: x.devSmartFuzz(engine="smart",samples=5,filename="/home/raindrop/PycharmProjects/AutoGadgetFs/binariesdb/Nud-Nuvoton-1046-20764-1590421333.5169587-Nuvoton-1046-20764-1590421600.8067
...: 274-device.bin")
[+]通用统计信息
完整字符集 : !"#$%&'()*+,-./0123456789:;<=>?@ABCDEFGHIJKLMNOPQRSTUVWXYZ[\]^_`abcdefghijklmnopqrstuvwxyz{|}~
丢弃的字符集 : !"#$%&'()*+,-./:;<=>?@ABCDEFGHIJKLMNOPQRSTUVWXYZ[\]^_`ghijklmnopqrstuvwxyz{|}~
最终字符集 : 0123456789abcdef
字长 : 128
小写索引使用率 : 92%
小写索引位置 : [1, 3, 4, 5, 6, 7, 8, 9, 10, 11, 12, 13, 14, 15, 16, 17, 18, 19, 20, 21, 22, 23, 24, 25, 26, 27, 28, 29, 30, 31, 32, 33, 34, 35, 36, 37, 38, 39, 40, 41, 42, 43, 44, 45, 46, 47, 48, 49, 50, 51, 52, 53, 54, 55, 56, 57, 58, 59, 60, 61, 62, 63, 64, 65, 66, 67, 68, 69, 70, 71, 72, 73, 74, 75, 76, 77, 78, 79, 80, 81, 82, 83, 84, 85, 86, 87, 88, 89, 90, 91, 92, 93, 94, 95, 96, 97, 98, 99, 100, 101, 102, 103, 104, 105, 106, 107, 108, 109, 110, 111, 112, 113, 114, 115, 121, 122, 124, 125, 127]
大写索引使用率 : 0%
大写索引位置 : []
数字索引使用率 : 96%
数字索引位置 : [0, 1, 2, 3, 4, 5, 6, 7, 8, 9, 10, 11, 12, 13, 14, 15, 16, 17, 18, 19, 20, 21, 22, 23, 24, 25, 26, 27, 28, 29, 30, 31, 32, 33, 34, 35, 36, 37, 38, 39, 40, 41, 42, 43, 44, 45, 46, 47, 48, 49, 50, 51, 52, 53, 54, 55, 56, 57, 58, 59, 60, 61, 62, 63, 64, 65, 66, 67, 68, 69, 70, 71, 72, 73, 74, 75, 76, 77, 78, 79, 80, 81, 82, 83, 84, 85, 86, 87, 88, 89, 90, 91, 92, 93, 94, 95, 96, 97, 98, 99, 100, 101, 102, 103, 104, 105, 106, 107, 108, 109, 110, 111, 112, 113, 114, 115, 116, 117, 118, 119, 120, 123, 126]
非字母数字索引使用率 : 0%
非字母数字索引位置 : []
计数统计 : 大写: 0 , 小写: 133071, 数字:212017 , 非字母数字:0
所有字符频率 :
字符:5 找到:5012 次
字符:2 找到:22563 次
字符:3 找到:12197 次
字符:8 找到:15008 次
字符:4 找到:13275 次
字符:0 找到:98056 次
字符:1 找到:17861 次
字符:f 找到:87823 次
字符:d 找到:7221 次
字符:7 找到:9614 次
字符:a 找到:11148 次
字符:6 找到:10472 次
字符:b 找到:8189 次
字符:9 找到:7959 次
字符:c 找到:9172 次
字符:e 找到:9518 次
***********************
生成:5个数据包
***********************
Out[44]:
['5608305852bf2ffd61770e2c827542f20be0b0fcba09db916bd07e1734b04cb0352b1d278068064d19f033bfad6fa90e53d865693fd4fee0214f00000eb0aa2c',
'3b083595f276e2f1353a535c32f0f59516fc9328f7673bb80262c4da11c93683afe6dcff8a7a83018d78f41498a0da4d141ebd39c361b1724f2b00000eb0aa2c',
'0120961963495c4dab9470738b497eddde07b0d70b357795ad9554d7964761969a6d997205e17eada6fa84eb33dcfb11412f75e04c195001283900000eb0aa2c',
'091065d52127bbc6e840e02f8e1316f1c4d9c92a23931c00cdbb8c158368852ef8fabd461b98812b51ec84e1ccc5c04aaa366fbafabec623bd3500000eb0aa2c',
'7300cc61151b7af27a578e766f49bebb2de68c48b37a00df1030ae464f456928eedd035303e697208bf58217af728a2a346fda5c8aef0335b82e00000eb0aa2c'
In [46]: https://raw.githubusercontent.com/ehabhussein/autogadgetfs/HEAD/x.edap.packets
Out[46]:
['5608305852bf2ffd61770e2c827542f20be0b0fcba09db916bd07e1734b04cb0352b1d278068064d19f033bfad6fa90e53d865693fd4fee0214f00000eb0aa2c',
'3b083595f276e2f1353a535c32f0f59516fc9328f7673bb80262c4da11c93683afe6dcff8a7a83018d78f41498a0da4d141ebd39c361b1724f2b00000eb0aa2c',
'0120961963495c4dab9470738b497eddde07b0d70b357795ad9554d7964761969a6d997205e17eada6fa84eb33dcfb11412f75e04c195001283900000eb0aa2c',
'091065d52127bbc6e840e02f8e1316f1c4d9c92a23931c00cdbb8c158368852ef8fabd461b98812b51ec84e1ccc5c04aaa366fbafabec623bd3500000eb0aa2c',
'7300cc61151b7af27a578e766f49bebb2de68c48b37a00df1030ae464f456928eedd035303e697208bf58217af728a2a346fda5c8aef0335b82e00000eb0aa2c']```
#### Help method:
```python3
In [15]: x.help("")
Currently supported methods:
__________________________________________________________________________________________________________________________________________________________________
Method ||-->Description
----------------------------------------------------------------------------------------------------------------------------
MITMproxy ||-->此方法建立与 RabbitMQ 的连接,并监听 todev 队列上接收的消息
____________________________________________________________________________________________________________________________
MITMproxyRQueues ||-->此方法从 todev 队列读取数据,并将请求发送到设备本身
____________________________________________________________________________________________________________________________
SmartFuzz ||-->此方法根据从主机或设备嗅探到的内容生成数据包
____________________________________________________________________________________________________________________________
chgIntrfs ||-->此方法允许您更改并选择另一个接口
____________________________________________________________________________________________________________________________
clearqueues ||-->此方法清除 RabbitMQ 上设置的所有队列
____________________________________________________________________________________________________________________________
clonedev ||-->此方法无需任何参数,仅保存设备的备份,以便您稍后共享或使用
____________________________________________________________________________________________________________________________
createctrltrsnfDB ||-->创建一个 SQLite 数据库,包含从控制传输枚举中枚举出的值
____________________________________________________________________________________________________________________________
createdb ||-->从 USBLyzer 捕获数据创建 SQLite 表和列
____________________________________________________________________________________________________________________________
decodePacketAscii ||-->此方法将数据包字节解码为 ASCII
____________________________________________________________________________________________________________________________
describeFuzz ||-->此方法允许您描述一个数据包,并选择哪些字节将被模糊测试
____________________________________________________________________________________________________________________________
devEnumCtrltrnsf ||-->此方法枚举控制传输请求的所有可能组合
____________________________________________________________________________________________________________________________
devReset ||-->此方法重置设备
____________________________________________________________________________________________________________________________
devWrite ||-->要配合某个方法向设备写入,请确保运行 startSniffReadThread(self,endpoint=None, pts=None, queue=None,channel=None)
____________________________________________________________________________________________________________________________
devctrltrnsf ||-->此方法允许您向目标设备发送控制传输请求
____________________________________________________________________________________________________________________________
deviceInfo ||-->获取连接到主机的任何 USB 的完整信息
____________________________________________________________________________________________________________________________
deviceInterfaces ||-->获取设备上的所有接口和端点
____________________________________________________________________________________________________________________________
devrandfuzz ||-->此方法允许您创建使用 urandom 生成的固定或随机大小数据包
____________________________________________________________________________________________________________________________
devseqfuzz ||-->此方法允许您创建顺序递增的数据包,并将其发送到设备
____________________________________________________________________________________________________________________________
findSelect ||-->此方法枚举所有连接的 USB 设备,并允许您将其以及其端点选为目标
____________________________________________________________________________________________________________________________
help ||-->AutogadgetFS 帮助方法
____________________________________________________________________________________________________________________________
hostwrite ||-->此方法将数据包写入主机,目标是控制设备的软件或驱动程序
____________________________________________________________________________________________________________________________
hstrandfuzz ||-->此方法允许您创建使用 urandom 生成的固定或随机大小数据包,并将其发送到主机队列
____________________________________________________________________________________________________________________________
monInterfaceChng ||-->负责监控接口变化的方法,通过 def startMonInterfaceChng(self) 调用
____________________________________________________________________________________________________________________________
newProject ||-->创建一个新的项目名称,用于测试其他内容时
____________________________________________________________________________________________________________________________
releasedev ||-->释放设备并重新附加内核驱动程序
____________________________________________________________________________________________________________________________
removeGadget ||-->此方法从 Raspberry Pi 中移除 gadget
____________________________________________________________________________________________________________________________
replaymsgs ||-->此方法搜索 USBLyzer 解析后的数据库,并提供选项重放从主机到设备的一条消息或所有消息
____________________________________________________________________________________________________________________________
searchmsgs ||-->此方法允许您搜索并选择所有符合模式的消息,这些消息来自 USBlyzer 数据库创建时保存的数据
____________________________________________________________________________________________________________________________
setupGadgetFS ||-->设置 gadgetFS 变量:仅限 Linux,在 Raspberry Pi Zero 上最佳选择
____________________________________________________________________________________________________________________________
showMessage ||-->显示错误、警告或信息消息
____________________________________________________________________________________________________________________________
sniffdevice ||-->读取设备到主机的通信
____________________________________________________________________________________________________________________________
startMITMusbWifi ||-->启动一个线程来监控 USB 目标设备
____________________________________________________________________________________________________________________________
startMonInterfaceChng||-->此方法允许您每隔 10 秒监控一个设备,以防其接口配置突然变化
____________________________________________________________________________________________________________________________
startQueuewrite ||-->初始化与队列的连接以与主机通信
____________________________________________________________________________________________________________________________
startSniffReadThread ||-->这是一个持续读取设备回复的线程,根据您传递给方法的参数(pts 或 queue)进行操作
____________________________________________________________________________________________________________________________
stopMITMusbWifi ||-->停止主机与设备之间的中间人线程
____________________________________________________________________________________________________________________________
stopMonInterfaceChang||-->停止接口监控线程
____________________________________________________________________________________________________________________________
stopQueuewrite ||-->停止负责与主机通信的线程
____________________________________________________________________________________________________________________________
stopSniffing ||-->杀死由 startSniffReadThread() 启动的嗅探线程
____________________________________________________________________________________________________________________________
usblyzerparse ||-->此方法将解析从 USBLyzer 导出的 XML,并将其导入数据库
____________________________________________________________________________________________________________________________
In [16]: x.help("findSelect")
****
[+]findSelect 方法的帮助信息:
[-]签名:findSelect(self, chgint=None)
[+]findSelect 帮助:
此方法枚举所有连接的 USB 设备,并允许您将其以及其端点选为目标
****```
---
#### AutoGadgetFS console. A much simpler way to use AGFS:
<div style="text-align:left"><img src="https://raw.githubusercontent.com/ehabhussein/AutoGadgetFS/master/screenshots/agfsconsole.png"/></div>
---
<a name="Youtube"/>
### Youtube Playlist:
[Youtube Playlist](https://www.youtube.com/playlist?list=PLKozlVgM6RQjNHmpWR2RBiFCtufV03o6Z)
---
<a name="Slack"/>
### Join Slack:
Visit [AutogadgetFS Slack Channel](https://join.slack.com/t/autogadgetfs/shared_invite/zt-emgcv3ol-unG_axHmSQlk~5GcBddhlQ)
---
<a name="Support"/>
### Supported by:
<img src="https://assets.kitploit.com/production/public/readmes/3835/31aa30e1b311728af097fe24cefc4db7272ad971ffe64bac8d4d4e36a542fc9e.jpg" width="166" height="166"> <img src="https://raw.githubusercontent.com/ehabhussein/AutoGadgetFS/master/screenshots/JetBrains.png" width="166" height="166"> <img src="https://raw.githubusercontent.com/ehabhussein/AutoGadgetFS/master/screenshots/pyusb.png" width="166" height="166">
---
<a name="Donate"/>
### Buy me a coffee to support the development of this project
## Ethereum Donations : 0xA919e40ddB0563918dDc174320D91992e0048477
---
<a name="Contact"/>
### Contact me:
### 📧: <[email protected]>
### 🐦 : <https://twitter.com/0xRaindrop>
---
<a name="Cont"/>
### Contribute:
We're looking for developers to make this tool great! send me an 📧: <[email protected]> if you feel you'd like to be a part of this.