 hackinglz/gibson
프로세스-네트워크 연결을 매핑하고, 클라우드 제공업체를 식별하며, 비콘 활동을 탐지하는 네트워크 모니터링 도구

프로세스-네트워크 연결을 매핑하고, 클라우드 제공자를 식별하며, 방화벽 규칙을 생성하는 네트워크 모니터링 도구입니다. 수집을 위한 경량 에이전트, 집계를 위한 서버, 분석을 위한 파서로 구성됩니다.
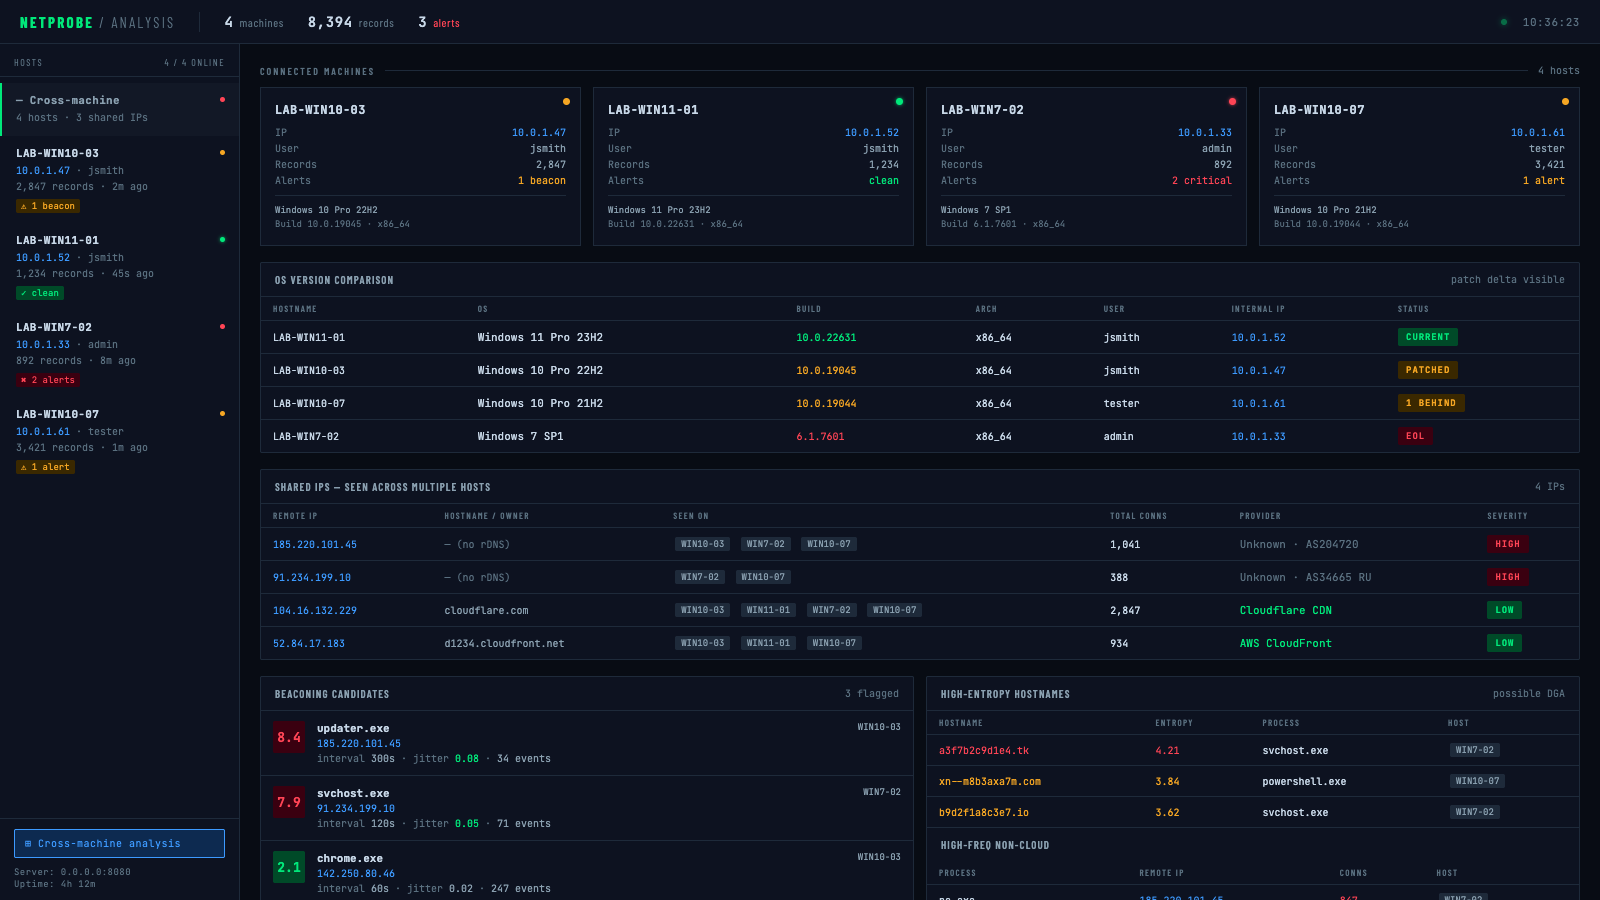
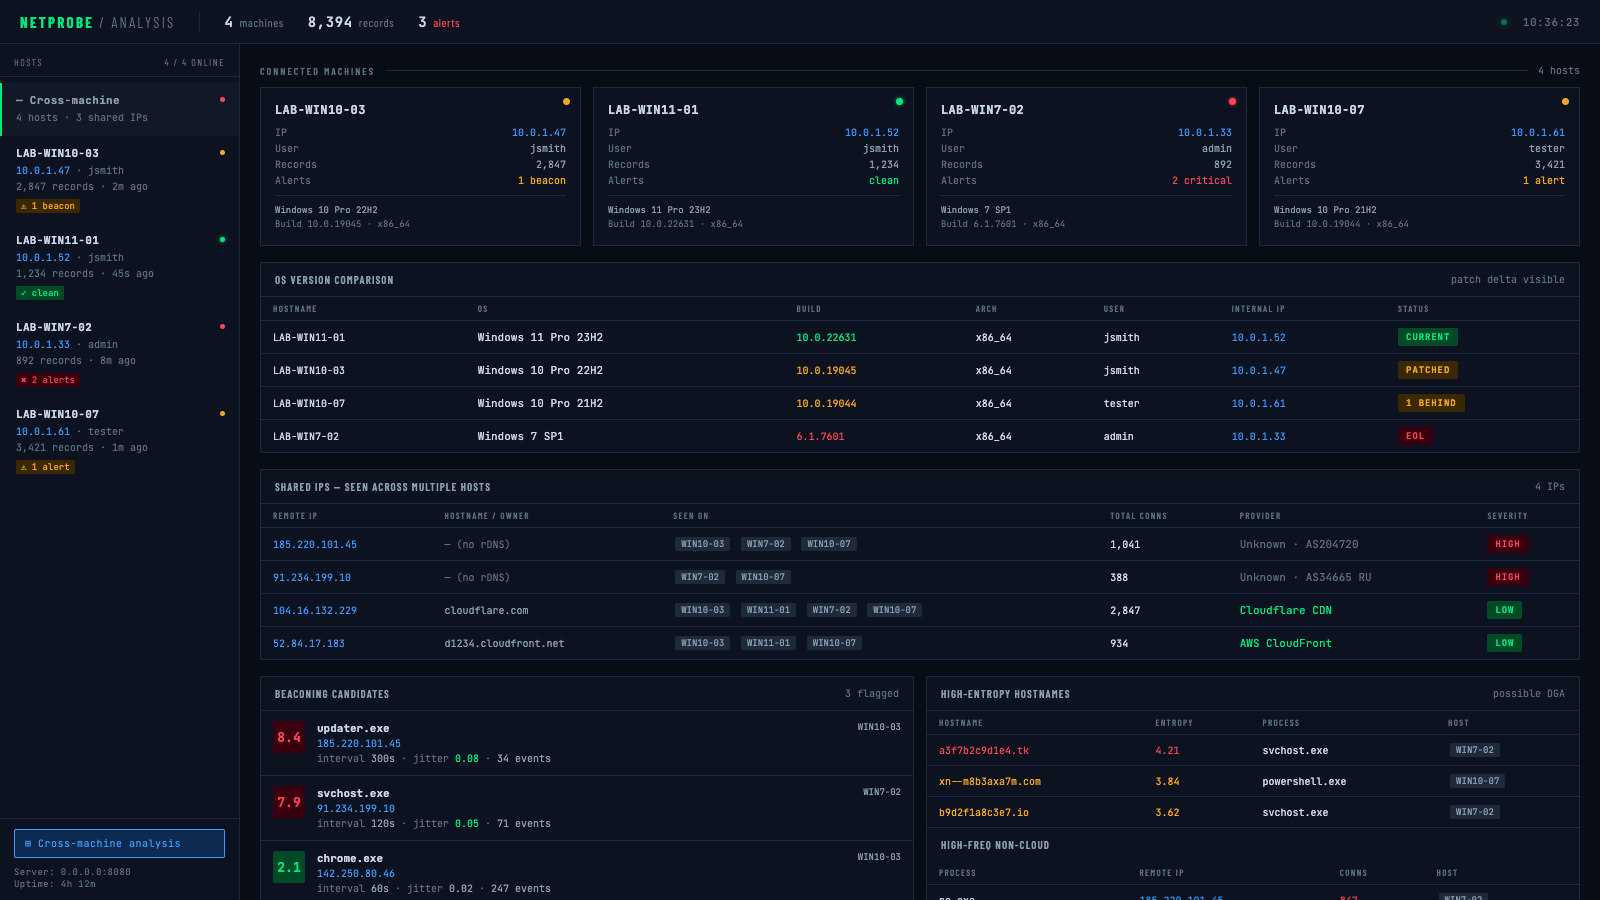
크로스 머신 개요 — OS 버전 비교, 공유 IP 탐지, 모든 호스트에서 비콘 후보:
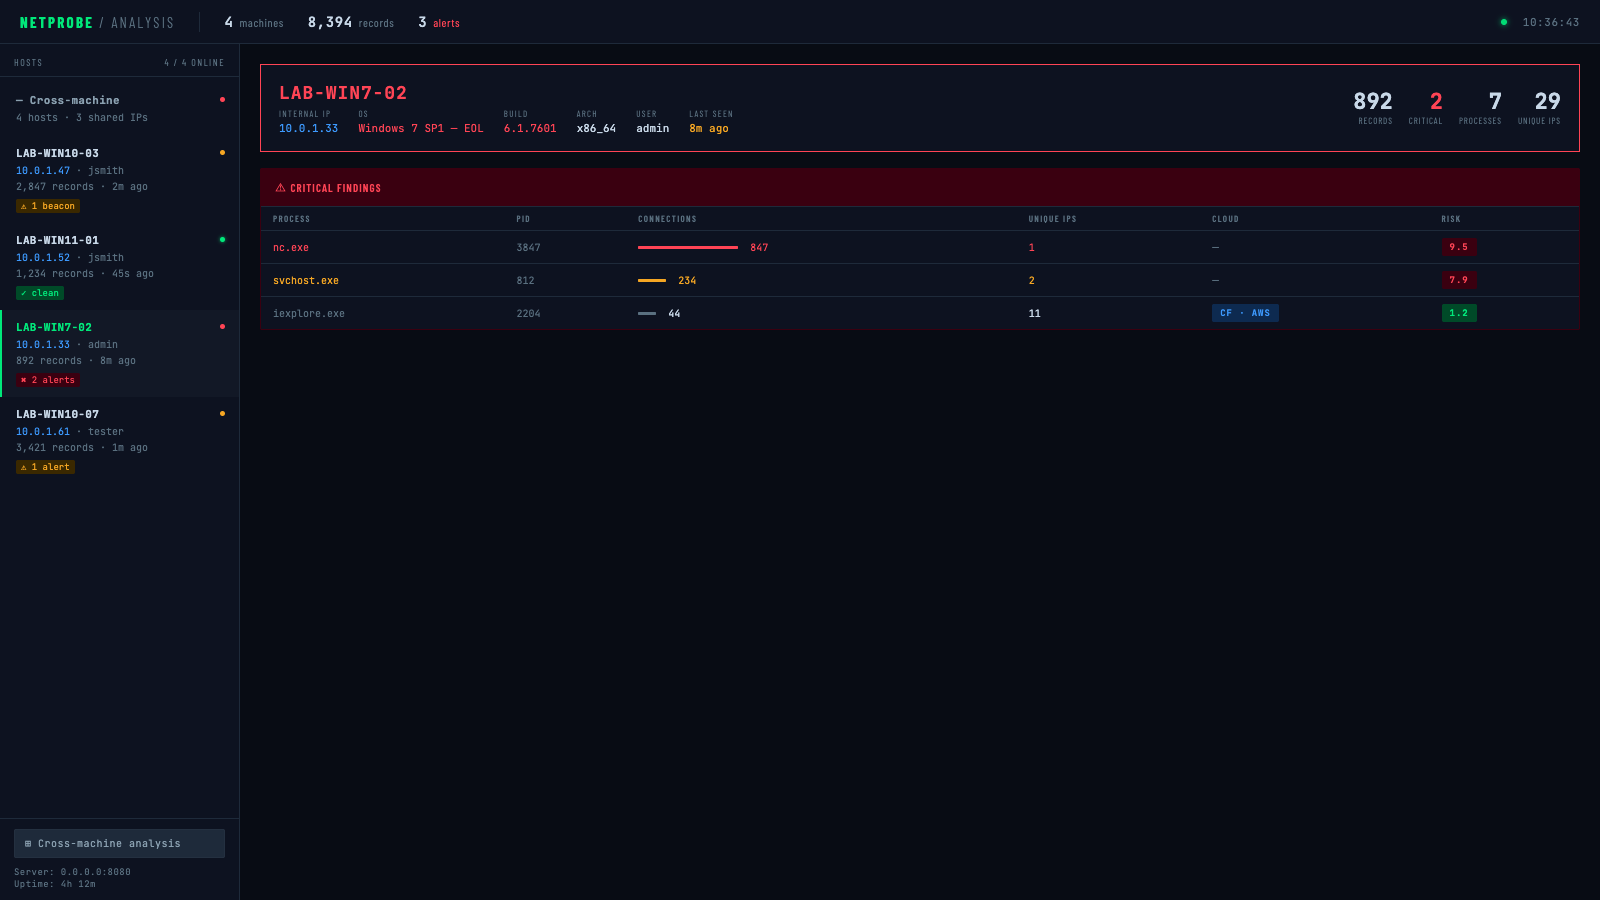
호스트별 세부 정보 — 중요 알림 (EOL OS, 알 수 없는 IP로 비콘을 보내는 nc.exe):
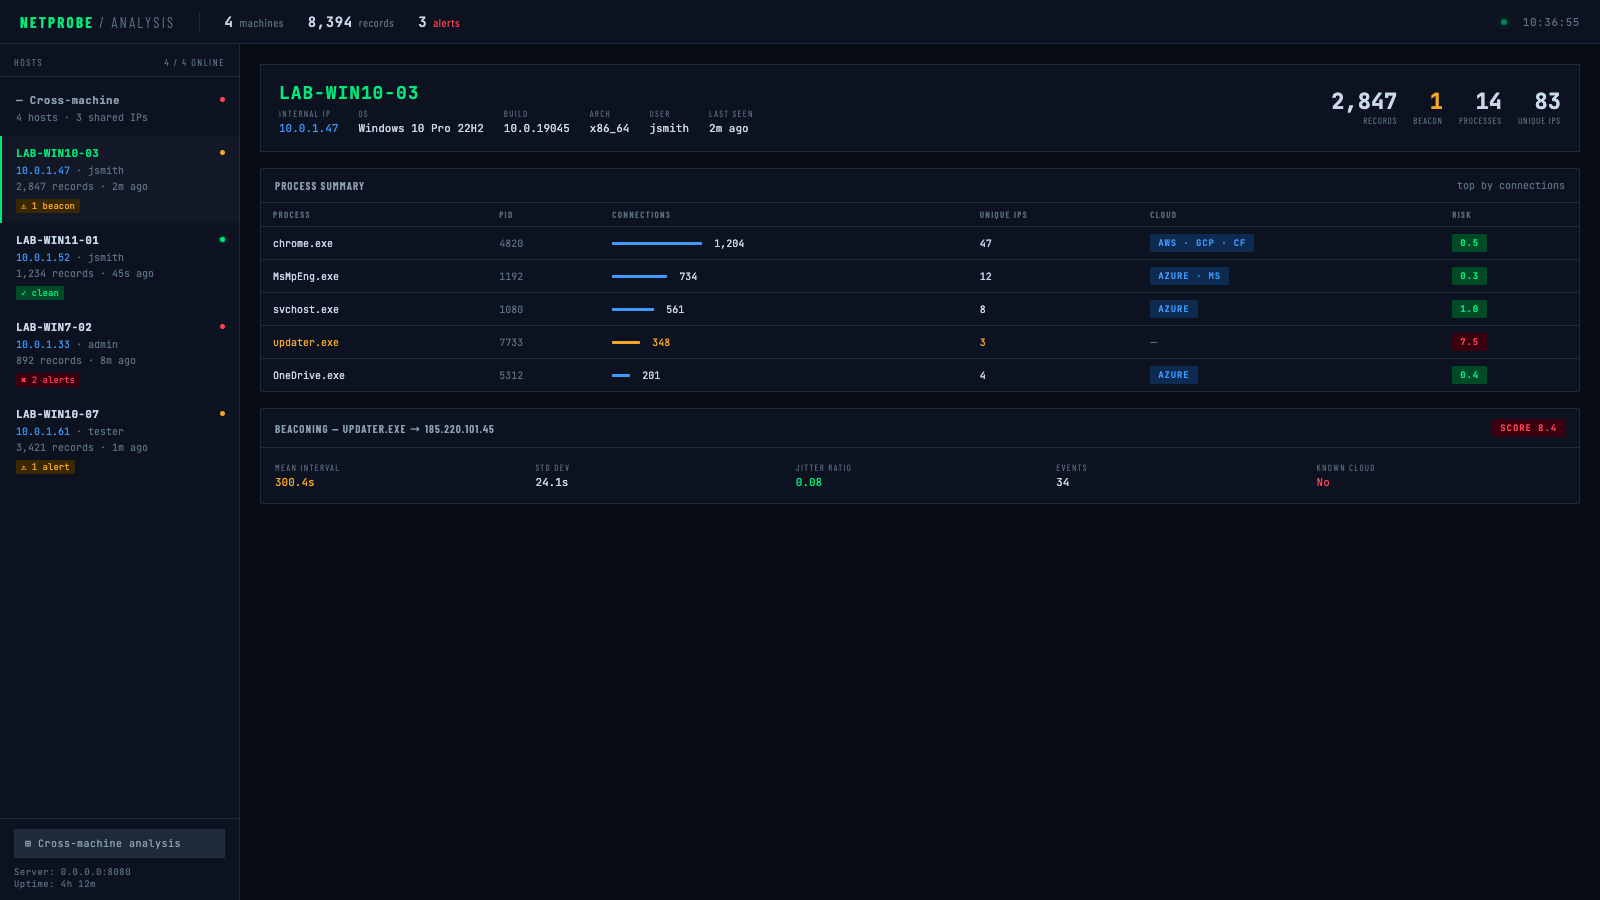
호스트별 세부 정보 — 경고 (비콘 후보 플래그 지정):
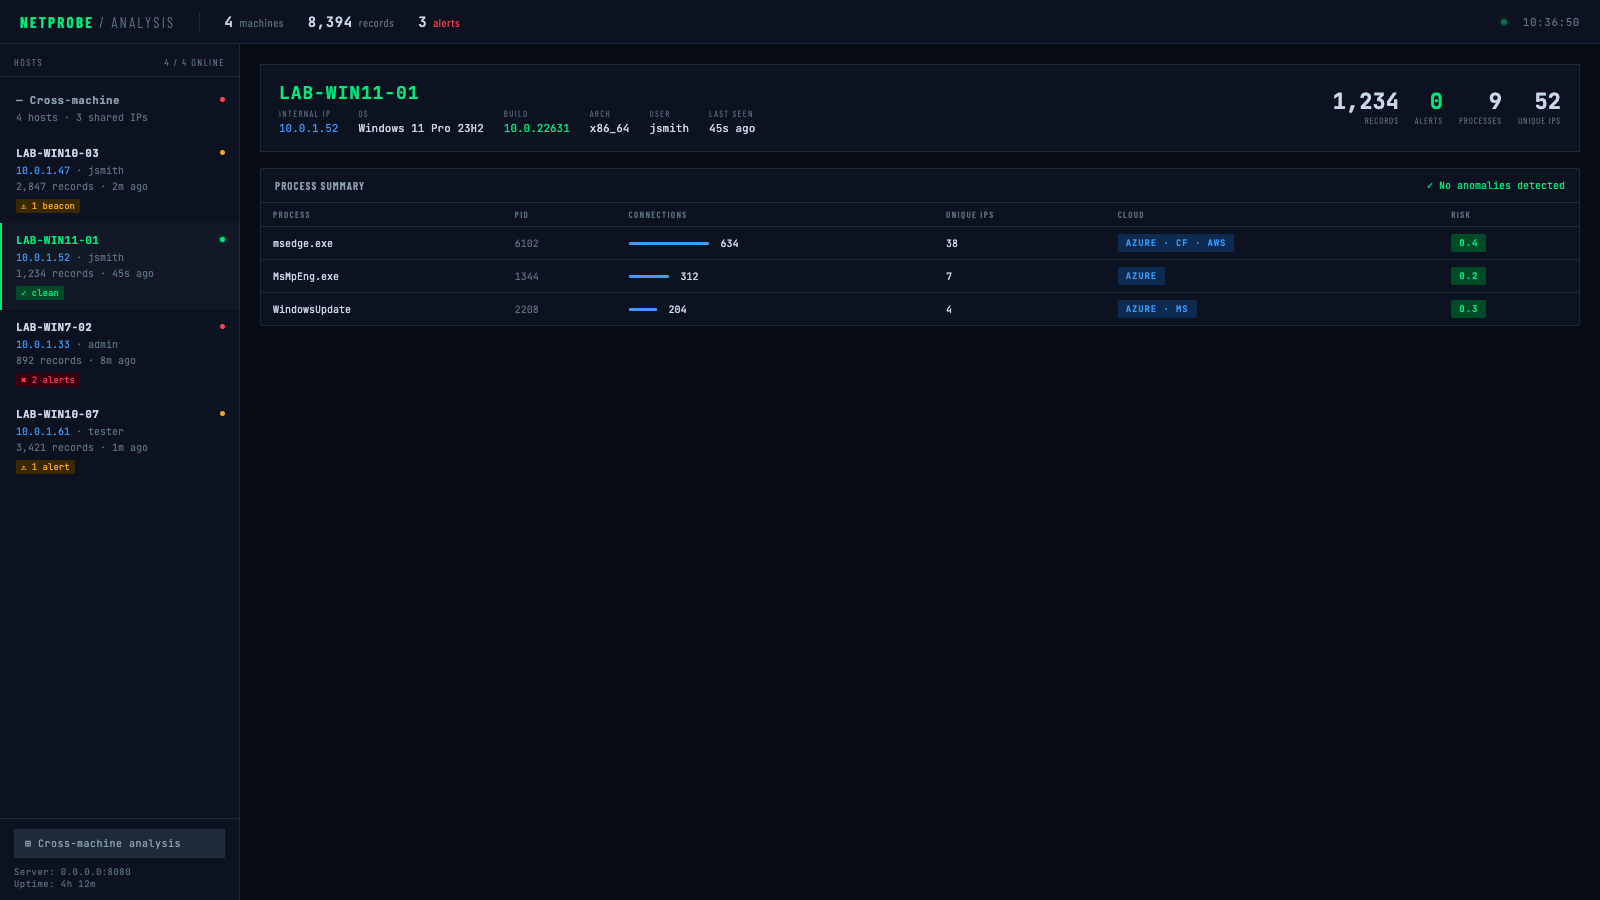
호스트별 세부 정보 — 정상 (이상 없음):
cargo build --release
# 간단한 수집
cargo run --release -- collect --duration-seconds 300

# DNS 조회 포함
cargo run --release -- collect --duration-seconds 300 --enable-dns

# 압축 및 암호화 포함
cargo run --release -- collect \
  --duration-seconds 300 \
  --compress \
  --encrypt-key "your-secret-password"
# 모든 보고서 생성
cargo run --release -- parse \
  --input connections.jsonl \
  --process-summary processes.json \
  --cloud-analysis cloud.json \
  --firewall-rules-iptables firewall.sh \
  --database-export network.sql

# 로컬 ASN DB를 이용한 오프라인 소유권 조회 (네트워크 호출 없음)
cargo run --release -- parse \
  --input connections.jsonl \
  --cloud-analysis cloud.json \
  --asn-db ip2asn-v4.tsv

# 영구 캐시를 사용한 실시간 ARIN 조회 (재실행 시 이미 조회된 IP는 건너뜀)
cargo run --release -- parse \
  --input connections.jsonl \
  --cloud-analysis cloud.json \
  --arin-lookup \
  --arin-cache arin_cache.json
# 빠른 5분 분석
cargo run --release -- monitor \
  --duration-seconds 300 \
  --output-dir ./analysis \
  --full-analysis
agent 바이너리는 최소한의, 플래그가 필요 없는 배포 대상입니다. 모든 구성은 컴파일 시 환경 변수를 통해 바이너리에 내장됩니다 — 대상 시스템에 배포하고 인수 없이 실행하기만 하면 됩니다.
AGENT_SERVER="http://10.0.1.5:8080/upload" \
AGENT_KEY="labkey123" \
AGENT_INTERVAL="5" \
AGENT_BATCH="200" \
AGENT_DURATION="0" \
AGENT_DNS="false" \
AGENT_ENCRYPT_KEY="mysecretpassword" \
cargo build --release --bin agent
결과 바이너리 target/release/agent는 외부 종속성이 없으며 플래그가 필요 없습니다:
./agent
| 변수 | 기본값 | 설명 |
|---|---|---|
AGENT_SERVER | http://localhost:8080/upload | 업로드 엔드포인트 URL |
AGENT_KEY | (없음) | X-API-Key 헤더 값 |
AGENT_INTERVAL | 5 | 소켓 폴링 간격 (초) |
AGENT_BATCH | 200 | 업로드 배치당 레코드 수 |
AGENT_DURATION | 0 | 실행 시간 (초) (0 = 무한 실행) |
AGENT_DNS | false | IP를 호스트명으로 해석 |
AGENT_ESTABLISHED | true | ESTABLISHED 연결만 |
AGENT_LOCAL_COPY | false | 업로드와 함께 로컬 .jsonl 사본 유지 |
AGENT_COMPRESS | false | 업로드 전 gzip 압축 |
AGENT_ENCRYPT_KEY | (없음) | AES-256-GCM 페이로드 암호화 (비밀번호 또는 64자 16진수 키) |
AGENT_UA | (reqwest 기본값) | HTTP User-Agent 헤더 |
AGENT_SERVER="https://collector.internal/upload" \
AGENT_KEY="prod-api-key" \
AGENT_DURATION="0" \
AGENT_INTERVAL="30" \
AGENT_COMPRESS="true" \
AGENT_ENCRYPT_KEY="$(cat /etc/gibson/key)" \
cargo build --release --bin agent
cargo run --release -- collect \
  --duration-seconds 3600 \
  --interval-seconds 10 \
  --compress \
  --encrypt-key "your-32-char-hex-key-or-password" \
  --upload-url "https://your-server.com/api/upload" \
  --api-key "your-api-key" \
  --batch-size 50 \
  --delete-after-upload
cargo run --release -- collect \
  --duration-seconds 86400 \
  --interval-seconds 30 \
  --output connections_daily.jsonl \
  --enable-dns \
  --compress
파서는 일치하지 않는 IP의 소유자를 식별하기 위해 두 가지 상호 배타적인 경로를 지원합니다:
| 방법 | 플래그 | 속도 | 네트워크 | 가장 적합한 경우 |
|---|---|---|---|---|
| 로컬 ASN DB | --asn-db | 즉시 | 없음 | 반복 분석, 에어갭 환경 |
| 실시간 ARIN RDAP | --arin-lookup | 느림 (IP별) | 있음 | 일회성 조회, 로컬 DB 없을 때 |
ip2asn 데이터베이스 다운로드 (매주 새로고침):
curl -O https://iptoasn.com/data/ip2asn-v4.tsv.gz && gunzip ip2asn-v4.tsv.gz
--asn-db가 제공되면 --arin-lookup은 무시됩니다. --arin-cache를 사용하여 ARIN 결과를 디스크에 유지하면 재실행 시 이미 조회된 IP를 건너뛸 수 있습니다.
# 클라우드 탐지에 초점을 맞춘 파싱
cargo run --release -- parse \
  --input connections.jsonl \
  --cloud-analysis cloud_report.json \
  --min-connections 5 \
  --whitelist-processes "chrome,firefox,safari,edge"
collector_server.py 생성:
from flask import Flask, request, jsonify
import os
import json
import base64
from datetime import datetime
from Crypto.Cipher import AES
import gzip

app = Flask(__name__)

# Configuration
UPLOAD_DIR = "./collected_data"
API_KEY = "your-secure-api-key"
ENCRYPTION_KEY = bytes.fromhex("your-32-byte-hex-key")  # Optional

os.makedirs(UPLOAD_DIR, exist_ok=True)

def decrypt_data(encrypted_data, key):
    """Decrypt AES-256-GCM encrypted data"""
    decoded = base64.b64decode(encrypted_data)
    nonce = decoded[:12]
    ciphertext = decoded[12:]

    cipher = AES.new(key, AES.MODE_GCM, nonce=nonce)
    plaintext = cipher.decrypt_and_verify(ciphertext[:-16], ciphertext[-16:])
    return plaintext

@app.route('/api/upload', methods=['POST'])
def upload():
    # Verify API key
    if request.headers.get('X-API-Key') != API_KEY:
        return jsonify({"error": "Invalid API key"}), 401

    try:
        data = request.get_data()

        # If data is base64 encoded (encrypted)
        if data.startswith(b'eyJ'):  # JSON starts with {"
            # Not encrypted, parse directly
            batch = json.loads(data)
        else:
            # Encrypted data
            decrypted = decrypt_data(data, ENCRYPTION_KEY)
            batch = json.loads(decrypted)

        # Save to file
        hostname = batch.get('hostname', 'unknown')
        timestamp = datetime.now().strftime('%Y%m%d_%H%M%S')
        filename = f"{UPLOAD_DIR}/{hostname}_{timestamp}.json"

        with open(filename, 'w') as f:
            json.dump(batch, f)

        return jsonify({"status": "success", "file": filename}), 200

    except Exception as e:
        return jsonify({"error": str(e)}), 500

if __name__ == '__main__':
    app.run(host='0.0.0.0', port=5000, ssl_context='adhoc')  # Use proper SSL in production
실행:
pip install flask pycryptodome
python collector_server.py
/etc/nginx/sites-available/collector 생성:
server {
    listen 443 ssl;
    server_name collector.yourcompany.com;

    ssl_certificate /etc/ssl/certs/your-cert.pem;
    ssl_certificate_key /etc/ssl/private/your-key.pem;

    client_max_body_size 100M;

    location /upload {
        # API key validation
        if ($http_x_api_key != "your-secure-api-key") {
            return 403;
        }

        # Save uploaded files
        client_body_in_file_only on;
        client_body_temp_path /var/uploads/;

        # Pass to processing script
        proxy_pass http://localhost:8080;
        proxy_set_header X-File $request_body_file;
    }
}
// index.js for AWS Lambda
const AWS = require('aws-sdk');
const crypto = require('crypto');
const s3 = new AWS.S3();
