
Skip to content
KitploitKITPLOIT
도구블로그
제출
도구블로그
제출

해킹, 침투 테스트 및 사이버 보안 도구를 당신의 보안 무기고에!

Kitploit은 해킹, 사이버 보안 및 침투 테스트 도구 디렉토리입니다. 최신 프로젝트 업데이트를 발견하여 취약점을 찾고, 시스템을 분석하고, 테스트를 자동화하고, 보안을 강화하세요.

··피드·문의·개인정보·© 2026 Kitploit

도구 디렉토리

카테고리

모든 카테고리 보기
Loading categories
ClientInspectorV2 — Azure 기반 클라이언트 인벤토리 및 드리프트 탐지 도구로, Windows 구성 데이터(안티바이러스, 패치, Bitlocker)를 LogAnalytics에 수집하여 KQL 기반 대시보드 및 Sentinel 경보에 활용합니다. | Kitploit
도구/GitHubGitHub/knudsenmorten/clientinspectorv2
Defensive ToolsConfiguration AuditingCloud SecurityIncident ResponseLog Analysis
GitHubknudsenmorten/clientinspectorv2

ClientInspectorV2

Azure 기반 클라이언트 인벤토리 및 드리프트 탐지 도구로, Windows 구성 데이터(안티바이러스, 패치, Bitlocker)를 LogAnalytics에 수집하여 KQL 기반 대시보드 및 Sentinel 경보에 활용합니다.


저장소 보기
2753년 전Kitploit 검토 완료

인기

모두 보기 →

커뮤니티에서 가장 많이 사용되는 도구를 찾아보세요.

모든 도구 탐색

도구 컬렉션을 둘러보세요

모든 도구 보기 →
공유

ClientInspector(v2) 소개

ClientInspector

당신이 통제하고 있습니까? - 아니면 패치, 안티바이러스, BitLocker 활성화 같은 핵심 인프라 프로세스가 표류하고 있습니까? 또는 고급 인벤토리를 수행하여 Lenovo 또는 Dell 보증 상태를 조회하고 싶다면 계속 읽어보세요.

ClientInspector를 확인해 보세요. 이 도구는 완전한 클라이언트 환경에 대한 탁월한 통찰력을 얻는 데 도움을 줍니다.

ClientInspector는 커뮤니티에 무료로 제공됩니다. Azure 로그 수집 파이프라인, Azure 데이터 수집 규칙, Azure Log Analytics를 사용하여 클라이언트에서 데이터를 가져오고, Azure Monitor 및 Azure 대시보드로 이를 확인하며, Microsoft Sentinel을 사용하여 "드리프트 알림"을 받는 방법을 보여주는 멋진 데모로 제작되었습니다.

동영상 3분 01초 - 대시보드

ClientInspector의 아키텍처 및 흐름

ClientInspector(v2)는 수집된 데이터를 로그 수집 API, Azure 데이터 수집 규칙(DCR) 및 Azure 데이터 수집 엔드포인트(DCE) 를 사용하여 Azure Log Analytics 작업 영역의 사용자 지정 로그에 업로드합니다.
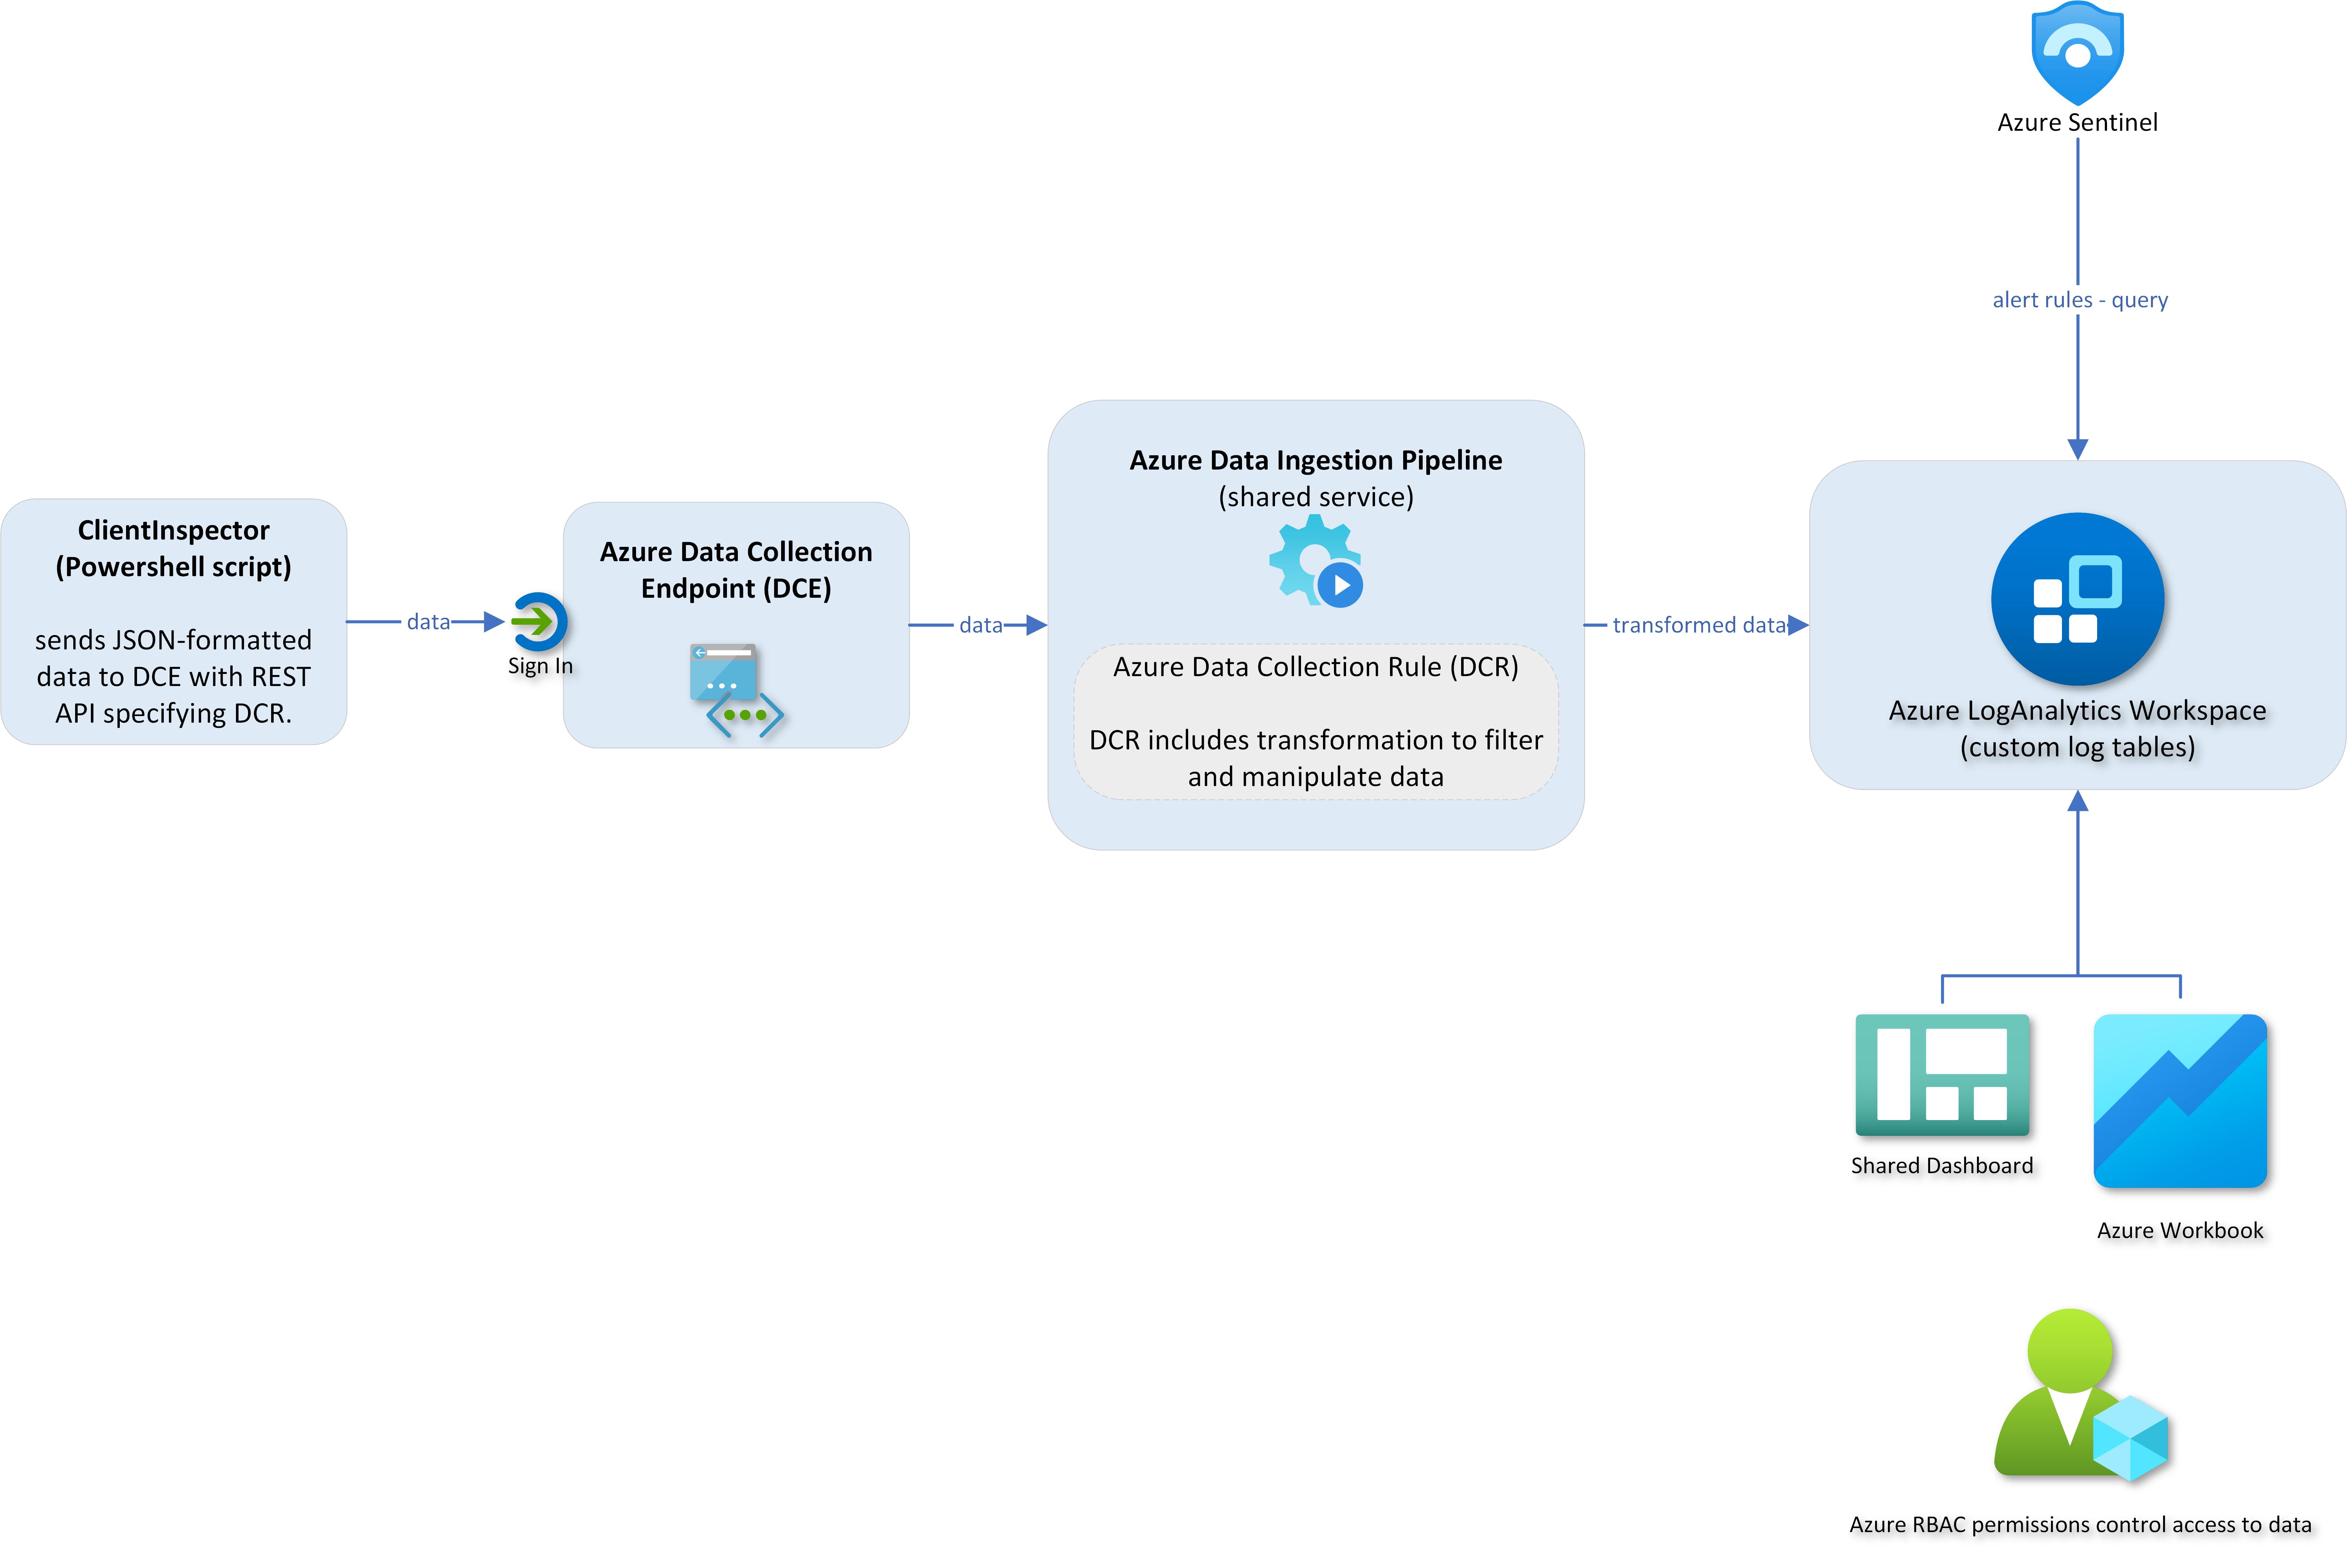
아키텍처

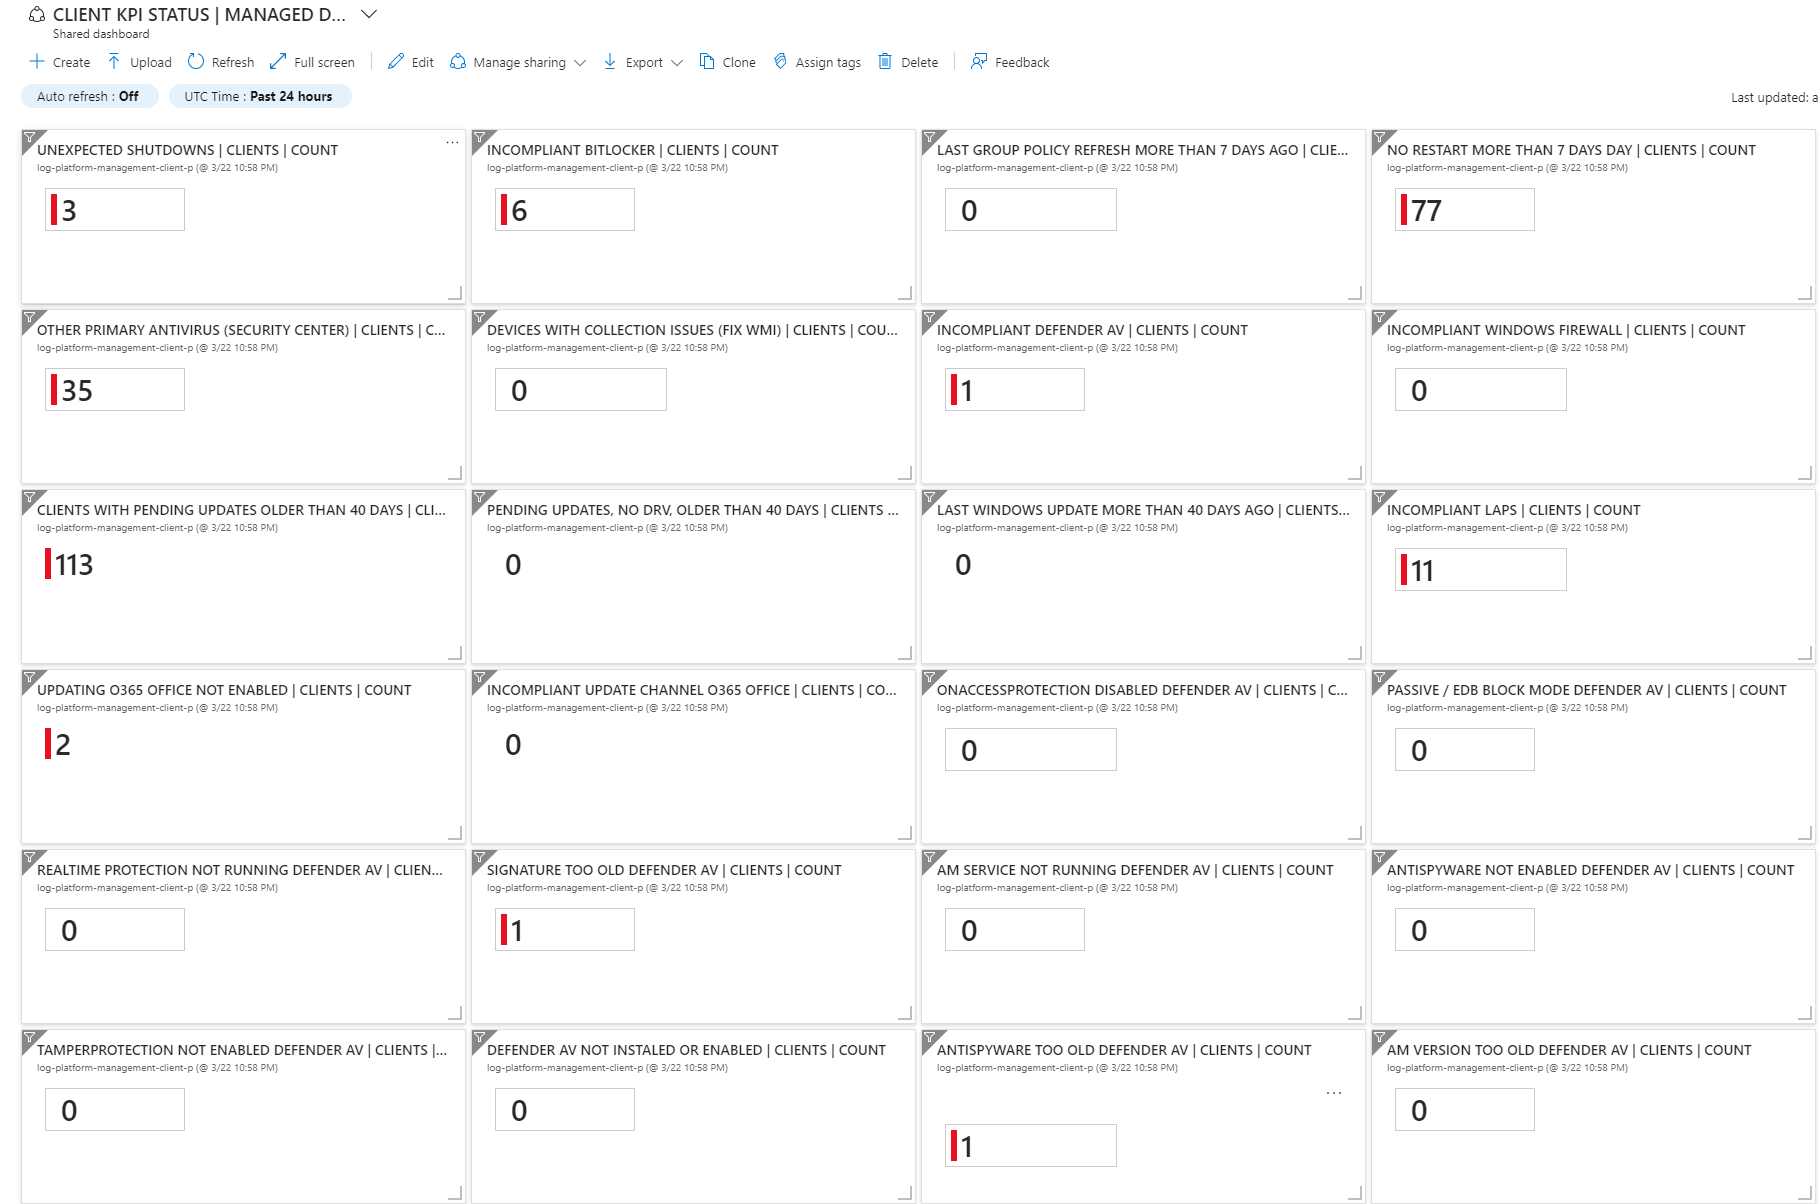
샘플 대시보드

KPI

안티바이러스

블루스크린

면책 조항

저는 Microsoft 보안 및 관리 스택과 경쟁할 별도의 관리 도구를 만들려는 것이 아님을 밝히는 것이 중요합니다.

Microsoft Azure/M365 관리 및 보안 스택을 능가하는 것은 없습니다. 이들은 최고의 솔루션입니다.

그러나 저는 로깅 기능과 클라이언트, 서버, 클라우드 및 타사 시스템에서 데이터를 가져와 멋진 유용한 정보를 얻는 능력에 진심으로 열정을 가지고 있습니다.

서버용 유사한 솔루션인 ServerInspector도 있습니다. 불행히도 공개되지는 않았습니다.

Microsoft 제품 팀의 훌륭한 분들께 큰 감사를 드립니다 - 여러분은 최고입니다 😄

즐거운 사냥 되세요 😄


빠른 링크

어떤 데이터가 수집되나요?
원하는 상태 대시보드 - 데이터에서 내 환경에 대한 통찰력을 얻는 방법은?
데이터를 어떻게 쿼리하나요? - Kusto(KQL)가 답입니다
아키텍처, 스키마 및 네트워킹
구현
종속성
ClientInspector.ps1 실행 - 3가지 모드
ClientInspector 출력 샘플
보안
ClientInspector 데이터 세트 레이아웃
자세한 모드 및 추가 도움말
비용 - 이 데이터를 저장하는 데 얼마나 드나요?
버그 발견 시 알려주세요
연락처

솔루션 동영상

동영상 3분 19초 - 명령줄을 사용한 ClientInspector 실행(일반 모드)
동영상 1분 40초 - 2개의 테이블 및 DCR 자동 생성(자세한 모드)
동영상 1분 37초 - 2개의 테이블 및 DCR 자동 생성(일반 모드)
동영상 1분 34초 - DCR 및 테이블 스키마 보기
동영상 2분 19초 - 데이터 조작
동영상 1분 58초 - 데이터에 대한 Kusto 쿼리
동영상 3분 01초 - 대시보드
동영상 0분 48초 - 데이터 사용 샘플 - Lenovo 보증 DB 조회
동영상 7분 25초 - ClientInspector DeploymentKit을 통한 배포


어떤 데이터가 수집되나요?

ClientInspector는 Windows 클라이언트에서 많은 유용한 정보를 수집하고 데이터를 Azure Log Analytics 사용자 지정 테이블로 전송하는 데 사용할 수 있습니다.

이 스크립트는 다음 정보(설정, 정보, 구성, 상태)를 수집합니다.

  1. 클라이언트에 로그온한 사용자
  2. 컴퓨터 정보 - BIOS, 프로세서, 하드웨어 정보, Windows OS 정보, OS 정보, 마지막 재시작
  3. 설치된 애플리케이션(WMI 및 레지스트리 사용)
  4. Windows의 안티바이러스 보안 센터 - 기본 안티바이러스, 상태, 구성
  5. Microsoft Defender 안티바이러스 - ASR, 제외, 실시간 보호 등 모든 설정
  6. Office - 버전, 업데이트 채널 구성, SKU
  7. VPN 클라이언트 - 버전, 제품
  8. LAPS - 버전
  9. Admin By Request(타사) - 버전
  10. Windows 업데이트 - 마지막 결과(언제), Windows 업데이트 소스 정보(어디서), 보류 중인 업데이트, 마지막 설치(무엇)
  11. BitLocker - 구성
  12. 이벤트 로그 - 로그온 이벤트, 블루 스크린 등 특정 이벤트 검색
  13. 네트워크 어댑터 - 구성, 설치된 어댑터
  14. 모든 어댑터의 IP 정보
  15. 로컬 관리자 그룹 구성원
  16. Windows 방화벽 - 3가지 모드 모두에 대한 설정
  17. 그룹 정책 - 마지막 새로 고침
  18. TPM 정보 - TPM이 있거나 없는 머신을 감지하는 데 관련됨

필요에 맞게 더 멋진 데이터 수집을 자유롭게 추가하세요. 커뮤니티에 참여하고 싶다면, 커뮤니티 전체에 도움이 될 것이라고 생각되는 수집 항목을 이메일로 보내주세요.


소스 데이터 - 어떤 데이터를 사용할 수 있나요?

Powershell(wmi, cim, 외부 데이터, rest api, xml 형식, json 형식, csv 형식 등)로 검색할 수 있는 모든 소스 데이터를 사용할 수 있습니다.

데이터를 보내기 전에 일반적으로 데이터를 조작하여 유효하고 관련 없는 데이터가 제거되었는지 확인해야 한다는 점을 이해하는 것이 매우 중요합니다.

ClientInspector는 Powershell 모듈 AzLogDcIngestPS 내의 24개 함수를 모두 사용하여 소스 데이터를 조작하고, 데이터의 "노이즈"를 제거하며, 테이블/DCR에서 금지된 열 이름을 바꾸고, UserLoggedOn, CollectionTime, Computer와 같은 추가 통찰력을 통한 투명성 요구를 지원합니다.

Convert-CimArrayToObjectFixStructure, Add-CollectionTimeToAllEntriesInArray, Add-ColumnDataToAllEntriesInArray, ValidateFix-AzLogAnalyticsTableSchemaColumnNames, Build-DataArrayToAlignWithSchema, Filter-ObjectExcludeProperty 함수 사용 예제```js #------------------------------------------------------------------------------------------- # Collecting data (in) #-------------------------------------------------------------------------------------------

Write-Output "" Write-Output "Collecting Bios information ... Please Wait !"

$DataVariable = Get-CimInstance -ClassName Win32_BIOS

#-------------------------------------------------------------------------------------------

Preparing data structure

#-------------------------------------------------------------------------------------------

convert CIM array to PSCustomObject and remove CIM class information

$DataVariable = Convert-CimArrayToObjectFixStructure -data $DataVariable -Verbose:$Verbose

add CollectionTime to existing array

$DataVariable = Add-CollectionTimeToAllEntriesInArray -Data $DataVariable -Verbose:$Verbose

add Computer & UserLoggedOn info to existing array

$DataVariable = Add-ColumnDataToAllEntriesInArray -Data $DataVariable -Column1Name Computer -Column1Data $Env:ComputerName -Column2Name UserLoggedOn -Column2Data $UserLoggedOn -Verbose:$Verbose

Remove unnecessary columns in schema

$DataVariable = Filter-ObjectExcludeProperty -Data $DataVariable -ExcludeProperty __*,SystemProperties,Scope,Qualifiers,Properties,ClassPath,Class,Derivation,Dynasty,Genus,Namespace,Path,Property_Count,RelPath,Server,Superclass -Verbose:$Verbose

AzLogDcrIngestPS에서 사용 가능한 함수 및 사용 방법에 대한 자세한 내용은 여기를 참조하세요


Desired State 대시보드 - 데이터에서 내 환경에 대한 인사이트를 얻는 방법?

ClientInSpectorV2-DeploymentKit을 사용한 초기 배포의 일환으로 많은 Azure 대시보드와 Azure Workbook에 액세스할 수 있습니다.

동영상 3분 01초 - 대시보드

대시보드의 개념은 인프라가 '원하는 상태'에서 벗어난 위치를 보여주는 것입니다. 이를 인프라가 통제되지 않는 KPI로 생각하십시오.

패치 및 안티바이러스 관리 작업 대신, 컴퓨터가 패치되지 않은 위치나 안티바이러스의 실시간 보호가 실행되지 않는 위치, 또는 지난 24시간 동안 블루스크린이 발생한 머신을 보여주는 KPI를 고려할 수 있습니다.

이는 Microsoft Secure Score와 동일한 개념입니다.

Antivirus

Bluescreens

솔루션에 포함된 추가 샘플 보기

Antivirus

Antivirus

Antivirus

Antivirus

Bitlocker

Bitlocker

Bluescreens

ComputerInfo

ComputerInfo

ComputerInfo

ComputerInfo

Defender

Office

제공된 Azure Workbook 전체 목록을 보려면 링크

모든 샘플 Azure 대시보드는 Azure Workbook에서 고정된 부분을 기반으로 생성되므로, 드릴다운하려면 링크를 클릭하면 자세한 정보에 액세스할 수 있습니다.

Dashboards

제공된 Azure 대시보드를 보려면 링크

나만의 Workbook 및 대시보드를 만들 수 있나요? - 네, 가능합니다 😄

더 많은 대시보드나 Workbook을 추가하려면 일반적으로 KQL 쿼리를 사용하여 사용자 지정 로그 테이블에서 수집된 데이터를 조사하는 것부터 시작합니다. 원하는 쿼리를 찾으면 Workbook에서 새 보기를 만들고 즐겨찾기를 대시보드에 고정할 수 있습니다.


데이터를 어떻게 쿼리하나요? - Kusto (KQL)가 답입니다

Kusto 언어를 모른다면, 매우 강력한 언어이므로 이것저것 시도해보는 것을 추천합니다.

동영상 1분 58초 - 데이터에 대한 Kusto 쿼리
동영상 3분 01초 - 대시보드

Kusto Query Language로 첫 번째 쿼리 작성

KQL을 사용하여 쿼리 결과 분석

다음은 ClientInspector의 데이터를 기반으로 시작하는 데 도움이 되는 4가지 쿼리 샘플입니다.

샘플 쿼리 1: Kusto (KQL) 쿼리를 사용한 고급 헌팅

고급 헌팅을 원한다면 테이블에서 전통적인 Kusto (KQL) 쿼리를 사용할 수 있습니다.

샘플 쿼리 ```js InvClientDefenderAvV2_CL | where TimeGenerated > ago(31d) | summarize CollectionTime = arg_max(CollectionTime, *) by Computer | where ((AMRunningMode == "Not running") or (parse_version(AMProductVersion) < parse_version("4.18.2203")) or (MPComputerStatusFound == false) or (MPPreferenceFound == false) or (RealTimeProtectionEnabled == false) or (AntivirusSignatureAge > 7) or (AntispywareSignatureAge > 7) or (NISSignatureAge > 7) or (AMRunningMode == "EDR Block Mode") or (AMRunningMode == "Passive Mode") or (AntispywareEnabled == false) or ((TamperProtectionSource != "ATP") and (TamperProtectionSource != "Intune")) or (IsTamperProtected == false) ) | project Computer, UserLoggedOn, CollectionTime, MPComputerStatusFound, MPPreferenceFound, AMEngineVersion, AMProductVersion, AMRunningMode, AMServiceEnabled, AMServiceVersion, AntispywareEnabled, AntispywareSignatureAge, AntispywareSignatureLastUpdated, AntispywareSignatureVersion, AntivirusEnabled, AntivirusSignatureAge, AntivirusSignatureLastUpdated, AntivirusSignatureVersion, BehaviorMonitorEnabled, DefenderSignaturesOutOfDate, DisableAutoExclusions, DisableBehaviorMonitoring, DisableRealtimeMonitoring, DisableScanningMappedNetworkDrivesForFullScan, DisableScanningNetworkFiles, DisableScriptScanning, EnableControlledFolderAccess, EnableNetworkProtection, FullScanAge, IoavProtectionEnabled, IsTamperProtected, IsVirtualMachine, MAPSReporting, NISEnabled, NISEngineVersion, NISSignatureAge, NISSignatureLastUpdated, NISSignatureVersion, OnAccessProtectionEnabled, ProductStatus, PUAProtection, QuickScanAge, RealTimeProtectionEnabled, RealTimeScanDirection, RebootRequired, ScanAvgCPULoadFactor, SignatureUpdateCatchupInterval, SignatureUpdateInterval, SubmitSamplesConsent, TamperProtectionSource ```

샘플 쿼리 2: 3개 테이블의 데이터를 병합하는 Kusto 쿼리

샘플 쿼리 ```js InvClientComputerInfoBiosV2_CL | summarize TimeGenerated = arg_max(TimeGenerated,*) by Computer | join (InvClientComputerInfoSystemV2_CL | summarize TimeGenerated = arg_max(TimeGenerated,*) by Computer) on $left.Computer == $right.Computer | join (InvClientComputerOSInfoV2_CL | summarize TimeGenerated = arg_max(TimeGenerated,*) by Computer) on $left.Computer == $right.Computer | project Computer, UserLoggedOn, SerialNumber, Manufacturer, PCSystemType, SystemFamily, Model, Windows=Caption2, WindowsVersion=Version1, TimeGenerated ```

샘플 쿼리 3: Powershell에서 LogAnalytics 데이터 쿼리하기

샘플 쿼리 ```js Connect-AzAccount

#----------------------------------------------------------------------------------------------------------------------

Variables

#----------------------------------------------------------------------------------------------------------------------

$LogAnalyticsWorkspaceId = "e74ca75a-c0e6-4933-a4f7-e5ae943fe4ac"

#----------------------------------------------------------------------------------------------------------------------

Collecting Computer data from Azure LogAnalytics

#---------------------------------------------------------------------------------------------------------------------- $Query = @' InvClientComputerInfoBiosV2_CL | summarize TimeGenerated = arg_max(TimeGenerated,) by Computer | join (InvClientComputerInfoSystemV2_CL | summarize TimeGenerated = arg_max(TimeGenerated,) by Computer) on $left.Computer == $right.Computer | join (InvClientComputerOSInfoV2_CL | summarize TimeGenerated = arg_max(TimeGenerated,*) by Computer) on $left.Computer == $right.Computer | project Computer, UserLoggedOn, SerialNumber, Manufacturer, PCSystemType, SystemFamily, Model, Windows=Caption2, WindowsVersion=Version1, TimeGenerated '@

write-output "Collecting computer information from LogAnalytics" $Query = Invoke-AzOperationalInsightsQuery -WorkspaceId $LogAnalyticsWorkspaceId -Query $Query $ComputerInfoArray = $Query.Results $ComputerInfoArray

root@kitploit:~
</details>

## 샘플 쿼리 4: 다른 소스와 데이터 통합 (Lenovo 보증 데이터베이스에 대한 보증 확인)
Azure LogAnalytics에 데이터가 있으면, REST API 조회를 통해 Dell 또는 Lenovo 보증 데이터 같은 다른 소스와 데이터를 통합할 수 있습니다.

[동영상 0m 48s - 데이터 샘플 사용 - Lenovo 보증 DB 조회](https://youtu.be/3ZDyTwiLU0w)  

다음은 PowerShell 스크립트로 자동 생성된 출력 예시입니다. 컴퓨터 목록과 일련 번호를 추출한 후, Lenovo 보증 데이터베이스를 조회하여 컴퓨터 구매 시기와 보증 상태에 대한 정보를 검색합니다.

[샘플 보증 출력 (Excel), ClientInspector로 수집된 데이터 기반](https://github.com/KnudsenMorten/ClientInspectorV2/raw/main/img/WarrantyInfo.xlsx)

<br>
   
# 아키텍처, 스키마 및 네트워킹
ClientInspector (v2)는 수집된 데이터를 **Azure LogAnalytics 작업 영역**의 **커스텀 로그**로 업로드하며, **로그 수집 API**, **Azure 데이터 수집 규칙 (DCR)** 및 **Azure 데이터 수집 엔드포인트 (DCE)** 를 사용합니다.

![아키텍처](https://assets.kitploit.com/production/public/readmes/6097/a1f4330c4e3747c2ebe092927df32352c2c158028f239afb7617e608aa882966.png)

## 스키마
DCR과 LogAnalytics 테이블 모두 소스 객체의 스키마와 일치해야 하는 스키마를 가지고 있습니다. 이는 AzLogDcrIngestPS 모듈의 함수를 사용하여 처리됩니다.

[동영상 1m 40s - 2개 테이블 및 DCR 자동 생성 (상세 모드)](https://youtu.be/rIUNs3yT-eI)  
[동영상 1m 37s - 2개 테이블 및 DCR 자동 생성 (일반 모드)](https://youtu.be/khQMDcON6r8)  
[동영상 1m 34s - DCR 및 테이블 스키마 확인](https://youtu.be/NDSNhvpa4Gs)  

AzLogDcrIngestPS는 스키마 관리를 위해 **Merge**와 **Overwrite**의 2가지 모드를 지원합니다.

### SchemaMode = Merge (기본값)
SchemaMode를 Merge로 설정하면, 소스 객체의 새 속성이 로그 분석 테이블의 현재 스키마에 추가(병합)됩니다. DCR은 로그 분석 테이블에서 스키마를 가져와 동일하게 유지합니다.

기본 모드는 Merge이며, 함수에서 SchemaMode 변수를 정의하지 않은 경우:
CheckCreateUpdate-TableDr-Structure
CreateUpdate-AzLogAnalyticsCustomLogTableDcr
CreateUpdate-AzDataCollectionRuleLogIngestCustomLog

### SchemaMode = Overwrite
SchemaMode를 Overwrite로 설정하면, DCR과 테이블의 스키마가 소스 객체 스키마를 기반으로 덮어쓰기(업데이트)됩니다.

## 네트워킹
Azure로 데이터를 업로드하기 위한 연결 옵션은 3가지입니다:

|업로드 방법|연결 세부 정보|OS 규정 준수|
|:------------|:-------------------|:------------|
|공용 액세스|REST 엔드포인트가 DCE의 공용 IP를 통해 DCE로 전송|엔드포인트가 TLS 1.2 지원|
|프라이빗 액세스|REST 엔드포인트가 DCE의 프라이빗 링크를 통해 DCE로 전송|엔드포인트가 TLS 1.2 지원|
|로그 허브|REST 엔드포인트가 [log-hub](https://github.com/KnudsenMorten/AzLogDcrIngestPSLogHub)를 통해 데이터 전송 - 제가 구축한 개념입니다.|엔드포인트가 TLS 1.2를 지원하지 않음.<br> Azure는 이러한 장치에서 직접 연결을 허용하지 않음|

### 인터넷 연결 엔드포인트 - OS 수준 규정 준수
![인터넷 연결 엔드포인트 - OS 수준 규정 준수](https://assets.kitploit.com/production/public/readmes/6097/3cc67f07297302ff59d08c95a790ec8ad417f8dbd07f566a24b154eecfecb8bb.png)

방화벽에서 다음 엔드포인트를 허용해야 합니다:
|엔드포인트|용도|포트|방향|HTTPS 검사 우회|
|:-------|:------|:----|:-------|:----------------------|
|global.handler.control.monitor.azure.com|액세스 제어 서비스|포트 443|아웃바운드|예|
|dce logs ingestion uri<br><br>샘플<br>https://dce-log-platform-management-client-demo-p-iur0.westeurope-1.ingest.monitor.azure.com|로그 데이터 수집|포트 443|아웃바운드|예|

<br>

### 인터넷에 연결되지 않거나 OS 수준 비호환성 (예: TLS 1.0/1.1 실행)
[이 링크를 통해 log-hub 개념 확인](https://github.com/KnudsenMorten/AzLogDcrIngestPSLogHub)

![인터넷에 연결되지 않거나 OS 수준 비호환성 (예: TLS 1.0/1.1 실행)](https://assets.kitploit.com/production/public/readmes/6097/42435b25d7c2cc8d405e62d577420fa980aef5f9267f461c56ce9a08f7f81917.png)

<br>

# 구현
모든 것을 설정하고 실행하는 것이 매우 쉽다는 것을 경험하시길 바랍니다. 아래에 3단계가 요약되어 있습니다.

시작하기 전에 아래 소개에서 구성 요소에 대해 더 자세히 읽어보시기를 권장합니다.

<details>
  <summary>ClientInspector의 일부로 사용되는 Azure 구성 요소 소개</summary>

<br>

다음 구성 요소가 필요합니다:

| Azure 리소스                | 용도                                           | 추가 정보 |
| :-------------                | :-----                                            | :-----           |
| 모든 REST 엔드포인트             | 데이터를 보내는 소스                   |                  |
| 로그 수집 API             | 기존 HTTP 데이터 수집기 API를 대체하는 새 API | https://learn.microsoft.com/en-us/azure/azure-monitor/logs/logs-ingestion-api-overview |
| 데이터 수집 엔드포인트 (DCE)| 엔드포인트로부터의 통신 진입점입니다. 데이터는 **Azure 데이터 수집 엔드포인트 수집 URI**로 전송됩니다. 단일 DCE가 여러 DCR을 지원할 수 있으므로, 다른 소스 및 대상 테이블에 대해 다른 DCR을 지정할 수 있습니다. | https://learn.microsoft.com/en-us/azure/azure-monitor/essentials/data-collection-endpoint-overview?tabs=portal |
| 데이터 수집 규칙 (DCR)   | 데이터 수집 규칙은 수집된 데이터(스키마)를 정의하고 해당 데이터를 보내거나 저장할 방법과 위치를 지정합니다. DCR은 입력 데이터의 구조와 대상 테이블의 구조를 이해해야 합니다. 둘이 일치하지 않으면 변환을 사용하여 소스 데이터를 대상 테이블에 맞게 변환할 수 있습니다. 변환을 사용하여 소스 데이터를 필터링하고 다른 계산 또는 변환을 수행할 수도 있습니다. | https://learn.microsoft.com/en-us/azure/azure-monitor/essentials/data-collection-rule-overview | 
| Azure LogAnalytics 작업 영역  | 데이터는 Azure LogAnalytics의 커스텀 로그로 전송됩니다 | https://learn.microsoft.com/en-us/azure/azure-monitor/logs/log-analytics-overview |
| Azure Workbooks               | 배포의 일부로 샘플 통합 문서가 배포됩니다 | https://learn.microsoft.com/en-us/azure/azure-monitor/visualize/workbooks-overview |
| Azure Dashboards              | 배포의 일부로 샘플 통합 문서가 배포됩니다 | https://learn.microsoft.com/en-us/azure/azure-monitor/visualize/tutorial-logs-dashboards |
| Kusto (KQL)                   | Kusto (KQL) 쿼리를 사용하여 데이터를 분석할 수 있습니다 | https://learn.microsoft.com/en-us/azure/azure-monitor/logs/get-started-queries |

</details>

환경에서 ClientInspector를 설정하는 단계는 다음과 같습니다:
1. [ClientInSpectorV2-DeploymentKit을 사용하여 환경 설정](https://github.com/KnudsenMorten/ClientInspectorV2-DeploymentKit)

2. ClientInspector 처음 실행 (초기 설정) - 아래에서 자세히 확인
<details>
  <summary>Azure LogAnalytics 테이블 및 데이터 수집 규칙의 초기 설정 구성 방법 (처음 실행 시)</summary>

<br>
테이블/DCR 관리를 위해 기준 컴퓨터를 사용하는 것을 권장합니다. 이렇게 하면 변경이 필요한 경우(예: 소스 객체 스키마가 변경되는 경우) 제어된 프로세스가 됩니다.

<br>
<br>
구성:

1. DeploymentKit을 실행하면 ClientInspector 파일이 자동으로 준비되므로 변수만 삽입하면 됩니다.```js
$TenantId                                   = "xxxx" 
$LogIngestAppId                             = "xxxx" 
$LogIngestAppSecret                         = "xxxx" 

$DceName                                    = "xxxx" 
$LogAnalyticsWorkspaceResourceId            = "xxxx"

$AzDcrPrefixClient                          = "xxx" 
$AzDcrSetLogIngestApiAppPermissionsDcrLevel = $false
$AzDcrLogIngestServicePrincipalObjectId     = "xxx" 
$AzDcrDceTableCreateFromReferenceMachine    = @()
$AzDcrDceTableCreateFromAnyMachine          = $true
  1. 배포 작업을 설정하여 ClientInspector가 매일 실행되어 인벤토리를 수집하도록 합니다. 선호하는 배포 도구를 사용하여 ClientInspector 스크립트를 실행할 수 있습니다. Microsoft Intune 및 ConfigMgr용 스크립트가 제공됩니다.
Microsoft Intune을 사용하여 배포하는 방법은 무엇인가요?
Microsoft Intune의 '사전 예방적 수정(proactive remediations)' 기능을 사용하여 인벤토리 스크립트를 실행합니다.
  1. 검색 스크립트 ClientInspector_Detection.ps1 다운로드 (마우스 오른쪽 버튼을 클릭하고 '다른 이름으로 링크 저장' 선택)

  2. 선호하는 편집기로 파일을 엽니다. 인벤토리를 실행하려는 빈도를 조정합니다.```js ##################################

VARIABLES

##################################

root@kitploit:~
$RunEveryHours    = 8
$LastRun_RegPath  = "HKLM:\SOFTWARE\ClientInspector"
$LastRun_RegKey   = "ClientInSpector_System"
root@kitploit:~
3. 이제 수정 작업을 생성해야 합니다. Microsoft Intune 포털 -> 보고서 -> 엔드포인트 분석 --> 사전 수정으로 이동하여 아래와 같이 스크립트 패키지를 생성합니다.

참고: 수정 스크립트의 경우 **ClientInspector.ps1** 파일을 사용하세요.

![Flow](https://assets.kitploit.com/production/public/readmes/6097/c5d24f8afca4130a3a58414028120540526722b92ed5c9ae6cb029c605baf657.png)

![Flow](https://assets.kitploit.com/production/public/readmes/6097/ea200a01c92a84d801e03439891428130160b4dd8bbb11e6ecac4b2f68de18d1.png)


### Intune 제한 사항

참고: Intune은 수정 스크립트의 크기를 200Kb로 제한합니다.**  

![Intune-error](https://assets.kitploit.com/production/public/readmes/6097/7488505e7c4a5e3fa31e1007bf435b89aeb5ebf4fb1c1dbf133835082cce33e6.png)


이 제한에 도달하는 경우 스크립트를 2개로 분할하는 것을 제안합니다. 

![Intune-split](https://assets.kitploit.com/production/public/readmes/6097/3ddc7edb1bdf2a492928a0dad8487996a9166878fba20a0403d347a895fe69a3.png)

![Intune-split](https://assets.kitploit.com/production/public/readmes/6097/36f29366fa4fbf0f878a569489c59100601f5a27f8d015373497b9fd387309ec.png)

두 번째 파일의 헤더에 UserLoggedOn 섹션을 포함한 헤더 섹션을 포함하는 것을 잊지 마십시오. UserLoggedOn은 로그온한 사용자를 표시하는 데 사용됩니다.

두 파일을 분리하는 방법을 보여주는 [샘플 스크립트 설정](https://github.com/KnudsenMorten/ClientInspectorV2/tree/main/Sample%20intune%20setup%20if%20file%20size%20is%20more%20than%20200%20Kb)을 준비했습니다. 참고: 이 스크립트의 코드는 업데이트되지 않았으므로 마스터 ClientInspector 파일에서 섹션을 가져와야 합니다.

기본 구조는 다음과 같습니다.

파일 1은 헤더 + UserLoggedOn(섹션 1) + 섹션 2-9를 포함하고 HKLM\Software\ClientInspector\ClientInspector_System_1에 확인 플래그를 작성합니다.  

파일 2는 헤더 + UserLoggedOn(섹션 1) + 섹션 10-18을 포함하고 HKLM\Software\ClientInspector\ClientInspector_System_2에 확인 플래그를 작성합니다.  


![Flow](https://assets.kitploit.com/production/public/readmes/6097/37639a721b2d45fae907e177c6cb90ea32151f1ab8bdb1262e8e2bed0f8ec354.png)

![Flow](https://assets.kitploit.com/production/public/readmes/6097/96d02fdeaf59594c29e9755b0033557a3594e33b6bf61b92fa38edebd4c5b84d.png)

![Flow](https://assets.kitploit.com/production/public/readmes/6097/070c7a1431ad3899d496cc333224c8ff58b35d523ba7c77e11ba151501039d73.png)


</details>


<details>
  <summary>ConfigMgr(또는 CMD 파일을 실행하는 다른 도구)를 사용하여 배포하는 방법?</summary>
  
<br>
전통적인 패키지 + 배포를 통해 인벤토리 스크립트를 실행합니다.
    
1. [CMD 파일 ClientInspector.cmd 다운로드](https://github.com/KnudsenMorten/ClientInspectorV2/raw/main/ConfigMgr/ClientInspector.cmd) (마우스 오른쪽 버튼을 클릭하고 '다른 이름으로 링크 저장' 선택)

2. ConfigMgr 패키지 소스 디렉터리에 예를 들어 ClientInspector라는 소스 구조를 만듭니다. 

3. 필요한 두 파일 **ClientInspector.cmd** 및 **ClientInspector.ps1**을 디렉토리에 복사합니다.

4. 패키지를 만들고 패키지가 **ClientInspector.cmd**를 실행하도록 지정합니다.

5. 배포를 만듭니다.

</details>

<br>

# 종속성

## Powershell 모듈 AzLogDcringestPS - 제가 만든 (Morten Knudsen)

ClientInspector는 Powershell 모듈 **AzLogDcrIngestPS**가 필요합니다.

Powershell 모듈 **AzLogDcrIngestPS**의 핵심 기능은 다음과 같습니다:
* DCR 및 테이블을 자동으로 생성/업데이트 - 소스 개체 스키마 기반
* 명명 규칙 문제에 대한 스키마 유효성 검사. 문제가 발견되면 해결합니다.
* 소스 개체의 구조가 변경되면 DCR 및 테이블의 스키마 업데이트
* DCR 또는 테이블에 문제가 발생하면 자동 수정
* 보내지 않으려는 데이터 열이 있는 경우 소스 개체에서 데이터를 제거할 수 있음
* CIM 또는 PS 개체를 기반으로 하는 소스 개체를 PSCustomObjects/배열로 변환할 수 있음
* 각 레코드에 UserLoggedOn, Computer, CollectionTime과 같은 관련 정보를 추가할 수 있음

모듈에 대한 자세한 정보는 아래 링크를 참조하세요:

[AzLogDcrIngestPS (Github)](https://github.com/KnudsenMorten/AzLogDcrIngestPS)

[AzLogDcrIngestPS (Powershell Gallery)](https://www.powershellgallery.com/packages/AzLogDcrIngestPS)

[AzLogDcrIngestPSLogHub (Github)](https://github.com/KnudsenMorten/AzLogDcrIngestPSLogHub)

<br>

## 타사 Powershell 모듈
Windows 업데이트 정보를 검색하기 위해 잘 알려진 Powershell 모듈인 PSWindowsUpdate를 사용하는 것을 선호합니다.

|ModuleName|Purpose|More info|Credit|
|:---------|:------|:--------|:-----|
|NuGet|AzLogDcrIngestPS를 포함한 많은 Powershell 모듈을 배포하는 데 사용되는 공통 패키지 공급자<br><br>스크립트가 실행될 때 패키지 공급자가 컴퓨터에 자동으로 설치됩니다.|[Link](https://www.nuget.org/packages)|
|PSWindowsUpdate|Windows 업데이트 정보(보류 중인 업데이트, 설치된 업데이트 등) 수집<br><br>스크립트가 실행될 때 모듈이 컴퓨터에 자동으로 설치됩니다.|[Link](https://www.powershellgallery.com/packages/PSWindowsUpdate)|Michal Gajda

<br>

# ClientInspector.ps1 실행 - 3가지 모드
ClientInspector는 필요한 Powershell 모듈을 설치/업데이트/가져오는 3가지 방법을 지원합니다: **Download**, **PsGallery**, **LocalPath**

기본적으로 PsGallery에서 최신 버전을 CurrentUser 범위로 다운로드합니다.

[Video 3m 19s - Running ClientInspector using commandline (normal mode)](https://youtu.be/4kA4BE0zJ9g)  

## .\ClientInspector.ps1 -function:LocalPath
ClientInspector는 스크립트가 실행되는 디렉터리에서 **AzLogDcrIngest.psm1** 파일을 찾습니다. 
AzLogDcrIngest.psm1이 없으면 스크립트가 종료되고, 그렇지 않으면 import-module을 수행합니다.

예```
.\ClientInspector.ps1 -verbose:$false -function:localpath

ClientInspector | Inventory of Operational & Security-related information
Developed by Morten Knudsen, Microsoft MVP - for free community use

Using AzLogDcrIngestPS module from local path D:\scripts\ClientInspectorV2
도구 다운로드

Validating/fixing schema data structure of source data

$DataVariable = ValidateFix-AzLogAnalyticsTableSchemaColumnNames -Data $DataVariable -Verbose:$Verbose

Aligning data structure with schema (requirement for DCR)

$DataVariable = Build-DataArrayToAlignWithSchema -Data $DataVariable -Verbose:$Verbose

root@kitploit:~
이 명령을 실행하여 소스 객체를 확인할 수 있습니다.````
# Get insight about the schema structure of an object BEFORE changes. Command is only needed to verify columns in schema
Get-ObjectSchemaAsArray -Data $DataVariable -Verbose:$Verbose

Office

Office

Office

WU

WU

WU

Winfw

  1. 로컬 관리자 권한으로 Powershell을 시작합니다

  2. 이 명령어를 사용하여 스크립트를 시작합니다```js C:\ClientInspector\ClientInspector.ps1 -verbose:$true

root@kitploit:~
4. ClientInspector는 약 10~20분 동안 실행되며, 환경의 실제 구조에 기반하여 필요한 테이블 및 데이터 수집 규칙(Data Collection Rules)을 생성합니다. 화면의 결과를 검토하여 오류(빨간색)가 있는지 확인하십시오.

5. 모든 것이 정상으로 보이면 스크립트를 다시 실행하면 훨씬 빠르게 진행됩니다. 여러 테이블에서 Kusto 쿼리를 사용하여 데이터가 들어오는지 확인하십시오. 참고: 첫 번째 데이터 업로드는 백엔드에서 파이프라인을 생성해야 하므로 약 10~15분 정도 소요될 수 있습니다.

6. 마지막 변경 사항으로, 참조 머신에서 실행할 때 ClientInspector가 스키마 변경만 수행하도록 매개변수에서 2개의 매개변수를 변경해야 합니다.```js
$AzLogDcrTableCreateFromReferenceMachine    = @("<<MyReferenceMachineComputerName>>")   # sample @("ComputerName")
$AzLogDcrTableCreateFromAnyMachine          = $false    # important so changes can only happen on reference machine
  1. 이제 테스트 그룹에 배포할 준비가 되었습니다.

.\ClientInspector.ps1 -function:Download

ClientInspector는 실행될 때마다 내 Github 저장소에서 최신 버전을 다운로드하여 로컬 경로에 저장합니다 (약 300KB)

예제``` .\ClientInspector.ps1 -verbose:$false -function:download

ClientInspector | Inventory of Operational & Security-related information Developed by Morten Knudsen, Microsoft MVP - for free community use

Downloading latest version of module AzLogDcrIngestPS from https://github.com/KnudsenMorten/CientInspectorV2 into local path D:\scripts\ClientInspectorV2

root@kitploit:~
## .\ClientInspector.ps1 -function:PsGallery -scope [AllUsers|CurrentUser]
이 매개변수는 다른 매개변수인 -scope [AllUsers | CurrentUser]를 필요로 합니다.

ClientInspector는 선택한 범위에 모듈이 설치되어 있는지 확인합니다.
설치되어 있지 않으면 Powershell Gallery에서 최신 버전을 자동으로 다운로드하고 import-module을 수행합니다.
클라이언트가 최신 버전을 실행 중이면 계속 진행합니다.

예제```
.\ClientInspector.ps1 -verbose:$false -function:PSGallery -scope:CurrentUser

ClientInspector | Inventory of Operational & Security-related information
Developed by Morten Knudsen, Microsoft MVP - for free community use

Powershell module was not found !
Installing in scope currentuser .... Please Wait !

주요 기능

최고의 펜테스팅 도구(Metasploit)는 명령줄에서 사용할 수 있는 서버 측 페이로드 옵션이 제한적입니다. 사용 가능한 페이로드 라이브러리는 매우 작습니다. 각 OS 아키텍처에 대해 사용 가능한 페이로드가 10개 미만입니다. Metasploit에는 다음을 모두 동시에 수행할 수 있는 single 페이로드가 없습니다:

  • 크로스 플랫폼 실행 (Windows, Linux, macOS)
  • 대상에 PHP 웹 셸 드롭
  • PowerShell 작업 실행
  • 파일 업로드 및 다운로드
  • Windows 및 Linux 도메인 컨트롤러 정찰 수행
  • xp_cmdshell을 통한 알려진 SQL 취약점 악용
  • Browser Exploitation Framework (BeEF)를 사용한 피싱 공격 수행
  • 대부분의 CrackMapExec 및 PowerSploit 명령 실행
  • 리버스 및 바인드 셸 실행
  • 빠른 Python 스크립트를 사용하여 즉석에서 맞춤형 및 복잡한 페이로드 생성
  • 여러 대상에 연결하기 위한 멀티세션 핸들러 생성
  • 터미널만 사용하여 대상 OS에서 명령 실행, 파일 업로드 및 대상으로부터 파일 다운로드
  • 셸코드 주입

Quak은 이 모든 것을 수행할 수 있습니다.

Quak의 고유 기능은 명령 및 제어 서버 역할을 할 수 있는 and/api C2입니다. 또한 Quak의 scanner는 Nmap, SQLMap 또는 Nikto와 같은 가장 유명한 스캐닝 도구의 거의 모든 모듈을 실행할 수 있습니다.

요구 사항```

.\ClientInspector.ps1 -verbose:$false -function:PsGallery -scope:currentuser

ClientInspector | Inventory of Operational & Security-related information Developed by Morten Knudsen, Microsoft MVP - for free community use

Checking latest version at PsGallery for AzLogDcrIngestPS module OK - Running latest version

root@kitploit:~
</details>

<br>

## ClientInspector의 샘플 출력
[비디오 3분 19초 - 명령줄(일반 모드)을 사용하여 ClientInspector 실행](https://youtu.be/4kA4BE0zJ9g)  

<br>

# 보안
## 코드 서명
**ClientInspector.ps1-file**과 **AzLogDcrIngestPS 모듈 (AzLogDcrIngest.psm1)** 모두 내 코드 서명 인증서(2LINKIT - 제 회사)로 서명되어 있습니다. 따라서 스크립트 서명이 필요한 경우 실행할 수 있습니다. 물론 자체 내부 코드 서명 인증서로 서명하도록 선택할 수도 있습니다.

![서명됨](https://assets.kitploit.com/production/public/readmes/6097/95ae9fae064341feae5467ba04c909e3bab84393eb7070a304d9d9e6fd184499.png)

[공개 키 인증서를 다운로드](https://github.com/KnudsenMorten/ClientInspectorV2/raw/main/Trusted_Publisher_Certificate/2LINKIT-TrustedPublisher.cer)하여 '신뢰할 수 있는 게시자' 컨테이너에 넣어 게시자(2LINKIT - 제 회사)를 신뢰하세요. Intune 또는 그룹 정책을 사용하여 배포할 수 있습니다.

![신뢰할 수 있는 게시자](https://assets.kitploit.com/production/public/readmes/6097/b02285397783a3495f5d1418ed716fa450b677117dd1754875354779568b0b47.png)  
![신뢰할 수 있는 게시자](https://assets.kitploit.com/production/public/readmes/6097/740ae59eff117b8e59d56a7274440a991b7c5ceddd486894160d0248826084b2.png)  
![신뢰할 수 있는 게시자](https://assets.kitploit.com/production/public/readmes/6097/47d1eb6b7da9ff5a341b8486c7b4bc7532b0b8ef3d05e7b710d495e183929279.png)  

### Intune 배포에는 신뢰할 수 있는 게시자가 필요하지 않음
기본적으로 Intune은 수정 스크립트를 실행할 때 BYPASS를 수행합니다.

## 구조
**ClientInspector**의 보안은 4개 계층으로 나뉩니다: **데이터 수집**, **데이터 업로드** (백엔드로 전송), **데이터 보기** (대시보드) - 및 **스키마 관리**

| 단계 | 보안 구현 | 위임 / 권한 |
|:------|:------------------------|:------------------------|
|데이터 수집 (수집)|이 단계는 실제 수집을 위해 선택한 방법(Intune, ConfigMg 또는 기타 타사)에 의해 제어됩니다.|스크립트는 하드웨어 및 Windows에서 핵심 데이터를 수집할 수 있도록 로컬 관리자(시스템 컨텍스트)로 실행되어야 합니다.|
|데이터 업로드|로그 수집 API에 대한 인증은 DCE에서 수행되며, 이는 표준 Azure Resource Manager 인증을 사용합니다.<br><br>일반적인 전략은 애플리케이션 ID와 애플리케이션 키를 사용하는 것이며, 이는 ClientInspector에서도 사용되는 방법입니다.<br><br>Azure AppId 및 Secret은 단순성을 위해 ClientInspector의 헤더에 저장됩니다.<br><br>Azure Keyvault를 사용하여 AppId와 Secret을 저장하는 것도 가능합니다.|[자세한 내용은 ClientInspectV2-DeploymentKit에서 다룹니다](https://github.com/KnudsenMorten/ClientInspectorV2-DeploymentKit#security-1)|
|데이터 보기|Azure RCAC 권한|Azure LogAnalytics, Azure Workbooks 및 Azure Dashboards에 대한 액세스 권한 부여|
|스키마 관리|방법 1: Azure RBAC (권장)<br><br>방법 2: Azure 앱 (비밀 또는 인증서 사용)|[자세한 내용은 ClientInSpectorV2-DeploymentKit에서 다룹니다](https://github.com/KnudsenMorten/ClientInspectorV2-DeploymentKit#azure-rbac-security-adjustment-separation-of-permissions-between-log-ingestion-and-tabledcr-management)|

<br>

# ClientInspector 데이터 세트 레이아웃
각 데이터 세트(bios, applications, bitlocker 등)는 동일한 4단계 구조로 구성됩니다.

## 1/4 단계 - 변수 (명명 - 데이터를 보낼 위치)```
#-------------------------------------------------------------------------------------------
# Variables
#-------------------------------------------------------------------------------------------
	
$TableName  = 'InvClientComputerInfoSystemV2'   # must not contain _CL
$DcrName    = "dcr-" + $AzDcrPrefixClient + "-" + $TableName + "_CL"

Phase 2/4 - 데이터 수집```

#-------------------------------------------------------------------------------------------

Collecting data (in)

#-------------------------------------------------------------------------------------------

Write-Output "" Write-Output "Collecting Computer system information ... Please Wait !"

$DataVariable = Get-CimInstance -ClassName Win32_ComputerSystem

root@kitploit:~
## Phase 3/4 - 데이터 조작 (데이터가 올바른 형식인지 확인하고 "noice"를 제거하며 관련 정보를 추가)```
#-------------------------------------------------------------------------------------------
# Preparing data structure
#-------------------------------------------------------------------------------------------

# convert CIM array to PSCustomObject and remove CIM class information
$DataVariable = Convert-CimArrayToObjectFixStructure -data $DataVariable -Verbose:$Verbose

# add CollectionTime to existing array
$DataVariable = Add-CollectionTimeToAllEntriesInArray -Data $DataVariable -Verbose:$Verbose

# add Computer & UserLoggedOn info to existing array
$DataVariable = Add-ColumnDataToAllEntriesInArray -Data $DataVariable -Column1Name Computer -Column1Data $Env:ComputerName  -Column2Name UserLoggedOn -Column2Data $UserLoggedOn

# Validating/fixing schema data structure of source data
$DataVariable = ValidateFix-AzLogAnalyticsTableSchemaColumnNames -Data $DataVariable -Verbose:$Verbose

# Aligning data structure with schema (requirement for DCR)
$DataVariable = Build-DataArrayToAlignWithSchema -Data $DataVariable -Verbose:$Verbose

4/4 단계 - 데이터 출력 (LogAnalytics로 전송) - 결합 함수```

#-------------------------------------------------------------------------------------------

Create/Update Schema for LogAnalytics Table & Data Collection Rule schema

#-------------------------------------------------------------------------------------------

CheckCreateUpdate-TableDcr-Structure -AzLogWorkspaceResourceId $LogAnalyticsWorkspaceResourceId -SchemaMode Merge -AzAppId $LogIngestAppId -AzAppSecret $LogIngestAppSecret -TenantId $TenantId -Verbose:$Verbose -DceName $DceName -DcrName $DcrName -TableName $TableName -Data $DataVariable -LogIngestServicePricipleObjectId $AzDcrLogIngestServicePrincipalObjectId -AzDcrSetLogIngestApiAppPermissionsDcrLevel $AzDcrSetLogIngestApiAppPermissionsDcrLevel -AzLogDcrTableCreateFromAnyMachine $AzLogDcrTableCreateFromAnyMachine -AzLogDcrTableCreateFromReferenceMachine $AzLogDcrTableCreateFromReferenceMachine

#-----------------------------------------------------------------------------------------------

Upload data to LogAnalytics using DCR / DCE / Log Ingestion API

#-----------------------------------------------------------------------------------------------

Post-AzLogAnalyticsLogIngestCustomLogDcrDce-Output -DceName $DceName -DcrName $DcrName -Data $DataVariable -TableName $TableName ` -AzAppId $LogIngestAppId -AzAppSecret $LogIngestAppSecret -TenantId $TenantId -Verbose:$Verbose

root@kitploit:~
<br>

**팁: error 513 - entity is too large**  
기본적으로 ClientInspector는 레코드당 계산된 평균 크기에 따라 데이터를 배치로 전송합니다. 레코드셋의 크기가 다른 경우 error 513이 발생할 수 있습니다.

원인은 각 업로드당 1MB 제한(Azure Pipeline 제한)에 도달했기 때문입니다. Microsoft는 공유 환경이므로 더 작은 데이터 청크를 여러 개 수신하기를 원합니다. 설치된 모든 애플리케이션 목록을 검색할 때 이 문제를 본 적이 있습니다. 애플리케이션은 크기가 매우 다양한 정보를 저장하는 것 같습니다.

Post-command에 **-BatchAmount <number of records to send per batch>** 매개변수를 추가하여 이 문제를 완화할 수 있습니다. 확실히 하려면 1로 설정하세요.```
Post-AzLogAnalyticsLogIngestCustomLogDcrDce-Output -DceName $DceName `
                                                   -DcrName $DcrName `
                                                   -Data $DataVariable `
                                                   -TableName $TableName `
                                                   -AzAppId $LogIngestAppId `
                                                   -AzAppSecret $LogIngestAppSecret `
                                                   -TenantId $TenantId `
                                                   -BatchAmount 1 `
                                                   -Verbose:$Verbose `
												   

단계 4/4 '내부 동작' - 데이터 출력(LogAnalytics로 전송)```

#-----------------------------------------------------------------------------------------------

Check if table and DCR exist - or schema must be updated due to source object schema changes

#-----------------------------------------------------------------------------------------------

Get insight about the schema structure

$Schema = Get-ObjectSchemaAsArray -Data $Data $StructureCheck = Get-AzLogAnalyticsTableAzDataCollectionRuleStatus -AzLogWorkspaceResourceId $AzLogWorkspaceResourceId -TableName $TableName -DcrName $DcrName -SchemaSourceObject $Schema -SchemaMode $SchemaMode -AzAppId $AzAppId -AzAppSecret $AzAppSecret -TenantId $TenantId ` -Verbose:$Verbose

#-----------------------------------------------------------------------------------------------

Structure check = $true -> Create/update table & DCR with necessary schema

#-----------------------------------------------------------------------------------------------

build schema to be used for LogAnalytics Table

$Schema = Get-ObjectSchemaAsHash -Data $Data -ReturnType Table -Verbose:$Verbose

CreateUpdate-AzLogAnalyticsCustomLogTableDcr -AzLogWorkspaceResourceId $AzLogWorkspaceResourceId -SchemaSourceObject $Schema -SchemaMode $SchemaMode -TableName $TableName -AzAppId $AzAppId -AzAppSecret $AzAppSecret -TenantId $TenantId -Verbose:$Verbose

build schema to be used for DCR

$Schema = Get-ObjectSchemaAsHash -Data $Data -ReturnType DCR

CreateUpdate-AzDataCollectionRuleLogIngestCustomLog -AzLogWorkspaceResourceId $AzLogWorkspaceResourceId -SchemaSourceObject $Schema -SchemaMode $SchemaMode -DceName $DceName -DcrName $DcrName -TableName $TableName -LogIngestServicePricipleObjectId $LogIngestServicePricipleObjectId -AzDcrSetLogIngestApiAppPermissionsDcrLevel $AzDcrSetLogIngestApiAppPermissionsDcrLevel -AzAppId $AzAppId -AzAppSecret $AzAppSecret -TenantId $TenantId -Verbose:$Verbose

$AzDcrDceDetails = Get-AzDcrDceDetails -DcrName $DcrName -DceName $DceName -AzAppId $AzAppId -AzAppSecret $AzAppSecret -TenantId $TenantId ` -Verbose:$Verbose

Post-AzLogAnalyticsLogIngestCustomLogDcrDce -DceUri $AzDcrDceDetails[2] -DcrImmutableId $AzDcrDceDetails[6] -TableName $TableName -DcrStream $AzDcrDceDetails[7] -Data $Data -BatchAmount $BatchAmount -AzAppId $AzAppId -AzAppSecret $AzAppSecret -TenantId $TenantId ` -Verbose:$Verbose

root@kitploit:~
<br>

# 상세 모드 및 추가 도움말
무슨 일이 일어나고 있는지에 대한 더 자세한 정보를 얻고 싶다면, 상세 모드를 활성화할 수 있습니다 (-verbose:$true)```
.\ClientInspector.ps1 -verbose:$true -function:localpath

Powershell ISE를 사용하여 테스트하려면 $Verbose 변수를 사용하여 verbose 모드를 활성화할 수도 있습니다.``` $Verbose = $false # can be $true or $false

root@kitploit:~
AzLogDcrLogIngestPS 모듈의 구문 및 예제에 대한 도움말을 보려면 다음을 작성하십시오.
get-module```
PS  get-command -module AzLogDcrIngestPS

CommandType     Name                                               Version    Source                                                                         
-----------     ----                                               -------    ------                                                                         
Function        Add-CollectionTimeToAllEntriesInArray              1.1.17     AzLogDcrIngestPS                                                               
Function        Add-ColumnDataToAllEntriesInArray                  1.1.17     AzLogDcrIngestPS                                                               
Function        Build-DataArrayToAlignWithSchema                   1.1.17     AzLogDcrIngestPS                                                               
Function        CheckCreateUpdate-TableDcr-Structure               1.1.17     AzLogDcrIngestPS                                                               
Function        Convert-CimArrayToObjectFixStructure               1.1.17     AzLogDcrIngestPS                                                               
Function        Convert-PSArrayToObjectFixStructure                1.1.17     AzLogDcrIngestPS                                                               
Function        CreateUpdate-AzDataCollectionRuleLogIngestCusto... 1.1.17     AzLogDcrIngestPS                                                               
Function        CreateUpdate-AzLogAnalyticsCustomLogTableDcr       1.1.17     AzLogDcrIngestPS                                                               
Function        Delete-AzDataCollectionRules                       1.1.17     AzLogDcrIngestPS                                                               
Function        Delete-AzLogAnalyticsCustomLogTables               1.1.17     AzLogDcrIngestPS                                                               
Function        Filter-ObjectExcludeProperty                       1.1.17     AzLogDcrIngestPS                                                               
Function        Get-AzAccessTokenManagement                        1.1.17     AzLogDcrIngestPS                                                               
Function        Get-AzDceListAll                                   1.1.17     AzLogDcrIngestPS                                                               
Function        Get-AzDcrDceDetails                                1.1.17     AzLogDcrIngestPS                                                               
Function        Get-AzDataCollectionRuleTransformKql               1.1.17     AzLogDcrIngestPS                                                               
Function        Get-AzDcrListAll                                   1.1.17     AzLogDcrIngestPS                                                               
Function        Get-AzLogAnalyticsTableAzDataCollectionRuleStatus  1.1.17     AzLogDcrIngestPS                                                               
Function        Get-ObjectSchemaAsArray                            1.1.17     AzLogDcrIngestPS                                                               
Function        Get-ObjectSchemaAsHash                             1.1.17     AzLogDcrIngestPS                                                               
Function        Post-AzLogAnalyticsLogIngestCustomLogDcrDce        1.1.17     AzLogDcrIngestPS                                                               
Function        Post-AzLogAnalyticsLogIngestCustomLogDcrDce-Output 1.1.17     AzLogDcrIngestPS                                                               
Function        Update-AzDataCollectionRuleDceEndpoint             1.1.17     AzLogDcrIngestPS                                                               
Function        Update-AzDataCollectionRuleResetTransformKqlDef... 1.1.17     AzLogDcrIngestPS                                                               
Function        Update-AzDataCollectionRuleTransformKql            1.1.17     AzLogDcrIngestPS                                                               
Function        ValidateFix-AzLogAnalyticsTableSchemaColumnNames   1.1.17     AzLogDcrIngestPS                                                               

특정 cmdlet에 대한 도움말 보기 - get-help Add-CollectionTimeToAllEntriesInArray -full``` get-help Add-CollectionTimeToAllEntriesInArray -full

NAME Add-CollectionTimeToAllEntriesInArray

SYNOPSIS Add property CollectionTime (based on current time) to all entries on the object

SYNTAX Add-CollectionTimeToAllEntriesInArray [-Data] []

DESCRIPTION Gives capability to do proper searching in queries to find latest set of records with same collection time Time Generated cannot be used when you are sending data in batches, as TimeGenerated will change An example where this is important is a complete list of applications for a computer. We want all applications to show up when queriying for the latest data

PARAMETERS -Data Object to modify

root@kitploit:~
    Required?                    true
    Position?                    1
    Default value                
    Accept pipeline input?       false
    Accept wildcard characters?  false
    
<CommonParameters>
    This cmdlet supports the common parameters: Verbose, Debug,
    ErrorAction, ErrorVariable, WarningAction, WarningVariable,
    OutBuffer, PipelineVariable, and OutVariable. For more information, see 
    about_CommonParameters (https:/go.microsoft.com/fwlink/?LinkID=113216). 

INPUTS None. You cannot pipe objects

OUTPUTS Updated object with CollectionTime

root@kitploit:~
-------------------------- EXAMPLE 1 --------------------------

PS C:\>#-------------------------------------------------------------------------------------------

# Variables
#-------------------------------------------------------------------------------------------
$Verbose                   = $true  # $true or $false

#-------------------------------------------------------------------------------------------
# Collecting data (in)
#-------------------------------------------------------------------------------------------
$DNSName                   = (Get-CimInstance win32_computersystem).DNSHostName +"." + (Get-CimInstance win32_computersystem).Domain
$ComputerName              = (Get-CimInstance win32_computersystem).DNSHostName
[datetime]$CollectionTime  = ( Get-date ([datetime]::Now.ToUniversalTime()) -format "yyyy-MM-ddTHH:mm:ssK" )

$UserLoggedOnRaw           = Get-Process -IncludeUserName -Name explorer | Select-Object UserName -Unique
$UserLoggedOn              = $UserLoggedOnRaw.UserName

$DataVariable = Get-CimInstance -ClassName Win32_Processor | Select-Object -ExcludeProperty "CIM*"

#-------------------------------------------------------------------------------------------
# Preparing data structure
#-------------------------------------------------------------------------------------------
$DataVariable = Convert-CimArrayToObjectFixStructure -data $DataVariable -Verbose:$Verbose
$DataVariable

# add CollectionTime to existing array
$DataVariable = Add-CollectionTimeToAllEntriesInArray -Data $DataVariable -Verbose:$Verbose
$DataVariable

#-------------------------------------------------------------------------------------------
# Output
#-------------------------------------------------------------------------------------------

VERBOSE:   Adding CollectionTime to all entries in array .... please wait !
Caption                                 : Intel64 Family 6 Model 165 Stepping 5
Description                             : Intel64 Family 6 Model 165 Stepping 5
InstallDate                             : 
Name                                    : Intel(R) Core(TM) i7-10700 CPU @ 2.90GHz
Status                                  : OK
Availability                            : 3
ConfigManagerErrorCode                  : 
ConfigManagerUserConfig                 : 
CreationClassName                       : Win32_Processor
DeviceID                                : CPU0
ErrorCleared                            : 
ErrorDescription                        : 
LastErrorCode                           : 
PNPDeviceID                             : 
PowerManagementCapabilities             : 
PowerManagementSupported                : False
StatusInfo                              : 3
SystemCreationClassName                 : Win32_ComputerSystem
SystemName                              : STRV-MOK-DT-02
AddressWidth                            : 64
CurrentClockSpeed                       : 2904
DataWidth                               : 64
Family                                  : 198
LoadPercentage                          : 1
MaxClockSpeed                           : 2904
OtherFamilyDescription                  : 
Role                                    : CPU
Stepping                                : 
UniqueId                                : 
UpgradeMethod                           : 1
Architecture                            : 9
AssetTag                                : To Be Filled By O.E.M.
Characteristics                         : 252
CpuStatus                               : 1
CurrentVoltage                          : 8
ExtClock                                : 100
L2CacheSize                             : 2048
L2CacheSpeed                            : 
L3CacheSize                             : 16384
L3CacheSpeed                            : 0
Level                                   : 6
Manufacturer                            : GenuineIntel
NumberOfCores                           : 8
NumberOfEnabledCore                     : 8
NumberOfLogicalProcessors               : 16
PartNumber                              : To Be Filled By O.E.M.
ProcessorId                             : BFEBFBFF000A0655
ProcessorType                           : 3
Revision                                : 
SecondLevelAddressTranslationExtensions : False
SerialNumber                            : To Be Filled By O.E.M.
SocketDesignation                       : U3E1
ThreadCount                             : 16
Version                                 : 
VirtualizationFirmwareEnabled           : False
VMMonitorModeExtensions                 : False
VoltageCaps                             : 
PSComputerName                          : 
CollectionTime                          : 12-03-2023 16:08:33


RELATED LINKS https://github.com/KnudsenMorten/AzLogDcrIngestPS

root@kitploit:~
<br>

# 비용 - 이 데이터를 저장하는 데 비용은 얼마나 드나요?
**500**명의 고객이 **매일** ClientInspector 인벤토리를 실행하는 데이터는 월 약 **DKK 200 / USD 27** 정도입니다.

<br>

# 버그 및 발견 사항, 알려주세요
현재 ClientInspectorV1은 수천 대의 컴퓨터에서 사용되고 있으며 (ServerInspectorV1은 수천 대의 서버에서 사용되고 있습니다).

ClientInspectorV2는 V1에서 완전히 재구축되어 새로운 명명 규칙 등을 적용하여 현재 배포 중이므로, 버그가 발견되지 않을 것이라고 장담할 수 없습니다.
하지만 **약속드릴 수 있는 것은**, 제 여가 시간이 허락하는 한 최대한 빠르게 수정하겠다는 것입니다. 발견 사항이 있으면 [email protected]으로 이메일을 보내주세요.

Github 사이트를 포크하거나, 대시보드/워크북 또는 ClientInspector 스크립트의 업데이트를 주시하는 것을 고려해 보세요.

또한 ClientInspector는 다양한 설계와 플랫폼을 포괄하도록 제작되었지만, 고유한 구성이 있을 수 있으며 컬렉션이나 대시보드에서 다루지 않을 수도 있습니다.
하지만 개방적인 접근 방식을 통해 대시보드, 워크북 및 ClientInspector 스크립트를 모두 조정하여 100% 사용자 환경에 맞게 작동하도록 할 수 있습니다. 이는 Azure 로깅 기술로 더 많은 작업을 수행하기 위한 쇼케이스로 간주하십시오. 24x7 지원이 포함된 유료 제품이 아닙니다. 모든 사람에게 무료입니다!

<br>

# 연락처
솔루션에 대한 의견이 있거나 저와 연결하고 싶다면 다음 채널을 통해 연락해 주세요. 연결되기를 기대합니다:

[Github](https://github.com/KnudsenMorten)

[Twitter](https://twitter.com/knudsenmortendk)

[Blog](https://mortenknudsen.net/)

[LinkedIn](https://www.linkedin.com/in/mortenwaltorpknudsen/)

[Microsoft MVP 프로필](https://mvp.microsoft.com/en-us/PublicProfile/5005156?fullName=Morten%20Knudsen)

[Sessionize](https://sessionize.com/mortenknudsen/)

[메일](mailto:[email protected])

<br>

# Microsoft 제품 팀의 훌륭한 분들께 큰 감사를 드립니다 - 여러분은 락스타입니다 :smile:
마지막으로, AzLogDcrIngestPS PowerShell 모듈을 구축하고 Azure 로그 및 보기 기능에 대한 일상 업무에서 함께 작업한 몇 분께 큰 감사를 전하고 싶습니다:

|이름|역할|
|:---|:---|
|Ivan Varnitski|프로그램 관리자 - Azure Pipeline|
|Evgeny Ternovsky|프로그램 관리자 - Azure Pipeline|
|Nick Kiest|프로그램 관리자 - Azure 데이터 수집 규칙|
|Oren Salzberg|프로그램 관리자 - Azure LogAnalytics|
|Guy Wild|기술 문서 작성자 - Azure LogAnalytics|
|John Gardner|프로그램 관리자 - Azure Workbooks|
|Shikha Jain|프로그램 관리자 - Azure Workbooks|
|Shayoni Seth|프로그램 관리자 - Azure Monitor Agent|
|Jeff Wolford|프로그램 관리자 - Azure Monitor Agent|
|Xema Pathak|프로그램 관리자 - Azure VMInsight (Azure Monitor Agent와 통합)|

![MS-친구들](https://assets.kitploit.com/production/public/readmes/6097/654c3844cb0324e2b53e04ebfd758652372ae0820636c3c37adc3f18ab178e8e.jpg)

