
Skip to content
KitploitKITPLOIT
StrumentiBlog
Invia
StrumentiBlog
Invia

Strumenti di Hacking, PenTest e Cybersecurity per il tuo Arsenale di Sicurezza!

Kitploit è una directory di strumenti di hacking, cybersecurity e pentesting. Scopri gli ultimi aggiornamenti dei progetti per trovare vulnerabilità, analizzare sistemi, automatizzare i test e rafforzare la tua sicurezza.

··Feed·Contatto·Privacy·© 2026 Kitploit

Directory degli strumenti

Categorie

Vedi tutte le categorie
Loading categories
MITM_Intercept — Un modo leggermente meno 'hackeristico' per intercettare e modificare protocolli non-HTTP tramite Burp e altri. | Kitploit
Strumenti/GitHubGitHub/cyberark/mitm_intercept
Proxy Web e IntercettazionePenetration Testing
GitHubcyberark/mitm_intercept

MITM_Intercept

Un modo leggermente meno 'hackeristico' per intercettare e modificare protocolli non-HTTP tramite Burp e altri.

Vedi Repository
219324 anni faRevisionato da Kitploit

Più Popolari

Vedi tutti →

Scopri gli strumenti più utilizzati dalla nostra community.

Esplora tutti gli strumenti

Sfoglia la nostra collezione di strumenti

Vedi tutti gli strumenti →
Condividi

MITM_Intercept

Un modo leggermente meno "hackish" per intercettare e modificare protocolli non HTTP tramite Burp e altri, con supporto all'intercettazione SSL e TLS. Questo strumento è pensato per ricercatori e penetration tester applicativi che eseguono valutazioni della sicurezza di client "thick".

Una versione migliorata del fantastico progetto mitm_relay.

La Storia

Come parte del nostro lavoro nel dipartimento di ricerca di CyberArk Labs, avevamo bisogno di un modo per ispezionare la comunicazione SSL e TLS su TCP e avere la possibilità di modificare il contenuto dei pacchetti al volo. Esistono molti modi per farlo (ad esempio, la nota estensione Burp Suite NoPE), ma nessuno di questi funzionava per noi in alcuni casi. Alla fine ci siamo imbattuti in mitm_relay.

mitm_relay è un modo rapido e semplice per eseguire MITM di qualsiasi protocollo basato su TCP attraverso software di intercettazione HTTP esistenti, come il proxy di Burp Suite. È particolarmente utile per le valutazioni di sicurezza dei client thick. Ma non funzionava completamente per noi, quindi abbiamo dovuto personalizzarlo. Dopo molte personalizzazioni, ogni nuova modifica richiedeva molto lavoro e abbiamo finito per riscrivere tutto in modo più modulare.

Speriamo che altri trovino utile questo script e che l'aggiunta di funzionalità sia semplice.

Come funziona

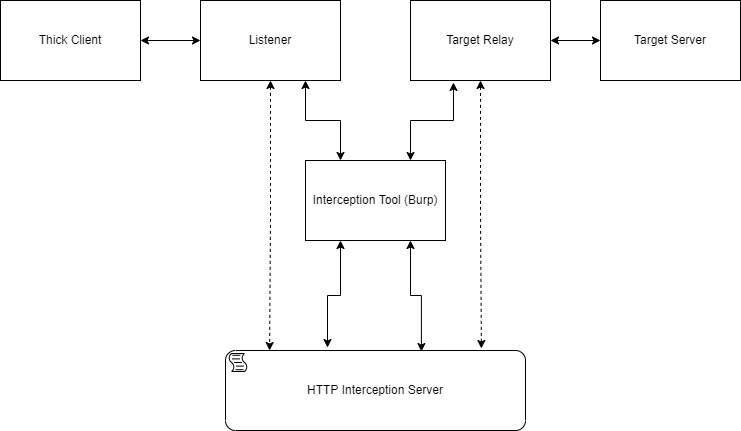
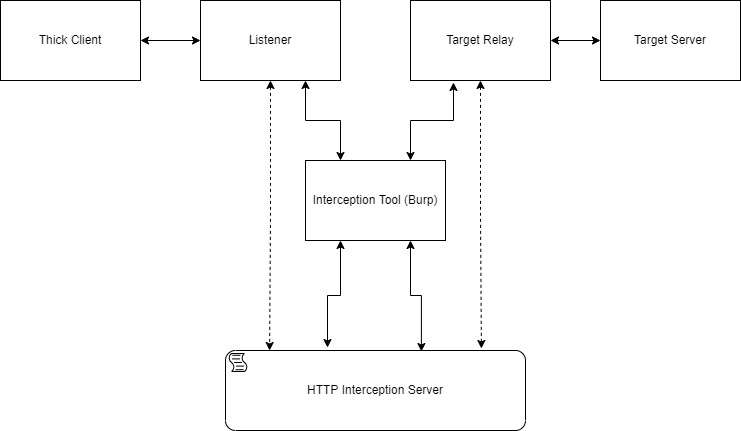
Per iniziare, è necessario configurare gli indirizzi e le porte dei listener. Per ogni listener, è necessario configurare anche un target (indirizzo e porta). Ogni dato ricevuto dal listener verrà inserito nel corpo di una richiesta HTTP POST con l'URL che contiene "CLIENT_REQUEST". Ogni dato ricevuto dal target verrà inserito nel corpo di una richiesta HTTP POST con l'URL che contiene "SERVER_RESPONSE". Queste richieste vengono inviate a un server di intercettazione HTTP locale.

È possibile configurare un proxy HTTP e utilizzare uno strumento come burp suite come strumento di intercettazione HTTP e visualizzare i messaggi lì. In questo modo, è facile modificare i messaggi utilizzando le funzioni "Match and Replace" di Burp, le estensioni o anche manualmente (Ricorda, il meccanismo di timeout del protocollo intercettato può essere molto breve).

Un altro modo per modificare i messaggi è utilizzare uno script Python che il server di intercettazione HTTP eseguirà quando riceve messaggi.

Il corpo dei messaggi inviati al server di intercettazione HTTP verrà stampato nella shell. I messaggi verranno stampati dopo le modifiche se viene fornito lo script di modifica. Dopo tutte le modifiche, il server di intercettazione risponderà anche con il corpo della risposta HTTP.

Per decrittare la comunicazione SSL/TLS, è necessario fornire a mitm_intercept un certificato e una chiave che il client accetterà quando avvia un handshake con il listener. Se il server target richiede un certificato specifico per l'handshake, è possibile fornire un certificato e una chiave.

Un piccolo diagramma per mostrare il flusso tipico del traffico:
test

Differenze da mitm_relay

mitm_intercept è compatibile con versioni più recenti di Python 3 (Python 3.9) ed è anche compatibile con Windows (ad esempio, socket.MSG_DONTWAIT non esiste in Windows). Abbiamo mantenuto l'opzione di utilizzare "STARTTLS", che abbiamo chiamato modalità "Mixed". L'uso del file di log delle chiavi SSL è aggiornato (l'opzione integrata per usarlo è nuova da Python 3.8) e abbiamo aggiunto l'opzione per cambiare l'intestazione SNI. Ora, la gestione della comunicazione in entrata e in uscita è effettuata da socketserver, e tutti i dati vengono inviati a una sottoclasse di ThreadingHTTPServer che gestisce la rappresentazione e la modifica dei dati. In questo modo, è possibile vedere le modifiche applicate dallo script di modifica nella risposta (comodo per usare Burp). Inoltre, ora possiamo cambiare i cipher disponibili che lo script utilizza utilizzando il formato della lista cipher di OpenSSL

Prerequisiti

  1. Python 3.9
  2. requests: $ python -m pip install requests

Utilizzo

root@kitploit:~
usage: mitm_intercept.py [-h] [-m] -l [u|t:]<interface>:<port> [[u|t:]<interface>:<port> ...] -t
                         [u|t:]<addr>:<port> [[u|t:]<addr>:<port> ...] [-lc <cert_path>]
                         [-lk <key_path>] [-tc <cert_path>] [-tk <key_path>] [-w <interface>:<port>]
                         [-p <addr>:<port>] [-s <script_path>] [--sni <server_name>]
                         [-tv <defualt|tls12|tls11|ssl3|tls1|ssl2>] [-ci <ciphers>]

mitm_intercept version 1.6

options:
  -h, --help            show this help message and exit
  -m, --mix-connection  Perform TCP relay without SSL handshake. If one of the relay sides starts an
                        SSL handshake, wrap the connection with SSL, and intercept the
                        communication. A listener certificate and private key must be provided.
  -l [u|t:]<interface>:<port> [[u|t:]<interface>:<port> ...], --listen [u|t:]<interface>:<port> [[u|t:]<interface>:<port> ...]
                        Creates SSLInterceptServer listener that listens on the specified interface
                        and port. Can create multiple listeners with a space between the parameters.
                        Adding "u:" before the address will make the listener listen in UDP
                        protocol. TCP protocol is the default but adding "t:" for cleanliness is
                        possible. The number of listeners must match the number of targets. The i-th
                        listener will relay to the i-th target.
  -t [u|t:]<addr>:<port> [[u|t:]<addr>:<port> ...], --target [u|t:]<addr>:<port> [[u|t:]<addr>:<port> ...]
                        Directs each SSLInterceptServer listener to forward the communication to a
                        target address and port. Can create multiple targets with a space between
                        the parameters. Adding "u:" before the address will make the target
                        communicate in UDP protocol.TCP protocol is the default but adding "t:" for
                        cleanliness is possible. The number of listeners must match the number of
                        targets. The i-th listener will relay to the i-th target.
  -lc <cert_path>, --listener-cert <cert_path>
                        The certificate that the listener uses when a client contacts him. Can be a
                        self-sign certificate if the client will accept it.
  -lk <key_path>, --listener-key <key_path>
                        The private key path for the listener certificate.
  -tc <cert_path>, --target-cert <cert_path>
                        The certificate that used to create a connection with the target. Can be a
                        self-sign certificate if the target will accept it. Doesn't necessary if the
                        target doesn't require a specific certificate.
  -tk <key_path>, --target-key <key_path>
                        The private key path for the target certificate.
  -w <interface>:<port>, --webserver <interface>:<port>
                        Specifies the interface and the port the InterceptionServer webserver will
                        listens on. If omitted the default is 127.0.0.1:49999
  -p <addr>:<port>, --proxy <addr>:<port>
                        Specifies the address and the port of a proxy between the InterceptionServer
                        webserver and the SSLInterceptServer. Can be configured so the communication
                        will go through a local proxy like Burp. If omitted, the communication will
                        be printed in the shell only.
  -s <script_path>, --script <script_path>
                        A path to a script that the InterceptionServer webserver executes. Must
                        contain the function handle_request(message) that will run before sending it
                        to the target or handle_response(message) after receiving a message from the
                        target. Can be omitted if doesn't necessary.
  --sni <server_name>   If there is a need to change the server name in the SSL handshake with the
                        target. If omitted, it will be the server name from the handshake with the
                        listener.
  -tv <defualt|tls12|tls11|ssl3|tls1|ssl2>, --tls-version <defualt|tls12|tls11|ssl3|tls1|ssl2>
                        If needed can be specified a specific TLS version.
  -ci <ciphers>, --ciphers <ciphers>
                        Sets different ciphers than the python defaults for the TLS handshake. It
                        should be a string in the OpenSSL cipher list format
                        (https://www.openssl.org/docs/manmaster/man1/ciphers.html).

For dumping SSL (pre-)master secrets to a file, set the environment variable SSLKEYLOGFILE with a
file path. Useful for Wireshark.

La comunicazione deve essere indirizzata al listener per intercettare protocolli arbitrari. Il modo per farlo dipende da come opera il client. A volte utilizza un indirizzo DNS e modificare il file hosts sarà sufficiente per risolvere l'indirizzo del listener. Se l'indirizzo è hard-coded, è necessario applicare metodi più creativi (di solito alcune modifiche della tabella di routing, patch del client o utilizzo di VM e iptables).

Script di Modifica

Il server di intercettazione HTTP può eseguire uno script fornito con il flag -s. Questo script viene eseguito quando vengono ricevute le richieste HTTP. La risposta dal server di intercettazione HTTP è la richiesta ricevuta dopo l'esecuzione dello script.

Quando è configurato un proxy (come Burp), le modifiche alla richiesta avverranno prima dell'esecuzione dello script e le modifiche alla risposta avverranno dopo. Le alterazioni sulla richiesta e sulla risposta da parte del proxy o dello script di modifica modificheranno il messaggio originale prima che venga inviato alla destinazione.

Lo script deve contenere le funzioni handle_request(message) e handle_response(message). Il server di intercettazione HTTP chiamerà handle_request(message) quando il messaggio proviene dal client verso il server e handle_response(message) quando il messaggio proviene dal server verso il client.

Un esempio di script che aggiunge un byte nullo alla fine del messaggio:

root@kitploit:~
def handle_request(message):
    return message + b"\x00"

def handle_response(message):
    # Entrambe le funzioni devono restituire un messaggio.
    return message

Certificati

Lo strumento richiede un certificato server e una chiave privata per l'intercettazione SSL. Le informazioni sulla generazione di un certificato auto-firmato o del certificato di Burp sono disponibili qui.

Se il server richiede un certificato specifico, è possibile fornire un certificato e una chiave allo strumento.

Demo

La demo qui sotto mostra come intercettare una connessione con MSSQL (questa demo è stata eseguita su DVTA):

https://user-images.githubusercontent.com/28649672/162933166-21c1f37d-ee6c-4162-8c00-2bc724cc10a7.mp4

La connessione a MSSQL è effettuata tramite il protocollo TDS su TCP. L'autenticazione stessa viene eseguita con TLS sopra il protocollo TDS. Per intercettare quel processo TLS, avremo bisogno di due script di modifica "patchy".

demo_script.py:

root@kitploit:~
from time import time
from struct import pack
from pathlib import Path


def handle_request(message):

    if message.startswith(b"\x17\x03"):
        return message

    with open("msg_req" + str(time()), "wb") as f:
        f.write(message[:8])

    return message[8:]


def handle_response(message):

    if message.startswith(b"\x17\x03"):
        return message

    path = Path(".")
    try:
        msg_res = min(i for i in path.iterdir() if i.name.startswith("msg_res"))
        data = msg_res.read_bytes()
        msg_res.unlink()
    except ValueError:
        data = b'\x12\x01\x00\x00\x00\x00\x01\x00'

    return data[:2] + pack(">h", len(message)+8) + data[4:] + message

demo_script2.py:

root@kitploit:~
from time import time
from struct import pack
from pathlib import Path

def handle_request(message):

    if message.startswith(b"\x17\x03"):
        return message

    path = Path(".")
    try:
        msg_req = min(i for i in path.iterdir() if i.name.startswith("msg_req"))
        data = msg_req.read_bytes()
        msg_req.unlink()
    except ValueError:
        data = b'\x12\x01\x00\x00\x00\x00\x01\x00'


    return data[:2] + pack(">h", len(message)+8) + data[4:] + message


def handle_response(message):

    if message.startswith(b"\x17\x03"):
        return message

    with open("msg_res" + str(time()), "wb") as f:
        f.write(message[:8])

    return message[8:]

Vedremo parte della comunicazione TLS con questi script patchy, ma poi il client fallirà (perché con questi script hacky alteriamo pesantemente la comunicazione TDS tranne la parte TLS).

https://user-images.githubusercontent.com/28649672/162976250-75f2e3c5-f328-4bcc-ad49-a9561d493cb1.mp4

Licenza

Copyright (c) 2022 CyberArk Software Ltd. Tutti i diritti riservati
Questo repository è concesso in licenza con la licenza Apache-2.0 - vedere LICENSE per maggiori dettagli.

Scarica lo strumento