Skip to content
KitploitKITPLOIT
उपकरणब्लॉग
जमा करें
उपकरणब्लॉग
जमा करें

हैकिंग, पेनटेस्ट और साइबर सुरक्षा उपकरण आपके सुरक्षा शस्त्रागार के लिए!

Kitploit हैकिंग, साइबर सुरक्षा और पेंटेस्टिंग टूल्स की एक निर्देशिका है। कमजोरियों को खोजने, सिस्टम का विश्लेषण करने, परीक्षण को स्वचालित करने और अपनी सुरक्षा को मजबूत करने के लिए नवीनतम प्रोजेक्ट अपडेट खोजें।

··फ़ीड·संपर्क·गोपनीयता·© 2026 Kitploit

टूल निर्देशिका

श्रेणियाँ

सभी श्रेणियाँ देखें
Loading categories
go-http-proxy-to-socks — CLI MITM प्रॉक्सी जो SOCKS4/SOCKS5 को HTTP/HTTPS/HTTP2/HTTP3 प्रॉक्सी में बदलता है, पारदर्शी TCP/UDP रीडायरेक्शन, ARP/NDP/DNS स्पूफिंग, ट्रैफिक स्निफिंग और पैकेट कैप्चर के साथ। पूर्णतः Go, libpcap के बिना। | Kitploit
उपकरण/GitHubGitHub/shadowy-pycoder/go-http-proxy-to-socks
पैकेट स्निफिंग और विश्लेषणवेब प्रॉक्सी और अवरोधनआईडीएस/आईपीएस से बचनानेटवर्क सुरक्षापेनिट्रेशन टेस्टिंगउपयोगिताएँ और फ्रेमवर्कDNS फज़िंगरेड टीमिंगDNS विश्लेषण

सबसे लोकप्रिय

सभी देखें →

हमारे समुदाय द्वारा सबसे अधिक उपयोग किए जाने वाले उपकरण खोजें।

सभी उपकरण खोजें

हमारे उपकरणों का संग्रह ब्राउज़ करें

सभी उपकरण देखें →
साझा करें
GitHubshadowy-pycoder/go-http-proxy-to-socks

go-http-proxy-to-socks

CLI MITM प्रॉक्सी जो SOCKS4/SOCKS5 को HTTP/HTTPS/HTTP2/HTTP3 प्रॉक्सी में बदलता है, पारदर्शी TCP/UDP रीडायरेक्शन, ARP/NDP/DNS स्पूफिंग, ट्रैफिक स्निफिंग और पैकेट कैप्चर के साथ। पूर्णतः Go, libpcap के बिना।

रिपॉजिटरी देखें
6931 महीना पहलेKitploit द्वारा समीक्षित

GoHPTS - HTTP(S) और TCP/UDP पारदर्शी प्रॉक्सी से SOCKS4/SOCKS5 प्रॉक्सी (श्रृंखला) Go में लिखा गया

License: GPL v3 Go Reference GitHub go.mod Go version AUR Version AUR Last Modified AUR Maintainer Docker Pulls GitHub Release GitHub Downloads (all assets, all releases) GitHub Downloads (all assets, latest release)

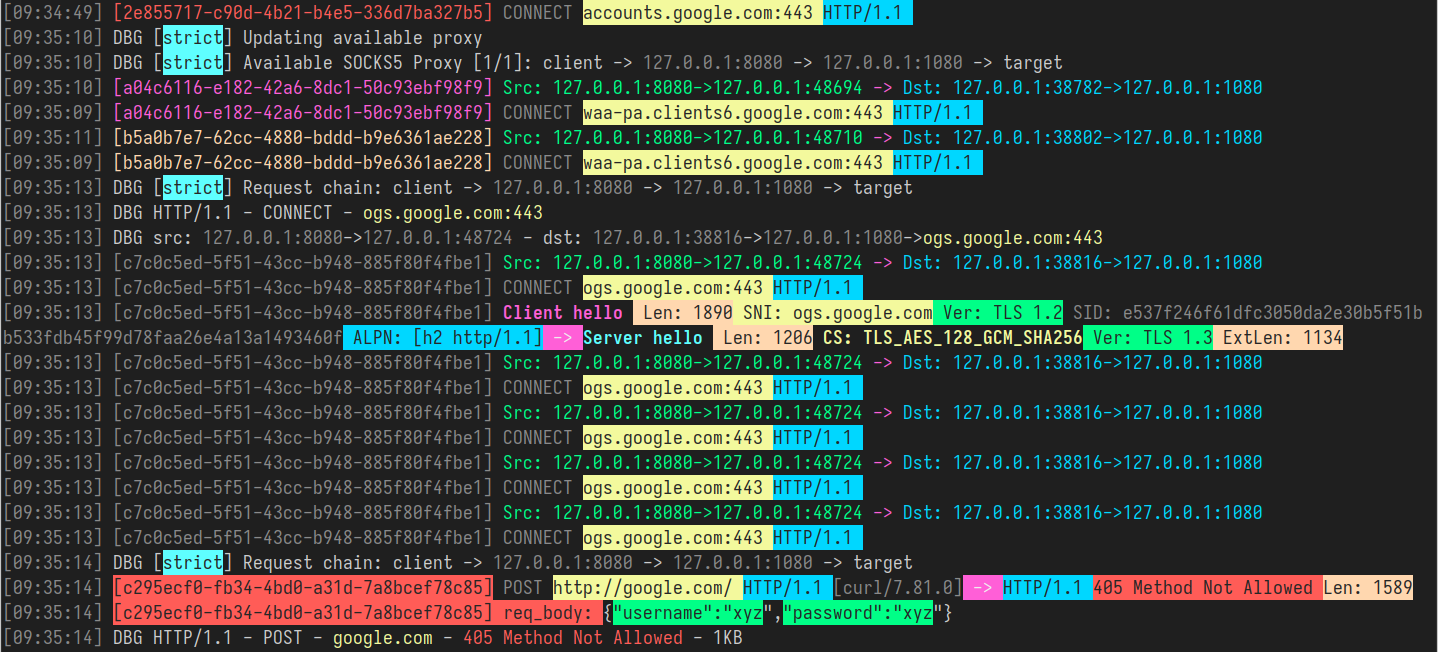
GoHPTS - Colors example

विषय-सूची

  • परिचय
  • विशेषताएँ
  • स्थापना
  • उपयोग
    • CLI फ़्लैग के माध्यम से कॉन्फ़िगरेशन
    • YAML फ़ाइल के माध्यम से कॉन्फ़िगरेशन
  • पारदर्शी प्रॉक्सी
    • redirect (NAT और SO_ORIGINAL_DST के माध्यम से)
    • redirect मोड के लिए स्वचालित कॉन्फ़िगरेशन
    • tproxy (MANGLE और IP_TRANSPARENT के माध्यम से)
    • tproxy मोड के लिए स्वचालित कॉन्फ़िगरेशन
    • UDP समर्थन
    • Android समर्थन
    • YAML कॉन्फ़िगरेशन
  • ट्रैफ़िक स्निफ़िंग
    • JSON प्रारूप
    • रंगीन प्रारूप
  • HTTP2 और HTTP3 समर्थन
    • स्व-हस्ताक्षरित प्रमाणपत्र का उपयोग करके उदाहरण सेटअप
    • कनेक्शन परीक्षण
    • ब्राउज़र में कनेक्शन परीक्षण
  • IPv4 और IPv6 समर्थन
  • ARP स्पूफ़िंग
  • NDP स्पूफ़िंग
  • DNS स्पूफ़िंग
  • पैकेट कैप्चर
  • नेटवर्क नेमस्पेस
    • प्लेग्राउंड सेटअप
    • उपयोग उदाहरण
  • मिश्रित सर्वर
  • लिंक्स
  • योगदान
  • लाइसेंस

परिचय

[वापस]

GoHPTS CLI उपकरण HTTP क्लाइंट और एक SOCKS5 प्रॉक्सी सर्वर या कई सर्वरों (श्रृंखला) के बीच एक सेतु है। यह स्थानीय रूप से एक HTTP प्रॉक्सी के रूप में सुनता है, मानक HTTP या HTTPS (CONNECT के माध्यम से) अनुरोधों को स्वीकार करता है और कनेक्शन को एक SOCKS5 प्रॉक्सी के माध्यम से अग्रेषित करता है। http-proxy-to-socks और Proxychains से प्रेरित।

संभावित उपयोग केस: आपको Postman के माध्यम से बाहरी API से कनेक्ट करने की आवश्यकता है, लेकिन यह API केवल किसी दूरस्थ सर्वर से उपलब्ध है। निम्नलिखित कमांड आपको ऐसा कार्य करने में मदद करेंगे:

ssh के माध्यम से SOCKS5 प्रॉक्सी सर्वर बनाएँ:```shell ssh -D 1080 -Nf

root@kitploit:~
`gohpts` के साथ HTTP से SOCKS5 कनेक्शन बनाएं```shell
gohpts -s :1080 -l :8080

Postman की प्रॉक्सी कॉन्फ़िगरेशन में http सर्वर निर्दिष्ट करें

विशेषताएँ

[पीछे]

  • प्रॉक्सी चेन कार्यक्षमता
    SOCKS4/SOCKS5 प्रॉक्सी की strict, dynamic, random, round_robin चेन का समर्थन करता है

  • पारदर्शी प्रॉक्सी
    redirect (SO_ORIGINAL_DST) और tproxy (IP_TRANSPARENT) मोड का समर्थन करता है

  • IPv4 और IPv6 समर्थन
    IPv4-only, IPv6-only या dual stack मोड में संचालित होता है

  • TCP और UDP पारदर्शी प्रॉक्सी
    tproxy और tlocal (IP_TRANSPARENT) TCP और UDP ट्रैफ़िक को संभालता है

  • ट्रैफ़िक स्निफ़िंग
    प्रॉक्सी HTTP हेडर, TLS हैंडशेक, DNS संदेश और अधिक को पार्स करने में सक्षम है

  • ARP स्पूफिंग
    ARP स्पूफिंग दृष्टिकोण से संपूर्ण सबनेट को प्रॉक्सी करें

स्थापना

[पीछे]

  • Arch Linux/CachyOS/EndeavourOS ```shell yay -S gohpts
    root@kitploit:~

या paru का उपयोग करके: ```shell paru -S gohpts

root@kitploit:~
- अपने प्लेटफॉर्म के लिए बाइनरी [Releases](https://github.com/shadowy-pycoder/go-http-proxy-to-socks/releases) पेज से डाउनलोड करें:  ```shell
GOHPTS_RELEASE=v1.15.5; wget -v https://github.com/shadowy-pycoder/go-http-proxy-to-socks/releases/download/$GOHPTS_RELEASE/gohpts-$GOHPTS_RELEASE-linux-amd64.tar.gz -O gohpts && tar xvzf gohpts && mv -f gohpts-$GOHPTS_RELEASE-linux-amd64 gohpts && ./gohpts -h
  • इसका उपयोग करके स्थापित करें go install कमांड (Go 1.26 या बाद के संस्करण की आवश्यकता है): ```shell CGO_ENABLED=0 go install -ldflags "-s -w" -trimpath github.com/shadowy-pycoder/go-http-proxy-to-socks/cmd/gohpts@latest
    root@kitploit:~

यह gohpts बाइनरी को आपके $GOPATH/bin निर्देशिका में स्थापित करेगा।

  • स्रोत से निर्माण करें: ```shell git clone https://github.com/shadowy-pycoder/go-http-proxy-to-socks.git cd go-http-proxy-to-socks make build ./bin/gohpts
    root@kitploit:~
  • Docker में चलाएँ: ```shell docker run -it --privileged --network host -v "$PWD/gohpts.yaml:/config.yaml" shadowypycoder/gohpts:latest -f config.yaml
    root@kitploit:~

उपयोग

[Back]```shell gohpts -h


/ | | | | | __ _ / ____| | | __ ___ | || | |) | | | | (__ | | |_ |/ _ | __ | / | | _
| |__| | (
) | | | | | | | ) | _|_/|| ||| || |___/

GoHPTS: HTTP(S) Proxy to SOCKS4/SOCKS5 proxy by shadowy-pycoder GitHub: https://github.com/shadowy-pycoder/go-http-proxy-to-socks Codeberg: https://codeberg.org/shadowy-pycoder/go-http-proxy-to-socks

Usage: gohpts [OPTIONS] OPTIONS: General: -h Show this help message and exit -v Show version and build information -D Run as a daemon (provide -logfile to see logs) -I Display list of network interfaces and exit -f Path to proxy configuration file in YAML format

Proxy: -l Address of HTTP proxy server (Default: "127.0.0.1:8080" for IPv4, "[::1]:8080" for IPv6) -s Address of SOCKS proxy server (Default: "127.0.0.1:1080" for IPv4 "[::1]:1080" for IPv6) -c Path to certificate PEM encoded file -k Path to private key PEM encoded file -U User for HTTP proxy (basic auth). This flag invokes prompt for password (not echoed to terminal) -u User for SOCKS proxy authentication. This flag invokes prompt for password (not echoed to terminal) -i Bind proxy to specific network interface (either by interface name or index) -4 Force IPv4 stack for TCP and UDP (Default: dual stack) -6 Force IPv6 stack for TCP and UDP (Default: dual stack) -socks4 Use SOCKS4/SOCKS4a protocol for upstream proxy and mixed server (default: SOCKS5/SOCKS5h) -nohttp Disable HTTP proxy server -nosocks Disable SOCKS upstream proxy -dns Use custom DNS server (Example: "8.8.8.8" or "2001:4860:4860::8888") -mixed Accept SOCKS connections on HTTP proxy server address

Logs: -d Show logs in DEBUG mode -j Show logs in JSON format -logfile Log file path (Default: stdout) -nocolor Disable colored output for logs (no effect if -j flag specified) -pprof Address of pprof server with profiling data

Sniffing: -sniff Enable traffic sniffing for HTTP and TLS -snifflog Sniffed traffic log file path (Default: the same as -logfile) -body Collect request and response body for HTTP traffic (credentials, tokens, etc)

TProxy: -T Address of transparent proxy server -Tu Address of transparent UDP proxy server -M Transparent proxy mode: (redirect, tproxy, tlocal) -w Number of instances of transparent proxy server (Default: number of CPU cores) -wu Number of instances of transparent UDP proxy server (Default: number of CPU cores) -auto Automatically setup iptables and kernel parameters for transparent proxy (requires elevated privileges) -mark Set mark for each packet sent through transparent proxy (Default: redirect 0, tproxy 100, tlocal 100) -P Comma separated list of ports to ignore when proxying traffic (Example: "22,80,443,9092") -dump Dump iptables rules and other system settings generated by -auto flag

Spoofing: -arpspoof Enable ARP spoof proxy for selected targets (Example: "targets 10.0.0.1,10.0.0.5-10,192.168.1.*,192.168.10.0/24;fullduplex false;debug true;interval 10s") -ndpspoof Enable NDP spoof proxy for selected targets (Example: "ra true;na true;targets fe80::3a1c:7bff:fe22:91a4;fullduplex false;debug true;interval 10s")

Packet Capture: -pcap Enable packet capture (Example: "promisc true;expr ip proto tcp;snaplen 65535;timeout 10s;packet_count 100;packet_buffer 8192;exts txt,pcap,pcapng")

Namespaces: -in-netns Name or path of network namespace for inbound listeners (Default: default namespace) -out-netns Name or path of network namespace for outbound connections (Default: default namespace)

root@kitploit:~
### CLI फ़्लैग्स के माध्यम से कॉन्फ़िगरेशन

[[Back]](#table-of-contents)```shell
gohpts -s 1080 -l 8080 -d -j

आउटपुट:```shell {"level":"info","time":"2025-05-28T06:15:18+00:00","message":"SOCKS5 Proxy: :1080"} {"level":"info","time":"2025-05-28T06:15:18+00:00","message":"HTTP Proxy: :8080"} {"level":"debug","time":"2025-05-28T06:15:22+00:00","message":"HTTP/1.1 - CONNECT - www.google.com:443"}

root@kitploit:~
SOCKS5 प्रॉक्सी सर्वर के लिए उपयोगकर्ता नाम और पासवर्ड निर्दिष्ट करें:```shell
gohpts -s 1080 -l 8080 -d -j -u user
SOCKS5 Password: #you will be prompted for password input here

HTTP प्रॉक्सी सर्वर के लिए उपयोगकर्ता नाम और पासवर्ड निर्दिष्ट करें:```shell gohpts -s 1080 -l 8080 -d -j -U user HTTP Password: #you will be prompted for password input here

root@kitploit:~
जब दोनों `-u` और `-U` मौजूद हों, तो आपको दो बार संकेत दिया जाएगा

TLS कनेक्शन पर http प्रॉक्सी चलाएं```shell
gohpts -s 1080 -l 8080 -c "path/to/certificate" -k "path/to/private/key"

प्रॉक्सी को डेमन के रूप में चलाएं (लॉग आउटपुट के लिए लॉगफ़ाइल आवश्यक है, अन्यथा आपको कुछ दिखाई नहीं देगा)```shell gohpts -D -logfile /tmp/gohpts.log

root@kitploit:~
इनपुट:```shell
# output
gohpts pid: <pid>
  • port - हटाए जाने वाले API का पोर्ट। आवश्यक। (डिफ़ॉल्ट: 8000).
  • verbose - प्रत्येक मॉड्यूल (हटाए जाने वाले API) से विस्तृत आउटपुट प्राप्त करें जिसे आप चला रहे हैं। डिफ़ॉल्ट false है।
  • server - API एंडपॉइंट के लिए उपयोग किया जाने वाला सर्वर। यह डिफ़ॉल्ट रूप से https://api.supertokens.io है और इसे तब तक नहीं बदलना चाहिए जब तक कि आप एक कस्टम SuperTokens कोर का उपयोग नहीं कर रहे हों। SuperTokens को अपने दम पर या किसी भिन्न क्षेत्र में होस्ट करने के दस्तावेज़ पढ़ने के लिए प्रबंधित सेवा दस्तावेज़ पृष्ठ पर जाएँ।

उपयोगकर्ता हटाएँ

root@kitploit:~
curl --location --request POST '/user/remove' \
--header 'api-key: <YOUR_API_KEY>' \
--header 'Content-Type: application/json; version=1' \
--data-raw '{
    "userId": "<USER_ID>"
}'
विवरण
root@kitploit:~
* यह उपयोगकर्ता की जानकारी हटाता है और अधिकांश मामलों में उपयोगकर्ता के सभी रिफ्रेश टोकन को SuperTokens कोर से हटा देता है।```shell

kill the process

kill #or kill $(pidof gohpts)

root@kitploit:~
`-u` और `-U` फ्लैग डेमॉन मोड में काम नहीं करते (और इसलिए प्रमाणीकरण भी नहीं), लेकिन आप एक कॉन्फिग फ़ाइल प्रदान कर सकते हैं (नीचे देखें)

### YAML फ़ाइल के माध्यम से कॉन्फ़िगरेशन

[[Back]](#table-of-contents)

कॉन्फ़िगरेशन फ़ाइलें तब उपयोगी होती हैं जब आप CLI से अधिक छेड़छाड़ किए बिना अपने प्रॉक्सी को पूर्व-कॉन्फ़िगर करना चाहते हैं या विभिन्न आवश्यकताओं के लिए कई प्रोफ़ाइल चाहते हैं।

SOCKS5 प्रॉक्सी चेन मोड में http प्रॉक्सी चलाएं (YAML कॉन्फ़िगरेशन फ़ाइल के माध्यम से सर्वर सेटिंग्स निर्दिष्ट करें)```shell
gohpts -f "~/gohtps.yaml" -d -j

कॉन्फ़िग उदाहरण:

root@kitploit:~
# bind proxy to specific network interface (either by interface name or index)
interface: "eth0" # if specified, overrides http server IP address
disable_http: false # disable http proxy (default: false)
disable_socks: false # disable upstream socks proxy (default: false)
# if ipv4 and ipv6 are both false or both true, dual stack is assumed
ipv4: false # this must be enabled for arpspoof (default: false)
ipv6: false # this must be enabled for ndpspoof (default: false)
socks4: false # use SOCKS4/SOCKS4a protocol (tcp only protocol, no udp tproxy or http3 possible) (default: false)
dns: 8.8.8.8 # custom DNS server (used in direct dialer, namespaces, spoofing)

http_server:
  address: 127.0.0.1:8080
  # username and password for adding basic authentication (comment out to disable auth)
  username: username
  password: password

# list of socks5 proxy
# if proxy_chain is disabled, uses first server in a list as upstream
proxy_list:
  - address: 127.0.0.1:1080
  - address: 127.0.0.1:1081
  - address: :1082 # empty host means localhost

proxy_chain:
  enabled: false
  # Explanations for chains taken from /etc/proxychains4.conf

  # strict - Each connection will be done via chained proxies
  # all proxies chained in the order as they appear in the list
  # all proxies must be online to play in chain

  # dynamic - Each connection will be done via chained proxies
  # all proxies chained in the order as they appear in the list
  # at least one proxy must be online to play in chain
  # (dead proxies are skipped)

  # random - Each connection will be done via random proxy
  # (or proxy chain, see  chain_len) from the list.
  # this option is good to test your IDS :)

  # round_robin - Each connection will be done via chained proxies
  # of chain_len length
  # all proxies chained in the order as they appear in the list
  # at least one proxy must be online to play in chain
  # (dead proxies are skipped).
  # the start of the current proxy chain is the proxy after the last
  # proxy in the previously invoked proxy chain.
  # if the end of the proxy chain is reached while looking for proxies
  # start at the beginning again.
  # These semantics are not guaranteed in a multithreaded environment.
  type: strict # dynamic, strict, random, round_robin
  length: 2 # maximum number of proxy in a chain (works only for random chain and round_robin chain)

logging:
  debug: true
  json: false
  # defaults to standard output
  #logfile: /tmp/gohpts.log
  # use colored output in logs (no effect if json enabled)
  nocolor: false
  # profiling data
  pprof: 127.0.0.1:8081
```
आप कॉन्फ़िगरेशन फ़ाइल में निर्दिष्ट लगभग किसी भी सेटिंग को संबंधित CLI ध्वज प्रदान करके ओवरराइड कर सकते हैं:```shell
gohpts -l :6969 -f "~/gohtps.yaml" -nocolor
```
प्रॉक्सी `~/gohpts.yaml` में निर्दिष्ट सभी सेटिंग्स लेता है लेकिन `127.0.0.1:8080` के बजाय `127.0.0.1:6969` पर http सर्वर शुरू करता है और लॉग में रंगीन आउटपुट अक्षम कर देता है।

कुछ सेटिंग्स (जैसे proxy_chain और dns फ़िल्टर) केवल फ़ाइल के माध्यम से कॉन्फ़िगर की जा सकती हैं।

कॉन्फ़िग का पूर्ण संस्करण यहाँ पाया जा सकता है: [example_gohpts.yaml](https://github.com/shadowy-pycoder/go-http-proxy-to-socks/blob/HEAD/resources/example_gohpts.yaml)

प्रॉक्सी चेन के बारे में अधिक जानने के लिए [Proxychains Github](https://github.com/rofl0r/proxychains-ng) पर जाएँ।

## पारदर्शी प्रॉक्सी

[[Back]](#table-of-contents)

> Also known as an `intercepting proxy`, `inline proxy`, या `forced proxy`, एक पारदर्शी प्रॉक्सी सामान्य एप्लिकेशन परत संचार को बिना किसी विशेष क्लाइंट कॉन्फ़िगरेशन की आवश्यकता के इंटरसेप्ट करता है। क्लाइंट को प्रॉक्सी के अस्तित्व के बारे में पता होने की आवश्यकता नहीं है। एक पारदर्शी प्रॉक्सी सामान्यतः क्लाइंट और इंटरनेट के बीच स्थित होता है, जिसमें प्रॉक्सी गेटवे या राउटर के कुछ कार्य करता है।
>
> -- _[विकी](https://en.wikipedia.org/wiki/Proxy_server) से_

यह कार्यक्षमता केवल Linux सिस्टम और Android (arm64) पर उपलब्ध है और अतिरिक्त सेटअप (`iptables`, ip route, आदि) की आवश्यकता है।

`-T address` फ़्लैग पारदर्शी प्रॉक्सी सर्वर का पता निर्दिष्ट करता है।

`-M` फ़्लैग के साथ तीन मोड `redirect`, `tproxy` और `tlocal` (`tproxy` के समान लेकिन स्थानीय ट्रैफ़िक को भी इंटरसेप्ट करता है) निर्दिष्ट किए जा सकते हैं।

### `redirect` (_NAT_ और _SO_ORIGINAL_DST_ के माध्यम से)

[[Back]](#table-of-contents)

इस मोड में प्रॉक्सीिंग `iptables` `nat` तालिका और `REDIRECT` लक्ष्य के साथ होती है। आने वाले पैकेट का होस्ट चल रहे `redirect` पारदर्शी प्रॉक्सी के पते में बदल जाता है, लेकिन इसमें मूल गंतव्य भी होता है जिसे `getsockopt(SO_ORIGINAL_DST)` के साथ प्राप्त किया जा सकता है।

इस मोड में `GoHPTS` चलाने के लिए आप `-T` फ़्लैग का उपयोग `-M redirect` के साथ करते हैं।

### उदाहरण

[[Back]](#table-of-contents)```shell
# run the proxy
gohpts -s 1080 -T 1090 -M redirect -d
```
कोई सामग्री प्रदान नहीं की गई है।```shell
# run socks5 server on 127.0.0.1:1080
ssh remote -D 1080 -Nf
```
अपना ऑपरेटिंग सिस्टम सेटअप करें:```shell
# commands below require elevated privileges (you can run it with `sudo -i`)

#enable ip forwarding
sysctl -w net.ipv4.ip_forward=1

# create `GOHPTS` nat chain
iptables -t nat -N GOHPTS

# set no redirection rules for local, http proxy, ssh and redirect proxy itself
iptables -t nat -A GOHPTS -d 127.0.0.0/8 -j RETURN
iptables -t nat -A GOHPTS -p tcp --dport 8080 -j RETURN
iptables -t nat -A GOHPTS -p tcp --dport 1090 -j RETURN
iptables -t nat -A GOHPTS -p tcp --dport 22 -j RETURN

# redirect traffic to transparent proxy
iptables -t nat -A GOHPTS -p tcp -j REDIRECT --to-ports 1090

# setup prerouting by adding our proxy
iptables -t nat -A PREROUTING -p tcp -j GOHPTS

# intercept local traffic for testing
iptables -t nat -A OUTPUT -p tcp -j GOHPTS
```
कनेक्शन का परीक्षण करें:```shell
#traffic should be redirected via 127.0.0.1:1090
curl http://example.com
```
## चेंजलॉग

- **अप्रैल 25, 2025**: वेब स्क्रैपिंग में सुधार के लिए प्रॉक्सी पूल मैनेजर (प्रॉक्सीज़ टैब)।
  - प्रॉक्सी की स्वतः जांच और रोटेशन (जांच अवधि, न्यूनतम अंतराल, प्रतिबंध समय, आदि)।
  - तेज़ प्रॉक्सी को प्राथमिकता देने के लिए प्राथमिकता भार।
  - प्रोजेक्ट के अनुसार समूह बनाएं, या वैश्विक प्रॉक्सी पूल का उपयोग करें।
  - नकली ब्राउज़र हेडर बनाने का परीक्षण उपकरण (स्टेल्थ!)
  - GUI से ऑटो IP रोटेशन के साथ Tor के माध्यम से प्राप्त करें।
- **अप्रैल 15, 2025**: aarch64 लिनक्स के लिए x86_64 क्रोमियम बाइनरी (`chromiumOptions.binaryPath` के लिए)।
- **मार्च 19, 2025**: macOS (Apple Silicon) के लिए ARM64 क्रोमियम बाइनरी (`chromiumOptions.binaryPath` के लिए)।

## पूर्वावलोकन

<p align="center">  
<img alt="Katana" src="https://raw.githubusercontent.com/TebbaaX/Katana/main/docs/img/preview.gif" width="640" />  
</p>```shell
#traffic should be redirected via 127.0.0.1:8080
curl --proxy http://127.0.0.1:8080 http://example.com
```
सब कुछ पूर्ववत करें:```shell
sysctl -w net.ipv4.ip_forward=0
iptables -t nat -D PREROUTING -p tcp -j GOHPTS
iptables -t nat -D OUTPUT -p tcp -j GOHPTS
iptables -t nat -F GOHPTS
iptables -t nat -X GOHPTS
```
### `redirect` मोड के लिए स्वचालित कॉन्फ़िगरेशन

[[वापस]](#table-of-contents)

अपने सिस्टम को स्वचालित रूप से कॉन्फ़िगर करने के लिए, निम्न कमांड चलाएँ:```shell
sudo env PATH=$PATH gohpts -d -T 8888 -M redirect -auto
```
कृपया ध्यान दें, स्वचालित कॉन्फ़िगरेशन के लिए `sudo` की आवश्यकता होती है और यह बहुत सामान्य है, जो आपकी आवश्यकताओं के लिए उपयुक्त नहीं हो सकता है।

आप वैकल्पिक रूप से `-mark <value>` निर्दिष्ट कर सकते हैं ताकि संभावित प्रॉक्सी लूप को रोका जा सके।```shell
sudo env PATH=$PATH gohpts -d -T 8888 -M redirect -auto -mark 100
```
### `tproxy` (द्वारा _MANGLE_ और _IP_TRANSPARENT_)

[[वापस]](#table-of-contents)

इस मोड में प्रॉक्सी `iptables` `mangle` table और `TPROXY` target के साथ होता है। ट्रांसपेरेंट प्रॉक्सी गंतव्य पते को वैसे ही देखता है, यह कर्नेल द्वारा पुनर्लिखित नहीं किया जाता है। इसके लिए काम करने के लिए प्रॉक्सी सॉकेट विकल्प `IP_TRANSPARENT` के साथ बाइंड होता है, `iptables` TPROXY target का उपयोग करके ट्रैफ़िक को इंटरसेप्ट करता है, रूटिंग नियम चिह्नित पैकेटों को उनके मूल गंतव्य को बदले बिना स्थानीय प्रॉक्सी में जाने का निर्देश देते हैं।

इस मोड को चलाने के लिए `GoHPTS` को उन्नत विशेषाधिकारों की आवश्यकता होती है। आप निम्नलिखित कमांड चलाकर ऐसा कर सकते हैं:```shell
sudo setcap 'cap_net_admin+ep' ~/go/bin/gohpts
```
To run `GoHPTS` in this mode you use `-T` flag with `-M tproxy`

### उदाहरण

[[Back]](#table-of-contents)```shell
# run the proxy
gohpts -s 1080 -T 0.0.0.0:1090 -M tproxy -d
```
(cd /var/www/USBPasswordManager; sudo bash install_DB.sh <path to db folder>)```shell
# run socks5 server on 127.0.0.1:1080
ssh remote -D 1080 -Nf
```
अपने ऑपरेटिंग सिस्टम को सेटअप करें:```shell
ip netns add ns-client
ip link add dev veth0 type veth peer name veth1 netns ns-client
ip addr add 10.0.0.1/24 dev veth0
ip link set dev veth0 up
ip netns exec ns-client ip addr add 10.0.0.2/24 dev veth1
ip netns exec ns-client ip link set dev lo up
ip netns exec ns-client ip link set dev veth1 up
ip netns exec ns-client ip route add default via 10.0.0.1
sysctl -w net.ipv4.ip_forward=1

iptables -t mangle -A PREROUTING -i veth0 -p tcp -j TPROXY --on-port 1090 --tproxy-mark 0x1/0x1

ip rule add fwmark 1 lookup 100
ip route add local 0.0.0.0/0 dev lo table 100
```
कनेक्शन का परीक्षण करें:```shell
ip netns exec ns-client curl http://1.1.1.1
```
सब कुछ पूर्ववत करें:```shell
sysctl -w net.ipv4.ip_forward=0
iptables -t mangle -F
ip rule del fwmark 1 lookup 100
ip route flush table 100
ip netns del ns-client
```
### `tproxy` मोड के लिए स्वचालित कॉन्फ़िगरेशन

[[Back]](#table-of-contents)

अपने सिस्टम को स्वचालित रूप से कॉन्फ़िगर करने के लिए, निम्न कमांड चलाएँ (उदाहरण के लिए, एक अलग VM पर):```shell
ssh remote -D 1080 -Nf
sudo env PATH=$PATH gohpts -d -T 8888 -M tproxy -auto -mark 100
```
अपने होस्ट पर निम्नलिखित चलाएँ:```shell
ip route show default > /tmp/default-route.txt

ip route add 0.0.0.0/1 via 192.168.0.1 # change with ip of your VM
ip route add 128.0.0.0/1 via 192.168.0.1
```
कनेक्शन परीक्षण:```shell
curl http://example.com #check logs on your VM
```
सब कुछ पूर्ववत करें:```shell
ip route del 0.0.0.0/1 via 192.168.0.1 2>/dev/null || true
ip route del 128.0.0.0/1 via 192.168.0.1 2>/dev/null || true

if [[ -f /tmp/default-route.txt ]]; then
    eval $(awk '{print "ip route add "$0}' /tmp/default-route.txt)
    rm -f /tmp/default-route.txt
else
    echo "Something went wrong"
fi
```
### UDP समर्थन

[[Back]](#table-of-contents)

`GoHPTS` में UDP समर्थन है जिसे `tproxy` और `tlocal` मोड में सक्षम किया जा सकता है। इस सेटअप के काम करने के लिए आपको UDP कनेक्शन (`UDP ASSOCIATE`) प्रदान करने में सक्षम socks5 सर्वर से जुड़ना होगा। उदाहरण के लिए, आप किसी दूरस्थ या स्थानीय मशीन पर UDP सक्षम socks5 सर्वर तैनात करने के लिए [https://github.com/wzshiming/socks5](https://github.com/wzshiming/socks5) का उपयोग कर सकते हैं। एक बार जब आपके पास जुड़ने के लिए सर्वर हो, तो निम्न कमांड चलाएँ:```shell
sudo env PATH=$PATH gohpts -s remote -Tu :8989 -M tproxy -auto -mark 100 -d
```
यह कमांड आपके ऑपरेटिंग सिस्टम को कॉन्फ़िगर करेगी और `0.0.0.0:8989` पते पर सर्वर सेटअप करेगी।

इसे स्थानीय रूप से परीक्षण करने के लिए, आप `-arpspoof` फ़्लैग के साथ UDP ट्रांसपेरेंट प्रॉक्सी को जोड़ सकते हैं। उदाहरण के लिए:

1. अपने सिस्टम पर किसी भी Linux वितरण (जैसे Kali Linux) के साथ VM सेटअप करें जो `tproxy` का समर्थन करता हो।
2. `bridged` नेटवर्क सक्षम करें ताकि VM आपके होस्ट मशीन तक पहुँच सके।
3. `gohpts` बाइनरी को VM में स्थानांतरित करें (जैसे `ssh` के माध्यम से) या विभिन्न OS/arch के मामले में वहीं बिल्ड करें।
4. अपने VM पर निम्न कमांड चलाएँ:```shell
# Do not forget to replace <socks5 server> and <your host> with actual addresses
sudo ./gohpts -s <socks5 server> -T 8888 -Tu :8989 -M tproxy -sniff -body -auto -mark 100 -d -arpspoof "targets <your host>;fullduplex true;debug false"
```
5. अपने होस्ट मशीन पर कनेक्शन की जाँच करें, ट्रैफ़िक को Kali मशीन के माध्यम से जाना चाहिए।

### Android support

[[Back]](#table-of-contents)

Android उपकरणों (arm64) पर रूट एक्सेस के साथ ट्रांसपेरेंट प्रॉक्सी सक्षम किया जा सकता है। आप [Termux](https://github.com/termux/termux-app) इंस्टॉल कर सकते हैं और वहां एक CLI टूल के रूप में `GoHPTS` चला सकते हैं:```shell
# you need to root your device first
pkg install tsu iproute2
# Android support added in v1.10.2
GOHPTS_RELEASE=v1.10.2; wget -v https://github.com/shadowy-pycoder/go-http-proxy-to-socks/releases/download/$GOHPTS_RELEASE/gohpts-$GOHPTS_RELEASE-android-arm64.tar.gz -O gohpts && tar xvzf gohpts && mv -f gohpts-$GOHPTS_RELEASE-android-arm64 gohpts && ./gohpts -h
# use your phone as router for LAN devices redirecting their traffic to remote socks5 server
sudo ./gohpts -s remote -T 8888 -Tu :8989 -M tproxy -sniff -body -auto -mark 100 -d -arpspoof "fullduplex true;debug false"
```
### YAML विन्यास

[[वापस]](#table-of-contents)```yaml
transparent_proxy:
  tcp:
    enabled: true
    address: 0.0.0.0:8888
    # number of instances of transparent proxy server (Default: number of CPU cores)
    workers: 1
  udp:
    enabled: true
    address: 0.0.0.0:8889
    # number of instances of transparent UDP proxy server (Default: number of CPU cores)
    workers: 1
  mode: "tproxy" # available modes are "redirect", "tproxy" and "tlocal" (udp requires tproxy or tlocal mode)
  # automatically setup iptables and kernel parameters for transparent proxy (requires elevated privileges)
  auto: true
  # dump iptables rules and other system settings generated by auto setting
  dump_rules: false
  # list of ports to ignore when proxying traffic (Example: [22,80,443,9092])
  ignored_ports: []
  # set mark for each packet sent through transparent proxy (Default: redirect 0, tproxy 100, tlocal 100)
  mark: 100
```
## ट्रैफ़िक स्निफ़िंग

[[वापस]](#table-of-contents)

<p align="center"><img alt="MrGopher" src="https://assets.kitploit.com/production/public/readmes/11401/ac38691c0f511a6265baf784c236e4ca9557e6c2b7744271f09b1b657af92ca7.png"/>

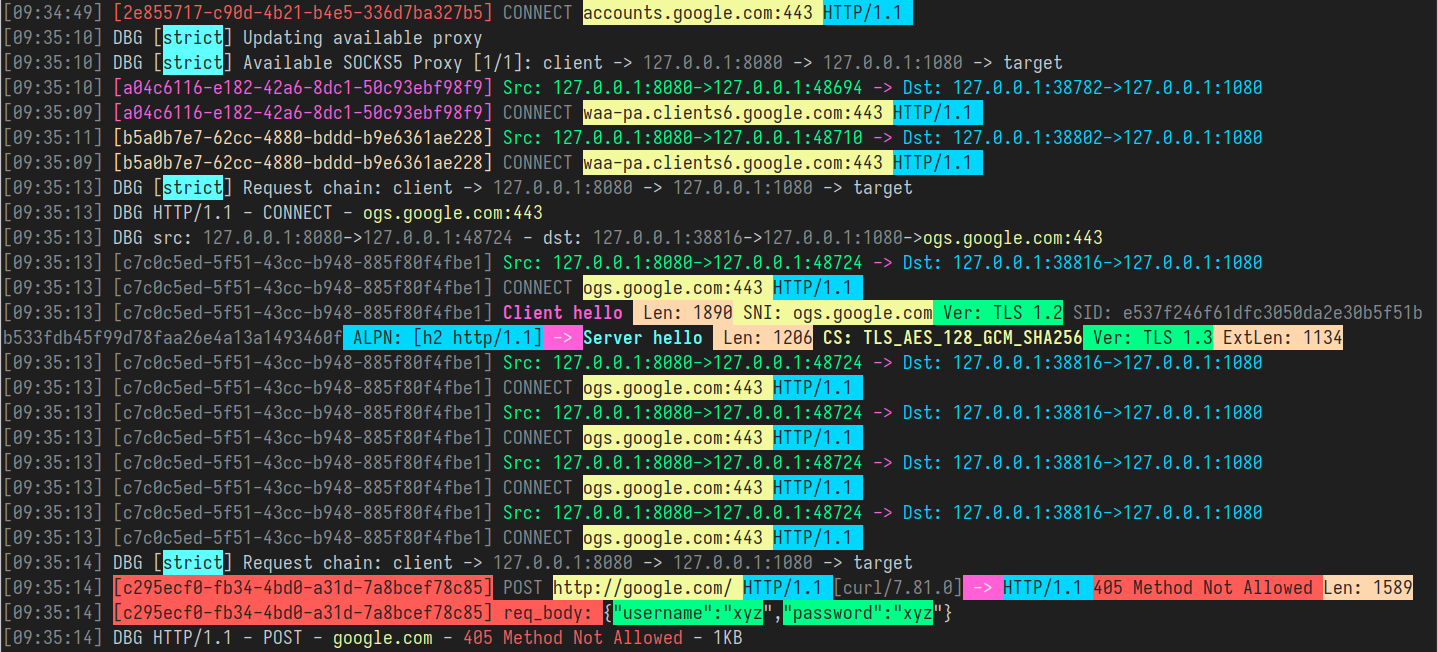
`GoHPTS` प्रॉक्सी सेवा से गुज़रने वाले ट्रैफ़िक को कैप्चर और मॉनिटर करने की अनुमति देता है। इस प्रक्रिया को `ट्रैफ़िक स्निफ़िंग`, `पैकेट स्निफ़िंग` या बस `स्निफ़िंग` कहा जाता है। विशेष रूप से, प्रॉक्सी यह पहचानने का प्रयास करता है कि यह सादा टेक्स्ट (HTTP) या TLS ट्रैफ़िक है, और पहचान पूरी होने के बाद, यह अनुरोध/प्रतिक्रिया मेटाडेटा को पार्स करता है और इसे फ़ाइल या कंसोल पर लिखता है। `GoHTPS` प्रॉक्सी के मामले में, पार्स किया गया मेटाडेटा निम्नलिखित जैसा दिखता है (TLS हैंडशेक):

### JSON प्रारूप

[[वापस]](#table-of-contents)```json
[
  {
    "connection": {
      "tproxy_mode": "redirect",
      "src_local": "127.0.0.1:8888",
      "src_remote": "192.168.0.107:51142",
      "dst_local": "127.0.0.1:56256",
      "dst_remote": "127.0.0.1:1080",
      "original_dst": "216.58.209.206:443"
    }
  },
  {
    "tls_request": {
      "sni": "www.youtube.com",
      "type": "Client hello (1)",
      "version": "TLS 1.2 (0x0303)",
      "session_id": "2670a6779b4346e5e84d46890ad2aaf7a53b08adcfe0c9f6868c2d9882242e39",
      "cipher_suites": [
        "TLS_AES_128_GCM_SHA256 (0x1301)",
        "TLS_CHACHA20_POLY1305_SHA256 (0x1303)",
        "TLS_AES_256_GCM_SHA384 (0x1302)",
        "TLS_ECDHE_ECDSA_WITH_AES_128_GCM_SHA256 (0xc02b)",
        "TLS_ECDHE_RSA_WITH_AES_128_GCM_SHA256 (0xc02f)",
        "TLS_ECDHE_ECDSA_WITH_CHACHA20_POLY1305_SHA256 (0xcca9)",
        "TLS_ECDHE_RSA_WITH_CHACHA20_POLY1305_SHA256 (0xcca8)",
        "TLS_ECDHE_ECDSA_WITH_AES_256_GCM_SHA384 (0xc02c)",
        "TLS_ECDHE_RSA_WITH_AES_256_GCM_SHA384 (0xc030)",
        "TLS_ECDHE_ECDSA_WITH_AES_256_CBC_SHA (0xc00a)",
        "TLS_ECDHE_ECDSA_WITH_AES_128_CBC_SHA (0xc009)",
        "TLS_ECDHE_RSA_WITH_AES_128_CBC_SHA (0xc013)",
        "TLS_ECDHE_RSA_WITH_AES_256_CBC_SHA (0xc014)",
        "TLS_RSA_WITH_AES_128_GCM_SHA256 (0x9c)",
        "TLS_RSA_WITH_AES_256_GCM_SHA384 (0x9d)",
        "TLS_RSA_WITH_AES_128_CBC_SHA (0x2f)",
        "TLS_RSA_WITH_AES_256_CBC_SHA (0x35)"
      ],
      "extensions": [
        "server_name (0)",
        "extended_master_secret (23)",
        "renegotiation_info (65281)",
        "supported_groups (10)",
        "ec_point_formats (11)",
        "session_ticket (35)",
        "application_layer_protocol_negotiation (16)",
        "status_request (5)",
        "delegated_credential (34)",
        "signed_certificate_timestamp (18)",
        "key_share (51)",
        "supported_versions (43)",
        "signature_algorithms (13)",
        "psk_key_exchange_modes (45)",
        "record_size_limit (28)",
        "compress_certificate (27)",
        "encrypted_client_hello (65037)"
      ],
      "alpn": ["h2", "http/1.1"]
    }
  },
  {
    "tls_response": {
      "type": "Server hello (2)",
      "version": "TLS 1.2 (0x0303)",
      "session_id": "2670a6779b4346e5e84d46890ad2aaf7a53b08adcfe0c9f6868c2d9882242e39",
      "cipher_suite": "TLS_AES_128_GCM_SHA256 (0x1301)",
      "extensions": ["key_share (51)", "supported_versions (43)"],
      "supported_version": "TLS 1.3 (0x0304)"
    }
  }
]
```
और curl के साथ HTTP अनुरोध:```json
[
  {
    "connection": {
      "tproxy_mode": "redirect",
      "src_local": "127.0.0.1:8888",
      "src_remote": "192.168.0.107:45736",
      "dst_local": "127.0.0.1:37640",
      "dst_remote": "127.0.0.1:1080",
      "original_dst": "96.7.128.198:80"
    }
  },
  {
    "http_request": {
      "host": "example.com",
      "uri": "/",
      "method": "GET",
      "proto": "HTTP/1.1",
      "header": {
        "Accept": ["*/*"],
        "My": ["Header"],
        "User-Agent": ["curl/7.81.0"]
      }
    }
  },
  {
    "http_response": {
      "proto": "HTTP/1.1",
      "status": "200 OK",
      "content-length": 1256,
      "header": {
        "Cache-Control": ["max-age=2880"],
        "Connection": ["keep-alive"],
        "Content-Length": ["1256"],
        "Content-Type": ["text/html"],
        "Date": ["Tue, 17 Jun 2025 14:43:24 GMT"],
        "Etag": ["\"84238dfc8092e5d9c0dac8ef93371a07:1736799080.121134\""],
        "Last-Modified": ["Mon, 13 Jan 2025 20:11:20 GMT"]
      }
    }
  }
]
```
उपयोग उतना ही सरल है जितना कि नियमित फ़्लैग के साथ `-sniff` फ़्लैग निर्दिष्ट करना```shell
gohpts -d -T 8888 -M redirect -sniff -j
```
आप एक फ़ाइल भी निर्दिष्ट कर सकते हैं जिसमें सूंघा गया ट्रैफ़िक लिखा जाए:```shell
gohpts -sniff -snifflog ~/sniff.log -j
```
### रंगीन प्रारूप

[[वापस]](#table-of-contents)

आप ऊपर चित्र में रंगीन आउटपुट का उदाहरण देख सकते हैं। इस मोड में, `GoHPTS` महत्वपूर्ण जानकारी जैसे TLS हैंडशेक, HTTP मेटाडेटा, लॉगिन/पासवर्ड जैसी चीज़ें या विभिन्न प्रकार के प्रमाणीकरण और गुप्त टोकन को उजागर करने का प्रयास करता है। आउटपुट JSON की तुलना में सीमित है लेकिन मनुष्यों के लिए पढ़ना बहुत आसान है।

`GoHPTS` को इस मोड में चलाने के लिए आप निम्नलिखित फ़्लैग का उपयोग करते हैं:```shell
gohpts -sniff -body
```
आप स्निफिंग को पारदर्शी मोड के साथ जोड़ सकते हैं:```shell
./gohpts -T 8888 -M redirect -sniff -body
```
रंगों को अक्षम करने के लिए `-nocolor` जोड़ें:```shell
gohpts -sniff -body -nocolor
```
## HTTP2 और HTTP3 समर्थन

[[वापस]](#table-of-contents)

`GoHPTS` प्रॉक्सी एक ही सर्वर पते और TLS प्रमाणपत्र का उपयोग करके HTTP/1.1, HTTP/2, और HTTP/3 अनुरोधों को संभालता है। इससे क्लाइंट बिना कॉन्फ़िगरेशन बदले स्वचालित रूप से सबसे अच्छा उपलब्ध प्रोटोकॉल चुन सकते हैं। TLS प्रमाणपत्र कई तरीकों से प्राप्त किया जा सकता है: क्लाउड प्रदाता (Google, AWS, Cloudflare), Let's Encrypt से मुफ्त प्रमाणपत्र, या आप `openssl` (Linux/macOS) या `New-SelfSignedCertificate` (Windows) का उपयोग करके स्व-हस्ताक्षरित प्रमाणपत्र बना सकते हैं।

### स्व-हस्ताक्षरित प्रमाणपत्र का उपयोग करके उदाहरण सेटअप

[[वापस]](#table-of-contents)

- `key.pem` और `cert.pem` फ़ाइलें बनाएँ:  ```shell
  openssl req -x509 -newkey rsa:2048 \
  -keyout key.pem \
  -out cert.pem \
  -sha256 \
  -days 365 \
  -nodes \
  -subj "/C=XX/ST=StateName/L=CityName/O=CompanyName/OU=CompanySectionName/CN=127.0.0.1" \
  -addext "subjectAltName=IP:127.0.0.1"
  ```
- socks5 सर्वर को UDP ASSOCIATE समर्थन के साथ तैयार करें  ```shell
  git clone https://github.com/wzshiming/socks5.git && cd socks5
  go build -o socks5_server ./cmd/socks5/main.go
  ./socks5_server -a 0.0.0.0:1080
  ```
- दूसरा टर्मिनल खोलें और `GoHPTS` प्रॉक्सी स्थापित करें:  ```shell
  go install github.com/shadowy-pycoder/go-http-proxy-to-socks/cmd/gohpts@latest
  ```
आप [स्थापना](#installation) अनुभाग में वर्णित अन्य विधियों का उपयोग कर सकते हैं।

- अंत में:
  1. अपने प्रॉक्सी के लिए न्यूनतम config बनाएं  ```yaml
  # gohpts_config.yaml
  http_server:
    address: 127.0.0.1:8080
    cert_file: ./cert.pem
    key_file: ./key.pem

  proxy_list:
    - address: 127.0.0.1:1080

  logging:
    debug: true

  sniffing:
    enabled: true
    body: true
  ```
प्रॉक्सी चलाएँ:  ```shell
  gohpts -f ./gohpts_config.yaml
  ```
2. या यदि आप कमांड लाइन तर्क पसंद करते हैं:  ```shell
  gohpts -l :8080 -s 1080 -c ./cert.pem -k ./key.pem -d -sniff -body
  ```
आपको कुछ इस तरह देखना चाहिए:  ```shell
    [15:20:32] INF SOCKS5 Proxy: 127.0.0.1:1080
    [15:20:32] INF HTTPS Proxy: 127.0.0.1:8080
    [15:20:32] INF HTTP3 Proxy (QUIC): 127.0.0.1:8080
  ```
### परीक्षण कनेक्शन

[[पीछे]](#table-of-contents)

- HTTP/2 प्रॉक्सी सर्वर के लिए आप `curl` का उपयोग कर सकते हैं:  ```shell
    curl -Nvk --http2 --proxy-insecure --proxy-http2 --proxy https://localhost:8080 "https://stream.wikimedia.org/v2/stream/recentchange"
  ```
स्ट्रीम को रोकने के लिए `Ctrl+C` दबाएँ।

- HTTP/3 के लिए यह अलग है क्योंकि (लेखन के समय) `curl` HTTP3 प्रॉक्सी का समर्थन नहीं करता है, इसलिए मैं परीक्षण उद्देश्यों के लिए अपने कस्टम क्लाइंट का उपयोग करूंगा।

  डाउनलोड और इंस्टॉल करें [Simple HTTP3 to SOCKS5 proxy example](https://github.com/shadowy-pycoder/http3-socks-proxy):  ```shell
  git clone https://github.com/shadowy-pycoder/http3-socks-proxy.git && cd http3-socks-proxy
  make
  ```
निम्नलिखित कमांड चलाएँ:  ```shell
  ./bin/client -a 127.0.0.1:8080 www.google.com
  ```
आपको कुछ अव्यवस्थित पाठ दिखाई देना चाहिए जो HTML पेज जैसा दिखता है।

  `GoHPTS` प्रॉक्सी वाले टर्मिनल टैब पर जाएं और लॉग्स की जांच करें, आपको वहां अपने सभी अनुरोध दिखाई देने चाहिए।

### ब्राउज़र में कनेक्शन का परीक्षण करें

[[वापस]](#table-of-contents)

- ब्राउज़र के लिए उचित स्व-हस्ताक्षरित प्रमाणपत्र बनाएं:  ```shell
  git clone https://github.com/shadowy-pycoder/go-http-proxy-to-socks.git
  cd go-http-proxy-to-socks
  cp ./resources/makecert.sh makecert.sh && chmod +x makecert.sh
  ./makecert.sh
  ```
अधिक जानकारी यहाँ पाई जा सकती है: [ब्राउज़र-विश्वसनीय, स्व-हस्ताक्षरित SSL प्रमाणपत्र बनाना](https://medium.com/@tbusser/creating-a-browser-trusted-self-signed-ssl-certificate-2709ce43fd15)

- नवनिर्मित `rootCA.crt` को सिस्टम ट्रस्ट स्टोर में जोड़ें:
  1. Debian/Ubuntu:  ```shell
  sudo cp rootCA.crt /usr/local/share/ca-certificates/rootCA.crt
  sudo update-ca-certificates
  ```
2. Arch Linux/CachyOS/EndeavourOS:  ```shell
  sudo trust anchor rootCA.crt
  ```
- प्रॉक्सी को `server.crt` और `server.key` का उपयोग करके चलाएं:  ```shell
  gohpts -l :8080 -s 1080 -c ./server.crt -k ./server.key -d -sniff -body
  ```
- ब्राउज़र चलाएँ और किसी भी वेबसाइट पर जाएँ:  ```shell
  chromium --proxy-server="https://127.0.0.1:8080"
  ```
## IPv4 और IPv6 समर्थन

[[Back]](#table-of-contents)

नेटवर्क लेयर हैंडलिंग के संदर्भ में, `GoHPTS` तीन मोड में काम कर सकता है: `dual stack`, `IPv4-only` और `IPv6-only`। उपयोगकर्ता `-4` और `-6` फ़्लैग निर्दिष्ट करके मोड को नियंत्रित कर सकता है। जब एक फ़्लैग सेट किया जाता है, तो प्रॉक्सी संबंधित मोड में शुरू होता है, जब दोनों फ़्लैग मौजूद होते हैं या दोनों छोड़ दिए जाते हैं, तो `dual stack` मान लिया जाता है। कृपया ध्यान दें कि "only" मोड में, केवल विशिष्ट संस्करण के IP पतों की अनुमति है, सभी डोमेन विशिष्ट IP संस्करण में हल हो जाते हैं (यदि संभव हो), सभी सुनने वाले पतों को समान संस्करण का उपयोग करने की आवश्यकता होती है, आदि।

`IPv4-only` मोड को सक्षम करने के लिए बस `-4` फ़्लैग जोड़ें:```shell
sudo ./gohpts -sniff -body -d -4
```
IPv4 मोड में प्रॉक्सी का परीक्षण करने के लिए आप किसी भी Linux VM का उपयोग कर सकते हैं:

1. अपनी वर्चुअल मशीन पर:```shell
# add your host machine as gateway for VM
export GATEWAY="<host IPv4 address>"
ip route add 0.0.0.0/1 via "$GATEWAY"
ip route add 128.0.0.0/1 via "$GATEWAY"
```
2. अपने होस्ट पर:```shell
# run proxy on your host
sudo ./gohpts -T 8888 -Tu 8889 -M tproxy -sniff -body -auto -d -4
```
3. अपने वर्चुअल मशीन पर किसी भी वेबसाइट पर जाएँ और प्रॉक्सी लॉग में ट्रैफ़िक देखें

`IPv6-only` मोड को सक्षम करने के लिए बस `-6` फ़्लैग जोड़ें, उदाहरण के लिए ट्रांसपैरेंट प्रॉक्सी का उपयोग करते समय:```shell
sudo ./gohpts -T 8888 -M redirect -sniff -body -auto -mark 100 -d -6
```
इसके काम करने के लिए, आपके ISP और रिमोट socks5 प्रॉक्सी में सक्रिय IPv6 समर्थन होना चाहिए, आप [https://test-ipv6.com/](https://test-ipv6.com/) पर जाकर पता कर सकते हैं कि आप IPv6 पतों तक पहुंच सकते हैं।
IPv6 मोड में प्रॉक्सी का परीक्षण करने के लिए आप किसी भी Linux VM का उपयोग कर सकते हैं:

1. अपनी वर्चुअल मशीन पर:```shell
# add your host machine as gateway IPv6 for VM
export GATEWAY6="<host IPv6 address>"
ip -6 route add ::/1 via "$GATEWAY6" dev eth0
ip -6 route add 8000::/1 via "$GATEWAY6" dev eth0
```
2. अपने होस्ट पर:```shell
# run proxy on your host
sudo ./gohpts -T 8888 -Tu 8889 -M tproxy -sniff -body -auto -d -6
```
3. अपने वर्चुअल मशीन पर किसी भी वेबसाइट पर जाएँ और प्रॉक्सी लॉग्स में ट्रैफ़िक देखें

## ARP स्पूफ़िंग

[[Back]](#table-of-contents)

`GoHPTS` में एक बिल्ट-इन ARP स्पूफ़र है जिसका उपयोग आपके LAN के सभी TCP-टॉकिंग उपकरणों को इंटरनेट से कनेक्ट करने के लिए प्रॉक्सी सर्वर का उपयोग करने के लिए किया जा सकता है।
यह `-arpspoof` फ़्लैग को अर्धविराम (;) द्वारा अलग किए गए कुछ पैरामीटर के साथ जोड़कर प्राप्त किया जाता है।

उदाहरणः```shell
ssh remote -D 1080 -Nf
sudo env PATH=$PATH gohpts -d -T 8888 -M tproxy -sniff -body -auto -mark 100 -arpspoof "targets 192.168.10.0/24;fullduplex true;debug true"
```
प्रॉक्सी सबनेट `192.168.10.0/24` में उपकरणों की खोज करेगा और उन्हें ARP पैकेट भेजेगा ताकि गेटवे होने का दिखावा कर सके, यदि `fullduplex` सत्य है, तो प्रॉक्सी गेटवे को भी ARP पैकेट भेजेगा ताकि उसे विश्वास हो जाए कि हमारे प्रॉक्सी के पास सबनेट का प्रत्येक IP है।

प्रॉक्सी को `Ctrl+C` से रोकने के बाद, यह स्वचालित रूप से सभी लक्ष्यों को अनस्पूफ कर देगा।

`GoHPTS` का उपयोग [Bettercap](https://github.com/bettercap/bettercap) जैसे उपकरणों के साथ ARP स्पूफ किए गए ट्रैफ़िक को प्रॉक्सी करने के लिए भी किया जा सकता है।

प्रॉक्सी चलाएँ:```shell
ssh remote -D 1080 -Nf
sudo env PATH=$PATH gohpts -d -T 8888 -M tproxy -sniff -body -auto -mark 100
```
`bettercap` को इस कमांड से चलाएं (देखें [दस्तावेज़ीकरण](https://www.bettercap.org/)):```shell
sudo bettercap -eval "net.probe on;net.recon on;set arp.spoof.fullduplex true;arp.spoof on"
```
अपने LAN से अन्य उपकरणों के ट्रैफ़िक के लिए प्रॉक्सी लॉग जाँचें

arpspoof विकल्पों के बारे में अधिक जानकारी के लिए `gohpts -h` और [https://github.com/shadowy-pycoder/arpspoof](https://github.com/shadowy-pycoder/arpspoof) देखें

## NDP स्पूफ़िंग

[[Back]](#table-of-contents)

`GoHPTS` में IPv6 नेटवर्कों में Router Advertisement (RA) और Neighbor Advertisement (NA) पैकेटों के साथ NDP स्पूफ़िंग करने की अंतर्निहित कार्यक्षमता है। यह RA पैकेटों में RDNSS विकल्प भी शामिल करता है ताकि प्रभावित क्लाइंटों के लिए होस्ट को IPv6 नेमसर्वर के रूप में रखा जा सके। जब इसे ट्रांसपेरेंट प्रॉक्सी मोड (TCP/UDP) के साथ जोड़ा जाता है, तो NDP स्पूफ़िंग `gohpts` को स्थानीय नेटवर्कों में क्लाइंटों के लिए ट्रैफ़िक प्रॉक्सी करने की अनुमति देती है। जैसा कि [ARP स्पूफ़िंग](#arp-spoofing) के मामले में है, आप एकल `-ndpspoof` फ़्लैग के साथ ndp स्पूफ़ विकल्प सेट कर सकते हैं:

उदाहरण:```shell
sudo env PATH=$PATH gohpts -d -T 8888 -M tproxy -sniff -body -auto -mark 100 -ndpspoof "ra true;na true;targets fe80::3a1c:7bff:fe22:91a4;fullduplex false;debug true"
```
For more information about ndpspoof options see `gohpts -h` and [https://github.com/shadowy-pycoder/ndpspoof](https://github.com/shadowy-pycoder/ndpspoof)

कृपया ध्यान दें कि `rdnss`, `gateway`, `interface` जैसे कुछ विकल्प `gohpts` द्वारा स्वचालित रूप से प्रॉक्सी के रूप में ठीक से काम करने के लिए सेट किए जाते हैं।

चूंकि `gohpts` सभी कनेक्शनों को अपस्ट्रीम SOCKS5 सर्वर के माध्यम से प्रॉक्सी करता है, आपके पास IPv4/IPv6 और TCP/UDP समर्थन वाला एक कार्यशील सर्वर होना आवश्यक है। जाहिर है, एक रिमोट मशीन (जैसे VPS) में भी IPv6 कनेक्टिविटी काम करनी चाहिए। यह कहने की आवश्यकता नहीं है कि जिस मशीन पर `gohpts` चलता है वह IPv6 समर्थन वाले नेटवर्क का हिस्सा होनी चाहिए।

NDP स्पूफिंग को सही ढंग से काम करने के लिए उदाहरण सेटअप:

1. VPS से कनेक्ट करें```shell
ssh [email protected]
```
2. निर्भरताएँ स्थापित करें```shell
GO_VERSION=$(curl 'https://go.dev/VERSION?m=text' | head -n1)
cd ~/Downloads/ && wget https://go.dev/dl/$GO_VERSION.linux-amd64.tar.gz
sudo rm -rf /usr/local/go && sudo tar -C /usr/local -xzf $GO_VERSION.linux-amd64.tar.gz
```
3. SOCKS5 सर्वर सेटअप करें (सुनिश्चित करें कि फ़ायरवॉल नियम उपयोग किए गए पोर्ट को ब्लॉक न करें)```shell
git clone https://github.com/wzshiming/socks5.git && cd socks5
go build -o ./bin/socks5_server ./cmd/socks5/*.go
./bin/socks5_server -a :3000
```
4. अपने होस्ट मशीन पर वापस जाएं और `gohpts` इंस्टॉल करें (देखें [Installation](#installation))

5. `gohtps` चलाएं:```shell
gohpts -s 203.0.113.10:3000 -T 8888 -Tu 8889 -M tproxy -sniff -body -auto -mark 100 -arpspoof "fullduplex true;debug true" -ndpspoof "ra true;debug true" -4 -6 -d
```
6. दूसरा उपकरण (फ़ोन, टैबलेट, आदि) लें और इसे उसी नेटवर्क से कनेक्ट करें। इंटरनेट तक पहुँचने का प्रयास करें और जाँचें कि आपके होस्ट मशीन पर कुछ ट्रैफ़िक दिखाई देता है या नहीं। कुछ ऑनलाइन टूल्स से सार्वजनिक IP पता जाँचें (यह आपके VPS पते `203.0.113.10` या ग्लोबल IPv6 पते से मेल खाना चाहिए)

7. प्रॉक्सी को Ctrl+C दबाकर रोकें

8. लाभ!

## DNS स्पूफ़िंग

[[Back]](#table-of-contents)

DNS फ़िल्टर लागू करने और DNS रिकॉर्ड बदलकर लक्ष्यों को स्पूफ करने के लिए, `GoHPTS` चलाने वाला होस्ट LAN उपकरणों के लिए डिफ़ॉल्ट गेटवे बनना चाहिए। इसे काम करने के लिए, बस udp सक्षम के साथ ट्रांसपेरेंट प्रॉक्सी चलाएं और लक्ष्यों को आपके DNS सर्वर का उपयोग करने के लिए ARP/NDP स्पूफिंग भी चलाएं।

`GoHPTS` द्वारा बनाए गए DNS उत्तर राउटर या विश्वसनीय DNS सर्वरों (Google, Cloudflare) से आने वाले सामान्य पैकेटों की तरह दिखते हैं, जिसके परिणामस्वरूप क्लाइंट आपके बताए अनुसार अपने कैश को अपडेट करते हैं। हालांकि, ध्यान रखें कि यह केवल "स्टैंडर्ड" अनएन्क्रिप्टेड DNS ट्रैफ़िक के लिए काम करता है (`DOT`/`DOH` फ़िल्टर या स्पूफ नहीं किए जाते)।

DNS फ़िल्टर और स्पूफिंग के लिए डोमेन को yaml फ़ाइल कॉन्फ़िगरेशन के `dns_filter` अनुभाग में कॉन्फ़िगर किया जा सकता है। सभी सूचियाँ URLs, फ़ाइल पथ और उन प्रविष्टियों को स्वीकार करती हैं जो आमतौर पर hosts फ़ाइल में पाई जाती हैं, देखें [https://en.wikipedia.org/wiki/Hosts\_(file)](https://github.com/shadowy-pycoder/go-http-proxy-to-socks/blob/HEAD/%3Chttps:/en.wikipedia.org/wiki/Hosts_(file)>)।

उदाहरण:```yaml
# dns filters require udp transparent proxy and arpspoof/ndpspoof
# filters accept hosts like entries (use either links, file paths or just plain comma separated lists
dns_filter:
  enabled: true
  whitelist: ["/tmp/whitelisted_domains.txt", "example.com", "*.google.com"] # ip is optional, domains can start with *. to match all subdomains
  blacklist:
    ["https://raw.githubusercontent.com/StevenBlack/hosts/master/hosts"]
  blacklist_all: false # block all non whitelisted domains
  spooflist: ["127.0.0.1 example.com"] # ip address is required here
```
उपयोग के मामले:

- सभी LAN उपकरणों के लिए विज्ञापन और ट्रैकर अवरोधक
- वेबसाइटों की विशिष्ट श्रेणियों को ब्लॉक करके अभिभावकीय नियंत्रण
- ज्ञात फ़िशिंग और मैलवेयर डोमेन को ब्लॉक करना
- विश्लेषण के लिए ट्रैफ़िक पुनर्निर्देशन
- पुनर्निर्देशन के माध्यम से क्रेडेंशियल चोरी
- ट्रैफ़िक अपहरण और हेरफेर (विज्ञापन, स्क्रिप्ट, ट्रैकिंग इंजेक्ट करना)
- निगरानी और प्रोफ़ाइलिंग

इस सेटअप के लिए न्यूनतम कॉन्फ़िगरेशन:```yaml
# gohpts_dns_spoof.yaml
proxy_list:
  - address: 127.0.0.1:1080 # point to socks5 server supporting TCP/UDP

sniffing:
  enabled: true
  body: true

transparent_proxy:
  tcp:
    enabled: true
    address: 0.0.0.0:8888
  udp:
    enabled: true
    address: 0.0.0.0:8889
  mode: "tproxy"
  auto: true

arpspoof:
  enabled: true
  settings: "fullduplex 1;debug 1;interval 1s"

dns_filter:
  enabled: true
  whitelist: []
  blacklist: [
      "https://raw.githubusercontent.com/StevenBlack/hosts/master/hosts",
    ] # list of domains to filter
  blacklist_all: true
  # all requests for example.com will be redirected to 0.0.0.0 address
  spooflist: ["0.0.0.0 example.com"]
```
चलाएँ:```shell
sudo ./gohpts -f ./gohpts_dns_spoof.yaml
```
अधिक जानकारी यहाँ मिल सकती है: [https://en.wikipedia.org/wiki/DNS_spoofing](https://en.wikipedia.org/wiki/DNS_spoofing)

## पैकेट कैप्चर

[[वापस]](#table-of-contents)

ट्रैफ़िक को pcap, pcapng या कस्टम txt फ़ॉर्मेट में कैप्चर किया जा सकता है और बाद में Wireshark, tcpdump और कई अन्य टूल्स के साथ विश्लेषण किया जा सकता है।

पहले, सुनिश्चित करें कि `GoHPTS` निष्पादन योग्य के पास रॉ पैकेट कैप्चर करने के लिए उन्नत विशेषाधिकार हों, आपके पास दो विकल्प हैं:

- रन करें `sudo setcap cap_net_raw+ep ~/go/bin/gohpts` एक बार प्रॉक्सी को रॉ ट्रैफ़िक एक्सेस देने के लिए
- प्रॉक्सी को `sudo` के साथ चलाएं जब आपको CLI में `-pcap` फ़्लैग या फ़ाइल कॉन्फ़िगरेशन में `pcap.enabled` निर्दिष्ट करने की आवश्यकता हो।

Configure proxy using CLI:```shell
gohpts -pcap "promisc true;timeout 10s;exts txt,pcap,pcapng"
```
कॉन्फ़िगरेशन फ़ाइल:```yaml
pcap:
  enabled: true
  settings: "promisc true;expr ip proto tcp;snaplen 65535;timeout 10s;packet_count 100;packet_buffer 8192;exts txt,pcap,pcapng"
```
ये कमांड तीन पैकेट कैप्चर फ़ाइलें उत्पन्न करते हैं जिनके संगत फ़ॉर्मेट होते हैं जिनका विश्लेषण बाद में विभिन्न उपकरणों द्वारा किया जा सकता है।

pcap विकल्पों के बारे में अधिक जानकारी के लिए `gohpts -h` और [https://github.com/shadowy-pycoder/mshark](https://github.com/shadowy-pycoder/mshark) देखें।

## नेटवर्क नेमस्पेस

[[वापस]](#table-of-contents)

डिफ़ॉल्ट रूप से `GoHPTS` प्रॉक्सी एकल नेटवर्क नेमस्पेस में चलता है लेकिन इसे ओवरराइड किया जा सकता है। `GoHPTS` द्वारा बनाए गए लिसनिंग सॉकेट (जैसे http सर्वर या ट्रांसपेरेंट प्रॉक्सी सर्वर) और आउटबाउंड सॉकेट (सॉक्स प्रॉक्सी या डायरेक्ट डायलर) को Linux/Android [network_namespaces (7)](https://man7.org/linux/man-pages/man7/network_namespaces.7.html) से अलग किया जा सकता है। प्रॉक्सी प्रक्रिया प्रारंभ करते समय, उपयोगकर्ता `-in-netns` (लिसनर) और `-out-netns` (डायलर) फ़्लैग को नेटवर्क नेमस्पेस के नाम या पथ के साथ निर्दिष्ट कर सकते हैं ताकि यह नियंत्रित किया जा सके कि सॉकेट किस पृथक वातावरण में बनाए जाएं। यदि आप वर्तमान (डिफ़ॉल्ट) नेमस्पेस में लिसनर या डायलर बनाना चाहते हैं, तो बस फ़्लैग को छोड़ दें। होस्ट नेमस्पेस को स्पष्ट रूप से निर्दिष्ट करने के लिए आप पथ `/proc/1/ns/net` का उपयोग कर सकते हैं - यह प्रॉक्सी को सिस्टम नेमसर्वर को सही ढंग से पहचानने की अनुमति देता है।

`GoHPTS` `/etc/netns/NAME/` निर्देशिका में स्थित फ़ाइलों के माध्यम से नेटवर्क कॉन्फ़िगरेशन प्रदान करने के लिए [ip-netns (8)](https://man7.org/linux/man-pages/man8/ip-netns.8.html) कन्वेंशन का समर्थन करता है। इसलिए, `ns1` नेटवर्क नेमस्पेस के लिए कस्टम नेमसर्वर निर्दिष्ट करने के लिए आप निम्न कार्य करें:```shell
sudo mkdir -p /etc/netns/ns1
sudo tee /etc/netns/ns1/resolv.conf << EOF
nameserver 8.8.8.8
nameserver 2001:4860:4860:0:0:0:0:8888
EOF
```
यदि कोई कॉन्फ़िग नहीं मिलता है, तो डोमेन नामों को हल करने के लिए Google DNS सर्वर का उपयोग किया जाएगा।

यदि आपके सिस्टम में [systemd-resolved.service (8)](https://man7.org/linux/man-pages/man8/systemd-resolved.service.8.html) सक्षम है, तो आप कस्टम नेटवर्क नेमस्पेस के माध्यम से क्वेरी करते समय इसे अस्थायी रूप से अक्षम करना चाह सकते हैं:```shell
sudo ip netns exec ns1 unshare --mount bash -c '
    mount --bind /dev/null /run/systemd/resolve/io.systemd.Resolve
    curl -Nvk https://example.com'
```
या इसे किसी विशिष्ट शेल इंस्टेंस के लिए स्थायी बनाएँ:```shell
sudo ip netns exec ns1 unshare --mount bash -c '
    mount --bind /dev/null /run/systemd/resolve/io.systemd.Resolve
    exec bash --login'
```
### प्लेग्राउंड सेटअप

[[पीछे]](#table-of-contents)

- UDP ASSOCIATE समर्थन के साथ socks5 सर्वर चलाएं  ```shell
  git clone https://github.com/wzshiming/socks5.git && cd socks5
  go build -o socks5_server ./cmd/socks5/main.go
  ./socks5_server -a 0.0.0.0:1080
  ```
- डाउनलोड और इंस्टॉल करें [Simple HTTP3 to SOCKS5 proxy example](https://github.com/shadowy-pycoder/http3-socks-proxy):  ```shell
  git clone https://github.com/shadowy-pycoder/http3-socks-proxy.git
  cd http3-socks-proxy
  make
  ```
- रिपॉजिटरी को क्लोन करें और कंपाइल करें  ```shell
  git clone https://github.com/shadowy-pycoder/go-http-proxy-to-socks.git
  cd go-http-proxy-to-socks
  make
  ```
- बनाएं `key.pem` और `cert.pem` फ़ाइलें:  ```shell
  openssl req -x509 -newkey rsa:2048 \
  -keyout key.pem \
  -out cert.pem \
  -sha256 \
  -days 365 \
  -nodes \
  -subj "/C=XX/ST=StateName/L=CityName/O=CompanyName/OU=CompanySectionName/CN=127.0.0.1" \
  -addext "subjectAltName=IP:127.0.0.1"
  ```
- एक नेटवर्क नेमस्पेस `ns1` बनाएं और veth नेटवर्क कॉन्फ़िगर करें  ```shell
  sudo ip netns add ns1
  sudo ip link add dev veth0 type veth peer name veth1 netns ns1
  sudo ip addr add 10.0.0.1/24 dev veth0
  sudo ip -6 addr add fd12:3456:789a::1/64 dev veth0
  sudo ip link set dev veth0 up
  sudo ip netns exec ns1 ip addr add 10.0.0.2/24 dev veth1
  sudo ip netns exec ns1 ip -6 addr add fd12:3456:789a::2/64 dev veth1
  sudo ip netns exec ns1 ip link set dev lo up
  sudo ip netns exec ns1 ip link set dev veth1 up
  ```
- `wlan0` का IP पता निर्धारित करें ताकि स्थानीय socks5 से कनेक्ट हो सके।  ```shell
  WLAN_IP=$(ip -4 -c=never route get 8.8.8.8 | awk '{print $7}' | tr -d '\n')
  ```
### उपयोग उदाहरण

[[Back]](#table-of-contents)

1. **HTTP प्रॉक्सी - प्रॉक्सी श्रोता `ns1` में (कोई डिफ़ॉल्ट रूट नहीं, कोई इंटरनेट एक्सेस नहीं), होस्ट पर आउटबाउंड सॉकेट**

   प्रॉक्सी चलाएं:   ```shell
   sudo ./bin/gohpts -s 0.0.0.0:1080 -l :8083 -4 -6 -d -sniff -body -in-netns ns1
   ```
के माध्यम से अनुरोध करें `ns1`   ```shell
   sudo ip netns exec ns1 curl -Nv --proxy http://127.0.0.1:8083 https://example.com
   ```
अनुरोध सफल होना चाहिए

2. **HTTP2 proxy - `ns1` में प्रॉक्सी लिसनर्स (कोई डिफ़ॉल्ट रूट नहीं, कोई इंटरनेट एक्सेस नहीं), होस्ट पर आउटबाउंड सॉकेट्स**

   प्रॉक्सी चलाएँ:   ```shell
   sudo ./bin/gohpts -s 0.0.0.0:1080 -l :8083 -4 -6 -d -sniff -body -in-netns ns1 -c ./cert.pem -k ./key.pem
   ```
`ns1` के माध्यम से अनुरोध करें   ```shell
   sudo ip netns exec ns1 curl -Nvk --http2 --proxy-insecure --proxy-http2 --proxy https://127.0.0.1:8083 https://example.com
   ```
अनुरोध सफल होना चाहिए

3. **HTTP3 proxy - proxy listeners in `ns1` (कोई डिफ़ॉल्ट रूट नहीं, कोई इंटरनेट पहुंच नहीं), होस्ट पर आउटबाउंड सॉकेट्स**

   प्रॉक्सी चलाएं:   ```shell
   sudo ./bin/gohpts -s 0.0.0.0:1080 -l :8083 -4 -6 -d -sniff -body -in-netns ns1 -c ./cert.pem -k ./key.pem
   ```
`ns1` के माध्यम से अनुरोध करें   ```shell
   sudo ip netns exec ns1 ./http3-socks-proxy/bin/client -a 127.0.0.1:8083 www.google.com
   ```
अनुरोध सफल होना चाहिए

4. **रीडायरेक्ट पारदर्शी प्रॉक्सी (`-M redirect`) - `ns1` में प्रॉक्सी लिसनर्स (डिफ़ॉल्ट रूट, कोई इंटरनेट पहुंच नहीं), होस्ट पर आउटबाउंड सॉकेट**

   प्रॉक्सी चलाएँ:   ```shell
   sudo ./bin/gohpts -s 0.0.0.0:1080 -l :8083 -4 -6 -d -sniff -body -in-netns ns1 -nohttp -M redirect -T :8888 -auto
   ```
`ns1` के माध्यम से अनुरोध करें   ```shell
   sudo ip netns exec ns1 curl -Nv https://example.com
   ```
अनुरोध विफल होना चाहिए

   `ns1` में डिफ़ॉल्ट रूट जोड़ें   ```shell
   sudo ip netns exec ns1 ip route add default via 10.0.0.1
   sudo ip netns exec ns1 ip -6 route add default via fd12:3456:789a::1
   ```
पुनः प्रयास करें   ```shell
   sudo ip netns exec ns1 curl -Nv https://example.com
   ```
अब अनुरोध सफल होना चाहिए

5. **HTTP प्रॉक्सी - होस्ट पर प्रॉक्सी लिसनर, `ns1` में आउटबाउंड सॉकेट (डिफ़ॉल्ट रूट, इंटरनेट एक्सेस)**

   `ns1` को `wlan0` के माध्यम से इंटरनेट से कनेक्ट करने की अनुमति देने के लिए NAT नियम जोड़ें   ```shell
   sudo iptables -t nat -A POSTROUTING -s 10.0.0.0/24 -o wlan0 -j MASQUERADE
   sudo ip6tables -t nat -A POSTROUTING -s fd12:3456:789a::/64 -o wlan0 -j MASQUERADE
   ```
प्रॉक्सी चलाएँ:   ```
   sudo ./bin/gohpts -s :1080 -l :8083 -4 -6 -d -sniff -body -out-netns ns1 -i wlan0
   ```
होस्ट के माध्यम से अनुरोध करें   ```shell
   curl -Nv --proxy http://$WLAN_IP:8083 https://example.com
   ```
अनुरोध सफल होना चाहिए

6. **HTTP3 प्रॉक्सी - होस्ट पर प्रॉक्सी लिसनर, `ns1` में आउटबाउंड सॉकेट (डिफ़ॉल्ट रूट, इंटरनेट एक्सेस)**

   प्रॉक्सी चलाएं:   ```
   sudo ./bin/gohpts -s :1080 -l :8083 -4 -6 -d -sniff -body -out-netns ns1 -i wlan0 -c ./cert.pem -k ./key.pem
   ```
होस्ट के माध्यम से अनुरोध करें   ```shell
   ./http3-socks-proxy/bin/client -a $WLAN_IP:8083 www.google.com
   ```
अनुरोध सफल होना चाहिए

7. **पारदर्शी प्रॉक्सी को पुनर्निर्देशित करें - होस्ट पर प्रॉक्सी लिसनर, `ns1` में आउटबाउंड सॉकेट (डिफ़ॉल्ट रूट, इंटरनेट एक्सेस)**

   प्रॉक्सी चलाएँ (`-auto` मेरे लिए स्थानीय socks5 सर्वर के साथ काम नहीं करता, इसलिए मैं रिमोट वाला उपयोग करता हूँ):   ```
   sudo ./bin/gohpts -s <remote> -4 -6 -d -sniff -body -out-netns ns1 -nohttp -M redirect -T :8888 -auto
   ```
होस्ट के माध्यम से अनुरोध करें   ```shell
   curl -Nv https://example.com
   ```
अनुरोध सफल होना चाहिए

8. **HTTP प्रॉक्सी - LAN (`ns2` (प्रॉक्सी श्रोता), `ns3`, `ns4`), `ns1` में आउटबाउंड सॉकेट (डिफ़ॉल्ट रूट, इंटरनेट एक्सेस)**

   LAN बनाएँ   ```shell
   sudo ip link add br0 type bridge
   sudo ip addr add 10.0.1.1/24 dev br0
   sudo ip -6 addr add fd12:3456:789b::1/64 dev br0
   sudo ip link set br0 up

   sudo ip netns add ns2
   sudo ip link add veth2 type veth peer name veth3 netns ns2
   sudo ip link set veth2 master br0
   sudo ip link set veth2 up
   sudo ip netns exec ns2 ip addr add 10.0.1.2/24 dev veth3
   sudo ip netns exec ns2 ip -6 addr add fd12:3456:789b::2/64 dev veth3
   sudo ip netns exec ns2 ip link set lo up
   sudo ip netns exec ns2 ip link set veth3 up
   sudo ip netns exec ns2 ip route add default via 10.0.1.1
   sudo ip netns exec ns2 ip -6 route add default via fd12:3456:789b::1

   sudo ip netns add ns3
   sudo ip link add veth4 type veth peer name veth5 netns ns3
   sudo ip link set veth4 master br0
   sudo ip link set veth4 up
   sudo ip netns exec ns3 ip addr add 10.0.1.3/24 dev veth5
   sudo ip netns exec ns3 ip -6 addr add fd12:3456:789b::3/64 dev veth5
   sudo ip netns exec ns3 ip link set lo up
   sudo ip netns exec ns3 ip link set veth5 up
   sudo ip netns exec ns3 ip route add default via 10.0.1.1
   sudo ip netns exec ns3 ip -6 route add default via fd12:3456:789b::1

   sudo ip netns add ns4
   sudo ip link add veth6 type veth peer name veth7 netns ns4
   sudo ip link set veth6 master br0
   sudo ip link set veth6 up
   sudo ip netns exec ns4 ip addr add 10.0.1.4/24 dev veth7
   sudo ip netns exec ns4 ip -6 addr add fd12:3456:789b::4/64 dev veth7
   sudo ip netns exec ns4 ip link set lo up
   sudo ip netns exec ns4 ip link set veth7 up
   sudo ip netns exec ns4 ip route add default via 10.0.1.1
   sudo ip netns exec ns4 ip -6 route add default via fd12:3456:789b::1
   ```
चलाएं proxy:   ```
   sudo ./bin/gohpts -s $WLAN_IP:1080 -l 0.0.0.0:8083 -4 -6 -d -sniff -body -in-netns ns2 -out-netns ns1
   ```
अनुरोध करें   ```shell
   curl -Nv --proxy http://10.0.1.2:8083 http://example.com
   sudo ip netns exec ns2 curl -Nv --proxy http://10.0.1.2:8083 https://example.com
   sudo ip netns exec ns3 curl -Nv --proxy http://10.0.1.2:8083 https://example.com
   sudo ip netns exec ns4 curl -Nv --proxy http://10.0.1.2:8083 https://example.com
   ```
सभी अनुरोध सफल होने चाहिए

9. **HTTP3 प्रॉक्सी - LAN (`ns2` (प्रॉक्सी श्रोता), `ns3`, `ns4`), `ns1` में आउटबाउंड सॉकेट (डिफ़ॉल्ट रूट, इंटरनेट एक्सेस)**

   प्रॉक्सी चलाएँ:   ```
   sudo ./bin/gohpts -s $WLAN_IP:1080 -l 0.0.0.0:8083 -4 -6 -d -sniff -body -in-netns ns2 -out-netns ns1 -c ./cert.pem -k ./key.pem
   ```
अनुरोध करें   ```shell
   ./http3-socks-proxy/bin/client -a 10.0.1.2:8083 www.google.com
   sudo ip netns exec ns2 ./http3-socks-proxy/bin/client -a 10.0.1.2:8083 www.google.com
   sudo ip netns exec ns3 ./http3-socks-proxy/bin/client -a 10.0.1.2:8083 www.google.com
   sudo ip netns exec ns4 ./http3-socks-proxy/bin/client -a 10.0.1.2:8083 www.google.com
   ```
All requests should succeed

10. **रीडायरेक्ट ट्रांसपेरेंट प्रॉक्सी - LAN (`ns2` (प्रॉक्सी सुनने वाले), `ns3`, `ns4`), आउटबाउंड सॉकेट `ns1` में (डिफ़ॉल्ट रूट, इंटरनेट एक्सेस)**

    Run proxy:

    ```shell
    sudo ./bin/gohpts -s $WLAN_IP:1080 -4 -6 -d -sniff -body -in-netns ns2 -out-netns ns1 -nohttp -M redirect -T :8888 -auto
    ```

    Make requests

    ```shell
    sudo ip netns exec ns2 curl -Nv https://example.com
    ```

    For `ns3` and `ns4` request fails

11. **`IP_TRANSPARENT` के साथ ट्रांसपेरेंट प्रॉक्सी (arp/ndp स्पूफिंग सक्षम) LAN (`ns2` (प्रॉक्सी सुनने वाले), `ns3`, `ns4`), आउटबाउंड सॉकेट `ns1` में (डिफ़ॉल्ट रूट, इंटरनेट एक्सेस)**

    Run proxy:

    ```shell
    sudo ./bin/gohpts -s $WLAN_IP:1080 -4 -6 -d -sniff -body -in-netns ns2 -out-netns ns1 -nohttp -M tproxy -T :8888 -auto -arpspoof "fullduplex 1;debug 1;interval 1s" -ndpspoof "ra true;interval 10s;debug 1"
    ```

    Now previous requests on `ns3` and `ns4` should work

    ```
    sudo ip netns exec ns3 curl -Nv https://example.com
    sudo ip netns exec ns4 curl -Nv https://example.com
    ```

12. **HTTP3 प्रॉक्सी - `ns1` में प्रॉक्सी श्रोता, होस्ट पर आउटबाउंड सॉकेट, `-nosocks` फ़्लैग**

    Run proxy:

    ```shell
    sudo ./bin/gohpts -l 0.0.0.0:8083 -4 -6 -d -sniff -body -in-netns ns1 -c ./cert.pem -k ./key.pem -nosocks
    ```

    Make request

    ```shell
    ./http3-socks-proxy/bin/client -a 10.0.0.2:8083 www.google.com
    ```

    Request should succeed

13. **HTTP3 प्रॉक्सी - होस्ट पर प्रॉक्सी श्रोता, `ns1` में आउटबाउंड सॉकेट, `-nosocks` फ़्लैग**

    Run proxy:

    ```shell
    sudo ./bin/gohpts -l 0.0.0.0:8083 -4 -6 -d -sniff -body -out-netns ns1 -c ./cert.pem -k ./key.pem -nosocks
    ```

    Make request

    ```shell
    ./http3-socks-proxy/bin/client -a 127.0.0.1:8083 www.google.com
    ```

    Request should fail

    Add rules to `FORWARD` chain

    ```shell
    sudo iptables -A FORWARD -i wlan0 -o veth0 -m conntrack --ctstate RELATED,ESTABLISHED -j ACCEPT
    sudo iptables -A FORWARD -i veth0 -o wlan0 -j ACCEPT

    sudo ip6tables -A FORWARD -i veth0 -j ACCEPT
    sudo ip6tables -A FORWARD -o veth0 -m conntrack --ctstate RELATED,ESTABLISHED -j ACCEPT
    ```

    Make request

    ```shell
    ./http3-socks-proxy/bin/client -a 127.0.0.1:8083 www.google.com
    ```

    Request should succeed

## मिश्रित सर्वर

[[Back]](#table-of-contents)

`GoHPTS` को SOCKS कनेक्शन सुनने के लिए उसी पते पर कॉन्फ़िगर किया जा सकता है जिस पर HTTP सर्वर है, बस अतिरिक्त SOCKS सर्वर चालू करने के लिए `-mixed` फ़्लैग जोड़ें। यह `GoHPTS` को न केवल `HTTP-to-SOCKS` प्रॉक्सी के रूप में बल्कि `SOCKS-to-SOCKS` प्रॉक्सी के रूप में भी कार्य करने देता है। स्थानीय SOCKS5 सर्वर `UDP ASSOCIATE` कमांड का समर्थन करता है, इसलिए तकनीकी रूप से उपयोगकर्ता इस मिश्रित सर्वर के साथ UDP डेटाग्राम भेज सकते हैं।

Run proxy:```shell
gohpts -s :1080 -l :8080 -mixed
```
कनेक्शन परीक्षण:```shell
curl -Nv --proxy socks5://127.0.0.1:8080 "https://example.com"
```
या upstream SOCKS प्रॉक्सी को अक्षम करें और `-nosocks` जोड़कर सीधे कनेक्ट करें:```shell
gohpts -l :8080 -mixed -nosocks
```
कनेक्शन परीक्षण:```shell
curl -Nv --proxy socks5://127.0.0.1:8080 "https://example.com"
```
इसके बजाय SOCKS4 प्रोटोकॉल का उपयोग करने के लिए `-socks4` फ़्लैग जोड़ें:```shell
# :1080 should be a socks4 server
gohpts -s :1080 -l :8080 -mixed -socks4
```
कनेक्शन का परीक्षण करें:```shell
curl -Nv --proxy socks4://127.0.0.1:8080 "https://example.com"
```
## लिंक

[[वापस]](#table-of-contents)

पारदर्शी प्रॉक्सी के बारे में अधिक जानने के लिए निम्नलिखित लिंक पर जाएँ:

- [Transparent proxy support in Linux Kernel](https://docs.kernel.org/networking/tproxy.html)
- [Transparent proxy tutorial by Gost](https://latest.gost.run/en/tutorials/redirect/)
- [Simple tproxy example](https://github.com/FarFetchd/simple_tproxy_example)
- [Golang TProxy](https://github.com/KatelynHaworth/go-tproxy)
- [Transparent Proxy Implementation using eBPF and Go](https://medium.com/all-things-ebpf/building-a-transparent-proxy-with-ebpf-50a012237e76)
- [https://github.com/heiher/hev-socks5-tproxy](https://github.com/heiher/hev-socks5-tproxy)

  `socks5` प्रॉक्सी `UDP ASSOCIATE` समर्थन के साथ:

- [https://github.com/wzshiming/socks5](https://github.com/wzshiming/socks5)
- [https://github.com/things-go/go-socks5](https://github.com/things-go/go-socks5)
- [https://github.com/0990/socks5](https://github.com/0990/socks5)
- [https://github.com/dizda/fast-socks5](https://github.com/dizda/fast-socks5)
- [https://github.com/semigodking/redsocks](https://github.com/semigodking/redsocks)
- [https://github.com/ginuerzh/gost](https://github.com/ginuerzh/gost)

IPv4/IPv6 नेटवर्क सुरक्षा:

- [https://caster0x00.com/legless/](https://caster0x00.com/legless/)
- [https://caster0x00.com/intercept/](https://caster0x00.com/intercept/)
- [https://www.prosec-networks.com/en/blog/ipv6-mitm/](https://www.prosec-networks.com/en/blog/ipv6-mitm/)

## योगदान

[[वापस]](#table-of-contents)

क्या आप एक डेवलपर हैं?

- रिपॉजिटरी को फोर्क करें
- अपनी फीचर ब्रांच बनाएँ: `git switch -c my-new-feature`
- अपने बदलाव कमिट करें: `git commit -am 'Add some feature'`
- ब्रांच पर पुश करें: `git push origin my-new-feature`
- एक पुल रिक्वेस्ट सबमिट करें

## लाइसेंस

[[वापस]](#table-of-contents)

GPLv3
टूल डाउनलोड करें

NDP स्पूफिंग
राउटर/नेबर एडवरटाइज़मेंट और RDNSS इंजेक्शन का उपयोग करके IPv6 कनेक्शन को प्रॉक्सी करें।

  • DNS स्पूफिंग
    DNS रिकॉर्ड हेरफेर का उपयोग करके क्लाइंट को मनमाने डोमेन पर रीडायरेक्ट करें

  • पैकेट कैप्चर
    ट्रैफ़िक को txt/pcap/pcapng फ़ाइलों में कैप्चर करें और Wireshark से विश्लेषण करें

  • DNS रिसाव सुरक्षा
    DNS रिज़ॉल्यूशन SOCKS5 सर्वर पक्ष पर होता है।

  • CONNECT विधि समर्थन
    HTTP CONNECT टनलिंग का समर्थन करता है, जिससे HTTPS और अन्य TCP-आधारित प्रोटोकॉल सक्षम होते हैं।

  • HTTP2/HTTP3 समर्थन
    आधुनिक HTTP/2 और HTTP/3 ट्रांसपोर्ट का समर्थन करता है, जिससे TLS 1.3 पर कुशल मल्टीप्लेक्स कनेक्शन सक्षम होते हैं

  • नेटवर्क नेमस्पेस समर्थन
    लिसनिंग सॉकेट और आउटबाउंड कनेक्शन के लिए कस्टम लिनक्स नेटवर्क नेमस्पेस का समर्थन करता है

  • ट्रेलर हेडर समर्थन
    HTTP ट्रेलर हेडर को संभालता है

  • चंक्ड ट्रांसफर एन्कोडिंग
    चंक्ड और स्ट्रीमिंग प्रतिक्रियाओं को संभालता है

  • SOCKS5 प्रमाणीकरण समर्थन
    SOCKS5 प्रॉक्सी के लिए उपयोगकर्ता नाम/पासवर्ड प्रमाणीकरण का समर्थन करता है।

  • HTTP प्रमाणीकरण समर्थन
    HTTP प्रॉक्सी सर्वर के लिए उपयोगकर्ता नाम/पासवर्ड प्रमाणीकरण का समर्थन करता है।

  • हल्का और तेज़
    न्यूनतम ओवरहेड और कुशल अनुरोध हैंडलिंग के साथ डिज़ाइन किया गया।

  • क्रॉस-प्लेटफ़ॉर्म
    सभी प्रमुख ऑपरेटिंग सिस्टम के साथ संगत।