
Una forma un poco menos 'hackish' para interceptar y modificar protocolos no HTTP a través de Burp y otros.
Una forma un poco menos improvisada de interceptar y modificar protocolos no HTTP a través de Burp y otros, con soporte para interceptación SSL y TLS. Esta herramienta está pensada para investigadores y testers de penetración aplicativos que realizan evaluaciones de seguridad de clientes pesados.
Una versión mejorada del fantástico proyecto mitm_relay.
Como parte de nuestro trabajo en el departamento de investigación de CyberArk Labs, necesitábamos una forma de inspeccionar la comunicación SSL y TLS sobre TCP y tener la opción de modificar el contenido de los paquetes sobre la marcha. Hay muchas formas de hacerlo (por ejemplo, la conocida extensión de Burp Suite NoPE), pero ninguna de ellas funcionó para nosotros en algunos casos. Al final nos topamos con mitm_relay.
mitm_relay es una forma rápida y sencilla de realizar MITM de cualquier protocolo basado en TCP a través de software de interceptación HTTP existente, como el proxy de Burp Suite. Es particularmente útil para evaluaciones de seguridad de clientes pesados. Pero no funcionó completamente para nosotros, así que necesitábamos personalizarlo. Después de muchas personalizaciones, cada nuevo cambio requería mucho trabajo, y terminamos reescribiendo todo de una manera más modular.
Esperamos que otros encuentren útil este script, y esperamos que agregar funcionalidad sea fácil.
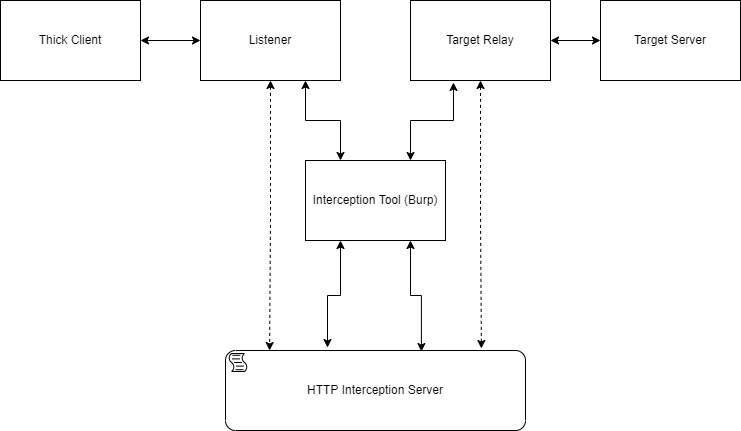
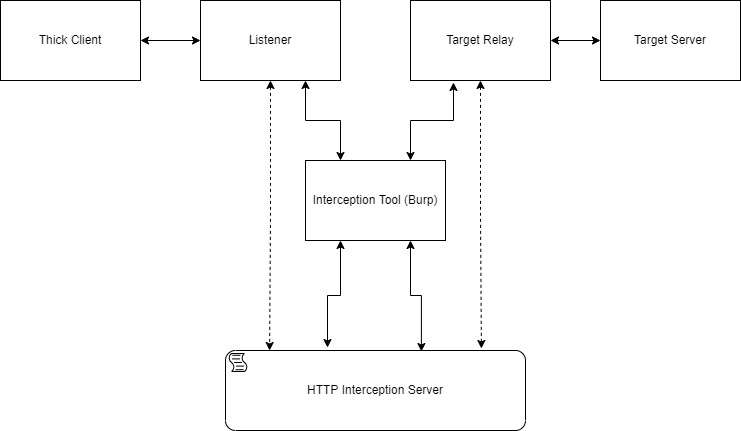
Para empezar, es necesario configurar las direcciones y puertos de los listeners. Para cada listener, también debe configurarse un objetivo (dirección y puerto). Cada dato recibido del listener se envolverá en el cuerpo de una solicitud HTTP POST con la URL que contiene "CLIENT_REQUEST". Cada dato recibido del objetivo se envolverá en el cuerpo de una solicitud HTTP POST con la URL que contiene "SERVER_RESPONSE". Esas solicitudes se envían a un servidor de interceptación HTTP local.
Existe la opción de configurar un proxy HTTP y usar una herramienta como burp suite como herramienta de interceptación HTTP y ver los mensajes allí. De esta manera, es fácil modificar los mensajes usando el "Match and Replace" de Burp, extensiones o incluso manualmente (Recuerde, el mecanismo de timeout del protocolo interceptado puede ser muy corto).
Otra forma de modificar los mensajes es mediante un script de Python que el servidor de interceptación HTTP ejecutará cuando reciba mensajes.
El cuerpo de los mensajes enviados al servidor de interceptación HTTP se imprimirá en la shell. Los mensajes se imprimirán después de los cambios si se proporciona el script de modificación. Después de todas las modificaciones, el servidor de interceptación también devolverá el mensaje como cuerpo de la respuesta HTTP.
Para descifrar la comunicación SSL/TLS, mitm_intercept necesita recibir un certificado y una clave que el cliente aceptará al iniciar un handshake con el listener. Si el servidor objetivo requiere un certificado específico para un handshake, existe la opción de proporcionar un certificado y una clave.
Un pequeño diagrama que muestra el flujo de tráfico típico:
mitm_intercept es compatible con versiones más nuevas de Python 3 (Python 3.9) y también es compatible con Windows (por ejemplo, socket.MSG_DONTWAIT no existe en Windows). Mantuvimos la opción de usar "STARTTLS", y la llamamos modo "Mixed". El uso del archivo de registro de claves SSL está actualizado (la opción incorporada para usarlo es nueva desde Python 3.8), y agregamos la opción de cambiar el encabezado SNI. Ahora, la gestión de la comunicación entrante y saliente se realiza mediante socketserver, y todos los datos se envían a una subclase de ThreadingHTTPServer que maneja la representación y modificación de datos. De esta manera, es posible ver los cambios aplicados por el script de modificación en la respuesta (conveniente para usar Burp). Además, ahora podemos cambiar los cifrados disponibles que utiliza el script usando el formato de lista de cifrados de OpenSSL.
$ python -m pip install requestsusage: mitm_intercept.py [-h] [-m] -l [u|t:]<interface>:<port> [[u|t:]<interface>:<port> ...] -t
[u|t:]<addr>:<port> [[u|t:]<addr>:<port> ...] [-lc <cert_path>]
[-lk <key_path>] [-tc <cert_path>] [-tk <key_path>] [-w <interface>:<port>]
[-p <addr>:<port>] [-s <script_path>] [--sni <server_name>]
[-tv <defualt|tls12|tls11|ssl3|tls1|ssl2>] [-ci <ciphers>]
mitm_intercept version 1.6
options:
-h, --help show this help message and exit
-m, --mix-connection Perform TCP relay without SSL handshake. If one of the relay sides starts an
SSL handshake, wrap the connection with SSL, and intercept the
communication. A listener certificate and private key must be provided.
-l [u|t:]<interface>:<port> [[u|t:]<interface>:<port> ...], --listen [u|t:]<interface>:<port> [[u|t:]<interface>:<port> ...]
Creates SSLInterceptServer listener that listens on the specified interface
and port. Can create multiple listeners with a space between the parameters.
Adding "u:" before the address will make the listener listen in UDP
protocol. TCP protocol is the default but adding "t:" for cleanliness is
possible. The number of listeners must match the number of targets. The i-th
listener will relay to the i-th target.
-t [u|t:]<addr>:<port> [[u|t:]<addr>:<port> ...], --target [u|t:]<addr>:<port> [[u|t:]<addr>:<port> ...]
Directs each SSLInterceptServer listener to forward the communication to a
target address and port. Can create multiple targets with a space between
the parameters. Adding "u:" before the address will make the target
communicate in UDP protocol.TCP protocol is the default but adding "t:" for
cleanliness is possible. The number of listeners must match the number of
targets. The i-th listener will relay to the i-th target.
-lc <cert_path>, --listener-cert <cert_path>
The certificate that the listener uses when a client contacts him. Can be a
self-sign certificate if the client will accept it.
-lk <key_path>, --listener-key <key_path>
The private key path for the listener certificate.
-tc <cert_path>, --target-cert <cert_path>
The certificate that used to create a connection with the target. Can be a
self-sign certificate if the target will accept it. Doesn't necessary if the
target doesn't require a specific certificate.
-tk <key_path>, --target-key <key_path>
The private key path for the target certificate.
-w <interface>:<port>, --webserver <interface>:<port>
Specifies the interface and the port the InterceptionServer webserver will
listens on. If omitted the default is 127.0.0.1:49999
-p <addr>:<port>, --proxy <addr>:<port>
Specifies the address and the port of a proxy between the InterceptionServer
webserver and the SSLInterceptServer. Can be configured so the communication
will go through a local proxy like Burp. If omitted, the communication will
be printed in the shell only.
-s <script_path>, --script <script_path>
A path to a script that the InterceptionServer webserver executes. Must
contain the function handle_request(message) that will run before sending it
to the target or handle_response(message) after receiving a message from the
target. Can be omitted if doesn't necessary.
--sni <server_name> If there is a need to change the server name in the SSL handshake with the
target. If omitted, it will be the server name from the handshake with the
listener.
-tv <defualt|tls12|tls11|ssl3|tls1|ssl2>, --tls-version <defualt|tls12|tls11|ssl3|tls1|ssl2>
If needed can be specified a specific TLS version.
-ci <ciphers>, --ciphers <ciphers>
Sets different ciphers than the python defaults for the TLS handshake. It
should be a string in the OpenSSL cipher list format
(https://www.openssl.org/docs/manmaster/man1/ciphers.html).
For dumping SSL (pre-)master secrets to a file, set the environment variable SSLKEYLOGFILE with a
file path. Useful for Wireshark.
La comunicación debe dirigirse al listener para interceptar protocolos arbitrarios. La forma de hacerlo depende de cómo opera el cliente. A veces usa una dirección DNS, y cambiar el archivo de hosts será suficiente para resolver la dirección del listener. Si la dirección está hardcodeada, entonces se deben aplicar formas más creativas (generalmente algunas modificaciones de la tabla de enrutamiento, parchear el cliente o usar una máquina virtual y iptables).
El servidor de interceptación HTTP puede ejecutar un script proporcionado con la bandera -s. Este script se ejecuta cuando se reciben las solicitudes HTTP. La respuesta del servidor de interceptación HTTP es la solicitud recibida después de ejecutar el script.
Cuando se configura un proxy (como Burp), las modificaciones de la solicitud ocurrirán antes de que se ejecute el script, y las modificaciones en la respuesta serán después de eso. Las alteraciones en la solicitud y la respuesta realizadas por el proxy o el script de modificación cambiarán el mensaje original antes de que llegue al destino.
El script debe contener las funciones handle_request(message) y handle_response(message). El servidor de interceptación HTTP llamará a handle_request(message) cuando el mensaje sea del cliente al servidor y a handle_response(message) cuando el mensaje sea del servidor al cliente.
Un ejemplo de un script que agrega un byte nulo al final del mensaje:
def handle_request(message):
return message + b"\x00"
def handle_response(message):
# Both functions must return a message.
return message
La herramienta requiere un certificado de servidor y una clave privada para la interceptación SSL. Información sobre cómo generar un certificado autofirmado o el certificado de Burp se puede encontrar aquí.
Si el servidor requiere un certificado específico, se puede proporcionar un certificado y una clave a la herramienta.
La demostración a continuación muestra cómo interceptar una conexión con MSSQL (esta demo se realizó en DVTA):
La conexión a MSSQL se realiza mediante el protocolo TDS sobre TCP. La autenticación en sí se realiza con TLS sobre el protocolo TDS. Para interceptar ese proceso TLS, necesitaremos dos scripts de modificación algo "parcheados".
demo_script.py:
from time import time
from struct import pack
from pathlib import Path
def handle_request(message):
if message.startswith(b"\x17\x03"):
return message
with open("msg_req" + str(time()), "wb") as f:
f.write(message[:8])
return message[8:]
def handle_response(message):
if message.startswith(b"\x17\x03"):
return message
path = Path(".")
try:
msg_res = min(i for i in path.iterdir() if i.name.startswith("msg_res"))
data = msg_res.read_bytes()
msg_res.unlink()
except ValueError:
data = b'\x12\x01\x00\x00\x00\x00\x01\x00'
return data[:2] + pack(">h", len(message)+8) + data[4:] + message
demo_script2.py:
from time import time
from struct import pack
from pathlib import Path
def handle_request(message):
if message.startswith(b"\x17\x03"):
return message
path = Path(".")
try:
msg_req = min(i for i in path.iterdir() if i.name.startswith("msg_req"))
data = msg_req.read_bytes()
msg_req.unlink()
except ValueError:
data = b'\x12\x01\x00\x00\x00\x00\x01\x00'
return data[:2] + pack(">h", len(message)+8) + data[4:] + message
def handle_response(message):
if message.startswith(b"\x17\x03"):
return message
with open("msg_res" + str(time()), "wb") as f:
f.write(message[:8])
return message[8:]
Con estos scripts "parcheados" veremos algo de la comunicación TLS, pero luego el cliente fallará (porque con estos scripts chapuceros, alteramos gravemente la comunicación TDS excepto la parte TLS).
Copyright (c) 2022 CyberArk Software Ltd. Todos los derechos reservados
Este repositorio está licenciado bajo la Licencia Apache-2.0 - consulte LICENSE para más detalles.