Skip to content
KitploitKITPLOIT
أدواتالمدونة
إرسال
أدواتالمدونة
إرسال

أدوات الاختراق واختبار الاختراق والأمن السيبراني لترسانتك الأمنية!

Kitploit هو دليل لأدوات الاختراق والأمن السيبراني واختبار الاختراق. اكتشف آخر تحديثات المشاريع للعثور على الثغرات وتحليل الأنظمة وأتمتة الاختبارات وتعزيز أمنك.

··الخلاصات·اتصال·الخصوصية·© 2026 Kitploit

دليل الأدوات

الفئات

عرض جميع الفئات
Loading categories
go-http-proxy-to-socks — وكيل MITM لواجهة الأوامر يقوم بتحويل SOCKS4/SOCKS5 إلى وكيل HTTP/HTTPS/HTTP2/HTTP3 مع إعادة توجيه TCP/UDP شفافة، وتزوير ARP/NDP/DNS، واعتراض حركة المرور، والتقاط الحزم. مكتوب بلغة Go نقية، بدون libpcap. | Kitploit
أدوات/GitHubGitHub/shadowy-pycoder/go-http-proxy-to-socks
التقاط وتحليل الحزمبروكسيات الويب والاعتراضالتهرب من IDS/IPSأمن الشبكاتاختبار الاختراقالأدوات والمكوناتالاختبار العشوائي لـ DNSالفريق الأحمرتحليل DNS

الأكثر شعبية

عرض الكل →

اكتشف الأدوات الأكثر استخدامًا من قبل مجتمعنا.

استكشف جميع الأدوات

تصفح مجموعتنا من الأدوات

عرض جميع الأدوات →
مشاركة
GitHubshadowy-pycoder/go-http-proxy-to-socks

go-http-proxy-to-socks

وكيل MITM لواجهة الأوامر يقوم بتحويل SOCKS4/SOCKS5 إلى وكيل HTTP/HTTPS/HTTP2/HTTP3 مع إعادة توجيه TCP/UDP شفافة، وتزوير ARP/NDP/DNS، واعتراض حركة المرور، والتقاط الحزم. مكتوب بلغة Go نقية، بدون libpcap.

عرض المستودع
693منذ شهر واحدتمت المراجعة من قبل Kitploit

GoHPTS - وكيل شفاف HTTP(S) و TCP/UDP إلى وكيل SOCKS4/SOCKS5 (سلسلة) مكتوب بلغة Go

License: GPL v3 Go Reference GitHub go.mod Go version AUR Version AUR Last Modified AUR Maintainer Docker Pulls GitHub Release GitHub Downloads (all assets, all releases) GitHub Downloads (all assets, latest release)

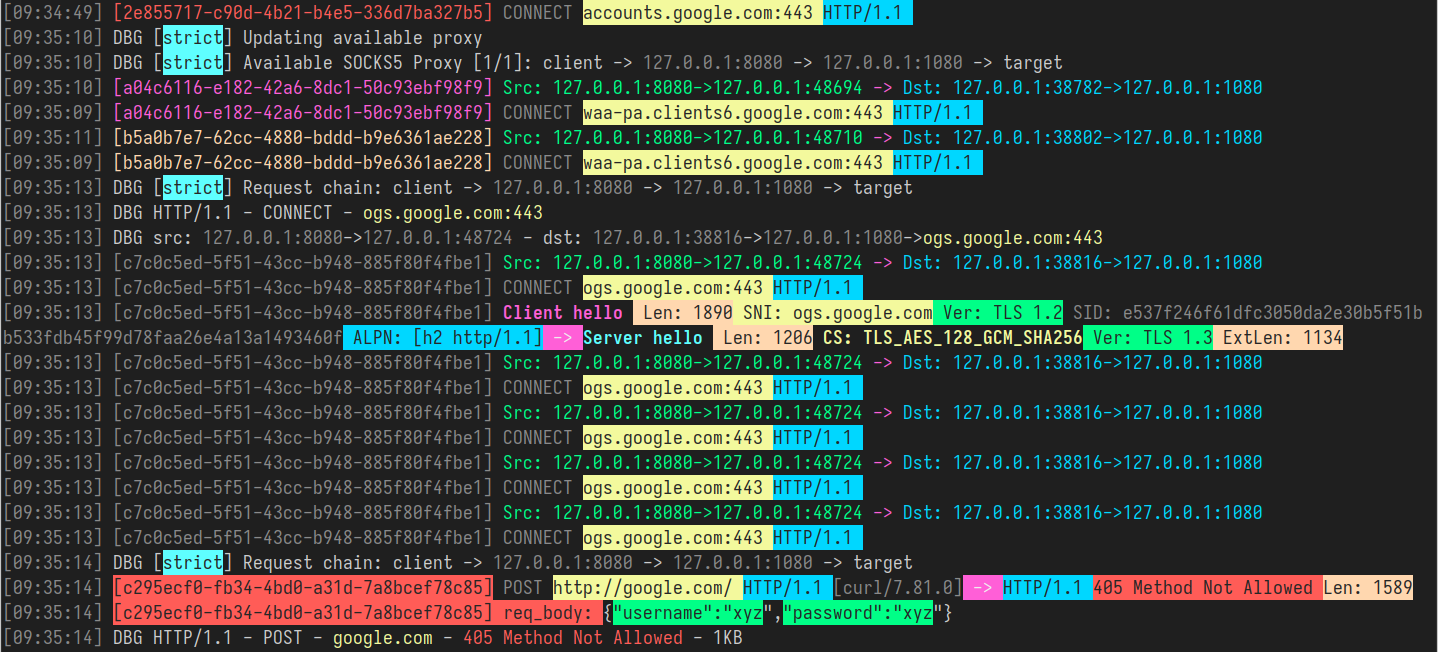
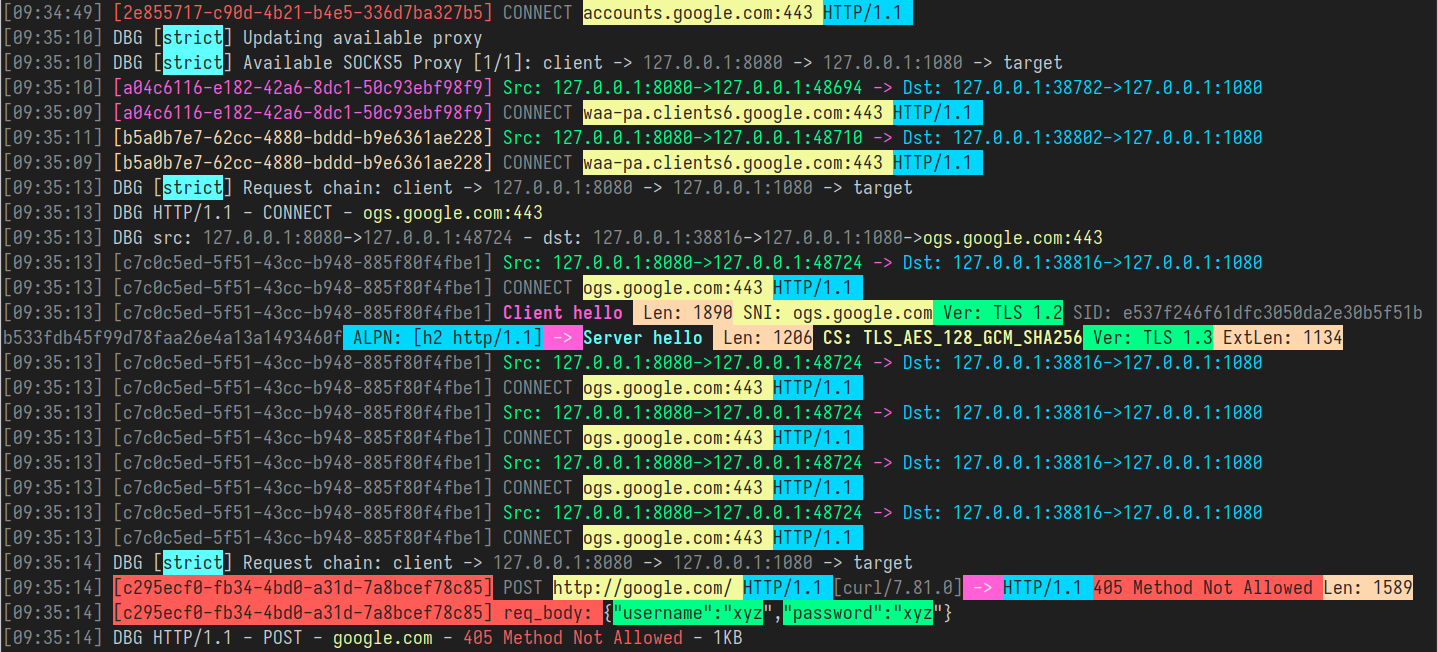
GoHPTS - مثال بالألوان

جدول المحتويات

  • مقدمة
  • الميزات
  • التثبيت
  • الاستخدام
    • التكوين عبر علامات CLI
    • التكوين عبر ملف YAML
  • الوكيل الشفاف
    • redirect (عبر NAT و SO_ORIGINAL_DST)
    • التكوين التلقائي لوضع redirect
    • tproxy (عبر MANGLE و IP_TRANSPARENT)
    • التكوين التلقائي لوضع tproxy
    • دعم UDP
    • دعم Android
    • تكوين YAML
  • التقاط حركة المرور
    • تنسيق JSON
    • تنسيق ملون
  • دعم HTTP2 و HTTP3
    • مثال على الإعداد باستخدام شهادة موقعة ذاتيًا
    • اختبار الاتصال
    • اختبار الاتصال في متصفح
  • دعم IPv4 و IPv6
  • انتحال ARP
  • انتحال NDP
  • انتحال DNS
  • التقاط الحزم
  • مساحات أسماء الشبكة
    • إعداد بيئة الاختبار
    • أمثلة الاستخدام
  • خادم مختلط
  • روابط
  • المساهمة
  • الترخيص

مقدمة

[العودة]

أداة سطر الأوامر GoHPTS هي جسر بين عملاء HTTP وخادم وكيل SOCKS5 أو خوادم متعددة (سلسلة). تستمع محليًا كوكيل HTTP، وتقبل طلبات HTTP القياسية أو HTTPS (عبر CONNECT) وتقوم بتوجيه الاتصال عبر وكيل SOCKS5. مستوحاة من http-proxy-to-socks و Proxychains

حالة استخدام محتملة: تحتاج إلى الاتصال بواجهة برمجة تطبيقات خارجية عبر Postman، ولكن واجهة برمجة التطبيقات هذه متاحة فقط من خادم بعيد معين. ستساعدك الأوامر التالية في أداء هذه المهمة:

إنشاء خادم وكيل SOCKS5 عبر ssh:```shell ssh -D 1080 -Nf

root@kitploit:~
إنشاء اتصال HTTP-to-SOCKS5 باستخدام `gohpts````shell
gohpts -s :1080 -l :8080

تحديد خادم HTTP في تكوين الوكيل لـ Postman

الميزات

[العودة]

  • وظيفة سلسلة الوكيل
    يدعم سلاسل strict, dynamic, random, round_robin لوكلاء SOCKS4/SOCKS5

  • وكيل شفاف
    يدعم وضعي redirect (SO_ORIGINAL_DST) و tproxy (IP_TRANSPARENT)

  • دعم IPv4 و IPv6
    يعمل في أوضاع IPv4-only أو IPv6-only أو dual stack

  • وكيل شفاف TCP و UDP
    يتعامل tproxy و tlocal (IP_TRANSPARENT) مع حركة TCP و UDP

  • التقاط حركة المرور
    الوكيل قادر على تحليل رؤوس HTTP، مصافحة TLS، رسائل DNS والمزيد

  • انتحال ARP
    وكيل الشبكات الفرعية بأكملها باستخدام نهج انتحال ARP

  • انتحال NDP
    اتصالات IPv6 الوكيلة باستخدام إعلانات الموجه/الجار وحقن RDNSS.

التثبيت

[العودة]

  • Arch Linux/CachyOS/EndeavourOS ```shell yay -S gohpts
    root@kitploit:~

أو باستخدام paru: ```shell paru -S gohpts

root@kitploit:~
- قم بتنزيل الملف الثنائي لمنصتك من صفحة [الإصدارات](https://github.com/shadowy-pycoder/go-http-proxy-to-socks/releases):  ```shell
GOHPTS_RELEASE=v1.15.5; wget -v https://github.com/shadowy-pycoder/go-http-proxy-to-socks/releases/download/$GOHPTS_RELEASE/gohpts-$GOHPTS_RELEASE-linux-amd64.tar.gz -O gohpts && tar xvzf gohpts && mv -f gohpts-$GOHPTS_RELEASE-linux-amd64 gohpts && ./gohpts -h
  • التثبيت باستخدام الأمر go install (يتطلب Go 1.26 أو أحدث): ```shell CGO_ENABLED=0 go install -ldflags "-s -w" -trimpath github.com/shadowy-pycoder/go-http-proxy-to-socks/cmd/gohpts@latest
    root@kitploit:~

سيؤدي ذلك إلى تثبيت الثنائي gohpts في مجلد $GOPATH/bin الخاص بك.

  • البناء من المصدر: ```shell git clone https://github.com/shadowy-pycoder/go-http-proxy-to-socks.git cd go-http-proxy-to-socks make build ./bin/gohpts
    root@kitploit:~
  • تشغيل داخل دوكر: ```shell docker run -it --privileged --network host -v "$PWD/gohpts.yaml:/config.yaml" shadowypycoder/gohpts:latest -f config.yaml
    root@kitploit:~

الاستخدام

[رجوع]```shell gohpts -h


/ | | | | | __ _ / ____| | | __ ___ | || | |) | | | | (__ | | |_ |/ _ | __ | / | | _
| |__| | (
) | | | | | | | ) | _|_/|| ||| || |___/

GoHPTS: HTTP(S) Proxy to SOCKS4/SOCKS5 proxy by shadowy-pycoder GitHub: https://github.com/shadowy-pycoder/go-http-proxy-to-socks Codeberg: https://codeberg.org/shadowy-pycoder/go-http-proxy-to-socks

Usage: gohpts [OPTIONS] OPTIONS: General: -h Show this help message and exit -v Show version and build information -D Run as a daemon (provide -logfile to see logs) -I Display list of network interfaces and exit -f Path to proxy configuration file in YAML format

Proxy: -l Address of HTTP proxy server (Default: "127.0.0.1:8080" for IPv4, "[::1]:8080" for IPv6) -s Address of SOCKS proxy server (Default: "127.0.0.1:1080" for IPv4 "[::1]:1080" for IPv6) -c Path to certificate PEM encoded file -k Path to private key PEM encoded file -U User for HTTP proxy (basic auth). This flag invokes prompt for password (not echoed to terminal) -u User for SOCKS proxy authentication. This flag invokes prompt for password (not echoed to terminal) -i Bind proxy to specific network interface (either by interface name or index) -4 Force IPv4 stack for TCP and UDP (Default: dual stack) -6 Force IPv6 stack for TCP and UDP (Default: dual stack) -socks4 Use SOCKS4/SOCKS4a protocol for upstream proxy and mixed server (default: SOCKS5/SOCKS5h) -nohttp Disable HTTP proxy server -nosocks Disable SOCKS upstream proxy -dns Use custom DNS server (Example: "8.8.8.8" or "2001:4860:4860::8888") -mixed Accept SOCKS connections on HTTP proxy server address

Logs: -d Show logs in DEBUG mode -j Show logs in JSON format -logfile Log file path (Default: stdout) -nocolor Disable colored output for logs (no effect if -j flag specified) -pprof Address of pprof server with profiling data

Sniffing: -sniff Enable traffic sniffing for HTTP and TLS -snifflog Sniffed traffic log file path (Default: the same as -logfile) -body Collect request and response body for HTTP traffic (credentials, tokens, etc)

TProxy: -T Address of transparent proxy server -Tu Address of transparent UDP proxy server -M Transparent proxy mode: (redirect, tproxy, tlocal) -w Number of instances of transparent proxy server (Default: number of CPU cores) -wu Number of instances of transparent UDP proxy server (Default: number of CPU cores) -auto Automatically setup iptables and kernel parameters for transparent proxy (requires elevated privileges) -mark Set mark for each packet sent through transparent proxy (Default: redirect 0, tproxy 100, tlocal 100) -P Comma separated list of ports to ignore when proxying traffic (Example: "22,80,443,9092") -dump Dump iptables rules and other system settings generated by -auto flag

Spoofing: -arpspoof Enable ARP spoof proxy for selected targets (Example: "targets 10.0.0.1,10.0.0.5-10,192.168.1.*,192.168.10.0/24;fullduplex false;debug true;interval 10s") -ndpspoof Enable NDP spoof proxy for selected targets (Example: "ra true;na true;targets fe80::3a1c:7bff:fe22:91a4;fullduplex false;debug true;interval 10s")

Packet Capture: -pcap Enable packet capture (Example: "promisc true;expr ip proto tcp;snaplen 65535;timeout 10s;packet_count 100;packet_buffer 8192;exts txt,pcap,pcapng")

Namespaces: -in-netns Name or path of network namespace for inbound listeners (Default: default namespace) -out-netns Name or path of network namespace for outbound connections (Default: default namespace)

root@kitploit:~
### التكوين عبر علامات واجهة سطر الأوامر

[[العودة]](#table-of-contents)```shell
gohpts -s 1080 -l 8080 -d -j

المخرجات:```shell {"level":"info","time":"2025-05-28T06:15:18+00:00","message":"SOCKS5 Proxy: :1080"} {"level":"info","time":"2025-05-28T06:15:18+00:00","message":"HTTP Proxy: :8080"} {"level":"debug","time":"2025-05-28T06:15:22+00:00","message":"HTTP/1.1 - CONNECT - www.google.com:443"}

root@kitploit:~
حدد اسم المستخدم وكلمة المرور لخادم وكيل SOCKS5:```shell
gohpts -s 1080 -l 8080 -d -j -u user
SOCKS5 Password: #you will be prompted for password input here

حدد اسم المستخدم وكلمة المرور لخادم بروكسي HTTP:```shell gohpts -s 1080 -l 8080 -d -j -U user HTTP Password: #you will be prompted for password input here

root@kitploit:~
عند وجود كل من `-u` و `-U`، سيُطلب منك مرتين

تشغيل وكيل HTTP عبر اتصال TLS```shell
gohpts -s 1080 -l 8080 -c "path/to/certificate" -k "path/to/private/key"

تشغيل الوكيل كخدمة خلفية (ملف السجل مطلوب لتسجيل المخرجات، وإلا فلن ترى شيئًا)```shell gohpts -D -logfile /tmp/gohpts.log

root@kitploit:~
هذا هو المقطع 31 من 241 من وثيقة Markdown أطول تُترجم بالتسلسل.```shell
# output
gohpts pid: <pid>

صورة Docker للبرمجة النصية```shell

kill the process

kill #or kill $(pidof gohpts)

root@kitploit:~
`-u` و `-U` لا تعمل في وضع الخفي (وبالتالي المصادقة)، ولكن يمكنك تقديم ملف تكوين (انظر أدناه)

### التكوين عبر ملف YAML

[[رجوع]](#table-of-contents)

ملفات التكوين مفيدة عندما تريد تكوين بروكسيك مسبقًا دون التلاعب بواجهة سطر الأوامر كثيرًا أو تريد ملفات تعريف متعددة لاحتياجات مختلفة.

تشغيل بروكسي HTTP في وضع سلسلة بروكسي SOCKS5 (تحديد إعدادات الخادم عبر ملف تكوين YAML)```shell
gohpts -f "~/gohtps.yaml" -d -j

مثال على الإعداد:```yaml

bind proxy to specific network interface (either by interface name or index)

interface: "eth0" # if specified, overrides http server IP address disable_http: false # disable http proxy (default: false) disable_socks: false # disable upstream socks proxy (default: false)

if ipv4 and ipv6 are both false or both true, dual stack is assumed

ipv4: false # this must be enabled for arpspoof (default: false) ipv6: false # this must be enabled for ndpspoof (default: false) socks4: false # use SOCKS4/SOCKS4a protocol (tcp only protocol, no udp tproxy or http3 possible) (default: false) dns: 8.8.8.8 # custom DNS server (used in direct dialer, namespaces, spoofing)

http_server: address: 127.0.0.1:8080

username and password for adding basic authentication (comment out to disable auth)

username: username password: password

list of socks5 proxy

if proxy_chain is disabled, uses first server in a list as upstream

proxy_list:

  • address: 127.0.0.1:1080
  • address: 127.0.0.1:1081
  • address: :1082 # empty host means localhost

proxy_chain: enabled: false

Explanations for chains taken from /etc/proxychains4.conf

strict - Each connection will be done via chained proxies

all proxies chained in the order as they appear in the list

all proxies must be online to play in chain

dynamic - Each connection will be done via chained proxies

all proxies chained in the order as they appear in the list

at least one proxy must be online to play in chain

(dead proxies are skipped)

random - Each connection will be done via random proxy

(or proxy chain, see chain_len) from the list.

this option is good to test your IDS :)

round_robin - Each connection will be done via chained proxies

of chain_len length

all proxies chained in the order as they appear in the list

at least one proxy must be online to play in chain

(dead proxies are skipped).

the start of the current proxy chain is the proxy after the last

proxy in the previously invoked proxy chain.

if the end of the proxy chain is reached while looking for proxies

start at the beginning again.

These semantics are not guaranteed in a multithreaded environment.

type: strict # dynamic, strict, random, round_robin length: 2 # maximum number of proxy in a chain (works only for random chain and round_robin chain)

logging: debug: true json: false

defaults to standard output

#logfile: /tmp/gohpts.log

use colored output in logs (no effect if json enabled)

nocolor: false

profiling data

pprof: 127.0.0.1:8081

root@kitploit:~
يمكنك تجاوز أي إعدادات تقريبًا محددة في ملف التكوين من خلال توفير علامات CLI المقابلة:```shell
gohpts -l :6969 -f "~/gohtps.yaml" -nocolor

Proxy يأخذ جميع الإعدادات المحددة في ~/gohpts.yaml ولكنه يشغل خادم HTTP على 127.0.0.1:6969 بدلاً من 127.0.0.1:8080 كما يُعطل الإخراج الملون في السجلات.

بعض الإعدادات (مثل proxy_chain ومرشحات DNS) يمكن تهيئتها فقط عبر ملف.

يمكن العثور على النسخة الكاملة من التهيئة هنا: example_gohpts.yaml

لمعرفة المزيد عن سلاسل الوكيل، تفضل بزيارة Proxychains Github

الوكيل الشفاف

[العودة]

يُعرف أيضًا باسم الوكيل المعترض أو الوكيل المضمن أو الوكيل الإجباري، يقوم الوكيل الشفاف باعتراض اتصالات طبقة التطبيق العادية دون الحاجة إلى أي تهيئة خاصة من العميل. لا يحتاج العملاء إلى معرفة وجود الوكيل. يُوضع الوكيل الشفاف عادةً بين العميل والإنترنت، حيث يؤدي بعض وظائف البوابة أو الموجه.

-- من ويكيبيديا

هذه الوظيفة متاحة فقط على أنظمة Linux وAndroid (arm64) وتتطلب إعدادات إضافية (iptables، توجيه IP، إلخ)

العلم -T address يحدد عنوان خادم الوكيل الشفاف

هناك ثلاثة أوضاع: redirect وtproxy وtlocal (نفس tproxy ولكنه يعترض أيضًا حركة المرور المحلية) يمكن تحديدها باستخدام العلم -M

redirect (عبر NAT و SO_ORIGINAL_DST)

[العودة]

في هذا الوضع، تتم عملية الوكيل باستخدام جدول nat الخاص بـ iptables وهدف REDIRECT. يتغير عنوان المضيف للحزمة الواردة إلى عنوان الوكيل الشفاف redirect الجاري تشغيله، ولكنه يحتوي أيضًا على الوجهة الأصلية التي يمكن استرجاعها باستخدام getsockopt(SO_ORIGINAL_DST)

لتشغيل GoHPTS في هذا الوضع، تستخدم العلم -T مع -M redirect

مثال

[العودة]```shell

run the proxy

gohpts -s 1080 -T 1090 -M redirect -d

root@kitploit:~
قواعد خاصة بالجزء:
1. ترجم النص الطبيعي فقط. لا تترجم أبدًا: كتل الأكواد، أوامر الصدفة، مسارات الملفات، عناوين URL، أسماء الحزم، المعرفات التقنية، معرفات CVE، أسماء المتغيرات البيئية.
2. احتفظ بكل صياغة Markdown تمامًا كما هي.
3. لا تضف عناوين تمهيدية مثل "## الجزء ن"، "## القسم ن"، "## متابعة من..." أو "## ترجمة الجزء...". لا تضف علامات "نهاية الجزء ن" أو "المحتوى مستمر...".
4. لا تضف علامات "..." للإشارة إلى الحذف. ترجم النص المقدم تمامًا حرفيًا في البنية.
5. حدود الأجزاء مقصودة. احتفظ بالبنية بحيث يمكن ربط الأجزاء بسلاسة دون تشوهات مرئية.
6. أعد النص المترجم فقط. لا مقدمة، لا تعليقات، لا لف في كتل أكواد، لا JSON/YAML/XML، لا مصفوفات، لا كائنات، لا مخططات، لا غلافات مفتاح/قيمة.
7. إذا بدأ الجزء في منتصف فقرة، فاستمر في الترجمة من تلك النقطة. لا تضف سطرًا جديدًا أو مسافة بادئة إلا إذا كانت موجودة في المصدر.```shell
# run socks5 server on 127.0.0.1:1080
ssh remote -D 1080 -Nf

قم بإعداد نظام التشغيل الخاص بك:```shell

commands below require elevated privileges (you can run it with sudo -i)

#enable ip forwarding sysctl -w net.ipv4.ip_forward=1

create GOHPTS nat chain

iptables -t nat -N GOHPTS

set no redirection rules for local, http proxy, ssh and redirect proxy itself

iptables -t nat -A GOHPTS -d 127.0.0.0/8 -j RETURN iptables -t nat -A GOHPTS -p tcp --dport 8080 -j RETURN iptables -t nat -A GOHPTS -p tcp --dport 1090 -j RETURN iptables -t nat -A GOHPTS -p tcp --dport 22 -j RETURN

redirect traffic to transparent proxy

iptables -t nat -A GOHPTS -p tcp -j REDIRECT --to-ports 1090

setup prerouting by adding our proxy

iptables -t nat -A PREROUTING -p tcp -j GOHPTS

intercept local traffic for testing

iptables -t nat -A OUTPUT -p tcp -j GOHPTS

root@kitploit:~
اختبار الاتصال:```shell
#traffic should be redirected via 127.0.0.1:1090
curl http://example.com

OvenMediaEngine (OME) هو محرك بث مفتوح المصدر بزمن انتقال منخفض جدًا يدعم WebRTC وRTMP وSRT وLL-DASH وMPEG2-TS. يمكنك نشر منصات بث مباشر بزمن انتقال أقل من ثانية ودمجها بسلاسة مع خدماتك.

يمكن نشر OvenMediaEngine بسهولة على خوادم المعدن العاري والبيئات الافتراضية ومنصات السحابة مثل AWS وAzure وGoogle Cloud وOracle Cloud وغيرها.

لمزيد من المعلومات، قم بزيارة موقع OvenMediaEngine

⚙ الميزات

  • الاستقبال

    • WebRTC, SRT, RTMP, MPEG-2 TS
    • القنوات المجدولة
    • RTMP Push (Beta)
  • الترميز التكيفي

    • تكامل سلس مع OvenMediaEngine وOvenLiveKit لزمن انتقال منخفض وLL-DASH
    • تسريع GPU (Intel QuickSync, Nvidia NVENC)
    • تمريرات متعددة لتشفير VBR (معدل البت المتغير) (Beta)
    • مسارات صوتية متعددة
    • مشفرات فيديو متنوعة (H.264, H.265, VP8, VP9, AV1 - حسب دعم GPU)
    • مشفرات صوت متنوعة (AAC, OPUS)
  • البث

    • WebRTC عبر ICE-DTLS/SRTP: زمن انتقال منخفض جدًا (أقل من ثانية واحدة)
    • LL-DASH عبر TCP/TLS: زمن انتقال منخفض جدًا (أقل من ثانيتين)
    • إشارات WebRTC عبر WSS أو TCP أو TLS
  • LL-DASH

    • LL-DASH عبر TCP/TLS: زمن انتقال منخفض جدًا، أقل من ثانية (أقل من ثانيتين من زجاج إلى زجاج عبر الإنترنت)
    • CMAF المجزأ بزمن انتقال منخفض
    • دعم ABR (معدل البت التكيفي)
    • دعم DRM متعدد (Widevine, PlayReady, FairPlay)
  • توفير أصل HTTP

    • دعم HTTP/1.1 و HTTP/2.0
    • دفع HTTP/2.0
    • صفحة تشغيل مباشر مضمنة بواسطة LL-DASH
    • دعم HLS كبديل```shell #traffic should be redirected via 127.0.0.1:8080 curl --proxy http://127.0.0.1:8080 http://example.com
root@kitploit:~
تراجع عن كل شيء:```shell
sysctl -w net.ipv4.ip_forward=0
iptables -t nat -D PREROUTING -p tcp -j GOHPTS
iptables -t nat -D OUTPUT -p tcp -j GOHPTS
iptables -t nat -F GOHPTS
iptables -t nat -X GOHPTS

التكوين التلقائي لوضع redirect

[Back]

لتكوين نظامك تلقائيًا، قم بتشغيل الأمر التالي:```shell sudo env PATH=$PATH gohpts -d -T 8888 -M redirect -auto

root@kitploit:~
يرجى ملاحظة أن التكوين التلقائي يتطلب `sudo` وهو عام جدًا، مما قد لا يناسب احتياجاتك. يمكنك اختياريًا تحديد `-mark <value>` لمنع حلقات الوكيل المحتملة.```shell
sudo env PATH=$PATH gohpts -d -T 8888 -M redirect -auto -mark 100

tproxy (عبر MANGLE و IP_TRANSPARENT)

[Back]

في هذا الوضع، يتم الوكالة باستخدام جدول mangle في iptables وهدف TPROXY. يرى الوكيل الشفاف عنوان الوجهة كما هو، ولا يتم إعادة كتابته بواسطة النواة. لكي يعمل هذا، يربط الوكيل مع خيار المقبس IP_TRANSPARENT، ويعترض iptables حركة المرور باستخدام هدف TPROXY، وتخبر قواعد التوجيه الحزم المميزة بالذهاب إلى الوكيل المحلي دون تغيير وجهتها الأصلية.

يتطلب هذا الوضع صلاحيات مرتفعة لتشغيل GoHPTS. يمكنك القيام بذلك عن طريق تشغيل الأمر التالي:```shell sudo setcap 'cap_net_admin+ep' ~/go/bin/gohpts

root@kitploit:~
لتشغيل `GoHPTS` في هذا الوضع، تستخدم العلم `-T` مع `-M tproxy`

### مثال

[[العودة]](#table-of-contents)```shell
# run the proxy
gohpts -s 1080 -T 0.0.0.0:1090 -M tproxy -d

". Actually no, the user message ends with "INPUT:" and then a newline and then "response"? Wait, the last line of the user message is "INPUT:" and then a blank line. It's ambiguous. Possibly the content is missing. I should assume the content is empty. In that case, following the rule: "Return ONLY the translated text. No preamble." So if source is empty, output is empty. But to be safe, I'll output nothing. However, the user might expect the chunk content. Given the instructions, I must not add anything. So I will respond with nothing.

But the system may consider that an error. Possibly the input is incomplete. I will provide only the translation of what was given, which is nothing. I'll output nothing.```shell

run socks5 server on 127.0.0.1:1080

ssh remote -D 1080 -Nf

root@kitploit:~
إعداد نظام التشغيل الخاص بك:```shell
ip netns add ns-client
ip link add dev veth0 type veth peer name veth1 netns ns-client
ip addr add 10.0.0.1/24 dev veth0
ip link set dev veth0 up
ip netns exec ns-client ip addr add 10.0.0.2/24 dev veth1
ip netns exec ns-client ip link set dev lo up
ip netns exec ns-client ip link set dev veth1 up
ip netns exec ns-client ip route add default via 10.0.0.1
sysctl -w net.ipv4.ip_forward=1

iptables -t mangle -A PREROUTING -i veth0 -p tcp -j TPROXY --on-port 1090 --tproxy-mark 0x1/0x1

ip rule add fwmark 1 lookup 100
ip route add local 0.0.0.0/0 dev lo table 100

اختبار الاتصال:```shell ip netns exec ns-client curl http://1.1.1.1

root@kitploit:~
تراجع عن كل شيء:```shell
sysctl -w net.ipv4.ip_forward=0
iptables -t mangle -F
ip rule del fwmark 1 lookup 100
ip route flush table 100
ip netns del ns-client

التكوين التلقائي لوضع tproxy mode

[Back]

لتكوين نظامك تلقائياً، قم بتشغيل الأمر التالي (على سبيل المثال، على جهاز افتراضي منفصل):```shell ssh remote -D 1080 -Nf sudo env PATH=$PATH gohpts -d -T 8888 -M tproxy -auto -mark 100

root@kitploit:~
شغّل ما يلي على مضيفك:```shell
ip route show default > /tmp/default-route.txt

ip route add 0.0.0.0/1 via 192.168.0.1 # change with ip of your VM
ip route add 128.0.0.0/1 via 192.168.0.1

اختبار الاتصال:```shell curl http://example.com #check logs on your VM

root@kitploit:~
تراجع كل شيء:```shell
ip route del 0.0.0.0/1 via 192.168.0.1 2>/dev/null || true
ip route del 128.0.0.0/1 via 192.168.0.1 2>/dev/null || true

if [[ -f /tmp/default-route.txt ]]; then
    eval $(awk '{print "ip route add "$0}' /tmp/default-route.txt)
    rm -f /tmp/default-route.txt
else
    echo "Something went wrong"
fi

دعم UDP

[رجوع]

GoHPTS يدعم UDP الذي يمكن تفعيله في وضعي tproxy و tlocal. لكي يعمل هذا الإعداد، تحتاج إلى الاتصال بخادم socks5 قادر على خدمة اتصالات UDP (UDP ASSOCIATE). على سبيل المثال، يمكنك استخدام https://github.com/wzshiming/socks5 لنشر خادم socks5 يدعم UDP على جهاز بعيد أو محلي. بمجرد حصولك على الخادم الذي تريد الاتصال به، قم بتشغيل الأمر التالي:```shell sudo env PATH=$PATH gohpts -s remote -Tu :8989 -M tproxy -auto -mark 100 -d

root@kitploit:~
سيقوم هذا الأمر بتكوين نظام التشغيل الخاص بك وإعداد الخادم على العنوان `0.0.0.0:8989`.

لاختباره محليًا، يمكنك الجمع بين وكيل شفاف UDP مع العلم `-arpspoof`. على سبيل المثال:

1. قم بإعداد جهاز افتراضي على نظامك باستخدام أي توزيعة لينكس تدعم `tproxy` (مثل Kali Linux).
2. قم بتمكين الشبكة `bridged` حتى يتمكن الجهاز الافتراضي من الوصول إلى جهاز المضيف الخاص بك.
3. انقل الملف الثنائي `gohpts` إلى الجهاز الافتراضي (عبر `ssh` مثلاً) أو قم ببنائه هناك في حالة اختلاف نظام التشغيل/الهندسة.
4. على جهازك الافتراضي، قم بتشغيل الأمر التالي:```shell
# Do not forget to replace <socks5 server> and <your host> with actual addresses
sudo ./gohpts -s <socks5 server> -T 8888 -Tu :8989 -M tproxy -sniff -body -auto -mark 100 -d -arpspoof "targets <your host>;fullduplex true;debug false"
  1. تحقق من الاتصال على جهازك المضيف، يجب أن يمر الحركة عبر جهاز Kali.

دعم Android

[Back]

يمكن تمكين البروكسي الشفاف على أجهزة Android (arm64) بصلاحية الجذر. يمكنك تثبيت Termux وتشغيل GoHPTS كأداة CLI هناك:```shell

you need to root your device first

pkg install tsu iproute2

Android support added in v1.10.2

GOHPTS_RELEASE=v1.10.2; wget -v https://github.com/shadowy-pycoder/go-http-proxy-to-socks/releases/download/$GOHPTS_RELEASE/gohpts-$GOHPTS_RELEASE-android-arm64.tar.gz -O gohpts && tar xvzf gohpts && mv -f gohpts-$GOHPTS_RELEASE-android-arm64 gohpts && ./gohpts -h

use your phone as router for LAN devices redirecting their traffic to remote socks5 server

sudo ./gohpts -s remote -T 8888 -Tu :8989 -M tproxy -sniff -body -auto -mark 100 -d -arpspoof "fullduplex true;debug false"

root@kitploit:~
### تهيئة YAML

[[العودة]](#table-of-contents)```yaml
transparent_proxy:
  tcp:
    enabled: true
    address: 0.0.0.0:8888
    # number of instances of transparent proxy server (Default: number of CPU cores)
    workers: 1
  udp:
    enabled: true
    address: 0.0.0.0:8889
    # number of instances of transparent UDP proxy server (Default: number of CPU cores)
    workers: 1
  mode: "tproxy" # available modes are "redirect", "tproxy" and "tlocal" (udp requires tproxy or tlocal mode)
  # automatically setup iptables and kernel parameters for transparent proxy (requires elevated privileges)
  auto: true
  # dump iptables rules and other system settings generated by auto setting
  dump_rules: false
  # list of ports to ignore when proxying traffic (Example: [22,80,443,9092])
  ignored_ports: []
  # set mark for each packet sent through transparent proxy (Default: redirect 0, tproxy 100, tlocal 100)
  mark: 100

التقاط حركة المرور

[عودة]

MrGopher

يسمح وكيل GoHPTS بالتقاط ومراقبة حركة المرور التي تمر عبر الخدمة. تُعرف هذه العملية باسم التقاط حركة المرور أو التقاط الحزم أو مجرد sniffing. على وجه الخصوص، يحاول الوكيل تحديد ما إذا كان النص عاديًا (HTTP) أو حركة مرور TLS، وبعد الانتهاء من التحديد، يقوم بتحليل بيانات الطلب/الاستجابة الوصفية وكتابتها إلى ملف أو وحدة التحكم. في حالة وكيل GoHTPS، تبدو البيانات الوصفية التي تم تحليلها كما يلي (مصافحة TLS):

تنسيق JSON

[عودة]```json [ { "connection": { "tproxy_mode": "redirect", "src_local": "127.0.0.1:8888", "src_remote": "192.168.0.107:51142", "dst_local": "127.0.0.1:56256", "dst_remote": "127.0.0.1:1080", "original_dst": "216.58.209.206:443" } }, { "tls_request": { "sni": "www.youtube.com", "type": "Client hello (1)", "version": "TLS 1.2 (0x0303)", "session_id": "2670a6779b4346e5e84d46890ad2aaf7a53b08adcfe0c9f6868c2d9882242e39", "cipher_suites": [ "TLS_AES_128_GCM_SHA256 (0x1301)", "TLS_CHACHA20_POLY1305_SHA256 (0x1303)", "TLS_AES_256_GCM_SHA384 (0x1302)", "TLS_ECDHE_ECDSA_WITH_AES_128_GCM_SHA256 (0xc02b)", "TLS_ECDHE_RSA_WITH_AES_128_GCM_SHA256 (0xc02f)", "TLS_ECDHE_ECDSA_WITH_CHACHA20_POLY1305_SHA256 (0xcca9)", "TLS_ECDHE_RSA_WITH_CHACHA20_POLY1305_SHA256 (0xcca8)", "TLS_ECDHE_ECDSA_WITH_AES_256_GCM_SHA384 (0xc02c)", "TLS_ECDHE_RSA_WITH_AES_256_GCM_SHA384 (0xc030)", "TLS_ECDHE_ECDSA_WITH_AES_256_CBC_SHA (0xc00a)", "TLS_ECDHE_ECDSA_WITH_AES_128_CBC_SHA (0xc009)", "TLS_ECDHE_RSA_WITH_AES_128_CBC_SHA (0xc013)", "TLS_ECDHE_RSA_WITH_AES_256_CBC_SHA (0xc014)", "TLS_RSA_WITH_AES_128_GCM_SHA256 (0x9c)", "TLS_RSA_WITH_AES_256_GCM_SHA384 (0x9d)", "TLS_RSA_WITH_AES_128_CBC_SHA (0x2f)", "TLS_RSA_WITH_AES_256_CBC_SHA (0x35)" ], "extensions": [ "server_name (0)", "extended_master_secret (23)", "renegotiation_info (65281)", "supported_groups (10)", "ec_point_formats (11)", "session_ticket (35)", "application_layer_protocol_negotiation (16)", "status_request (5)", "delegated_credential (34)", "signed_certificate_timestamp (18)", "key_share (51)", "supported_versions (43)", "signature_algorithms (13)", "psk_key_exchange_modes (45)", "record_size_limit (28)", "compress_certificate (27)", "encrypted_client_hello (65037)" ], "alpn": ["h2", "http/1.1"] } }, { "tls_response": { "type": "Server hello (2)", "version": "TLS 1.2 (0x0303)", "session_id": "2670a6779b4346e5e84d46890ad2aaf7a53b08adcfe0c9f6868c2d9882242e39", "cipher_suite": "TLS_AES_128_GCM_SHA256 (0x1301)", "extensions": ["key_share (51)", "supported_versions (43)"], "supported_version": "TLS 1.3 (0x0304)" } } ]

root@kitploit:~
وطلب HTTP باستخدام curl:```json
[
  {
    "connection": {
      "tproxy_mode": "redirect",
      "src_local": "127.0.0.1:8888",
      "src_remote": "192.168.0.107:45736",
      "dst_local": "127.0.0.1:37640",
      "dst_remote": "127.0.0.1:1080",
      "original_dst": "96.7.128.198:80"
    }
  },
  {
    "http_request": {
      "host": "example.com",
      "uri": "/",
      "method": "GET",
      "proto": "HTTP/1.1",
      "header": {
        "Accept": ["*/*"],
        "My": ["Header"],
        "User-Agent": ["curl/7.81.0"]
      }
    }
  },
  {
    "http_response": {
      "proto": "HTTP/1.1",
      "status": "200 OK",
      "content-length": 1256,
      "header": {
        "Cache-Control": ["max-age=2880"],
        "Connection": ["keep-alive"],
        "Content-Length": ["1256"],
        "Content-Type": ["text/html"],
        "Date": ["Tue, 17 Jun 2025 14:43:24 GMT"],
        "Etag": ["\"84238dfc8092e5d9c0dac8ef93371a07:1736799080.121134\""],
        "Last-Modified": ["Mon, 13 Jan 2025 20:11:20 GMT"]
      }
    }
  }
]

الاستخدام بسيط مثل تحديد العلم -sniff إلى جانب الأعلام العادية```shell gohpts -d -T 8888 -M redirect -sniff -j

root@kitploit:~
يمكنك أيضًا تحديد ملف لكتابة حركة المرور الملتقطة:```shell
gohpts -sniff -snifflog ~/sniff.log -j

تنسيق ملون

[العودة]

يمكنك رؤية مثال على الإخراج الملون في الصورة أعلاه. في هذا الوضع، يحاول GoHPTS تمييز المعلومات الهامة مثل TLS Handshake، وبيانات HTTP الوصفية، وأي شيء يشبه أسماء المستخدمين/كلمات المرور أو أنواع مختلفة من التوثيق والرموز السرية. يكون الإخراج محدودًا مقارنة بـ JSON ولكنه أسهل بكثير في القراءة للبشر.

لتشغيل GoHPTS في هذا الوضع، تستخدم العلامات التالية:```shell gohpts -sniff -body

root@kitploit:~
يمكنك الجمع بين التنصت ووضع الشفافية:```shell
./gohpts -T 8888 -M redirect -sniff -body

لتعطيل الألوان أضف -nocolor:```shell gohpts -sniff -body -nocolor

root@kitploit:~
## دعم HTTP2 و HTTP3

[[Back]](#table-of-contents)

يتولى وكيل `GoHPTS` التعامل مع طلبات HTTP/1.1 و HTTP/2 و HTTP/3 باستخدام نفس عنوان الخادم وشهادة TLS. وهذا يسمح للعملاء باختيار أفضل بروتوكول متاح تلقائيًا دون تغيير الإعدادات. يمكن الحصول على شهادة TLS بعدة طرق: مزودي الخدمات السحابية (Google, AWS, Cloudflare)، أو شهادة مجانية من Let's Encrypt، أو يمكنك إنشاء شهادة موقعة ذاتيًا باستخدام `openssl` (Linux/macOS) أو `New-SelfSignedCertificate` (Windows).

### إعداد مثال باستخدام شهادة موقعة ذاتيًا

[[Back]](#table-of-contents)

- إنشاء ملفي `key.pem` و `cert.pem`:  ```shell
  openssl req -x509 -newkey rsa:2048 \
  -keyout key.pem \
  -out cert.pem \
  -sha256 \
  -days 365 \
  -nodes \
  -subj "/C=XX/ST=StateName/L=CityName/O=CompanyName/OU=CompanySectionName/CN=127.0.0.1" \
  -addext "subjectAltName=IP:127.0.0.1"
  • تجهيز خادم socks5 مع دعم UDP ASSOCIATE ```shell git clone https://github.com/wzshiming/socks5.git && cd socks5 go build -o socks5_server ./cmd/socks5/main.go ./socks5_server -a 0.0.0.0:1080
    root@kitploit:~
  • افتح محطة طرفية أخرى وقم بتثبيت وكيل GoHPTS: ```shell go install github.com/shadowy-pycoder/go-http-proxy-to-socks/cmd/gohpts@latest
    root@kitploit:~

يمكنك استخدام طرق أخرى موصوفة في قسم التثبيت.

  • أخيرا:

    1. إنشاء تكوين بسيط للوكيل الخاص بك ```yaml

    gohpts_config.yaml

    http_server: address: 127.0.0.1:8080 cert_file: ./cert.pem key_file: ./key.pem

    proxy_list:

    • address: 127.0.0.1:1080

    logging: debug: true

    sniffing: enabled: true body: true

    root@kitploit:~

قم بتشغيل الوكيل: ```shell gohpts -f ./gohpts_config.yaml

root@kitploit:~
2. أو إذا كنت تفضل وسائط سطر الأوامر:  ```shell
gohpts -l :8080 -s 1080 -c ./cert.pem -k ./key.pem -d -sniff -body

يجب أن ترى شيئًا كهذا: ```shell [15:20:32] INF SOCKS5 Proxy: 127.0.0.1:1080 [15:20:32] INF HTTPS Proxy: 127.0.0.1:8080 [15:20:32] INF HTTP3 Proxy (QUIC): 127.0.0.1:8080

root@kitploit:~
### اختبار الاتصال

[[رجوع]](#table-of-contents)

- بالنسبة لخادم الوكيل HTTP/2 يمكنك استخدام `curl`:  ```shell
  curl -Nvk --http2 --proxy-insecure --proxy-http2 --proxy https://localhost:8080 "https://stream.wikimedia.org/v2/stream/recentchange"

اضغط Ctrl+C لإيقاف تشغيل الدفق.

  • بالنسبة لـ HTTP/3، الأمر مختلف لأنه (في وقت كتابة هذا النص) لا يدعم curl وكيل HTTP3، لذا سأستخدم العميل المخصص الذي أنشأته لأغراض الاختبار.

    قم بتنزيل وتثبيت مثال وكيل HTTP3 إلى SOCKS5: ```shell git clone https://github.com/shadowy-pycoder/http3-socks-proxy.git && cd http3-socks-proxy make

    root@kitploit:~

قم بتشغيل الأمر التالي: ```shell ./bin/client -a 127.0.0.1:8080 www.google.com

root@kitploit:~
يجب أن ترى بعض النصوص غير المفهومة التي تشبه صفحة HTML.

اذهب إلى علامة التبويب الطرفية مع وكيل `GoHPTS` وتحقق من السجلات، يجب أن ترى جميع طلباتك هناك.

### اختبار الاتصال في متصفح

[[Back]](#table-of-contents)

- إنشاء شهادة موقعة ذاتيًا مناسبة للمتصفح:  ```shell
git clone https://github.com/shadowy-pycoder/go-http-proxy-to-socks.git
cd go-http-proxy-to-socks
cp ./resources/makecert.sh makecert.sh && chmod +x makecert.sh
./makecert.sh

يمكن العثور على مزيد من المعلومات هنا: Creating a browser trusted, self signed, SSL certificate

  • أضف rootCA.crt الذي تم إنشاؤه حديثًا إلى مخزن الثقة للنظام:
    1. دبيان/أوبونتو: ```shell sudo cp rootCA.crt /usr/local/share/ca-certificates/rootCA.crt sudo update-ca-certificates
    root@kitploit:~
  1. Arch Linux/CachyOS/EndeavourOS: ```shell sudo trust anchor rootCA.crt
root@kitploit:~
- تشغيل البروكسي باستخدام `server.crt` و `server.key`:  ```shell
gohpts -l :8080 -s 1080 -c ./server.crt -k ./server.key -d -sniff -body
  • قم بتشغيل المتصفح وانتقل إلى أي موقع ويب: ```shell chromium --proxy-server="https://127.0.0.1:8080"
    root@kitploit:~

دعم IPv4 و IPv6

[رجوع]

من حيث معالجة طبقة الشبكة، يمكن لـ GoHPTS العمل في ثلاثة أوضاع: مكدس مزدوج، IPv4 فقط و IPv6 فقط. يمكن للمستخدم التحكم في الوضع عن طريق تحديد العلمين -4 و -6. عند تعيين أحد العلمين، يبدأ الوكيل في الوضع المقابل، وعند وجود كلا العلمين أو حذفهما، يُفترض مكدس مزدوج. يُرجى ملاحظة أنه في أوضاع "فقط"، يُسمح فقط بعناوين IP من إصدار معين، ويتم حل جميع النطاقات إلى إصدار IP محدد (إن أمكن)، وتتطلب جميع عناوين الاستماع استخدام نفس الإصدار، إلخ.

لتمكين وضع IPv4 فقط فقط أضف العلم -4:```shell sudo ./gohpts -sniff -body -d -4

root@kitploit:~
لاختبار البروكسي في وضع IPv4، يمكنك استخدام أي جهاز افتراضي يعمل بنظام Linux:

1. على جهازك الافتراضي:```shell
# add your host machine as gateway for VM
export GATEWAY="<host IPv4 address>"
ip route add 0.0.0.0/1 via "$GATEWAY"
ip route add 128.0.0.0/1 via "$GATEWAY"
  1. على مضيفك:```shell

run proxy on your host

sudo ./gohpts -T 8888 -Tu 8889 -M tproxy -sniff -body -auto -d -4

root@kitploit:~
3. قم بزيارة أي موقع ويب على جهازك الافتراضي وشاهد حركة المرور في سجلات الوكيل

لتفعيل وضع `IPv6-only` فقط أضف العلم `-6`، على سبيل المثال عند استخدام الوكيل الشفاف:```shell
sudo ./gohpts -T 8888 -M redirect -sniff -body -auto -mark 100 -d -6

لكي يعمل هذا، يجب أن يدعم مزود خدمة الإنترنت (ISP) والبروكسي البعيد (socks5) IPv6 بنشاط، يمكنك زيارة https://test-ipv6.com/ لمعرفة ما إذا كان بإمكانك الوصول إلى عناوين IPv6. لاختبار البروكسي في وضع IPv6، يمكنك استخدام أي جهاز افتراضي (VM) يعمل بنظام Linux:

  1. على جهازك الافتراضي:```shell

add your host machine as gateway IPv6 for VM

export GATEWAY6="" ip -6 route add ::/1 via "$GATEWAY6" dev eth0 ip -6 route add 8000::/1 via "$GATEWAY6" dev eth0

root@kitploit:~
2. على مضيفك:```shell
# run proxy on your host
sudo ./gohpts -T 8888 -Tu 8889 -M tproxy -sniff -body -auto -d -6
  1. قم بزيارة أي موقع ويب على جهازك الافتراضي وشاهد حركة المرور في سجلات الوكيل

انتحال ARP

[العودة]

يحتوي GoHPTS على أداة انتحال ARP مدمجة يمكن استخدامها لجعل جميع أجهزة LAN التي تتحدث TCP تستخدم خادم الوكيل للاتصال بالإنترنت. يتم ذلك بإضافة علامة -arpspoof مع بضع معاملات، مفصولة بفاصلة منقوطة.

مثال:```shell ssh remote -D 1080 -Nf sudo env PATH=$PATH gohpts -d -T 8888 -M tproxy -sniff -body -auto -mark 100 -arpspoof "targets 192.168.10.0/24;fullduplex true;debug true"

root@kitploit:~
سوف يقوم الـ Proxy بفحص الأجهزة في الشبكة الفرعية `192.168.10.0/24` وإرسال حزم ARP إليها للتظاهر بأنها بوابة، إذا كانت `fullduplex` صحيحة، سيرسل الـ Proxy حزم ARP إلى البوابة أيضًا لجعلها تعتقد أن الـ Proxy الخاص بنا يمتلك كل عنوان IP في الشبكة الفرعية.

بعد إيقاف الـ Proxy باستخدام `Ctrl+C`، سوف يقوم تلقائيًا بإلغاء التزوير (unspoof) لجميع الأهداف.

يمكن أيضًا استخدام `GoHPTS` مع أدوات مثل [Bettercap](https://github.com/bettercap/bettercap) لتمرير حركة المرور المزورة عبر ARP عبر الـ Proxy.

تشغيل الـ Proxy:```shell
ssh remote -D 1080 -Nf
sudo env PATH=$PATH gohpts -d -T 8888 -M tproxy -sniff -body -auto -mark 100

شغّل bettercap بهذا الأمر (انظر الوثائق):```shell sudo bettercap -eval "net.probe on;net.recon on;set arp.spoof.fullduplex true;arp.spoof on"

root@kitploit:~
تحقق من سجلات الوكيل (proxy) لحركة المرور من الأجهزة الأخرى في شبكتك المحلية (LAN)

لمزيد من المعلومات حول خيارات arpspoof، انظر `gohpts -h` و[https://github.com/shadowy-pycoder/arpspoof](https://github.com/shadowy-pycoder/arpspoof)

## انتحال NDP

[[العودة]](#table-of-contents)

`GoHPTS` يحتوي على وظيفة مدمجة لأداء انتحال NDP في شبكات IPv6 باستخدام حزم إعلان الموجه (RA) وإعلان الجيران (NA). كما يتضمن خيار RDNSS في حزم RA لجعل المضيف خادم أسماء IPv6 للعملاء المتأثرين. عند دمجه مع وضع الوكيل الشفاف (TCP/UDP)، يتيح انتحال NDP لـ `gohpts` وكيلاً لحركة المرور للعملاء في الشبكات المحلية. كما هو الحال مع [انتحال ARP](#arp-spoofing)، يمكنك تعيين خيارات انتحال NDP باستخدام العلم الواحد `-ndpspoof`:

مثال:```shell
sudo env PATH=$PATH gohpts -d -T 8888 -M tproxy -sniff -body -auto -mark 100 -ndpspoof "ra true;na true;targets fe80::3a1c:7bff:fe22:91a4;fullduplex false;debug true"

للحصول على مزيد من المعلومات حول خيارات ndpspoof، انظر gohpts -h و https://github.com/shadowy-pycoder/ndpspoof

يرجى ملاحظة أن بعض الخيارات مثل rdnss و gateway و interface يتم ضبطها تلقائيًا بواسطة gohpts نفسه لتعمل كبروكسي بشكل صحيح.

نظرًا لأن gohpts يعمل كوسيط لجميع الاتصالات عبر خادم SOCKS5 خارجي، يجب أن يكون لديك خادم عامل يدعم IPv4/IPv6 و TCP/UDP. من الواضح أن الجهاز البعيد (مثل VPS) يجب أن يكون لديه اتصال IPv6 فعال. وغني عن القول أن الجهاز الذي يعمل عليه gohpts يجب أن يكون جزءًا من شبكة تدعم IPv6.

مثال على الإعداد لكي يعمل انتحال NDP بشكل صحيح:

  1. الاتصال بـ VPS```shell ssh [email protected]
root@kitploit:~
2. تثبيت التبعيات```shell
GO_VERSION=$(curl 'https://go.dev/VERSION?m=text' | head -n1)
cd ~/Downloads/ && wget https://go.dev/dl/$GO_VERSION.linux-amd64.tar.gz
sudo rm -rf /usr/local/go && sudo tar -C /usr/local -xzf $GO_VERSION.linux-amd64.tar.gz
  1. إعداد خادم SOCKS5 (تأكد من أن قواعد جدار الحماية لا تحجب المنافذ المستخدمة)```shell git clone https://github.com/wzshiming/socks5.git && cd socks5 go build -o ./bin/socks5_server ./cmd/socks5/*.go ./bin/socks5_server -a :3000
root@kitploit:~
4. ارجع إلى جهاز المضيف الخاص بك وقم بتثبيت `gohpts` (راجع [التثبيت](#installation))

5. قم بتشغيل `gohtps`:```shell
gohpts -s 203.0.113.10:3000 -T 8888 -Tu 8889 -M tproxy -sniff -body -auto -mark 100 -arpspoof "fullduplex true;debug true" -ndpspoof "ra true;debug true" -4 -6 -d
  1. احصل على جهاز آخر (هاتف، جهاز لوحي، إلخ) وقم بتوصيله بنفس الشبكة. حاول الوصول إلى الإنترنت وتحقق مما إذا كان هناك بعض حركة المرور تظهر على جهازك المضيف. تحقق من عنوان IP العام باستخدام بعض الأدوات عبر الإنترنت (يجب أن يتطابق مع عنوان خادمك الافتراضي الخاص 203.0.113.10 في هذه الحالة أو عنوان IPv6 الشامل)

  2. أوقف الوكيل بالضغط على Ctrl+C

  3. أربح!

انتحال DNS

[رجوع]

لفرض مرشحات DNS وانتحال الأهداف عن طريق تغيير سجلات DNS، يجب أن يصبح المضيف الذي يعمل عليه GoHPTS بوابة افتراضية لأجهزة الشبكة المحلية. لكي يعمل هذا، قم بتشغيل الوكيل الشفاف مع تمكين udp وكذلك تشغيل انتحال ARP/NDP لجعل الأهداف تستخدم خادم DNS الخاص بك.

تبدو ردود DNS التي تم إنشاؤها بواسطة GoHPTS مثل الحزم العادية القادمة من جهاز التوجيه أو خوادم DNS الموثوقة (Google، Cloudflare)، مما يؤدي إلى قيام العملاء بتحديث ذاكرة التخزين المؤقت الخاصة بهم بما تخبرهم به. ضع في اعتبارك، مع ذلك، أنه يعمل فقط مع حركة مرور DNS "القياسية" غير المشفرة (DOT/DOH غير مفلترة أو منتحلة).

يمكن تكوين مرشحات DNS والمجالات الخاصة بالانتحال في قسم dns_filter من إعداد ملف yaml. تقبل جميع القوائم عناوين URL ومسارات الملفات والإدخالات المشابهة لتلك الموجودة عادةً في ملف hosts، راجع https://en.wikipedia.org/wiki/Hosts_(file).

مثال:```yaml

dns filters require udp transparent proxy and arpspoof/ndpspoof

filters accept hosts like entries (use either links, file paths or just plain comma separated lists

dns_filter: enabled: true whitelist: ["/tmp/whitelisted_domains.txt", "example.com", "*.google.com"] # ip is optional, domains can start with *. to match all subdomains blacklist: ["https://raw.githubusercontent.com/StevenBlack/hosts/master/hosts"] blacklist_all: false # block all non whitelisted domains spooflist: ["127.0.0.1 example.com"] # ip address is required here

root@kitploit:~
حالات الاستخدام:

- حظر الإعلانات والمتتبعات لجميع أجهزة الشبكة المحلية
- التحكم الأبوي عبر حظر فئات معينة من المواقع
- حظر نطاقات التصيد والبرامج الضارة المعروفة
- إعادة توجيه حركة المرور للتحليل
- جمع بيانات الاعتماد عبر إعادة التوجيه
- اختطاف حركة المرور والتلاعب بها (حقن الإعلانات والنصوص والتتبع)
- المراقبة والتنميط

الحد الأدنى من التكوين لهذا الإعداد:```yaml
# gohpts_dns_spoof.yaml
proxy_list:
  - address: 127.0.0.1:1080 # point to socks5 server supporting TCP/UDP

sniffing:
  enabled: true
  body: true

transparent_proxy:
  tcp:
    enabled: true
    address: 0.0.0.0:8888
  udp:
    enabled: true
    address: 0.0.0.0:8889
  mode: "tproxy"
  auto: true

arpspoof:
  enabled: true
  settings: "fullduplex 1;debug 1;interval 1s"

dns_filter:
  enabled: true
  whitelist: []
  blacklist: [
      "https://raw.githubusercontent.com/StevenBlack/hosts/master/hosts",
    ] # list of domains to filter
  blacklist_all: true
  # all requests for example.com will be redirected to 0.0.0.0 address
  spooflist: ["0.0.0.0 example.com"]

تشغيل:```shell sudo ./gohpts -f ./gohpts_dns_spoof.yaml

root@kitploit:~
يمكن العثور على مزيد من المعلومات هنا: [https://en.wikipedia.org/wiki/DNS_spoofing](https://en.wikipedia.org/wiki/DNS_spoofing)

## التقاط الحزم

[[العودة]](#table-of-contents)

يمكن التقاط حركة المرور إلى تنسيقات pcap أو pcapng أو txt مخصصة وتحليلها لاحقًا باستخدام أدوات مثل Wireshark و tcpdump وغيرها الكثير.

أولاً، تأكد من أن الملف التنفيذي `GoHPTS` لديه صلاحيات مرتفعة ليتمكن من التقاط الحزم الخام، لديك خياران:

- قم بتشغيل `sudo setcap cap_net_raw+ep ~/go/bin/gohpts` مرة واحدة لمنح الوكيل وصولًا إلى حركة المرور الخام
- قم بتشغيل الوكيل باستخدام `sudo` عندما تحتاج إلى تحديد العلامة `-pcap` في سطر الأوامر أو `pcap.enabled` في تكوين الملف.

قم بتكوين الوكيل باستخدام سطر الأوامر:```shell
gohpts -pcap "promisc true;timeout 10s;exts txt,pcap,pcapng"

ملف التكوين:```yaml pcap: enabled: true settings: "promisc true;expr ip proto tcp;snaplen 65535;timeout 10s;packet_count 100;packet_buffer 8192;exts txt,pcap,pcapng"

root@kitploit:~
تنتج هذه الأوامر ثلاثة ملفات التقاط حزم بتنسيقات مقابلة يمكن تحليلها لاحقًا بواسطة أدوات متنوعة.

لمزيد من المعلومات حول خيارات pcap، انظر `gohpts -h` و [https://github.com/shadowy-pycoder/mshark](https://github.com/shadowy-pycoder/mshark)

## مساحات أسماء الشبكة

[[Back]](#table-of-contents)

بشكل افتراضي، يعمل وكيل `GoHPTS` داخل مساحة اسم شبكة واحدة ولكن يمكن تجاوز ذلك. يمكن عزل مآخذ الاستماع (مثل خادم http أو وكيل الشفاف) ومآخذ الصادرة (وكيل socks أو direct dialer) التي تم إنشاؤها بواسطة `GoHPTS` باستخدام [network_namespaces (7)](https://man7.org/linux/man-pages/man7/network_namespaces.7.html) في Linux/Android. عند بدء عملية الوكيل، يمكن للمستخدمين تحديد العلامات `-in-netns` (المستمعون) و `-out-netns` (المتصلون) مع اسم أو مسار إلى مساحة اسم الشبكة للتحكم في البيئة المعزولة التي يتم فيها إنشاء المآخذ. إذا كنت ترغب في إنشاء إما المستمعين أو المتصلين في المساحة الافتراضية الحالية، فقط تجاهل العلامة. لتحديد مساحة اسم المضيف بشكل صريح، يمكنك استخدام المسار `/proc/1/ns/net` - وهذا يسمح للوكيل بتحديد خوادم الأسماء النظامية بشكل صحيح.

يدعم `GoHPTS` اصطلاح [ip-netns (8)](https://man7.org/linux/man-pages/man8/ip-netns.8.html) لتوفير تكوين الشبكة عبر الملفات الموجودة في الدليل `/etc/netns/NAME/`. لذلك، لتحديد خوادم أسماء مخصصة لمساحة اسم الشبكة `ns1`، قم بما يلي:```shell
sudo mkdir -p /etc/netns/ns1
sudo tee /etc/netns/ns1/resolv.conf << EOF
nameserver 8.8.8.8
nameserver 2001:4860:4860:0:0:0:0:8888
EOF

إذا لم يتم العثور على تكوين، فسيتم استخدام خوادم Google DNS لحل أسماء النطاقات.

إذا كان نظامك يحتوي على systemd-resolved.service (8) ممكّنًا، فقد ترغب في تعطيله مؤقتًا عند إجراء استعلامات عبر مساحات أسماء شبكة مخصصة:```shell sudo ip netns exec ns1 unshare --mount bash -c ' mount --bind /dev/null /run/systemd/resolve/io.systemd.Resolve curl -Nvk https://example.com'

root@kitploit:~
أو اجعله دائمًا لمثيل شل محدد:```shell
sudo ip netns exec ns1 unshare --mount bash -c '
    mount --bind /dev/null /run/systemd/resolve/io.systemd.Resolve
    exec bash --login'

إعداد بيئة التجربة

[العودة]

  • تشغيل خادم socks5 مع دعم UDP ASSOCIATE ```shell git clone https://github.com/wzshiming/socks5.git && cd socks5 go build -o socks5_server ./cmd/socks5/main.go ./socks5_server -a 0.0.0.0:1080
    root@kitploit:~
  • قم بتنزيل وتثبيت Simple HTTP3 to SOCKS5 proxy example: ```shell git clone https://github.com/shadowy-pycoder/http3-socks-proxy.git cd http3-socks-proxy make
    root@kitploit:~
  • استنسخ المستودع واجمعه ```shell git clone https://github.com/shadowy-pycoder/go-http-proxy-to-socks.git cd go-http-proxy-to-socks make
    root@kitploit:~
  • أنشئ ملفات key.pem و cert.pem: ```shell openssl req -x509 -newkey rsa:2048
    -keyout key.pem
    -out cert.pem
    -sha256
    -days 365
    -nodes
    -subj "/C=XX/ST=StateName/L=CityName/O=CompanyName/OU=CompanySectionName/CN=127.0.0.1"
    -addext "subjectAltName=IP:127.0.0.1"
    root@kitploit:~
  • إنشاء مساحة اسم شبكة ns1 وتكوين شبكة veth ```shell sudo ip netns add ns1 sudo ip link add dev veth0 type veth peer name veth1 netns ns1 sudo ip addr add 10.0.0.1/24 dev veth0 sudo ip -6 addr add fd12:3456:789a::1/64 dev veth0 sudo ip link set dev veth0 up sudo ip netns exec ns1 ip addr add 10.0.0.2/24 dev veth1 sudo ip netns exec ns1 ip -6 addr add fd12:3456:789a::2/64 dev veth1 sudo ip netns exec ns1 ip link set dev lo up sudo ip netns exec ns1 ip link set dev veth1 up
    root@kitploit:~

أمثلة الاستخدام

[العودة]

  1. وكيل HTTP - مستمعو الوكيل في ns1 (بدون مسار افتراضي، بدون وصول إلى الإنترنت)، مقابس صادرة على المضيف

    تشغيل الوكيل: ```shell sudo ./bin/gohpts -s 0.0.0.0:1080 -l :8083 -4 -6 -d -sniff -body -in-netns ns1

    root@kitploit:~

تقديم طلب عبر ns1 ```shell sudo ip netns exec ns1 curl -Nv --proxy http://127.0.0.1:8083 https://example.com

root@kitploit:~
يجب أن ينجح الطلب

2. **وكيل HTTP2 - مستمعو الوكيل في `ns1` (لا يوجد مسار افتراضي، لا وصول إلى الإنترنت)، مآخذ صادرة على المضيف**

تشغيل الوكيل:   ```shell
sudo ./bin/gohpts -s 0.0.0.0:1080 -l :8083 -4 -6 -d -sniff -body -in-netns ns1 -c ./cert.pem -k ./key.pem

أرسل الطلب عبر ns1 ```shell sudo ip netns exec ns1 curl -Nvk --http2 --proxy-insecure --proxy-http2 --proxy https://127.0.0.1:8083 https://example.com

root@kitploit:~
يجب أن ينجح الطلب

3. **HTTP3 proxy - مستمعو البروكسي في `ns1` (بدون مسار افتراضي، بدون وصول للإنترنت)، مآخذ الخروج على المضيف**

تشغيل البروكسي:   ```shell
sudo ./bin/gohpts -s 0.0.0.0:1080 -l :8083 -4 -6 -d -sniff -body -in-netns ns1 -c ./cert.pem -k ./key.pem

قم بتقديم الطلب عبر ns1 ```shell sudo ip netns exec ns1 ./http3-socks-proxy/bin/client -a 127.0.0.1:8083 www.google.com

root@kitploit:~
يجب أن ينجح الطلب

4. **الوكيل الشفاف لإعادة التوجيه (`-M redirect`) - مستمعو الوكيل في `ns1` (المسار الافتراضي، لا وصول إلى الإنترنت)، مآخذ الخرج على المضيف**

تشغيل الوكيل:   ```shell
sudo ./bin/gohpts -s 0.0.0.0:1080 -l :8083 -4 -6 -d -sniff -body -in-netns ns1 -nohttp -M redirect -T :8888 -auto

قم بتقديم الطلب عبر ns1 ```shell sudo ip netns exec ns1 curl -Nv https://example.com

root@kitploit:~
يجب أن يفشل الطلب

أضف المسار الافتراضي إلى `ns1`   ```shell
sudo ip netns exec ns1 ip route add default via 10.0.0.1
sudo ip netns exec ns1 ip -6 route add default via fd12:3456:789a::1

حاول مرة أخرى ```shell sudo ip netns exec ns1 curl -Nv https://example.com

root@kitploit:~
يجب أن ينجح الطلب الآن

5. **HTTP proxy - مستمعي الوكيل على المضيف، مقابس صادرة في `ns1` (المسار الافتراضي، الوصول إلى الإنترنت)**

أضف قواعد NAT للسماح لـ `ns1` بالاتصال بالإنترنت عبر `wlan0`   ```shell
sudo iptables -t nat -A POSTROUTING -s 10.0.0.0/24 -o wlan0 -j MASQUERADE
sudo ip6tables -t nat -A POSTROUTING -s fd12:3456:789a::/64 -o wlan0 -j MASQUERADE

تشغيل الوكيل: ``` sudo ./bin/gohpts -s :1080 -l :8083 -4 -6 -d -sniff -body -out-netns ns1 -i wlan0

root@kitploit:~
تقديم الطلب عبر المضيف   ```shell
curl -Nv --proxy http://$WLAN_IP:8083 https://example.com

يجب أن ينجح الطلب

  1. وكيل HTTP3 - مستمعو الوكيل على المضيف، مآخذ الإرسال في ns1 (المسار الافتراضي، الوصول إلى الإنترنت)

    تشغيل الوكيل: ``` sudo ./bin/gohpts -s :1080 -l :8083 -4 -6 -d -sniff -body -out-netns ns1 -i wlan0 -c ./cert.pem -k ./key.pem

    root@kitploit:~

تقديم الطلب عبر المضيف ```shell ./http3-socks-proxy/bin/client -a $WLAN_IP:8083 www.google.com

root@kitploit:~
يجب أن ينجح الطلب

7. **إعادة توجيه البروكسي الشفاف - مستمعو البروكسي على المضيف، مآخذ الخروج في `ns1` (المسار الافتراضي، الوصول إلى الإنترنت)**

تشغيل البروكسي (`-auto` لا يعمل مع خادم socks5 المحلي بالنسبة لي، لذا أستخدم واحدًا عن بعد):   ```
sudo ./bin/gohpts -s <remote> -4 -6 -d -sniff -body -out-netns ns1 -nohttp -M redirect -T :8888 -auto

تقديم طلب عبر المضيف ```shell curl -Nv https://example.com

root@kitploit:~
يجب أن ينجح الطلب

8. **وكيل HTTP - شبكة محلية (`ns2` (مستمعو الوكيل), `ns3`, `ns4`)، مآخذ صادرة في `ns1` (المسار الافتراضي، الوصول إلى الإنترنت)**

إنشاء شبكة محلية   ```shell
sudo ip link add br0 type bridge
sudo ip addr add 10.0.1.1/24 dev br0
sudo ip -6 addr add fd12:3456:789b::1/64 dev br0
sudo ip link set br0 up

sudo ip netns add ns2
sudo ip link add veth2 type veth peer name veth3 netns ns2
sudo ip link set veth2 master br0
sudo ip link set veth2 up
sudo ip netns exec ns2 ip addr add 10.0.1.2/24 dev veth3
sudo ip netns exec ns2 ip -6 addr add fd12:3456:789b::2/64 dev veth3
sudo ip netns exec ns2 ip link set lo up
sudo ip netns exec ns2 ip link set veth3 up
sudo ip netns exec ns2 ip route add default via 10.0.1.1
sudo ip netns exec ns2 ip -6 route add default via fd12:3456:789b::1

sudo ip netns add ns3
sudo ip link add veth4 type veth peer name veth5 netns ns3
sudo ip link set veth4 master br0
sudo ip link set veth4 up
sudo ip netns exec ns3 ip addr add 10.0.1.3/24 dev veth5
sudo ip netns exec ns3 ip -6 addr add fd12:3456:789b::3/64 dev veth5
sudo ip netns exec ns3 ip link set lo up
sudo ip netns exec ns3 ip link set veth5 up
sudo ip netns exec ns3 ip route add default via 10.0.1.1
sudo ip netns exec ns3 ip -6 route add default via fd12:3456:789b::1

sudo ip netns add ns4
sudo ip link add veth6 type veth peer name veth7 netns ns4
sudo ip link set veth6 master br0
sudo ip link set veth6 up
sudo ip netns exec ns4 ip addr add 10.0.1.4/24 dev veth7
sudo ip netns exec ns4 ip -6 addr add fd12:3456:789b::4/64 dev veth7
sudo ip netns exec ns4 ip link set lo up
sudo ip netns exec ns4 ip link set veth7 up
sudo ip netns exec ns4 ip route add default via 10.0.1.1
sudo ip netns exec ns4 ip -6 route add default via fd12:3456:789b::1

تشغيل الوكيل: ``` sudo ./bin/gohpts -s $WLAN_IP:1080 -l 0.0.0.0:8083 -4 -6 -d -sniff -body -in-netns ns2 -out-netns ns1

root@kitploit:~
تقديم الطلبات   ```shell
curl -Nv --proxy http://10.0.1.2:8083 http://example.com
sudo ip netns exec ns2 curl -Nv --proxy http://10.0.1.2:8083 https://example.com
sudo ip netns exec ns3 curl -Nv --proxy http://10.0.1.2:8083 https://example.com
sudo ip netns exec ns4 curl -Nv --proxy http://10.0.1.2:8083 https://example.com

جميع الطلبات يجب أن تنجح

  1. HTTP3 proxy - LAN (ns2 (مستمعي الوكيل), ns3, ns4), مقابس الخروج في ns1 (المسار الافتراضي، الوصول إلى الإنترنت)

    تشغيل الوكيل: ``` sudo ./bin/gohpts -s $WLAN_IP:1080 -l 0.0.0.0:8083 -4 -6 -d -sniff -body -in-netns ns2 -out-netns ns1 -c ./cert.pem -k ./key.pem

    root@kitploit:~

تقديم الطلبات ```shell ./http3-socks-proxy/bin/client -a 10.0.1.2:8083 www.google.com sudo ip netns exec ns2 ./http3-socks-proxy/bin/client -a 10.0.1.2:8083 www.google.com sudo ip netns exec ns3 ./http3-socks-proxy/bin/client -a 10.0.1.2:8083 www.google.com sudo ip netns exec ns4 ./http3-socks-proxy/bin/client -a 10.0.1.2:8083 www.google.com

root@kitploit:~
يجب أن تنجح جميع الطلبات

10. **وكيل شفاف إعادة توجيه - شبكة محلية (`ns2` (مستمعات الوكيل), `ns3`, `ns4`), مآخذ صادرة في `ns1` (المسار الافتراضي, الوصول إلى الإنترنت)**

 تشغيل الوكيل:

 ```shell
 sudo ./bin/gohpts -s $WLAN_IP:1080 -4 -6 -d -sniff -body -in-netns ns2 -out-netns ns1 -nohttp -M redirect -T :8888 -auto
 ```

 تقديم الطلبات

 ```shell
 sudo ip netns exec ns2 curl -Nv https://example.com
 ```

 بالنسبة لـ `ns3` و `ns4`, يفشل الطلب

11. **وكيل شفاف مع `IP_TRANSPARENT` (تمكين انتحال ARP/NDP) شبكة محلية (`ns2` (مستمعات الوكيل), `ns3`, `ns4`), مآخذ صادرة في `ns1` (المسار الافتراضي, الوصول إلى الإنترنت)**

 تشغيل الوكيل:

 ```shell
 sudo ./bin/gohpts -s $WLAN_IP:1080 -4 -6 -d -sniff -body -in-netns ns2 -out-netns ns1 -nohttp -M tproxy -T :8888 -auto -arpspoof "fullduplex 1;debug 1;interval 1s" -ndpspoof "ra true;interval 10s;debug 1"
 ```

 الآن يجب أن تعمل الطلبات السابقة على `ns3` و `ns4`

 ```
 sudo ip netns exec ns3 curl -Nv https://example.com
 sudo ip netns exec ns4 curl -Nv https://example.com
 ```

12. **وكيل HTTP3 - مستمعات الوكيل في `ns1`, مآخذ صادرة على المضيف, علامة `-nosocks`**

 تشغيل الوكيل:

 ```shell
 sudo ./bin/gohpts -l 0.0.0.0:8083 -4 -6 -d -sniff -body -in-netns ns1 -c ./cert.pem -k ./key.pem -nosocks
 ```

 تقديم الطلب

 ```shell
 ./http3-socks-proxy/bin/client -a 10.0.0.2:8083 www.google.com
 ```

 يجب أن ينجح الطلب

13. **وكيل HTTP3 - مستمعات الوكيل على المضيف, مآخذ صادرة في `ns1`, علامة `-nosocks`**

 تشغيل الوكيل:

 ```shell
 sudo ./bin/gohpts -l 0.0.0.0:8083 -4 -6 -d -sniff -body -out-netns ns1 -c ./cert.pem -k ./key.pem -nosocks
 ```

 تقديم الطلب

 ```shell
 ./http3-socks-proxy/bin/client -a 127.0.0.1:8083 www.google.com
 ```

 يجب أن يفشل الطلب

 إضافة قواعد إلى سلسلة `FORWARD`

 ```shell
 sudo iptables -A FORWARD -i wlan0 -o veth0 -m conntrack --ctstate RELATED,ESTABLISHED -j ACCEPT
 sudo iptables -A FORWARD -i veth0 -o wlan0 -j ACCEPT

 sudo ip6tables -A FORWARD -i veth0 -j ACCEPT
 sudo ip6tables -A FORWARD -o veth0 -m conntrack --ctstate RELATED,ESTABLISHED -j ACCEPT
 ```

 تقديم الطلب

 ```shell
 ./http3-socks-proxy/bin/client -a 127.0.0.1:8083 www.google.com
 ```

 يجب أن ينجح الطلب

## خادم مختلط

[[الرجوع]](#table-of-contents)

يمكن تكوين `GoHPTS` للاستماع لاتصالات SOCKS على نفس عنوان خادم HTTP، فقط أضف علامة `-mixed` لتشغيل خادم SOCKS إضافي. هذا يسمح لـ `GoHPTS` بالعمل ليس فقط كوكيل `HTTP-to-SOCKS` ولكن أيضًا كوكيل `SOCKS-to-SOCKS`. يدعم خادم SOCKS5 المحلي أمر `UDP ASSOCIATE`، لذا من الناحية الفنية يمكن للمستخدمين إرسال حزم UDP باستخدام هذا الخادم المختلط.

تشغيل الوكيل:```shell
gohpts -s :1080 -l :8080 -mixed

اختبار الاتصال:```shell curl -Nv --proxy socks5://127.0.0.1:8080 "https://example.com"

root@kitploit:~
أو قم بتعطيل الوكيل SOCKS العلوي والاتصال مباشرة عن طريق إضافة `-nosocks`:```shell
gohpts -l :8080 -mixed -nosocks

اختبار الاتصال:```shell curl -Nv --proxy socks5://127.0.0.1:8080 "https://example.com"

root@kitploit:~
أضف العلم `-socks4` لاستخدام بروتوكول SOCKS4 بدلاً من ذلك:```shell
# :1080 should be a socks4 server
gohpts -s :1080 -l :8080 -mixed -socks4

اختبار الاتصال:```shell curl -Nv --proxy socks4://127.0.0.1:8080 "https://example.com"

root@kitploit:~
## روابط

[[العودة]](#جدول-المحتويات)

تعرف على المزيد حول البروكسيات الشفافة من خلال زيارة الروابط التالية:

- [دعم البروكسي الشفاف في نواة لينكس](https://docs.kernel.org/networking/tproxy.html)
- [دروس البروكسي الشفاف بواسطة Gost](https://latest.gost.run/en/tutorials/redirect/)
- [مثال بسيط لـ tproxy](https://github.com/FarFetchd/simple_tproxy_example)
- [Golang TProxy](https://github.com/KatelynHaworth/go-tproxy)
- [تنفيذ بروكسي شفاف باستخدام eBPF و Go](https://medium.com/all-things-ebpf/building-a-transparent-proxy-with-ebpf-50a012237e76)
- [https://github.com/heiher/hev-socks5-tproxy](https://github.com/heiher/hev-socks5-tproxy)

  بروكسي `socks5` مع دعم `UDP ASSOCIATE`:

- [https://github.com/wzshiming/socks5](https://github.com/wzshiming/socks5)
- [https://github.com/things-go/go-socks5](https://github.com/things-go/go-socks5)
- [https://github.com/0990/socks5](https://github.com/0990/socks5)
- [https://github.com/dizda/fast-socks5](https://github.com/dizda/fast-socks5)
- [https://github.com/semigodking/redsocks](https://github.com/semigodking/redsocks)
- [https://github.com/ginuerzh/gost](https://github.com/ginuerzh/gost)

أمان الشبكة IPv4/IPv6:

- [https://caster0x00.com/legless/](https://caster0x00.com/legless/)
- [https://caster0x00.com/intercept/](https://caster0x00.com/intercept/)
- [https://www.prosec-networks.com/en/blog/ipv6-mitm/](https://www.prosec-networks.com/en/blog/ipv6-mitm/)

## المساهمة

[[العودة]](#جدول-المحتويات)

هل أنت مطور؟

- انسخ المستودع (Fork)
- أنشئ فرع الميزة الخاص بك: `git switch -c my-new-feature`
- أضف تغييراتك: `git commit -am 'Add some feature'`
- ادفع إلى الفرع: `git push origin my-new-feature`
- قدم طلب سحب (Pull Request)

## الترخيص

[[العودة]](#جدول-المحتويات)

GPLv3
تنزيل الأداة
  • انتحال DNS
    توجيه العملاء إلى نطاقات عشوائية باستخدام التلاعب بسجلات DNS

  • التقاط الحزم
    التقاط حركة المرور إلى ملفات txt/pcap/pcapng وتحليلها باستخدام Wireshark

  • حماية تسرب DNS
    يحدث تحليل DNS على جانب خادم SOCKS5.

  • دعم طريقة CONNECT
    يدعم نفق HTTP CONNECT، مما يتيح HTTPS والبروتوكولات الأخرى المعتمدة على TCP.

  • دعم HTTP2/HTTP3
    يدعم نقل HTTP/2 و HTTP/3 الحديث، مما يتيح اتصالات متعددة فعالة عبر TLS 1.3

  • دعم مساحات أسماء الشبكة
    يدعم مساحات أسماء الشبكة المخصصة لنظام Linux لمآخذ الاستماع والاتصالات الصادرة

  • دعم رؤوس المقطورة
    يتعامل مع رؤوس HTTP المقطورة

  • ترميز النقل المجزأ
    يتعامل مع الاستجابات المجزأة والمتدفقة

  • دعم مصادقة SOCKS5
    يدعم مصادقة اسم المستخدم/كلمة المرور لوكلاء SOCKS5.

  • دعم مصادقة HTTP
    يدعم مصادقة اسم المستخدم/كلمة المرور لخادم وكيل HTTP.

  • خفيف وسريع
    مصمم مع الحد الأدنى من الحمل ومعالجة الطلبات بكفاءة.

  • متعدد المنصات
    متوافق مع جميع أنظمة التشغيل الرئيسية.

  • حدد عنوان IP لـ wlan0 لتتمكن من الاتصال بـ socks5 المحلية ```shell WLAN_IP=$(ip -4 -c=never route get 8.8.8.8 | awk '{print $7}' | tr -d '\n')
    root@kitploit:~