Skip to content
KitploitKITPLOIT
工具博客
提交
工具博客
提交

黑客、渗透测试和网络安全工具,武装您的安全武器库!

Kitploit 是一个黑客、网络安全和渗透测试工具的目录。发现最新的项目更新,查找漏洞、分析系统、自动化测试并加强你的安全。

··订阅源·联系·隐私·© 2026 Kitploit

工具目录

分类

查看所有分类
Loading categories
go-http-proxy-to-socks — CLI MITM代理,将SOCKS4/SOCKS5转换为HTTP/HTTPS/HTTP2/HTTP3代理,具有透明TCP/UDP重定向、ARP/NDP/DNS欺骗、流量嗅探和数据包捕获功能。纯Go实现,无需libpcap。 | Kitploit
工具/GitHubGitHub/shadowy-pycoder/go-http-proxy-to-socks
数据包嗅探与分析Web代理与拦截IDS/IPS规避网络安全渗透测试实用工具与框架DNS 模糊测试红队DNS 分析

最受欢迎

查看全部 →

发现我们社区最常用的工具。

探索所有工具

浏览我们的工具集合

查看所有工具 →
GitHubshadowy-pycoder/go-http-proxy-to-socks

go-http-proxy-to-socks

CLI MITM代理,将SOCKS4/SOCKS5转换为HTTP/HTTPS/HTTP2/HTTP3代理,具有透明TCP/UDP重定向、ARP/NDP/DNS欺骗、流量嗅探和数据包捕获功能。纯Go实现,无需libpcap。

查看仓库
693182个月前Kitploit 审核通过
分享

GoHPTS - 用 Go 编写的 HTTP(S) 和 TCP/UDP 透明代理转 SOCKS4/SOCKS5 代理(链)

License: GPL v3 Go Reference GitHub go.mod Go version AUR Version AUR Last Modified AUR Maintainer Docker Pulls GitHub Release GitHub Downloads (all assets, all releases) GitHub Downloads (all assets, latest release)

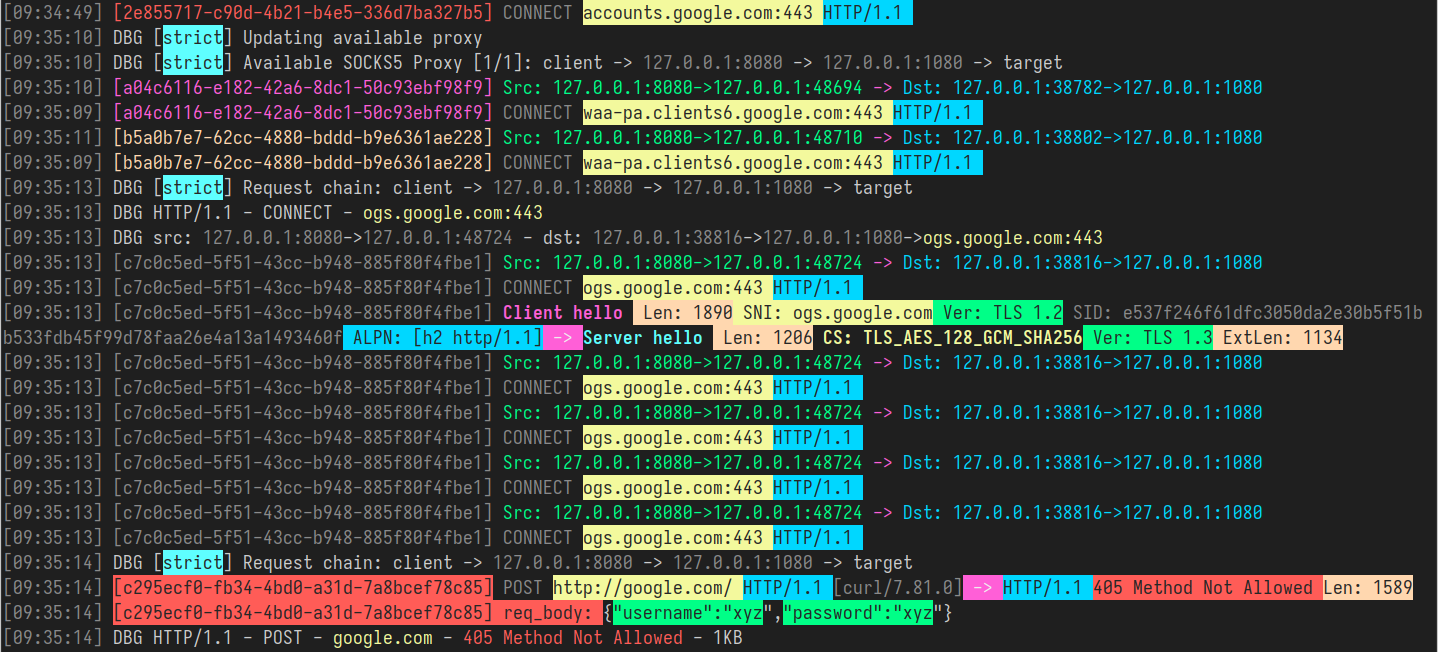
GoHPTS - Colors example

目录

  • 简介
  • 特性
  • 安装
  • 使用
    • 通过 CLI 标志配置
    • 通过 YAML 文件配置
  • 透明代理
    • redirect(通过 NAT 和 SO_ORIGINAL_DST)
    • redirect 模式的自动配置
    • tproxy(通过 MANGLE 和 IP_TRANSPARENT)
    • tproxy 模式的自动配置
    • UDP 支持
    • Android 支持
    • YAML 配置
  • 流量嗅探
    • JSON 格式
    • 彩色格式
  • HTTP2 和 HTTP3 支持
    • 使用自签名证书的示例设置
    • 测试连接
    • 在浏览器中测试连接
  • IPv4 和 IPv6 支持
  • ARP 欺骗
  • NDP 欺骗
  • DNS 欺骗
  • 数据包捕获
  • 网络命名空间
    • Playground 设置
    • 使用示例
  • 混合服务器
  • 链接
  • 贡献
  • 许可证

简介

[返回]

GoHPTS CLI 工具是 HTTP 客户端与 SOCKS5 代理服务器或多个服务器(链)之间的桥梁。它在本地作为 HTTP 代理监听,接受标准 HTTP 或 HTTPS(通过 CONNECT)请求,并通过 SOCKS5 代理转发连接。灵感来源于 http-proxy-to-socks 和 Proxychains。

可能的用例:你需要通过 Postman 连接到外部 API,但该 API 仅能从某个远程服务器访问。以下命令将帮助你完成此任务:

通过 ssh 创建 SOCKS5 代理服务器:```shell ssh -D 1080 -Nf

root@kitploit:~
使用 `gohpts` 创建 HTTP-to-SOCKS5 连接```shell
gohpts -s :1080 -l :8080

在Postman的代理配置中指定HTTP服务器

功能特性

[返回]

  • 代理链功能
    支持 strict、dynamic、random、round_robin 链式 SOCKS4/SOCKS5 代理

  • 透明代理
    支持 redirect(SO_ORIGINAL_DST)和 tproxy(IP_TRANSPARENT)模式

  • IPv4 和 IPv6 支持
    支持 仅 IPv4、仅 IPv6 或 双栈 模式

  • TCP 和 UDP 透明代理
    tproxy 和 tlocal(IP_TRANSPARENT)处理 TCP 和 UDP 流量

  • 流量嗅探
    代理能够解析 HTTP 头部、TLS 握手、DNS 消息等

  • ARP 欺骗
    通过 ARP 欺骗方式代理整个子网

  • NDP 欺骗
    使用路由器/邻居通告和 RDNSS 注入代理 IPv6 连接

  • DNS 欺骗
    通过操纵 DNS 记录将客户端重定向到任意域名

  • 数据包捕获 将流量捕获为 txt/pcap/pcapng 文件,并使用 Wireshark 分析

安装

[返回]

  • Arch Linux/CachyOS/EndeavourOS ```shell yay -S gohpts
    root@kitploit:~

或者使用 paru: ```shell paru -S gohpts

root@kitploit:~
- 从 [Releases](https://github.com/shadowy-pycoder/go-http-proxy-to-socks/releases) 页面下载适用于您平台的二进制文件:  ```shell
GOHPTS_RELEASE=v1.15.5; wget -v https://github.com/shadowy-pycoder/go-http-proxy-to-socks/releases/download/$GOHPTS_RELEASE/gohpts-$GOHPTS_RELEASE-linux-amd64.tar.gz -O gohpts && tar xvzf gohpts && mv -f gohpts-$GOHPTS_RELEASE-linux-amd64 gohpts && ./gohpts -h
  • 使用 go install 命令安装(需要 Go 1.26 或更高版本): ```shell CGO_ENABLED=0 go install -ldflags "-s -w" -trimpath github.com/shadowy-pycoder/go-http-proxy-to-socks/cmd/gohpts@latest
    root@kitploit:~

这将把 gohpts 二进制文件安装到你的 $GOPATH/bin 目录。

  • 从源码构建: ```shell git clone https://github.com/shadowy-pycoder/go-http-proxy-to-socks.git cd go-http-proxy-to-socks make build ./bin/gohpts
    root@kitploit:~
  • 在 Docker 中运行: ```shell docker run -it --privileged --network host -v "$PWD/gohpts.yaml:/config.yaml" shadowypycoder/gohpts:latest -f config.yaml
    root@kitploit:~

使用方法

[返回]```shell gohpts -h


/ | | | | | __ _ / ____| | | __ ___ | || | |) | | | | (__ | | |_ |/ _ | __ | / | | _
| |__| | (
) | | | | | | | ) | _|_/|| ||| || |___/

GoHPTS: HTTP(S) Proxy to SOCKS4/SOCKS5 proxy by shadowy-pycoder GitHub: https://github.com/shadowy-pycoder/go-http-proxy-to-socks Codeberg: https://codeberg.org/shadowy-pycoder/go-http-proxy-to-socks

Usage: gohpts [OPTIONS] OPTIONS: General: -h Show this help message and exit -v Show version and build information -D Run as a daemon (provide -logfile to see logs) -I Display list of network interfaces and exit -f Path to proxy configuration file in YAML format

Proxy: -l Address of HTTP proxy server (Default: "127.0.0.1:8080" for IPv4, "[::1]:8080" for IPv6) -s Address of SOCKS proxy server (Default: "127.0.0.1:1080" for IPv4 "[::1]:1080" for IPv6) -c Path to certificate PEM encoded file -k Path to private key PEM encoded file -U User for HTTP proxy (basic auth). This flag invokes prompt for password (not echoed to terminal) -u User for SOCKS proxy authentication. This flag invokes prompt for password (not echoed to terminal) -i Bind proxy to specific network interface (either by interface name or index) -4 Force IPv4 stack for TCP and UDP (Default: dual stack) -6 Force IPv6 stack for TCP and UDP (Default: dual stack) -socks4 Use SOCKS4/SOCKS4a protocol for upstream proxy and mixed server (default: SOCKS5/SOCKS5h) -nohttp Disable HTTP proxy server -nosocks Disable SOCKS upstream proxy -dns Use custom DNS server (Example: "8.8.8.8" or "2001:4860:4860::8888") -mixed Accept SOCKS connections on HTTP proxy server address

Logs: -d Show logs in DEBUG mode -j Show logs in JSON format -logfile Log file path (Default: stdout) -nocolor Disable colored output for logs (no effect if -j flag specified) -pprof Address of pprof server with profiling data

Sniffing: -sniff Enable traffic sniffing for HTTP and TLS -snifflog Sniffed traffic log file path (Default: the same as -logfile) -body Collect request and response body for HTTP traffic (credentials, tokens, etc)

TProxy: -T Address of transparent proxy server -Tu Address of transparent UDP proxy server -M Transparent proxy mode: (redirect, tproxy, tlocal) -w Number of instances of transparent proxy server (Default: number of CPU cores) -wu Number of instances of transparent UDP proxy server (Default: number of CPU cores) -auto Automatically setup iptables and kernel parameters for transparent proxy (requires elevated privileges) -mark Set mark for each packet sent through transparent proxy (Default: redirect 0, tproxy 100, tlocal 100) -P Comma separated list of ports to ignore when proxying traffic (Example: "22,80,443,9092") -dump Dump iptables rules and other system settings generated by -auto flag

Spoofing: -arpspoof Enable ARP spoof proxy for selected targets (Example: "targets 10.0.0.1,10.0.0.5-10,192.168.1.*,192.168.10.0/24;fullduplex false;debug true;interval 10s") -ndpspoof Enable NDP spoof proxy for selected targets (Example: "ra true;na true;targets fe80::3a1c:7bff:fe22:91a4;fullduplex false;debug true;interval 10s")

Packet Capture: -pcap Enable packet capture (Example: "promisc true;expr ip proto tcp;snaplen 65535;timeout 10s;packet_count 100;packet_buffer 8192;exts txt,pcap,pcapng")

Namespaces: -in-netns Name or path of network namespace for inbound listeners (Default: default namespace) -out-netns Name or path of network namespace for outbound connections (Default: default namespace)

root@kitploit:~
### 通过 CLI 标志进行配置

[[返回]](#table-of-contents)```shell
gohpts -s 1080 -l 8080 -d -j

输出:```shell {"level":"info","time":"2025-05-28T06:15:18+00:00","message":"SOCKS5 Proxy: :1080"} {"level":"info","time":"2025-05-28T06:15:18+00:00","message":"HTTP Proxy: :8080"} {"level":"debug","time":"2025-05-28T06:15:22+00:00","message":"HTTP/1.1 - CONNECT - www.google.com:443"}

root@kitploit:~
为SOCKS5代理服务器指定用户名和密码:```shell
gohpts -s 1080 -l 8080 -d -j -u user
SOCKS5 Password: #you will be prompted for password input here

为 HTTP 代理服务器指定用户名和密码:```shell gohpts -s 1080 -l 8080 -d -j -U user HTTP Password: #you will be prompted for password input here

root@kitploit:~
当同时存在 `-u` 和 `-U` 时,你将被提示两次

通过 TLS 连接运行 HTTP 代理```shell
gohpts -s 1080 -l 8080 -c "path/to/certificate" -k "path/to/private/key"

作为守护进程运行代理(需要日志文件来记录输出,否则你将看不到任何内容)```shell gohpts -D -logfile /tmp/gohpts.log

root@kitploit:~
# 
pkg install python
pkg install git
pip install colorama
git clone https://github.com/FLOCK-4/Excalibur
cd Excalibur
python Excalibur.py```shell
# output
gohpts pid: <pid>

| -relay-host <host> | 将请求中继到指定的主机(host 是一个 IP 地址,可采用 CIDR 表示法) | | -tun <host:port> | 监听指定的主机和端口,并将传入数据重定向到 WireGuard 接口。监听地址可使用 CIDR 表示法。 | | -server | 启用 gTunnel 的服务器模式配置。要从客户端配置生成服务器配置文件,应同时指定 -cfg 和 -server 选项。 |

示例

所有命令均兼容 Windows(CMD 或 PowerShell)、Linux 和 macOS 的 Shell,除非另有说明。

  • 简单 gTunnel 代理:

    root@kitploit:~
    # 在 Windows 上,从具有管理员权限的 CMD shell 中运行以下命令
    gtunnel.exe -tun 10.10.10.0/24 -sni www.kitploit.com -pwd mySecretPassPhrase -daemon
    
  • 指定多个 SNI 域名:

    root@kitploit:~
    # 在 macOS 或 Linux 上,从您选择的终端中运行以下命令
    gtunnel -relay-host 10.10.10.1 -sni www.kitploit.com,www.example.com -pwd mySecretPassPhrase -daemon
    
  • 自定义服务器的 SNI 和密码:

    root@kitploit:~
    # 在 Windows 上使用 PowerShell
    gtunnel.exe -pwd mySecretPassPhrase -sni www.example.com -daemon
    
  • 自定义 WireGuard 接口:

    root@kitploit:~
    # 将 "eth0" 替换为您要使用的实际接口名称
    gtunnel -interface eth0 -pwd mySecretPassPhrase -sni www.kitploit.com -daemon
    
  • 使用自定义 DNS 服务器:

    root@kitploit:~
    # 将 "<dns_ip>" 替换为您要使用的 DNS 服务器的实际 IP 地址
    gtunnel -dns "<dns_ip>" -pwd mySecretPassPhrase -sni www.kitploit.com -daemon
    ``````shell
    

kill the process

kill #or kill $(pidof gohpts)

root@kitploit:~
`-u` 和 `-U` 标志在守护进程模式下不起作用(因此认证也不起作用),但您可以提供一个配置文件(见下文)

### 通过 YAML 文件进行配置

[[Back]](#table-of-contents)

当您想预先配置代理而无需过多折腾 CLI,或者只是想要多个配置文件以满足不同需求时,配置文件非常有用。

在 SOCKS5 代理链模式下运行 http 代理(通过 YAML 配置文件指定服务器设置)```shell
gohpts -f "~/gohtps.yaml" -d -j

配置示例:```yaml

bind proxy to specific network interface (either by interface name or index)

interface: "eth0" # if specified, overrides http server IP address disable_http: false # disable http proxy (default: false) disable_socks: false # disable upstream socks proxy (default: false)

if ipv4 and ipv6 are both false or both true, dual stack is assumed

ipv4: false # this must be enabled for arpspoof (default: false) ipv6: false # this must be enabled for ndpspoof (default: false) socks4: false # use SOCKS4/SOCKS4a protocol (tcp only protocol, no udp tproxy or http3 possible) (default: false) dns: 8.8.8.8 # custom DNS server (used in direct dialer, namespaces, spoofing)

http_server: address: 127.0.0.1:8080

username and password for adding basic authentication (comment out to disable auth)

username: username password: password

list of socks5 proxy

if proxy_chain is disabled, uses first server in a list as upstream

proxy_list:

  • address: 127.0.0.1:1080
  • address: 127.0.0.1:1081
  • address: :1082 # empty host means localhost

proxy_chain: enabled: false

Explanations for chains taken from /etc/proxychains4.conf

strict - Each connection will be done via chained proxies

all proxies chained in the order as they appear in the list

all proxies must be online to play in chain

dynamic - Each connection will be done via chained proxies

all proxies chained in the order as they appear in the list

at least one proxy must be online to play in chain

(dead proxies are skipped)

random - Each connection will be done via random proxy

(or proxy chain, see chain_len) from the list.

this option is good to test your IDS :)

round_robin - Each connection will be done via chained proxies

of chain_len length

all proxies chained in the order as they appear in the list

at least one proxy must be online to play in chain

(dead proxies are skipped).

the start of the current proxy chain is the proxy after the last

proxy in the previously invoked proxy chain.

if the end of the proxy chain is reached while looking for proxies

start at the beginning again.

These semantics are not guaranteed in a multithreaded environment.

type: strict # dynamic, strict, random, round_robin length: 2 # maximum number of proxy in a chain (works only for random chain and round_robin chain)

logging: debug: true json: false

defaults to standard output

#logfile: /tmp/gohpts.log

use colored output in logs (no effect if json enabled)

nocolor: false

profiling data

pprof: 127.0.0.1:8081

root@kitploit:~
您几乎可以通过提供相应的CLI标志来覆盖配置文件中指定的任何设置:```shell
gohpts -l :6969 -f "~/gohtps.yaml" -nocolor

Proxy 会接收 ~/gohpts.yaml 中的所有设置,但 HTTP 服务器会启动在 127.0.0.1:6969 而非 127.0.0.1:8080,同时还会在日志中禁用彩色输出。

某些设置(例如 proxy_chain 和 DNS 过滤器)只能通过配置文件进行配置。

完整版配置文件详见:example_gohpts.yaml

要了解更多关于代理链的信息,请访问 Proxychains Github

透明代理

[返回]

透明代理(也称为 拦截代理、内联代理 或 强制代理)可在无需特殊客户端配置的情况下拦截正常的应用层通信。客户端无需知晓代理的存在。透明代理通常位于客户端与互联网之间,代理执行网关或路由器的一部分功能。

-- 摘自 维基百科

该功能仅在 Linux 系统及 Android(arm64)上可用,并且需要额外配置(iptables、IP 路由等)

-T address 标志用于指定透明代理服务器的地址

通过 -M 标志可以指定三种模式:redirect、tproxy 和 tlocal(与 tproxy 相同,但还会拦截本地流量)

redirect(通过 NAT 和 SO_ORIGINAL_DST)

[返回]

在此模式下,代理通过 iptables 的 nat 表和 REDIRECT 目标进行。入站数据包的主机地址会变更为运行中的 redirect 透明代理地址,但它同时包含可通过 getsockopt(SO_ORIGINAL_DST) 获取的原始目标地址。

要在此模式下运行 GoHPTS,请使用 -T 标志并搭配 -M redirect

示例

[返回]```shell

run the proxy

gohpts -s 1080 -T 1090 -M redirect -d

root@kitploit:~
INPUT:```shell
# run socks5 server on 127.0.0.1:1080
ssh remote -D 1080 -Nf

设置您的操作系统:```shell

commands below require elevated privileges (you can run it with sudo -i)

#enable ip forwarding sysctl -w net.ipv4.ip_forward=1

create GOHPTS nat chain

iptables -t nat -N GOHPTS

set no redirection rules for local, http proxy, ssh and redirect proxy itself

iptables -t nat -A GOHPTS -d 127.0.0.0/8 -j RETURN iptables -t nat -A GOHPTS -p tcp --dport 8080 -j RETURN iptables -t nat -A GOHPTS -p tcp --dport 1090 -j RETURN iptables -t nat -A GOHPTS -p tcp --dport 22 -j RETURN

redirect traffic to transparent proxy

iptables -t nat -A GOHPTS -p tcp -j REDIRECT --to-ports 1090

setup prerouting by adding our proxy

iptables -t nat -A PREROUTING -p tcp -j GOHPTS

intercept local traffic for testing

iptables -t nat -A OUTPUT -p tcp -j GOHPTS

root@kitploit:~
测试连接:```shell
#traffic should be redirected via 127.0.0.1:1090
curl http://example.com

(由于输入内容为空,直接返回空字符串。)```shell #traffic should be redirected via 127.0.0.1:8080 curl --proxy http://127.0.0.1:8080 http://example.com

root@kitploit:~
撤销所有操作:```shell
sysctl -w net.ipv4.ip_forward=0
iptables -t nat -D PREROUTING -p tcp -j GOHPTS
iptables -t nat -D OUTPUT -p tcp -j GOHPTS
iptables -t nat -F GOHPTS
iptables -t nat -X GOHPTS

Auto configuration for redirect mode

[Back]

要自动配置您的系统,请运行以下命令:```shell sudo env PATH=$PATH gohpts -d -T 8888 -M redirect -auto

root@kitploit:~
请注意,自动配置需要 `sudo`,且非常通用,可能不适合您的需求。

您可以选择指定 `-mark <value>` 以防止可能的代理循环```shell
sudo env PATH=$PATH gohpts -d -T 8888 -M redirect -auto -mark 100

tproxy(通过 MANGLE 和 IP_TRANSPARENT)

[Back]

在此模式下,代理通过 iptables 的 mangle 表和 TPROXY 目标实现。透明代理直接看到原始目标地址,内核不会对其进行重写。要实现此功能,代理需使用 IP_TRANSPARENT 套接字选项进行绑定,iptables 通过 TPROXY 目标拦截流量,路由规则将标记的数据包导向本地代理而不修改其原始目标。

此模式需要提升权限才能运行 GoHPTS。可通过运行以下命令来实现:```shell sudo setcap 'cap_net_admin+ep' ~/go/bin/gohpts

root@kitploit:~
要在此模式下运行 `GoHPTS`,请使用带有 `-M tproxy` 的 `-T` 标志

### Example

[[Back]](#table-of-contents)```shell
# run the proxy
gohpts -s 1080 -T 0.0.0.0:1090 -M tproxy -d

(空)```shell

run socks5 server on 127.0.0.1:1080

ssh remote -D 1080 -Nf

root@kitploit:~
设置你的操作系统:```shell
ip netns add ns-client
ip link add dev veth0 type veth peer name veth1 netns ns-client
ip addr add 10.0.0.1/24 dev veth0
ip link set dev veth0 up
ip netns exec ns-client ip addr add 10.0.0.2/24 dev veth1
ip netns exec ns-client ip link set dev lo up
ip netns exec ns-client ip link set dev veth1 up
ip netns exec ns-client ip route add default via 10.0.0.1
sysctl -w net.ipv4.ip_forward=1

iptables -t mangle -A PREROUTING -i veth0 -p tcp -j TPROXY --on-port 1090 --tproxy-mark 0x1/0x1

ip rule add fwmark 1 lookup 100
ip route add local 0.0.0.0/0 dev lo table 100

测试连接:```shell ip netns exec ns-client curl http://1.1.1.1

root@kitploit:~
撤销所有操作:```shell
sysctl -w net.ipv4.ip_forward=0
iptables -t mangle -F
ip rule del fwmark 1 lookup 100
ip route flush table 100
ip netns del ns-client

tproxy 模式的自动配置

[返回]

要自动配置您的系统,请运行以下命令(例如,在单独的虚拟机上):```shell ssh remote -D 1080 -Nf sudo env PATH=$PATH gohpts -d -T 8888 -M tproxy -auto -mark 100

root@kitploit:~
在你的主机上运行以下命令:```shell
ip route show default > /tmp/default-route.txt

ip route add 0.0.0.0/1 via 192.168.0.1 # change with ip of your VM
ip route add 128.0.0.0/1 via 192.168.0.1

测试连接:```shell curl http://example.com #check logs on your VM

root@kitploit:~
撤销所有操作:```shell
ip route del 0.0.0.0/1 via 192.168.0.1 2>/dev/null || true
ip route del 128.0.0.0/1 via 192.168.0.1 2>/dev/null || true

if [[ -f /tmp/default-route.txt ]]; then
    eval $(awk '{print "ip route add "$0}' /tmp/default-route.txt)
    rm -f /tmp/default-route.txt
else
    echo "Something went wrong"
fi

UDP 支持

[返回]

GoHPTS 具有 UDP 支持,可以在 tproxy 和 tlocal 模式下启用。要使此设置生效,您需要连接到能够提供 UDP 连接(UDP ASSOCIATE)的 socks5 服务器。例如,您可以使用 https://github.com/wzshiming/socks5 在远程或本地机器上部署支持 UDP 的 socks5 服务器。一旦您有要连接的服务器,运行以下命令:```shell sudo env PATH=$PATH gohpts -s remote -Tu :8989 -M tproxy -auto -mark 100 -d

root@kitploit:~
这条命令将配置你的操作系统,并在 `0.0.0.0:8989` 地址上设置服务器。

要在本地测试,你可以将 UDP 透明代理与 `-arpspoof` 标志结合使用。例如:

1. 在你的系统上设置一个虚拟机,使用支持 `tproxy` 的任意 Linux 发行版(例如 Kali Linux)。
2. 启用 `bridged` 网络,以便虚拟机能够访问你的宿主机。
3. 将 `gohpts` 二进制文件移动到虚拟机中(例如通过 `ssh`),或者如果操作系统/架构不同,则直接在虚拟机上构建它。
4. 在你的虚拟机上运行以下命令:```shell
# Do not forget to replace <socks5 server> and <your host> with actual addresses
sudo ./gohpts -s <socks5 server> -T 8888 -Tu :8989 -M tproxy -sniff -body -auto -mark 100 -d -arpspoof "targets <your host>;fullduplex true;debug false"
  1. 在你的主机上检查连接,流量应经过Kali机器。

Android 支持

[返回]

可以在拥有root权限的Android设备(arm64)上启用透明代理。你可以安装Termux并在其中以CLI工具的方式运行GoHPTS:```shell

you need to root your device first

pkg install tsu iproute2

Android support added in v1.10.2

GOHPTS_RELEASE=v1.10.2; wget -v https://github.com/shadowy-pycoder/go-http-proxy-to-socks/releases/download/$GOHPTS_RELEASE/gohpts-$GOHPTS_RELEASE-android-arm64.tar.gz -O gohpts && tar xvzf gohpts && mv -f gohpts-$GOHPTS_RELEASE-android-arm64 gohpts && ./gohpts -h

use your phone as router for LAN devices redirecting their traffic to remote socks5 server

sudo ./gohpts -s remote -T 8888 -Tu :8989 -M tproxy -sniff -body -auto -mark 100 -d -arpspoof "fullduplex true;debug false"

root@kitploit:~
### YAML 配置

[[返回]](#table-of-contents)```yaml
transparent_proxy:
  tcp:
    enabled: true
    address: 0.0.0.0:8888
    # number of instances of transparent proxy server (Default: number of CPU cores)
    workers: 1
  udp:
    enabled: true
    address: 0.0.0.0:8889
    # number of instances of transparent UDP proxy server (Default: number of CPU cores)
    workers: 1
  mode: "tproxy" # available modes are "redirect", "tproxy" and "tlocal" (udp requires tproxy or tlocal mode)
  # automatically setup iptables and kernel parameters for transparent proxy (requires elevated privileges)
  auto: true
  # dump iptables rules and other system settings generated by auto setting
  dump_rules: false
  # list of ports to ignore when proxying traffic (Example: [22,80,443,9092])
  ignored_ports: []
  # set mark for each packet sent through transparent proxy (Default: redirect 0, tproxy 100, tlocal 100)
  mark: 100

流量嗅探

[返回]

MrGopher

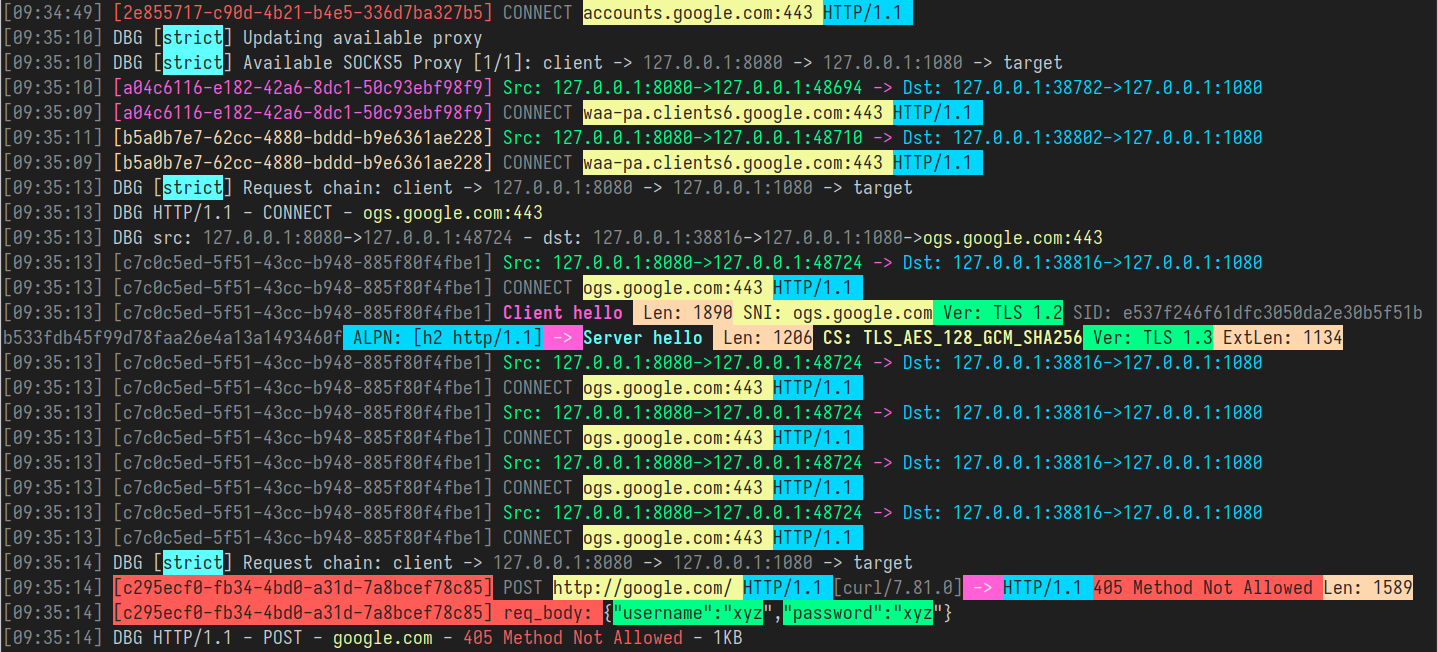
GoHPTS 代理允许捕获和监控通过该服务的流量。此过程称为 流量嗅探、数据包嗅探 或简称 嗅探。特别是,代理会尝试识别流量是明文(HTTP)还是TLS流量,识别完成后,它会解析请求/响应元数据并写入文件或控制台。对于 GoHTPS 代理,解析后的元数据如下所示(TLS握手):

JSON 格式

[返回]```json [ { "connection": { "tproxy_mode": "redirect", "src_local": "127.0.0.1:8888", "src_remote": "192.168.0.107:51142", "dst_local": "127.0.0.1:56256", "dst_remote": "127.0.0.1:1080", "original_dst": "216.58.209.206:443" } }, { "tls_request": { "sni": "www.youtube.com", "type": "Client hello (1)", "version": "TLS 1.2 (0x0303)", "session_id": "2670a6779b4346e5e84d46890ad2aaf7a53b08adcfe0c9f6868c2d9882242e39", "cipher_suites": [ "TLS_AES_128_GCM_SHA256 (0x1301)", "TLS_CHACHA20_POLY1305_SHA256 (0x1303)", "TLS_AES_256_GCM_SHA384 (0x1302)", "TLS_ECDHE_ECDSA_WITH_AES_128_GCM_SHA256 (0xc02b)", "TLS_ECDHE_RSA_WITH_AES_128_GCM_SHA256 (0xc02f)", "TLS_ECDHE_ECDSA_WITH_CHACHA20_POLY1305_SHA256 (0xcca9)", "TLS_ECDHE_RSA_WITH_CHACHA20_POLY1305_SHA256 (0xcca8)", "TLS_ECDHE_ECDSA_WITH_AES_256_GCM_SHA384 (0xc02c)", "TLS_ECDHE_RSA_WITH_AES_256_GCM_SHA384 (0xc030)", "TLS_ECDHE_ECDSA_WITH_AES_256_CBC_SHA (0xc00a)", "TLS_ECDHE_ECDSA_WITH_AES_128_CBC_SHA (0xc009)", "TLS_ECDHE_RSA_WITH_AES_128_CBC_SHA (0xc013)", "TLS_ECDHE_RSA_WITH_AES_256_CBC_SHA (0xc014)", "TLS_RSA_WITH_AES_128_GCM_SHA256 (0x9c)", "TLS_RSA_WITH_AES_256_GCM_SHA384 (0x9d)", "TLS_RSA_WITH_AES_128_CBC_SHA (0x2f)", "TLS_RSA_WITH_AES_256_CBC_SHA (0x35)" ], "extensions": [ "server_name (0)", "extended_master_secret (23)", "renegotiation_info (65281)", "supported_groups (10)", "ec_point_formats (11)", "session_ticket (35)", "application_layer_protocol_negotiation (16)", "status_request (5)", "delegated_credential (34)", "signed_certificate_timestamp (18)", "key_share (51)", "supported_versions (43)", "signature_algorithms (13)", "psk_key_exchange_modes (45)", "record_size_limit (28)", "compress_certificate (27)", "encrypted_client_hello (65037)" ], "alpn": ["h2", "http/1.1"] } }, { "tls_response": { "type": "Server hello (2)", "version": "TLS 1.2 (0x0303)", "session_id": "2670a6779b4346e5e84d46890ad2aaf7a53b08adcfe0c9f6868c2d9882242e39", "cipher_suite": "TLS_AES_128_GCM_SHA256 (0x1301)", "extensions": ["key_share (51)", "supported_versions (43)"], "supported_version": "TLS 1.3 (0x0304)" } } ]

root@kitploit:~
以及使用 curl 发送 HTTP 请求:```json
[
  {
    "connection": {
      "tproxy_mode": "redirect",
      "src_local": "127.0.0.1:8888",
      "src_remote": "192.168.0.107:45736",
      "dst_local": "127.0.0.1:37640",
      "dst_remote": "127.0.0.1:1080",
      "original_dst": "96.7.128.198:80"
    }
  },
  {
    "http_request": {
      "host": "example.com",
      "uri": "/",
      "method": "GET",
      "proto": "HTTP/1.1",
      "header": {
        "Accept": ["*/*"],
        "My": ["Header"],
        "User-Agent": ["curl/7.81.0"]
      }
    }
  },
  {
    "http_response": {
      "proto": "HTTP/1.1",
      "status": "200 OK",
      "content-length": 1256,
      "header": {
        "Cache-Control": ["max-age=2880"],
        "Connection": ["keep-alive"],
        "Content-Length": ["1256"],
        "Content-Type": ["text/html"],
        "Date": ["Tue, 17 Jun 2025 14:43:24 GMT"],
        "Etag": ["\"84238dfc8092e5d9c0dac8ef93371a07:1736799080.121134\""],
        "Last-Modified": ["Mon, 13 Jan 2025 20:11:20 GMT"]
      }
    }
  }
]

使用方法简单,只需在常规标志后指定-sniff标志```shell gohpts -d -T 8888 -M redirect -sniff -j

root@kitploit:~
你也可以指定一个文件来写入嗅探到的流量:```shell
gohpts -sniff -snifflog ~/sniff.log -j

彩色格式

[返回]

你可以从上图中看到彩色输出的示例。在此模式下,GoHPTS 会尝试高亮显示重要信息,例如 TLS 握手、HTTP 元数据、类似登录/密码的内容,以及不同类型的认证和秘密令牌。与 JSON 相比,输出内容有所限制,但更易于人类阅读。

要以该模式运行 GoHPTS,请使用以下标志:```shell gohpts -sniff -body

root@kitploit:~
你可以将嗅探与透明模式结合使用:```shell
./gohpts -T 8888 -M redirect -sniff -body

要禁用颜色,请添加-nocolor:```shell gohpts -sniff -body -nocolor

root@kitploit:~
## HTTP2 和 HTTP3 支持

[[返回]](#table-of-contents)

`GoHPTS` 代理使用相同的服务器地址和 TLS 证书处理 HTTP/1.1、HTTP/2 和 HTTP/3 请求。这使得客户端可以自动选择最佳可用协议,而无需更改配置。TLS 证书可以通过多种方式获取:云提供商(Google、AWS、Cloudflare)、Let's Encrypt 的免费证书,或者使用 `openssl`(Linux/macOS)或 `New-SelfSignedCertificate`(Windows)创建自签名证书。

### 使用自签名证书的示例设置

[[返回]](#table-of-contents)

- 创建 `key.pem` 和 `cert.pem` 文件:  ```shell
  openssl req -x509 -newkey rsa:2048 \
  -keyout key.pem \
  -out cert.pem \
  -sha256 \
  -days 365 \
  -nodes \
  -subj "/C=XX/ST=StateName/L=CityName/O=CompanyName/OU=CompanySectionName/CN=127.0.0.1" \
  -addext "subjectAltName=IP:127.0.0.1"
  • 准备支持UDP ASSOCIATE的socks5服务器 ```shell git clone https://github.com/wzshiming/socks5.git && cd socks5 go build -o socks5_server ./cmd/socks5/main.go ./socks5_server -a 0.0.0.0:1080
    root@kitploit:~
  • 打开另一个终端并安装 GoHPTS 代理: ```shell go install github.com/shadowy-pycoder/go-http-proxy-to-socks/cmd/gohpts@latest
    root@kitploit:~

您可以使用安装部分中描述的其他方法。

  • 最后:

    1. 为您的代理创建最小配置 ```yaml

    gohpts_config.yaml

    http_server: address: 127.0.0.1:8080 cert_file: ./cert.pem key_file: ./key.pem

    proxy_list:

    • address: 127.0.0.1:1080

    logging: debug: true

    sniffing: enabled: true body: true

    root@kitploit:~

运行代理: ```shell gohpts -f ./gohpts_config.yaml

root@kitploit:~
2. 或者如果你更喜欢命令行参数:  ```shell
gohpts -l :8080 -s 1080 -c ./cert.pem -k ./key.pem -d -sniff -body

你应该看到类似这样的内容: ```shell [15:20:32] INF SOCKS5 Proxy: 127.0.0.1:1080 [15:20:32] INF HTTPS Proxy: 127.0.0.1:8080 [15:20:32] INF HTTP3 Proxy (QUIC): 127.0.0.1:8080

root@kitploit:~
### 测试连接

[[Back]](#table-of-contents)

- 对于 HTTP/2 代理服务器,你可以使用 `curl`:  ```shell
  curl -Nvk --http2 --proxy-insecure --proxy-http2 --proxy https://localhost:8080 "https://stream.wikimedia.org/v2/stream/recentchange"

按下 Ctrl+C 停止运行流。

  • 对于 HTTP/3 则有所不同,因为(在撰写本文时)curl 不支持 HTTP3 代理,所以我将使用我为测试目的创建的自定义客户端。

    下载并安装 Simple HTTP3 to SOCKS5 proxy example: ```shell git clone https://github.com/shadowy-pycoder/http3-socks-proxy.git && cd http3-socks-proxy make

    root@kitploit:~

运行以下命令: ```shell ./bin/client -a 127.0.0.1:8080 www.google.com

root@kitploit:~
You should see some gibberish resembling HTML page.

Go to terminal tab with `GoHPTS` proxy and check logs, you should see all your requests there.

### Test connection in a browser

[[Back]](#table-of-contents)

- Create proper self-signed ceritificate for browser:  ```shell
git clone https://github.com/shadowy-pycoder/go-http-proxy-to-socks.git
cd go-http-proxy-to-socks
cp ./resources/makecert.sh makecert.sh && chmod +x makecert.sh
./makecert.sh

更多信息可在这里找到:创建浏览器信任的自签名SSL证书

  • 将新创建的 rootCA.crt 添加到系统信任存储区:
    1. Debian/Ubuntu: ```shell sudo cp rootCA.crt /usr/local/share/ca-certificates/rootCA.crt sudo update-ca-certificates
    root@kitploit:~
  1. Arch Linux/CachyOS/EndeavourOS: ```shell sudo trust anchor rootCA.crt
root@kitploit:~
- 使用 `server.crt` 和 `server.key` 运行代理:  ```shell
gohpts -l :8080 -s 1080 -c ./server.crt -k ./server.key -d -sniff -body
  • 运行浏览器,然后访问任意网站: ```shell chromium --proxy-server="https://127.0.0.1:8080"
    root@kitploit:~

IPv4 和 IPv6 支持

[Back]

在网络层处理方面,GoHPTS 可以以三种模式运行:dual stack、IPv4-only 和 IPv6-only。用户可以通过指定 -4 和 -6 标志来控制模式。当设置了其中一个标志时,代理会以相应模式启动;当两个标志都存在或都省略时,则默认为 dual stack 模式。请注意,在“仅”模式下,只允许特定版本的 IP 地址,所有域名都会解析为特定 IP 版本(如果可能),所有监听地址都需要使用同一版本,等等。

要启用 IPv4-only 模式,只需添加 -4 标志:```shell sudo ./gohpts -sniff -body -d -4

root@kitploit:~
要在 IPv4 模式下测试代理,你可以使用任何 Linux 虚拟机:

1. 在你的虚拟机上:```shell
# add your host machine as gateway for VM
export GATEWAY="<host IPv4 address>"
ip route add 0.0.0.0/1 via "$GATEWAY"
ip route add 128.0.0.0/1 via "$GATEWAY"
  1. 在您的主机上:```shell

run proxy on your host

sudo ./gohpts -T 8888 -Tu 8889 -M tproxy -sniff -body -auto -d -4

root@kitploit:~
3. 在您的虚拟机上访问任意网站,并在代理日志中查看流量

要启用`IPv6-only`模式,只需添加`-6`标志,例如在使用透明代理时:```shell
sudo ./gohpts -T 8888 -M redirect -sniff -body -auto -mark 100 -d -6

为此,您的 ISP 和远程 socks5 代理需支持 IPv6,您可以访问 https://test-ipv6.com/ 来检查是否能访问 IPv6 地址。 要测试代理的 IPv6 模式,您可以使用任何 Linux 虚拟机:

  1. 在您的虚拟机上:```shell

add your host machine as gateway IPv6 for VM

export GATEWAY6="" ip -6 route add ::/1 via "$GATEWAY6" dev eth0 ip -6 route add 8000::/1 via "$GATEWAY6" dev eth0

root@kitploit:~
2. 在你的主机上:```shell
# run proxy on your host
sudo ./gohpts -T 8888 -Tu 8889 -M tproxy -sniff -body -auto -d -6
  1. 在虚拟机上访问任意网站,并在代理日志中查看流量

ARP 欺骗

[返回]

GoHPTS 内置了 ARP 欺骗器,可用于使局域网中所有进行 TCP 通信的设备通过代理服务器连接到互联网。 这通过添加 -arpspoof 标志以及若干个以分号分隔的参数来实现。

示例:```shell ssh remote -D 1080 -Nf sudo env PATH=$PATH gohpts -d -T 8888 -M tproxy -sniff -body -auto -mark 100 -arpspoof "targets 192.168.10.0/24;fullduplex true;debug true"

root@kitploit:~
代理将扫描 `192.168.10.0/24` 子网中的设备,并向它们发送 ARP 数据包以冒充网关。如果 `fullduplex` 为 true,
代理还会向网关发送 ARP 数据包,使其相信我们的代理拥有该子网的每个 IP 地址。

使用 `Ctrl+C` 停止代理后,它将自动取消对所有目标的欺骗。

`GoHPTS` 还可以与 [Bettercap](https://github.com/bettercap/bettercap) 等工具一起使用,以代理 ARP 欺骗流量。

运行代理:```shell
ssh remote -D 1080 -Nf
sudo env PATH=$PATH gohpts -d -T 8888 -M tproxy -sniff -body -auto -mark 100

使用以下命令运行 bettercap(参见文档):```shell sudo bettercap -eval "net.probe on;net.recon on;set arp.spoof.fullduplex true;arp.spoof on"

root@kitploit:~
检查代理日志中来自局域网其他设备的流量

关于arpspoof选项的更多信息,请参见 `gohpts -h` 和 [https://github.com/shadowy-pycoder/arpspoof](https://github.com/shadowy-pycoder/arpspoof)

## NDP欺骗

[[返回]](#table-of-contents)

`GoHPTS` 内置了在IPv6网络中通过路由器通告(RA)和邻居通告(NA)数据包执行NDP欺骗的功能。它还在RA数据包中包含RDNSS选项,将主机设置为受影响客户端的IPv6名称服务器。当与透明代理模式(TCP/UDP)结合时,NDP欺骗允许 `gohpts` 代理本地网络中客户端的流量。与 [ARP欺骗](#arp-spoofing) 的情况类似,您可以通过单个 `-ndpspoof` 标志设置NDP欺骗选项:

示例:```shell
sudo env PATH=$PATH gohpts -d -T 8888 -M tproxy -sniff -body -auto -mark 100 -ndpspoof "ra true;na true;targets fe80::3a1c:7bff:fe22:91a4;fullduplex false;debug true"

关于ndpspoof选项的更多信息,请参见gohpts -h和https://github.com/shadowy-pycoder/ndpspoof

请注意,像rdnss、gateway、interface等选项是由gohpts自动设置的,以确保其作为代理正常运行。

由于gohpts通过上游SOCKS5服务器代理所有连接,您需要有一个支持IPv4/IPv6和TCP/UDP的正常运行的服务器。显然,远程机器(例如VPS)也应具备IPv6连接能力。不用说,运行gohpts的机器应该位于支持IPv6的网络中。

使NDP欺骗正常工作的示例设置:

  1. 连接到VPS```shell ssh [email protected]
root@kitploit:~
2. 安装依赖项```shell
GO_VERSION=$(curl 'https://go.dev/VERSION?m=text' | head -n1)
cd ~/Downloads/ && wget https://go.dev/dl/$GO_VERSION.linux-amd64.tar.gz
sudo rm -rf /usr/local/go && sudo tar -C /usr/local -xzf $GO_VERSION.linux-amd64.tar.gz
  1. 设置 SOCKS5 服务器(确保防火墙规则不阻止使用的端口)```shell git clone https://github.com/wzshiming/socks5.git && cd socks5 go build -o ./bin/socks5_server ./cmd/socks5/*.go ./bin/socks5_server -a :3000
root@kitploit:~
4. 回到你的主机并安装 `gohpts`(参见 [安装](#installation))

5. 运行 `gohtps`:```shell
gohpts -s 203.0.113.10:3000 -T 8888 -Tu 8889 -M tproxy -sniff -body -auto -mark 100 -arpspoof "fullduplex true;debug true" -ndpspoof "ra true;debug true" -4 -6 -d
  1. 获取另一台设备(手机、平板等)并连接到同一网络。尝试访问互联网,并在主机上检查是否有流量出现。使用一些在线工具检查公网IP地址(在本例中应与您的VPS地址203.0.113.10或全局IPv6地址匹配)

  2. 按Ctrl+C停止代理

  3. 收获成果!

DNS 欺骗

[返回]

要强制实施DNS过滤并通过更改DNS记录来欺骗目标,运行GoHPTS的主机应成为LAN设备的默认网关。为此,只需运行启用了UDP的透明代理,并同时运行ARP/NDP欺骗,使目标使用您的DNS服务器。

由GoHPTS创建的DNS回复看起来像是来自路由器或受信任DNS服务器(Google, Cloudflare)的正常数据包,这会导致客户端按照您告知的内容更新其缓存。但请注意,这仅适用于“标准”未加密的DNS流量(DOT/DOH不会被过滤或欺骗)。

DNS过滤和用于欺骗的域名可以在yaml配置文件中的dns_filter部分进行配置。所有列表接受URL、文件路径以及类似于hosts文件中常见条目的内容,请参见https://en.wikipedia.org/wiki/Hosts_(file)>)。

示例:```yaml

dns filters require udp transparent proxy and arpspoof/ndpspoof

filters accept hosts like entries (use either links, file paths or just plain comma separated lists

dns_filter: enabled: true whitelist: ["/tmp/whitelisted_domains.txt", "example.com", "*.google.com"] # ip is optional, domains can start with *. to match all subdomains blacklist: ["https://raw.githubusercontent.com/StevenBlack/hosts/master/hosts"] blacklist_all: false # block all non whitelisted domains spooflist: ["127.0.0.1 example.com"] # ip address is required here

root@kitploit:~
用例:

- 为所有局域网设备屏蔽广告和跟踪器
- 通过屏蔽特定类别网站实现家长控制
- 屏蔽已知的网络钓鱼和恶意软件域名
- 将流量重定向以进行分析
- 通过重定向进行凭证收集
- 流量劫持与操控(注入广告、脚本、跟踪)
- 监视与画像分析

此设置的最小配置:```yaml
# gohpts_dns_spoof.yaml
proxy_list:
  - address: 127.0.0.1:1080 # point to socks5 server supporting TCP/UDP

sniffing:
  enabled: true
  body: true

transparent_proxy:
  tcp:
    enabled: true
    address: 0.0.0.0:8888
  udp:
    enabled: true
    address: 0.0.0.0:8889
  mode: "tproxy"
  auto: true

arpspoof:
  enabled: true
  settings: "fullduplex 1;debug 1;interval 1s"

dns_filter:
  enabled: true
  whitelist: []
  blacklist: [
      "https://raw.githubusercontent.com/StevenBlack/hosts/master/hosts",
    ] # list of domains to filter
  blacklist_all: true
  # all requests for example.com will be redirected to 0.0.0.0 address
  spooflist: ["0.0.0.0 example.com"]

运行:```shell sudo ./gohpts -f ./gohpts_dns_spoof.yaml

root@kitploit:~
更多信息请参见:[https://en.wikipedia.org/wiki/DNS_spoofing](https://en.wikipedia.org/wiki/DNS_spoofing)

## 数据包捕获

[[返回]](#table-of-contents)

流量可以捕获为 pcap、pcapng 或自定义的 txt 格式,之后可以使用 Wireshark、tcpdump 等工具进行分析。

首先,确保 `GoHPTS` 可执行文件拥有提升的权限以捕获原始数据包,你有两个选择:

- 运行 `sudo setcap cap_net_raw+ep ~/go/bin/gohpts` 一次,赋予代理原始流量访问权限
- 当你需要在 CLI 中指定 `-pcap` 标志或在文件配置中指定 `pcap.enabled` 时,使用 `sudo` 运行代理。

使用 CLI 配置代理:```shell
gohpts -pcap "promisc true;timeout 10s;exts txt,pcap,pcapng"

配置文件:```yaml pcap: enabled: true settings: "promisc true;expr ip proto tcp;snaplen 65535;timeout 10s;packet_count 100;packet_buffer 8192;exts txt,pcap,pcapng"

root@kitploit:~
这些命令会生成三个数据包捕获文件,文件格式各不相同,后续可使用多种工具进行分析。

有关 pcap 选项的更多信息,请参见 `gohpts -h` 和 [https://github.com/shadowy-pycoder/mshark](https://github.com/shadowy-pycoder/mshark)

## 网络命名空间

[[返回]](#table-of-contents)

默认情况下,`GoHPTS` 代理在单个网络命名空间中运行,但这一行为可被覆盖。`GoHPTS` 创建的监听套接字(例如 HTTP 服务器或透明代理服务器)和出站套接字(SOCKS 代理或直接拨号器)可以通过 Linux/Android 的 [network_namespaces(7)](https://man7.org/linux/man-pages/man7/network_namespaces.7.html) 进行隔离。启动代理进程时,用户可以指定 `-in-netns`(监听器)和 `-out-netns`(拨号器)标志,并传入网络命名空间的名称或路径,以控制在哪个隔离环境中创建套接字。如果希望在当前(默认)命名空间中创建监听器或拨号器,只需省略相应标志即可。要显式指定主机命名空间,可以使用路径 `/proc/1/ns/net` —— 这有助于代理正确识别系统域名服务器。

`GoHPTS` 支持 [ip-netns(8)](https://man7.org/linux/man-pages/man8/ip-netns.8.html) 的约定,即通过位于 `/etc/netns/NAME/` 目录下的文件提供网络配置。因此,要为 `ns1` 网络命名空间指定自定义域名服务器,可以执行以下操作:```shell
sudo mkdir -p /etc/netns/ns1
sudo tee /etc/netns/ns1/resolv.conf << EOF
nameserver 8.8.8.8
nameserver 2001:4860:4860:0:0:0:0:8888
EOF

如果没有找到配置,将使用 Google DNS 服务器来解析域名。

如果你的系统启用了 systemd-resolved.service (8),在执行通过自定义网络命名空间的查询时,你可能想要暂时禁用它:```shell sudo ip netns exec ns1 unshare --mount bash -c ' mount --bind /dev/null /run/systemd/resolve/io.systemd.Resolve curl -Nvk https://example.com'

root@kitploit:~
或者使其对特定的 shell 实例持久化:```shell
sudo ip netns exec ns1 unshare --mount bash -c '
    mount --bind /dev/null /run/systemd/resolve/io.systemd.Resolve
    exec bash --login'

实验环境设置

[Back]

  • 运行具有 UDP ASSOCIATE 支持的 socks5 服务器 ```shell git clone https://github.com/wzshiming/socks5.git && cd socks5 go build -o socks5_server ./cmd/socks5/main.go ./socks5_server -a 0.0.0.0:1080
    root@kitploit:~
  • 下载并安装 Simple HTTP3 to SOCKS5 proxy example: ```shell git clone https://github.com/shadowy-pycoder/http3-socks-proxy.git cd http3-socks-proxy make
    root@kitploit:~
  • 克隆仓库并编译 ```shell git clone https://github.com/shadowy-pycoder/go-http-proxy-to-socks.git cd go-http-proxy-to-socks make
    root@kitploit:~
  • 创建 key.pem 和 cert.pem 文件: ```shell openssl req -x509 -newkey rsa:2048
    -keyout key.pem
    -out cert.pem
    -sha256
    -days 365
    -nodes
    -subj "/C=XX/ST=StateName/L=CityName/O=CompanyName/OU=CompanySectionName/CN=127.0.0.1"
    -addext "subjectAltName=IP:127.0.0.1"
    root@kitploit:~
  • 创建一个网络命名空间 ns1 并配置 veth 网络 ```shell sudo ip netns add ns1 sudo ip link add dev veth0 type veth peer name veth1 netns ns1 sudo ip addr add 10.0.0.1/24 dev veth0 sudo ip -6 addr add fd12:3456:789a::1/64 dev veth0 sudo ip link set dev veth0 up sudo ip netns exec ns1 ip addr add 10.0.0.2/24 dev veth1 sudo ip netns exec ns1 ip -6 addr add fd12:3456:789a::2/64 dev veth1 sudo ip netns exec ns1 ip link set dev lo up sudo ip netns exec ns1 ip link set dev veth1 up
    root@kitploit:~

使用示例

[返回]

  1. HTTP 代理 - 在 ns1 中的代理监听器(无默认路由,无互联网访问),主机上的出站套接字

    运行代理: ```shell sudo ./bin/gohpts -s 0.0.0.0:1080 -l :8083 -4 -6 -d -sniff -body -in-netns ns1

    root@kitploit:~

通过 ns1 发出请求 ```shell sudo ip netns exec ns1 curl -Nv --proxy http://127.0.0.1:8083 https://example.com

root@kitploit:~
请求应成功

2. **HTTP2代理 - 代理监听器位于 `ns1`(无默认路由,无互联网访问),出站套接字在主机上**

运行代理:   ```shell
sudo ./bin/gohpts -s 0.0.0.0:1080 -l :8083 -4 -6 -d -sniff -body -in-netns ns1 -c ./cert.pem -k ./key.pem

Make request via ns1 ```shell sudo ip netns exec ns1 curl -Nvk --http2 --proxy-insecure --proxy-http2 --proxy https://127.0.0.1:8083 https://example.com

root@kitploit:~
请求应成功

3. **HTTP3 代理 - `ns1` 中的代理监听器(无默认路由,无互联网访问),主机上的出站套接字**

运行代理:   ```shell
sudo ./bin/gohpts -s 0.0.0.0:1080 -l :8083 -4 -6 -d -sniff -body -in-netns ns1 -c ./cert.pem -k ./key.pem

通过 ns1 发出请求 ```shell sudo ip netns exec ns1 ./http3-socks-proxy/bin/client -a 127.0.0.1:8083 www.google.com

root@kitploit:~
4. **透明重定向代理 (`-M redirect`) - 在 `ns1` 中的代理监听器(默认路由,无互联网访问),出站套接字位于宿主机**

运行代理:   ```shell
sudo ./bin/gohpts -s 0.0.0.0:1080 -l :8083 -4 -6 -d -sniff -body -in-netns ns1 -nohttp -M redirect -T :8888 -auto

通过 ns1 发起请求 ```shell sudo ip netns exec ns1 curl -Nv https://example.com

root@kitploit:~
Request should fail

Add default route to `ns1`   ```shell
sudo ip netns exec ns1 ip route add default via 10.0.0.1
sudo ip netns exec ns1 ip -6 route add default via fd12:3456:789a::1

再试一次 ```shell sudo ip netns exec ns1 curl -Nv https://example.com

root@kitploit:~
现在请求应该成功

5. **HTTP代理 - 主机上的代理监听,`ns1`中的出站套接字(默认路由,互联网访问)**

添加NAT规则以允许`ns1`通过`wlan0`连接到互联网   ```shell
sudo iptables -t nat -A POSTROUTING -s 10.0.0.0/24 -o wlan0 -j MASQUERADE
sudo ip6tables -t nat -A POSTROUTING -s fd12:3456:789a::/64 -o wlan0 -j MASQUERADE

运行代理: ``` sudo ./bin/gohpts -s :1080 -l :8083 -4 -6 -d -sniff -body -out-netns ns1 -i wlan0

root@kitploit:~
通过主机发出请求   ```shell
curl -Nv --proxy http://$WLAN_IP:8083 https://example.com

Request should succeed

  1. HTTP3 代理 - 主机上的代理监听器,ns1 中的出站套接字(默认路由,互联网访问)

    运行代理: ``` sudo ./bin/gohpts -s :1080 -l :8083 -4 -6 -d -sniff -body -out-netns ns1 -i wlan0 -c ./cert.pem -k ./key.pem

    root@kitploit:~

通过主机发起请求 ```shell ./http3-socks-proxy/bin/client -a $WLAN_IP:8083 www.google.com

root@kitploit:~
请求应成功

7. **重定向透明代理 - 主机上的代理监听,`ns1` 中的出站套接字(默认路由,互联网访问)**

运行代理(`-auto` 选项对我本地 socks5 服务器无效,因此我使用远程的):   ```
sudo ./bin/gohpts -s <remote> -4 -6 -d -sniff -body -out-netns ns1 -nohttp -M redirect -T :8888 -auto

通过主机发起请求 ```shell curl -Nv https://example.com

root@kitploit:~
请求应成功

8. **HTTP proxy - LAN (`ns2` (proxy listeners), `ns3`, `ns4`), outbound sockets in `ns1` (default route, internet access)**

创建局域网   ```shell
sudo ip link add br0 type bridge
sudo ip addr add 10.0.1.1/24 dev br0
sudo ip -6 addr add fd12:3456:789b::1/64 dev br0
sudo ip link set br0 up

sudo ip netns add ns2
sudo ip link add veth2 type veth peer name veth3 netns ns2
sudo ip link set veth2 master br0
sudo ip link set veth2 up
sudo ip netns exec ns2 ip addr add 10.0.1.2/24 dev veth3
sudo ip netns exec ns2 ip -6 addr add fd12:3456:789b::2/64 dev veth3
sudo ip netns exec ns2 ip link set lo up
sudo ip netns exec ns2 ip link set veth3 up
sudo ip netns exec ns2 ip route add default via 10.0.1.1
sudo ip netns exec ns2 ip -6 route add default via fd12:3456:789b::1

sudo ip netns add ns3
sudo ip link add veth4 type veth peer name veth5 netns ns3
sudo ip link set veth4 master br0
sudo ip link set veth4 up
sudo ip netns exec ns3 ip addr add 10.0.1.3/24 dev veth5
sudo ip netns exec ns3 ip -6 addr add fd12:3456:789b::3/64 dev veth5
sudo ip netns exec ns3 ip link set lo up
sudo ip netns exec ns3 ip link set veth5 up
sudo ip netns exec ns3 ip route add default via 10.0.1.1
sudo ip netns exec ns3 ip -6 route add default via fd12:3456:789b::1

sudo ip netns add ns4
sudo ip link add veth6 type veth peer name veth7 netns ns4
sudo ip link set veth6 master br0
sudo ip link set veth6 up
sudo ip netns exec ns4 ip addr add 10.0.1.4/24 dev veth7
sudo ip netns exec ns4 ip -6 addr add fd12:3456:789b::4/64 dev veth7
sudo ip netns exec ns4 ip link set lo up
sudo ip netns exec ns4 ip link set veth7 up
sudo ip netns exec ns4 ip route add default via 10.0.1.1
sudo ip netns exec ns4 ip -6 route add default via fd12:3456:789b::1

运行代理: ``` sudo ./bin/gohpts -s $WLAN_IP:1080 -l 0.0.0.0:8083 -4 -6 -d -sniff -body -in-netns ns2 -out-netns ns1

root@kitploit:~
发起请求   ```shell
curl -Nv --proxy http://10.0.1.2:8083 http://example.com
sudo ip netns exec ns2 curl -Nv --proxy http://10.0.1.2:8083 https://example.com
sudo ip netns exec ns3 curl -Nv --proxy http://10.0.1.2:8083 https://example.com
sudo ip netns exec ns4 curl -Nv --proxy http://10.0.1.2:8083 https://example.com

All requests should succeed

  1. HTTP3 代理 - 局域网 (ns2 (代理监听器), ns3, ns4), 出站套接字在 ns1 (默认路由, 互联网访问)

    Run proxy: ``` sudo ./bin/gohpts -s $WLAN_IP:1080 -l 0.0.0.0:8083 -4 -6 -d -sniff -body -in-netns ns2 -out-netns ns1 -c ./cert.pem -k ./key.pem

    root@kitploit:~

发出请求 ```shell ./http3-socks-proxy/bin/client -a 10.0.1.2:8083 www.google.com sudo ip netns exec ns2 ./http3-socks-proxy/bin/client -a 10.0.1.2:8083 www.google.com sudo ip netns exec ns3 ./http3-socks-proxy/bin/client -a 10.0.1.2:8083 www.google.com sudo ip netns exec ns4 ./http3-socks-proxy/bin/client -a 10.0.1.2:8083 www.google.com

root@kitploit:~
所有请求都应成功

10. **重定向透明代理 - LAN(`ns2`(代理监听器),`ns3`,`ns4`),出站套接字在`ns1`中(默认路由,互联网访问)**

 运行代理:

 ```shell
 sudo ./bin/gohpts -s $WLAN_IP:1080 -4 -6 -d -sniff -body -in-netns ns2 -out-netns ns1 -nohttp -M redirect -T :8888 -auto
 ```

 发起请求

 ```shell
 sudo ip netns exec ns2 curl -Nv https://example.com
 ```

 对于`ns3`和`ns4`,请求会失败

11. **带`IP_TRANSPARENT`(启用arp/ndp欺骗)的透明代理 LAN(`ns2`(代理监听器),`ns3`,`ns4`),出站套接字在`ns1`中(默认路由,互联网访问)**

 运行代理:

 ```shell
 sudo ./bin/gohpts -s $WLAN_IP:1080 -4 -6 -d -sniff -body -in-netns ns2 -out-netns ns1 -nohttp -M tproxy -T :8888 -auto -arpspoof "fullduplex 1;debug 1;interval 1s" -ndpspoof "ra true;interval 10s;debug 1"
 ```

 现在`ns3`和`ns4`上的先前请求应该能够正常工作

 ```
 sudo ip netns exec ns3 curl -Nv https://example.com
 sudo ip netns exec ns4 curl -Nv https://example.com
 ```

12. **HTTP3代理 - 代理监听器在`ns1`中,出站套接字在宿主机上,`-nosocks`标志**

 运行代理:

 ```shell
 sudo ./bin/gohpts -l 0.0.0.0:8083 -4 -6 -d -sniff -body -in-netns ns1 -c ./cert.pem -k ./key.pem -nosocks
 ```

 发起请求

 ```shell
 ./http3-socks-proxy/bin/client -a 10.0.0.2:8083 www.google.com
 ```

 请求应成功

13. **HTTP3代理 - 代理监听器在宿主机上,出站套接字在`ns1`中,`-nosocks`标志**

 运行代理:

 ```shell
 sudo ./bin/gohpts -l 0.0.0.0:8083 -4 -6 -d -sniff -body -out-netns ns1 -c ./cert.pem -k ./key.pem -nosocks
 ```

 发起请求

 ```shell
 ./http3-socks-proxy/bin/client -a 127.0.0.1:8083 www.google.com
 ```

 请求应失败

 向`FORWARD`链添加规则

 ```shell
 sudo iptables -A FORWARD -i wlan0 -o veth0 -m conntrack --ctstate RELATED,ESTABLISHED -j ACCEPT
 sudo iptables -A FORWARD -i veth0 -o wlan0 -j ACCEPT

 sudo ip6tables -A FORWARD -i veth0 -j ACCEPT
 sudo ip6tables -A FORWARD -o veth0 -m conntrack --ctstate RELATED,ESTABLISHED -j ACCEPT
 ```

 发起请求

 ```shell
 ./http3-socks-proxy/bin/client -a 127.0.0.1:8083 www.google.com
 ```

 请求应成功

## 混合服务器

[[Back]](#table-of-contents)

`GoHPTS` 可以配置为在与HTTP服务器相同的地址上监听SOCKS连接,只需添加`-mixed`标志来启动额外的SOCKS服务器。这使得`GoHPTS`不仅可以作为HTTP-to-SOCKS代理,还可以作为SOCKS-to-SOCKS代理。本地SOCKS5服务器支持`UDP ASSOCIATE`命令,因此技术上用户可以使用此混合服务器发送UDP数据报。

运行代理:```shell
gohpts -s :1080 -l :8080 -mixed

测试连接:```shell curl -Nv --proxy socks5://127.0.0.1:8080 "https://example.com"

root@kitploit:~
或者禁用上游SOCKS代理,并通过添加 `-nosocks`:```shell
gohpts -l :8080 -mixed -nosocks

测试连接:```shell curl -Nv --proxy socks5://127.0.0.1:8080 "https://example.com"

root@kitploit:~
添加 `-socks4` 标志以使用 SOCKS4 协议:```shell
# :1080 should be a socks4 server
gohpts -s :1080 -l :8080 -mixed -socks4

测试连接:```shell curl -Nv --proxy socks4://127.0.0.1:8080 "https://example.com"

root@kitploit:~
## 链接

[[返回]](#table-of-contents)

通过以下链接了解更多关于透明代理的信息:

- [Linux 内核中的透明代理支持](https://docs.kernel.org/networking/tproxy.html)
- [Gost 的透明代理教程](https://latest.gost.run/en/tutorials/redirect/)
- [简单的 tproxy 示例](https://github.com/FarFetchd/simple_tproxy_example)
- [Golang TProxy](https://github.com/KatelynHaworth/go-tproxy)
- [使用 eBPF 和 Go 实现透明代理](https://medium.com/all-things-ebpf/building-a-transparent-proxy-with-ebpf-50a012237e76)
- [https://github.com/heiher/hev-socks5-tproxy](https://github.com/heiher/hev-socks5-tproxy)

  支持 `UDP ASSOCIATE` 的 `socks5` 代理:

- [https://github.com/wzshiming/socks5](https://github.com/wzshiming/socks5)
- [https://github.com/things-go/go-socks5](https://github.com/things-go/go-socks5)
- [https://github.com/0990/socks5](https://github.com/0990/socks5)
- [https://github.com/dizda/fast-socks5](https://github.com/dizda/fast-socks5)
- [https://github.com/semigodking/redsocks](https://github.com/semigodking/redsocks)
- [https://github.com/ginuerzh/gost](https://github.com/ginuerzh/gost)

IPv4/IPv6 网络安全:

- [https://caster0x00.com/legless/](https://caster0x00.com/legless/)
- [https://caster0x00.com/intercept/](https://caster0x00.com/intercept/)
- [https://www.prosec-networks.com/en/blog/ipv6-mitm/](https://www.prosec-networks.com/en/blog/ipv6-mitm/)

## 贡献

[[返回]](#table-of-contents)

你是一名开发者吗?

- 复刻(Fork)该仓库
- 创建你的功能分支:`git switch -c my-new-feature`
- 提交你的变更:`git commit -am '添加某个功能'`
- 推送到分支:`git push origin my-new-feature`
- 提交拉取请求(Pull Request)

## 许可证

[[返回]](#table-of-contents)

GPLv3
下载工具

  • DNS 泄漏保护
    DNS 解析在 SOCKS5 服务器端完成

  • CONNECT 方法支持
    支持 HTTP CONNECT 隧道,启用 HTTPS 和其他基于 TCP 的协议

  • HTTP2/HTTP3 支持
    支持现代 HTTP/2 和 HTTP/3 传输,通过 TLS 1.3 实现高效多路复用连接

  • 网络命名空间支持
    支持为监听套接字和出站连接自定义 Linux 网络命名空间

  • 尾部头部支持
    处理 HTTP 尾部头部

  • 分块传输编码
    处理分块和流式响应

  • SOCKS5 认证支持
    支持 SOCKS5 代理的用户名/密码认证

  • HTTP 认证支持
    支持 HTTP 代理服务器的用户名/密码认证

  • 轻量快速
    设计极低开销,高效处理请求

  • 跨平台
    兼容所有主流操作系统

  • 确定 wlan0 的 IP 地址,以便能够连接到本地 socks5 代理 ```shell WLAN_IP=$(ip -4 -c=never route get 8.8.8.8 | awk '{print $7}' | tr -d '\n')
    root@kitploit:~