该工具帮助识别可能易受攻击或揭示其他测试人员可能遗漏的有趣功能的隐藏参数。通过逐行比较页面、响应码对比以及反射,实现了高精度。
说明所有功能的文档可在 https://sh1yo.art/x8docs/ 获取。文档源码位于 /docs.md。
x8 -u "https://example.com/" -w <wordlist>
使用默认参数:
x8 -u "https://example.com/?something=1" -w <wordlist>
/?something=1 等同于 /?something=1&%s
x8 -u "https://example.com/" -X POST -w <wordlist>
或使用自定义请求体:
x8 -u "https://example.com/" -X POST -b '{"x":{%s}}' -w <wordlist>
%s 会被替换为不同参数,例如 {"x":{"a":"b3a1a", "b":"ce03a", ...}}
x8 -u "https://example.com/" "https://4rt.one/" -W0
x8 -u "https://example.com/" --param-template "user[%k]=%v" -w <wordlist>
现在每个请求将类似于 /?user[a]=hg2s4&user[b]=a34fa&...
有时参数需要编码。这也是可行的:
x8 -u "https://example.com/?path=..%2faction.php%3f%s%23" --encode -w <wordlist>
GET /?path=..%2faction.php%3fWTDa8%3Da7UOS%26rTIDA%3DexMFp...%23 HTTP/1.1
Host: example.com
x8 -u "https://example.com" --headers -w <wordlist>
你也可以针对单个请求头:
x8 -u "https://example.com" --headers -H "Cookie: %s" -w <wordlist>
你可以在以下 URL 上检查该工具并与其他工具进行比较:
https://4rt.one/level1 (GET)
https://4rt.one/level3 (GET)
USAGE:
    x8 [FLAGS] [OPTIONS]

FLAGS:
        --append                       追加到输出文件而非覆盖。
    -B                                 等同于 -x http://localhost:8080
        --check-binary                 检查带有二进制内容类型的响应体
        --disable-additional-checks    私有
        --disable-colors
        --disable-custom-parameters    不自动检查类似 admin=true 的参数
        --disable-progress-bar
        --disable-trustdns             可解决一些 DNS 相关问题
        --encode                       在发起请求前对查询或请求体进行编码,例如 & -> %26, = -> %3D
                                        要编码的字符列表: ", `, , <, >, &, #, ;, /, =, %
    -L, --follow-redirects             跟随重定向
        --force                        强制在大于 25MB 的页面上搜索参数。若存在一个工作线程且使用了 --one-worker-per-host 选项,则消除错误。
    -h, --help                         打印帮助信息
        --headers                      切换到请求头发现模式。
                                        注意:Content-Length 和 Host 请求头会自动从列表中移除
        --invert                       默认情况下,参数仅在 PUT 或 POST 方法时通过请求体发送。
                                        可通过指定此选项来覆盖该行为
        --mimic-browser                添加浏览器通常设置的默认请求头。
        --one-worker-per-host          同一主机的多个 URL 将逐个检查,不同主机的 URL 则并行检查。
                                        不增加工作线程数量
        --reflected-only               禁用页面比较,仅搜索反射参数。
        --remove-empty                 跳过写入未找到参数的 url:method 对的输出文件
        --replay-once                  若指定了重放代理,则在一次请求中发送所有找到的参数。
        --strict                       仅报告已改变页面不同部分的参数
        --test                         打印请求和响应
    -V, --version                      打印版本信息
        --verify                       验证找到的参数。

OPTIONS:
    -b, --body <body>                                       示例:--body '{"x":{%s}}'
                                                             可用变量:{{random}}
    -c <concurrency>                                        每个 URL 的并发请求数 [默认: 1]
        --custom-parameters <custom-parameters>
            使用非随机值(如 true/false yes/no)检查这些参数
            (默认是 "admin bot captcha debug disable encryption env show sso test waf")
        --custom-values <custom-values>
            自定义参数的值(默认是 "1 0 false off null true yes no")

    -t, --data-type <data-type>
            可选:urlencode, json
            如果指定了 --body,可自动检测(默认是 "urlencode")
    -d, --delay <请求之间的延迟(毫秒)>                   [默认: 0]
    -H <headers>                                            示例:-H 'one:one' 'two:two'
        --http <http>                                       HTTP 版本。支持的版本:--http 1.1, --http 2
    -j, --joiner <joiner>
            如何连接参数模板。示例:--joiner '&'
            默认:urlencoded - '&', json - ', ', header values - '; '
        --learn-requests <learn-requests-count>             设置自定义的学习请求数量。[默认: 9]
    -m, --max <max>
            更改每个请求的最大参数数量。
            (默认情况下,查询为 <= 256,请求头为 64,请求体为 512)
    -X, --method <methods>                                  支持多个值:-X GET POST
    -o, --output <file>
    -O, --output-format <output-format>                     standart, json, url, request [默认: standart]
    -P, --param-template <parameter-template>
            %k - 键,%v - 值。示例:--param-template 'user[%k]=%v'
            默认:urlencoded - <%k=%v>, json - <"%k":%v>, headers - <%k=%v>
    -p, --port <port>                                       与请求文件一起使用的端口
        --progress-bar-len <progress-bar-len>                 [默认: 26]
        --proto <proto>                                     与请求文件一起使用的协议(默认是 "https")
    -x, --proxy <proxy>
        --recursion-depth <recursion-depth>
            使用已找到的参数检查相同的参数列表,直到没有新参数可发现。
            目前与 --verify 冲突。
        --replay-proxy <replay-proxy>
            最后通过重放代理将每个已找到的参数发送到目标。

    -r, --request <request>                                 包含原始 HTTP 请求的文件
        --save-responses <save-responses>
            当发现参数时,将请求和响应保存到目录

        --split-by <split-by>
            按提供的序列将请求拆分成行。默认按 \r, \n 和 \r\n 拆分

        --timeout <timeout>                                 HTTP 请求超时时间(秒)。[默认: 15]
    -u, --url <url>
            你可以使用 %s 添加自定义注入点。
            支持多个 URL 和文件名:
            -u filename.txt
            -u https://url1 http://url2
    -v, --verbose <verbose>                                 详细级别 0/1/2 [默认: 1]
    -w, --wordlist <wordlist>
            包含参数的文件(留空则从标准输入读取)[默认: ]

    -W, --workers <workers>
            并发 URL 检查的数量。
            使用 -W0 可以并行运行所有任务 [默认: 1]
参数:
请求头:
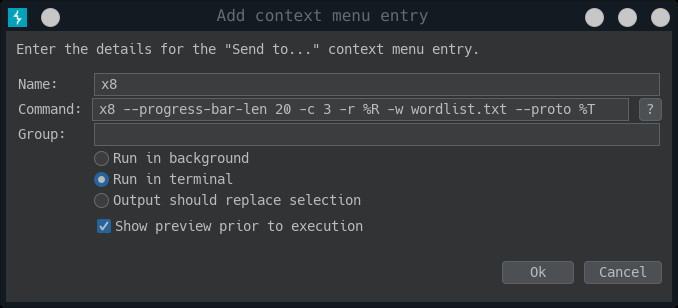
Burp Suite 集成通过 send to 扩展实现。
为条目命名,并在命令字段中插入以下行:
/path/to/x8 --progress-bar-len 20 -c 3 -r %R -w /path/to/wordlist --proto %T --port %P
你也可以添加常用参数,如 --output-format、--replay-proxy、--recursion-depth 等。
注意:如果进度条显示不正常,请尝试减小 --progress-bar-len 的值。
将“在后台运行”切换为“在终端中运行”。