Skip to content
KitploitKITPLOIT
工具博客
提交
工具博客
提交

黑客、渗透测试和网络安全工具,武装您的安全武器库!

Kitploit 是一个黑客、网络安全和渗透测试工具的目录。发现最新的项目更新,查找漏洞、分析系统、自动化测试并加强你的安全。

··订阅源·联系·隐私·© 2026 Kitploit

工具目录

分类

查看所有分类
Loading categories
Sentinel-Queries — 精选的 Microsoft Sentinel KQL 查询与教程合集,用于威胁搜寻、分析 Azure AD 登录日志、检测异常以及构建高效的检测模式。 | Kitploit
工具/GitHubGitHub/reprise99/sentinel-queries
防御工具威胁情报学习与教育精选资源异常检测日志分析
GitHubreprise99/sentinel-queries

Sentinel-Queries

精选的 Microsoft Sentinel KQL 查询与教程合集,用于威胁搜寻、分析 Azure AD 登录日志、检测异常以及构建高效的检测模式。

查看仓库
1.6k3826个月前Kitploit 审核通过

最受欢迎

查看全部 →

发现我们社区最常用的工具。

探索所有工具

浏览我们的工具集合

查看所有工具 →
分享

KQL for Microsoft Sentinel

一些使用 KQL for Microsoft Sentinel 的技巧、示例和实例。

  1. 简介
  2. KQL 查询的结构
  3. 基础知识
    1. 时间基础
    2. Where 基础
    3. Project 基础
    4. Summarize 基础
    5. Render 基础
    6. Parse 与 Split 基础

简介

Kusto 查询语言是一种用于 Azure Monitor、Azure Data Explorer 和 Azure Log Analytics(Microsoft Sentinel 底层使用的语言)的语言。我一直觉得下面这张关于 KQL 的图非常有用——
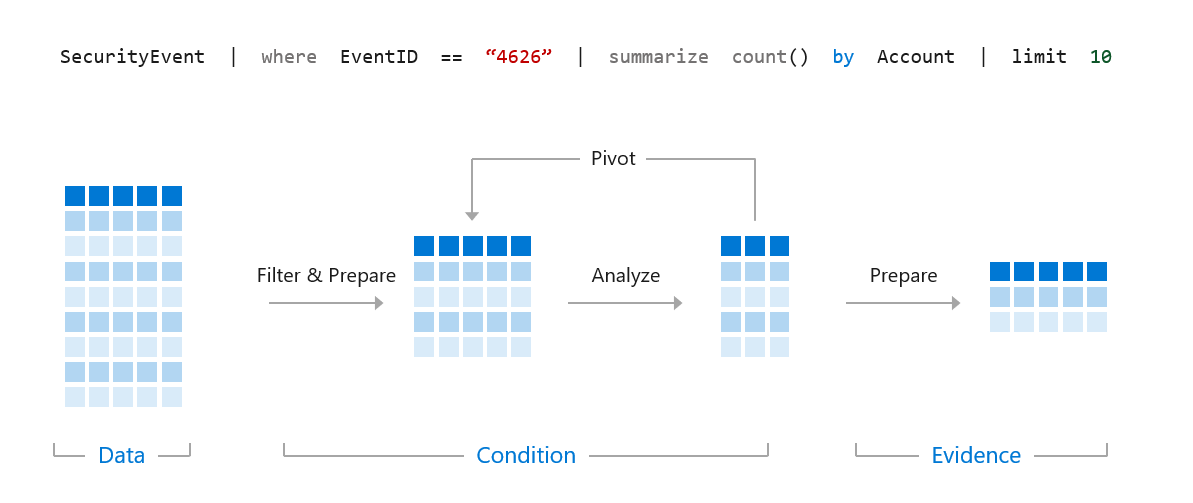
KQL 可视化

我们想要使用 KQL 创建准确、高效的查询,以便从更大的数据集中发现威胁、检测、模式和异常。

KQL 查询的结构

以下面的查询为例```kql SigninLogs | where TimeGenerated > ago(14d) | where UserPrincipalName == "[email protected]" | where ResultType == "0" | where AppDisplayName == "Microsoft Teams" | project TimeGenerated, Location, IPAddress, UserAgent

root@kitploit:~
当我们运行这样的查询时,第一行告诉 Microsoft Sentinel 要在哪个表中查找数据,所以在这种情况下,我们要搜索 SigninLogs 表,这是 Azure AD 登录数据被发送到的地方。你可以[在此处](https://docs.microsoft.com/en-us/azure/sentinel/data-source-schema-reference)查看表列表。

然后 Microsoft Sentinel 会按顺序运行你的查询,也就是说,它会一行一行地执行,直到到达末尾或出现错误。所以下面我们逐行分解这个查询。```kql
SigninLogs

因此,首先我们选择了我们的 SigninLogs 表。```kql SigninLogs | where TimeGenerated > ago(14d)

root@kitploit:~
接下来,我们让 Sentinel 回溯查看此表中过去 14 天的数据。```kql
SigninLogs
| where TimeGenerated > ago(14d)
| where UserPrincipalName == "[email protected]"

接下来,我们要求 Sentinel 仅查找 UserPrincipalName 等于 "[email protected]" 的日志。```kql SigninLogs | where TimeGenerated > ago(14d) | where UserPrincipalName == "[email protected]" | where ResultType == "0"

root@kitploit:~
然后,我们只查找 `ResultType == 0` 的日志,这些日志表示成功登录 Azure AD。```kql
SigninLogs
| where TimeGenerated > ago(14d)
| where UserPrincipalName == "[email protected]"
| where ResultType == "0"
| where AppDisplayName == "Microsoft Teams"

接下来,我们只查找登录 Microsoft Teams 的情况。```kql SigninLogs | where TimeGenerated > ago(14d) | where UserPrincipalName == "[email protected]" | where ResultType == "0" | where AppDisplayName == "Microsoft Teams" | project TimeGenerated, Location, IPAddress, UserAgent

root@kitploit:~
Our last line uses the project operator, to return only 4 fields from our logs, so we will only see the TimeGenerated, Location, IPAddress and UserAgent returned from our SigninLogs data.

That is how you build queries, now the basics.

## 基础知识

### 时间基础

Microsoft Sentinel 和 KQL 针对时间筛选进行了高度优化,因此如果你知道要搜索的数据的时间段,应该立即筛选时间范围。例如,检索最近 14 天的日志,然后搜索一个用户名,如下面的查询 -```kql
SigninLogs
| where TimeGenerated > ago(14d)
| where UserPrincipalName == "[email protected]"

比先搜索用户名再搜索时间段要高效得多,就像这样 -```kql SigninLogs | where UserPrincipalName == "[email protected]" | where TimeGenerated > ago(14d)

root@kitploit:~
KQL 有许多选项可用于查询特定时间段。```kql
SigninLogs
| where TimeGenerated > ago(14d)

如第一个示例所示,这将搜索最近14天。```kql SigninLogs | where TimeGenerated > ago(14h)

root@kitploit:~
你也可以按小时进行。```kql
SigninLogs
| where TimeGenerated > ago(14m)

And minutes.

KQL also supports querying between time ranges -```kql SigninLogs | where TimeGenerated between (ago(14d) .. ago(7d))

root@kitploit:~
这将查找14天前至7天前之间的SigninLogs数据。```kql
SigninLogs
| where TimeGenerated between (ago(14h) .. ago(7h))

在14小时前到7小时前之间。```kql SigninLogs | where TimeGenerated between (ago(14m) .. ago(7m))

root@kitploit:~
And between 14 minutes and 7 minutes ago.

### Where 基础

Where 是一个运算符,你基本上在编写的每个查询中都会使用它。这就是你告诉 Microsoft Sentinel 搜索特定数据的方式。对于 where 运算符来说,语法非常重要。如果我们使用之前相同的示例。```kql
SigninLogs
| where TimeGenerated > ago(14d)
| where UserPrincipalName == "[email protected]"

这将搜索我们的 SigninLogs 表,在过去 14 天内,查找 UserPrincipalName 等于 [email protected] 的精确匹配。在 KQL 中,== 区分大小写,因此如果你搜索 [email protected] 而实际用户名是 [email protected],你将不会得到任何结果。不区分大小写的等效写法是 =```kql SigninLogs | where TimeGenerated > ago(14d) | where UserPrincipalName = "[email protected]"

root@kitploit:~
这将查找 [email protected] 的任何匹配项,无论大小写如何。

除了 equals,我们也可以使用 contains。```kql
SigninLogs
| where TimeGenerated > ago(14d)
| where UserPrincipalName contains "reprise_99"

这将查找 UserPrincipalName 包含 reprise_99 的任何日志条目,如果您有 [email protected] 和 [email protected] 的数据,它将同时找到两者。contains 运算符不区分大小写,但您可以使用 contains_cs 使其区分大小写。

如果您正在搜索特定模式,可以使用 startswith 或 endswith。```kql SigninLogs | where TimeGenerated > ago(14d) | where UserPrincipalName startswith "reprise_99"

SigninLogs | where TimeGenerated > ago(14d) | where UserPrincipalName endswith "testdomain.com"

root@kitploit:~
startswith 和 endswith 均不区分大小写,但你可以使用 startswith_cs 或 endswith_cs 使其区分大小写。

如果你要搜索完整的单词(超过四个字符),在 KQL 中可以使用 has 运算符。使用 'has' 比 'contains' 更高效,因为数据已为你建立索引。```kql
SigninLogs
| where TimeGenerated > ago(14d)
| where AppDisplayName has "Teams"

这将查找应用程序显示名称中包含单词 Teams 的任何 SigninLogs,可能包括 "Microsoft Teams" 和 "Microsoft Teams Web Client",两者都满足该查询。

如果要搜索多个单词,可以使用 has_any 或 has_all。```kql SigninLogs | where TimeGenerated > ago(14d) | where AppDisplayName has_any ("Teams","Outlook")

root@kitploit:~
这将返回应用程序显示名称包含 "Teams" 或 "Outlook" 的结果```kql
SigninLogs
| where TimeGenerated > ago(14d)
| where AppDisplayName has_all ("Teams","Outlook")

这将返回应用程序显示名称包含“Teams”和“Outlook”的结果。

如果你不知道要在哪些字段中搜索,你也可以使用通配符,这样效率不高,但可能会帮你找到正确的方向。```kql SigninLogs | where TimeGenerated > ago(14d) | where * contains "reprise_99"

root@kitploit:~
这将在 SigninLogs 表中搜索任何包含 reprise_99 的字段。

其中许多选项还支持使用 `!` 来反转查询,以查找条件不成立的结果。```kql
SigninLogs
| where TimeGenerated > ago(14d)
| where UserPrincipalName != "[email protected]"

此查询将查找所有 UserPrincipalName 不等于 [email protected] 的 SigninLogs```kql SigninLogs | where TimeGenerated > ago(14d) | where UserPrincipalName !contains "reprise_99"

root@kitploit:~
此查询将查找所有 UserPrincipalName 不包含 reprise_99 的 SigninLogs```kql
SigninLogs
| where TimeGenerated > ago(14d)
| where AppDisplayName !has "Teams"

此查询将查找应用程序显示名称不包含"Teams"的 SigninLogs。

Project 基础

Project 允许我们选择在查询中返回哪些列以及它们的顺序。```kql SigninLogs | where TimeGenerated > ago(14d) | where UserPrincipalName == "[email protected]" | where ResultType == "0" | where AppDisplayName == "Microsoft Teams" | project TimeGenerated, Location, IPAddress, UserAgent

root@kitploit:~
此查询搜索过去 14 天的 SigninLogs 数据,其中 UserPrincipalname 等于 [email protected],ResultType 为 0,应用程序显示名称等于 "Microsoft Teams",然后对于该查询的每个匹配项,返回 TimeGenerated、Location、IPAddress 和 UserAgent。

我们可以在同一个函数中重命名列。```kql
| project LogTime=TimeGenerated, SigninLocation=Location, IP=IPAddress, Agent=UserAgent

这将返回相同的数据,但将列重命名为 LogTime、SigninLocation、IP 和 Agent。

我们甚至可以借助 project 运算符对输出进行内联操作。```kql | project LocalTime=TimeGenerated+5h, Location, IPAddress, UserAgent

root@kitploit:~
这会返回相同的数据,但会将 TimeGenerated 名称更改为 LocalTime,如果你在该时区工作,则转换为 +5h 时区。

project-away 与 project 相反,将从查询中移除列。```kql
SigninLogs
| where TimeGenerated > ago(14d)
| project-away UserAgent
| where UserPrincipalName == "[email protected]"
| where ResultType == "0"
| where AppDisplayName == "Microsoft Teams"

在此查询中,我们移除了 UserAgent。请记住,如果你移除了某一列,之后在查询中就无法再访问它了。

Summarize 基础

Summarize 生成一个表,用于聚合你查询中的内容。Summarize 具有许多底层的聚合函数。如果我们再次使用示例查询,就可以通过 summarize 以各种方式操作结果。```kql SigninLogs | where TimeGenerated > ago(14d) | where UserPrincipalName == "[email protected]" | where ResultType == "0" | summarize count() by AppDisplayName

root@kitploit:~
此查询将查找 SigninLogs 表中过去 14 天内与 [email protected] 匹配的所有事件,其中结果为成功(ResultType == 0),然后按应用程序显示名称汇总这些事件。

您可以选择为结果列命名。```kql
SigninLogs
| where TimeGenerated > ago(14d)
| where UserPrincipalName == "[email protected]"
| where ResultType == "0"
| summarize AppCount=count() by AppDisplayName

这会返回相同的数据,但会将返回列的名称更新为 AppCount。

除了总计数之外,你还可以对去重计数进行汇总。```kql SigninLogs | where TimeGenerated > ago(14d) | where UserPrincipalName == "[email protected]" | where ResultType == "0" | summarize DistinctAppCount=dcount(AppDisplayName) by AppDisplayName

root@kitploit:~
这将针对 [email protected] 登录过的每个不同应用程序返回一条记录。

您可以使用 arg_max 和 arg_min 函数返回与查询匹配的最新或最旧记录。```kql
SigninLogs
| where TimeGenerated > ago(14d)
| where UserPrincipalName == "[email protected]"
| where ResultType == "0"
| summarize arg_max(TimeGenerated, *) by UserPrincipalName

此查询查找过去 14 天内 UserPrincipalname 为 [email protected] 且登录成功的所有登录日志,然后返回最新记录。```kql SigninLogs | where TimeGenerated > ago(14d) | where UserPrincipalName == "[email protected]" | where ResultType == "0" | summarize arg_min(TimeGenerated, *) by UserPrincipalName

root@kitploit:~
这与上述相同,但返回最旧的记录。

您可以使用 countif 为您的求和提供逻辑。```kql
SigninLogs
| where TimeGenerated > ago(14d)
| where UserPrincipalName == "[email protected]"
| where ResultType == "0"
| summarize TeamsLogons=countif(AppDisplayName has "Teams"), SharePointLogons=countif(AppDisplayName has "SharePoint")

这会将数据汇总为两个新列:TeamsLogons(应用程序显示名称包含"Teams")和 SharePointLogons(应用程序显示名称包含"SharePoint")。你可以通过指示 KQL 将数据划分到时间"bins"中来进一步处理数据。```kql SigninLogs | where TimeGenerated > ago(14d) | where UserPrincipalName == "[email protected]" | where ResultType == "0" | summarize AppCount=count() by AppDisplayName, bin(TimeGenerated, 1d)

root@kitploit:~
这将返回与我们第一个 summarize 示例相同的数据,然后将这些数据分组到 1d bins 中。

您可以在有用时将这些函数组合在一起。```kql
SigninLogs
| where TimeGenerated > ago(14d)
| where UserPrincipalName == "[email protected]"
| where ResultType == "0"
| summarize TeamsLogons=countif(AppDisplayName has "Teams"), SharePointLogons=countif(AppDisplayName has "SharePoint") by bin(TimeGenerated, 1d)

这是我们 countif 和 bin 函数的组合,它根据应用程序显示名称进行汇总,并将结果放入一维分箱中。

您可以在查询中创建一组条目。```kql SigninLogs | where TimeGenerated > ago(14d) | where UserPrincipalName == "[email protected]" | where ResultType == "0" | summarize AppList=make_set(AppDisplayName) by UserPrincipalName

root@kitploit:~
这将把 [email protected] 已登录的应用程序列表输出到一个名为 AppList 的列表中。

你可以将它与我们的时间分箱结合使用。```kql
SigninLogs
| where TimeGenerated > ago(14d)
| where UserPrincipalName == "[email protected]"
| where ResultType == "0"
| summarize AppList=make_set(AppDisplayName) by UserPrincipalName, bin(TimeGenerated, 1d)

这将把 [email protected] 登录过的应用程序列表按天分成一个列表。

Render Basics

render 操作符允许 KQL 将数据可视化为不同格式,例如饼图、时间图或面积图,以及柱状图和条形图。

如果我们使用 Signinlogs 表中相同的示例,我们可以看到如何以各种方式可视化数据。```kql SigninLogs | where TimeGenerated > ago(14d) | where UserPrincipalName == "[email protected]" | where ResultType == "0" | summarize AppCount=count()by AppDisplayName | render piechart

root@kitploit:~
此查询汇总了 [email protected] 在过去 14 天内登录过的所有应用程序,然后将输出渲染为饼图。

![KQL 饼图](https://raw.githubusercontent.com/reprise99/Sentinel-Queries/main/Diagrams/render-piechart.png?raw=true)

您也可以将图表渲染为柱状图。```kql
SigninLogs
| where TimeGenerated > ago(14d)
| where UserPrincipalName == "[email protected]"
| where ResultType == "0"
| summarize AppCount=count()by AppDisplayName
| render columnchart

KQL 柱状图

或者条形图。```kql SigninLogs | where TimeGenerated > ago(14d) | where UserPrincipalName == "[email protected]" | where ResultType == "0" | summarize AppCount=count()by AppDisplayName | render barchart

root@kitploit:~
![KQL 条形图](https://raw.githubusercontent.com/reprise99/Sentinel-Queries/main/Diagrams/render-barchart.png?raw=true)

对于时间数据,你首先按照 summarize 部分所述,将数据汇总到时间'bins'中,然后即可在一段时间内可视化你的数据。```kql
SigninLogs
| where TimeGenerated > ago(14d)
| where UserPrincipalName == "[email protected]"
| where ResultType == "0"
| summarize SigninCount=count() by bin(TimeGenerated, 1d)
| render timechart

这会将 [email protected] 在过去 14 天内每天的登录情况可视化,并以时间图的形式显示。

KQL Timechart

您也可以使用 render 将其呈现为面积图。```kql SigninLogs | where TimeGenerated > ago(14d) | where UserPrincipalName == "[email protected]" | where ResultType == "0" | summarize SigninCount=count() by bin(TimeGenerated, 1d) | render areachart

root@kitploit:~
![KQL Areachart](https://raw.githubusercontent.com/reprise99/Sentinel-Queries/main/Diagrams/render-areachart.png?raw=true)

柱状图和条形图也可以与时间数据一起使用。在较大的时间范围内,每个时间'bin'都会对应一根柱或条。```kql
SigninLogs
| where TimeGenerated > ago(14d)
| where UserPrincipalName == "[email protected]"
| where ResultType == "0"
| summarize SigninCount=count() by bin(TimeGenerated, 1d)
| render columnchart

此查询与我们的 timechart 相同,但以柱状图形式呈现,每天一列。

KQL 时间柱状图```kql SigninLogs | where TimeGenerated > ago(14d) | where UserPrincipalName == "[email protected]" | where ResultType == "0" | summarize SigninCount=count() by bin(TimeGenerated, 1d) | render barchart

root@kitploit:~
还有一个条形图。

![KQL Time Bar Chart](https://raw.githubusercontent.com/reprise99/Sentinel-Queries/main/Diagrams/render-timebarchart.png?raw=true)

使用柱状图或条形图时,可以将它们堆叠在一起(这是默认设置)。```kql
SigninLogs
| where TimeGenerated > ago(14d)
| where UserPrincipalName == "[email protected]"
| where ResultType == "0"
| summarize SigninCount=count() by AppDisplayName, bin(TimeGenerated, 1d)
| render columnchart

此查询会查找我们帐户的所有登录记录,按应用程序统计登录次数,然后为每一天创建一个单独的柱。

KQL Time Column Chart Stacked

如果你希望每个应用程序都有自己的柱,可以将其设置为非堆叠模式。```kql SigninLogs | where TimeGenerated > ago(14d) | where UserPrincipalName == "[email protected]" | where ResultType == "0" | summarize SigninCount=count() by bin(TimeGenerated, 1d) | render columnchart with (kind=unstacked)

root@kitploit:~
![KQL Time Column Chart Unstacked](https://raw.githubusercontent.com/reprise99/Sentinel-Queries/main/Diagrams/render-timecolumnchartunstacked.png?raw=true)

你还可以根据 KQL 重命名图表的坐标轴和标题。```kql
SigninLogs
| where TimeGenerated > ago(14d)
| where UserPrincipalName == "[email protected]"
| where ResultType == "0"
| summarize SigninCount=count() by AppDisplayName, bin(TimeGenerated, 1d)
| render columnchart with (kind=unstacked, ytitle="Total Sign Ins", xtitle="Day", title="Application Signins Per Day")

KQL 时间柱状图(未堆叠,已重命名)

你可以在 summarize 操作中组合逻辑,为 render 运算符构建动态内容。```kql SigninLogs | where TimeGenerated > ago(14d) | where ResultType == "0" | summarize TeamsCount=countif(AppDisplayName has "Teams"), OneDrive=countif(AppDisplayName has "OneDrive"), SharePointCount=countif(AppDisplayName has "SharePoint") by bin(TimeGenerated, 1d) | render columnchart with (kind=unstacked, ytitle="Sign In Count", xtitle="Day", title="Teams vs OneDrive vs SharePoint Sign Ins Per Day")

root@kitploit:~
此查询搜索你租户中的所有登录,然后按过去 14 天中的每一天统计三组:应用程序显示名称包含 "Teams" 的组、包含 "OneDrive" 的组,以及包含 "SharePoint" 的组,最后以非堆叠柱状图呈现。

![KQL 时间柱状图:Outlook、OneDrive、SharePoint](https://raw.githubusercontent.com/reprise99/Sentinel-Queries/main/Diagrams/render-timecolumn-outlookonedrivesharepoint.png?raw=true)

### Parse 和 Split 基础

Parse 和 split 是基于匹配将单个数据字符串扩展为多个列的两种不同方式。

许多导入到 Microsoft Sentinel 的日志可能以单个长字符串形式出现(例如 sysmon),parse 和 split 允许你将它们处理成可读的数据。

对于这些示例,我们将使用以下测试数据```kql
let ExampleText = datatable(TestData:string)
[
'Name=Reprise99,UPNSuffix=testdomain.com,AadTenantId=345c1234-a833-43e4-1d34-123440a5bcdd1,AadUserId=cf6f2df6-b754-48dc-b7bc-c8339caf211,DisplayName=Test User,Type=account'
];

这些数据只是一个单独的字符串,看起来像这样。

Parse

我们可以使用以下方法解析出特定的数据匹配。```kql let ExampleText = datatable(TestData:string) [ 'Name=Reprise99,UPNSuffix=testdomain.com,AadTenantId=345c1234-a833-43e4-1d34-123440a5bcdd1,AadUserId=cf6f2df6-b754-48dc-b7bc-c8339caf211,DisplayName=Test User,Type=account' ]; ExampleText | parse TestData with * 'Name=' DisplayName ',' * | project DisplayName

root@kitploit:~
这会将 Name= 和 , 之间的所有数据解析到名为 'DisplayName' 的新列中。

![Parse 1](https://raw.githubusercontent.com/reprise99/Sentinel-Queries/main/Diagrams/parse1.png?raw=true)

你可以通过沿字符串进行匹配,在同一条命令中解析出多个列。```kql
let ExampleText = datatable(TestData:string)
[
'Name=Reprise99,UPNSuffix=testdomain.com,AadTenantId=345c1234-a833-43e4-1d34-123440a5bcdd1,AadUserId=cf6f2df6-b754-48dc-b7bc-c8339caf211,DisplayName=Test User,Type=account'
];
ExampleText
| parse TestData with * 'Name=' DisplayName ',UPNSuffix=' DomainSuffix ',AadTenantId=' AzureADTenantId ',' *
| project DisplayName, DomainSuffix, AzureADTenantId

这将解析三个新列 - DisplayName、DomainSuffix 和 AzureADTenantId

Parse 2

请记住,KQL 是按顺序执行其操作的,一旦完成解析,我们就可以在新创建的列上再次进行解析。```kql let ExampleText = datatable(TestData:string) [ 'Name=Reprise99,UPNSuffix=testdomain.com,AadTenantId=345c1234-a833-43e4-1d34-123440a5bcdd1,AadUserId=cf6f2df6-b754-48dc-b7bc-c8339caf211,DisplayName=Test User,Type=account', ]; ExampleText | parse TestData with * 'Name=' DisplayName ',UPNSuffix=' DomainSuffix ',AadTenantId=' AzureADTenantId ',' * | project DisplayName, DomainSuffix, AzureADTenantId | parse DomainSuffix with * '.' TopLevelDomain | project DisplayName, DomainSuffix, TopLevelDomain, AzureADTenantId

root@kitploit:~
这进一步解析我们的域名,以找到顶级域,在本例中是一个 .com

![Parse 3](https://raw.githubusercontent.com/reprise99/Sentinel-Queries/main/Diagrams/parse3.png?raw=true)

使用 parse 运算符时,KQL 将遍历所有数据行,即使没有匹配也会返回结果。因此,根据您的数据结构,您最终可能会得到许多空数据行。如果我们扩展示例数据,加入另一行具有不同名称的数据,并运行相同的查询,您将看到空结果。```kql
let ExampleText = datatable(TestData:string)
[
'Name=Reprise99,UPNSuffix=testdomain.com,AadTenantId=345c1234-a833-43e4-1d34-123440a5bcdd1,AadUserId=cf6f2df6-b754-48dc-b7bc-c8339caf211,DisplayName=Test User,Type=account',
'Display=Reprise99,UPN=testdomain.com,AadDirectoryId=345c1234-a833-43e4-1d34-123440a5bcdd1,AadObjectId=cf6f2df6-b754-48dc-b7bc-c8339caf211,Name=Test User,AccountType=account'
]
;
ExampleText
| parse TestData with * 'Name=' DisplayName ',UPNSuffix=' DomainSuffix ',AadTenantId=' AzureADTenantId ',' *
| project DisplayName, DomainSuffix, AzureADTenantId
| parse DomainSuffix with * '.' TopLevelDomain
| project DisplayName, DomainSuffix, TopLevelDomain, AzureADTenantId

Parse 4

为了解决这个问题,你可以使用 'parse-where' 运算符,它只返回与你的查询匹配的结果。```kql let ExampleText = datatable(TestData:string) [ 'Name=Reprise99,UPNSuffix=testdomain.com,AadTenantId=345c1234-a833-43e4-1d34-123440a5bcdd1,AadUserId=cf6f2df6-b754-48dc-b7bc-c8339caf211,DisplayName=Test User,Type=account', 'Display=Reprise99,UPN=testdomain.com,AadDirectoryId=345c1234-a833-43e4-1d34-123440a5bcdd1,AadObjectId=cf6f2df6-b754-48dc-b7bc-c8339caf211,Name=Test User,AccountType=account' ] ; ExampleText | parse-where TestData with * 'Name=' DisplayName ',UPNSuffix=' DomainSuffix ',AadTenantId=' AzureADTenantId ',' * | project DisplayName, DomainSuffix, AzureADTenantId | parse DomainSuffix with * '.' TopLevelDomain | project DisplayName, DomainSuffix, TopLevelDomain, AzureADTenantId

root@kitploit:~
我们可以看到,在解析时我们又回到了单一结果,即在我们的 parse 上匹配成功。

![Parse 5](https://raw.githubusercontent.com/reprise99/Sentinel-Queries/main/Diagrams/parse5.png?raw=true)

Split 会根据分隔符将一串文本拆分为一个数组。如果我们回到原始测试数据,可以基于逗号进行拆分。```kql
let ExampleText = datatable(TestData:string)
[
'Name=Reprise99,UPNSuffix=testdomain.com,AadTenantId=345c1234-a833-43e4-1d34-123440a5bcdd1,AadUserId=cf6f2df6-b754-48dc-b7bc-c8339caf211,DisplayName=Test User,Type=account',
]
;
ExampleText
| extend SplitData = split(TestData,',')
| project SplitData

我们将返回一个数组,其中包含我们拆分出的字符串。

Split 1

拆分是索引感知的,因此如果您的数据顺序相同,您可以直接拆分到新列中。```kql let ExampleText = datatable(TestData:string) [ 'Name=Reprise99,UPNSuffix=testdomain.com,AadTenantId=345c1234-a833-43e4-1d34-123440a5bcdd1,AadUserId=cf6f2df6-b754-48dc-b7bc-c8339caf211,DisplayName=Test User,Type=account', ] ; ExampleText | extend Name = split(TestData,',')[0] | extend DomainSuffix = split(TestData,',')[1] | extend AzureADTenantId = split(TestData,',')[2] | extend AzureADUserId = split(TestData,',')[3] | extend DisplayName = split(TestData,',')[4] | extend AccountType = split(TestData,',')[5] | project Name, DomainSuffix, AzureADTenantId, AzureADUserId, DisplayName, AccountType

root@kitploit:~
如果我们知道数据在字符串中的位置,那么我们可以直接将其拆分为命名列。

![Split 2](https://raw.githubusercontent.com/reprise99/Sentinel-Queries/main/Diagrams/split2.png?raw=true)

一旦我们拆分了数据,就可以像它一开始就是结构化数据一样进行查询。因此,如果我们向数据中添加第二条记录,然后查询特定匹配项,就能找到我们想要的结果。```kql
let ExampleText = datatable(TestData:string)
[
'Name=Reprise99,UPNSuffix=testdomain.com,AadTenantId=345c1234-a833-43e4-1d34-123440a5bcdd1,AadUserId=cf6f2df6-b754-48dc-b7bc-c8339caf211,DisplayName=Test User,Type=account',
'Name=Reprise103,UPNSuffix=testdomain.com,AadTenantId=331c1234-a841-43e5-1d31-12220a5bcee1,AadUserId=cf6f2df6-b754-48dc-b7bc-c8339caf211,DisplayName=Test User 2,Type=account'
]
;
ExampleText
| extend Name = split(TestData,',')[0]
| extend DomainSuffix = split(TestData,',')[1]
| extend AzureADTenantId = split(TestData,',')[2]
| extend AzureADUserId = split(TestData,',')[3]
| extend DisplayName = split(TestData,',')[4]
| extend AccountType = split(TestData,',')[5]
| project Name, DomainSuffix, AzureADTenantId, AzureADUserId, DisplayName, AccountType
| where Name contains "Reprise99"

我们只得到一个命中,即 Name 包含 "Reprise99" 的记录;我们的第二条记录(Name 包含 "Reprise103")未被找到。

Split 3

下载工具