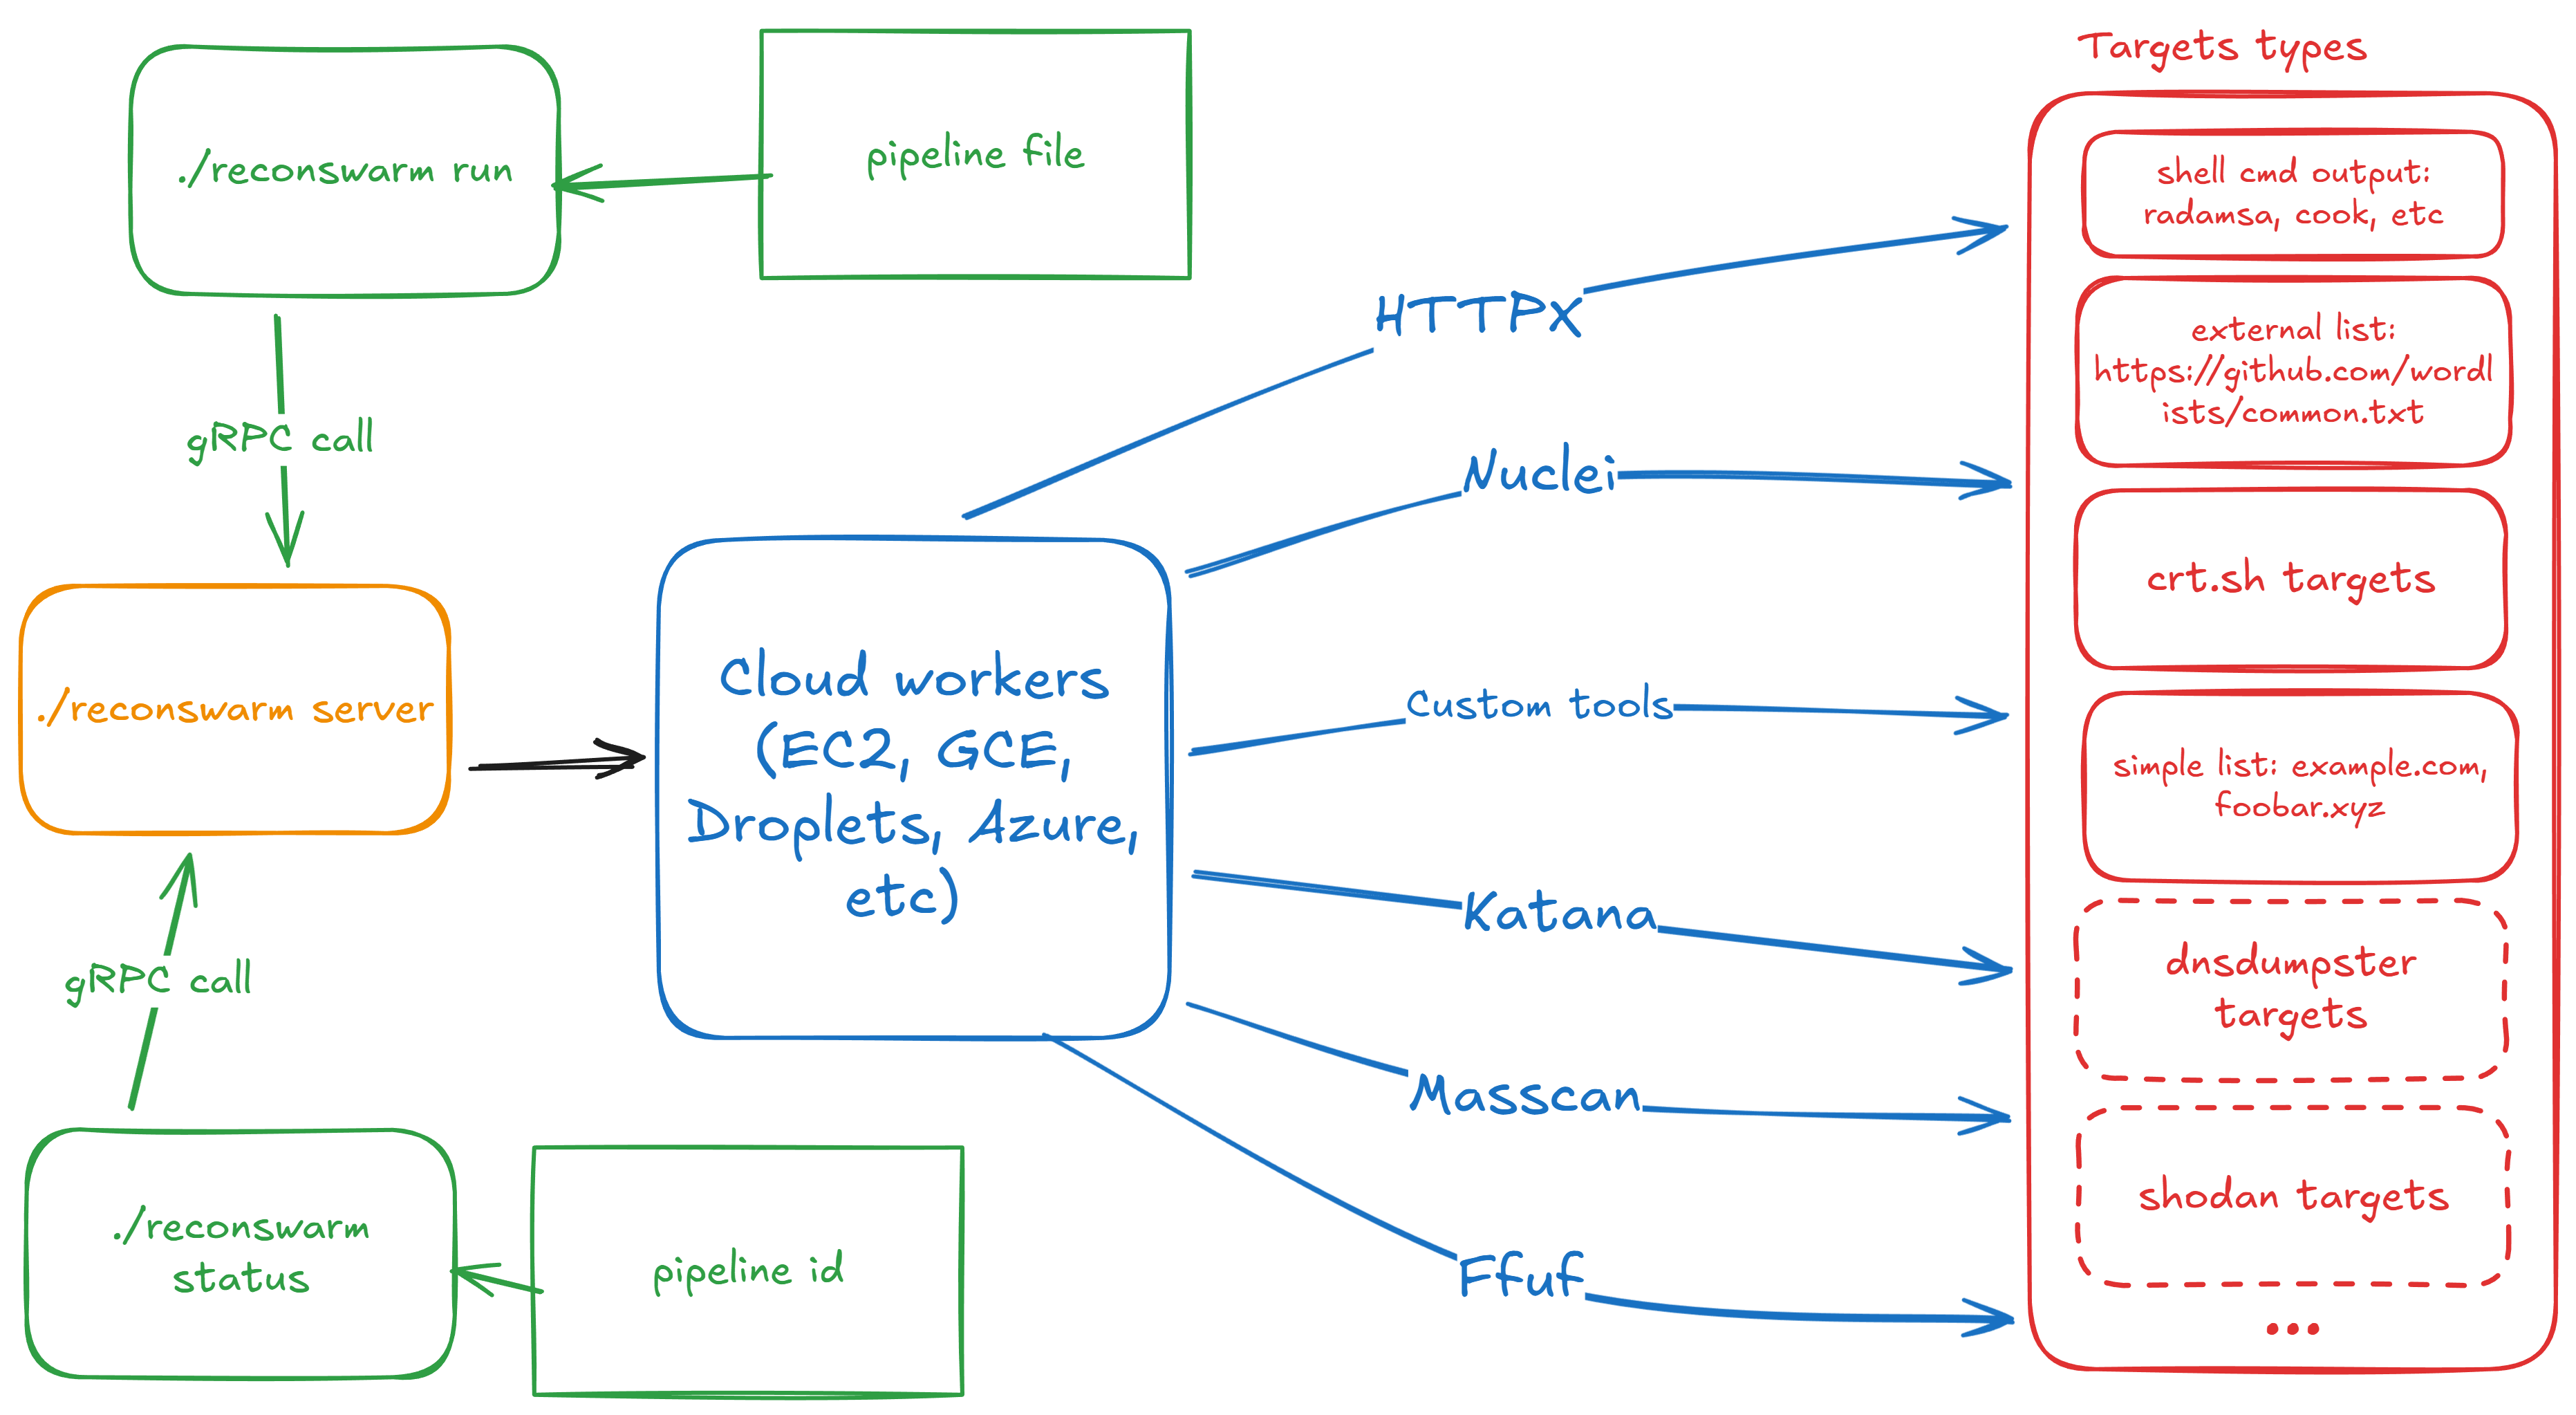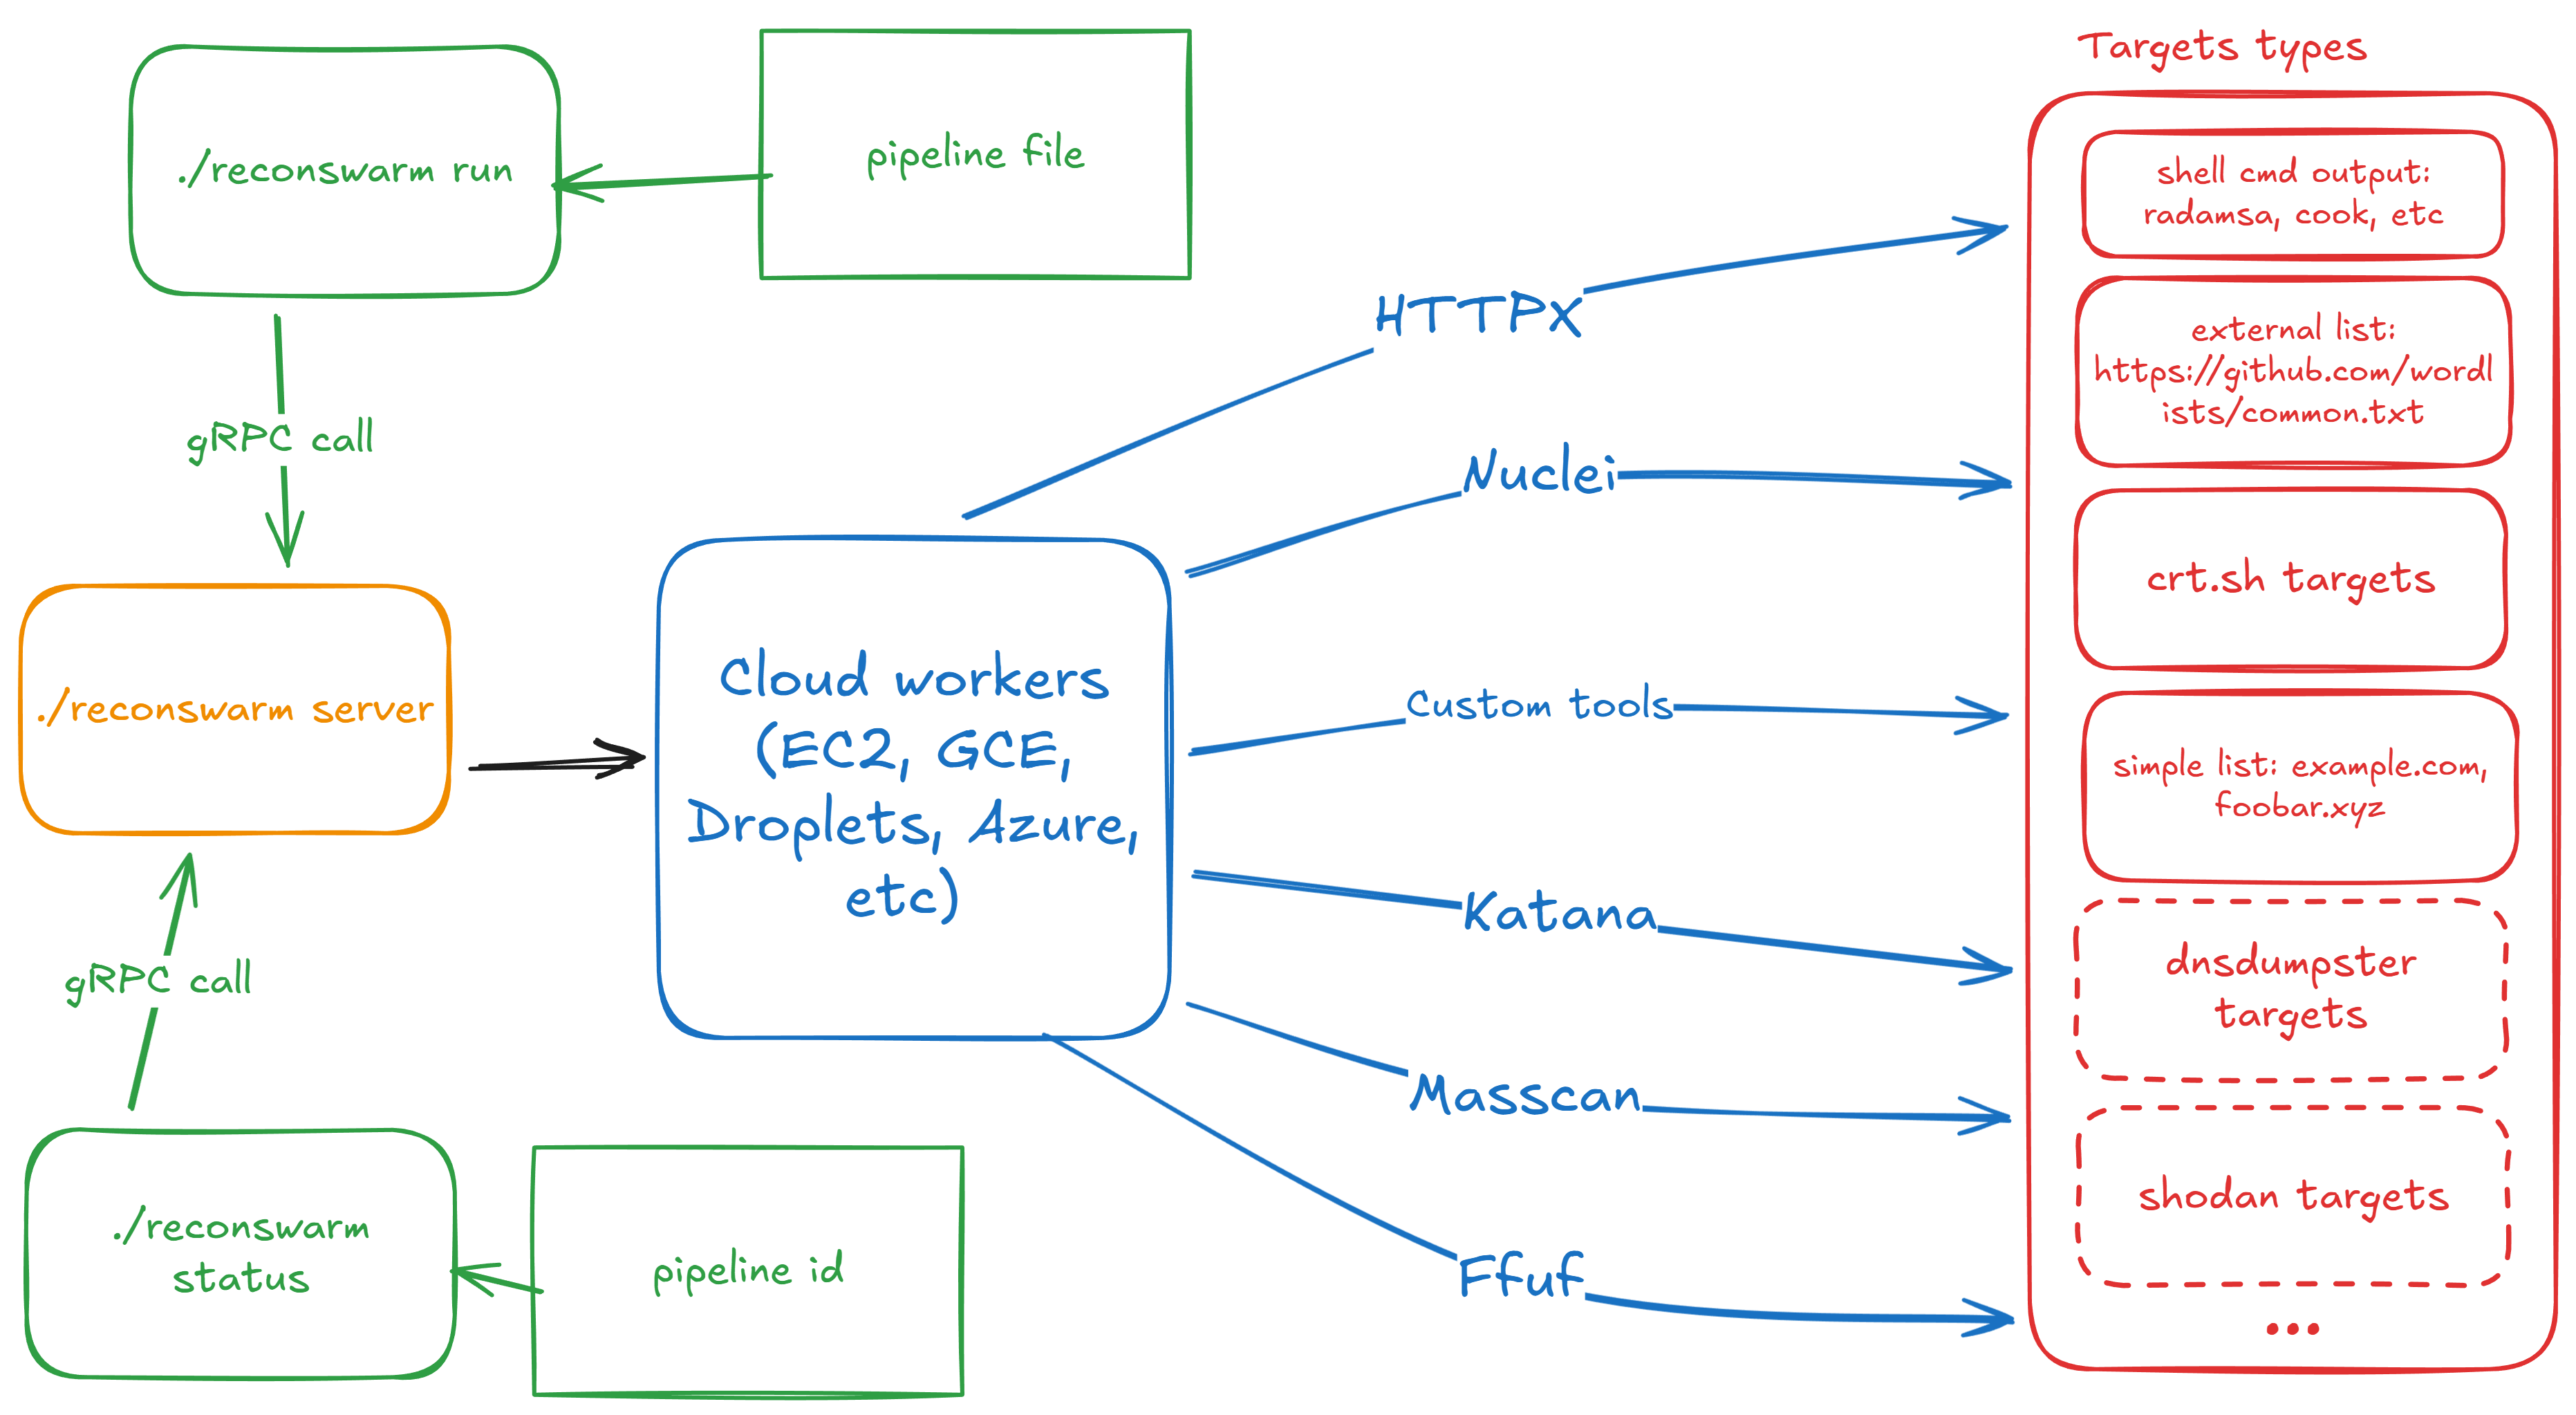
ReconSwarm 是一个模块化侦察自动化框架,专为分布式安全测试而设计。它能够部署云基础设施、执行并行侦察流水线,并以极低的配置开销收集结果。
ReconSwarm 适用于漏洞赏金猎人、渗透测试人员、DevSecOps 工程师和安全研究人员,他们需要可扩展的自动化侦察工作流,而无需手动管理基础设施。
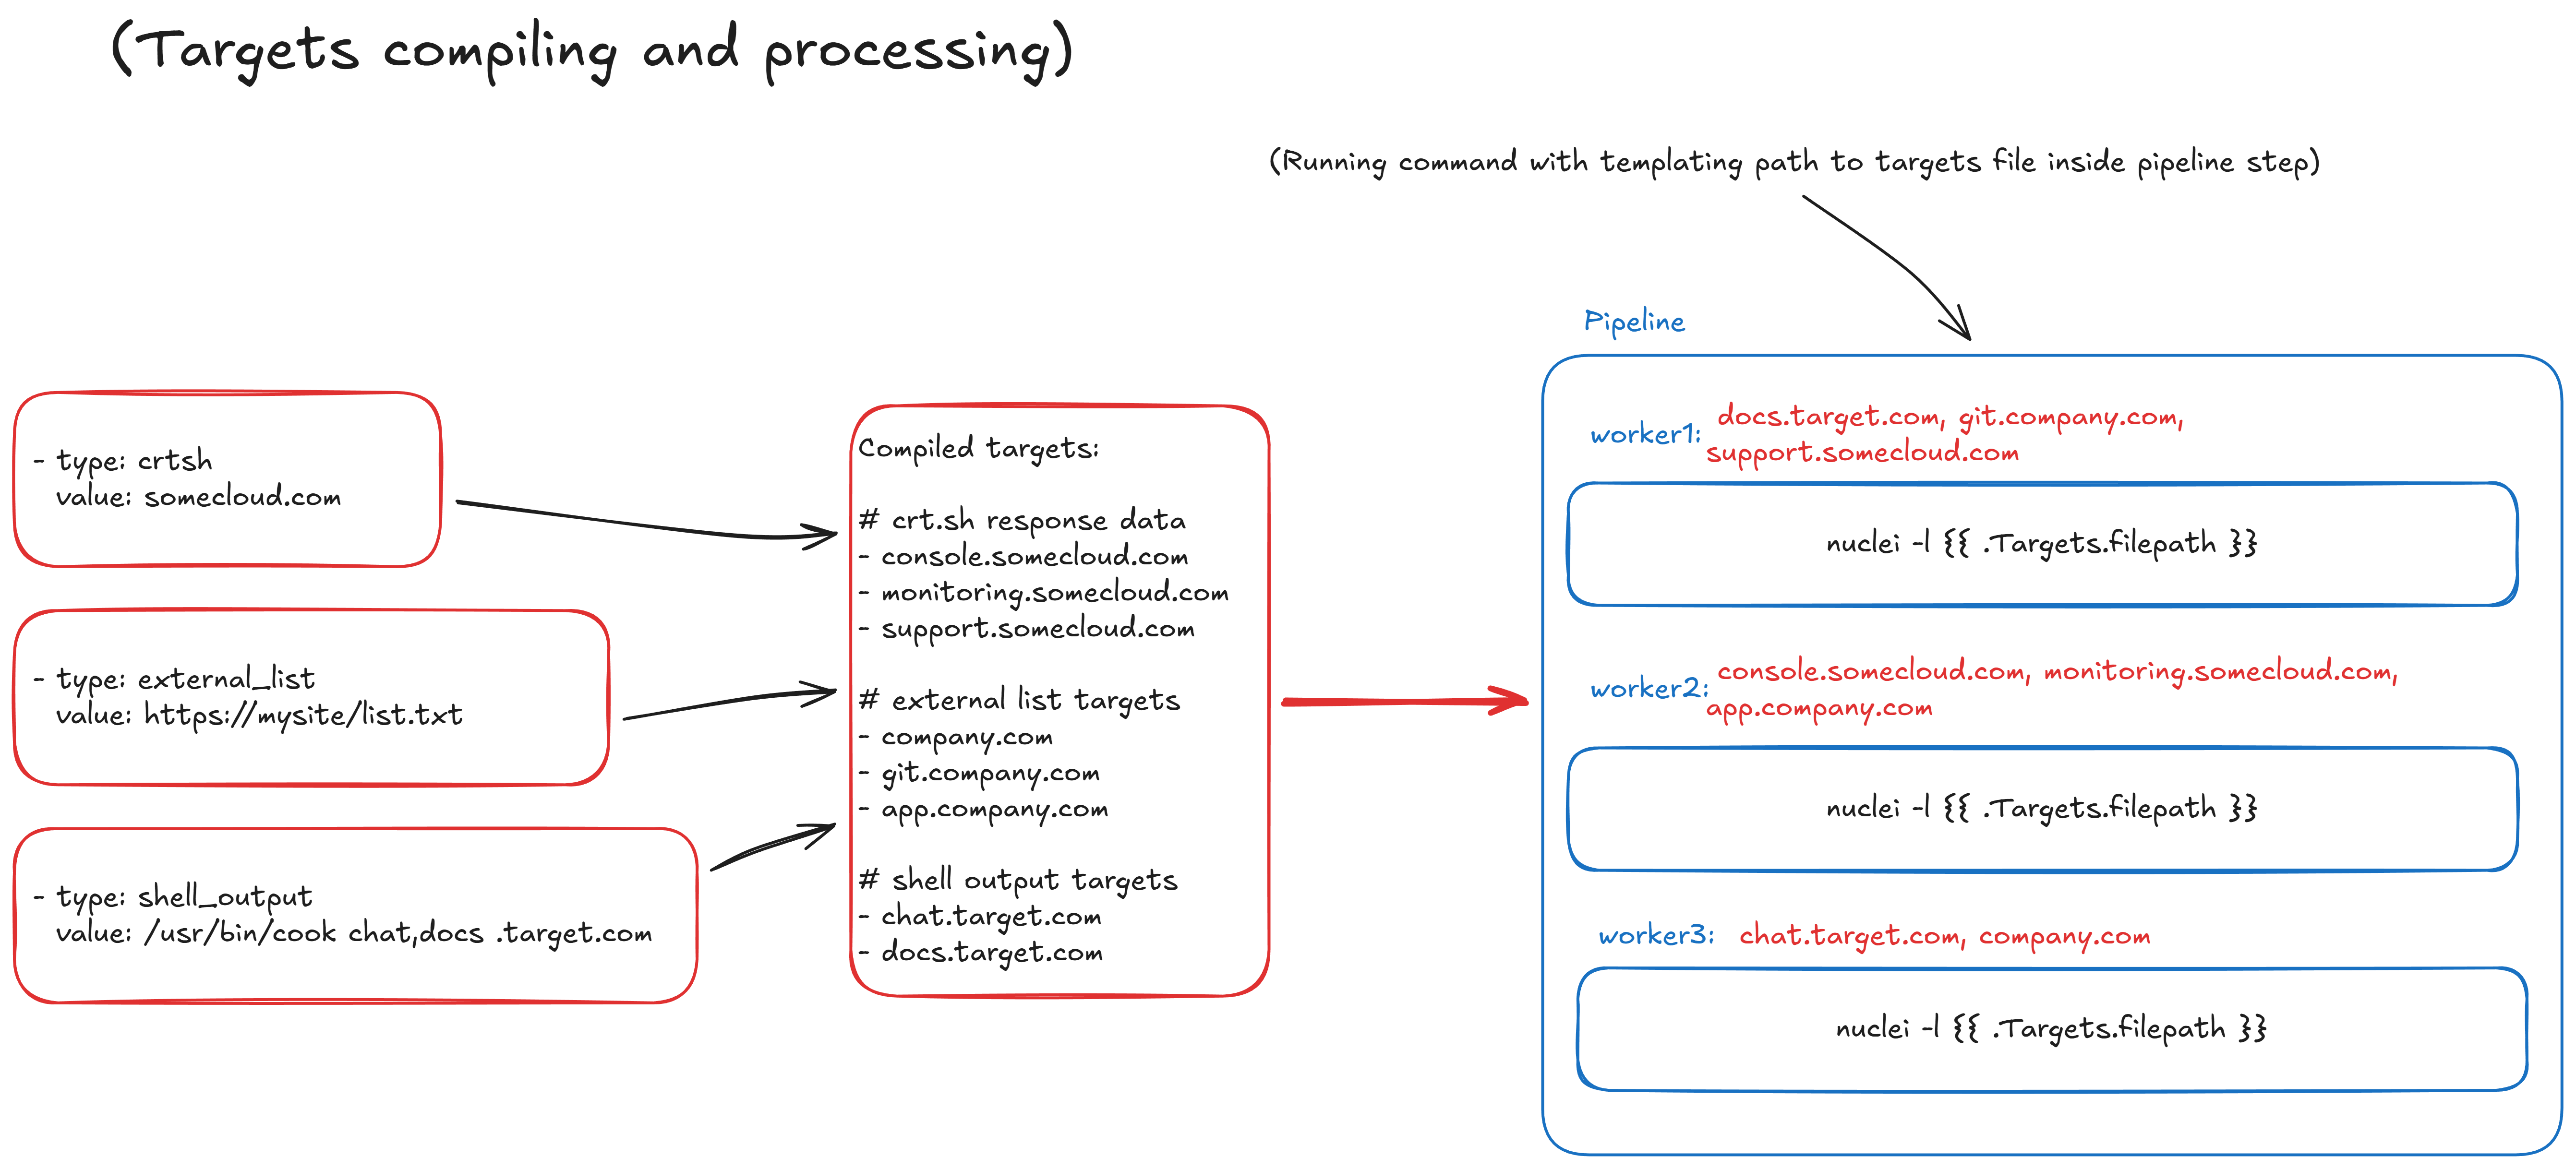
ReconSwarm 采用模块化架构,在云资源部署、远程系统控制、流水线执行和配置管理之间实现了清晰的关注点分离。
ReconSwarm 对云 provisioner 使用可判别联合模式。provisioner.type 字段决定哪个提供商的配置处于激活状态:
provisioner:
  type: yandex_cloud  # Discriminator field
  yandex_cloud:       # Active when type: yandex_cloud
    iam_token: "${YC_TOKEN}"
    # key_path: "./sa_auth_key.json"
    folder_id: "${YC_FOLDER_ID}"
    # ... provider-specific settings
通过实现 Provisioner 接口并向工厂添加新类型,即可集成其他云提供商。
阶段是在 worker VM 上执行操作的可扩展组件:
所有阶段字段都支持模板渲染。可以添加新的阶段类型来扩展功能。
ReconSwarm server 是完全无状态的——所有状态都持久化在 etcd 中:
该架构支持:
| 能力 | 描述 |
|---|---|
| 水平扩展 | 在负载均衡器后面运行多个 server 实例 |
| 零停机重启 | 重启 server 而不丢失流水线状态 |
| 崩溃恢复 | 新的 server 实例从上一个实例停止的地方继续执行 |
| 状态检查 | 直接查询 etcd 以进行调试和监控 |
高可用性设置:
                    ┌─────────────┐
                    │   Client    │
                    └──────┬──────┘
                           │
                    ┌──────▼──────┐
                    │Load Balancer│
                    └──────┬──────┘
              ┌────────────┼────────────┐
              │            │            │
       ┌──────▼──────┐ ┌───▼───┐ ┌──────▼──────┐
       │  Server 1   │ │Server2│ │  Server 3   │
       └──────┬──────┘ └───┬───┘ └──────┬──────┘
              │            │            │
              └────────────┼────────────┘
                           │
                    ┌──────▼──────┐
                    │ etcd cluster│
                    └─────────────┘
所有 server 共享同一个 etcd 集群,可以处理任何请求。如果某个 server 在流水线执行中途崩溃,另一个 server 可以在从 etcd 读取状态后继续执行。
注意: 当前实现会在从 etcd 加载后于内存中执行流水线。支持流水线恢复的完整崩溃恢复功能计划在未来的版本中实现。
git clone <repository>
cd reconswarm
go mod download
task build
ReconSwarm 将 server 配置和流水线配置分开:
| 配置类型 | 文件 | 描述 |
|---|---|---|
| Server | reconswarm.yaml | 云提供商、etcd、worker 池设置 |
| 流水线 | 独立的 YAML 文件 | 目标和阶段,通过 -f 标志传入 |
Server 配置存储在 reconswarm.yaml 中(可通过 CONFIG_PATH 环境变量配置)。所有字符串值都支持使用 ${VAR} 或 $VAR 语法进行环境变量展开。
# Server settings
server:
  port: 50051

# Etcd connection for state management
etcd:
  endpoints:
    - "localhost:2379"
  dial_timeout: 5  # seconds
  username: ""     # optional, supports ${ETCD_USER}
  password: ""     # optional, supports ${ETCD_PASSWORD}

# Cloud provisioner (discriminated union)
provisioner:
  type: yandex_cloud  # Provider selector

  # Yandex Cloud configuration (active when type: yandex_cloud)
  yandex_cloud:
    iam_token: "${YC_TOKEN}"
    # key_path: "./sa_auth_key.json"
    folder_id: "${YC_FOLDER_ID}"
    default_zone: "ru-central1-b"
    default_image: "fd8b1cmhmncn7lt4tqn4"
    default_username: "root"
    default_cores: 2
    default_memory: 2      # GB
    default_disk_size: 20  # GB

# Worker pool settings
workers:
  max_workers: 5
  setup_commands:
    - "apt update"
    - "apt install -y docker.io"
流水线配置存储在单独的 YAML 文件中,并通过 -f 标志传入。支持包装(wrapped)和非包装(unwrapped)两种格式:
包装格式(推荐):
# pipeline.yaml
pipeline:
  targets:
    - value: "example.com"
      type: crtsh
    - value: ["sub1.example.com", "sub2.example.com"]
      type: list
  stages:
    - name: "Run scanner"
      type: exec
      steps:
        - "nmap -sC -sV -iL {{.Targets.filepath}} -oN /opt/recon/scan.txt"
    - name: "Collect results"
      type: sync
      src: "/opt/recon/scan.txt"
      dest: "./results/{{.Worker.Name}}.txt"
非包装格式(同样支持):
# pipeline.yaml
targets:
  - value: "example.com"
    type: crtsh
stages:
  - name: "Run scanner"
    type: exec
    steps:
      - "nmap -iL {{.Targets.filepath}} -oN /opt/recon/scan.txt"
配置值支持两种格式的环境变量替换:
${VAR} — 带花括号的完整变量名$VAR — 简单的变量名如果环境变量未设置,将使用字面字符串(包括 ${VAR} 或 $VAR)。
对于 Yandex Cloud 集成,请使用提供的设置脚本:
安装 Yandex Cloud CLI(如果尚未安装):
# Follow official Yandex Cloud documentation for CLI installation
配置 Yandex Cloud CLI:
yc config profile create <profile-name>
yc config set cloud-id <your-cloud-id>
yc config set folder-id <your-folder-id>
导出凭据:
source ./secrets-setup.sh
该脚本导出:
YC_TOKEN — 用于身份验证的 IAM tokenYC_FOLDER_ID — 用于资源管理的 Folder IDYC_CLOUD_ID — Cloud ID(如果需要)在配置中引用:
provisioner:
  type: yandex_cloud
  yandex_cloud:
    iam_token: "${YC_TOKEN}"
    # key_path: "./sa_auth_key.json"
    folder_id: "${YC_FOLDER_ID}"
secrets-setup.sh 脚本每次执行时都会自动生成新的 IAM token,确保安全认证,无需在代码中硬编码凭据。
创建服务账号:
配置环境:
export GCP_PROJECT_ID="your-project-id"
export GCP_CREDENTIALS_PATH="/path/to/key.json"
在配置中引用:
provisioner:
  type: gcp
  gcp:
    project_id: "${GCP_PROJECT_ID}"
    credentials_path: "${GCP_CREDENTIALS_PATH}"
    default_zone: "us-central1-a"
创建 IAM 用户:
配置环境:
export AWS_ACCESS_KEY_ID="your-access-key"
export AWS_SECRET_ACCESS_KEY="your-secret-key"
在配置中引用:
provisioner:
  type: aws
  aws:
    region: "us-east-1"
    access_key_id: "${AWS_ACCESS_KEY_ID}"
    secret_access_key: "${AWS_SECRET_ACCESS_KEY}"
    default_zone: "us-east-1a"
生成 Token:
配置环境:
export DO_TOKEN="your-token"
在配置中引用:
provisioner:
  type: digitalocean
  digitalocean:
    token: "${DO_TOKEN}"
    default_region: "nyc1"
crt.sh 枚举:
targets:
  - value: "example.com"
    type: crtsh
手动列表:
targets:
  - value: ["sub1.example.com", "sub2.example.com"]
    type: list
所有阶段配置字段都支持 Go 模板语法,用于动态生成值。模板变量在执行时根据自动提供的上下文数据进行渲染。
模板上下文
以下数据可用于所有阶段模板:
| 变量 | 描述 |
|---|---|
{{.Targets.filepath}} | 远程 VM 上目标文件的绝对路径 |
{{.Targets.list}} | 用于编程访问的目标字符串数组 |
{{.Worker.Name}} | worker VM 实例的唯一标识符 |
Exec 阶段 — 执行支持模板的 shell 命令:
stages:
  - name: "Run tool"
    type: exec
    steps:
      - "docker run --rm -v /opt/recon:/data scanner:latest {{.Targets.filepath}}"
      - "cat /opt/recon/results.json"