Skip to content
KitploitKITPLOIT
工具博客
提交
工具博客
提交

黑客、渗透测试和网络安全工具,武装您的安全武器库!

Kitploit 是一个黑客、网络安全和渗透测试工具的目录。发现最新的项目更新,查找漏洞、分析系统、自动化测试并加强你的安全。

··订阅源·联系·隐私·© 2026 Kitploit

工具目录

分类

查看所有分类
Loading categories
exist — EXIST is a web application for aggregating and analyzing cyber threat intelligence. | Kitploit
工具/GitHubGitHub/nict-csl/exist
Indicator of Compromise (IOC) ManagementOSINT (Open Source Intelligence)Threat Feeds & AggregatorsVulnerability AnalysisInformation GatheringThreat IntelligenceLearning & EducationIncident ResponseLog AnalysisArchived
GitHubnict-csl/exist

exist

152295个月前Kitploit 审核通过

最受欢迎

查看全部 →

发现我们社区最常用的工具。

探索所有工具

浏览我们的工具集合

查看所有工具 →
分享

EXIST is a web application for aggregating and analyzing cyber threat intelligence.

查看仓库

EXIST(外部信息聚合系统应对网络威胁)

⚠️ 此仓库已停止维护/归档。安全问题将不会被修复。

EXIST 是一个用于聚合和分析 CTI(网络威胁情报)的 Web 应用程序。

EXIST 由以下软件编写:

  • Python 3
  • Django 1.11

概念

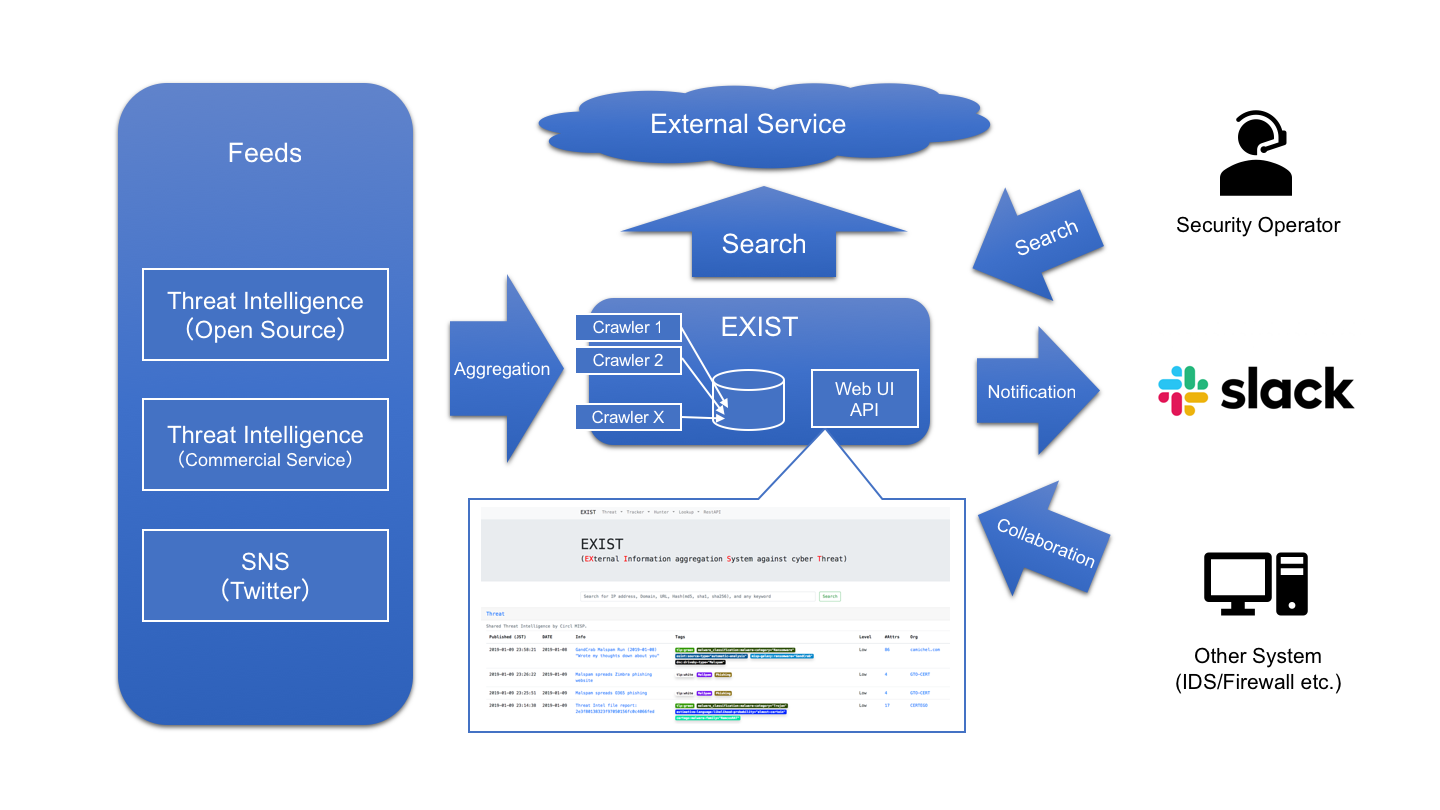
EXIST 是一个用于聚合 CTI 的 Web 应用程序,旨在帮助安全运维人员根据相关指标调查事件。

EXIST 通过 API 和订阅源自动从多个 CTI 服务和 Twitter 获取数据。 您可以通过 Web 界面和 API 进行交叉搜索指标。

如果您有记录客户端网络行为的服务器(例如 DNS 和 HTTP 代理服务器的日志),则可以通过与 EXIST 上的数据进行关联来分析这些日志。 如果您使用 API 实现某些程序,您将实现自动化 CTI 驱动的安全运营中心。
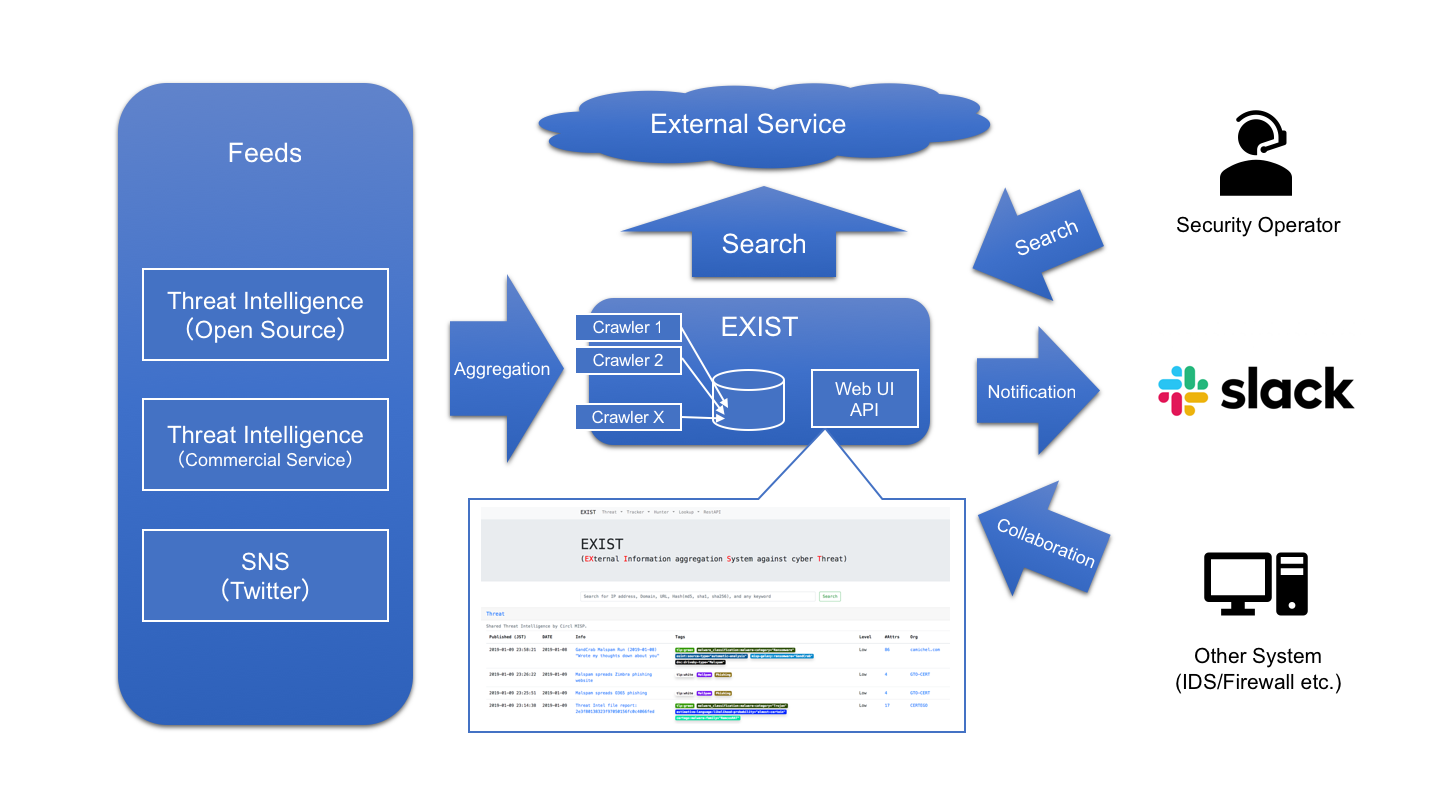
overview

用例

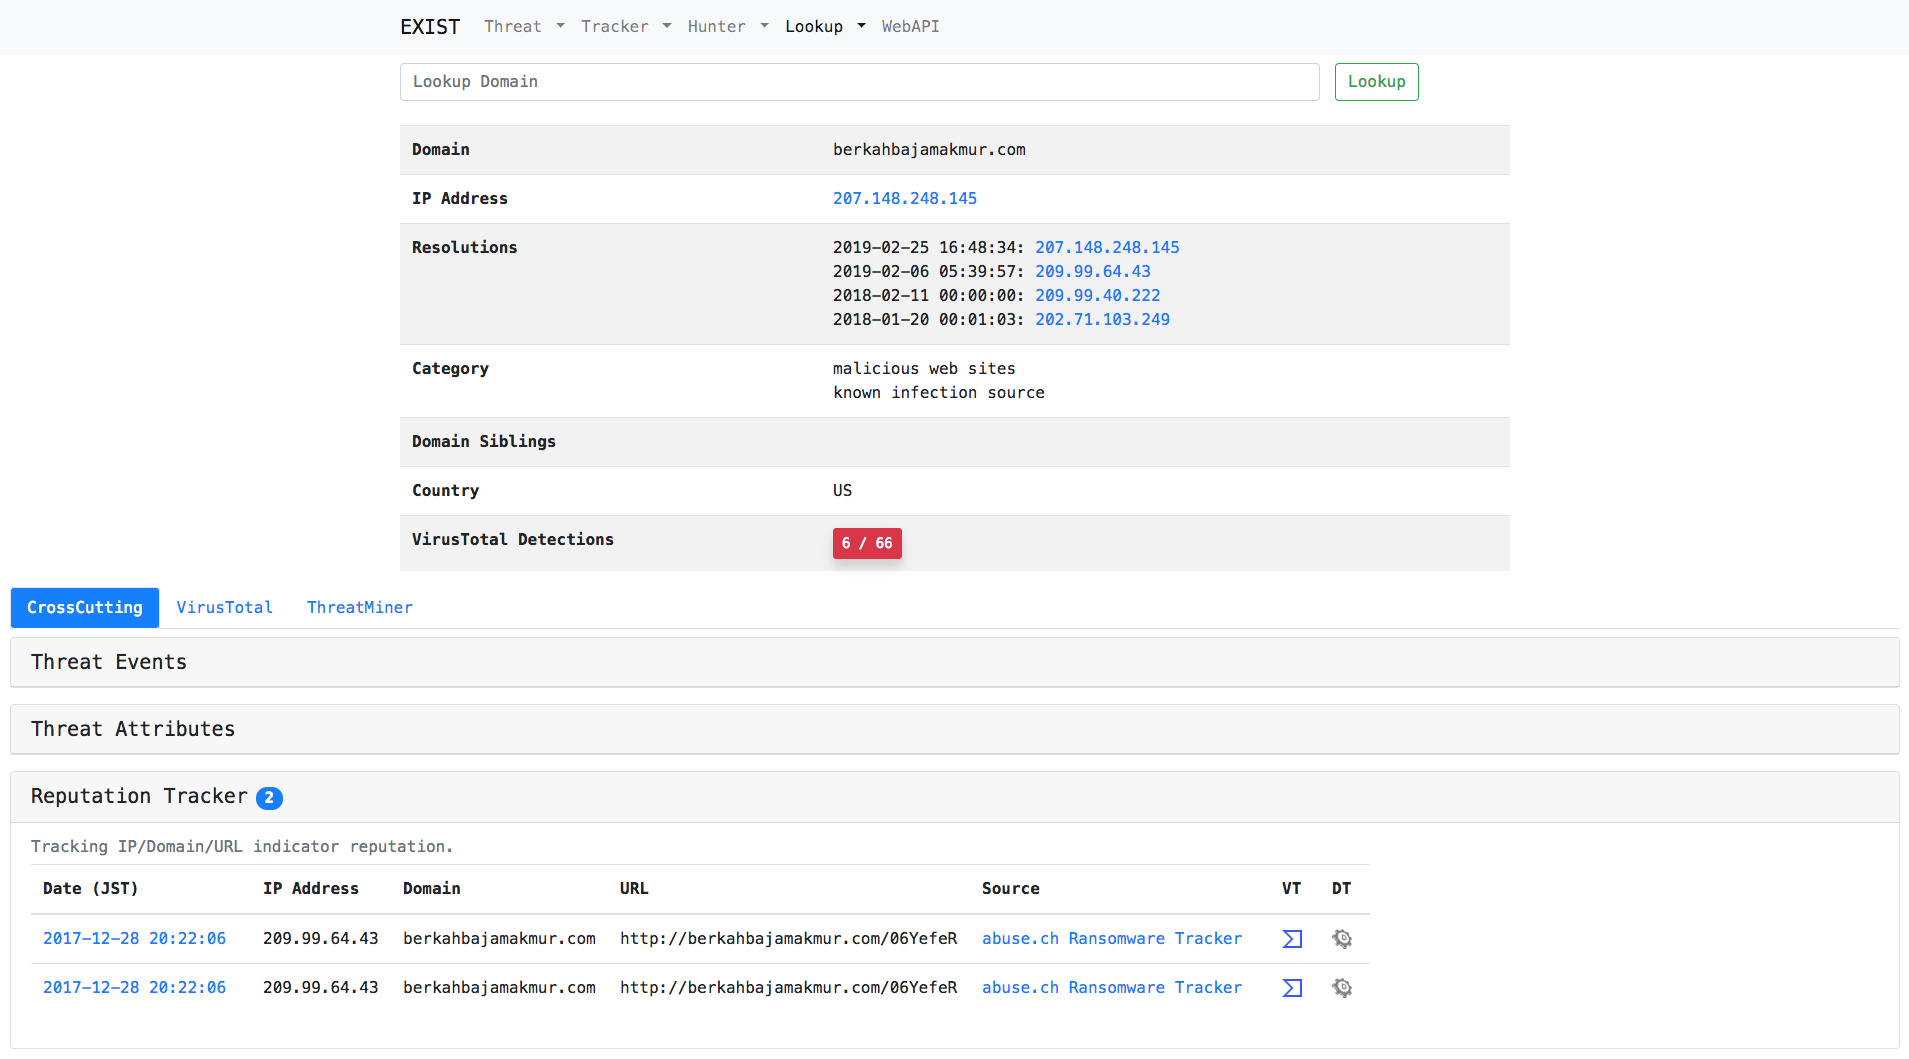
案例1:调查 IDS 检测到的域名

只需在搜索表单中输入域名。

lookup_domain

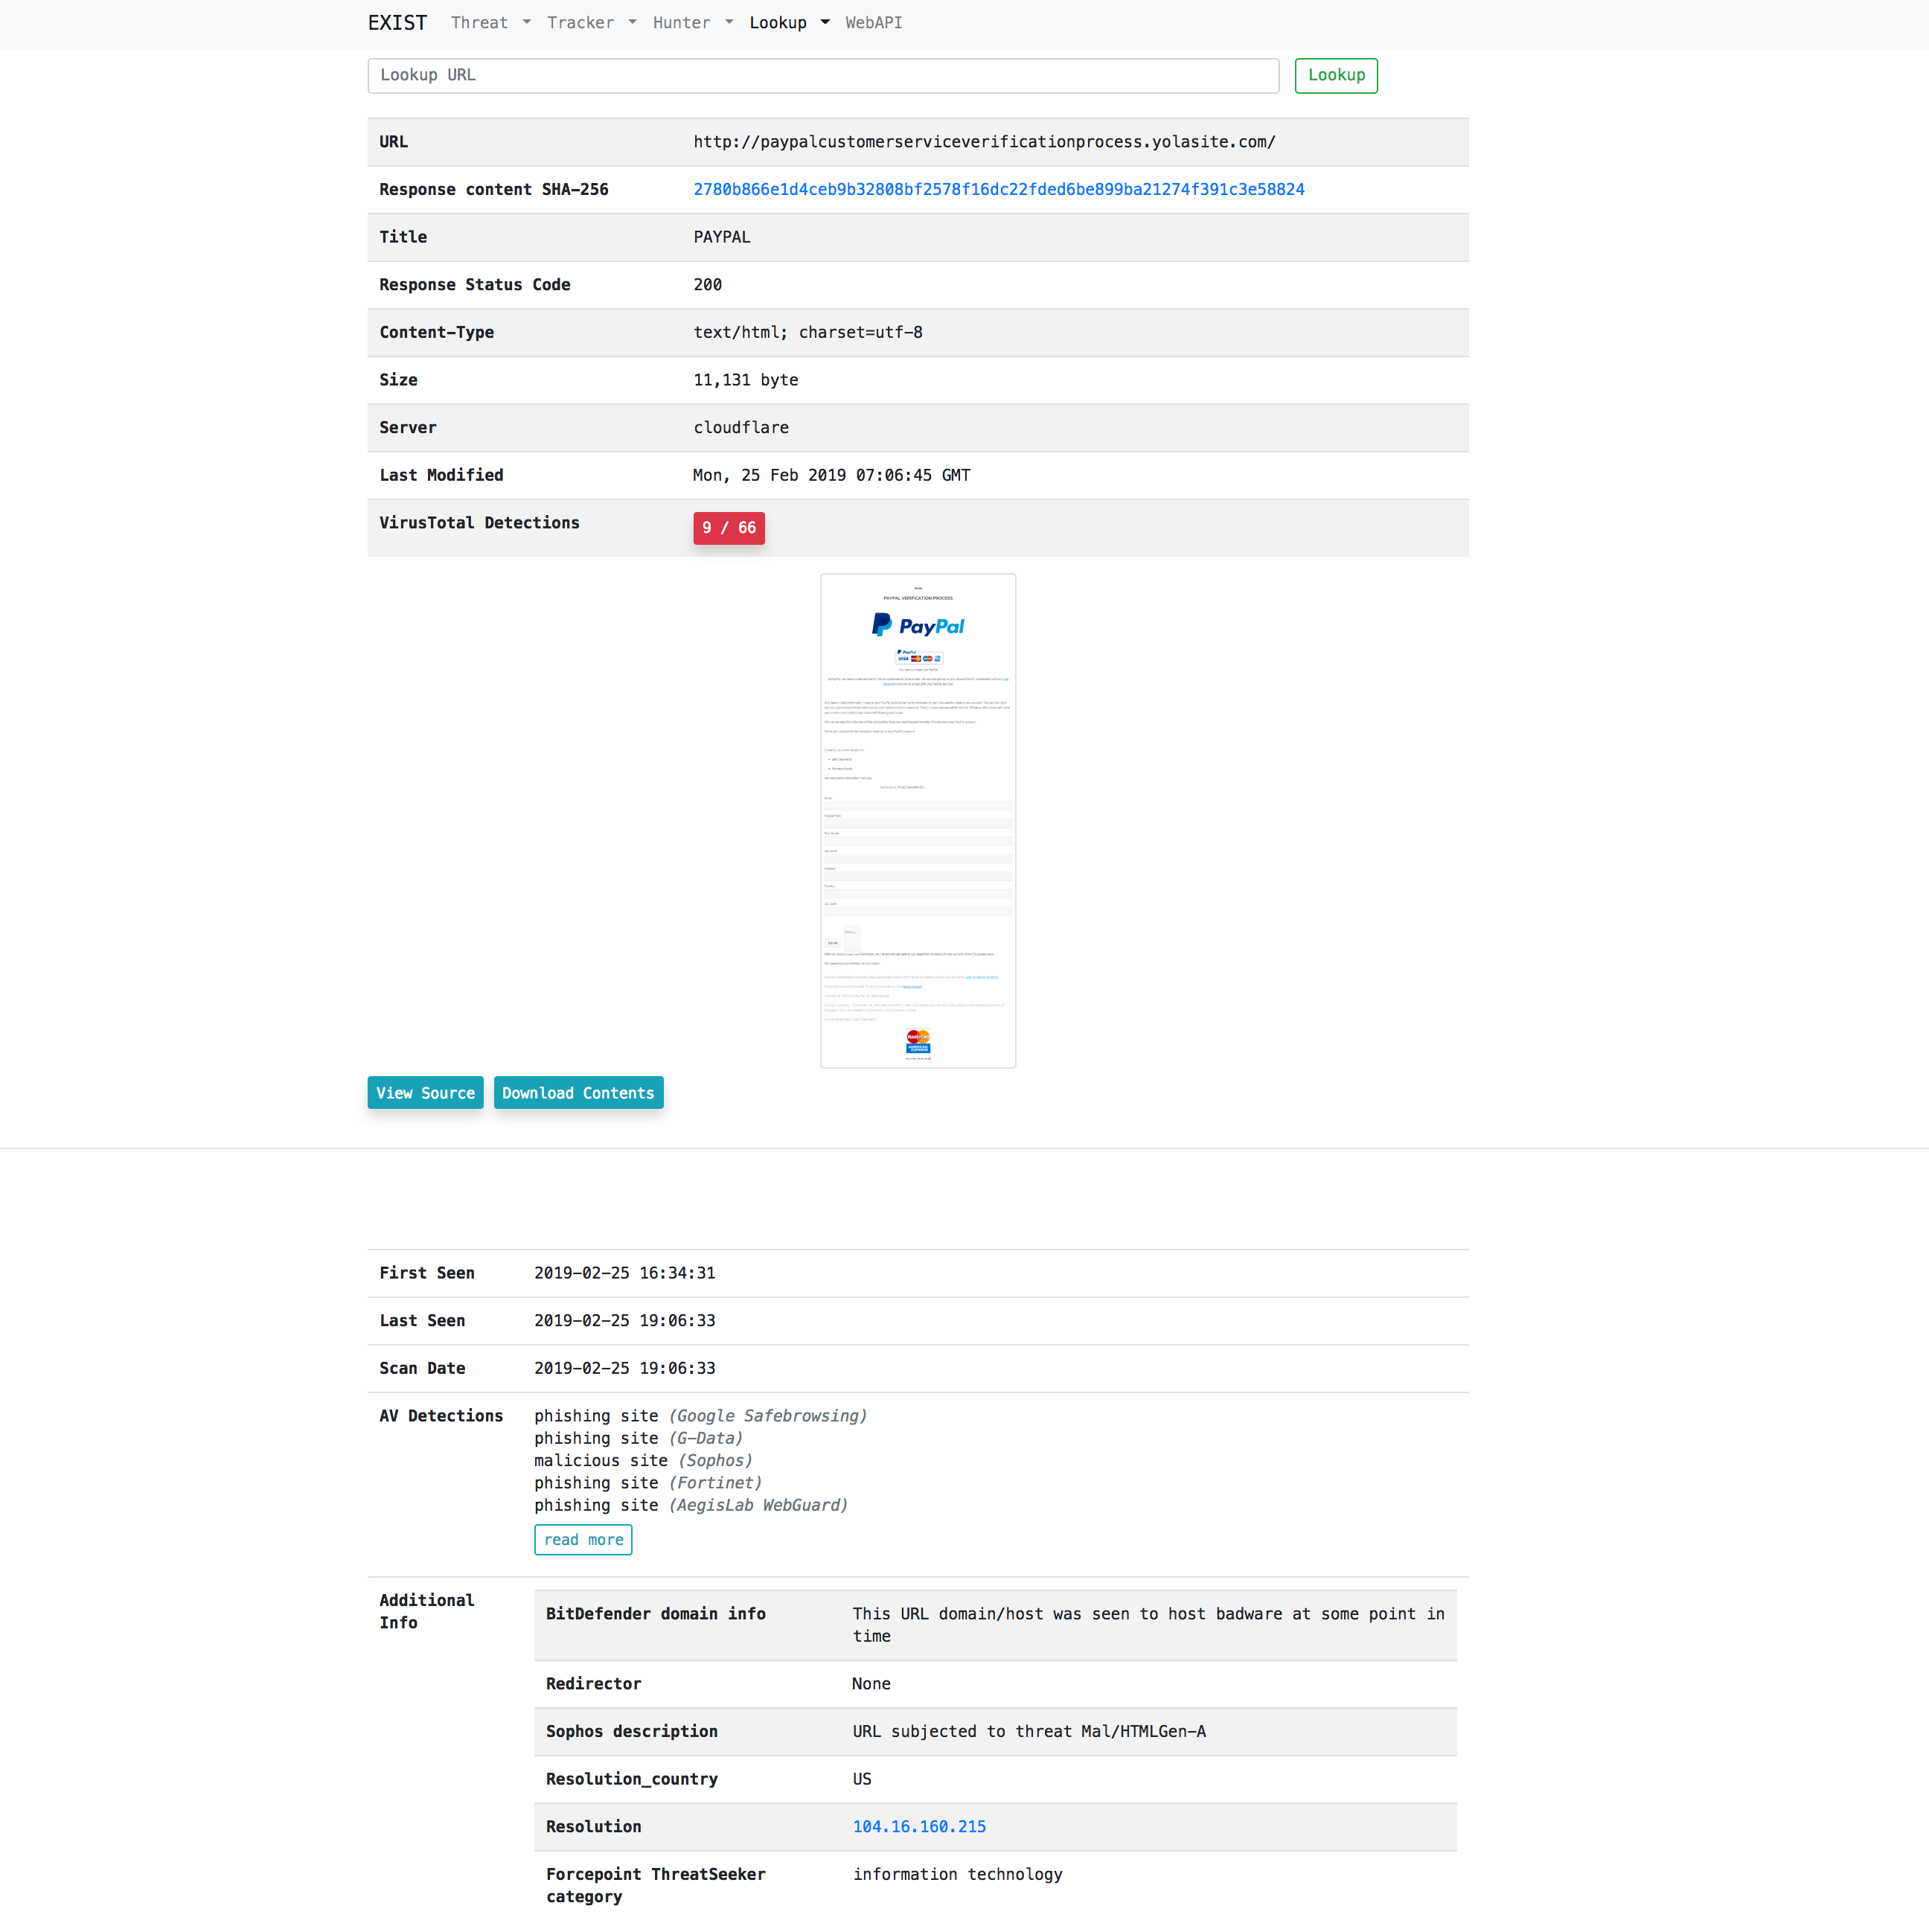
案例2:代表用户访问恶意 URL 并获取浏览器显示图像和要下载的内容

只需在搜索表单中输入 URL。

lookup_url

案例3:监控网络威胁

只需在威胁 Hunter 或 Twitter Hunter 中添加关键词。

twitter_hunter

特性

Tracker

Tracker 自动从多个 CTI 服务收集数据订阅源。

  • 威胁 Tracker
  • 信誉 Tracker
  • Twitter Tracker
  • 漏洞利用 Tracker
  • 新闻 Tracker
  • 漏洞 Tracker

Hunter

Hunter 使我们能够设置查询,从多个 CTI 服务和 Twitter 收集数据。

  • Twitter Hunter
  • 威胁 Hunter
  • 新闻 Hunter

Lookup

Lookup 从多个互联网服务(例如 whois)检索与特定信息(如 IP 地址、域名)相关的信息。

  • IP 地址
  • 域名
  • URL
  • 文件哈希

工具

用于对来自 Twitter tracker 的推文进行标注的工具。

  • 标注工具

Web API

通过 Web API 提供存储在 EXIST 数据库中的数据。

  • reputation
  • twitter
  • exploit
  • threatEvent
  • threatAttribute
  • news
  • vuln

快速开始

此后我假设环境为 CentOS 7 或 Ubuntu 18.04 LTS。部署到其他环境时请自行承担风险。

安装 Python 模块

root@kitploit:~
$ sudo pip install -r requirements.txt

安装 MariaDB

  • CentOS 7
root@kitploit:~
$ curl -sS https://downloads.mariadb.com/MariaDB/mariadb_repo_setup | sudo bash
$ sudo yum install MariaDB-server MariaDB-client
  • Ubuntu 18.04 LTS
root@kitploit:~
$ sudo apt install mariadb-server mariadb-client

运行数据库

root@kitploit:~
$ sudo systemctl start mariadb
$ sudo systemctl enable mariadb

数据库设置

  • 创建数据库和用户。
  • 参考 .env.example 创建 .env。并根据您的数据库设置进行编辑。

为 Django 生成密钥

Django 的密钥必须写在 .env 文件中。

首先,运行密钥生成器:

root@kitploit:~
$ python keygen.py
(example)> 70mm6h)()h3r&*b9xq$e52=-7($p=5983gfoyz%$d-j-gd7u5@

然后将密钥写入 .env 文件:

root@kitploit:~
...
# EXIST Application Settings
EXIST_SECRET_KEY="70mm6h)()h3r&*b9xq$e52=-7($p=5983gfoyz%$d-j-gd7u5@"
...

迁移数据库

root@kitploit:~
$ python manage.py makemigrations exploit reputation threat threat_hunter twitter twitter_hunter news news_hunter vuln
$ python manage.py migrate

安装 Redis 服务器

信誉 tracker 使用 Redis 作为 Celery 缓存服务器后端。

  • CentOS 7
root@kitploit:~
$ sudo yum install redis
$ sudo systemctl start redis
$ sudo systemctl enable redis
  • Ubuntu 18.04 LTS
root@kitploit:~
$ sudo apt install redis-server
$ sudo systemctl start redis-server
$ sudo systemctl enable redis-server

设置 Celery

信誉 tracker 使用 Celery 作为异步任务作业队列。

  • 创建 Celery 配置。我建议将配置放在以下路径:
    • CentOS 7: /etc/sysconfig/celery
    • Ubuntu 18.04 LTS: /etc/celery.conf
root@kitploit:~
# Name of nodes to start
# here we have a single node
CELERYD_NODES="w1"
# or we could have three nodes:
#CELERYD_NODES="w1 w2 w3"

# Absolute or relative path to the 'celery' command:
CELERY_BIN="/path/to/your/celery"

# App instance to use
# comment out this line if you don't use an app
CELERY_APP="intelligence"
# or fully qualified:
#CELERY_APP="proj.tasks:app"

# How to call manage.py
CELERYD_MULTI="multi"

# Extra command-line arguments to the worker
CELERYD_OPTS="--time-limit=300 --concurrency=8"

# - %n will be replaced with the first part of the nodename.
# - %I will be replaced with the current child process index
# and is important when using the prefork pool to avoid race conditions.
CELERYD_PID_FILE="/var/run/celery/%n.pid"
CELERYD_LOG_FILE="/var/log/celery/%n%I.log"
CELERYD_LOG_LEVEL="INFO"
  • 在 /etc/systemd/system/celery.service 上创建 Celery 服务管理脚本。此外,您必须将 Celery 配置路径设置到 EnvironmentFile 中。
root@kitploit:~
[Unit]
Description=Celery Service
After=network.target

[Service]
Type=forking
User=YOUR_USER
Group=YOUR_GROUP
EnvironmentFile=/etc/sysconfig/celery
WorkingDirectory=/path/to/your/exist
ExecStart=/bin/sh -c '${CELERY_BIN} multi start ${CELERYD_NODES} \
-A ${CELERY_APP} --pidfile=${CELERYD_PID_FILE} \
--logfile=${CELERYD_LOG_FILE} --loglevel=${CELERYD_LOG_LEVEL} ${CELERYD_OPTS}'
ExecStop=/bin/sh -c '${CELERY_BIN} multi stopwait ${CELERYD_NODES} \
--pidfile=${CELERYD_PID_FILE}'
ExecReload=/bin/sh -c '${CELERY_BIN} multi restart ${CELERYD_NODES} \
-A ${CELERY_APP} --pidfile=${CELERYD_PID_FILE} \
--logfile=${CELERYD_LOG_FILE} --loglevel=${CELERYD_LOG_LEVEL} ${CELERYD_OPTS}'

[Install]
WantedBy=multi-user.target
  • 创建 Celery 日志和运行目录。
root@kitploit:~
$ sudo mkdir /var/log/celery; sudo chown YOUR_USER:YOUR_GROUP /var/log/celery
$ sudo mkdir /var/run/celery; sudo chown YOUR_USER:YOUR_GROUP /var/run/celery
  • 在 /etc/tmpfiles.d/exist.conf 中创建配置文件
root@kitploit:~
#Type  Path               Mode  UID        GID         Age  Argument
d      /var/run/celery    0755  YOUR_USER  YOUR_GROUP  -
  • 运行 Celery
root@kitploit:~
$ sudo systemctl start celery.service
$ sudo systemctl enable celery.service

运行 Web 服务器

root@kitploit:~
$ python manage.py runserver 0.0.0.0:8000
  • 使用浏览器访问 http://[YourWebServer]:8000。
  • WebAPI: http://[YourWebServer]:8000/api/

注意: 在生产环境中运行时,我建议使用 Nginx 和 uWSGI。

收集数据源

用于将数据源插入数据库的脚本位于 scripts/insert2db/*/insert2db.py。

配置 insert2db

  • 配置文件位于 scripts/insert2db/conf/insert2db.conf。请参考 insert2db.conf.template 创建。
  • 如果您使用 MISP,请将 MISP URL 和 API 密钥写入 insert2db.conf。
  • 如果您使用 Malshare,请将您的 API 密钥写入 insert2db.conf。
  • 在 https://developer.twitter.com/ 创建您的 Twitter API 帐户,以便通过 EXIST 进行追踪。
  • 为 EXIST 创建一个 App。
  • 获取 Consumer API key (CA)、Consumer API secret key (CS)、Access token (AT)、access token secret (AS)。
  • 将 CA、CS、AT、AS 写入 insert2db.conf。

运行脚本

root@kitploit:~
$ python scripts/insert2db/reputation/insert2db.py
$ python scripts/insert2db/twitter/insert2db.py
$ python scripts/insert2db/exploit/insert2db.py
$ python scripts/insert2db/threat/insert2db.py
$ python scripts/insert2db/news/insert2db.py
$ python scripts/insert2db/vuln/insert2db.py

注意: 为了自动化信息收集,请将它们写入您的 cron。

设置 Hunter

Twitter Hunter

Twitter Hunter 可以检测包含特定关键词和用户 ID 的推文。如果需要,您还可以通知 Slack。

  • 配置文件位于 scripts/hunter/conf/hunter.conf。请参考 hunter.conf.template 创建。
  • 如果您使用 Slack,请将您的 Slack 令牌写入 hunter.conf。
  • 在 https://developer.twitter.com/ 创建您的 Twitter API 帐户。
  • 为 EXIST 创建 18 个 App。
  • 获取 18 组 Consumer API key (CA)、Consumer API secret key (CS)、Access token (AT)、access token secret (AS)。
  • 将 CA、CS、AT、AS 写入 hunter.conf 中的 auth-hunter[00-18]。
  • 使 scripts/hunter/twitter/tw_watchhunter.py 每分钟通过 cron 运行,以使 Twitter Hunter 持久运行。

Threat Hunter

Threat Hunter 可以检测包含特定关键词的威胁事件。如果需要,您还可以通知 Slack。

  • 配置文件位于 scripts/hunter/conf/hunter.conf。请参考 hunter.conf.template 创建。
  • 如果您使用 Slack,请将您的 Slack 令牌写入 hunter.conf。
  • 使 scripts/hunter/threat/th_watchhunter.py 每分钟通过 cron 运行,以使 Threat Hunter 持久运行。

其他必需工具和设置

VirusTotal API

EXIST 使用 VirusTotal API。

  • 创建您的 VirusTotal 帐户。
  • 将您的 API 密钥写入 conf/vt.conf。

注意: 如果您拥有私有 API 密钥,您将获得更多信息。

GeoIP 数据库

IP / 域名查询使用 GeoLite2 Database。

  • 从 http://geolite.maxmind.com/download/geoip/database/GeoLite2-City.mmdb.gz 下载 GeoIP DB。
  • 将 GeoLite2-City.mmdb 的路径写入您的 conf/geoip.conf。

wkhtmltopdf 和 Xvfb

URL 查询使用 wkhtmltopdf 和 Xvfb。

  • 从 https://wkhtmltopdf.org/downloads.html 下载并安装 wkhtmltopdf。
  • 安装 Xvfb。
root@kitploit:~
$ sudo yum install xorg-x11-server-Xvfb

如果您在 Ubuntu 18.04 LTS 上部署 EXIST,可以使用 apt 安装这些包。

root@kitploit:~
$ sudo apt install wkhtmltopdf xvfb

刷新旧数据

  • 配置文件位于 scripts/url/url.conf。请参考 url.conf.template 创建。
  • 使 scripts/url/delete_webdata.sh 每天通过 cron 运行,以刷新旧的 Lookup URL 数据。
  • 使 scripts/url/delete_oldtaskresult.sh 每天通过 cron 运行,以刷新旧的 Celery 数据。

标注工具

用于创建推文训练数据的标注工具。此工具适用于机器学习研究人员。

使用方法

  1. 检查标注目标。 annotation_target
  2. 点击“Annotation”按钮。 annotation_button
  3. 选择要标注的词语。 annotation_labeled
  4. 点击标签按钮。
  5. 保存。

报告漏洞

如果您发现任何漏洞,请通过电子邮件联系我们。

漏洞报告模板

鸣谢

本产品包含由 MaxMind 创建的 GeoLite2 数据,可从 https://www.maxmind.com 获取。

许可证

MIT 许可证 © Cybersecurity Laboratory, NICT

下载工具