Skip to content
KitploitKITPLOIT
工具博客
提交
工具博客
提交

黑客、渗透测试和网络安全工具,武装您的安全武器库!

Kitploit 是一个黑客、网络安全和渗透测试工具的目录。发现最新的项目更新,查找漏洞、分析系统、自动化测试并加强你的安全。

··订阅源·联系·隐私·© 2026 Kitploit

工具目录

分类

查看所有分类
Loading categories
ClientInspectorV2 — 基于Azure的客户端库存和漂移检测工具,用于收集Windows配置数据(防病毒、补丁管理、Bitlocker)到LogAnalytics,以支持KQL驱动的仪表板和Sentinel警报。 | Kitploit
工具/GitHubGitHub/knudsenmorten/clientinspectorv2
防御工具配置审计云安全事件响应日志分析
GitHubknudsenmorten/clientinspectorv2

ClientInspectorV2

基于Azure的客户端库存和漂移检测工具,用于收集Windows配置数据(防病毒、补丁管理、Bitlocker)到LogAnalytics,以支持KQL驱动的仪表板和Sentinel警报。

查看仓库
2753年前Kitploit 审核通过

最受欢迎

查看全部 →

发现我们社区最常用的工具。

探索所有工具

浏览我们的工具集合

查看所有工具 →
分享

ClientInspector (v2) 简介

ClientInspector

你掌控全局了吗? —— 还是你的某些核心基础架构流程,如补丁、防病毒、BitLocker启用,正在偏离轨道?或者你想进行高级资产盘点,能够对照联想或戴尔的保修信息查询保修状态?那就继续往下看。

试试 ClientInspector,它可以帮助你深入了解你的整个客户端环境。

ClientInspector 对社区免费开源 —— 它旨在酷炫展示如何利用 Azure 日志引入管道、Azure 数据收集规则、Azure LogAnalytics 从客户端回传数据;并通过 Azure Monitor 和 Azure 仪表板进行查看,同时使用 Microsoft Sentinel 获取“漂移警报”。

视频 3分01秒 - 仪表板

ClientInspector 架构与流程

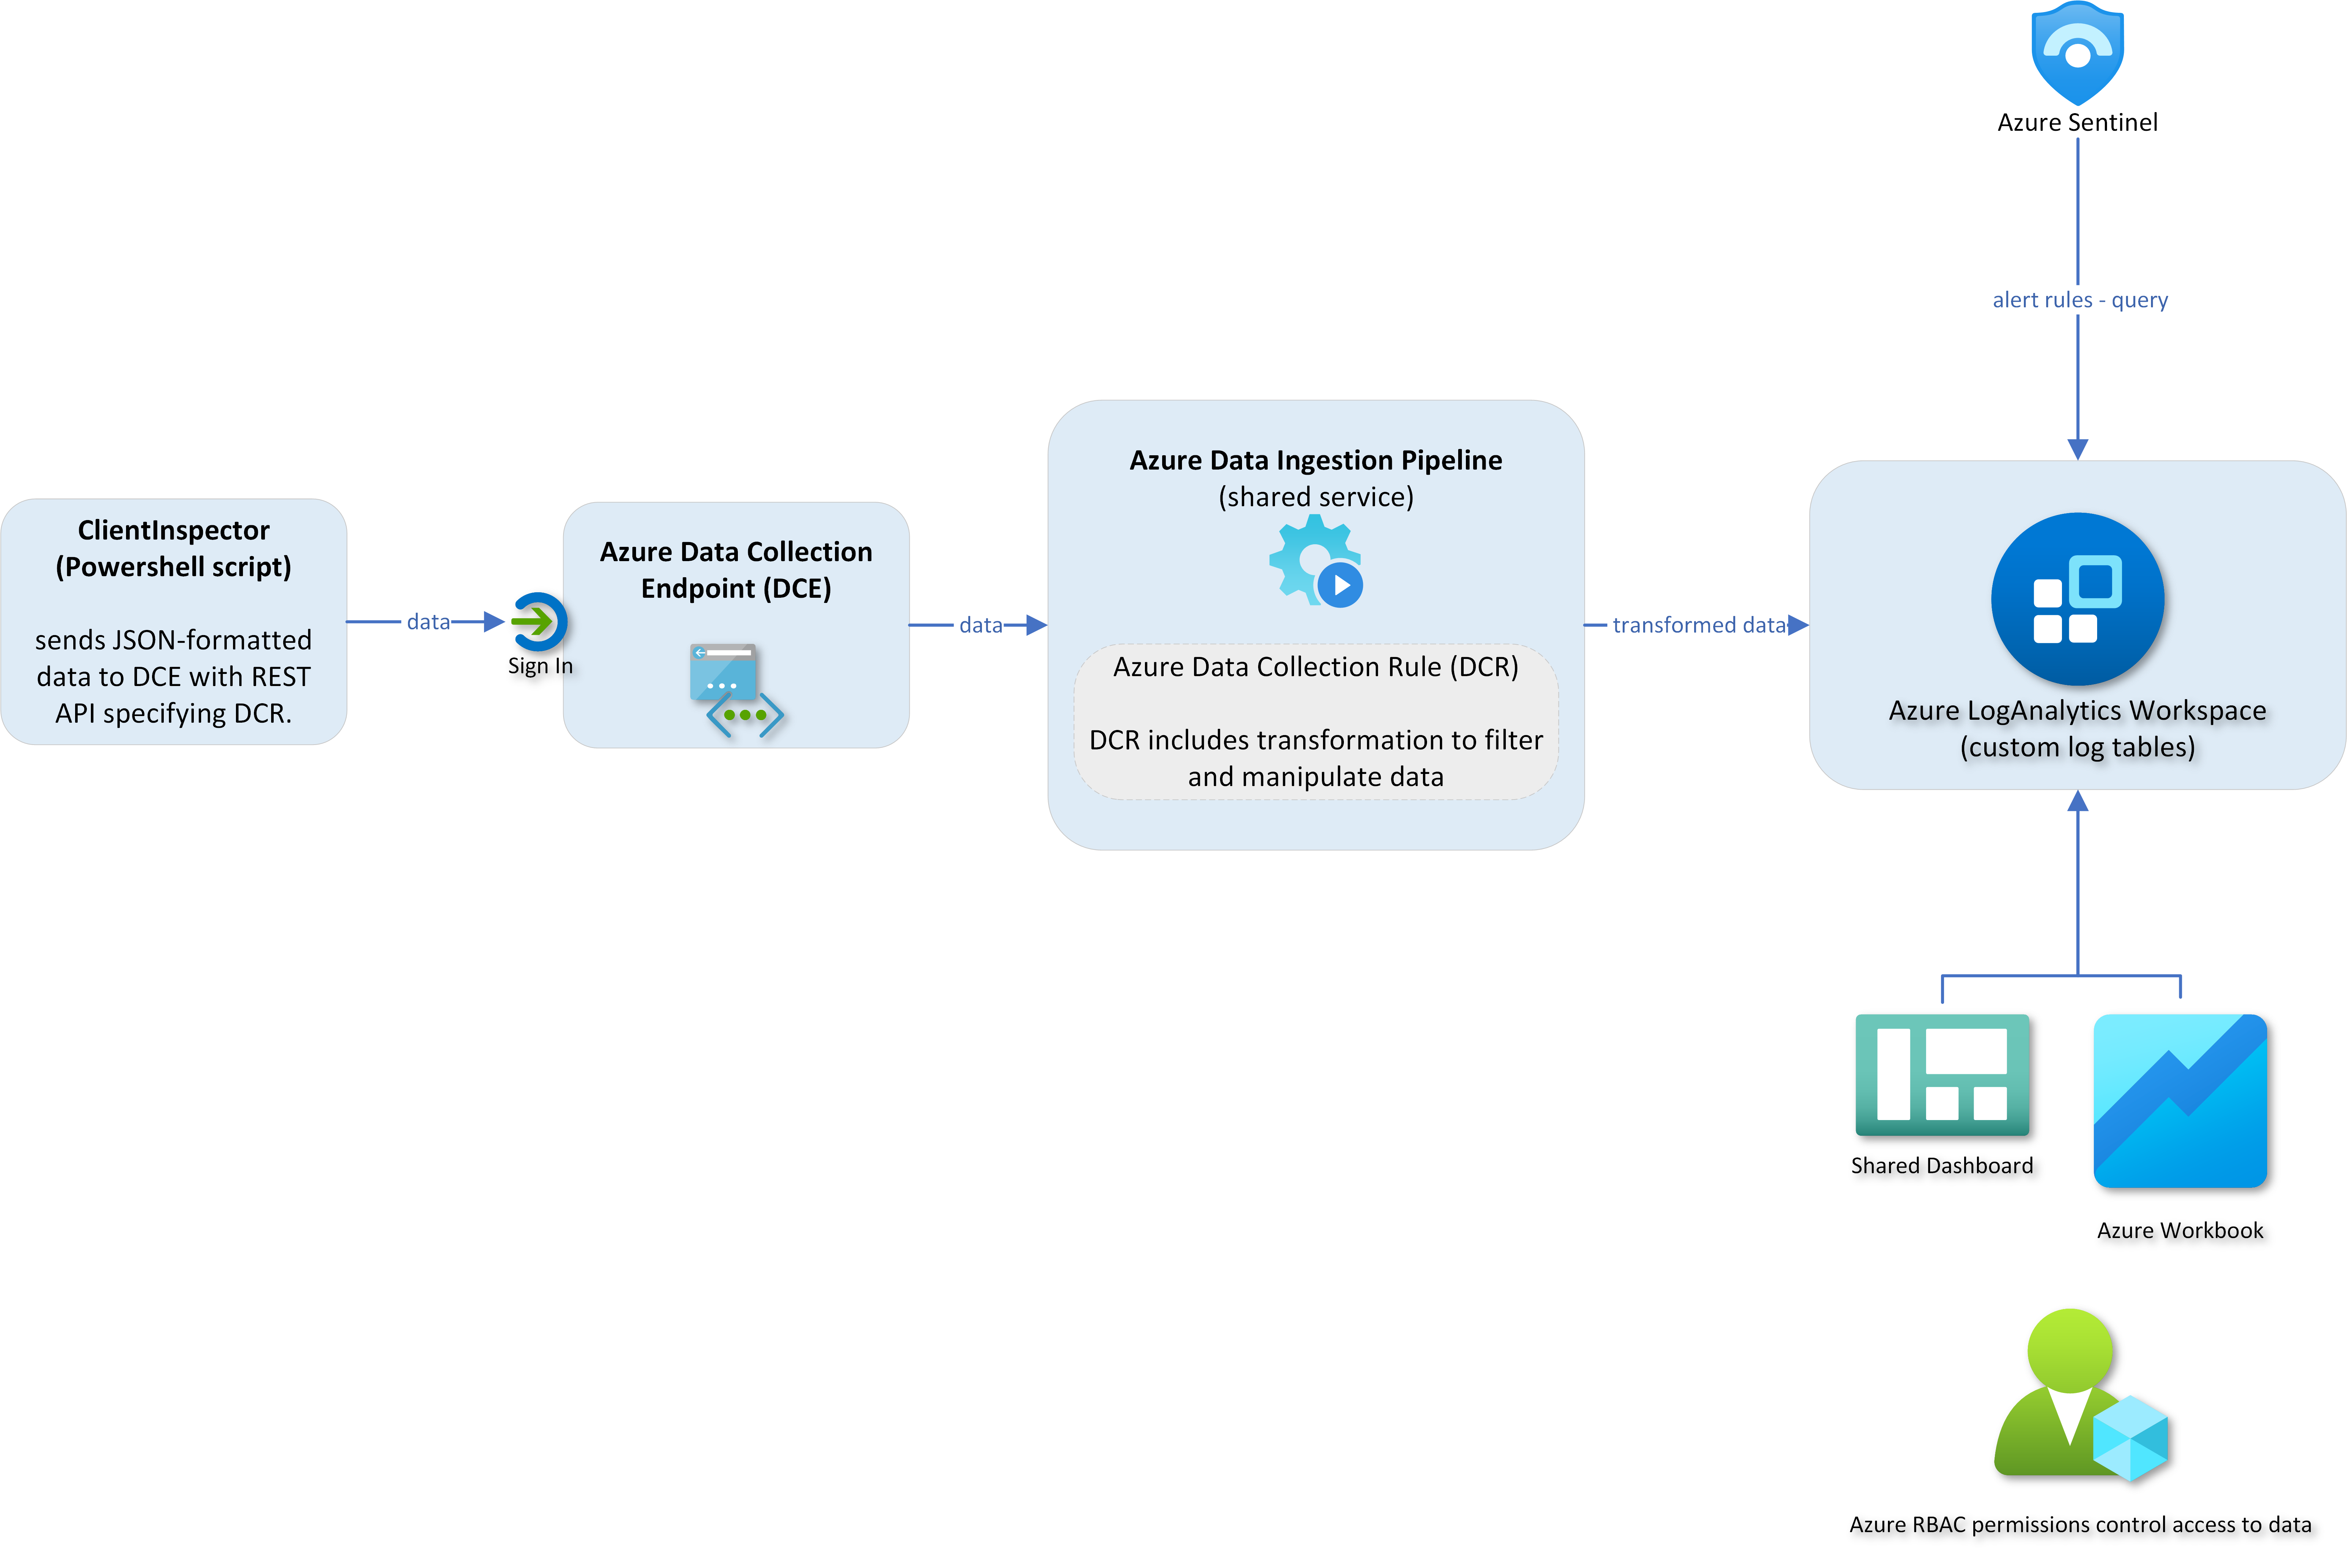
ClientInspector (v2) 通过日志引入 API、Azure 数据收集规则 (DCR) 和 Azure 数据收集终结点 (DCE),将收集到的数据上传到 Azure LogAnalytics 工作区的自定义日志中。
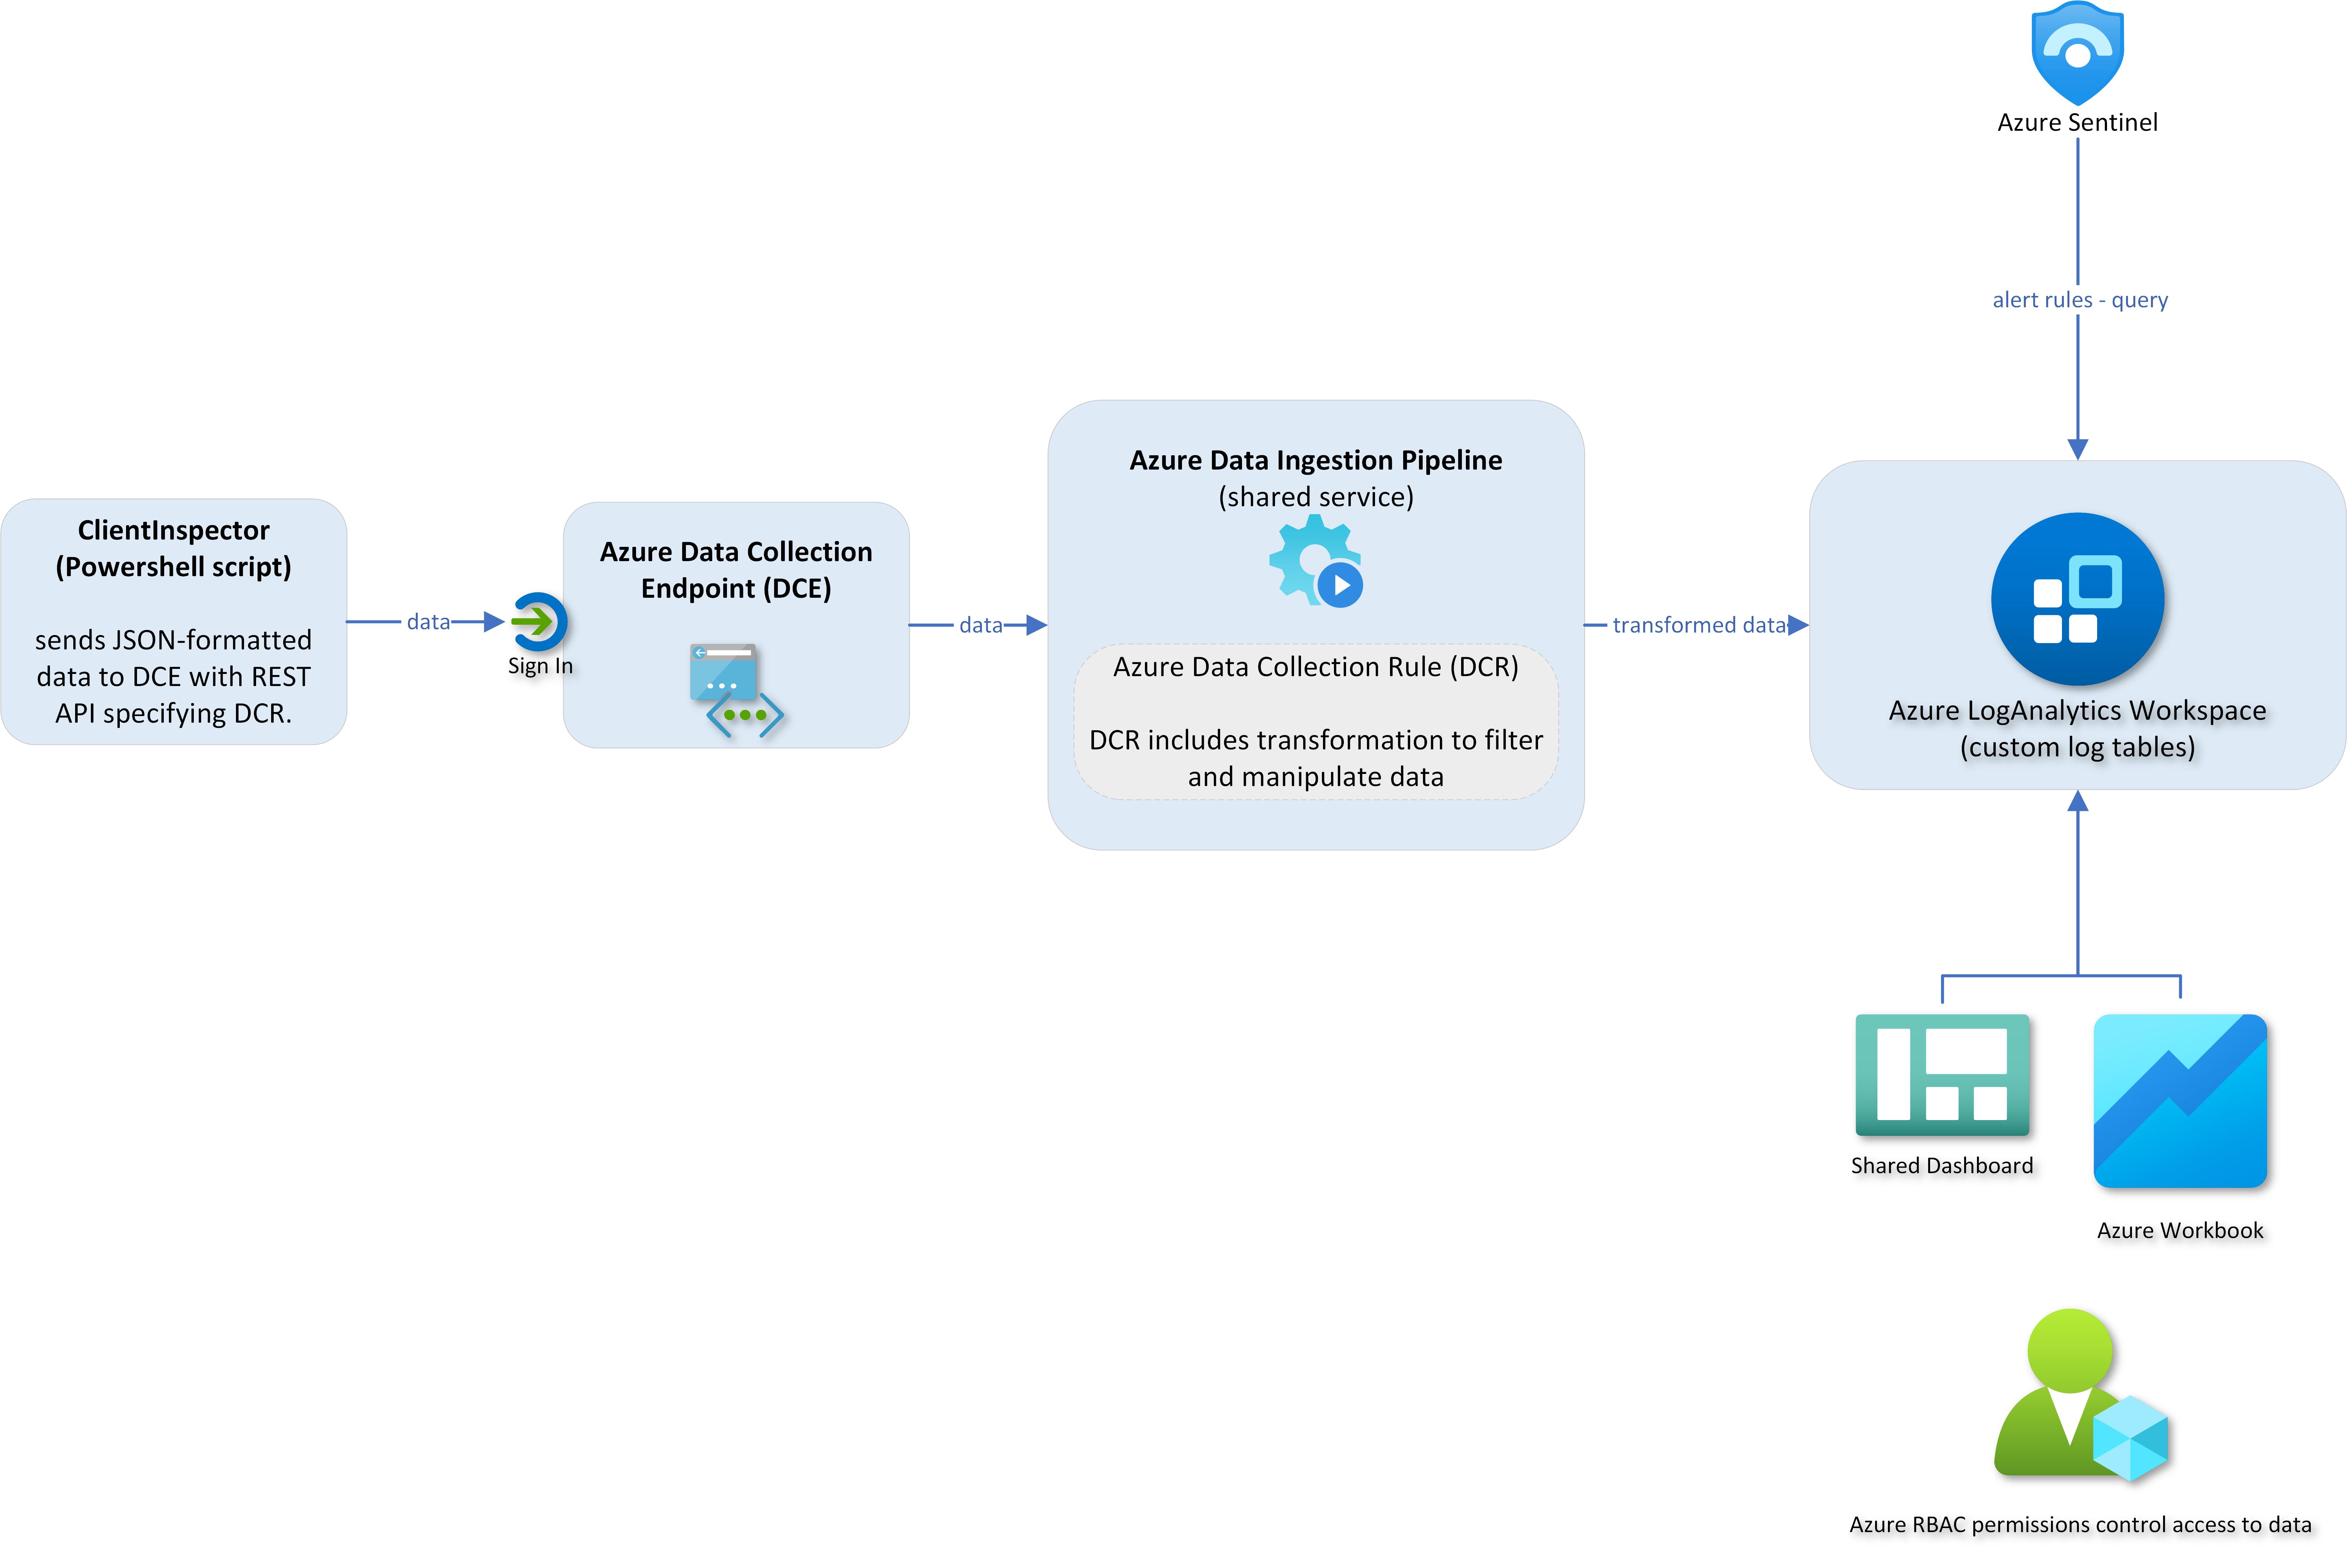
架构图

示例仪表板

KPI

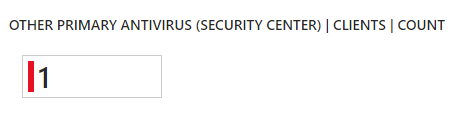
防病毒

蓝屏

免责声明

重要的是,我要说明我并非试图构建一个与微软安全和管理堆栈竞争的管理工具。

微软 Azure/M365 管理与安全堆栈无可匹敌,它们是明星级解决方案。

但我对日志记录能力以及从客户端、服务器、云端和第三方系统回传数据并从中获取有价值的酷信息充满热情。

我也有一个针对服务器的类似解决方案——ServerInspector。遗憾的是,该方案尚未公开。

衷心感谢微软产品团队的优秀人才——你们是明星 😄

祝搜索愉快 😄


快速链接

收集了哪些数据?
期望状态仪表板——如何从数据中洞察我的环境?
如何查询数据?——答案是 Kusto (KQL)
架构、架构与网络
实施
依赖项
运行 ClientInspector.ps1 - 3 种模式
ClientInspector 输出示例
安全
ClientInspector 数据集布局
详细模式与更多帮助
成本——存储这些数据需要多少费用?
发现 Bug,请告知我
联系方式

解决方案视频

视频 3分19秒 - 使用命令行运行 ClientInspector(普通模式)
视频 1分40秒 - 自动创建 2 个表与 DCR(详细模式)
视频 1分37秒 - 自动创建 2 个表与 DCR(普通模式)
视频 1分34秒 - 查看 DCR 和表的架构
视频 2分19秒 - 数据处理
视频 1分58秒 - 针对数据的 Kusto 查询
视频 3分01秒 - 仪表板
视频 0分48秒 - 数据使用示例——查询联想保修数据库
视频 7分25秒 - 通过 ClientInspector DeploymentKit 部署


收集了哪些数据?

ClientInspector 可用于收集来自 Windows 客户端的大量有用信息,并将数据发送到 Azure LogAnalytics 自定义表。

该脚本收集以下信息(设置、信息、配置、状态):

  1. 登录客户端的用户
  2. 计算机信息——BIOS、处理器、硬件信息、Windows 操作系统信息、操作系统信息、上次重启时间
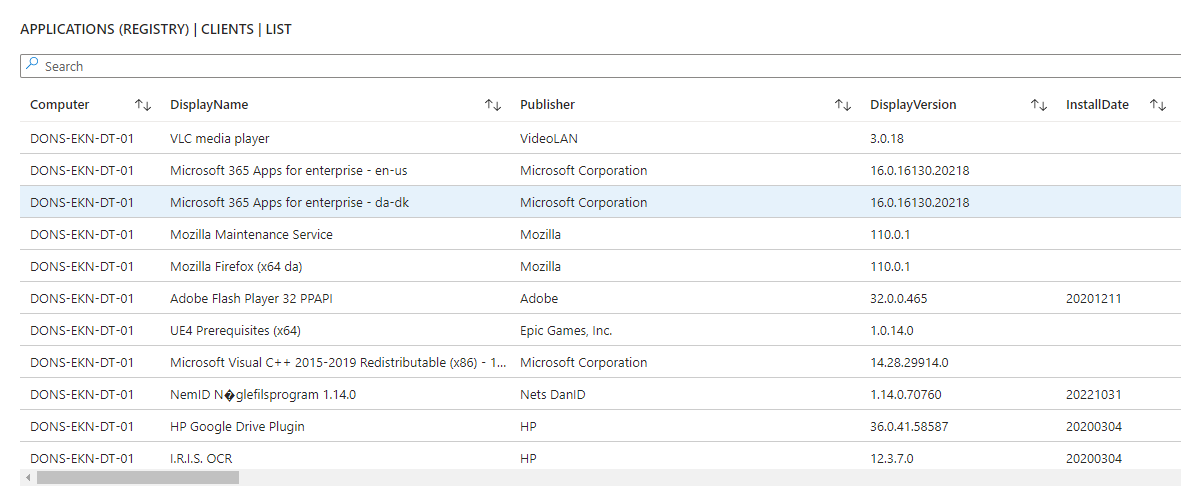
  3. 已安装的应用程序(同时使用 WMI 和注册表)
  4. Windows 安全中心的防病毒信息——默认防病毒软件、状态、配置
  5. Microsoft Defender 防病毒——所有设置,包括 ASR、排除项、实时保护等
  6. Office——版本、更新通道配置、SKU
  7. VPN 客户端——版本、产品
  8. LAPS——版本
  9. Admin By Request(第三方)——版本
  10. Windows Update——上次结果(时间)、Windows 更新源信息(位置)、待更新、上次安装内容
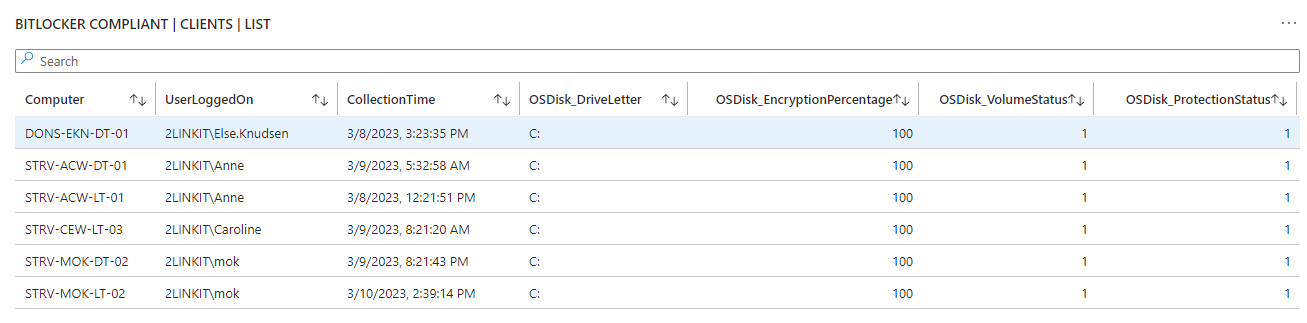
  11. BitLocker——配置
  12. 事件日志——查找特定事件,包括登录事件、蓝屏等
  13. 网络适配器——配置、已安装适配器
  14. 所有适配器的 IP 信息
  15. 本地管理员组成员身份
  16. Windows 防火墙——所有三种模式的设置
  17. 组策略——上次刷新
  18. TPM 信息——用于检测有/无 TPM 的计算机

欢迎添加更多酷炫的数据收集项以满足你的需求。
如果你想参与社区贡献,请将你的收集项通过电子邮件发送给我,如果你认为它们对全社区有价值。


源数据——我可以使用哪些数据?

你可以使用任何能够通过 PowerShell(WMI、CIM、外部数据、REST API、XML 格式、JSON 格式、CSV 格式等)检索到的源数据。

需要特别理解的是,数据通常需要在发送前进行处理,以确保数据有效并移除任何无关数据。

ClientInspector 使用了 PowerShell 模块 AzLogDcIngestPS 中的所有 24 个函数,来处理源数据的**“数据噪声”移除**、表/DCR 中禁止列的重命名,并支持通过 UserLoggedOn、CollectionTime、Computer 等额外洞察实现透明性的需求:

如何使用函数 Convert-CimArrayToObjectFixStructure、Add-CollectionTimeToAllEntriesInArray、Add-ColumnDataToAllEntriesInArray、ValidateFix-AzLogAnalyticsTableSchemaColumnNames、Build-DataArrayToAlignWithSchema、Filter-ObjectExcludeProperty 的示例```js #------------------------------------------------------------------------------------------- # Collecting data (in) #-------------------------------------------------------------------------------------------

Write-Output "" Write-Output "Collecting Bios information ... Please Wait !"

$DataVariable = Get-CimInstance -ClassName Win32_BIOS

#-------------------------------------------------------------------------------------------

Preparing data structure

#-------------------------------------------------------------------------------------------

convert CIM array to PSCustomObject and remove CIM class information

$DataVariable = Convert-CimArrayToObjectFixStructure -data $DataVariable -Verbose:$Verbose

add CollectionTime to existing array

$DataVariable = Add-CollectionTimeToAllEntriesInArray -Data $DataVariable -Verbose:$Verbose

add Computer & UserLoggedOn info to existing array

$DataVariable = Add-ColumnDataToAllEntriesInArray -Data $DataVariable -Column1Name Computer -Column1Data $Env:ComputerName -Column2Name UserLoggedOn -Column2Data $UserLoggedOn -Verbose:$Verbose

Remove unnecessary columns in schema

$DataVariable = Filter-ObjectExcludeProperty -Data $DataVariable -ExcludeProperty __*,SystemProperties,Scope,Qualifiers,Properties,ClassPath,Class,Derivation,Dynasty,Genus,Namespace,Path,Property_Count,RelPath,Server,Superclass -Verbose:$Verbose

请参阅有关AzLogDcrIngestPS中可用功能的更多详细信息 - 以及如何使用它们


期望状态仪表板 - 如何从数据中获取环境的洞察?

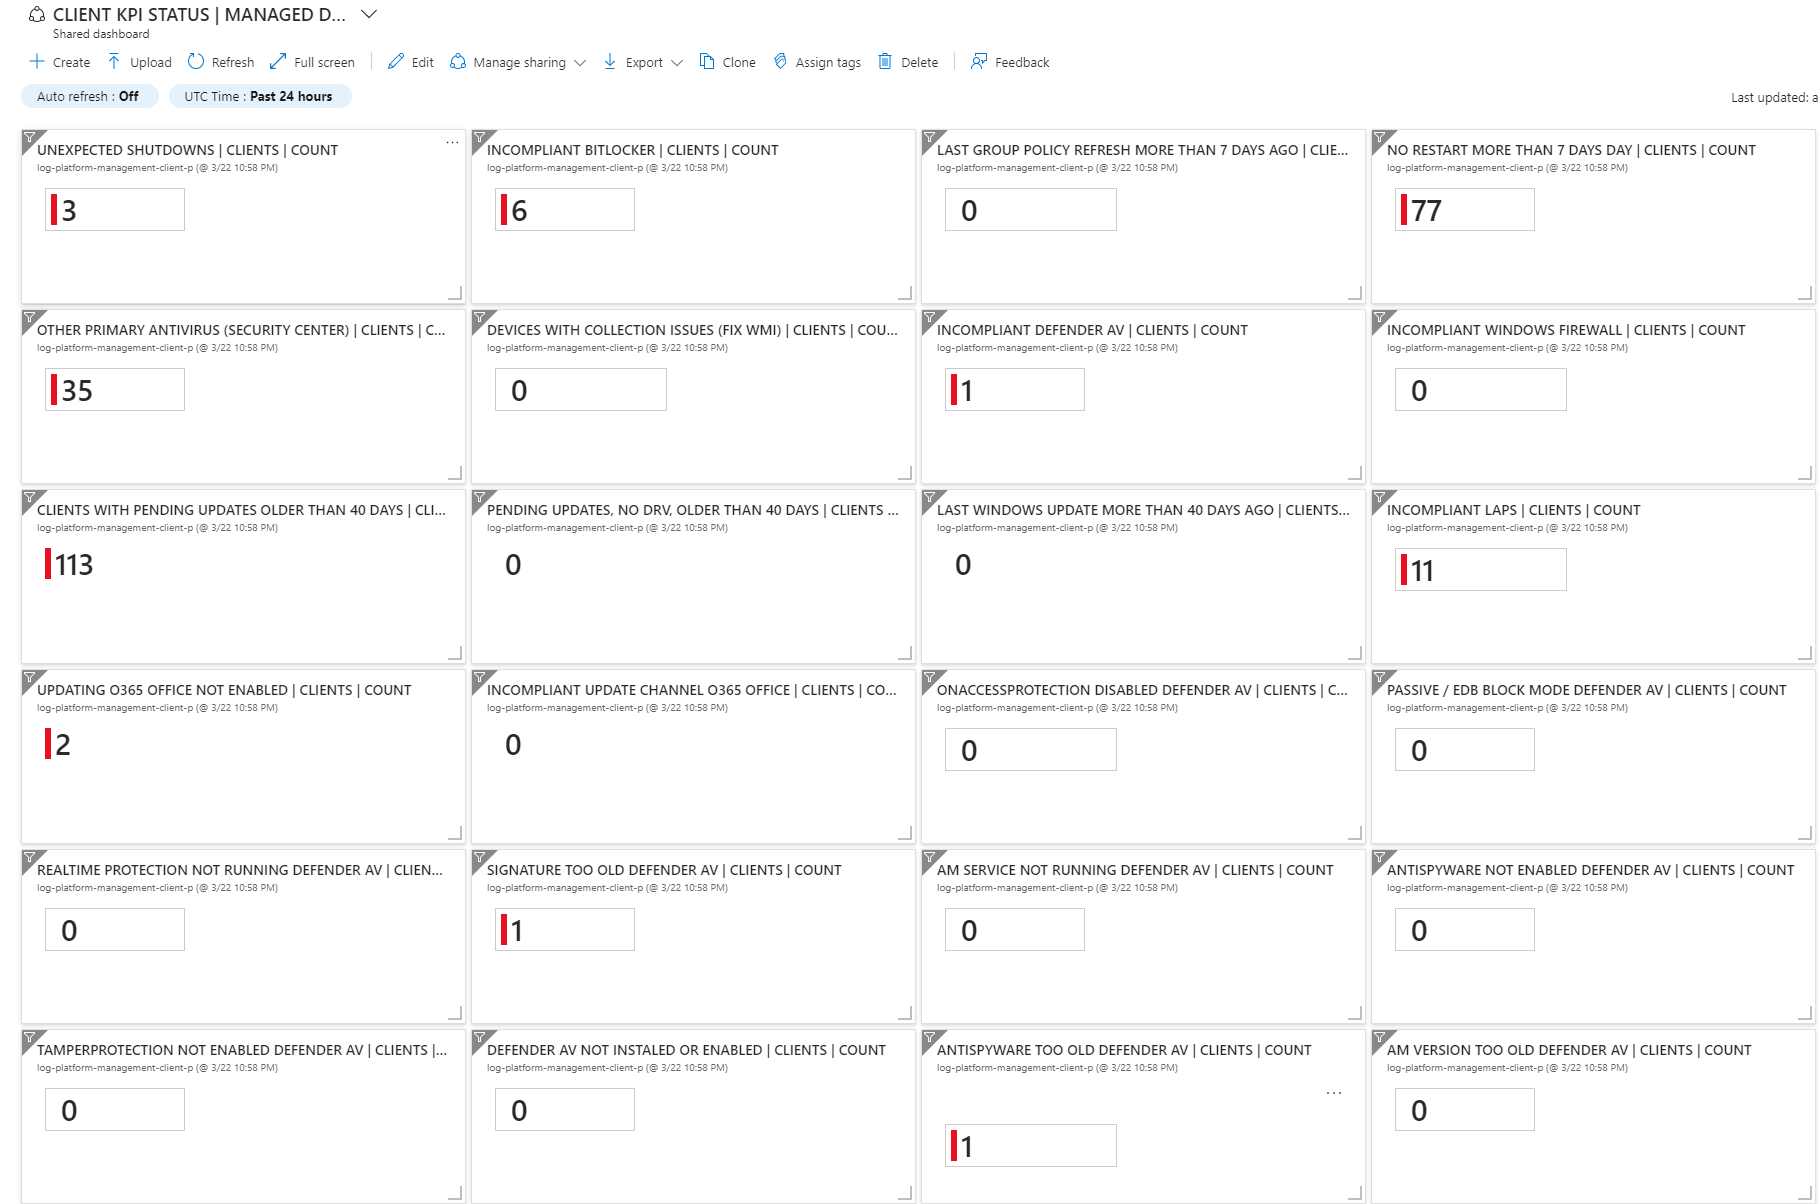
作为使用ClientInSpectorV2-DeploymentKit初始部署的一部分,您将可以访问大量的Azure仪表板和Azure工作簿。

视频3分01秒 - 仪表板

仪表板的理念是显示您的基础设施在哪些方面偏离了‘期望状态’。可以把它们看作关键绩效指标(KPI),显示基础设施失控之处。

与其有一个修补和管理防病毒的任务,您可以考虑使用KPI,这些KPI将显示哪些计算机没有打补丁 - 或者防病毒中的实时保护没有运行 - 或者在过去24小时内蓝屏过的计算机。

这与Microsoft安全评分的概念相同。

防病毒

蓝屏

解决方案中包含的更多示例视图

防病毒

防病毒

防病毒

防病毒

Bitlocker

Bitlocker

蓝屏

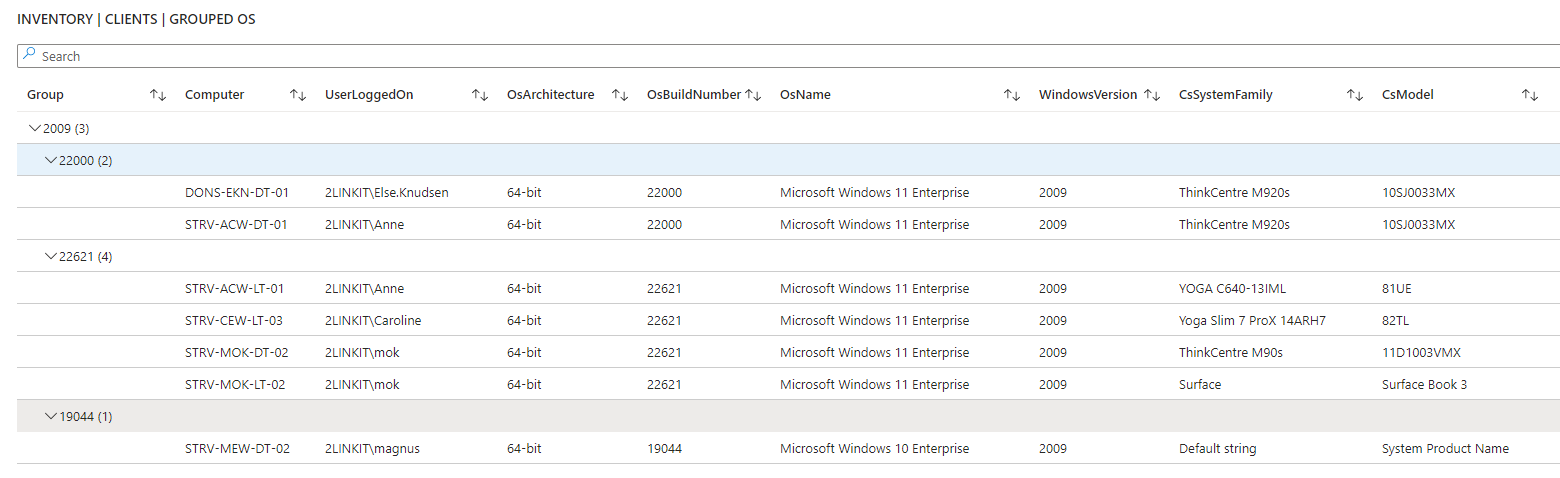
计算机信息

计算机信息

计算机信息

计算机信息

Defender

Office

链接查看提供的Azure工作簿的完整列表

所有示例Azure仪表板都是基于Azure工作簿中的固定部件创建的,因此如果您想要深入查看,可以单击链接来获取详细信息。

仪表板

链接查看提供的Azure仪表板

我可以创建自己的工作簿和仪表板吗 - 是的,你可以 😄

如果你想添加更多的仪表板或工作簿,通常你需要先使用KQL查询在自定义日志表中调查收集的数据。找到所需的查询后,你可以创建工作簿中的新视图 - 并将你喜欢的视图固定到仪表板上。


如何查询数据? - Kusto (KQL) 就是答案

如果你不了解Kusto语言,我建议你开始尝试使用它,因为它是一种非常强大的语言。

视频1分58秒 - Kusto查询数据
视频3分01秒 - 仪表板

使用Kusto查询语言编写第一个查询

使用KQL分析查询结果

以下是根据ClientInspector数据准备的4个查询示例,帮助您入门。

示例查询1:使用Kusto (KQL) 查询进行高级搜寻

如果你想进行高级搜寻,你可以在表中使用传统的Kusto (KQL) 查询

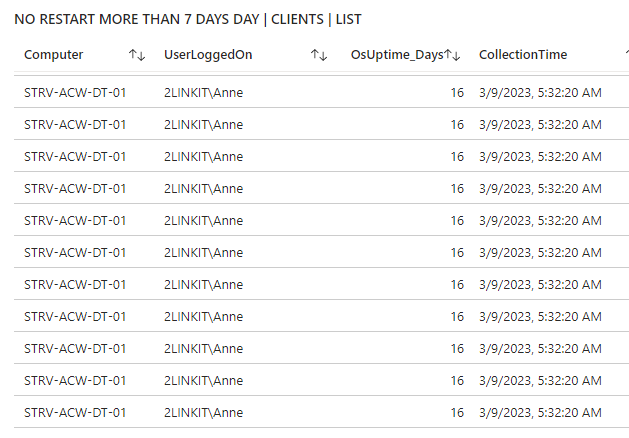
示例查询 ```js InvClientDefenderAvV2_CL | where TimeGenerated > ago(31d) | summarize CollectionTime = arg_max(CollectionTime, *) by Computer | where ((AMRunningMode == "Not running") or (parse_version(AMProductVersion) < parse_version("4.18.2203")) or (MPComputerStatusFound == false) or (MPPreferenceFound == false) or (RealTimeProtectionEnabled == false) or (AntivirusSignatureAge > 7) or (AntispywareSignatureAge > 7) or (NISSignatureAge > 7) or (AMRunningMode == "EDR Block Mode") or (AMRunningMode == "Passive Mode") or (AntispywareEnabled == false) or ((TamperProtectionSource != "ATP") and (TamperProtectionSource != "Intune")) or (IsTamperProtected == false) ) | project Computer, UserLoggedOn, CollectionTime, MPComputerStatusFound, MPPreferenceFound, AMEngineVersion, AMProductVersion, AMRunningMode, AMServiceEnabled, AMServiceVersion, AntispywareEnabled, AntispywareSignatureAge, AntispywareSignatureLastUpdated, AntispywareSignatureVersion, AntivirusEnabled, AntivirusSignatureAge, AntivirusSignatureLastUpdated, AntivirusSignatureVersion, BehaviorMonitorEnabled, DefenderSignaturesOutOfDate, DisableAutoExclusions, DisableBehaviorMonitoring, DisableRealtimeMonitoring, DisableScanningMappedNetworkDrivesForFullScan, DisableScanningNetworkFiles, DisableScriptScanning, EnableControlledFolderAccess, EnableNetworkProtection, FullScanAge, IoavProtectionEnabled, IsTamperProtected, IsVirtualMachine, MAPSReporting, NISEnabled, NISEngineVersion, NISSignatureAge, NISSignatureLastUpdated, NISSignatureVersion, OnAccessProtectionEnabled, ProductStatus, PUAProtection, QuickScanAge, RealTimeProtectionEnabled, RealTimeScanDirection, RebootRequired, ScanAvgCPULoadFactor, SignatureUpdateCatchupInterval, SignatureUpdateInterval, SubmitSamplesConsent, TamperProtectionSource ```

示例查询2:从3个表合并数据的Kusto查询

示例查询 ```js InvClientComputerInfoBiosV2_CL | summarize TimeGenerated = arg_max(TimeGenerated,*) by Computer | join (InvClientComputerInfoSystemV2_CL | summarize TimeGenerated = arg_max(TimeGenerated,*) by Computer) on $left.Computer == $right.Computer | join (InvClientComputerOSInfoV2_CL | summarize TimeGenerated = arg_max(TimeGenerated,*) by Computer) on $left.Computer == $right.Computer | project Computer, UserLoggedOn, SerialNumber, Manufacturer, PCSystemType, SystemFamily, Model, Windows=Caption2, WindowsVersion=Version1, TimeGenerated ```

示例查询3:从Powershell查询LogAnalytics数据

示例查询 ```js Connect-AzAccount

#----------------------------------------------------------------------------------------------------------------------

Variables

#----------------------------------------------------------------------------------------------------------------------

$LogAnalyticsWorkspaceId = "e74ca75a-c0e6-4933-a4f7-e5ae943fe4ac"

#----------------------------------------------------------------------------------------------------------------------

Collecting Computer data from Azure LogAnalytics

#---------------------------------------------------------------------------------------------------------------------- $Query = @' InvClientComputerInfoBiosV2_CL | summarize TimeGenerated = arg_max(TimeGenerated,) by Computer | join (InvClientComputerInfoSystemV2_CL | summarize TimeGenerated = arg_max(TimeGenerated,) by Computer) on $left.Computer == $right.Computer | join (InvClientComputerOSInfoV2_CL | summarize TimeGenerated = arg_max(TimeGenerated,*) by Computer) on $left.Computer == $right.Computer | project Computer, UserLoggedOn, SerialNumber, Manufacturer, PCSystemType, SystemFamily, Model, Windows=Caption2, WindowsVersion=Version1, TimeGenerated '@

write-output "Collecting computer information from LogAnalytics" $Query = Invoke-AzOperationalInsightsQuery -WorkspaceId $LogAnalyticsWorkspaceId -Query $Query $ComputerInfoArray = $Query.Results $ComputerInfoArray

root@kitploit:~
</details>

## 示例查询4:将数据与其他源集成(针对联想保修数据库的保修检查)

当我们在 Azure LogAnalytics 中拥有数据时,我们可以开始将这些数据与其他源集成,例如通过 REST API 查询 Dell 或 Lenovo 的保修数据。

[视频 0分48秒 - 数据使用示例 - 查询联想保修数据库](https://youtu.be/3ZDyTwiLU0w)  

以下是一个输出示例,由 PowerShell 脚本自动创建——提取计算机和序列号列表,然后查询联想保修数据库以获取计算机购买日期及其保修状态的信息。

[基于 ClientInspector 收集的数据的示例保修输出(Excel)](https://github.com/KnudsenMorten/ClientInspectorV2/raw/main/img/WarrantyInfo.xlsx)

<br>
   
# 架构、架构与网络
ClientInspector (v2) 将收集到的数据上传到 **Azure LogAnalytics 工作区**中的**自定义日志**——使用**日志引入 API**、**Azure 数据收集规则 (DCR)** 和**Azure 数据收集端点 (DCE)**。 

![架构](https://assets.kitploit.com/production/public/readmes/6097/a1f4330c4e3747c2ebe092927df32352c2c158028f239afb7617e608aa882966.png)

## 架构
DCR 和 LogAnalytics 表都有一个架构,需要与源对象的架构匹配。这通过使用 AzLogDcrIngestPS 模块中的函数来处理。

[视频 1分40秒 - 自动创建2个表及DCR(详细模式)](https://youtu.be/rIUNs3yT-eI)  
[视频 1分37秒 - 自动创建2个表及DCR(正常模式)](https://youtu.be/khQMDcON6r8)  
[视频 1分34秒 - 查看DCR和表的架构](https://youtu.be/NDSNhvpa4Gs)  

AzLogDcrIngestPS 支持两种管理架构的模式:**合并**和**覆盖**

### SchemaMode = Merge(默认)

如果设置 SchemaMode = Merge,则源对象的新属性将添加(合并)到日志分析当前架构中。DCR 将从日志分析表导入架构以确保它们完全相同。

默认模式是 Merge,如果你没有在函数上定义 SchemaMode 变量:
CheckCreateUpdate-TableDr-Structure
CreateUpdate-AzLogAnalyticsCustomLogTableDcr
CreateUpdate-AzDataCollectionRuleLogIngestCustomLog

### SchemaMode = Overwrite

如果设置 SchemaMode = Overwrite,则 DCR 和表中的架构将根据源对象架构被覆盖(更新)。

## 网络

你有3种连接到 Azure 上传数据的方式:

|上传方式|连接详情|操作系统合规性|
|:------------|:-------------------|:------------|
|公共访问|REST 端点通过 DCE 的公共 IP 发送到 DCE|端点支持 TLS 1.2|
|私有访问|REST 端点通过 DCE 的私有链接发送到 DCE|端点支持 TLS 1.2|
|日志中心|REST 端点通过 [log-hub](https://github.com/KnudsenMorten/AzLogDcrIngestPSLogHub) 发送数据——这是我构建的一个概念。|端点不支持 TLS 1.2。<br> Azure 将不直接接受来自这些设备的连接|

### 互联网连接端点 - 操作系统级合规性
![互联网连接端点 - 操作系统级合规性](https://assets.kitploit.com/production/public/readmes/6097/3cc67f07297302ff59d08c95a790ec8ad417f8dbd07f566a24b154eecfecb8bb.png)

你需要在防火墙中允许以下端点:
|端点|用途|端口|方向|绕过 HTTPS 检查|
|:-------|:------|:----|:-------|:----------------------|
|global.handler.control.monitor.azure.com|访问控制服务|端口 443|出站|是|
|dce 日志引入 URI<br><br>示例<br>https://dce-log-platform-management-client-demo-p-iur0.westeurope-1.ingest.monitor.azure.com|引入日志数据|端口 443|出站|是|

<br>

### 无互联网访问或操作系统级不兼容,例如运行 TLS 1.0/1.1
[通过此链接查看 log-hub 概念](https://github.com/KnudsenMorten/AzLogDcrIngestPSLogHub)

![无互联网访问或操作系统级不兼容,例如运行 TLS 1.0/1.1](https://assets.kitploit.com/production/public/readmes/6097/42435b25d7c2cc8d405e62d577420fa980aef5f9267f461c56ce9a08f7f81917.png)

<br>

# 实施
希望你能体验到,让一切运行起来相当简单。以下概述了3个步骤。

在开始之前,我强烈建议你详细阅读下面介绍中的组件。

<details>
  <summary>ClientInspector 使用的 Azure 组件介绍</summary>

<br>

需要以下组件:

| Azure 资源                     | 目的                                           | 更多信息 |
| :-------------                | :-----                                            | :-----           |
| 任意 REST 端点                | 这是发送数据的源                                  |                  |
| 日志引入 API                  | 这是替代旧 HTTP 数据收集器 API 的新 API            | https://learn.microsoft.com/en-us/azure/azure-monitor/logs/logs-ingestion-api-overview |
| 数据收集端点 (DCE)            | 这是来自端点的通信入口点。数据被发送到**Azure 数据收集端点引入 URI**。单个 DCE 可以支持多个 DCR,因此你可以为不同的源和目标表指定不同的 DCR。 | https://learn.microsoft.com/en-us/azure/azure-monitor/essentials/data-collection-endpoint-overview?tabs=portal |
| 数据收集规则 (DCR)            | 数据收集规则定义收集的数据(架构),并指定数据应如何以及发送或存储到何处。DCR 必须理解输入数据的结构和目标表的结构。如果两者不匹配,它可以利用转换将源数据转换为与目标表匹配。你还可以使用转换来过滤源数据并执行任何其他计算或转换。 | https://learn.microsoft.com/en-us/azure/azure-monitor/essentials/data-collection-rule-overview | 
| Azure LogAnaltyics 工作区     | 数据被发送到 Azure LogAnalytics 中的自定义日志     | https://learn.microsoft.com/en-us/azure/azure-monitor/logs/log-analytics-overview |
| Azure Workbooks               | 作为部署的一部分,将部署示例工作簿                | https://learn.microsoft.com/en-us/azure/azure-monitor/visualize/workbooks-overview |
| Azure Dashboards              | 作为部署的一部分,将部署示例工作簿                | https://learn.microsoft.com/en-us/azure/azure-monitor/visualize/tutorial-logs-dashboards |
| Kusto (KQL)                   | 数据可以使用 Kusto (KQL) 查询进行分析              | https://learn.microsoft.com/en-us/azure/azure-monitor/logs/get-started-queries |

</details>

在你的环境中设置 ClientInspector 的步骤如下:
1. [使用 ClientInSpectorV2-DeploymentKit 设置环境](https://github.com/KnudsenMorten/ClientInspectorV2-DeploymentKit)

2. 首次运行 ClientInspector(初始设置)——参见下方
<details>
  <summary>如何配置 Azure LogAnalytics 表和 Data Collection Rules 的初始设置(首次)</summary>

<br>
我建议使用一台参考计算机,用于表/DCR 管理。这样如果必须进行更改(例如源对象架构更改),过程将是可控的。

<br>
<br>
配置:

1. 当你运行 DeploymentKit 时,它会自动为你准备好 ClientInspector 文件,因此你只需插入变量即可```js
$TenantId                                   = "xxxx" 
$LogIngestAppId                             = "xxxx" 
$LogIngestAppSecret                         = "xxxx" 

$DceName                                    = "xxxx" 
$LogAnalyticsWorkspaceResourceId            = "xxxx"

$AzDcrPrefixClient                          = "xxx" 
$AzDcrSetLogIngestApiAppPermissionsDcrLevel = $false
$AzDcrLogIngestServicePrincipalObjectId     = "xxx" 
$AzDcrDceTableCreateFromReferenceMachine    = @()
$AzDcrDceTableCreateFromAnyMachine          = $true
  1. 设置部署任务,让 ClientInspector 每天运行以收集清单。你可以使用你喜欢的部署工具运行 ClientInspector 脚本。提供了适用于 Microsoft Intune 和 ConfigMgr 的脚本。
如何使用 Microsoft Intune 部署?
你将在 Microsoft Intune 中使用“主动修复”运行清单脚本。
  1. 下载检测脚本 ClientInspector_Detection.ps1(右键单击并选择“另存链接为”)

  2. 用你喜欢的编辑器打开文件。根据需要调整清单运行的频率。```js ##################################

VARIABLES

##################################

root@kitploit:~
$RunEveryHours    = 8
$LastRun_RegPath  = "HKLM:\SOFTWARE\ClientInspector"
$LastRun_RegKey   = "ClientInSpector_System"
root@kitploit:~
3. 现在我们需要创建修复任务。进入 Microsoft Intune 门户 -> 报告 -> 终结点分析 --> 主动修复 - 并创建一个脚本包,如下所示

注意:对于修复脚本,请使用 **ClientInspector.ps1** 文件

![流程](https://assets.kitploit.com/production/public/readmes/6097/c5d24f8afca4130a3a58414028120540526722b92ed5c9ae6cb029c605baf657.png)

![流程](https://assets.kitploit.com/production/public/readmes/6097/ea200a01c92a84d801e03439891428130160b4dd8bbb11e6ecac4b2f68de18d1.png)


### Intune 限制

注意:Intune 对修复脚本的大小限制为 200 Kb。**

![Intune 错误](https://assets.kitploit.com/production/public/readmes/6097/7488505e7c4a5e3fa31e1007bf435b89aeb5ebf4fb1c1dbf133835082cce33e6.png)


如果遇到此限制,建议将脚本拆分为 2 个脚本。

![Intune 拆分](https://assets.kitploit.com/production/public/readmes/6097/3ddc7edb1bdf2a492928a0dad8487996a9166878fba20a0403d347a895fe69a3.png)

![Intune 拆分](https://assets.kitploit.com/production/public/readmes/6097/36f29366fa4fbf0f878a569489c59100601f5a27f8d015373497b9fd387309ec.png)

请记住,需要包含头部部分,包括 UserLoggedOn 部分作为第二个文件的头部。UserLoggedOn 用于显示当前登录的用户。

我已经准备了一个[示例脚本设置](https://github.com/KnudsenMorten/ClientInspectorV2/tree/main/Sample%20intune%20setup%20if%20file%20size%20is%20more%20than%20200%20Kb),你可以查看如何拆分它们。注意:这些脚本中的代码尚未更新,因此请确保从主 ClientInspector 文件中提取相应的部分。

基本结构如下:

文件 1 包含头部 + UserLoggedOn(第 1 部分)+ 第 2-9 部分 + 将检查标志写入 HKLM\Software\ClientInspector\ClientInspector_System_1  

文件 2 包含头部 + UserLoggedOn(第 1 部分)+ 第 10-18 部分 + 将检查标志写入 HKLM\Software\ClientInspector\ClientInspector_System_2  


![流程](https://assets.kitploit.com/production/public/readmes/6097/37639a721b2d45fae907e177c6cb90ea32151f1ab8bdb1262e8e2bed0f8ec354.png)

![流程](https://assets.kitploit.com/production/public/readmes/6097/96d02fdeaf59594c29e9755b0033557a3594e33b6bf61b92fa38edebd4c5b84d.png)

![流程](https://assets.kitploit.com/production/public/readmes/6097/070c7a1431ad3899d496cc333224c8ff58b35d523ba7c77e11ba151501039d73.png)


</details>


<details>
  <summary>如何使用 ConfigMgr(或任何其他运行 CMD 文件的工具)进行部署?</summary>
  
<br>
你将通过传统的包和部署方式运行清单脚本
    
1. [下载 CMD 文件 ClientInspector.cmd](https://github.com/KnudsenMorten/ClientInspectorV2/raw/main/ConfigMgr/ClientInspector.cmd)(右键单击并选择“将链接另存为”)

2. 在 ConfigMgr 包源目录中创建一个源结构,例如命名为 ClientInspector。

3. 将所需的两个文件 **ClientInspector.cmd** 和 **ClientInspector.ps1** 复制到该目录中

4. 创建一个包 - 并将包指向运行 **ClientInspector.cmd**

5. 创建一个部署

</details>

<br>

# 依赖项

## Powershell 模块 AzLogDcringestPS - 由我(Morten Knudsen)构建

ClientInspector 需要 Powershell 模块 **AzLogDcrIngestPS**

Powershell 模块 **AzLogDcrIngestPS** 的核心功能包括:
* 根据源对象架构自动创建/更新 DCR 和表
* 验证架构的命名约定问题。如果发现问题,将进行修复
* 如果源对象的结构发生变化,更新 DCR 和表的架构
* 如果 DCR 或表出现问题,自动修复
* 可以从源对象中删除数据,如果你不想发送某些数据列
* 可以将基于 CIM 或 PS 对象的源对象转换为 PSCustomObjects/数组
* 可以为每条记录添加相关信息,如 UserLoggedOn、Computer、CollectionTime

你可以通过以下链接找到有关该模块的更多详细信息:

[AzLogDcrIngestPS (Github)](https://github.com/KnudsenMorten/AzLogDcrIngestPS)

[AzLogDcrIngestPS (Powershell Gallery)](https://www.powershellgallery.com/packages/AzLogDcrIngestPS)

[AzLogDcrIngestPSLogHub (Github)](https://github.com/KnudsenMorten/AzLogDcrIngestPSLogHub)

<br>

## 第三方 Powershell 模块
我倾向于使用著名的 Powershell 模块 PSWindowsUpdate 来检索 Windows Update 信息。

|模块名称|用途|更多信息|致谢|
|:---------|:------|:--------|:-----|
|NuGet|用于部署许多 Powershell 模块(包括 AzLogDcrIngestPS)的通用包提供程序<br><br>脚本运行时,包提供程序将自动安装在计算机上|[链接](https://www.nuget.org/packages)|
|PSWindowsUpdate|收集 Windows Update 信息(待处理更新、已安装更新等)<br><br>脚本运行时,模块将自动安装在计算机上|[链接](https://www.powershellgallery.com/packages/PSWindowsUpdate)|Michal Gajda

<br>

# 运行 ClientInspector.ps1 - 3 种模式
ClientInspector 支持 3 种安装/更新/导入所需 Powershell 模块的方式:**Download**、**PsGallery**、**LocalPath**

默认情况下,它将从 PsGallery 下载最新版本到 CurrentUser 作用域。

[视频 3 分 19 秒 - 使用命令行运行 ClientInspector(正常模式)](https://youtu.be/4kA4BE0zJ9g)  

## .\ClientInspector.ps1 -function:LocalPath
ClientInspector 会在脚本运行目录中查找 **AzLogDcrIngest.psm1** 文件。
如果缺少 AzLogDcrIngest.psm1,脚本将终止 - 否则它将执行 import-module。

示例```
.\ClientInspector.ps1 -verbose:$false -function:localpath

ClientInspector | Inventory of Operational & Security-related information
Developed by Morten Knudsen, Microsoft MVP - for free community use

Using AzLogDcrIngestPS module from local path D:\scripts\ClientInspectorV2
下载工具

Validating/fixing schema data structure of source data

$DataVariable = ValidateFix-AzLogAnalyticsTableSchemaColumnNames -Data $DataVariable -Verbose:$Verbose

Aligning data structure with schema (requirement for DCR)

$DataVariable = Build-DataArrayToAlignWithSchema -Data $DataVariable -Verbose:$Verbose

root@kitploit:~
您可以通过运行以下命令来验证源对象````
# Get insight about the schema structure of an object BEFORE changes. Command is only needed to verify columns in schema
Get-ObjectSchemaAsArray -Data $DataVariable -Verbose:$Verbose

Office

Office

Office

WU

WU

WU

WinFw

  1. 以本地管理员身份启动 PowerShell

  2. 使用以下命令启动脚本```js C:\ClientInspector\ClientInspector.ps1 -verbose:$true

root@kitploit:~
4. ClientInspector 将运行 10-20 分钟,根据您环境中的实际结构创建必要的表和数据收集规则。请仔细查看屏幕上的结果,查找任何错误(红色)

5. 一切正常后,重新运行脚本,速度会快很多。使用不同表中的 Kusto 查询验证数据是否成功传入。注意:首次上传数据可能需要大约 10-15 分钟,因为后端需要创建管道

6. 作为最后一步,我们需要更改参数中的 2 个参数,以告知 ClientInspector 仅在从参考机器运行时才进行架构更改。```js
$AzLogDcrTableCreateFromReferenceMachine    = @("<<MyReferenceMachineComputerName>>")   # sample @("ComputerName")
$AzLogDcrTableCreateFromAnyMachine          = $false    # important so changes can only happen on reference machine
  1. 你现在可以将其部署到你的测试组

.\ClientInspector.ps1 -function:Download

ClientInspector 每次运行时都会从我的 Github 仓库下载最新版本并存储在本地路径中(约 300 kb)

示例``` .\ClientInspector.ps1 -verbose:$false -function:download

ClientInspector | Inventory of Operational & Security-related information Developed by Morten Knudsen, Microsoft MVP - for free community use

Downloading latest version of module AzLogDcrIngestPS from https://github.com/KnudsenMorten/CientInspectorV2 into local path D:\scripts\ClientInspectorV2

root@kitploit:~
## .\ClientInspector.ps1 -function:PsGallery -scope [AllUsers|CurrentUser]
此参数要求另一个参数:-scope [AllUsers | CurrentUser]

ClientInspector 将检查模块是否安装在所选范围内。
如果未安装,它将自动从 Powershell Gallery 下载最新版本并 import-module。
如果客户端正在运行最新版本,它将继续。

示例```
.\ClientInspector.ps1 -verbose:$false -function:PSGallery -scope:CurrentUser

ClientInspector | Inventory of Operational & Security-related information
Developed by Morten Knudsen, Microsoft MVP - for free community use

Powershell module was not found !
Installing in scope currentuser .... Please Wait !

作为 root 用户运行以避免权限问题。这将生成一份包含系统所有关键信息的报告。

常用选项

  • --level:设置扫描强度(1-5)。级别越高,包含的测试越多,耗时越长。
  • --output:指定报告和日志的输出目录。
  • --email:通过电子邮件发送最终报告(需要 SMTP 配置)。
  • --daemon:作为后台服务运行。
  • --update:更新工具的规则数据库。

依赖项

  • Python 3.x
  • 基于 Linux 的操作系统(已在 Ubuntu、Debian、CentOS 上测试)
  • 用于更新和电子邮件功能的网络访问``` .\ClientInspector.ps1 -verbose:$false -function:PsGallery -scope:currentuser

ClientInspector | Inventory of Operational & Security-related information Developed by Morten Knudsen, Microsoft MVP - for free community use

Checking latest version at PsGallery for AzLogDcrIngestPS module OK - Running latest version

root@kitploit:~
</details>

<br>

## ClientInspector 的示例输出
[视频 3 分 19 秒 - 使用命令行运行 ClientInspector(正常模式)](https://youtu.be/4kA4BE0zJ9g)  


<br>

# 安全性
## 代码签名
**ClientInspector.ps1-file** 和 **AzLogDcrIngestPS 模块(AzLogDcrIngest.psm1)** 都使用我的代码签名证书(2LINKIT - 我的公司)进行签名。这样,如果你要求脚本必须签名,你就可以运行它。当然,你也可以选择使用自己的内部代码签名证书对其进行签名。

![已签名](https://assets.kitploit.com/production/public/readmes/6097/95ae9fae064341feae5467ba04c909e3bab84393eb7070a304d9d9e6fd184499.png)

请 [下载公钥证书](https://github.com/KnudsenMorten/ClientInspectorV2/raw/main/Trusted_Publisher_Certificate/2LINKIT-TrustedPublisher.cer) 并将其放入你的“受信任的发布者”容器中,以信任发布者(2LINKIT - 我的公司)。你可以使用 Intune 或组策略进行部署。

![受信任的发布者](https://assets.kitploit.com/production/public/readmes/6097/b02285397783a3495f5d1418ed716fa450b677117dd1754875354779568b0b47.png)  
![受信任的发布者](https://assets.kitploit.com/production/public/readmes/6097/740ae59eff117b8e59d56a7274440a991b7c5ceddd486894160d0248826084b2.png)  
![受信任的发布者](https://assets.kitploit.com/production/public/readmes/6097/47d1eb6b7da9ff5a341b8486c7b4bc7532b0b8ef3d05e7b710d495e183929279.png)  


### Intune 部署不需要预先放置受信任的发布者
默认情况下,Intune 在运行补救脚本时将执行 BYPASS。

## 结构
**ClientInspector** 的安全性分为 4 层:**数据输入**、**数据上传**(发送到后端)和**数据查看**(仪表板)——以及**架构管理**

| 阶段 | 安全实施方案 |委托 / 权限|
|:------|:------------------------|:------------------------|
|数据输入(收集)|此阶段由你选择用于实际收集的方法(Intune、ConfigMg 或其他第三方)控制|脚本需要以本地管理员身份(系统上下文)运行,以便从硬件和 Windows 收集核心数据
|数据上传|日志引入 API 的身份验证在 DCE 处执行,使用标准的 Azure Resource Manager 身份验证。<br><br>一种常见策略是使用应用程序 ID 和应用程序密钥,这也是 ClientInspector 中使用的方法。<br><br>为简化起见,Azure AppId 和 Secret 存储在 ClientInspector 的头部<br><br>也可以使用 Azure Keyvault 存储 AppId 和 Secret|[详细信息见 ClientInspectV2-DeploymentKit](https://github.com/KnudsenMorten/ClientInspectorV2-DeploymentKit#security-1)
|数据查看|Azure RCAC 权限|授予对你的 Azure LogAnalytics、Azure Workbooks 和 Azure Dashboards 的访问权限
|架构管理|方法 1:Azure RBAC(推荐)<br><br>方法 2:使用机密或证书的 Azure 应用|[详细信息见 ClientInSpectorV2-DeploymentKit](https://github.com/KnudsenMorten/ClientInspectorV2-DeploymentKit#azure-rbac-security-adjustment-separation-of-permissions-between-log-ingestion-and-tabledcr-management)

<br>

---

# ClientInspector 数据集布局
每个数据集(bios、applications、bitlocker 等)都采用相同的 4 阶段结构构建:

## 阶段 1/4 - 变量(命名 - 数据发送位置)```
#-------------------------------------------------------------------------------------------
# Variables
#-------------------------------------------------------------------------------------------
	
$TableName  = 'InvClientComputerInfoSystemV2'   # must not contain _CL
$DcrName    = "dcr-" + $AzDcrPrefixClient + "-" + $TableName + "_CL"

阶段 2/4 - 数据收集```

#-------------------------------------------------------------------------------------------

Collecting data (in)

#-------------------------------------------------------------------------------------------

Write-Output "" Write-Output "Collecting Computer system information ... Please Wait !"

$DataVariable = Get-CimInstance -ClassName Win32_ComputerSystem

root@kitploit:~
## Phase 3/4 - Data Manipulation (确保数据格式正确,去除任何"noice"并添加相关信息)```
#-------------------------------------------------------------------------------------------
# Preparing data structure
#-------------------------------------------------------------------------------------------

# convert CIM array to PSCustomObject and remove CIM class information
$DataVariable = Convert-CimArrayToObjectFixStructure -data $DataVariable -Verbose:$Verbose

# add CollectionTime to existing array
$DataVariable = Add-CollectionTimeToAllEntriesInArray -Data $DataVariable -Verbose:$Verbose

# add Computer & UserLoggedOn info to existing array
$DataVariable = Add-ColumnDataToAllEntriesInArray -Data $DataVariable -Column1Name Computer -Column1Data $Env:ComputerName  -Column2Name UserLoggedOn -Column2Data $UserLoggedOn

# Validating/fixing schema data structure of source data
$DataVariable = ValidateFix-AzLogAnalyticsTableSchemaColumnNames -Data $DataVariable -Verbose:$Verbose

# Aligning data structure with schema (requirement for DCR)
$DataVariable = Build-DataArrayToAlignWithSchema -Data $DataVariable -Verbose:$Verbose

阶段 4/4 - 数据输出(发送到 LogAnalytics)- 组合函数```

#-------------------------------------------------------------------------------------------

Create/Update Schema for LogAnalytics Table & Data Collection Rule schema

#-------------------------------------------------------------------------------------------

CheckCreateUpdate-TableDcr-Structure -AzLogWorkspaceResourceId $LogAnalyticsWorkspaceResourceId -SchemaMode Merge -AzAppId $LogIngestAppId -AzAppSecret $LogIngestAppSecret -TenantId $TenantId -Verbose:$Verbose -DceName $DceName -DcrName $DcrName -TableName $TableName -Data $DataVariable -LogIngestServicePricipleObjectId $AzDcrLogIngestServicePrincipalObjectId -AzDcrSetLogIngestApiAppPermissionsDcrLevel $AzDcrSetLogIngestApiAppPermissionsDcrLevel -AzLogDcrTableCreateFromAnyMachine $AzLogDcrTableCreateFromAnyMachine -AzLogDcrTableCreateFromReferenceMachine $AzLogDcrTableCreateFromReferenceMachine

#-----------------------------------------------------------------------------------------------

Upload data to LogAnalytics using DCR / DCE / Log Ingestion API

#-----------------------------------------------------------------------------------------------

Post-AzLogAnalyticsLogIngestCustomLogDcrDce-Output -DceName $DceName -DcrName $DcrName -Data $DataVariable -TableName $TableName ` -AzAppId $LogIngestAppId -AzAppSecret $LogIngestAppSecret -TenantId $TenantId -Verbose:$Verbose

root@kitploit:~
<br>

**提示:错误 513 - 实体过大**  
默认情况下,ClientInspector 会根据每条记录计算出的平均大小分批发送数据。如果您的记录集大小不同,可能会收到错误 513。

原因在于您达到了每次上传 1 MB 的限制(Azure Pipeline 的限制)。微软希望接收许多较小的数据块,因为这是一个共享环境。我在检索所有已安装应用程序列表时遇到过此问题。显然,应用程序存储的信息大小差异很大。

您可以通过在 Post 命令中添加参数 **-BatchAmount <number of records to send per batch>** 来缓解此问题。如果您想确保无误,请将其设置为 1。```
Post-AzLogAnalyticsLogIngestCustomLogDcrDce-Output -DceName $DceName `
                                                   -DcrName $DcrName `
                                                   -Data $DataVariable `
                                                   -TableName $TableName `
                                                   -AzAppId $LogIngestAppId `
                                                   -AzAppSecret $LogIngestAppSecret `
                                                   -TenantId $TenantId `
                                                   -BatchAmount 1 `
                                                   -Verbose:$Verbose `
												   

Phase 4/4 "底层" - 数据输出(发送到 LogAnalytics)```

#-----------------------------------------------------------------------------------------------

Check if table and DCR exist - or schema must be updated due to source object schema changes

#-----------------------------------------------------------------------------------------------

Get insight about the schema structure

$Schema = Get-ObjectSchemaAsArray -Data $Data $StructureCheck = Get-AzLogAnalyticsTableAzDataCollectionRuleStatus -AzLogWorkspaceResourceId $AzLogWorkspaceResourceId -TableName $TableName -DcrName $DcrName -SchemaSourceObject $Schema -SchemaMode $SchemaMode -AzAppId $AzAppId -AzAppSecret $AzAppSecret -TenantId $TenantId ` -Verbose:$Verbose

#-----------------------------------------------------------------------------------------------

Structure check = $true -> Create/update table & DCR with necessary schema

#-----------------------------------------------------------------------------------------------

build schema to be used for LogAnalytics Table

$Schema = Get-ObjectSchemaAsHash -Data $Data -ReturnType Table -Verbose:$Verbose

CreateUpdate-AzLogAnalyticsCustomLogTableDcr -AzLogWorkspaceResourceId $AzLogWorkspaceResourceId -SchemaSourceObject $Schema -SchemaMode $SchemaMode -TableName $TableName -AzAppId $AzAppId -AzAppSecret $AzAppSecret -TenantId $TenantId -Verbose:$Verbose

build schema to be used for DCR

$Schema = Get-ObjectSchemaAsHash -Data $Data -ReturnType DCR

CreateUpdate-AzDataCollectionRuleLogIngestCustomLog -AzLogWorkspaceResourceId $AzLogWorkspaceResourceId -SchemaSourceObject $Schema -SchemaMode $SchemaMode -DceName $DceName -DcrName $DcrName -TableName $TableName -LogIngestServicePricipleObjectId $LogIngestServicePricipleObjectId -AzDcrSetLogIngestApiAppPermissionsDcrLevel $AzDcrSetLogIngestApiAppPermissionsDcrLevel -AzAppId $AzAppId -AzAppSecret $AzAppSecret -TenantId $TenantId -Verbose:$Verbose

$AzDcrDceDetails = Get-AzDcrDceDetails -DcrName $DcrName -DceName $DceName -AzAppId $AzAppId -AzAppSecret $AzAppSecret -TenantId $TenantId ` -Verbose:$Verbose

Post-AzLogAnalyticsLogIngestCustomLogDcrDce -DceUri $AzDcrDceDetails[2] -DcrImmutableId $AzDcrDceDetails[6] -TableName $TableName -DcrStream $AzDcrDceDetails[7] -Data $Data -BatchAmount $BatchAmount -AzAppId $AzAppId -AzAppSecret $AzAppSecret -TenantId $TenantId ` -Verbose:$Verbose

root@kitploit:~
<br>

# 详细模式与更多帮助
如果您想获取有关正在发生的事情的更详细信息,可以启用详细模式 (-verbose:$true)```
.\ClientInspector.ps1 -verbose:$true -function:localpath

如果你更喜欢使用 Powershell ISE 进行测试,你还可以使用变量 $Verbose 启用详细模式。``` $Verbose = $false # can be $true or $false

root@kitploit:~
如果你想要获取 AzLogDcrLogIngestPS 模块的语法和示例的帮助,你可以输入
get-module```
PS  get-command -module AzLogDcrIngestPS

CommandType     Name                                               Version    Source                                                                         
-----------     ----                                               -------    ------                                                                         
Function        Add-CollectionTimeToAllEntriesInArray              1.1.17     AzLogDcrIngestPS                                                               
Function        Add-ColumnDataToAllEntriesInArray                  1.1.17     AzLogDcrIngestPS                                                               
Function        Build-DataArrayToAlignWithSchema                   1.1.17     AzLogDcrIngestPS                                                               
Function        CheckCreateUpdate-TableDcr-Structure               1.1.17     AzLogDcrIngestPS                                                               
Function        Convert-CimArrayToObjectFixStructure               1.1.17     AzLogDcrIngestPS                                                               
Function        Convert-PSArrayToObjectFixStructure                1.1.17     AzLogDcrIngestPS                                                               
Function        CreateUpdate-AzDataCollectionRuleLogIngestCusto... 1.1.17     AzLogDcrIngestPS                                                               
Function        CreateUpdate-AzLogAnalyticsCustomLogTableDcr       1.1.17     AzLogDcrIngestPS                                                               
Function        Delete-AzDataCollectionRules                       1.1.17     AzLogDcrIngestPS                                                               
Function        Delete-AzLogAnalyticsCustomLogTables               1.1.17     AzLogDcrIngestPS                                                               
Function        Filter-ObjectExcludeProperty                       1.1.17     AzLogDcrIngestPS                                                               
Function        Get-AzAccessTokenManagement                        1.1.17     AzLogDcrIngestPS                                                               
Function        Get-AzDceListAll                                   1.1.17     AzLogDcrIngestPS                                                               
Function        Get-AzDcrDceDetails                                1.1.17     AzLogDcrIngestPS                                                               
Function        Get-AzDataCollectionRuleTransformKql               1.1.17     AzLogDcrIngestPS                                                               
Function        Get-AzDcrListAll                                   1.1.17     AzLogDcrIngestPS                                                               
Function        Get-AzLogAnalyticsTableAzDataCollectionRuleStatus  1.1.17     AzLogDcrIngestPS                                                               
Function        Get-ObjectSchemaAsArray                            1.1.17     AzLogDcrIngestPS                                                               
Function        Get-ObjectSchemaAsHash                             1.1.17     AzLogDcrIngestPS                                                               
Function        Post-AzLogAnalyticsLogIngestCustomLogDcrDce        1.1.17     AzLogDcrIngestPS                                                               
Function        Post-AzLogAnalyticsLogIngestCustomLogDcrDce-Output 1.1.17     AzLogDcrIngestPS                                                               
Function        Update-AzDataCollectionRuleDceEndpoint             1.1.17     AzLogDcrIngestPS                                                               
Function        Update-AzDataCollectionRuleResetTransformKqlDef... 1.1.17     AzLogDcrIngestPS                                                               
Function        Update-AzDataCollectionRuleTransformKql            1.1.17     AzLogDcrIngestPS                                                               
Function        ValidateFix-AzLogAnalyticsTableSchemaColumnNames   1.1.17     AzLogDcrIngestPS                                                               

获取特定 cmdlet 的帮助 - get-help Add-CollectionTimeToAllEntriesInArray -full``` get-help Add-CollectionTimeToAllEntriesInArray -full

NAME Add-CollectionTimeToAllEntriesInArray

SYNOPSIS Add property CollectionTime (based on current time) to all entries on the object

SYNTAX Add-CollectionTimeToAllEntriesInArray [-Data] []

DESCRIPTION Gives capability to do proper searching in queries to find latest set of records with same collection time Time Generated cannot be used when you are sending data in batches, as TimeGenerated will change An example where this is important is a complete list of applications for a computer. We want all applications to show up when queriying for the latest data

PARAMETERS -Data Object to modify

root@kitploit:~
    Required?                    true
    Position?                    1
    Default value                
    Accept pipeline input?       false
    Accept wildcard characters?  false
    
<CommonParameters>
    This cmdlet supports the common parameters: Verbose, Debug,
    ErrorAction, ErrorVariable, WarningAction, WarningVariable,
    OutBuffer, PipelineVariable, and OutVariable. For more information, see 
    about_CommonParameters (https:/go.microsoft.com/fwlink/?LinkID=113216). 

INPUTS None. You cannot pipe objects

OUTPUTS Updated object with CollectionTime

root@kitploit:~
-------------------------- EXAMPLE 1 --------------------------

PS C:\>#-------------------------------------------------------------------------------------------

# Variables
#-------------------------------------------------------------------------------------------
$Verbose                   = $true  # $true or $false

#-------------------------------------------------------------------------------------------
# Collecting data (in)
#-------------------------------------------------------------------------------------------
$DNSName                   = (Get-CimInstance win32_computersystem).DNSHostName +"." + (Get-CimInstance win32_computersystem).Domain
$ComputerName              = (Get-CimInstance win32_computersystem).DNSHostName
[datetime]$CollectionTime  = ( Get-date ([datetime]::Now.ToUniversalTime()) -format "yyyy-MM-ddTHH:mm:ssK" )

$UserLoggedOnRaw           = Get-Process -IncludeUserName -Name explorer | Select-Object UserName -Unique
$UserLoggedOn              = $UserLoggedOnRaw.UserName

$DataVariable = Get-CimInstance -ClassName Win32_Processor | Select-Object -ExcludeProperty "CIM*"

#-------------------------------------------------------------------------------------------
# Preparing data structure
#-------------------------------------------------------------------------------------------
$DataVariable = Convert-CimArrayToObjectFixStructure -data $DataVariable -Verbose:$Verbose
$DataVariable

# add CollectionTime to existing array
$DataVariable = Add-CollectionTimeToAllEntriesInArray -Data $DataVariable -Verbose:$Verbose
$DataVariable

#-------------------------------------------------------------------------------------------
# Output
#-------------------------------------------------------------------------------------------

VERBOSE:   Adding CollectionTime to all entries in array .... please wait !
Caption                                 : Intel64 Family 6 Model 165 Stepping 5
Description                             : Intel64 Family 6 Model 165 Stepping 5
InstallDate                             : 
Name                                    : Intel(R) Core(TM) i7-10700 CPU @ 2.90GHz
Status                                  : OK
Availability                            : 3
ConfigManagerErrorCode                  : 
ConfigManagerUserConfig                 : 
CreationClassName                       : Win32_Processor
DeviceID                                : CPU0
ErrorCleared                            : 
ErrorDescription                        : 
LastErrorCode                           : 
PNPDeviceID                             : 
PowerManagementCapabilities             : 
PowerManagementSupported                : False
StatusInfo                              : 3
SystemCreationClassName                 : Win32_ComputerSystem
SystemName                              : STRV-MOK-DT-02
AddressWidth                            : 64
CurrentClockSpeed                       : 2904
DataWidth                               : 64
Family                                  : 198
LoadPercentage                          : 1
MaxClockSpeed                           : 2904
OtherFamilyDescription                  : 
Role                                    : CPU
Stepping                                : 
UniqueId                                : 
UpgradeMethod                           : 1
Architecture                            : 9
AssetTag                                : To Be Filled By O.E.M.
Characteristics                         : 252
CpuStatus                               : 1
CurrentVoltage                          : 8
ExtClock                                : 100
L2CacheSize                             : 2048
L2CacheSpeed                            : 
L3CacheSize                             : 16384
L3CacheSpeed                            : 0
Level                                   : 6
Manufacturer                            : GenuineIntel
NumberOfCores                           : 8
NumberOfEnabledCore                     : 8
NumberOfLogicalProcessors               : 16
PartNumber                              : To Be Filled By O.E.M.
ProcessorId                             : BFEBFBFF000A0655
ProcessorType                           : 3
Revision                                : 
SecondLevelAddressTranslationExtensions : False
SerialNumber                            : To Be Filled By O.E.M.
SocketDesignation                       : U3E1
ThreadCount                             : 16
Version                                 : 
VirtualizationFirmwareEnabled           : False
VMMonitorModeExtensions                 : False
VoltageCaps                             : 
PSComputerName                          : 
CollectionTime                          : 12-03-2023 16:08:33


RELATED LINKS https://github.com/KnudsenMorten/AzLogDcrIngestPS

root@kitploit:~
<br>

# 费用 - 存储这些数据需要多少成本?
来自 **500** 个客户,每天执行 **日常** ClientInspector 清单的数据,大约每月花费 **200 丹麦克朗 / 27 美元**

<br>

# 错误与发现,请告知我
目前,ClientInspectorV1 已在数千台计算机上使用(ServerInspectorV1 已在数千台服务器上使用)

由于 ClientInspectorV2 是从 V1 完全重写而来,现在正在推出,例如采用新的命名规范,我无法保证不会发现错误。
但 **我可以向你保证**,我会在空闲时间内尽快修复它们。请将你的发现发邮件至 [email protected]。

考虑 Fork Github 站点——或者留意仪表板/工作簿或 ClientInspector 脚本的更新。

此外,ClientInspector 旨在覆盖不同的设计和平台,但你可能拥有独特且未被集合或仪表板覆盖的配置。
但开放的方式允许你调整仪表板、工作簿和 ClientInspector 脚本,使其 100% 适用于你。将其视为一个展示如何利用 Azure 日志技术的示例——它并非付费产品,不提供 24x7 支持。它对所有人免费!

<br>

# 联系方式
如果你对该解决方案有任何意见——或者只是想与我联系,请通过这些渠道联系我——很乐意建立联系:

[Github](https://github.com/KnudsenMorten)

[Twitter](https://twitter.com/knudsenmortendk)

[博客](https://mortenknudsen.net/)

[LinkedIn](https://www.linkedin.com/in/mortenwaltorpknudsen/)

[Microsoft MVP 个人资料](https://mvp.microsoft.com/en-us/PublicProfile/5005156?fullName=Morten%20Knudsen)

[Sessionize](https://sessionize.com/mortenknudsen/)

[邮件](mailto:[email protected])

<br>

# 特别感谢 Microsoft 产品团队的优秀成员——你们是摇滚明星 :smile:
最后,我要特别感谢几位与我合作构建 AzLogDcrIngestPS PowerShell 模块以及日常使用 Azure 日志和查看功能的人:

|姓名|角色|
|:---|:---|
|Ivan Varnitski|项目经理 - Azure Pipeline|
|Evgeny Ternovsky|项目经理 - Azure Pipeline|
|Nick Kiest|项目经理 - Azure 数据收集规则|
|Oren Salzberg|项目经理 - Azure LogAnalytics|
|Guy Wild|技术作家 - Azure LogAnalytics|
|John Gardner|项目经理 - Azure Workbooks|
|Shikha Jain|项目经理 - Azure Workbooks|
|Shayoni Seth|项目经理 - Azure Monitor Agent|
|Jeff Wolford|项目经理 - Azure Monitor Agent|
|Xema Pathak|项目经理 - Azure VMInsight(集成到 Azure Monitor Agent)|

![MS-friends](https://assets.kitploit.com/production/public/readmes/6097/654c3844cb0324e2b53e04ebfd758652372ae0820636c3c37adc3f18ab178e8e.jpg)