# Exploit Mapper 一个全面的漏洞管理平台,可分析安全扫描报告、利用漏洞情报丰富漏洞数据,并提供可操作的风险评分以优先修复。    ## 特性 - **多格式导入**:支持来自各种扫描器(Nessus、Qualys、Arctic Wolf、OpenVAS 等)的 CSV 和 Excel 漏洞报告 - **自动列检测**:智能将扫描器特有的列名映射到标准字段 - **漏洞利用丰富**:自动查询 CISA KEV(已知被利用漏洞)和 Exploit-DB - **风险评分引擎**:基于 CVSS、漏洞利用可用性和资产关键性提供上下文风险评分 - **手动添加漏洞(非系统)**:能够手动添加扫描器无法检测到的漏洞;例如:应用程序 XYZ 使用了 TLS v1 - **交互式仪表盘**:实时风险仪表、严重性细分和趋势分析 - **设备管理**:按主机/设备跟踪漏洞,包含操作系统和关键性信息 - **修复跟踪**:状态工作流、分配和解决跟踪 - **用户认证**:基于角色的访问控制(管理员、用户、查看者) - **安全设计**:符合 OWASP 的文件验证、PBKDF2 密码哈希、会话管理 *** 首次上传时使用 CVE 丰富流程会减慢上传速度,它只会尝试丰富从扫描中标记为可被利用的已上传漏洞,但时间可能因上传文件大小而有显著差异。*** 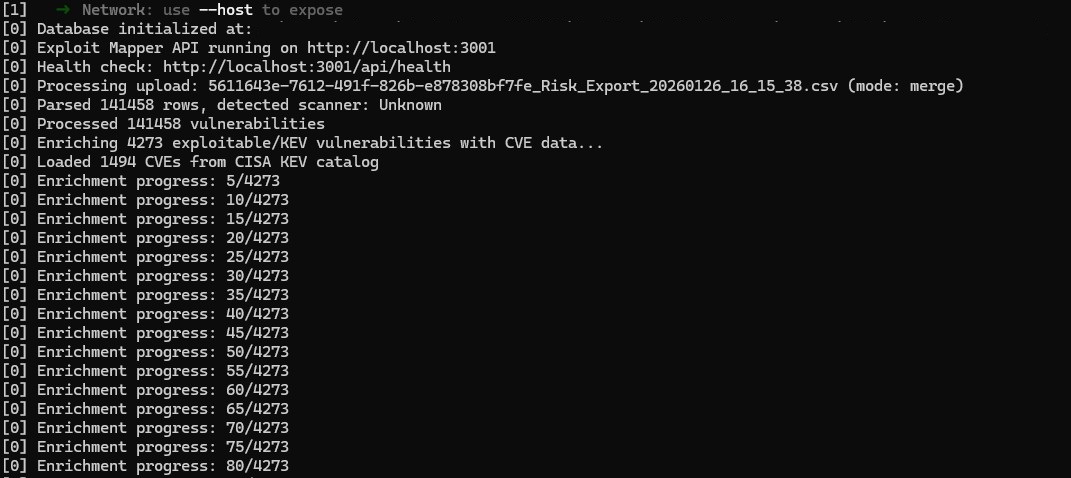 ### 仪表盘 仪表盘提供安全态势的概览,包含: - 总体风险评分仪表 - 严重性分布图表 - 最易被利用的漏洞 - 修复进度跟踪 ### 漏洞列表 浏览、筛选和排序漏洞,依据: - 严重性、风险评分、CVSS - 漏洞利用可用性 - CISA KEV 状态 - 主机/设备 - 状态(打开、处理中、已解决) 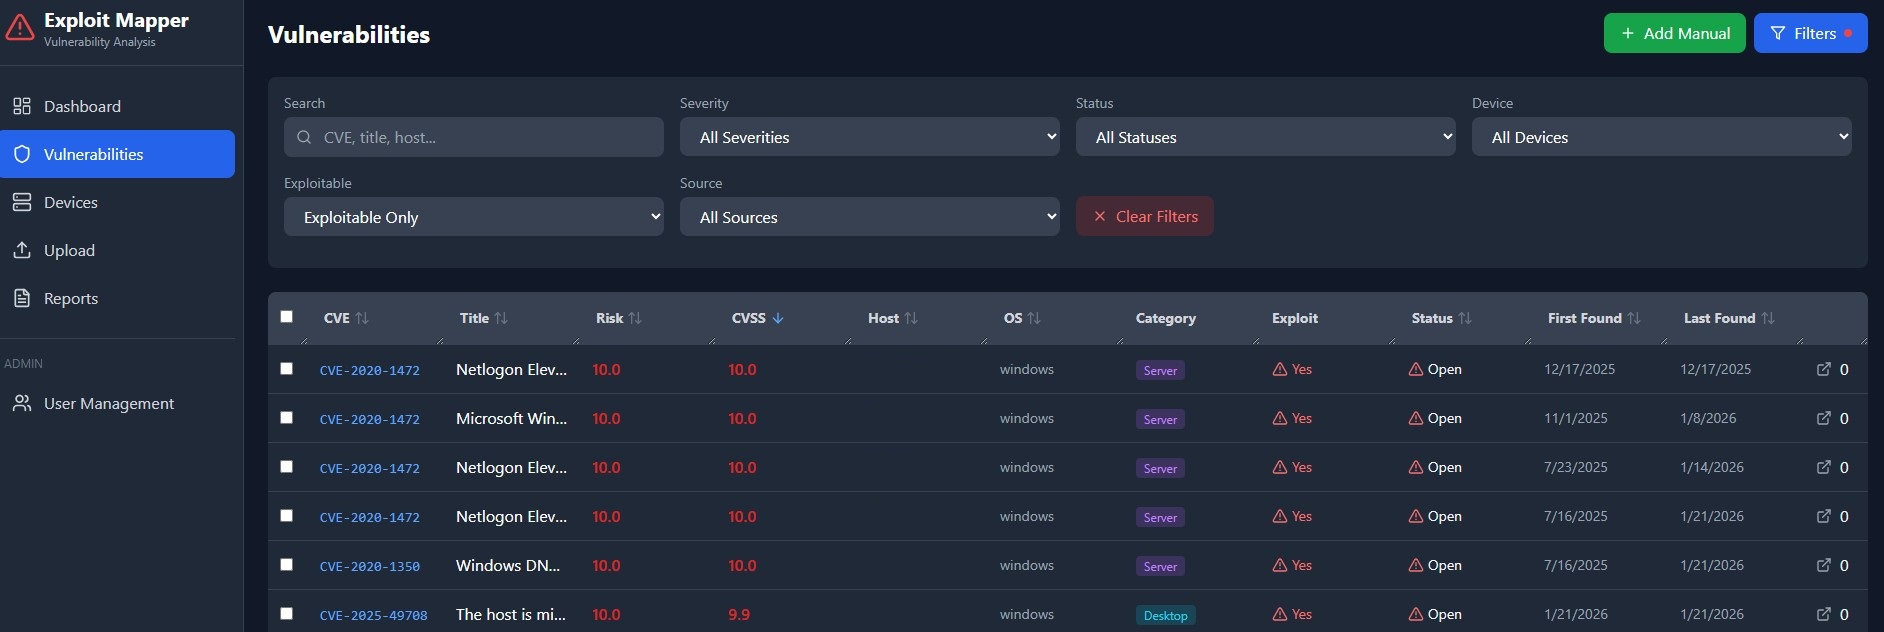 ### 漏洞详情 详细视图包括: - 扫描器建议 - CISA KEV 要求的操作 - 攻击场景 - 跨设备的相关发现 - 修复工作流 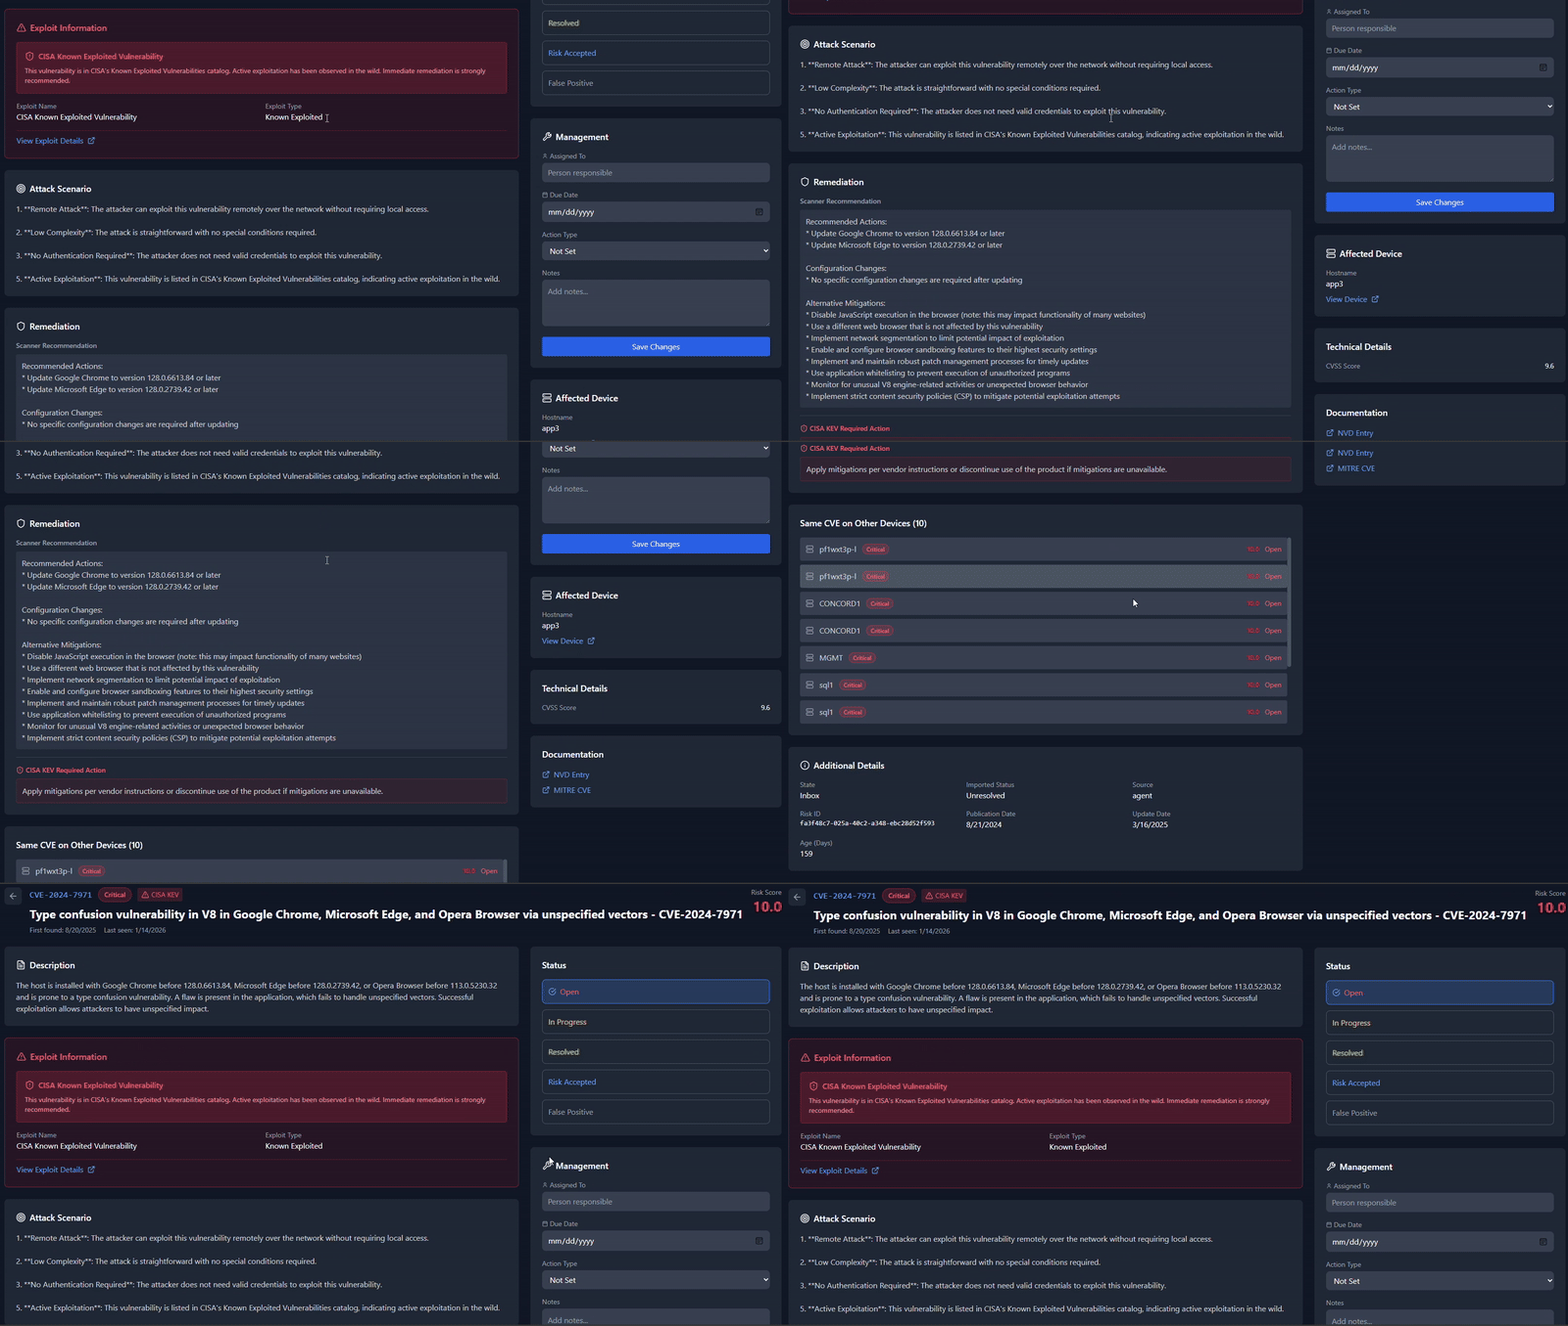 ## 前提条件 - **Node.js** >= 18.0.0 - **npm** >= 9.0.0 - **Git**(用于克隆仓库) - 现代网页浏览器(Chrome、Firefox、Edge、Safari) ### 安装前提条件 <details> <summary><strong>Windows</strong></summary> **选项 A:使用安装程序** 1. 从 [https://nodejs.org](https://nodejs.org) 下载 Node.js LTS 2. 运行安装程序并按照提示操作 3. 确保安装时勾选“添加到 PATH” 4. 打开**新的**命令提示符或 PowerShell,验证: ```cmd node --version npm --version ``` **选项 B:使用稳定的 Node 版本(推荐)** 1. 下载 nvm-windows [https://github.com/coreybutler/nvm-windows)](https://github.com/coreybutler/nvm-windows) 2. 运行安装程序并按照提示操作 ```cmd nvm install 22.12.0 nvm use 22.12.0 ``` **选项 C:使用 winget(Windows 包管理器)** ```cmd winget install OpenJS.NodeJS.LTS winget install Git.Git ``` **选项 D:使用 Chocolatey** ```cmd choco install nodejs-lts choco install git ``` </details> <details> <summary><strong>macOS</strong></summary> **使用 Homebrew:** ```bash brew install node brew install git ``` **或从 [https://nodejs.org](https://nodejs.org) 下载安装程序** 验证安装: ```bash node --version npm --version ``` </details> <details> <summary><strong>Linux (Ubuntu/Debian)</strong></summary> ```bash # 使用 NodeSource 仓库获取最新 LTS curl -fsSL https://deb.nodesource.com/setup_lts.x | sudo -E bash - sudo apt-get install -y nodejs git # 验证 node --version npm --version ``` </details> ## 安装 ### 1. 克隆仓库 **macOS / Linux:** ```bash git clone https://github.com/jrokz2315/exploit-mapper.git cd exploit-mapper ``` **Windows(命令提示符):** ```cmd git clone https://github.com/jrokz2315/exploit-mapper.git cd exploit-mapper ``` **Windows(PowerShell):** ```powershell git clone https://github.com/jrokz2315/exploit-mapper.git cd exploit-mapper ``` ### 2. 安装依赖 所有平台: ```bash npm run install:all ``` 或手动安装: **macOS / Linux:** ```bash npm install cd server && npm install cd ../client && npm install cd .. ``` **Windows(命令提示符):** ```cmd npm install cd server && npm install cd ..\client && npm install cd .. ``` **Windows(PowerShell):** ```powershell npm install cd server; npm install cd ..\client; npm install cd .. ``` > **注意(Windows):** 如果遇到 `better-sqlite3` 错误,可能需要安装 Windows 构建工具: > ```cmd > npm install --global windows-build-tools > ``` > 或从 [https://visualstudio.microsoft.com/visual-cpp-build-tools/](https://visualstudio.microsoft.com/visual-cpp-build-tools/) 安装 Visual Studio Build Tools,并选择“使用 C++ 的桌面开发”工作负载 ### 3. 启动应用程序 **开发模式**(热重载)—— 所有平台: ```bash npm run dev ``` 这将同时启动后端服务器(端口 3000)和前端开发服务器(端口 5173)。 **生产模式**—— 所有平台: ```bash # 构建客户端 npm run build # 启动服务器 npm start ``` ### 4. 访问应用程序 打开浏览器并导航到: - 开发模式:`http://localhost:5173` - 生产模式:`http://localhost:3000` ### 5. 默认登录 首次运行时,会创建一个默认管理员账户: - **用户名**:`admin` - **密码**:`Admin123!` 首次登录时系统会提示更改此密码。 ## 项目结构 ``` exploit-mapper/ ├── client/ # React 前端 │ ├── src/ │ │ ├── components/ # 可复用 UI 组件 │ │ ├── pages/ # 页面组件 │ │ └── App.jsx # 主应用组件 │ ├── package.json │ └── vite.config.js ├── server/ # Express 后端 │ ├── src/ │ │ ├── db/ # 数据库架构和连接 │ │ ├── middleware/ # 认证中间件 │ │ ├── routes/ # API 路由 │ │ └── services/ # 业务逻辑 │ ├── data/ # SQLite 数据库(gitignore) │ ├── uploads/ # 临时上传存储(gitignore) │ └── package.json ├── package.json # 根包,包含脚本 ├── .gitignore ├── LICENSE ├── CONTRIBUTING.md └── README.md ``` ## API 端点 ### 认证 | 方法 | 端点 | 描述 | |--------|----------|-------------| | `POST` | `/api/auth/login` | 用户登录 | | `POST` | `/api/auth/logout` | 用户注销 | | `GET` | `/api/auth/me` | 获取当前用户 | | `POST` | `/api/auth/change-password` | 更改密码 | ### 仪表盘 | 方法 | 端点 | 描述 | |--------|----------|-------------| | `GET` | `/api/dashboard/summary` | 仪表盘指标 | | `GET` | `/api/dashboard/risk` | 风险细分 | | `GET` | `/api/dashboard/trends` | 历史趋势 | | `GET` | `/api/dashboard/executive-summary` | 执行摘要 | ### 漏洞 | 方法 | 端点 | 描述 | |--------|----------|-------------| | `GET` | `/api/vulnerabilities` | 列表(含过滤/分页) | | `GET` | `/api/vulnerabilities/:id` | 漏洞详情 | | `GET` | `/api/vulnerabilities/exploitable` | 仅可被利用的漏洞 | | `GET` | `/api/vulnerabilities/stats/summary` | 统计数据 | | `PATCH` | `/api/vulnerabilities/:id` | 更新状态 | | `PATCH` | `/api/vulnerabilities` | 批量更新 | | `POST` | `/api/vulnerabilities/manual` | 添加手动条目 | | `DELETE` | `/api/vulnerabilities/:id` | 删除手动条目 | ### 设备 | 方法 | 端点 | 描述 | |--------|----------|-------------| | `GET` | `/api/devices` | 列出设备 | | `GET` | `/api/devices/:id` | 设备详情 | | `PATCH` | `/api/devices/:id` | 更新设备信息 | ### 上传 | 方法 | 端点 | 描述 | |--------|----------|-------------| | `POST` | `/api/upload` | 上传漏洞报告 | | `GET` | `/api/upload/info` | 上传统计 | | `DELETE` | `/api/upload/clear` | 清除所有数据 | ### 报告 | 方法 | 端点 | 描述 | |--------|----------|-------------| | `GET` | `/api/reports` | 列出已上传报告 | | `GET` | `/api/reports/:id/export` | 导出报告 | ## 支持的扫描器格式 Exploit Mapper 自动检测并映射来自各种漏洞扫描器的列: | 扫描器 | 检测方法 | |---------|-----------------| | Arctic Wolf | `risk_id`、`asset_category` 列 | | Nessus/Tenable | `plugin_id` 列 | | Qualys | `qid` 列 | | OpenVAS | `nvt` 列 | | Nexpose/Rapid7 | `nexpose` 标识符 | | 通用 CSV/Excel | 智能列名匹配 | ### 列映射 解析器自动映射常见的列名: | 字段 | 识别的列名 | |-------|------------------------| | CVE | `cve`、`cves`、`cve_id`、`vulnerability_id` | | 标题 | `name`、`title`、`vulnerability`、`plugin_name` | | 描述 | `description`、`synopsis`、`summary` | | 解决方案 | `solution`、`remediation`、`fix`、`recommendation` | | 严重性 | `severity`、`risk_severity`、`risk_level` | | CVSS 分数 | `cvss`、`cvss_score`、`cvssv3_score` | | 主机 | `hostname`、`asset_name`、`host_name`、`fqdn` | | IP 地址 | `ip_address`、`host_ip`、`asset_ip` | ## 风险评分 ### 单个漏洞风险评分 ``` 风险评分 = CVSS 分数 + 调整 调整: +0.5 如果在 CISA KEV 中(被积极利用) +0.3 如果有公开可用漏洞利用 ``` ### 整体组织风险评分 ``` 总体 = (最大风险 x 30%) + (平均风险 x 40%) + (平均可利用 x 20%) + (密度 x 10%) 如果存在 CISA KEV:乘以 1.05 ``` | 组件 | 权重 | 描述 | |-----------|--------|-------------| | 最大风险评分 | 30% | 单个最高漏洞风险 | | 平均风险评分 | 40% | 所有漏洞的平均值 | | 平均可利用风险 | 20% | 仅可被利用漏洞的平均值 | | 密度因素 | 10% | `log10(总漏洞数 + 1) x 3`(最高 10) | ## 配置 ### 环境变量 在 `server/` 目录中创建 `.env` 文件(可选 — 参见 `server/.env.example`): ```env PORT=3000 NODE_ENV=production SESSION_SECRET=your-secret-key ``` ### 数据库 Exploit Mapper 使用 SQLite 实现零配置存储。数据库在首次运行时自动创建于 `server/data/exploit-mapper.db`。 ## 安全注意事项 - 密码使用 PBKDF2 进行哈希,迭代次数 100,000 次,算法 SHA-512 - 会话令牌为 256 位加密安全随机值 - 文件上传经过类型、大小(最大 500MB)和魔数验证 - SQL 查询全程使用参数化语句 - CORS 仅配置为前端来源 - 默认管理员账户要求首次登录时更改密码 ## 故障排除 ### 常见问题 <details> <summary><strong>端口已被占用</strong></summary> **Windows:** ```cmd netstat -ano | findstr :3000 taskkill /PID <pid> /F ``` **macOS / Linux:** ```bash lsof -i :3000 kill -9 <pid> ``` </details> <details> <summary><strong>Windows 上 better-sqlite3 构建错误</strong></summary> 此原生模块需要 C++ 构建工具: ```cmd :: 选项 1:通过 npm 安装 npm install --global windows-build-tools :: 选项 2:安装 Visual Studio Build Tools :: 从 https://visualstudio.microsoft.com/visual-cpp-build-tools/ 下载 :: 选择“使用 C++ 的桌面开发”工作负载 ``` 安装后,删除 `node_modules` 并重新安装: ```cmd cd server rmdir /s /q node_modules npm install ``` </details> <details> <summary><strong>数据库锁定</strong></summary> 确保只有一个服务器实例在运行。在 Windows 上: ```cmd tasklist | findstr node taskkill /IM node.exe /F ``` 在 macOS / Linux 上: ```bash pkill -f "node.*index.js" ``` </details> <details> <summary><strong>上传失败</strong></summary> - 检查文件大小(最大 500MB) - 确保文件格式为 `.csv`、`.xlsx` 或 `.xls` - 验证文件至少包含标题/名称列 - 检查服务器控制台以获取详细错误信息 </details> <details> <summary><strong>Windows 上 npm run dev 失败</strong></summary> 如果 `concurrently` 失败,尝试在两个终端窗口中分别运行服务器和客户端: **终端 1(服务器):** ```cmd cd server npm run dev ``` **终端 2(客户端):** ```cmd cd client npm run dev ``` </details> ## 贡献 有关详细指南,请参见 [CONTRIBUTING.md](https://github.com/jrokz2315/exploit-mapper/blob/main/CONTRIBUTING.md)。 1. Fork 仓库 2. 创建特性分支(`git checkout -b feature/amazing-feature`) 3. 提交更改(`git commit -m 'Add amazing feature'`) 4. 推送到分支(`git push origin feature/amazing-feature`) 5. 打开 Pull Request ## 许可证 本项目基于 MIT 许可证 — 详情请参见 [LICENSE](https://github.com/jrokz2315/exploit-mapper/blob/main/LICENSE) 文件。 ## 致谢 - [CISA KEV Catalog](https://www.cisa.gov/known-exploited-vulnerabilities-catalog) 提供漏洞利用情报 - [NVD](https://nvd.nist.gov/) 提供 CVE 数据 - [Exploit-DB](https://www.exploit-db.com/) 提供漏洞利用信息 - [Lucide Icons](https://lucide.dev/) 提供图标集 - [Tailwind CSS](https://tailwindcss.com/) 提供样式 - [Recharts](https://recharts.org/) 提供数据可视化