



fennec 是一个使用 Rust 编写的工件收集工具,用于在基于 *nix 的系统上进行应急响应。fennec 允许你编写一个配置文件,其中包含如何收集工件。
| 操作系统详情 | 架构 | 成功? | 详情 |
|---|---|---|---|
| Ubuntu 20.04.3 LTS | x86_64 | ✅ | |
| Ubuntu 19.04 | x86_64 | ✅ | |
| Ubuntu 18.04.6 LTS | x86_64 | ✅ | |
| Ubuntu 17.04 | x86_64 | ✅ | |
| Ubuntu 16.04.7 LTS | x86_64 | ✅ | |
| Ubuntu 15.10 | x86_64 | ✅ | |
| Ubuntu 14.04.6 LTS | x86_64 | ✅ | |
| Ubuntu 13.04 | x86_64 | ✅ | |
| Ubuntu 12.04.5 LTS | x86_64 | ✅ | |
| CentOS 8.4.2105 | x86_64 | ✅ | |
| CentOS 7.9.2009 | x86_64 | ✅ | |
| CentOS 6.10 | x86_64 | ✅ | |
| CentOS 5.11 | x86_64 | ❌ | osquery 要求 libc >= 2.12 |
| Ubuntu 20.04 | aarch64 | ✅ | |
| MacOS Monterey v12.0.1 | x86_64 | ✅ | 需要调整配置。如果你在 MacOS 工件方面有经验,欢迎贡献。 |
| Oracle Linux Server 7.9 | x86_64 | ✅ |
fennec 0.4.1 AbdulRhman Alfaifi [email protected] Aritfact collection tool for *nix systems
USAGE: fennec [OPTIONS]
OPTIONS: -c, --config Sets a custom config file (Embedded : true)
-o, --output <FILE>
        Sets output file name [default: ABDULRHMAN-PC.zip]

-l, --log-level <LEVEL>
        Sets the log level [default: info] [possible values: trace, debug, info, error]

-f, --log-file <FILE>
        Sets the log file name [default: fennec.log]

-u, --upload-artifact <CONFIG>...
        Upload configuration string. Supported Protocols:
        * s3 : Upload artifact package to S3 bucket (ex. minio)
            * Format :
        s3://<ACCESS_KEY>:<SECRET_ACCESS_KEY>@(http|https)://<HOSTNAME>:<PORT>/<BUCKET_NAME>:<PATH>
            * Example (minio): s3://minioadmin:minioadmin@http://192.168.100.190:9000/fennec:/
        * aws3 : Upload artifact package to AWS S3 bucket
            * Format : aws3://<ACCESS_KEY>:<SECRET_ACCESS_KEY>@<AWS_REGOIN>.<BUCKET_NAME>:<PATH>
            * Example: aws3://AKIAXXX:[email protected]:/
        * scp : Upload artifact package to a server using SCP protocol
            * Format : scp://<USERNAME>:<PASSWORD>@<HOSTNAME>:<PORT>:<PATH>
            * Example: scp://testusername:[email protected]:22:/dev/shm

-q, --quiet
        Do not print logs to stdout

-t, --timeout <SEC>
        Sets osquery queries timeout in seconds [default: 60]

-h, --help
        Print help information

    --non-root
        Run Fennec with non root permisions. This isn't recommended, most artifacts require root
        permissions

    --osquery-path <PATH>
        Sets osquery path, if osquery is embedded it will be writen to this path otherwise the
        path will be used to spawn osquery instance (Embedded : true) [default: ./osqueryd]

    --output-format <FORMAT>
        Sets output format [default: jsonl] [possible values: jsonl, csv, kjson]

    --show-config
        Show the embedded configuration file

    --show-embedded
        Show the embedded files metadata

-V, --version
        Print version information
* `-c`, `--config` : 使用指定的配置文件而非内嵌配置
* `-f`, `--log-file` : 更改日志文件的默认名称(默认:`fennec.log`)
* `-h`, `--help` : 打印帮助信息
* `-l`, `--log-level` : 更改默认日志级别(默认:`info`)
* `-o`, `--output` : 更改zip输出文件的默认文件名(默认:`{HOSTNAME}.zip`,其中hostname是运行时计算的主机名)
* `--osquery-path` : osquery可执行文件路径,该值的用法取决于以下条件:
* 如果osquery二进制文件嵌入在`fennec`中,则将其提取并转储到`--osquery-path`
* 如果osquery未嵌入`fennec`,则使用路径`--osquery-path`下的osquery二进制文件
* `--output-format` : 选择输出格式,支持的格式:
* jsonl : 以换行分隔的JSON对象(默认)
* csv: 逗号分隔的值
* kjson: 如果你想将结果文件上传到[Kuiper](https://github.com/DFIRKuiper/Kuiper)分析平台,请使用此格式。
* `-q`, `--quiet` : 不将日志打印到`stdout`
* `--non-root`: 以非root权限运行Fennec。默认情况下,Fennec需要root权限,如果不是root则会退出并显示错误信息。
* `--show-config` : 打印内嵌配置后退出
* `--show-embedded` : 显示内嵌文件
* `-t`, `--timeout` : 设置每个osquery查询工件的超时时间(秒)
* `-u`, `--upload-artifact` : 上传工件包到远程服务器。支持的协议:
* `s3` : 上传工件包到S3存储桶
* `格式` : s3://<ACCESS_KEY>:<SECRET_ACCESS_KEY>@(http|https)://<HOSTNAME>:<PORT>/<BUCKET_NAME>:<PATH>
* `示例`: s3://minioadmin:minioadmin@http://192.168.100.190:9000/fennec:/
* `aws3` : 上传工件包到AWS S3存储桶
* `格式` : aws3://<ACCESS_KEY>:<SECRET_ACCESS_KEY>@<AWS_REGOIN>.<BUCKET_NAME>:<PATH>
* `示例`: aws3://AKIAXXXXXXXXXXXXXXXXX:[email protected]:/
* `scp` : 使用SCP协议上传工件包到服务器
* `格式` : scp://`<USERNAME>`:`<PASSWORD>`@`<HOSTNAME>`:`<PORT>`:`<PATH>`
* `示例`: scp://testusername:[email protected]:22:/dev/shm
* `-V`, `--version` : 打印`fennec`版本后退出
## 与依赖项一起编译 👨💻
fennec依赖`osquery`来运行类型为`query`的工件。名为`deps`的目录包含将根据目标操作系统和架构嵌入到二进制文件中的文件。在编译之前,请遵循以下步骤:
* 根据需要修改配置文件 `deps/<TARGET_OS>/fennec.yaml`
* 使用以下命令之一构建二进制文件:
* 动态链接: ```bash
cargo build --release
您也可以使用发布部分中的预编译二进制文件。
以下是在Ubuntu 20上使用本仓库中相同配置运行的示例:
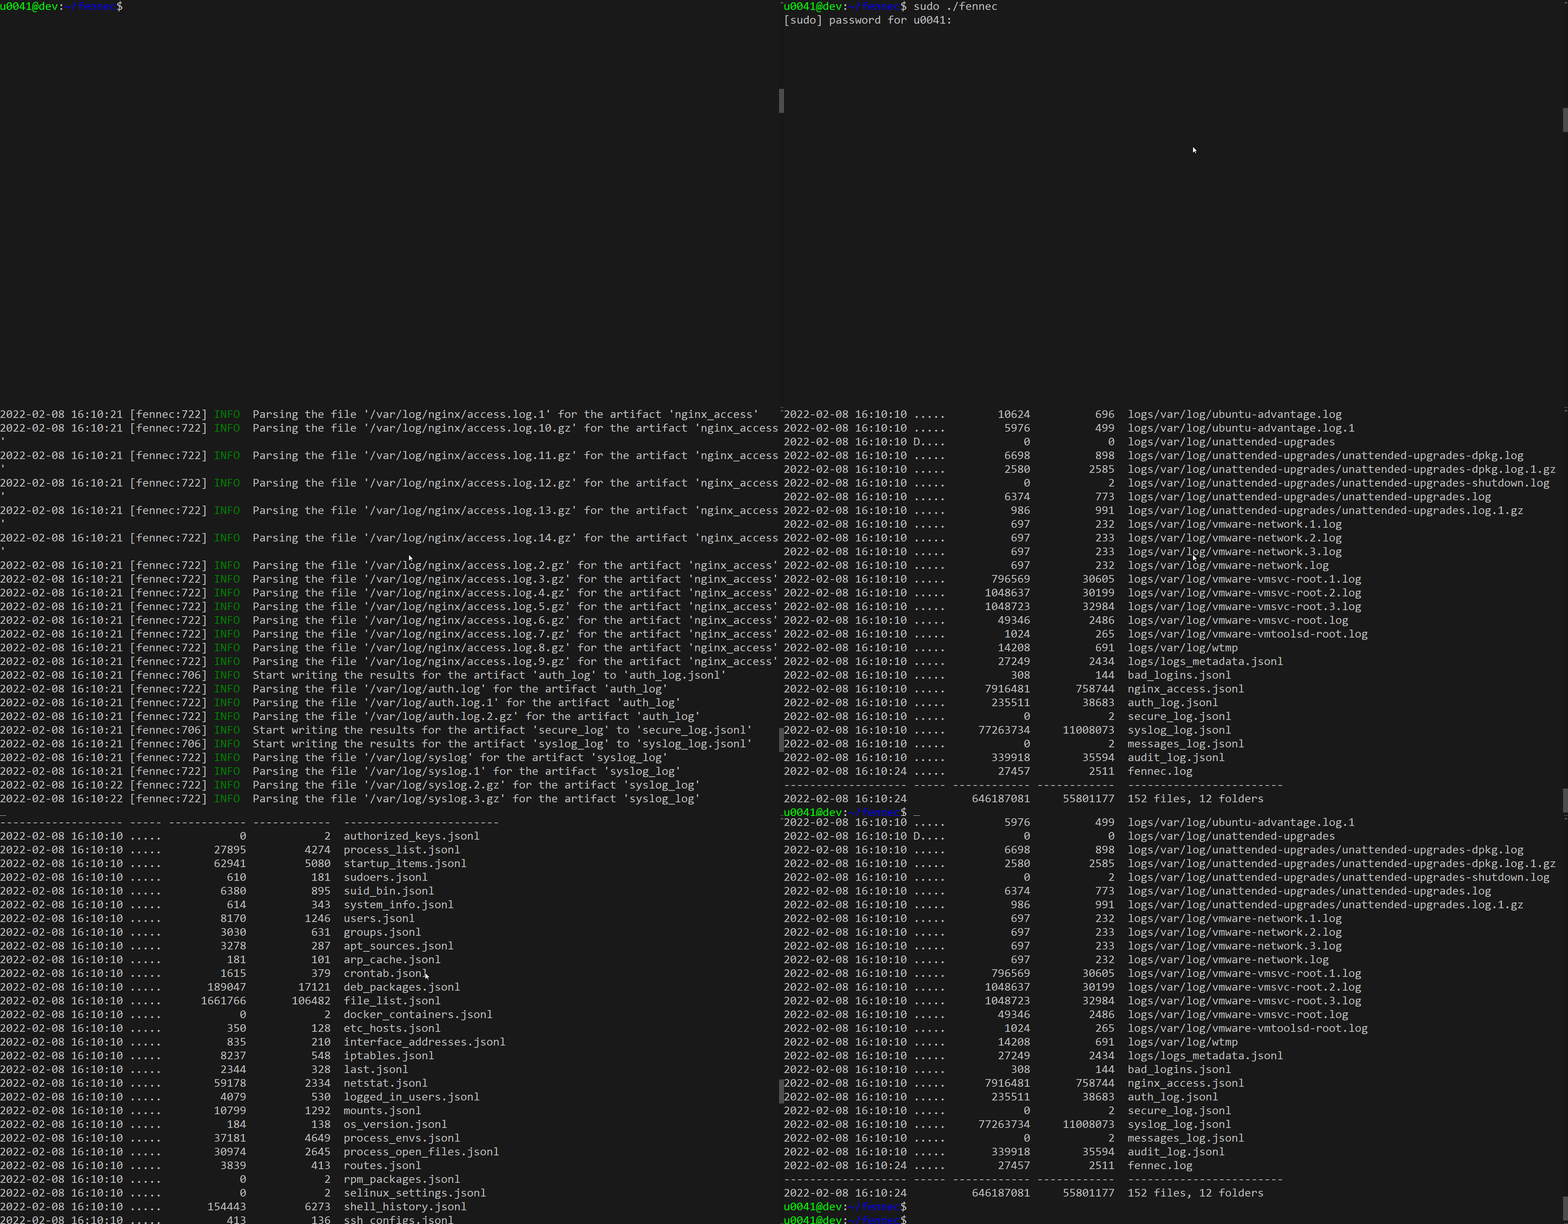
要将数据输出为Kuiper支持的格式,请使用以下参数执行Fennec:```bash sudo ./fennec --output-format kjson
或者将以下内容添加到配置中的 `args` 部分:```yaml
args:
  - "--output-format"
  - "kjson"
重新编译然后执行:```bash sudo ./fennec
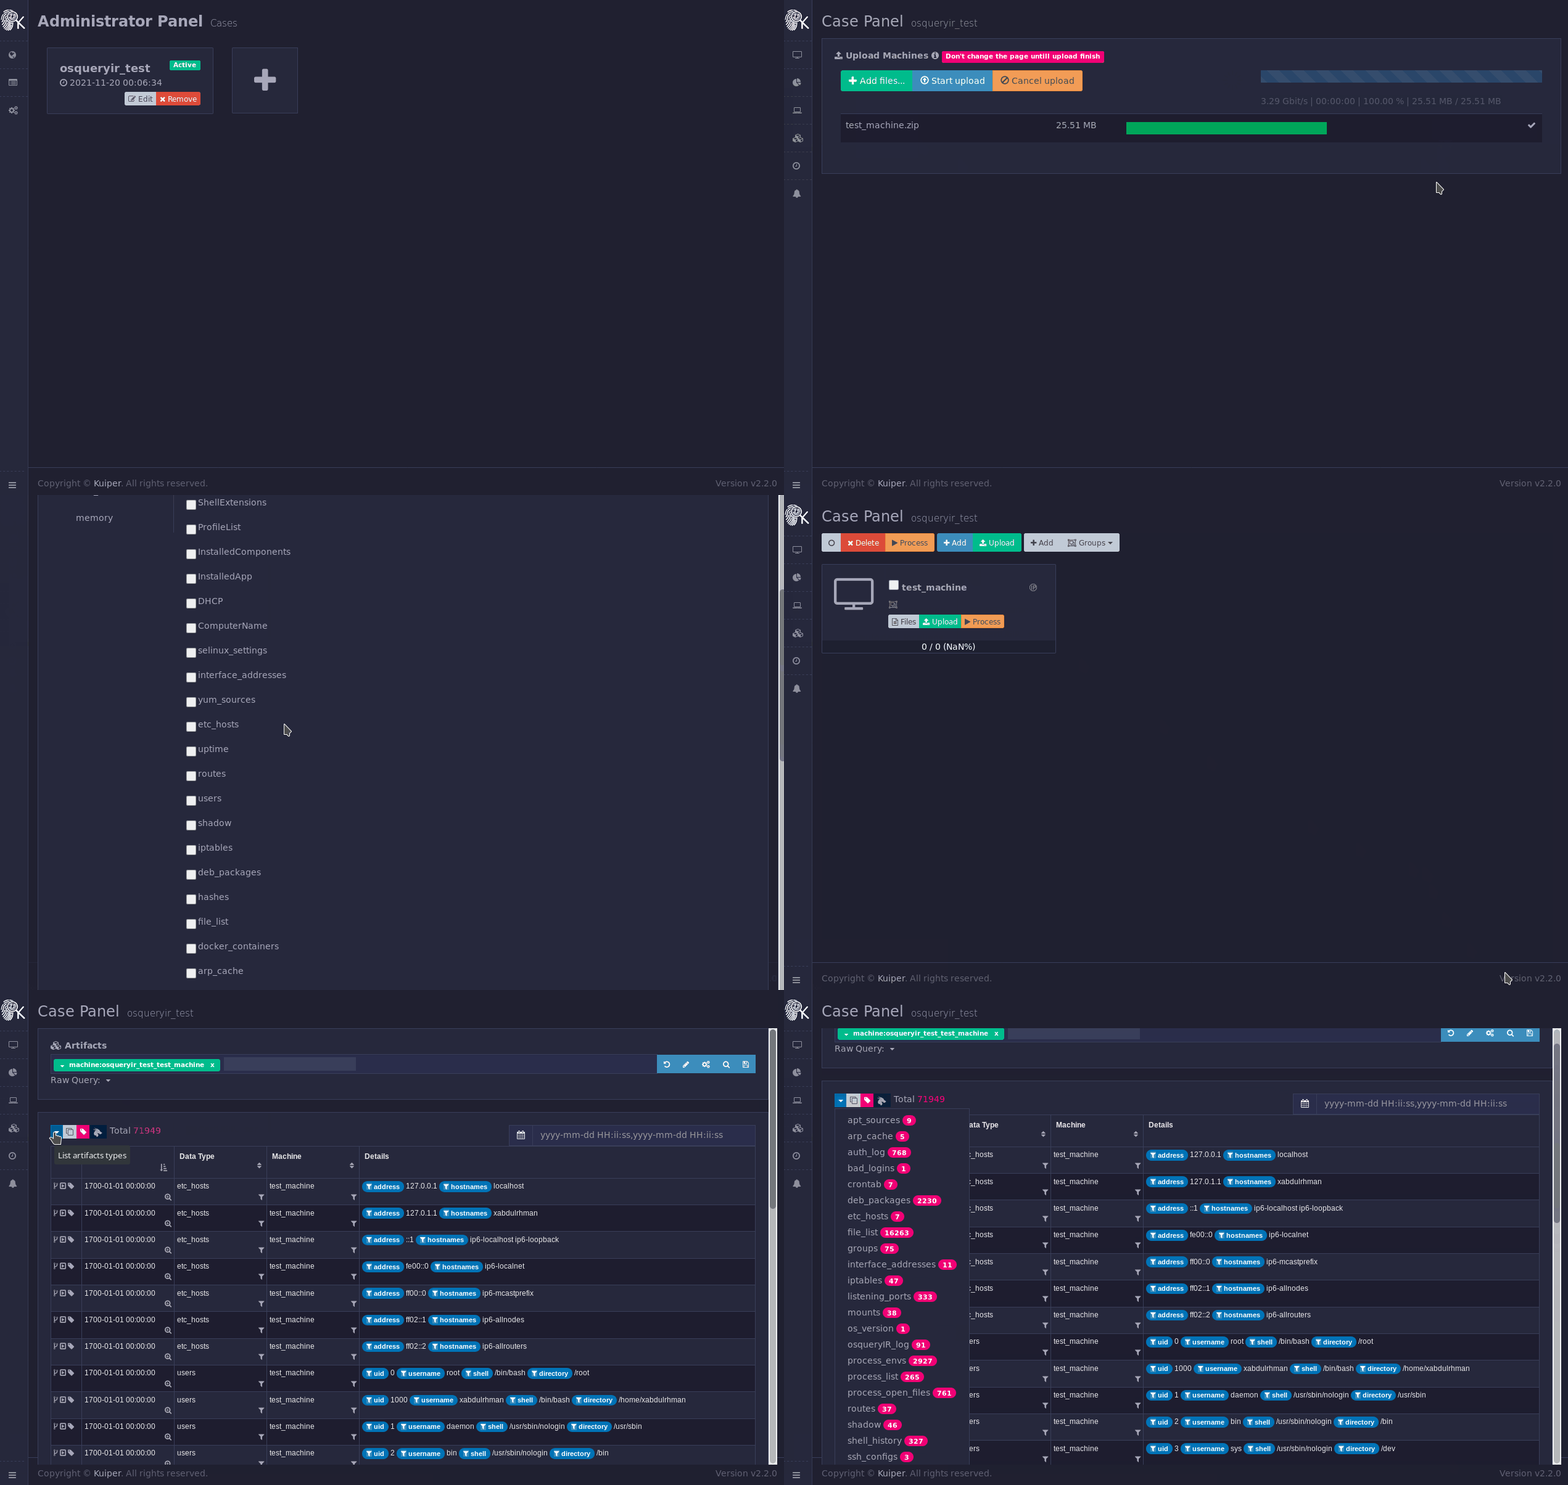
然后上传生成的zip文件到Kuiper,示例如下:
## 配置🔨
默认情况下,位于 `deps/<TARGET_OS>/fennec.yaml` 路径的配置会在编译时嵌入到可执行文件中。配置采用YAML格式,包含两个部分:
### Args
包含要作为命令行参数传递给可执行文件的参数列表,以下是 `args` 部分的示例,它将输出格式设置为 `jsonl`,日志文件名设置为 `fennec.log`:```yaml
args:
- "--output-format"
- "jsonl"
- "--log-file"
- "fennec.log"
...
命令行参数将按以下优先级使用:
包含要收集的工件列表。每个工件包含以下字段: