
Skip to content
KitploitKITPLOIT
도구블로그
제출
도구블로그
제출

해킹, 침투 테스트 및 사이버 보안 도구를 당신의 보안 무기고에!

Kitploit은 해킹, 사이버 보안 및 침투 테스트 도구 디렉토리입니다. 최신 프로젝트 업데이트를 발견하여 취약점을 찾고, 시스템을 분석하고, 테스트를 자동화하고, 보안을 강화하세요.

··피드·문의·개인정보·© 2026 Kitploit

도구 디렉토리

카테고리

모든 카테고리 보기
Loading categories
doppelganger_assistant — 카드 계산기 및 Doppelgänger Community, Pro, Stealth, MFAS가 지원하는 모든 카드 유형을 작성 및/또는 시뮬레이션하기 위한 Proxmark3 플러그인 | Kitploit
도구/GitHubGitHub/tweathers-sec/doppelganger_assistant
Embedded Systems SecurityEncryption/Decryption ToolsRFID/NFC ToolsInformation GatheringHardware HackingPenetration TestingUtilities & FrameworksRed Teaming

인기

모두 보기 →

커뮤니티에서 가장 많이 사용되는 도구를 찾아보세요.

모든 도구 탐색

도구 컬렉션을 둘러보세요

모든 도구 보기 →
공유
GitHub
tweathers-sec/doppelganger_assistant

doppelganger_assistant

카드 계산기 및 Doppelgänger Community, Pro, Stealth, MFAS가 지원하는 모든 카드 유형을 작성 및/또는 시뮬레이션하기 위한 Proxmark3 플러그인

저장소 보기웹사이트
3228개월 전Kitploit 검토 완료

Doppelgänger Assistant

모든 카드 유형에 대해 Doppelgänger Core 및 Stealth가 지원하는 카드 데이터 계산과 Proxmark3 작업 자동화를 위한 전문 GUI 애플리케이션입니다. 이 도구는 직관적인 인터페이스에 이중 출력 표시, 시각적 구분선, 원클릭 클립보드 복사 기능을 제공하여 복잡한 Proxmark3 구문을 외우거나 메모를 뒤질 필요 없이 물리적 침투 테스트를 위한 카드 쓰기 과정을 간소화합니다.
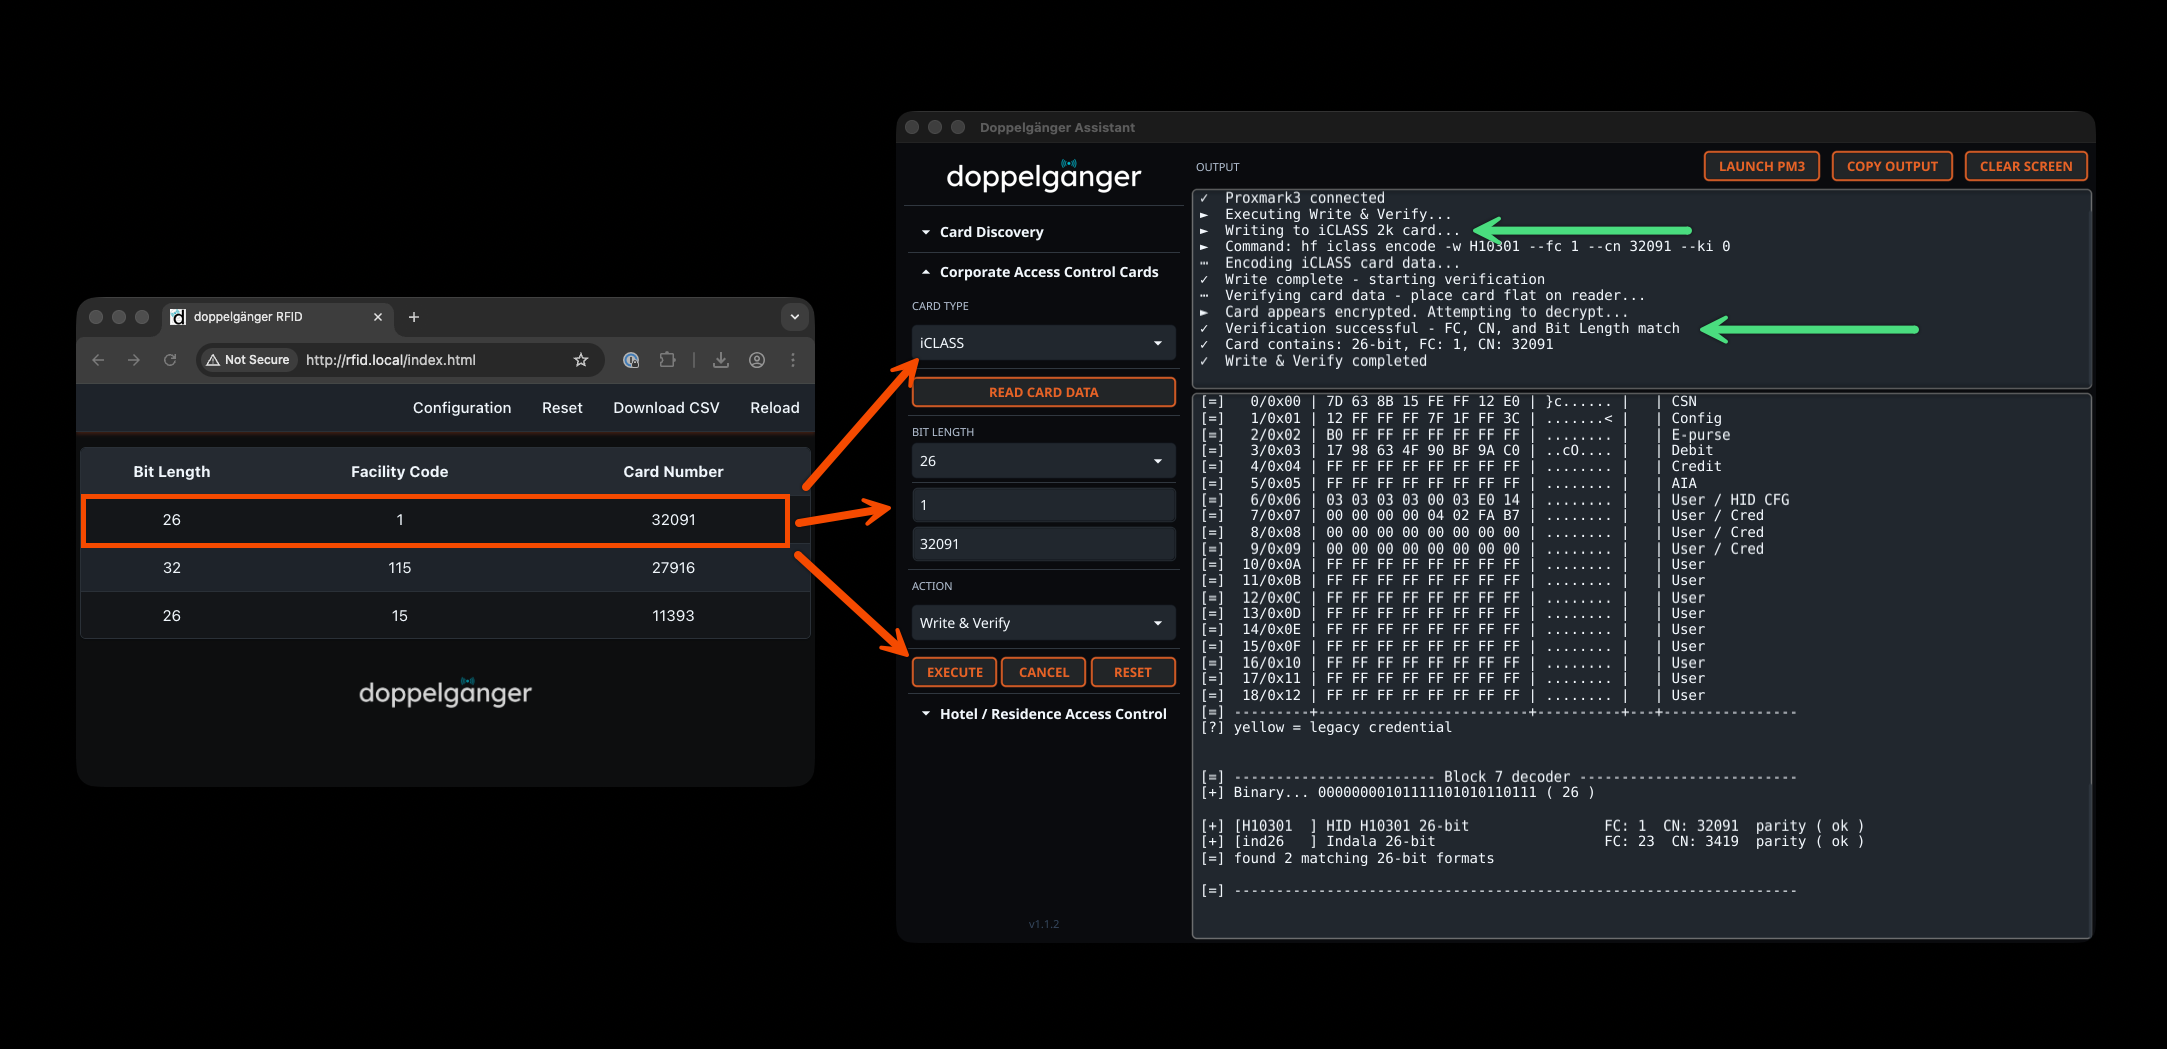
Doppelgänger Assistant GUI

기능

  • 현대적인 GUI 인터페이스: 상태 및 명령 출력 전용의 직관적인 2열 레이아웃
  • 카드 작업: 카드 쓰기, 검증, 시뮬레이션을 위한 Proxmark3 명령을 자동 생성 및 실행
  • 직접 실행: GUI에서 Proxmark3로 쓰기, 검증, 시뮬레이션 작업을 직접 실행
  • 크로스 플랫폼: macOS, Linux, Windows(WSL) 지원
  • 카드 탐지: 카드 유형 자동 감지 및 카드 데이터 읽기
  • 호텔 출입 통제: 완전한 MIFARE 카드 복구 및 분석 도구
  • 터미널 통합: 별도의 터미널 창에서 Proxmark3 실행

빠른 설치(권장)

자동 설치 프로그램이 Doppelganger Assistant, 필수 종속성, 그리고 최신 Iceman 포크 Proxmark3을 설치합니다. 설치 중 최적의 구성을 위해 Proxmark3 장치 유형을 선택하라는 메시지가 표시됩니다.

macOS```sh

/bin/bash -c "$(curl -fsSL https://raw.githubusercontent.com/tweathers-sec/doppelganger_assistant/main/installers/doppelganger_install_macos.sh)"

root@kitploit:~
### Linux```bash
curl -sSL https://raw.githubusercontent.com/tweathers-sec/doppelganger_assistant/main/installers/doppelganger_install_linux.sh | sudo bash

Windows (WSL)

관리자 권한의 PowerShell을 열고 다음을 실행하세요:```powershell irm https://raw.githubusercontent.com/tweathers-sec/doppelganger_assistant/main/installers/doppelganger_install_windows.ps1 | iex

root@kitploit:~
**참고:** 설치 프로그램에서 **Ubuntu 24.04 LTS (Noble)**(권장) 또는 **Kali Linux** 중에서 선택하라는 메시지가 표시됩니다. 기존 설치를 자동으로 감지하고 업데이트를 요청합니다. WSL 기능을 활성화하기 위해 재부팅이 필요한 경우 안내가 표시됩니다. 재부팅 후 동일한 명령을 다시 실행하면 됩니다.

⚠️ 중요: WSL2는 중첩 가상 머신 내부에서 실행을 지원하지 않습니다. 설치 프로그램은 이러한 환경에서의 설치를 자동으로 감지하여 차단합니다. 진행하려면 물리적 하드웨어에 설치하십시오.

## Doppelgänger Assistant가 할 수 있는 일

Doppelgänger Assistant는 초기 감지부터 성공적인 쓰기 작업까지 완전한 카드 분석 및 복제 워크플로우를 제공합니다. 이 애플리케이션은 카드 기술을 자동으로 식별하고, 자격 증명 데이터를 추출하며, 암호화 키를 복구하고, 검증과 함께 복제 카드 쓰기를 수행합니다.

### 지능형 카드 감지

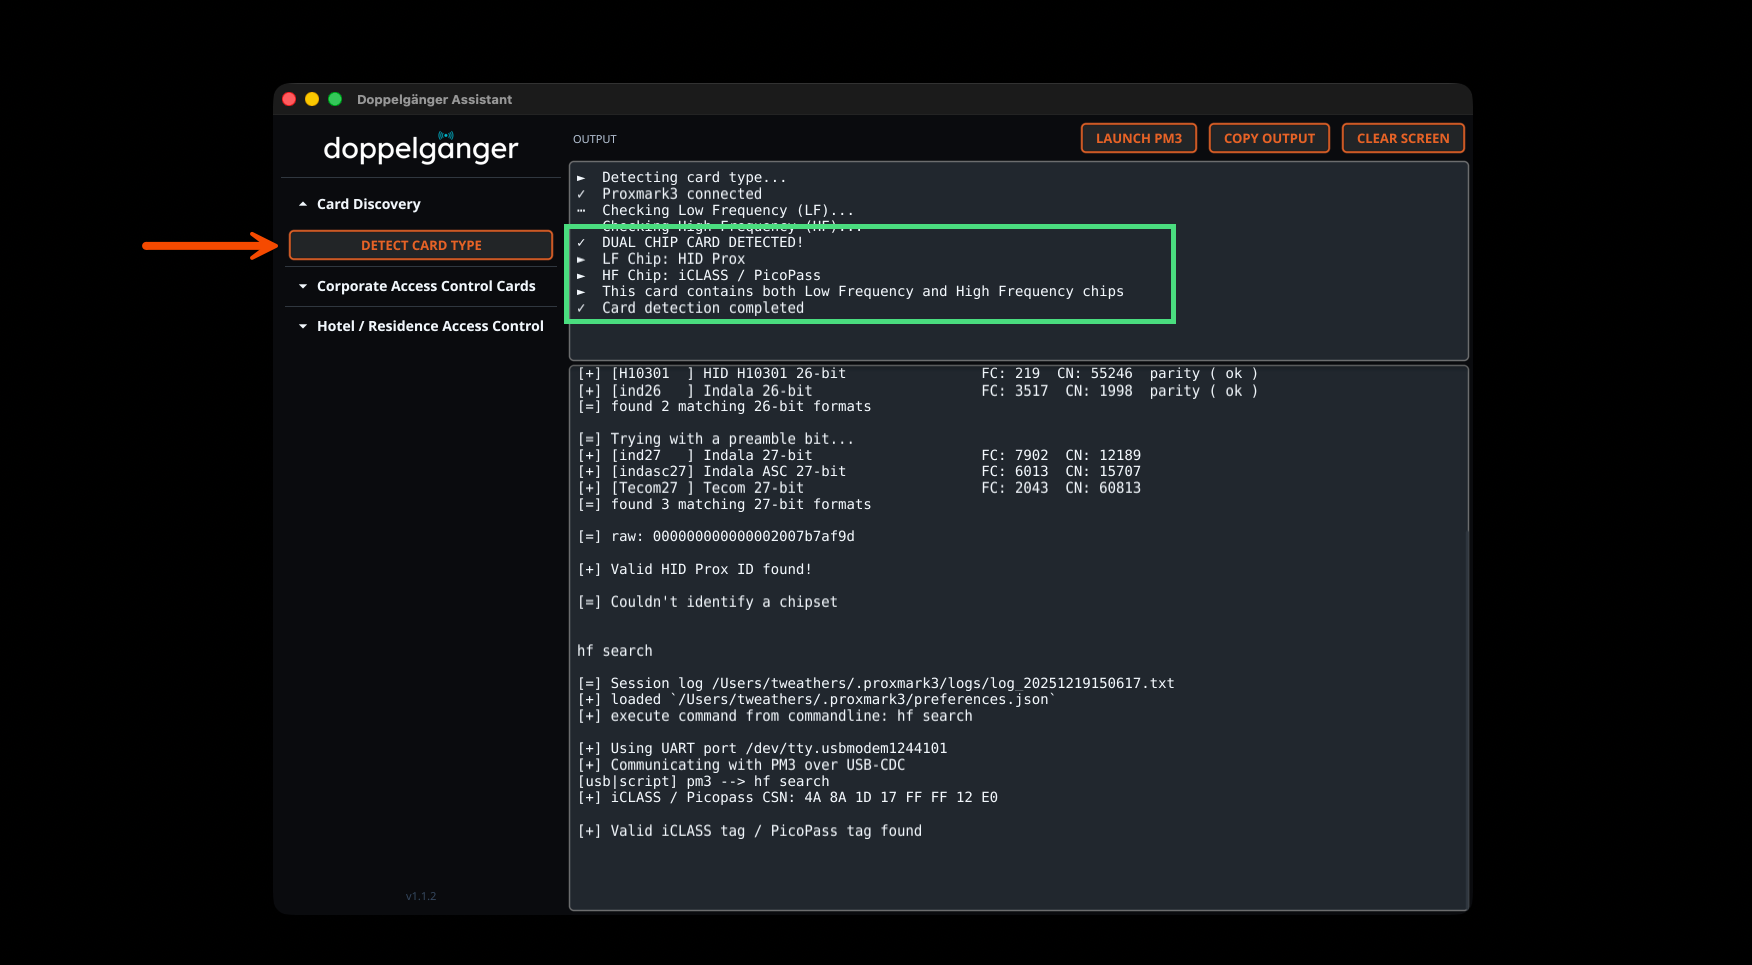
Card Discovery 기능은 저주파(LF) 및 고주파(HF) 칩을 모두 자동으로 스캔하여 듀얼 칩 카드를 식별하고 HID Prox, iCLASS, PicoPass, MIFARE 등을 포함한 특정 카드 기술을 판별합니다. 결과에는 가능한 경우 시설 코드와 카드 번호가 포함된 디코딩된 Wiegand 데이터가 포함됩니다.
![Card Discovery](https://raw.githubusercontent.com/tweathers-sec/doppelganger_assistant/main/img/assistant_detect_card_type.png)

### 호텔 키 카드 분석

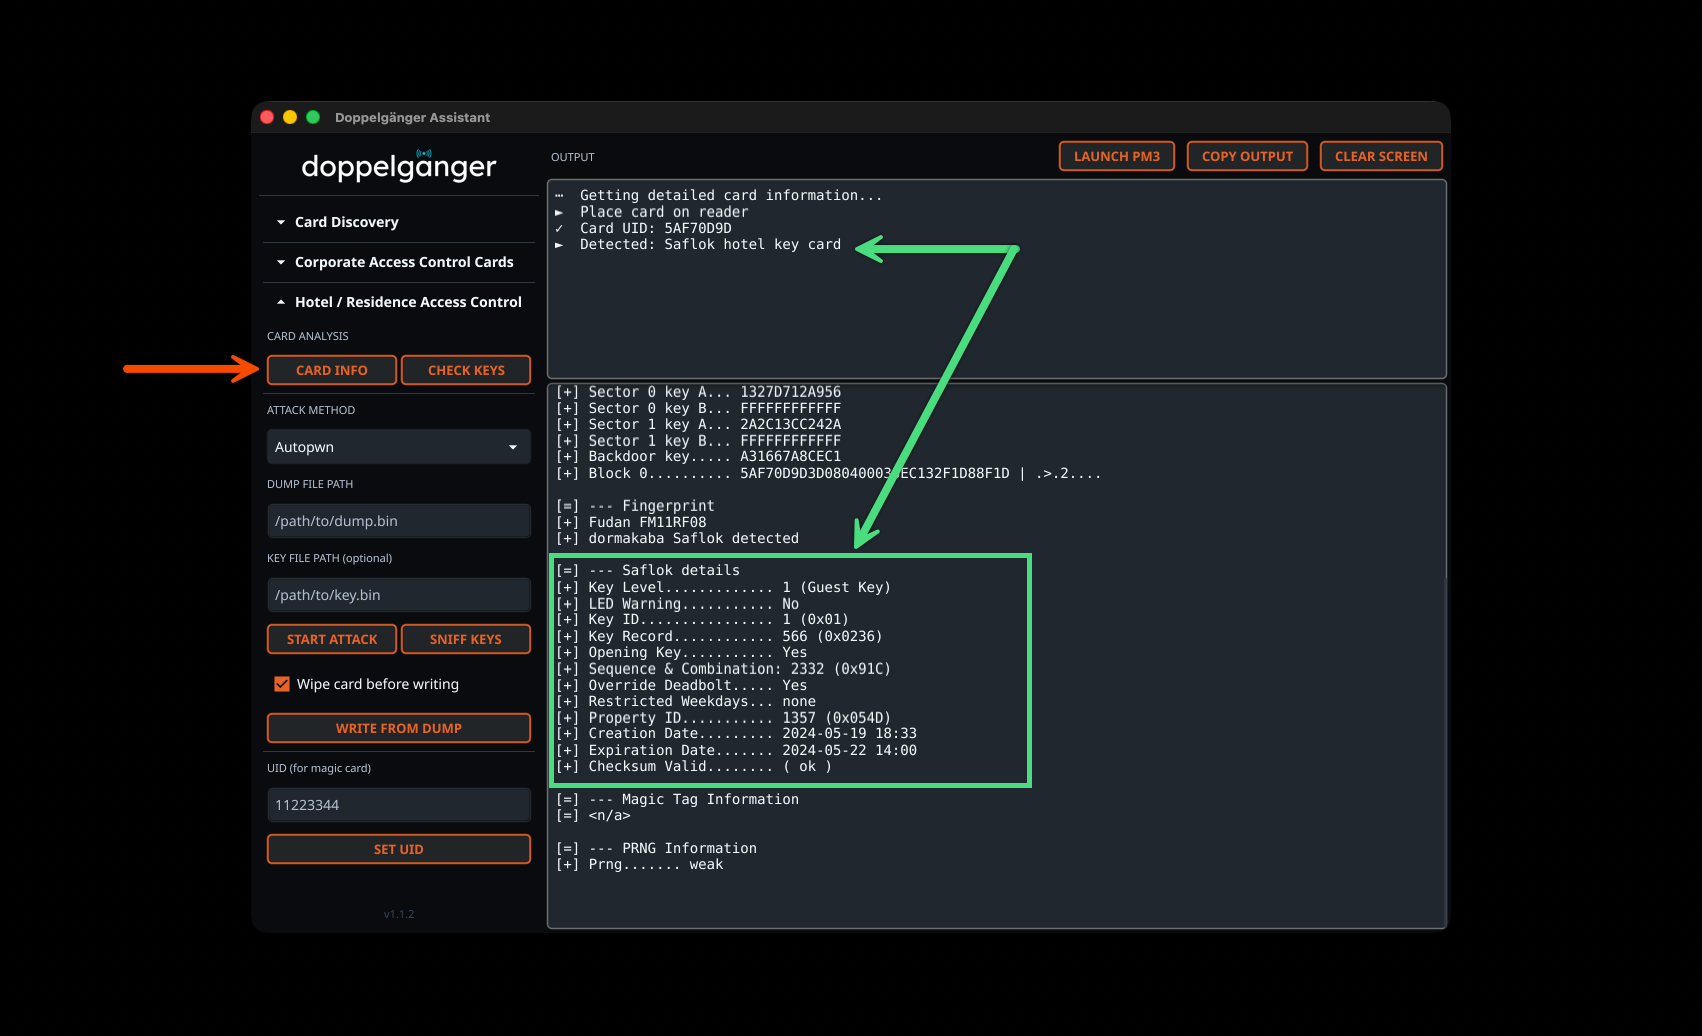
Hotel Access Control 섹션은 MIFARE 기반 호텔 키 시스템을 위한 특수 도구를 제공합니다. Card Info 검색은 Saflok 호텔 키 카드를 자동으로 식별하고 UID, 카드 유형, 매직 기능, PRNG 감지를 포함한 상세한 카드 정보를 표시합니다. 원시 Proxmark3 출력에는 사용 가능한 경우 포괄적인 Saflok 메타데이터가 포함됩니다.
![Saflok Hotel Key Detection](https://raw.githubusercontent.com/tweathers-sec/doppelganger_assistant/main/img/assistant_detect_hotel_key.png)

### 자동 키 복구

MIFARE 공격 도구에는 여러 복구 방법이 포함됩니다: Autopwn(자동 다중 방법), Darkside, Nested, Hardnested, Static Nested, Bruteforce 및 NACK 취약점 테스트. Autopwn은 카드 특성에 따라 최적의 공격 방법을 자동으로 선택합니다. 결과에는 복구된 섹터, 발견된 총 키 수, 사용된 복구 방법 및 즉각적인 카드 복제를 위한 자동 덤프 파일 생성이 표시되는 포괄적인 복구 요약이 표시됩니다.
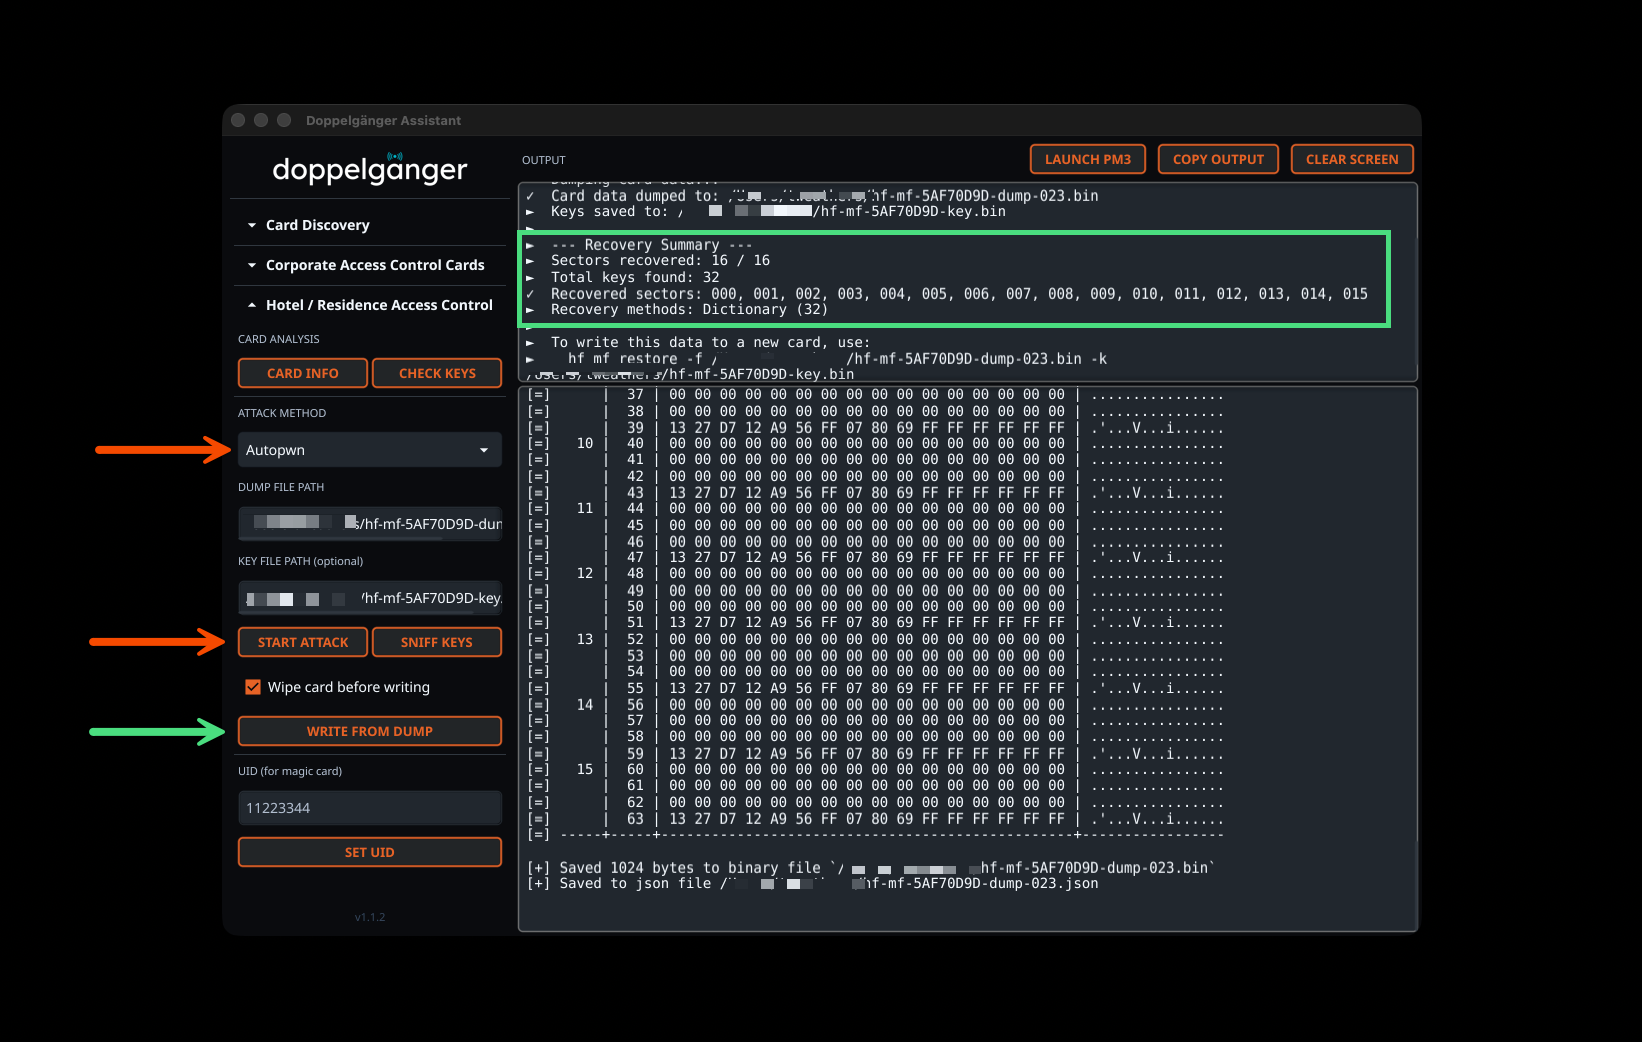
![MIFARE Autopwn](https://raw.githubusercontent.com/tweathers-sec/doppelganger_assistant/main/img/assistant_mifare_autopwn.png)

### 기업 출입 카드 작업

Corporate Access Control 섹션은 iCLASS, PicoPass, AWID, HID Prox, Indala, Avigilon 및 기타 기업 카드 기술의 읽기와 쓰기를 지원합니다. 카드 데이터는 Proxmark3 출력에서 자동으로 파싱되어 시설 코드, 카드 번호, 비트 길이, 형식 유형(H10301, C1k35s 등), CSN 값 및 원시 16진수 데이터를 추출합니다. 통합 워크플로우를 통해 선택적 검증과 함께 빈 카드에 즉시 쓸 수 있습니다.
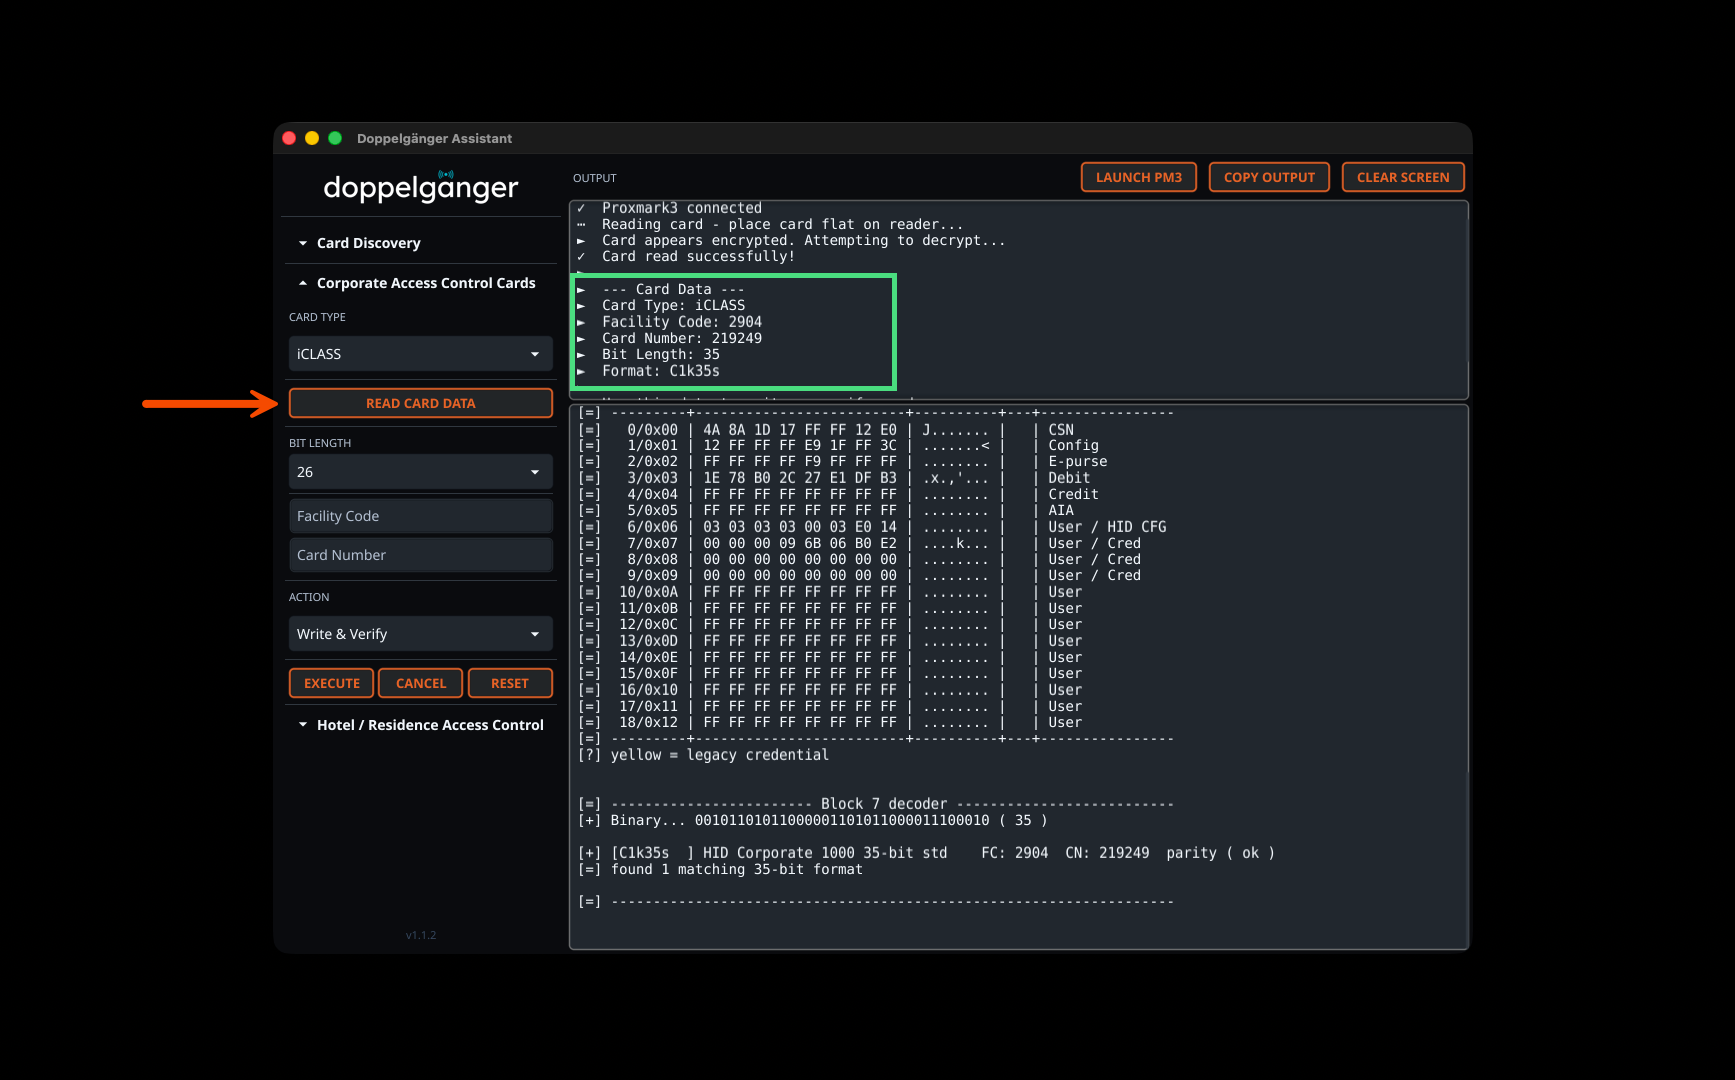
![iCLASS Card Reading](https://raw.githubusercontent.com/tweathers-sec/doppelganger_assistant/main/img/assistant_read_corporate_card.png)

### 완전한 복제 워크플로우

Doppelgänger Assistant는 Doppelgänger RFID 하드웨어 및 Proxmark3 장치와 완벽하게 통합됩니다. Doppelgänger 리더기로 캡처한 자격 증명은 분석 및 쓰기를 위해 GUI로 직접 가져올 수 있습니다. 이 애플리케이션은 여러 제조업체의 카드 읽기, 웹 인터페이스에서 데이터 파싱, 실시간 상태 업데이트 및 검증을 통한 쓰기 작업 실행을 지원합니다.

![Integrated Write Workflow](https://raw.githubusercontent.com/tweathers-sec/doppelganger_assistant/main/img/assistant_gui_write.png)

## 변경 로그

### 버전 1.1.2 (2025년 12월 18일)

**새로운 기능:**
* 별도의 터미널 창에서 Proxmark3를 여는 LAUNCH PM3 버튼 추가
* 자동 카드 유형 감지 기능이 포함된 Card Discovery 섹션 추가
* 지원되는 모든 카드 유형에 대한 READ CARD DATA 기능 추가
* MIFARE 도구가 포함된 Hotel / Residence Access Control 섹션 추가
* LF와 HF 기능을 모두 가진 카드에 대한 듀얼 칩 카드 감지 추가
* MIFARE 카드 감지 시 자동 카드 정보 검색 추가

**개선 사항:**
* 특정 MIFARE 유형과 매직 기능을 표시하도록 카드 감지 개선
* 더 명확한 성공 메시지로 카드 검증 강화
* 애플리케이션 전반에 걸친 오류 처리 및 사용자 피드백 개선
* 자동 복호화 지원을 통한 iCLASS 카드 읽기 개선

### 버전 1.1.1

* 핵심 카드 쓰기, 검증 및 시뮬레이션 기능을 갖춘 최초 릴리스
* PROX, iCLASS, AWID, Indala, Avigilon, EM4100, PIV 및 MIFARE 카드 지원

## Doppelgänger 장치

Stealth 리더기, Doppelgänger Dev Board 또는 완전히 조립된 장거리 리더기는 [Physical Exploitation Store](https://store.physicalexploit.com/)에서 구매할 수 있습니다. 오픈 소스 펌웨어는 [Doppelgänger Core](https://github.com/mwgroup-io/Doppelganger_Core)에서 확인하세요.

## 지원되는 Proxmark3 장치

Doppelgänger Assistant는 [Iceman fork of Proxmark3](https://github.com/RfidResearchGroup/proxmark3)와 함께 작동하며 다음 장치 유형을 지원합니다:

* **Proxmark3 RDV4** - Blueshark Bluetooth 애드온 유무에 관계없이 지원
* **Proxmark3 Easy (512KB)** - 범용 플랫폼 지원

자동 설치 프로그램은 최적의 구성을 위해 설치 중에 장치 유형을 선택하도록 안내합니다.

## 기업 PACS 카드 유형

아래는 Doppelgänger 펌웨어 기반의 공식 지원 기업 PACS 카드 유형입니다. 호텔/MIFARE 키 카드 지원은 키 복구 및 복제 기능과 함께 버전 1.1.2에서 추가되었습니다. 참고로, 호텔 키 카드 / 상세 MIFARE 분석은 Doppelgänger 제품을 사용하여 캡처된 데이터와 일치하지 않습니다. 이는 물리적 침투 테스트 노력을 지원하기 위해 추가된 기능일 뿐이며 작업 진행 중인 기능으로 간주됩니다.

| Card Types                  | Core | Stealth | FC Range    | CN Range        |
| --------------------------- | ---- | ------- | ----------- | --------------- |
| Keypad PIN Codes            |      | X       | N/A         | N/A             |
| HID H10301 26-bit           | X    | X       | 0–255       | 0–65,535        |
| Indala 26-bit               | X    | X       | 0–255       | 0–65,535        |
| Indala 27-bit               | X    | X       | 0–4,095     | 0–8,191         |
| 2804 WIEGAND 28-bit         | X    | X       | 0–255       | 0–16,383        |
| Indala 29-bit               | X    | X       | 0–4,095     | 0–32,767        |
| ATS Wiegand 30-bit          | X    | X       | 0–2,047     | 0–32,767        |
| HID ADT 31-Bit              | X    | X       | 0–15        | 0–8,388,607     |
| EM4102 / Wiegand 32-bit     | X    | X       | 0–32,767    | 0–65,535        |
| HID D10202 33-bit           | X    | X       | 0–127       | 0–16,777,215    |
| HID H10306 34-bit           | X    | X       | 0–65,535    | 0–65,535        |
| HID Corporate 1000 35-bit   | X    | X       | 0–4,095     | 0–1,048,575     |
| HID Simplex 36-bit (S12906) | X    | X       | 0–255       | 0–65,535        |
| HID H10304 37-bit           | X    | X       | 0–65,535    | 0–524,287       |
| HID H800002 46-bit          | X    | X       | 0–16,383    | 0–1,073,741,823 |
| HID Corporate 1000 48-bit   | X    | X       | 0–4,194,303 | 0–8,388,607     |
| AWID 50-bit                 | X    | X       | 0–65,535    | 0–8,388,607     |
| Avigilon 56-bit             | X    | X       | 0–1,048,575 | 0–4,194,303     |
| C910 PIVKey                 | X    | X       | N/A         | N/A             |
| MIFARE (Various Types)      | X    | X       | N/A         | N/A             |

지원되는 기술은 다음과 같습니다:

* iCLASS(Legacy/SE/Seos) *참고: 캡처된 SE 및 Seos 카드는 iCLASS 2k 카드에만 쓸 수 있습니다.*
* PROX
* Indala
* AWID
* Avigilon
* EM4102
* PIV (UID만 해당 - 리더기의 Wiegand 출력을 통해 제공되는 정보이기 때문)
* MIFARE (UID만 해당 - 리더기의 Wiegand 출력을 통해 제공되는 정보이기 때문)

## 상세 설치 안내

### 수동 MacOS 설치

1. [릴리스 페이지](https://github.com/tweathers-sec/doppelganger_assistant/releases)에서 아키텍처에 맞는 DMG 파일을 다운로드하세요:
   - Apple Silicon (M1/M2/M3): `doppelganger_assistant_darwin_arm64.dmg`
   - Intel: `doppelganger_assistant_darwin_amd64.dmg`

2. DMG 파일을 열고 `doppelganger_assistant.app`을 `/Applications` 폴더로 드래그하세요.

3. 격리 속성을 제거하세요:   ```sh
   xattr -cr /Applications/doppelganger_assistant.app
  1. 셸 프로필(~/.zshrc 또는 ~/.zprofile)에 추가하여 명령줄 별칭을 만드세요: ```sh alias doppelganger_assistant='/Applications/doppelganger_assistant.app/Contents/MacOS/doppelganger_assistant'
    root@kitploit:~
  2. 셸을 다시 로드하세요: ```sh source ~/.zshrc
    root@kitploit:~

Manual Linux Installation

Option 1: Using .deb package (Debian/Ubuntu/Kali - Recommended)

  1. 의존성 설치: ```sh sudo apt update && sudo apt upgrade -y sudo apt install libgl1 xterm wget -y

    root@kitploit:~
  2. 사용자 아키텍처에 맞는 .deb 패키지를 다운로드하여 설치하세요: ```sh

    For x86_64/amd64 systems:

    wget https://github.com/tweathers-sec/doppelganger_assistant/releases/latest/download/doppelganger_assistant_linux_amd64.deb sudo dpkg -i doppelganger_assistant_linux_amd64.deb

    For ARM64 systems:

    wget https://github.com/tweathers-sec/doppelganger_assistant/releases/latest/download/doppelganger_assistant_linux_arm64.deb sudo dpkg -i doppelganger_assistant_linux_arm64.deb

    root@kitploit:~
  3. 누락된 의존성을 수정하세요 (필요한 경우): ```sh sudo apt-get install -f -y

    root@kitploit:~

옵션 2: tar.xz 아카이브 사용 (기타 배포판)

  1. 의존성 설치: ```sh sudo apt update && sudo apt upgrade -y sudo apt install libgl1 xterm make git wget -y

    root@kitploit:~
  2. 사용 중인 아키텍처에 맞게 다운로드하여 설치하세요: ```sh

    For x86_64/amd64 systems:

    wget https://github.com/tweathers-sec/doppelganger_assistant/releases/latest/download/doppelganger_assistant_linux_amd64.tar.xz

    For ARM64 systems:

    wget https://github.com/tweathers-sec/doppelganger_assistant/releases/latest/download/doppelganger_assistant_linux_arm64.tar.xz

    Extract and install:

    tar xvf doppelganger_assistant_linux_*.tar.xz cd doppelganger_assistant sudo make install cd .. rm -rf doppelganger_assistant

    root@kitploit:~

Doppelganger Assistant GUI를 실행하려면:```sh doppelganger_assistant

root@kitploit:~
### 수동 Windows (WSL) 설치

1. **WSL을 사용하도록 설정하고 Linux 배포판을 설치합니다**. PowerShell을 관리자 권한으로 엽니다:   ```powershell
   # For Ubuntu 24.04 LTS (recommended):
   wsl --install -d Ubuntu-24.04
   
   # OR for Kali Linux:
   wsl --install -d kali-linux
  1. Windows를 재부팅합니다. 재부팅 후 WSL이 설정을 완료합니다. 메시지가 표시되면 Linux 환경의 사용자 이름과 암호를 만드세요.

  2. Doppelganger Assistant 설치 (WSL 내에서): ```sh sudo apt update && sudo apt upgrade -y sudo apt install libgl1 xterm wget -y

    For x86_64/amd64 systems:

    wget https://github.com/tweathers-sec/doppelganger_assistant/releases/latest/download/doppelganger_assistant_linux_amd64.deb sudo dpkg -i doppelganger_assistant_linux_amd64.deb

    For ARM64 systems:

    wget https://github.com/tweathers-sec/doppelganger_assistant/releases/latest/download/doppelganger_assistant_linux_arm64.deb sudo dpkg -i doppelganger_assistant_linux_arm64.deb

    root@kitploit:~
  3. Proxmark3 종속성 설치: ```sh sudo apt install --no-install-recommends -y git ca-certificates build-essential pkg-config
    libreadline-dev gcc-arm-none-eabi libnewlib-dev qtbase5-dev
    libbz2-dev liblz4-dev libbluetooth-dev libpython3-dev libssl-dev libgd-dev

    root@kitploit:~
  4. Proxmark3 클론 및 빌드: ```sh mkdir -p ~/src && cd ~/src git clone https://github.com/RfidResearchGroup/proxmark3.git cd proxmark3

    Configure for your Proxmark3 device type:

    cp Makefile.platform.sample Makefile.platform

    Edit Makefile.platform for your device:

Doppelganger Assistant를 실행하려면:```sh doppelganger_assistant

root@kitploit:~
## 업데이트

### Windows (WSL) 설치 업데이트

#### 자동 업데이트 (권장)

설치 디렉터리에서 업데이트 스크립트를 실행하세요:```powershell
powershell -ExecutionPolicy Bypass -File C:\doppelganger_assistant\wsl_update.ps1

또는 GitHub에서 직접 다운로드하여 실행하세요:```powershell powershell -ExecutionPolicy Bypass -Command "irm https://raw.githubusercontent.com/tweathers-sec/doppelganger_assistant/main/scripts/wsl_update.ps1 | iex"

root@kitploit:~
The update script will:
- Download the latest Doppelganger Assistant binary
- Update all scripts and installers from the repository
- Update and rebuild Proxmark3 from source
- Preserve your WSL configuration and settings

### Updating macOS or Linux Installation

Re-run the installer script. It will detect the existing installation and prompt you to update:

**macOS:**```bash
bash <(curl -fsSL https://raw.githubusercontent.com/tweathers-sec/doppelganger_assistant/main/installers/doppelganger_install_macos.sh)

Linux:```bash bash <(curl -fsSL https://raw.githubusercontent.com/tweathers-sec/doppelganger_assistant/main/installers/doppelganger_install_linux.sh)

root@kitploit:~
## 제거

### Windows(WSL)에서 제거

#### 자동 제거(권장)

GitHub에서 제거 프로그램을 직접 다운로드하여 실행하세요:```powershell
powershell -ExecutionPolicy Bypass -Command "irm https://raw.githubusercontent.com/tweathers-sec/doppelganger_assistant/main/scripts/uninstall.ps1 | iex"

수동 제거

Doppelganger Assistant가 설치되어 있다면 uninstall 스크립트를 실행하세요:```powershell powershell -ExecutionPolicy Bypass -File C:\doppelganger_assistant\uninstall.ps1

root@kitploit:~
제거 프로그램은 다음을 수행합니다:
- WSL 배포판(Kali-doppelganger_assistant 또는 Ubuntu-doppelganger_assistant)을 중지하고 등록을 해제합니다.
- `C:\doppelganger_assistant`에서 모든 파일을 제거합니다.
- 바탕 화면 바로 가기를 삭제합니다.
- usbipd를 제거합니다(설치 프로그램을 다시 실행하면 다시 설치됩니다).

**참고:** 스크립트는 설치 디렉터리를 완전히 제거할 수 있도록 자동으로 임시 디렉터리로 이동합니다.

### macOS에서 제거

macOS에서 제거하려면:```bash
sudo rm -rf /Applications/doppelganger_assistant.app
sudo rm /usr/local/bin/doppelganger_assistant

Linux에서 제거하기

.deb 패키지로 설치한 경우:```bash sudo apt remove doppelganger-assistant

root@kitploit:~
**tar.xz 아카이브로 설치한 경우:**```bash
sudo rm /usr/local/bin/doppelganger_assistant
rm -f ~/.local/share/applications/doppelganger_assistant.desktop
rm -f ~/Desktop/doppelganger_assistant.desktop
sudo rm /usr/share/pixmaps/doppelganger_assistant.png

개발

소스에서 빌드하기

소스에서 Doppelganger Assistant를 빌드하려면:```bash

Clone the repository

git clone https://github.com/tweathers-sec/doppelganger_assistant.git cd doppelganger_assistant

Build for current platform

./build.sh

Build for all platforms (requires Docker)

./build_all.sh

root@kitploit:~
### Project Structure

- **`src/`** - 모든 Go 소스 코드 및 모듈 파일 포함
- **`installers/`** - 플랫폼별 설치 스크립트
- **`scripts/`** - WSL 및 Windows 설정용 유틸리티 스크립트
- **`build.sh`** - 단일 플랫폼 빌드 스크립트
- **`build_all.sh`** - fyne-cross를 사용하는 다중 플랫폼 빌드 스크립트

### Contributing

1. 리포지토리를 포크하세요
2. 기능 브랜치를 생성하세요
3. `src/` 디렉터리에서 변경 사항을 적용하세요
4. `./build.sh`로 변경 사항을 테스트하세요
5. 풀 리퀘스트를 제출하세요

## Usage

### Launching the GUI

Doppelgänger Assistant GUI는 애플리케이션을 실행하면 기본적으로 시작됩니다:```sh
doppelganger_assistant

또는 GUI 모드에서 명시적으로 실행:```sh doppelganger_assistant -g

root@kitploit:~
### GUI 워크플로

1. **카드 유형 선택**: PROX, iCLASS, AWID, Indala, Avigilon, EM4100, PIV, MIFARE 중에서 선택합니다
2. **비트 길이 선택**: 카드 유형에 맞는 적절한 비트 길이를 선택합니다 (카드 유형에 따라 자동으로 필터링됨)
3. **카드 데이터 입력**: 선택한 카드 유형에 필요한 시설 코드, 카드 번호, 16진수 데이터 또는 UID를 입력합니다
4. **작업 선택**:
   - **생성만 하기**: 쓰기 없이 수동 실행을 위한 Proxmark3 명령을 표시합니다
   - **쓰기 및 검증**: 빈 카드에 카드 데이터를 쓰고 결과를 검증합니다
   - **카드 시뮬레이션**: Proxmark3 장치를 사용하여 카드를 시뮬레이션합니다
5. **실행**: EXECUTE 버튼을 클릭하여 작업을 실행합니다
6. **출력 모니터링**: 
   - **상태 출력** (상단 패널): 작업 진행 상황이 포함된 색상 구분 상태 메시지
   - **명령 출력** (하단 패널): 시각적 구분선이 포함된 상세 Proxmark3 명령 결과
7. **결과 복사**: COPY OUTPUT을 클릭하여 모든 명령 결과를 클립보드에 복사합니다
8. **초기화**: RESET을 클릭하여 모든 필드를 지우고 처음부터 다시 시작합니다

이중 출력 패널은 상태 업데이트와 명령 결과를 명확히 구분하며, 시각적 구분선(예: `|----------- WRITE #1 -----------|`)을 통해 여러 쓰기 시도 또는 검증 단계를 쉽게 구별할 수 있습니다.

### 동영상 데모

아래는 사용법에 대한 간단한 동영상 데모입니다:

[![Doppelgänger Assistant Demo](https://assets.kitploit.com/production/public/readmes/41553/df510930c22aac9f0d36a9f7cb3e9e0adfee2d397883b97b899ac1d60e0c913d.jpg)](https://youtu.be/RfWKgS-U8ws)

### 명령줄 사용 예제

#### iCLASS 카드 쓰기 명령 생성

이 명령은 iCLASS(Legacy/SE/Seos) 카드 데이터를 iCLASS 2k 카드에 인코딩하는 데 필요한 명령을 생성합니다:```sh
doppelganger_assistant -t iclass -bl 26 -fc 123 -cn 4567

[>>] Writing to iCLASS 2k card...
[>>] Command: hf iclass encode -w H10301 --fc 123 --cn 4567 --ki 0

검증과 함께 iCLASS 카드 데이터 쓰기

-w(쓰기) 및 -v(검증) 플래그를 추가하면 응용 프로그램이 사용자의 Proxmark3를 사용하여 카드 데이터를 쓰고 검증합니다:```sh doppelganger_assistant -t iclass -bl 26 -fc 123 -cn 4567 -w -v

|----------- WRITE -----------| [..] Encoding iCLASS card data... [>>] Command: hf iclass encode -w H10301 --fc 123 --cn 4567 --ki 0

[=] Session log /Users/user/.proxmark3/logs/log_20250105120000.txt [+] loaded /Users/user/.proxmark3/preferences.json [+] execute command from commandline: hf iclass encode -w H10301 --fc 123 --cn 4567 --ki 0 [+] Using UART port /dev/tty.usbmodem101 [+] Communicating with PM3 over USB-CDC [+] Encoding successful

[OK] Write complete - starting verification

|----------- VERIFICATION -----------| [..] Verifying card data - place card flat on reader...

[=] Session log /Users/user/.proxmark3/logs/log_20250105120005.txt [+] execute command from commandline: hf iclass rdbl --blk 7 --ki 0 [+] Using key[0] AE A6 84 A6 DA B2 32 78 [+] block 7/0x07 : 00 00 00 00 06 F6 23 AE

[OK] Verification successful - Block 7: 00 00 00 00 06 F6 23 AE [OK] Card contains: 26-bit, FC: 123, CN: 4567

root@kitploit:~
#### PIV/MF 카드 시뮬레이션

Doppelgänger (Core 및 Stealth)에서 제공하는 UID를 사용하면 Proxmark3로 정확한 wiegand 신호를 시뮬레이션할 수 있습니다.```sh
doppelganger_assistant -uid 5AF70D9D -s -t piv
 
Handling PIV card... 
 
Simulating the PIV card on your Proxmark3: 
 
Executing command: hf 14a sim -t 3 --uid 5AF70D9D 
  
[=] Session log /Users/tweathers/.proxmark3/logs/log_20240614152754.txt
[+] loaded `/Users/tweathers/.proxmark3/preferences.json`
[+] execute command from commandline: hf 14a sim -t 3 --uid 5AF70D9D

[+] Using UART port /dev/tty.usbmodem2134301

여러 번 시도하여 HID Prox 카드 쓰기

LF 카드(Prox, AWID, Indala, Avigilon, EM)는 시각적 구분선과 함께 자동으로 5번의 쓰기 시도를 수행합니다:```sh doppelganger_assistant -t prox -bl 46 -fc 123 -cn 4567 -w

[..] Writing Prox card (5 attempts)...

|----------- WRITE #1 -----------| [+] Using UART port /dev/tty.usbmodem101 [+] Communicating with PM3 over USB-CDC [+] Wrote block successfully [..] Move card slowly... Write attempt #1 complete

|----------- WRITE #2 -----------| [+] Using UART port /dev/tty.usbmodem101 [+] Communicating with PM3 over USB-CDC [+] Wrote block successfully [..] Move card slowly... Write attempt #2 complete

|----------- WRITE #3 -----------| ... (continues for all 5 attempts)

[OK] All 5 write attempts complete

root@kitploit:~
#### Avigilon 56비트 카드 작성

Avigilon 카드는 다른 LF 카드와 마찬가지로 5회 시도로 작성됩니다:```sh
doppelganger_assistant -t avigilon -bl 56 -fc 118 -cn 1603 -w

[..] Writing Avigilon card (5 attempts)...

|----------- WRITE #1 -----------|
[+] Using UART port /dev/tty.usbmodem101
[+] Communicating with PM3 over USB-CDC
lf hid clone -w Avig56 --fc 118 --cn 1603
[..] Move card slowly... Write attempt #1 complete

... (continues for all 5 attempts)

Avigilon 카드 시뮬레이션

Avigilon 카드 데이터를 사용하면 Proxmark3로 정확한 신호를 시뮬레이션할 수 있습니다:```sh doppelganger_assistant -t avigilon -bl 56 -fc 118 -cn 1603 -s

Simulating the Avigilon card on your Proxmark3:

Executing command: lf hid sim -w Avig56 --fc 118 --cn 1603

Simulation is in progress... If your Proxmark3 has a battery, you can remove the device and the simulation will continue.

To end the simulation, press the pm3 button.

root@kitploit:~
## Legal Notice

이 애플리케이션은 전문 침투 테스트 및 승인된 보안 평가만을 목적으로 합니다. 이 소프트웨어의 무단 또는 불법 사용/소지는 전적으로 사용자의 책임입니다. Mayweather Group LLC, Practical Physical Exploitation 및 제작자는 이 소프트웨어의 불법 사용에 대해 책임을 지지 않습니다.

## License

[![License: CC BY-NC-ND 4.0](https://img.shields.io/badge/License-CC%20BY--NC--ND%204.0-lightgrey.svg)](https://creativecommons.org/licenses/by-nc-nd/4.0/)

이 저작물은 [Creative Commons Attribution-NonCommercial-NoDerivatives 4.0 International License](https://creativecommons.org/licenses/by-nc-nd/4.0/)에 따라 라이선스가 부여됩니다.

**귀하는 다음을 자유롭게 할 수 있습니다:**
* **공유** — 어떤 매체나 형식으로든 자료를 복사 및 재배포할 수 있습니다.

**다음 조건에 따라:**
* **저작자 표시** — 적절한 저작자 표시를 하고, 라이선스 링크를 제공하며, 변경 사항이 있었는지 표시해야 합니다.
* **비영리** — 이 자료를 상업적 목적으로 사용할 수 없습니다.
* **변경 금지** — 자료를 리믹스, 변환 또는 수정하는 경우 수정된 자료를 배포할 수 없습니다.

전체 라이선스 전문은 [LICENSE](https://github.com/tweathers-sec/doppelganger_assistant/blob/HEAD/LICENSE) 파일을 참조하십시오.

## Support

전문적인 지원 및 문서를 보려면 다음을 방문하십시오:
* [Practical Physical Exploitation Documentation](https://docs.physicalexploit.com/)
* [GitHub Issues](https://github.com/tweathers-sec/doppelganger_assistant/issues)
* [Professional Store](https://store.physicalexploit.com/)

## Credits

Travis Weathers([@tweathers-sec](https://github.com/tweathers-sec))가 개발  
Copyright © 2025 Mayweather Group, LLC

---

*이 소프트웨어는 [Doppelgänger Core](https://github.com/mwgroup-io/Doppelganger_Core) 및 Doppelgänger 하드웨어 장치와 함께 작동합니다.*
도구 다운로드

- For RDV4 with Blueshark: Uncomment PLATFORM=PM3RDV4 and PLATFORM_EXTRAS=BTADDON

- For RDV4 without Blueshark: Uncomment PLATFORM=PM3RDV4 only

- For Proxmark3 Easy (512KB): Uncomment PLATFORM=PM3GENERIC and PLATFORM_SIZE=512

nano Makefile.platform

Build and install

make clean && make -j$(nproc) sudo make install PREFIX=/usr/local

root@kitploit:~
  • USBipd 설치 (관리자 권한 Windows PowerShell에서): ```powershell winget install --interactive --exact dorssel.usbipd-win

    root@kitploit:~
  • Proxmark3를 WSL에 연결 (Windows cmd.exe 또는 PowerShell을 관리자 권한으로 실행): ```powershell usbipd list # List USB devices - find your Proxmark3 (VID: 9ac4) usbipd bind --busid 9-1 # Replace 9-1 with your Proxmark3's busid usbipd attach --wsl --busid 9-1 # Attach to WSL

    root@kitploit:~