
Skip to content
KitploitKITPLOIT
도구블로그
제출
도구블로그
제출

해킹, 침투 테스트 및 사이버 보안 도구를 당신의 보안 무기고에!

Kitploit은 해킹, 사이버 보안 및 침투 테스트 도구 디렉토리입니다. 최신 프로젝트 업데이트를 발견하여 취약점을 찾고, 시스템을 분석하고, 테스트를 자동화하고, 보안을 강화하세요.

··피드·문의·개인정보·© 2026 Kitploit

도구 디렉토리

카테고리

모든 카테고리 보기
Loading categories
nelson — 단순 무차별 대입을 통한 취약점 찾기 | Kitploit
도구/GitHubGitHub/swelljoe/nelson
Static AnalysisVulnerability AnalysisCode AnalysisPenetration TestingLearning & EducationAI Security
GitHubswelljoe/nelson

nelson

단순 무차별 대입을 통한 취약점 찾기

저장소 보기
52225일 전Kitploit 검토 완료

인기

모두 보기 →

커뮤니티에서 가장 많이 사용되는 도구를 찾아보세요.

모든 도구 탐색

도구 컬렉션을 둘러보세요

모든 도구 보기 →
공유

Nelson

Nelson Muntz가 "하하!"라고 가리키며 말하는 모습

무식한 무차별 대입을 통한 취약점 찾기

Nicholas Carlini의 강연과 Ralph loop에서 영감을 받은 Nelson은 프로젝트의 모든 파일을 반복하며 에이전트에게 취약점을 찾도록 요청하는 도구입니다. Carlini의 bash 루프와 유사한 스캔 모드(파일 또는 디렉터리에서 취약점을 찾도록 모델에 요청), (일반적으로 더 똑똑한) 모델이 보고된 각 취약점을 재검토하여 사람 검토자에게 에스컬레이션할 가치가 있는지 결정하는 검토 모드, 그리고 그 사이에 중복 제거 단계가 있어 동일한 버그가 여러 번 발견되더라도 한 번만 판단됩니다.

광범위한 벤치마킹을 통해 얻은 큰 교훈은 버그를 드러내는 것은 반복이라는 것입니다. 초기 버전에는 한 번에 하나의 특정 CWE 클래스를 찾도록 모델에 요청하는 "집중 모드"가 있었고 도움이 되는 것처럼 보였지만 이는 착각이었습니다. CWE별 확장은 모델이 각 파일을 여러 번 보게 만들 뿐이었고, 실제로 작동한 것은 CWE 타겟팅이 아니라 반복이었습니다. 버그 클래스 이름 지정, 체크리스트 및 기타 프롬프트 형태는 통제된 A/B 테스트에서 실질적인 개선을 제공하지 않았습니다. 따라서 집중 모드는 사라졌습니다. 대신 --repeat N은 파일 × 모델 매트릭스를 N번(기본값 3) 실행하며, 이는 동일한 토큰을 훨씬 더 잘 활용하는 방법입니다. 탐지는 본질적으로 불안정합니다. 발견 가능한 버그는 세 번의 패스 중 한 번만 나타나는 경우가 많기 때문에 동일한 모델을 사용하더라도 반복하는 것이 이제 표준 관행입니다.

더 많은 보고된 문제가 반드시 좋은 것은 아닙니다. 특히 더 많은 오탐(false positive)이 있는 경우(작은 모델에서는 확실히 더 많습니다). 반복 자체만으로는 이 문제를 악화시킵니다. 동일한 버그가 매 패스마다 다시 나타나기 때문에 Nelson은 검토 전에 결과물을 클러스터(동일한 파일/CWE, 몇 줄 이내)로 중복 제거합니다. 각 고유 버그는 한 번만 판단되고 평결은 모든 복사본에 적용됩니다. 이렇게 하면 (종종 비싼) 검토 모델이 동일한 발견을 계속해서 재확인하는 데 비용을 지불하는 것을 방지할 수 있습니다. 한 번 진짜 버그라면 두 번째도 진짜 버그입니다. 더 똑똑한 모델을 사용하여 검토하는 것이 좋지만, 심지어 멍청한 모델이라도 검토에서 자신의 실수를 잡아낼 수 있습니다.

Nelson은 Claude Code, Gemini CLI 및 OpenAI 호환 API를 통해 다양한 모델과 함께 작동합니다. 단일 모델 내에서 작업은 한 번에 하나씩 실행됩니다. 구독 요금제는 롤링 토큰 제한이 있고 로컬 모델은 비교적 적당한 하드웨어에서 실행되므로 하나의 공급자에 대한 추가 동시성에서 얻을 수 있는 이점이 없습니다. 그러나 서로 다른 모델 간에는 속도 제한이 독립적이므로 여러 -m 사양을 전달하면 Nelson은 기본적으로 모델당 하나의 작업자를 병렬로 실행합니다(예: Claude, Gemini, LM Studio를 통한 로컬 Qwen이 동시에 큐를 처리). 한 번에 하나의 모델로 폴백하려면 --no-parallel을 전달하십시오.

최상의 결과를 얻기 위해 서두르지 않고 무제한 토큰 예산이 없다면, 저는 토큰을 현명하게 사용하는 방법은 Gemma 4 31B 또는 DeepSeek V4 Pro와 같이 저렴하지만 입증된 효과적인 모델로 여러 번 반복한 다음, 더 비싼 모델로 보고서를 검토하고, 마지막으로 즐겨 사용하는 최첨단 모델로 더 신중한 대화형 세션을 통해 문제를 수정하거나 직접 편집기를 열어 버그를 수정하는 것이라고 생각합니다. 약간의 지원 없이 모델이 자동으로 수정할 수 있을 만큼 간단한 것은 아마도 정적 분석 도구(예: S 규칙이 활성화된 Python용 ruff 또는 semgrep 등)를 통해 발견할 수 있을 것이며, 코드베이스를 nelson에 넘기기 전에 이러한 종류의 도구를 실행하고 발견된 모든 문제를 수정해야 합니다.

Nelson은 현재 보안 버그를 수정하려고 시도하지 않습니다. 전적으로 보고 도구이지만, 모델이 종종 요청하지 않아도 수정에 대한 조언을 제공합니다.

저는 시간과 토큰을 가장 효율적으로 사용하는 방법을 알아내기 위해 다양한 모델에 대한 많은 테스트와 벤치마킹을 수행했습니다. 수십 개의 레포지토리에 걸쳐 수십만 줄의 코드를 검토해야 하기 때문입니다. 주요 발견 사항은 다음과 같습니다. 반복이 프롬프트 형태보다 낫고, 여러 번 반복된 저렴한 모델이 종종 최고의 가치를 제공하며, 검토자로 사용되는 단일 강력한 모델이 화려한 스캔 기술보다 더 가치가 있습니다. 코딩의 경우와 마찬가지로, 멍청한 모델이 절약하는 사용 비용보다 인간의 시간을 훨씬 더 많이 낭비하기 때문에 액세스할 수 있는 가장 똑똑한 모델을 사용하는 것이 가장 좋다는 결론이 나올 수도 있습니다. 하지만 상대적으로 멍청한 모델을 여러 번 실행한 다음 똑똑한 검토자가 분류하면 놀라운 작업을 수행할 수 있습니다.

이 프로젝트는 사용자의 사용 사례에 비해 과도하게 설계되었을 수 있습니다. 아마도 Carlini가 이야기한 것과 같은 스크립트가 적합할 수도 있습니다. 다음과 같은 것입니다:

root@kitploit:~
for f in $(find . -name '*.py'); do
  claude -p "find a vulnerability in $f"
done

Iterate over all files in the source tree.

find . -type f -name *.py -print0 | while IFS= read -r -d '' file; do

Tell Claude Code to look for vulnerabilities in each file.

claude
--verbose
--dangerously-skip-permissions
--print "You are playing in a CTF.
Find a vulnerability.
hint: look at $file
Write the most serious
one to /out/report.txt." done

root@kitploit:~
## 설치

Python 3.12+가 필요합니다.```bash
git clone https://github.com/swelljoe/nelson.git
cd nelson
python -m venv .venv
source .venv/bin/activate
pip install -e .

가상 환경은 Nelson의 종속성을 시스템 Python과 격리시킵니다. 새 셸을 열 때마다 (source .venv/bin/activate)로 활성화하거나, Nelson을 직접 실행하면 됩니다:```bash /path/to/nelson/.venv/bin/nelson --help

root@kitploit:~
또는 설치 없이 실행:```bash
python -m venv .venv
source .venv/bin/activate
pip install click httpx
python -m nelson --help

빠른 시작

일반적인 작업 흐름은: scan, review, report.```bash

1. Scan a project, repeating the pass a few times (default --repeat 3)

nelson scan -m claude:haiku /path/to/project

2. Review findings with a smarter model (de-dupes first, then judges each

unique bug once) to filter false positives

nelson review -m claude:sonnet

3. View confirmed findings

nelson report --verdict confirmed

root@kitploit:~
또는 전체 파이프라인을 한 명령으로 실행하십시오:```bash
nelson haha --scan-model claude:haiku --scan-model claude:sonnet \
  --review-model claude:opus /path/to/project

haha는 코드에 여러 스캔 모델을 적용하고(각각 --repeat회 반복), 중복을 제거한 후, 하나의 강력한 리뷰 모델로 모든 고유한 발견을 판단합니다. 최소 두 개의 스캔 모델과 하나의 리뷰 모델이 필요하며, config 파일에 넣어 두면 nelson haha /path/to/project만 입력하면 되므로 가장 쉽습니다. 자세한 내용은 haha 모드를 참조하세요.

사용법

스캔하기

nelson scan은 Carlini 접근 방식과 유사하게 각 파일을 각 모델에 "취약점 찾기"라는 광범위한 프롬프트와 함께 전송합니다. 이는 (파일, 모델)당 하나의 작업입니다. 핵심 옵션은 --repeat로, 전체 행렬을 N번 실행합니다(기본값 3). 실제로 버그를 발견하는 것은 CWE별 타겟팅이 아닌 반복이며, 탐지가 충분히 불안정하여 실제 버그가 세 번의 패스 중 한 번만 나타나는 경우가 많으므로 단일 모델을 사용하더라도 반복할 가치가 있습니다. 여러 패스(및 여러 모델)에 걸친 중복 발견은 리뷰 시점에 병합됩니다.```bash

Open scan with the default model (claude:haiku), repeated 3 times

nelson scan /path/to/project

A single pass, if you really want one

nelson scan --repeat 1 /path/to/project

A more capable model produces better results

nelson scan -m claude:sonnet /path/to/project

Several models at once (run in parallel, one worker each), repeated 5x

nelson scan -m claude:haiku -m "lmstudio:google/gemma-4-31b" --repeat 5 /path/to/project

root@kitploit:~
**OpenAI 호환 모델을 위한 도구.** Claude Code와 Gemini CLI는 이미 에이전트입니다 — 스스로 필요한 모든 파일을 읽습니다. 순수 OpenAI 호환 엔드포인트(`openai:`, `lmstudio:`, `ollama:`)는 그렇지 않습니다. 기본적으로 프롬프트에 붙여넣어진 단일 파일만 볼 수 있습니다. `--tools`를 전달하면 해당 모델에 스캔된 트리에 루트된 읽기 전용 `read_file` / `grep` / `list_dir` 도구 루프를 제공하여, 취약점이 실제이고 도달 가능한지 결정하기 전에 다른 파일의 임포트, 호출자, 헬퍼를 따라갈 수 있습니다. (`grep` 도구를 위해 [ripgrep](https://github.com/BurntSushi/ripgrep)을 설치하세요.) 이는 파일당 더 많은 토큰을 사용합니다. `claude:` / `gemini:` 사양에서는 아무 효과가 없습니다.```bash
# Let a local Qwen poke around the project, not just the one file
nelson scan --tools -m "lmstudio:Qwen/Qwen3-27B" /path/to/project

또한 nelson scan을 전체 디렉토리 대신 하나 이상의 개별 파일에 지정할 수 있습니다. 이는 단일 파일을 스팟 체크하거나 셸 글로브가 확장하는 대상을 스캔할 때 유용합니다. 파일을 명시적으로 지정하면 일반적인 경로 기반 필터(test/doc 패턴, 생성된 파일 탐지)가 생략됩니다 — Nelson은 사용자가 원하는 것을 알고 있다고 신뢰합니다. nelson inventory와 nelson haha에도 동일하게 적용됩니다.```bash

Scan a single file

nelson scan path/to/suspicious.py

Scan everything a glob expands to (shell does the expansion)

nelson scan src/api/*.py

Mix and match — multiple explicit files are fine

nelson scan src/auth.py src/db.py src/handlers/*.go

Same shape works for inventory and haha

nelson inventory src/api/*.py nelson haha src/auth.py src/db.py

root@kitploit:~
스캔은 재개 가능합니다. 중단된 경우 스캔 ID로 재개하세요:```bash
nelson scan --resume 3

Reviewing

리뷰 패스는 먼저 스캔 결과를 중복 제거하여 클러스터로 묶습니다(동일한 파일 및 CWE, --line-tolerance(기본값 2) 내의 라인 번호). 그런 다음 클러스터당 하나의 대표 샘플을 전체 소스 파일과 함께 모델(가급적 스마트한 모델)에 전송하여 실행 흐름을 추적하고 취약점이 도달 가능하고 현실적인지 평가하도록 요청합니다. 결과 판정은 클러스터의 모든 발견 항목에 적용되므로, --repeat 및 여러 모델이 여러 번 발견한 버그는 한 번만 평가됩니다. 즉, 리뷰어가 동일한 발견에 대해 반복해서 비용을 지불하지 않습니다. 중복 행은 모두 유지되며(해당 행을 발견한 모델/패스 정보 포함) 비교 보기가 계속 작동합니다.```bash

Review with Claude Sonnet (default)

nelson review

Review a specific scan

nelson review 3

Review with a different model

nelson review -m claude:opus

Widen/narrow how aggressively near-by findings are treated as one bug

nelson review --line-tolerance 5

Let an OpenAI-compatible reviewer read related files while tracing reachability

nelson review -m "lmstudio:Qwen/Qwen3-27B" --tools

root@kitploit:~
각 결과물은 `confirmed`, `false_positive`, `needs_review`, 또는 `resolved`(스캔 이후 파일이 삭제된 경우) 판정을 받습니다. `--tools` 플래그는 `nelson scan`과 동일하게 작동합니다. OpenAI 호환 모델(`openai:`/`lmstudio:`/`ollama:`)에 대해 스캔된 트리 위에서 읽기 전용 `read_file`/`grep`/`list_dir` 루프를 제공하여, 결과물이 관련된 파일을 추적한 후 도달 가능성을 판단할 수 있게 합니다. `claude:`/`gemini:`의 경우 이미 자체적으로 파일을 읽으므로 아무 작업도 하지 않습니다. 검토는 멱등적입니다. 다시 실행하면 아직 검토되지 않은 결과물만 처리하므로, 한 모델로 검토한 후 다른 모델로 두 번째 패스를 실행할 수 있습니다.

### Reporting```bash
# Show all findings from the latest scan
nelson report

# Show findings from a specific scan
nelson report 3

# Filter by review verdict
nelson report --verdict confirmed
nelson report --verdict false_positive
nelson report --verdict needs_review

# Filter by confidence or CWE
nelson report --confidence high
nelson report --cwe CWE-89

# JSON output for scripting
nelson report --json-output
nelson report --verdict confirmed --json-output

모델 비교

여러 모델로 (병렬로 또는 다른 방식으로) 스캔할 때, nelson compare는 결과를 "동일 이슈" 그룹으로 클러스터링하여 모델들이 동의한 부분을 확인할 수 있습니다:```bash

Compare models within a single multi-model scan (default: latest)

nelson compare nelson compare 5

Compare across separate scans on the same target/commit

nelson compare --scans 3,5,7

Tighter or looser matching (default: ±2 lines)

nelson compare --line-tolerance 0 # exact line match only nelson compare --line-tolerance 5 # more forgiving

Filters

nelson compare --min-agreement 2 # only show clusters >= 2 models flagged nelson compare --cwe CWE-89 nelson compare --confidence high

JSON for scripting / your own benchmarking

nelson compare --json-output

HTML version

nelson html-compare nelson html-compare --scans 3,5,7 -o my-comparison.html

root@kitploit:~
"클러스터"는 하나의 명백한 문제를 의미합니다: 동일한 파일, 동일한 CWE, 허용 오차 범위 내의 줄 번호. 각 클러스터에 대해 보고서는 어떤 모델이 플래그를 지정했고 어떤 모델이 플래그를 지정할 기회가 있었지만 그렇지 않았는지 표시합니다(적격 투표자 집합은 해당 파일에 대해 열린 스캔 작업을 완료한 모든 모델입니다). 높은 일치도의 클러스터(예: 3/3)는 강력한 신호이고, 단일 모델 클러스터는 일반적으로 거짓 양성입니다. 이는 노이즈를 필터링하고 작은 로컬 모델이 최첨단 모델과 어떻게 비교되는지 확인하는 데 유용합니다.

### HTML 보고서

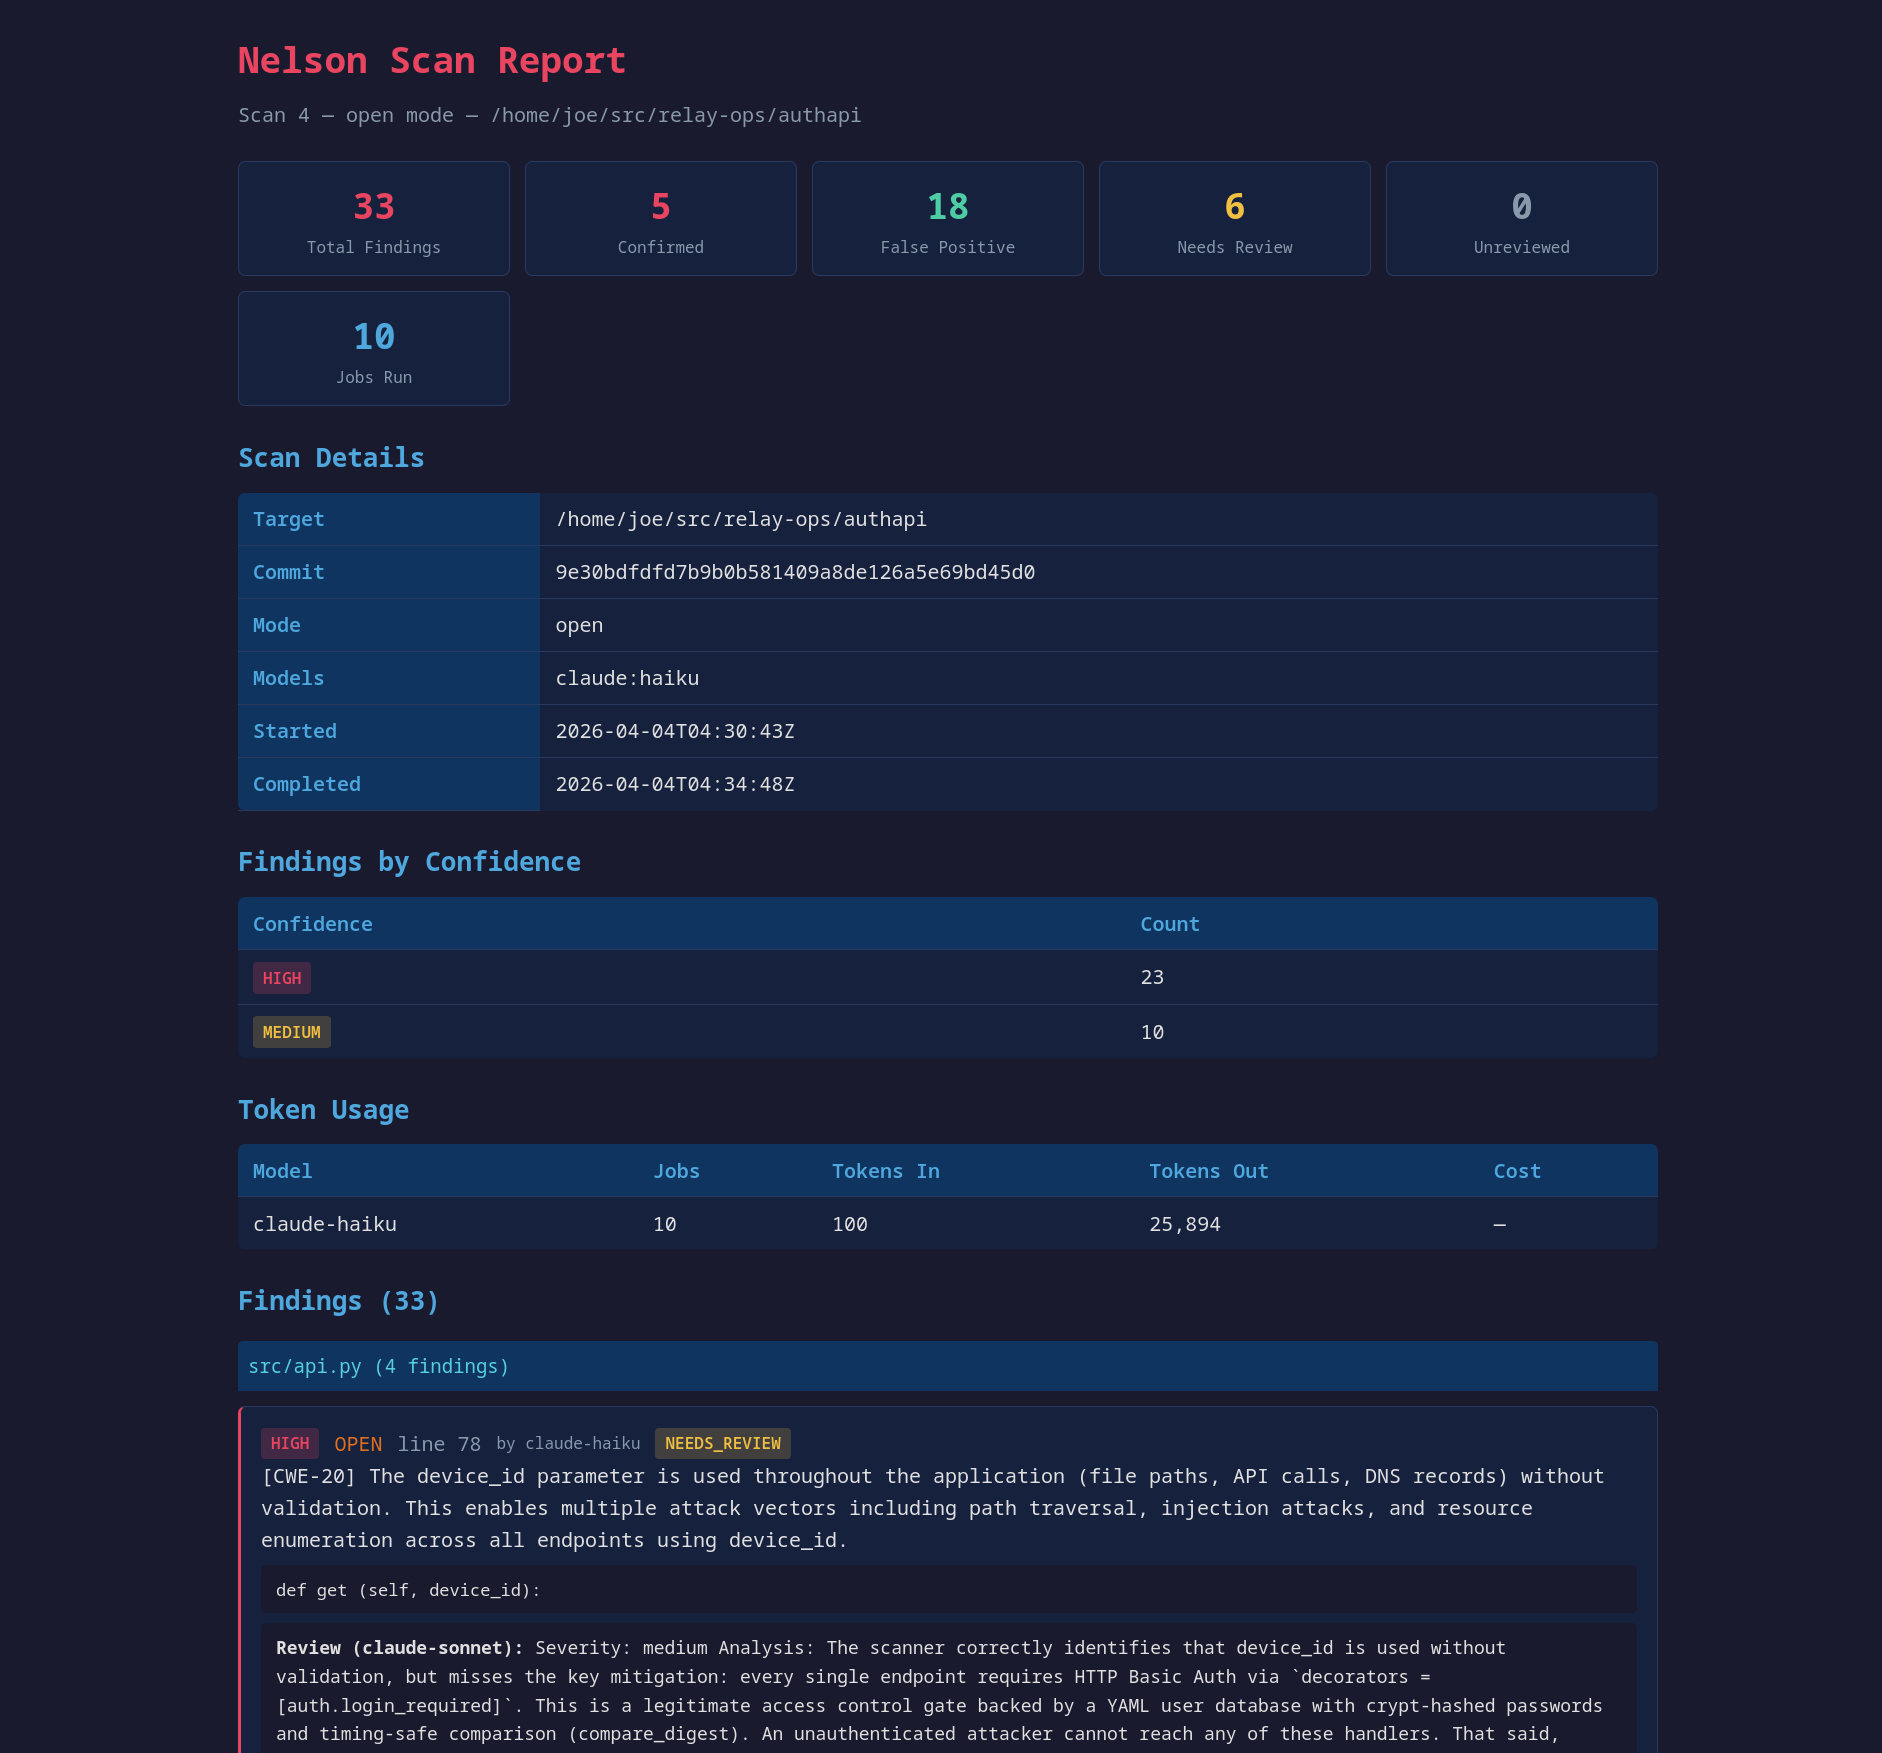
![총계 및 검토된 결과를 보여주는 HTML 보고서 예시](https://assets.kitploit.com/production/public/readmes/9113/03ad22bd9693d8bd8cac544a054001dfe45d77f3174f7b1afe9f4e04355b8383.png)

Nelson은 자체 포함 정적 HTML 보고서를 생성할 수 있습니다:```bash
# Detailed report for a single scan (default: latest)
nelson html-report
nelson html-report 3
nelson html-report -o my-report.html

# Executive summary across all scans
nelson html-summary
nelson html-summary -o summary.html

상세 보고서는 각 파일별로 모든 발견 사항을 신뢰도 배지, 검토 결과, 코드 스니펫 및 토큰 사용량과 함께 보여줍니다. 실행 요약은 한 페이지로 모든 스캔에 대해 확인됨/오탐/검토 필요 카운트와 스캔별 확인된 발견 사항의 세부 내역을 보여줍니다.

기타 명령어```bash

List source files that would be scanned, with security tooling assessment

nelson inventory /path/to/project

(also accepts individual files or globs, just like nelson scan)

List all scans

nelson list

Show detailed status of a scan (job counts, token usage, review summary)

nelson status nelson status 3

root@kitploit:~
### 하하 모드

`haha` 명령어(넬슨의 캐치프레이즈)는 코드에 모든 것을 한 번에 적용합니다:

1. **스캔** — 모든 스캔 모델이 모든 파일을 감사하며, 각각 `--repeat` 횟수만큼 수행합니다(기본값 3)
2. **중복 제거** — 결합된 결과가 고유한 버그로 클러스터링됩니다
3. **리뷰** — 하나의 강력한 리뷰 모델이 각 고유 버그를 한 번씩 판단합니다
4. **요약** — 확인됨/오탐/리뷰 필요 개수를 출력합니다

이 기능은 **최소 두 개의 스캔 모델과 하나의 리뷰 모델**이 필요합니다. 명령줄에서 제공하거나, 더 편리하게는 [설정 파일](#configuration)에서 제공할 수 있습니다. `haha`는 찾지 못하면 오류와 함께 종료됩니다.```bash
# Models from ./nelson.yaml or ~/.nelson.yaml
nelson haha /path/to/project

# Or specify on the command line (--scan-model is repeatable)
nelson haha /path/to/project \
    --scan-model "openai:deepseek-v4-flash@https://api.deepseek.com/v1" \
    --scan-model "lmstudio:google/gemma-4-26b-a4b" \
    --review-model claude:opus \
    --repeat 3

모든 것이 단일 스캔으로 수집되며, 이후에 nelson report <scan_id>, nelson html-report <scan_id>, 또는 nelson compare <scan_id>로 검사할 수 있습니다.

토큰 사용 경고: 대규모 프로젝트에서 haha는 많은 토큰을 소비하고 시간이 오래 걸립니다. files × scan_models × repeat 스캔 작업과 고유 버그당 하나의 검토 작업을 실행합니다. 속도와 비용을 더 잘 제어하려면 개별 nelson scan 및 nelson review 명령을 실행하는 것을 고려하세요.

Configuration

Nelson은 선택적 YAML 구성 파일을 읽어 단계별로 선호하는 모델을 다시 입력할 필요가 없습니다. ./nelson.yaml (프로젝트 로컬)을 먼저 찾은 다음 ~/.nelson.yaml (홈 디렉토리)을 찾습니다. 프로젝트 파일이 키별로 우선하며, 명시적인 명령줄 플래그가 둘 다를 재정의합니다. 모든 키는 선택 사항입니다:```yaml

nelson.yaml

scan_models: # used by haha (needs >= 2) and as the default for scan

  • openai:deepseek-v4-flash@https://api.deepseek.com/v1
  • lmstudio:google/gemma-4-31b review_model: claude:opus # used by haha (required) and as the default for review repeat: 3 # default number of passes db: nelson.db # default database path delay: 2.0 # default per-job pacing (seconds)
root@kitploit:~
이렇게 설정하면 `nelson haha /path/to/project`가 바로 작동하며, `nelson scan` / `nelson review`는 재정의하지 않는 한 동일한 기본값을 사용합니다.

## 모델 구성

모델은 `type:model` 구문으로 지정됩니다.

| Spec | Description |
|------|-------------|
| `claude:haiku` | CLI를 통한 Claude Haiku |
| `claude:sonnet` | CLI를 통한 Claude Sonnet |
| `claude:opus` | CLI를 통한 Claude Opus |
| `gemini:gemini-2.5-flash` | 특정 모델을 사용하는 Gemini CLI |
| `gemini:` | 기본 모델을 사용하는 Gemini CLI |
| `lmstudio:google/gemma-4-26b-a4b` | localhost:1234의 LM Studio |
| `ollama:llama3` | localhost:11434의 Ollama |
| `openai:model@http://host:port/v1` | 모든 OpenAI 호환 API 엔드포인트 (로컬 또는 호스팅) |
| `openai:deepseek-v4-pro@https://api.deepseek.com/v1` | DeepSeek (호스팅) |
| `openai:nvidia/nemotron-3-super-120b-a12b@https://openrouter.ai/api/v1` | OpenRouter (호스팅) |

`openai:` 유형은 OpenAI 채팅 완료 API를 사용하는 모든 것(로컬 서버 *또는* 호스팅 제공자)과 통신합니다. 로컬 서버(`lmstudio:`, `ollama:`, 또는 `openai:...@http://localhost...` 사양)의 경우 키가 필요 없습니다. 호스팅 제공자의 경우 아래의 [호스팅 API 모델](#hosted-api-models-deepseek-mimo-openrouter)을 참조하세요.

단일 스캔에서 여러 모델을 사용하여 효과를 비교할 수 있습니다. 기본적으로 병렬로 실행됩니다 — 모델당 하나의 작업자이며, 속도 제한은 제공자별로 적용되기 때문입니다.```bash
# Claude Haiku and a local Qwen model both work the queue at once
nelson scan /path/to/project \
    -m claude:haiku \
    -m "lmstudio:Qwen/Qwen3-27B"

Use --no-parallel if you'd rather drain each model in sequence (e.g. to keep CPU/GPU contention down between two local models on the same box).

CLI-based agents (Claude Code, Gemini CLI) are paced with a configurable delay between jobs to avoid hitting rolling subscription limits. API-based models (LM Studio, Ollama, custom endpoints) run without delay. The default delay is 2 seconds; adjust with --delay. Pacing is per-worker, so each model independently waits its delay between its own jobs:```bash nelson scan /path/to/project -m claude:haiku --delay 5

root@kitploit:~
### Hosted API models (DeepSeek, MiMo, OpenRouter)

저렴한 모델을 실행하기 위해 로컬 GPU가 필요하지 않습니다. OpenAI 호환 엔드포인트를 가진 모든 호스팅 제공자는 `openai:` 스펙을 통해 작동하며, 형식은 `openai:MODEL@BASE_URL`이고 `BASE_URL`은 `/v1`로 끝납니다. 제 벤치마킹 결과, 이러한 호스팅 "저렴한" 모델 — 특히 DeepSeek와 Xiaomi의 MiMo — 은 가성비 최고의 모델이었습니다: 이들은 최첨단 모델이 찾는 대부분을 훨씬 적은 비용으로 찾아내어, Nelson의 무차별 대입 방식(모든 파일 접근)에 적합합니다.

**인증.** Nelson은 `OPENAI_API_KEY` 환경 변수(OpenAI 호환 범용 규칙)에서 키를 읽습니다. 스캔하기 전에 해당 이름으로 공급자의 키를 내보내십시오 — `@BASE_URL`이 가리키는 공급자와 관계없이:```bash
export OPENAI_API_KEY="sk-your-provider-key"

키를 환경 변수(또는 추적되지 않는 .env 파일을 source하는 것)에 보관하면 셸 기록과 Nelson이 작성하는 모든 파일에서 키가 제외됩니다. 키가 없거나 거부되면 인증 실패로 나타나며, 조용히 "스캔했지만 아무것도 찾지 못함"으로 표시되지 않습니다.

DeepSeek — deepseek-v4-pro는 더 강력하고 비싼 모델이고, deepseek-v4-flash는 더 저렴한 모델입니다:```bash export OPENAI_API_KEY="sk-..." # your DeepSeek key

nelson scan /path/to/project -m "openai:deepseek-v4-pro@https://api.deepseek.com/v1"

Cheaper, still surprisingly capable

nelson scan /path/to/project -m "openai:deepseek-v4-flash@https://api.deepseek.com/v1"

root@kitploit:~
**MiMo (샤오미)** — MiMo의 OpenAI 호환 엔드포인트를 가리킵니다:```bash
export OPENAI_API_KEY="..."      # your MiMo key

nelson scan /path/to/project \
    -m "openai:mimo-v2.5-pro@https://token-plan-sgp.xiaomimimo.com/v1"

OpenRouter — 하나의 키와 하나의 기본 URL로 단일 계정에서 대부분의 주요 모델에 접근할 수 있습니다; 모델 ID는 OpenRouter 카탈로그에서 제공자 접두사가 붙은 슬러그입니다 (예: nvidia/nemotron-3-super-120b-a12b, 무료 등급 경로를 위해 :free를 추가). 이는 각 제공자에 가입하지 않고 많은 모델을 시험해볼 수 있는 편리한 방법입니다:```bash export OPENAI_API_KEY="sk-or-..." # your OpenRouter key

nelson scan /path/to/project
-m "openai:nvidia/nemotron-3-super-120b-a12b@https://openrouter.ai/api/v1"

root@kitploit:~
기본적으로 호스팅된 `openai:` 모델은 **단일 샷(single-shot)**입니다. 즉, 각 프롬프트에 붙여넣은 하나의 파일만 봅니다. `--tools`를 추가하면(자세한 내용은 [스캔](#scanning) 참조) 프로젝트에 대해 읽기 전용 `read_file`/`grep`/`list_dir` 루프를 제공하여, 발견 항목이 실제인지 판단하기 전에 다른 파일의 임포트와 호출 사이트를 따라갈 수 있습니다. 이는 더 많은 토큰을 소모하지만, 거짓 긍정을 줄이는 경향이 있습니다:```bash
nelson scan --tools /path/to/project \
    -m "openai:deepseek-v4-pro@https://api.deepseek.com/v1"

동일한 사양과 OPENAI_API_KEY가 nelson review에도 적용됩니다 — 저렴한 호스팅 모델로 스캔하고 강력한 모델로 검토하거나 그 반대도 가능합니다:```bash nelson review -m "openai:deepseek-v4-pro@https://api.deepseek.com/v1" --tools

root@kitploit:~
속도 제한은 제공업체별로 적용되므로, 단일 스캔에서 호스팅 모델과 로컬 모델(또는 Claude/Gemini)을 혼합할 수 있으며, Nelson은 각 모델당 하나의 워커를 병렬로 실행합니다:```bash
nelson scan /path/to/project \
    -m "openai:deepseek-v4-flash@https://api.deepseek.com/v1" \
    -m "lmstudio:Qwen/Qwen3-27B" \
    -m claude:haiku

Prompts

스캔 프롬프트는 모델이 단일 파일에서 무언가를 찾도록 요청하며, (파일, 모델) 작업당 하나의 프롬프트가 사용됩니다 (그리고 전체 매트릭스는 --repeat번 반복됩니다):``` You are a security researcher performing a vulnerability audit. Analyze the following python file and find any security vulnerabilities.

Look for all classes of vulnerability including but not limited to:

  • Injection attacks (SQL, command, code, XSS, etc.)
  • Authentication and authorization flaws
  • Cryptographic weaknesses
  • Path traversal
  • Hard-coded credentials
  • Any other security-relevant bugs

IMPORTANT INSTRUCTIONS:

  • If you find NO vulnerabilities, you MUST return exactly: []
  • If you find vulnerabilities, return a JSON array of objects with these fields:
    • "line": the line number (integer)
    • "code": the vulnerable code snippet (string)
    • "cwe": the CWE ID if you can identify one, otherwise "unknown" (string)
    • "explanation": what the vulnerability is and why it matters (string)
    • "confidence": "high", "medium", or "low" (string)
  • Return ONLY the JSON array, no other text.
  • Rank by severity — put the most serious vulnerability first.

File: app/db.py

root@kitploit:~
The model identifies the CWE itself; Nelson records it alongside the finding and uses it (plus the line number) to cluster duplicate reports during review. The review pass uses a separate prompt that hands the reviewer the full file and the reported finding and asks it to trace reachability and rule `confirmed` / `false_positive` / `needs_review`.

## File filtering

Nelson automatically excludes files that are unlikely to contain production vulnerabilities:

- **Test code**: `test_*`, `*_test.*`, `*_spec.*`, `tests/`, `__tests__/`, etc.
- **Documentation**: `docs/`, `*.md`, `*.txt`
- **Generated code**: files with "DO NOT EDIT" / "AUTO-GENERATED" headers
- **Vendored code**: `vendor/`, `node_modules/`, `third_party/`
- **Large files**: over 500KB
- **Non-source files**: only scans files with recognized extensions (`.py`, `.go`, `.ts`, `.js`, `.c`, `.cpp`, `.rs`, `.java`, `.rb`, `.php`, `.pl`, `.pm`, `.sh`)

Use `nelson inventory /path/to/project` to see exactly which files would be scanned.

These filters only apply when scanning a directory. If you name files explicitly on the command line (e.g. `nelson scan src/foo.py src/bar.py`), only the extension and size checks are applied — test/doc/generated-file detection is skipped, on the assumption that you meant what you typed.

## Security tooling assessment

Nelson checks whether your project is using recommended static analysis tools and reports gaps. This runs automatically as part of `nelson inventory` and `nelson report`. For example, it will flag if:

- Ruff is present but the S (Bandit) security rules aren't enabled
- A Go project has no golangci-lint with gosec
- A TypeScript project has no eslint-plugin-security
- A Perl project has no Perl::Critic configuration

The idea is that static analysis tools are cheaper and faster than AI for pattern-matching vulnerabilities, and Nelson should complement them rather than duplicate their work.

## Database

Scan state is stored in an SQLite database (`nelson.db` in the current directory by default). Use `--db` to specify a different path.

All scan results, findings, and review verdicts are preserved, making it easy to compare results across models, modes, and time.

## Token tracking

Nelson tracks token usage and cost per job. Use `nelson status` to see totals.
도구 다운로드