
Skip to content
KitploitKITPLOIT
도구블로그
제출
도구블로그
제출

해킹, 침투 테스트 및 사이버 보안 도구를 당신의 보안 무기고에!

Kitploit은 해킹, 사이버 보안 및 침투 테스트 도구 디렉토리입니다. 최신 프로젝트 업데이트를 발견하여 취약점을 찾고, 시스템을 분석하고, 테스트를 자동화하고, 보안을 강화하세요.

··피드·문의·개인정보·© 2026 Kitploit

도구 디렉토리

카테고리

모든 카테고리 보기
Loading categories
BlackLotus-analysis-stage2-bootkit-rootkit-stage — Z2A-BlackLotus 챌린지 2단계 부트킷-루트킷 분석 | Kitploit
도구/GitHubGitHub/spiralbl0ck/blacklotus-analysis-stage2-bootkit-rootkit-stage
Static AnalysisDynamic Analysis (Sandboxing)Reverse EngineeringDebuggersMalware AnalysisBinary AnalysisLearning & EducationFirmware Analysis

인기

모두 보기 →

커뮤니티에서 가장 많이 사용되는 도구를 찾아보세요.

모든 도구 탐색

도구 컬렉션을 둘러보세요

모든 도구 보기 →
GitHub
spiralbl0ck/blacklotus-analysis-stage2-bootkit-rootkit-stage

BlackLotus-analysis-stage2-bootkit-rootkit-stage

Z2A-BlackLotus 챌린지 2단계 부트킷-루트킷 분석

저장소 보기
17543년 전아직 검토되지 않음
공유

BlackLotus-analysis-stage2-bootkit-rootkit-stage

BlackLotus 2단계 부트킷-루트킷 분석

이 신성한 똥(제발 믿어줘, 이건 정말 신성한 똥이야. 아무도 신의 뜻 없이는 이걸 해낼 수 없어(적어도 이게 내 생각이야))에 뛰어들기 전에, 부트킷 파일의 해시가 여기 있다

1

가장 먼저, 정상적인 시스템은 이렇게 생겼다

1
2
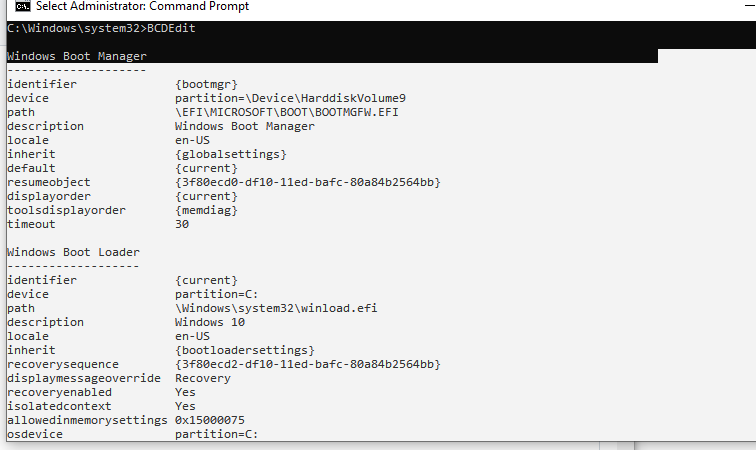
``` C:\Windows\system32>BCDEdit

Windows Boot Manager

identifier {bootmgr} device partition=\Device\HarddiskVolume9 path \EFI\MICROSOFT\BOOT\BOOTMGFW.EFI description Windows Boot Manager locale en-US inherit {globalsettings} default {current} resumeobject {3f80ecd0-df10-11ed-bafc-80a84b2564bb} displayorder {current} toolsdisplayorder {memdiag} timeout 30

Windows Boot Loader

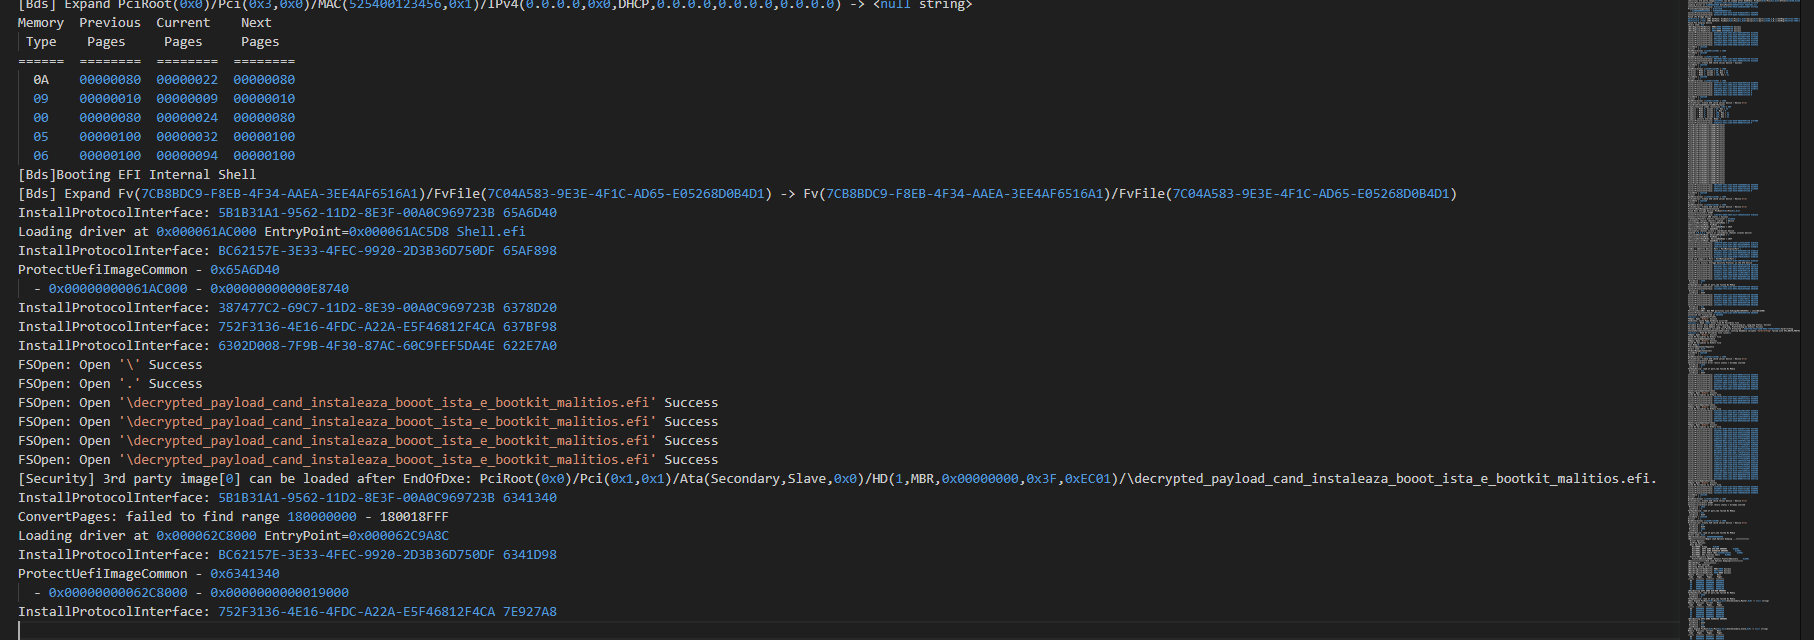
``` So how do we set up a breakpoint in order to debug the bootkit? Well that's we we compiled the ovmf image as debug rather than release. If you specifically start qemu with that command you'll have qemu run and debug messages will be logged in a file called debug.log , which looks like this ```

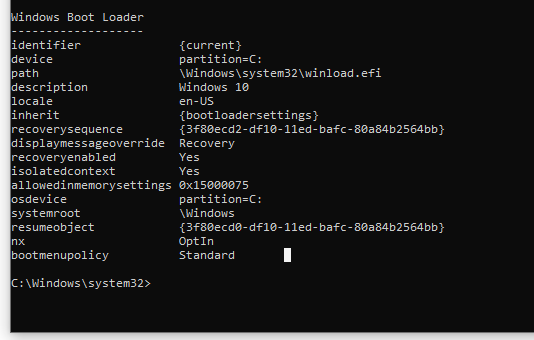
identifier {current} device partition=C: path \Windows\system32\winload.efi description Windows 10 locale en-US inherit {bootloadersettings} recoverysequence {3f80ecd2-df10-11ed-bafc-80a84b2564bb} displaymessageoverride Recovery recoveryenabled Yes isolatedcontext Yes allowedinmemorysettings 0x15000075 osdevice partition=C: systemroot \Windows resumeobject {3f80ecd0-df10-11ed-bafc-80a84b2564bb} nx OptIn bootmenupolicy Standard

root@kitploit:~
이제 제 분석에서 저는 제 머신을 감염시키는 데 성공하지 못했습니다. 그래서 앞서 언급한 아시아 연구원의 블로그 게시물에 나온 예시를 사용하겠습니다. 이는 감염된 머신이 어떻게 보이는지 보여줍니다.```
    // Windows Boot Manager
    // --------------------
    // identifier              {9dea862c-5cdd-4e70-acc1-f32b344d4795}
    // description             Windows Boot Manager
    // locale                  en-US
    // inherit                 {7ea2e1ac-2e61-4728-aaa3-896d9d0a9f0e}
    // bootdebug               Yes
    // displayorder            {57e1b615-0355-11ec-abb0-005056c00008}
    // timeout                 30

    // Windows Boot Loader
    // -------------------
    // identifier              {57e1b615-0355-11ec-abb0-005056c00008}
    // device                  boot
    // path                    \system32\hvloader.efi
    // description             Hoy la disco se flota
    // locale                  en-US
    // inherit                 {6efb52bf-1766-41db-a6b3-0ee5eff72bd7}
    // truncatememory          0x10000000
    // avoidlowmemory          0x1000
    // nointegritychecks       Yes
    // testsigning             Yes
    // isolatedcontext         Yes
    // osdevice                boot
    // systemroot              \
    // ems                     Yes

=============================================================================

=============================================================================

본격적으로 시작하기 전에, 어쨌든 EFI 모듈 분석을 위한 환경을 어떻게 구축할까요? @MaverickMusic__ 님께 감사를 표합니다. 그와 논의하던 중 그가 저에게 이것을 건네주었습니다( https://zhuanlan-zhihu-com.translate.goog/p/343293521?_x_tr_sl=auto&_x_tr_tl=en&_x_tr_hl=en-GB ). 저는 거기의 단계를 완전히 따라 하지는 않았습니다. 그래서 제가 환경을 구축하기 위해 정확히 수행한 작업은 다음과 같습니다:

-첫째, 저는 edk2를 설치했습니다(https://github.com/tianocore/tianocore.github.io/wiki/Windows-systems)

-둘째, 저는 ovmf를 릴리스가 아닌 디버그로 구성했습니다(이것은 나중에 우리에게 도움이 될 것입니다). 명령어는 다음과 같습니다: build -a X64 -t VS2019 -b DEBUG -p OvmfPkg/OvmfPkgX64.dsc

-셋째, windbg를 구성해야 했습니다. 도대체 어떻게 했을까요? 이 링크에서 모든 것을 다운로드했습니다(git clone https://github.com/microsoft/WinDbg-Samples). 그런 다음 ExdiGdbSrv.sln을 컴파일했습니다. 그런 다음 이 링크의 모든 내용을 따랐습니다(https://learn.microsoft.com/en-us/windows-hardware/drivers/debugger/setting-up-qemu-kernel-mode-debugging-using-exdi), "관리자 명령 프롬프트에서 regsvr32를 사용하여 DLL을 등록하십시오."라고 나온 부분부터 PS>.\Start-ExdiDebugger.ps1 -ExdiTarget "QEMU" -GdbPort 1234 -Architecture x64 -ExdiDropPath "C:\path\to\built\exdi\files"까지요. 혼란스럽다는 것을 압니다. 하지만 인내심을 갖고 기다려 주세요. 모든 단계를 설명하는 비디오를 반드시 만들 예정이니까요! 좋습니다. 이제 디버깅을 위한 환경이 준비되었으니, 도대체 코드를 어떻게 디버깅할까요? 그래서 우리는 qemu를 시작합니다. 제 경우에는 qemu-system-x86_64.exe -L . -bios OVMF.fd -hdd dos.img -debugcon file:debug.log -global isa-debugcon.iobase=0x402를 실행하여 수행했습니다. qemu 명령어를 실행한 후 즉시 qemu의 view 메뉴에서 compat_monitor0을 선택했습니다. 그렇게 하면 아래와 같이 보일 것입니다.
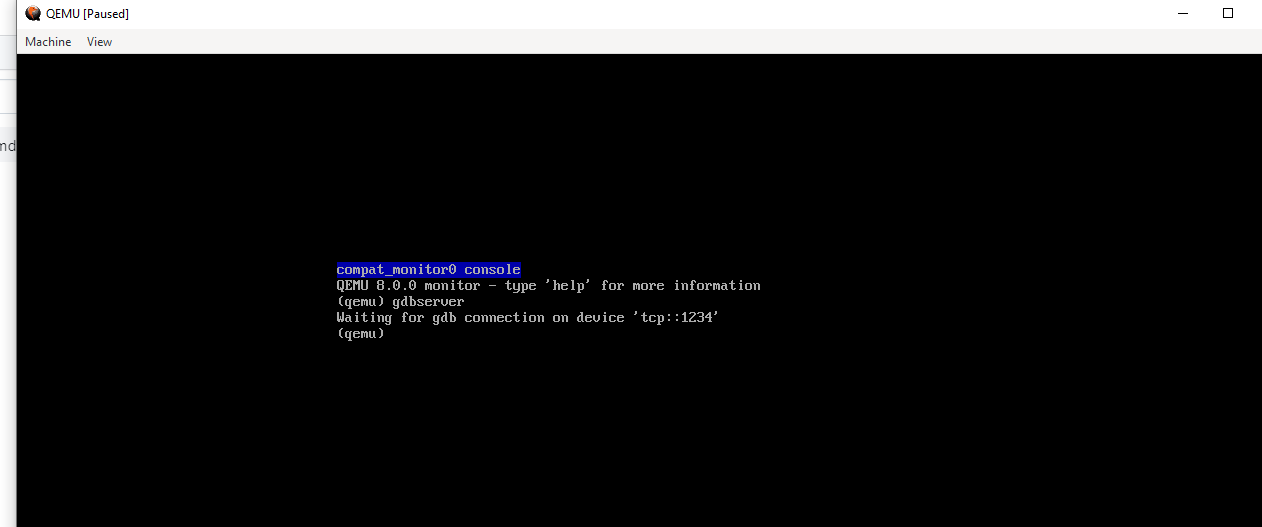
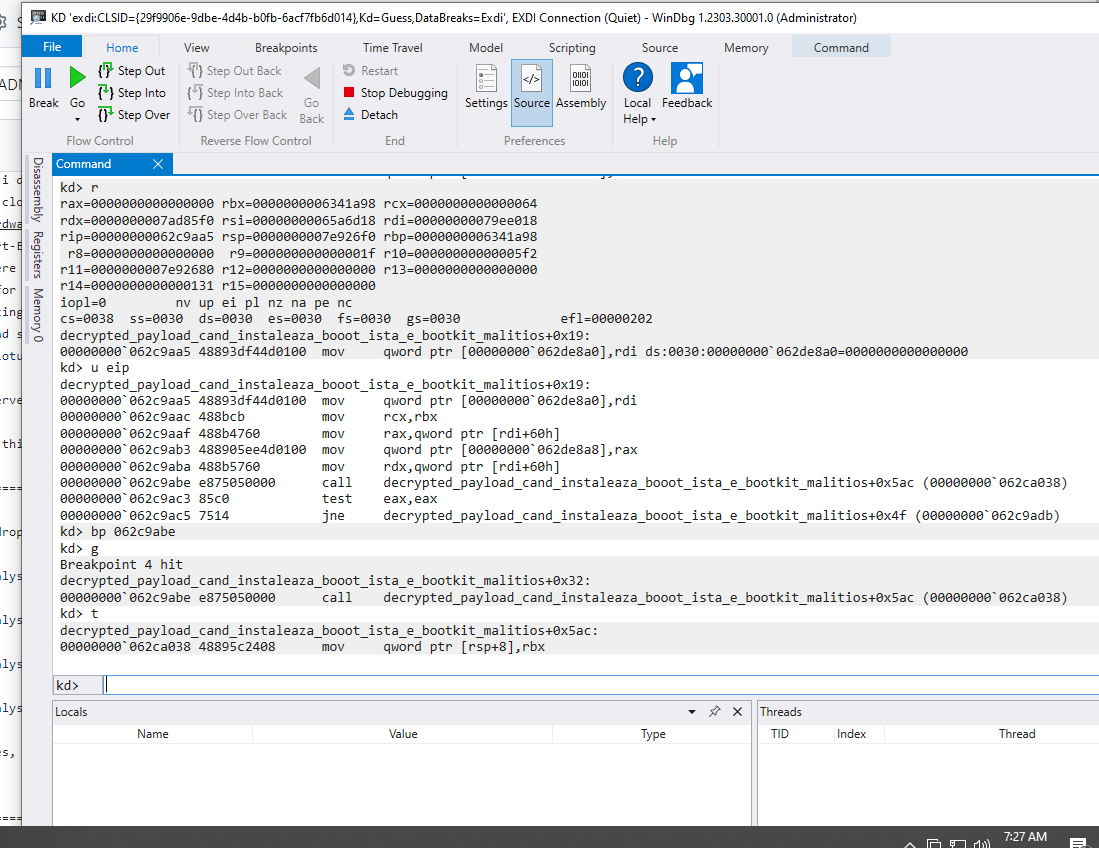
또한 이것을 선택한 후에는 gdbserver를 입력하여 원격 gdb 디버깅 인스턴스를 시작해야 합니다. 여기에 windbg로 다음 명령어를 사용하여 연결할 것입니다: .\Start-ExdiDebugger.ps1 -ExdiTarget "QEMU" -GdbPort 1234 -Architecture x64 좋습니다. 일단 연결하면 아래와 같이 보일 것입니다.
1
1

이제 이 출력을 이해하기 위해 좋아요. 우리 경우에 유일하게 관련된 줄은 EntryPoint=0x000062C9A8C인데, 이는 부트킷을 실행할 때마다 선호되는 로드 주소와 같습니다. 특히 부트킷의 경우 0x62C4A8C 또는 0x62C9A8C 사이에서 변합니다. 이제 IDA에서 프로그램을 리베이스하고 평소처럼 작업을 할 수 있습니다 :) . 나머지 블로그도 즐기세요!

=============================================================================

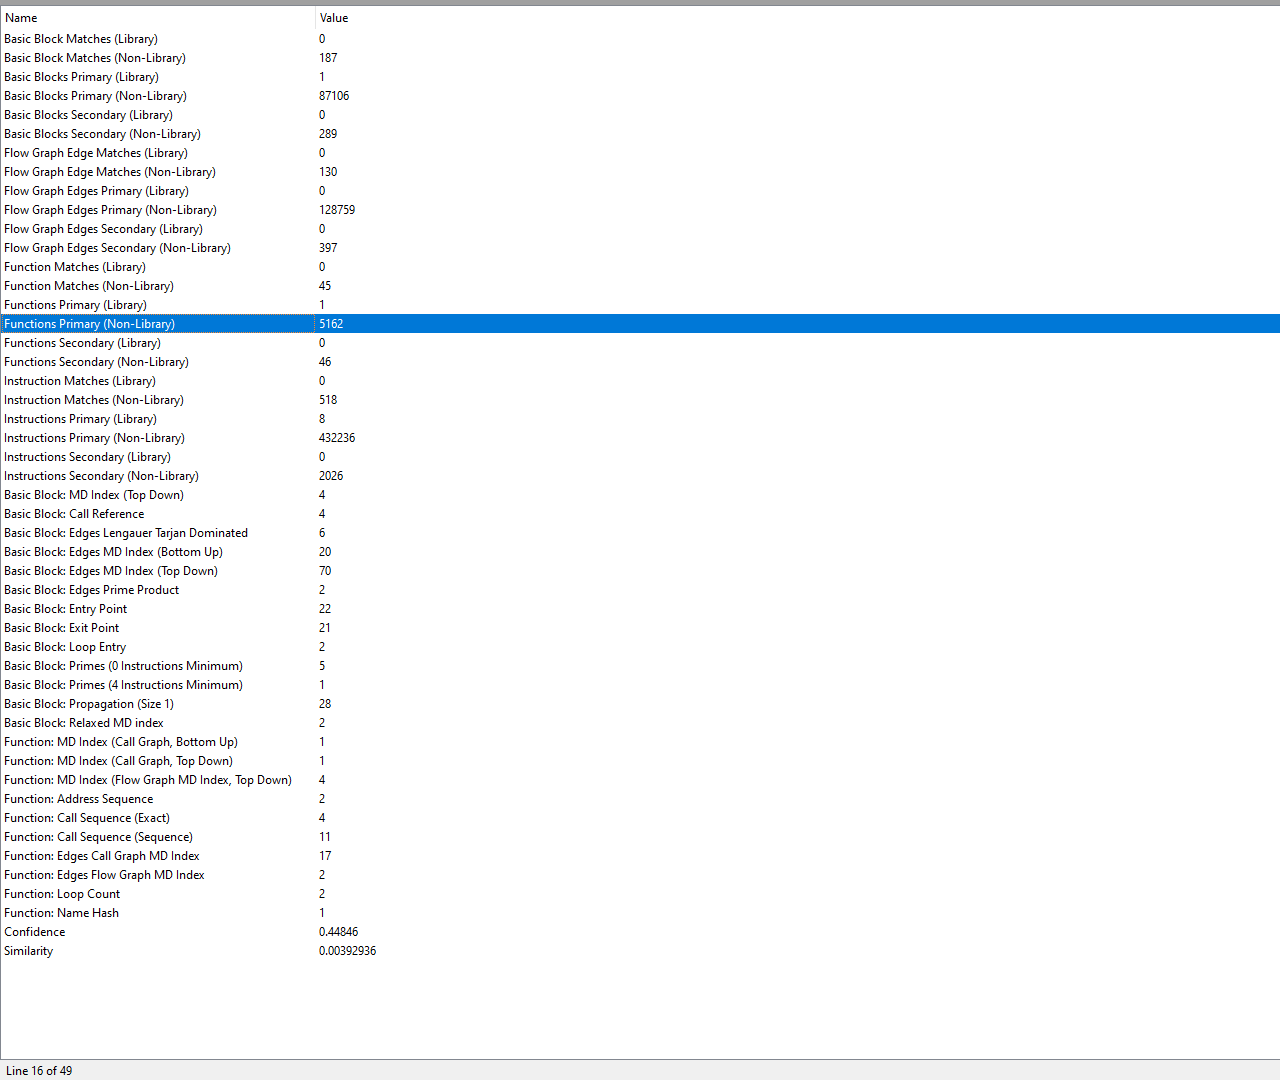
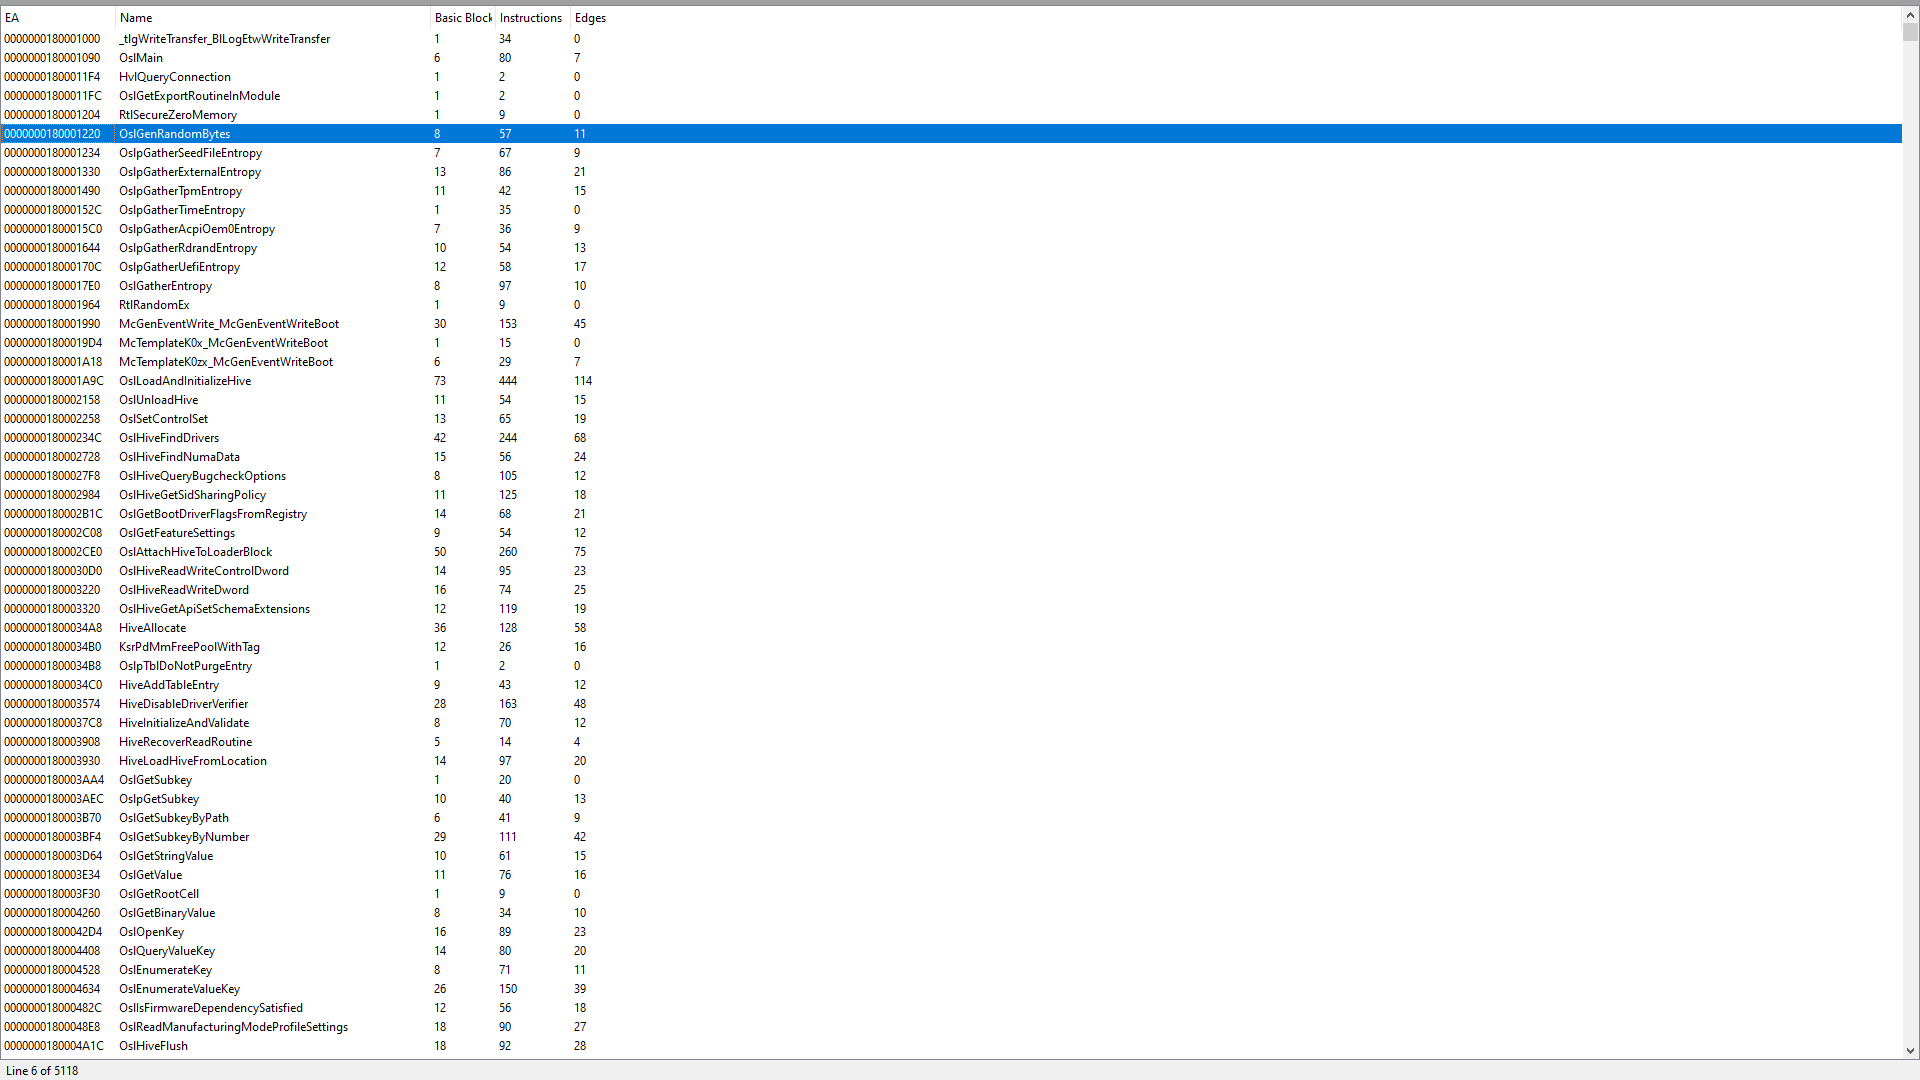
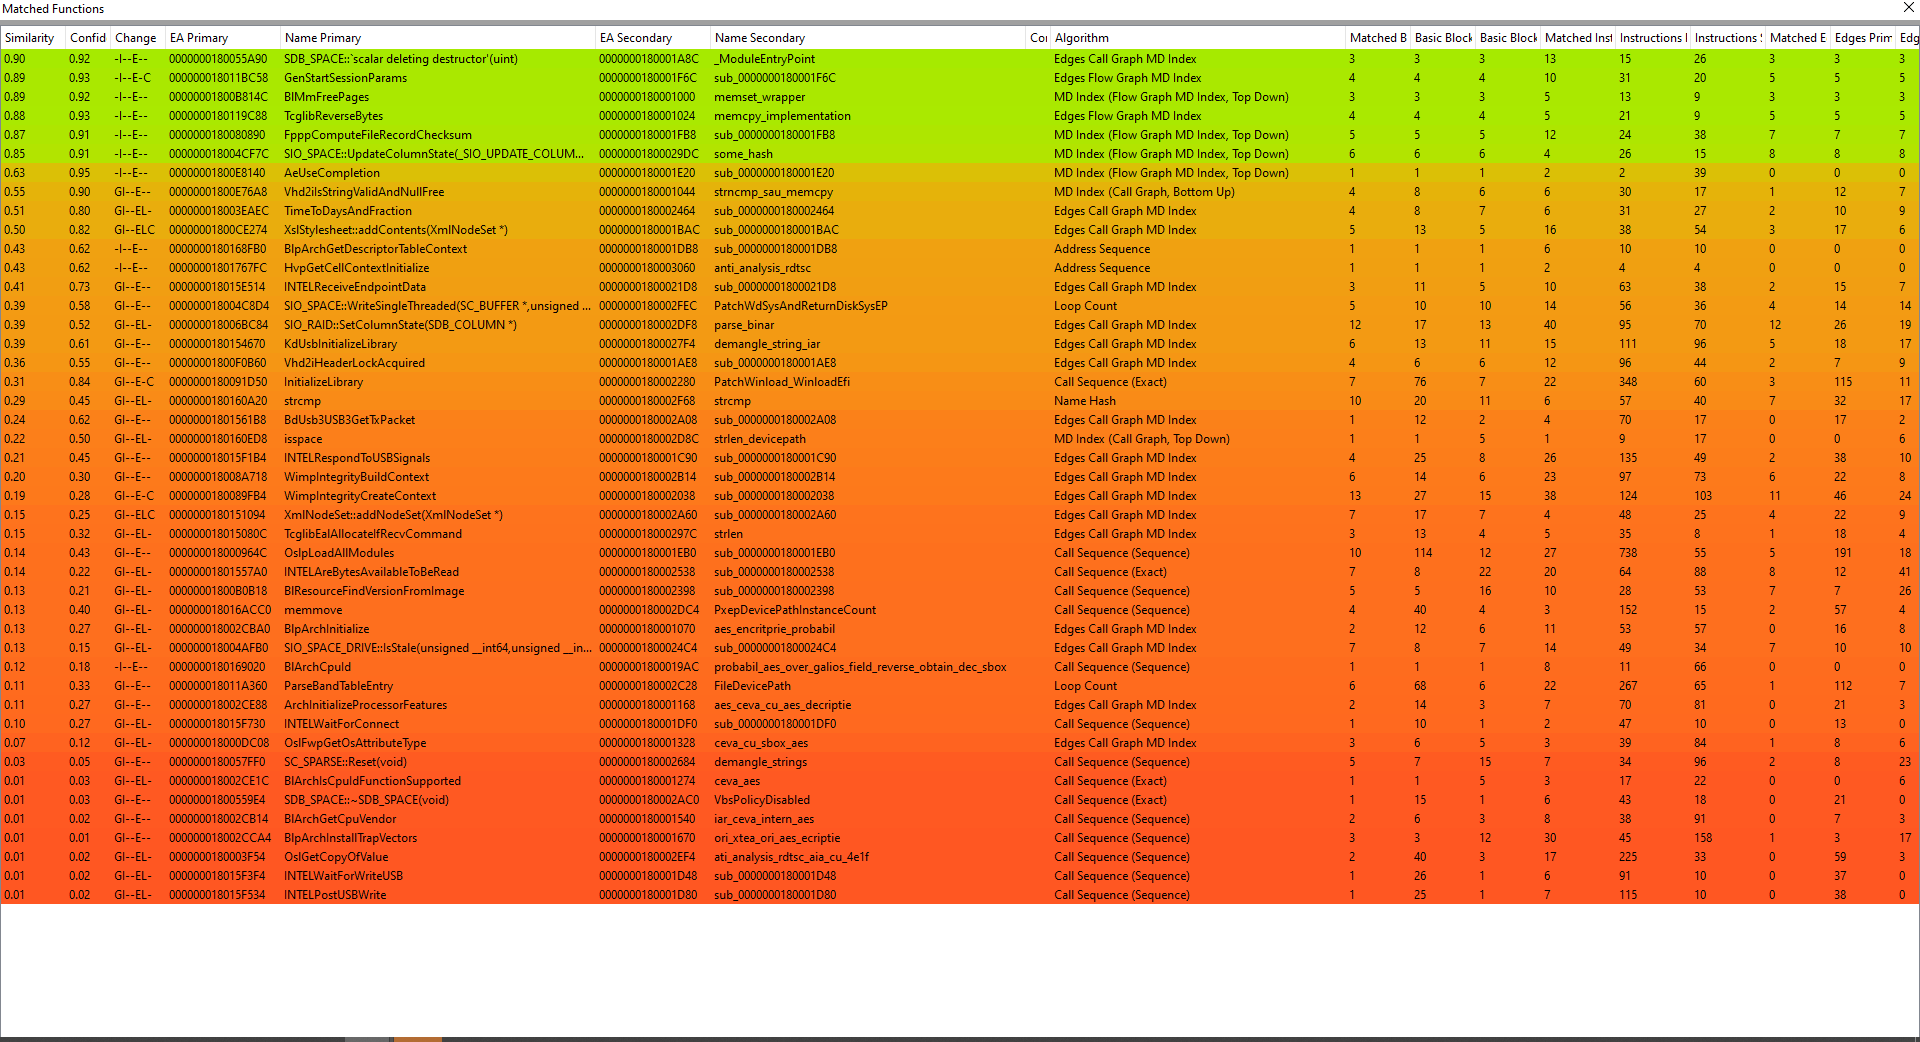
Bindiffing 원본 winload.efi와 blacklotus가 드롭한 파일
1
2
3
4

약간의 유사점도 보이지만 차이점도 보이네요, 하지만 유용한 건 없어요, 어쨌든....

=============================================================================

좋아요, 그럼 시작해 볼까요.

1
1

좋아요, 이제 분석을 시작해 봅시다. 먼저 호출되는 함수가 하나 있다는 것을 볼 수 있습니다. 그래서 무엇일까요? 음

1
2

좋아, 또 다른 함수네. 정확히는 아니지만... 뭔가 익숙한 게 보이나요?

1
2
3

4

5

아직 아무것도 없나요???

문제없어, 아마 이제?

1
2

같은 demangle 함수네! 안녕, 옛 친구 :)))

좋아, 그런데 return (*(a1 + 88))(v2, &unk_62CEABC, 3i64); 는 어떨까? 솔직히 정적 분석만으로는 뭐라고 말할 수 없으니 디버거를 사용해서 이해해 보자 :))

그래서 문자열을 디맹글하면 다음과 같이 나옵니다.

1

그다음 call 명령에 도달하면

1

그리고 아무 정보도 얻지 못합니다.... 좋아요, 그런데 왜 그럴까요? .pdb 파일이 없어서 디버그 심볼을 얻을 수 없기 때문입니다.... 좋아요, 적어도 IDA가 여기서는 도움이 되네요. 그래서 이 "grand" 함수가 SystemTable->RuntimeServices를 입력으로 받는다는 것을 알 수 있습니다. 이는 EFI_SYSTEM_TABLE 타입입니다. 좋아요, 이를 검사해 보면 A pointer to the EFI Runtime Services Table. 입니다. 구글에서 검색해 보면 많은 문서가 나오지만, 중요한 문서 하나는 https://uefi.org/sites/default/files/resources/UEFI\_Spec\_2\_1\_D.pdf 입니다. 거기에는 이렇게 나와 있습니다.

1

좋아요, 많은 포인터가 있는 구조체네요, 네, 하지만 더 확대해 봅시다.

먼저 VbsPolicyDisable을 디맹글합니다. 구글에서 검색해 보면 ESET 분석 결과가 나오는데, 여기에는 that this variable is evaluated by the Windows OS loader during boot and if defined, the core VBS features, such as HVCI and Credential Guard will not be initialized. 라고 나와 있습니다. 기본적으로 이 변수는 부팅 수준의 현재 "보안"을 담당합니다. 좋아요, 다음으로 그 변수를 받는 함수가 있고,

1

그래서 우리는 이것이 그 변수의 상태를 어떻게든 변경하는 함수라는 결론을 내릴 수 있습니다. 좋아요, 그렇다면 이런 일을 할 수 있는 가능한 함수는 무엇이 있을까요? EFI_SYSTEM_TABLE에는 EFI_SET_VARIABLE SetVariable이라는 단 하나의 함수만 있습니다.

그래서 우리는 이 함수가 단순히 VbsPolicyDisable을 가져와서 그것을 다음 값으로 설정한다고 결론을 내립니다.``` db 77h ; w .data:0000000180005034 db 59h ; Y .data:0000000180005035 db 3 .data:0000000180005036 db 32h ; 2 .data:0000000180005037 db 4Dh ; M .data:0000000180005038 db 0BDh ; ½ .data:0000000180005039 db 60h ; ` .data:000000018000503A db 28h ; ( .data:000000018000503B db 0F4h ; ô .data:000000018000503C db 0E7h ; ç .data:000000018000503D db 8Fh .data:000000018000503E db 78h ; x .data:000000018000503F db 4Bh ; K.

root@kitploit:~
Now is there anything important about these bytes ? well yes, if you by chance have read the first part of the blacklotus analysis you'll know that i referenced an asian's researcher work. Well that researcher was kind enough to also analyse the dropped bootkit . Please check it out(https://www.cnblogs.com/DirWang/p/17294545.html#autoid-3-2-1) , so in his analysis he was kind enough to give us that info. He points us to https://github.com/Mattiwatti/EfiGuard/blob/master/EfiGuardDxe/PatchWinload.c . there we see a similar line

<div>

<img src="https://assets.kitploit.com/production/public/readmes/44336/33c755aa460f5bdc338c75f3f5e1322c731123299d59c43dcdf2be3b72d1276c.png" alt="1">


<figure><img src="https://assets.kitploit.com/production/public/readmes/44336/144b057568871a60a32e477ed1ae7e8d7090778a67b7fc24222f0f58fe44afc1.png" alt=""><figcaption></figcaption></figure>

</div>

이 뒤에 특별한 이유가 있을까? 솔직히 모르겠다. 부트킷을 분석하는 건 이번이 처음이다. :) 이 분야에서 나보다 경험이 많다면 알려주거나 이 문서를 수정할 pr/pull request를 만들어 주길 바란다.

\=============================================================================

좋아, 다음으로 운이 좋게도 IDA의 의사 코드가 어셈블리와 비슷하다.

<div>

<img src="https://assets.kitploit.com/production/public/readmes/44336/7457c9d8beb807556618728c7aba102109a472ef2f990f35ec344038fafc4cd5.png" alt="1">


<figure><img src="https://assets.kitploit.com/production/public/readmes/44336/e11c4b4e4260f7a91e6dc08bcabb7c3ac420dcee346b1bf9dff02835342f7837.png" alt=""><figcaption></figcaption></figure>

</div>

그래서 내가 추측하기에 여기서 일어나는 일은 EFI\_SYSTEM\_TABLE의 일반적인 초기화다. 기본적으로 부트 프로세스를 계속할 프로세스를 초기화하는 것 같다. 그리고 나서 PatchBootManager 함수 호출이 있다.

\=============================================================================

PatchBootManager

<div>

<img src="https://assets.kitploit.com/production/public/readmes/44336/66c49bf5b64655af7e0edfe384ad715912c02fbeea1ac1313e4f65479ab58f80.png" alt="1">


<figure><img src="https://assets.kitploit.com/production/public/readmes/44336/7a1dc3ac7c01cbd4cfd9b3ec614c357895210e4f03ae5d58000e6b047f84eb96.png" alt=""><figcaption></figcaption></figure>

</div>

<div>

<img src="https://assets.kitploit.com/production/public/readmes/44336/3fc22a51052c24c9e436ace83a1672ce88bf25fb11103b32d0143fa0ab4d7216.png" alt="2">


<figure><img src="https://assets.kitploit.com/production/public/readmes/44336/22c7869b067f26c6469e4baffcd4226535c47e82d4baaf7fa8e27820915b1580.png" alt=""><figcaption></figcaption></figure>

</div>

<div>

<img src="https://assets.kitploit.com/production/public/readmes/44336/38cf7697523141faa68a59b52abd2a1ca14d0d9053f1e6960052a5093e3a94bb.png" alt="3">


<figure><img src="https://assets.kitploit.com/production/public/readmes/44336/505a3fd02b96bcb823bf108ee03a8a1204827852260c1e8ce3902638237259b3.png" alt=""><figcaption></figcaption></figure>

</div>

그리고 의사 코드에서

<div>

<img src="https://assets.kitploit.com/production/public/readmes/44336/9c8482f0faa4d4de5f8643acc4276ebbbfc57386e9b00a4057793b5c67b1bf3b.png" alt="1">


<figure><img src="https://assets.kitploit.com/production/public/readmes/44336/c44de61b9f089fd8972bcc8567110bc2d58c21e5465a7b4f14fc7beaefee30a3.png" alt=""><figcaption></figcaption></figure>

</div>

<div>

<img src="https://assets.kitploit.com/production/public/readmes/44336/6809c28e881b3626d73a476cd31631891539f6a7b71cf276619f9cd2244d83e9.png" alt="2">


<figure><img src="https://assets.kitploit.com/production/public/readmes/44336/c8cd4870cd0488e57cde3448ba01fdd44063f266516d8530731f42e6ccc5be78.png" alt=""><figcaption></figcaption></figure>

</div>

좋아, 보이는 첫 번째 함수 호출은 HandleProtocol이다. 그래서 이 코드가 하는 일이 뭘까? 운 좋게도 빠른 구글 검색을 하다가 이걸 발견했다(https://tianocore-docs.github.io/edk2-ModuleWriteGuide/draft/5\_uefi\_drivers/54\_communication\_between\_uefi\_drivers.html). 여기서 `retrieve protocols`라는 것을 알 수 있다. 좋아, 내가 이해할 수 있는 건 별로 없지만. 그래, 알아들었어. 기본적으로 이건 다른 UEFI 드라이버에서 사용하는 통신 정보/방법을 검색한다. 좋아, 좀 더 파보면 두 번째 매개변수가 다음과 같다는 것을 알 수 있다.

<div>

<img src="https://assets.kitploit.com/production/public/readmes/44336/703c3f52bd8c3d10eaf046fc801cbc60ca7a62e9162d67a6ba63caf4c9e9038d.png" alt="1">


<figure><img src="https://assets.kitploit.com/production/public/readmes/44336/9d41aacaed9c15391beb8b1b62739572bf7f873508938ade770610eec371a17c.png" alt=""><figcaption></figcaption></figure>

</div>

그 특정 바이트를 검색하면 이걸 발견한다.

<div>

<img src="https://assets.kitploit.com/production/public/readmes/44336/f4a8ed3b81486c8481c0f8894175f9d7390ddf62f9974ba025aad9827dea119e.png" alt="1">


<figure><img src="https://assets.kitploit.com/production/public/readmes/44336/882b5116cfd08886c3dac510443fb77c9aa31781eb234208ec81fdf313544c29.png" alt=""><figcaption></figcaption></figure>

</div>

그럼 EFI\_LOADED\_IMAGE\_PROTOCOL\_GUID는 도대체 무엇을 하는 걸까? https://uefi.org/specs/UEFI/2.10/09\_Protocols\_EFI\_Loaded\_Image.html 에서 인용하면 `Can be used on any image handle to obtain information about the loaded image.` , 어떤 정보일까? \`\`\`이 섹션은 EFI\_LOADED\_IMAGE\_PROTOCOL과 EFI\_LOADED\_IMAGE\_DEVICE\_PATH\_PROTOCOL을 정의한다. 각각 이 프로토콜은 메모리에 로드된 이미지를 설명하고, PE/COFF 이미지가 EFI Boot Service LoadImage()를 통해 로드될 때 사용된 장치 경로를 지정한다. 이러한 설명에는 이미지가 로드된 소스, 이미지의 메모리 내 현재 위치, 이미지에 할당된 메모리 유형, 이미지가 호출될 때 전달된 매개변수가 포함된다.\`\`\`\`

그래서 우리의 경우에는 부트킷에 대한 정보를 가져온다. 이제 문제가 하나 있다. 디버그 심볼이 없어서 함수 결과를 제대로 검사할 수 없다. :/ 하지만 추측할 수 있다. 그리고 나는 이전 함수 호출 결과인 구조체가 rbx에 있을 것이라고 추측한다.

<figure><img src="https://assets.kitploit.com/production/public/readmes/44336/b8f744ecd9fd4be572a1e2d191b06231559eca2b32aeaa981a399eec7f3ee710.png" alt=""><figcaption></figcaption></figure>

다음으로 demangle string을 호출한다.

<figure><img src="https://assets.kitploit.com/production/public/readmes/44336/1fdc75d2dc9221250e6d46692770ad5240f7a0d6cda9cc5634749b327fc8c146.png" alt=""><figcaption></figcaption></figure>

그 결과는 다음과 같다.

<div>

<img src="https://assets.kitploit.com/production/public/readmes/44336/e073b265ff13675b755ec8413554bec74ab4eae57dd002b25694632eb43cbc8e.png" alt="1">


<figure><img src="https://assets.kitploit.com/production/public/readmes/44336/3654bb54071386cd020c43ed4a35fae40aec386897a0ca26a27b58b8e1a91c95.png" alt=""><figcaption></figcaption></figure>

</div>

그리고 나서 호출한다.

<div>

<img src="https://assets.kitploit.com/production/public/readmes/44336/c433aa63cddd2ecfb5ce0fd57a6774ad35b1c1ed4ee71e7cecb566cc861d2b80.png" alt="1">


<figure><img src="https://assets.kitploit.com/production/public/readmes/44336/6834be566cdd81f2410ec7d4ee97936d14a27017a723371eea3046b8590609f4.png" alt=""><figcaption></figcaption></figure>

</div>

\=============================================================================

sub\_180002B14

<div>

<img src="https://assets.kitploit.com/production/public/readmes/44336/483f2b789c0fa6fe9378ba324f8e349bc72cbb45e540bbc2355ef55acaf1b6b4.png" alt="1">


<figure><img src="https://assets.kitploit.com/production/public/readmes/44336/d84d79115facbc0f9ff7afe06d70a18555e7d94bc196f6f9d0ff6b5cfd40408a.png" alt=""><figcaption></figcaption></figure>

</div>

<div>

<img src="https://assets.kitploit.com/production/public/readmes/44336/19e2366fddab99fa3aa4375b8306475ee31d3bf9a3c3737efeeb4d627868404e.png" alt="2">


<figure><img src="https://assets.kitploit.com/production/public/readmes/44336/6c808c76821c756eca776cf6290482f6f9829167f539bf31b2ad82b3de0af829.png" alt=""><figcaption></figcaption></figure>

</div>

<div>

<img src="https://assets.kitploit.com/production/public/readmes/44336/ad0d06238e39e4ba1decb2f1305510a8375822b13ae9148d91e267d14762eb3b.png" alt="3">


<figure><img src="https://assets.kitploit.com/production/public/readmes/44336/0e45e9ae64c3fbd8a61ffdf60ec2e532529d8cab6cfc7786fa2c91824233d347.png" alt=""><figcaption></figcaption></figure>

</div>

그리고 의사 코드

<div>

<img src="https://assets.kitploit.com/production/public/readmes/44336/c14b1eacbe8eef4155c4148b66fa95f93bbd9e6fc81e5ca80f1ddc5b2b9a7a16.png" alt="1">


<figure><img src="https://assets.kitploit.com/production/public/readmes/44336/b7c452865661d95b79886a48a455eba663c2e3915e0a81ad16dc7ddd8c2c0189.png" alt=""><figcaption></figcaption></figure>

</div>

좋아, if까지는 모든 것이 자명하다. 그럼 if는 무엇일까? 다시 매개변수로 unk\_180005010을 사용하는 호출이 있다. 이것은 또 바이트 배열이다. 더 자세히 보면 다음과 같이 보인다.

<figure><img src="https://assets.kitploit.com/production/public/readmes/44336/c3bb66f35a4e559ae793ba590fc0c342bdde1e1c9765e144cb450a809009655d.png" alt=""><figcaption></figcaption></figure>

이제 첫 번째 바이트를 다시 조사하고 빠른 검색을 하면 이 사이트(https://github.com/theopolis/uefi-firmware-parser/blob/master/uefi\_firmware/guids/efiguids\_ami.py)를 발견하게 된다. 더 정확히는 이것이다: `'EFI_DEVICE_PATH_PROTOCOL_GUID': [0x09576e91, 0x6d3f, 0x11d2, 0x8e, 0x39, 0x00, 0xa0, 0xc9, 0x69, 0x72, 0x3b]` .

UEFI 사양 페이지에 다시 가 보면 `Can be used on any device handle to obtain generic path/location information concerning the physical device or logical device.` 라고 되어 있다. 게다가 이런 것도 볼 수 있다: `The device path describes the location of the device the handle is for`. 좋아, 조금만 스크롤하면 \_EFI\_DEVICE\_PATH\_PROTOCOL이라는 함수가 보인다. 결론적으로 이것이 EFI\_DEVICE\_PATH\_PROTOCOL\_GUID와 관련이 있다는 것을 알 수 있지만, 우리의 함수는 EFI\_BOOT\_SERVICES 타입이다. 그렇다면 EFI\_BOOT\_SERVICES에 프로토콜을 처리하는 것 같은 함수가 있을까? 있다. https://www.intel.com/content/dam/doc/product-specification/efi-v1-10-specification.pdf 의 4.4 섹션을 보면 다음과 같다.

<div>

<img src="https://assets.kitploit.com/production/public/readmes/44336/918a0a5184849cbb87454df44c5ffa5e5fa586f223213287f6c7fbe737a0fbc8.png" alt="1">


<figure><img src="https://assets.kitploit.com/production/public/readmes/44336/fab94604327fe596d9eeb68368efcf0afc721ef7bfcdc07a8977392b4309238c.png" alt=""><figcaption></figcaption></figure>

</div>

더 정확히는 우리에게 익숙한 함수(HandleProtocol)가 있다. 좋아.

다음으로 이번에는 우리에게 익숙하지 않은 함수 호출이 보인다. 이 함수가 어떤 인자를 받는지 보자. 인자 2개를 받고, 전달된 문자열의 길이를 유니코드로, 그리고 변수에 대한 포인터를 받는다.

<div>

<img src="https://assets.kitploit.com/production/public/readmes/44336/39e0d1d9baabff8d95da7109294db94f9fc4409a6ede34d37ece9662fb73651d.png" alt="2">


<figure><img src="https://assets.kitploit.com/production/public/readmes/44336/e116e90f20a09d48f21a981e7d24c49f7474ea9ac6007b6fa41973300af4e83d.png" alt=""><figcaption></figcaption></figure>

</div>

이제 디버거에서 이를 검사하면

<div>

<img src="https://assets.kitploit.com/production/public/readmes/44336/f412c3bf83f60da9213f4c29b39350c925a0aa6411c42de52d7fa4530c5bc3fe.png" alt="1">


<figure><img src="https://assets.kitploit.com/production/public/readmes/44336/5285bf4d5e52dbbef857e46e8738c3ba6e7f6cda87f9b67a4965b23cc70aba0e.png" alt=""><figcaption></figcaption></figure>

</div>

rcx에 'AllocatePool'이라는 디버그 문자열이 있는 이상한 점을 볼 수 있다. 이는 함수 호출 뒤에 나타나므로, 이것이 아마도 AllocatePool 호출일 것이라고 결론을 내린다. 재미있게도 사양을 살펴보면 boot\_services에도 AllocatePool에 대한 포인터가 있어서 우리의 추측을 더욱 강하게 만들어 준다.

좋아, 충분한 공간을 할당할 수 있다면(>= 0 검사는 할당에 성공했는지 확인하는 것이다. 왜냐하면 EFI\_OUT\_OF_RESOURCES가 다음과 같이 구현되어 있으므로

<div>

<img src="https://assets.kitploit.com/production/public/readmes/44336/bf08cd5dd33ad9ca16ff4e6a44a4cbfd51cd1f8b0300d9b6b44984c4306fcb6e.png" alt="1">


<figure><img src="https://assets.kitploit.com/production/public/readmes/44336/c28af9995294473937be13a6094de90cb57a688c83727617ca9f667c2705d7cd.png" alt=""><figcaption></figcaption></figure>

</div>

다음의 경우에만

<div>

<img src="https://assets.kitploit.com/production/public/readmes/44336/3741ef8be2dc989f601d26568907381f1847d29c0bf514add76485b0f0fef4b6.png" alt="1">


<figure><img src="https://assets.kitploit.com/production/public/readmes/44336/cdfc6ccb296659fc8156d4bfba6d777da8b2792e4af56677d0f0d57695932216.png" alt=""><figcaption></figcaption></figure>

</div>

성공적인 할당으로 간주하는 것이 안전하다)

한 가지 흥미로운 사실은 할당 후 버퍼가 0이 아니라 이러한 바이트를 포함하고 있다는 것이다. 이에 대해 더 아는 사람이 있다면 이 문서를 수정하는 PR 요청을 만들어 주길 바란다.

<div>

<img src="https://assets.kitploit.com/production/public/readmes/44336/e4b15da615e07faa4965d864435bf4deec0e01270f9d1ac1134fb5b20ad46892.png" alt="1">


<figure><img src="https://assets.kitploit.com/production/public/readmes/44336/b229a700b321040fc8978f4f0f489a058381795c128d27dbcfbcfff5f9ffd3b2.png" alt=""><figcaption></figcaption></figure>

</div>

어쨌든 우리는 결국 memcpy를 호출하게 된다. 호출 후 버퍼는 다음과 같다.

<div>

<img src="https://assets.kitploit.com/production/public/readmes/44336/28e61d8725687245e9a9dae7e467929ac15d5a81e33178262f0ce886a3c4555c.png" alt="1">


<figure><img src="https://assets.kitploit.com/production/public/readmes/44336/f161ab0441b14d71dbade9fc3acebbd12b1453de5d53b77b09af98c0cf0ac6d6.png" alt=""><figcaption></figcaption></figure>

</div>

그런 다음 몇 바이트를 추가하여 버퍼가 다음과 같이 보이게 한다.

<div>

<img src="https://assets.kitploit.com/production/public/readmes/44336/80906384a49ef1d6eaea9667cb962459c27feb8e9deac857491a248be5443a4f.png" alt="1">


<figure><img src="https://assets.kitploit.com/production/public/readmes/44336/7c703952c72c154d156603c457a00013305c48519ddee808925c32a62499135f.png" alt=""><figcaption></figcaption></figure>

</div>

그리고 나서 FileDevicePath\_call이라는 함수를 호출한다. 이 함수는 대략 다음과 같이 생겼다.

<figure><img src="https://assets.kitploit.com/production/public/readmes/44336/66c77ae12715ee6d982ba2cfb769ba6a650f52ce56d7bae54e3bd93686695f02.png" alt=""><figcaption></figcaption></figure>

<figure><img src="https://assets.kitploit.com/production/public/readmes/44336/5f7e06800ec3eecb9559d1592b8a76868038c0cbb64744e5c928b65d189ef183.png" alt=""><figcaption></figcaption></figure>

그리고 이것으로 변환된다.

<div>

<img src="https://assets.kitploit.com/production/public/readmes/44336/2b36492bb7dd46a7139c27de61371b59adac5bfbec989bbb542b58d34ce7982d.png" alt="2">


<figure><img src="https://assets.kitploit.com/production/public/readmes/44336/361e2b338c676b99393f7baa48e970ba886894f579065a4468fe113841c0783b.png" alt=""><figcaption></figcaption></figure>

</div>

좋아, 하지만 설명이 없으면 이건 말이 안 되니까....

먼저 우리는 strlen의 커스텀 구현을 가지고 있는데, 이것은 쓸모가 없으므로 분석하지 않겠다. :) 하지만 결과는 다음과 같다.

<div>

<img src="https://assets.kitploit.com/production/public/readmes/44336/03a0aabe9f7c87f42b7e64bb284d74738ecdc81134136cfec68c70084644c3ea.png" alt="1">


<figure><img src="https://assets.kitploit.com/production/public/readmes/44336/823c30bd0a6a8c1d750ef1dfb0bce5be67a13a96de12e53b3e46b2226a1c2be1.png" alt=""><figcaption></figcaption></figure>

</div>

<div>

<img src="https://assets.kitploit.com/production/public/readmes/44336/5dd4684c37f3129c8234cd69574bb6371b4bef72ff7e027199b7900134cdd101.png" alt="2">


<figure><img src="https://assets.kitploit.com/production/public/readmes/44336/118ee749874a6b08d40286821735190f67af45ca8d4573fc94aee3a2cea04af2.png" alt=""><figcaption></figcaption></figure>

</div>

32자는 len(of(str)+"\x00")에서 나오고, 함수 호출 전에 마지막 4바이트 0x4FF7F가 추가된다.

다음으로 내가 아시아 연구자의 블로그 게시물에서도 사용한 PxepDevicePathInstanceCount를 호출한다. 이것은 단순히 strlen이다. 각 문자를 세고 카운터가 있기 때문이다. 여기서 볼 수 있듯이.

<div>

<img src="https://assets.kitploit.com/production/public/readmes/44336/130931a6676f0519da2b50a9762955b7581e7102434e587236137b216cc62ead.png" alt="1">


<figure><img src="https://assets.kitploit.com/production/public/readmes/44336/ce1a6ad93452a8092d2fb71ffd6418df78c32fc8cdf4fb99133924cc9037f12e.png" alt=""><figcaption></figcaption></figure>

</div>

그래서 pop rbx가 보이고, 호출 후 rbx=0x48이 보인다.

<div>

<img src="https://assets.kitploit.com/production/public/readmes/44336/4c2eabdd91ec40fc82c100e67579d729def9e74c6bfd000fff287bc9c10b0f38.png" alt="1">


<figure><img src="https://assets.kitploit.com/production/public/readmes/44336/818bb3c8398d4a53c0260d9310d4d192cfa5b65a404348df5516c94fa3d8dcaa.png" alt=""><figcaption></figcaption></figure>

</div>

그런 다음 같은 문자열에 대해 다시 strlen을 호출한다. 아마도 다음 줄에서 정확히 `v6 + v4 * v5;`를 하기 때문일 것이다. v4\*v5는 아마도 유니코드 문자열을 처리하는 어떤 방식인 것 같다.

어쨌든 그런 다음 gEfiBootServices + 64를 사용하여 다시 메모리를 할당한다. 이것은 이전에 만난 것인데 AllocatePool로 확인되었다.

여기서 또한 멋진 것을 볼 수 있다.

<div>

<img src="https://assets.kitploit.com/production/public/readmes/44336/26d19e06bd335f1267946a5da2542cf3eb9f2965fab788d0bcf720d7e3c08d37.png" alt="1">


<figure><img src="https://assets.kitploit.com/production/public/readmes/44336/225c92cbe9a5e72214cb279e61ad5fcbaef0a243db835b67fce5ff7ef74e7c86.png" alt=""><figcaption></figcaption></figure>

</div>

바로 여기 메모리 블록에 afafafaf 패턴이 포함되어 있다는 사실이다.

그래서 다음에 일어나는 일은 main loop가 실행된 후 두 개의 버퍼가 생기는데, 이들은 다음과 같다.

<div>

<img src="https://assets.kitploit.com/production/public/readmes/44336/35f257d96c752ac436e81778da5f37c28bfcb79fc5614f3ea8e099888cc011c3.png" alt="1">


<figure><img src="https://assets.kitploit.com/production/public/readmes/44336/b9c706cc28161a6e7274c5cabc895bedc1279728b3ed7c11084cb6cb38dbf9e3.png" alt=""><figcaption></figcaption></figure>

</div>

<div>

<img src="https://assets.kitploit.com/production/public/readmes/44336/52477a3825650e47112a5e619a098c74e7e0de778ebfeda5682e5b49d48f3923.png" alt="2">


<figure><img src="https://assets.kitploit.com/production/public/readmes/44336/762a6dd3897f3b630ce1d0faa371e58ed9b2bce755bb8edd54f958aab7c3b69b.png" alt=""><figcaption></figcaption></figure>

</div>

솔직히 말하면 우리는 첫 번째 버퍼에만 관심이 있다. 왜냐하면 그것이 반환되는 것이기 때문이다. 그래서 이것은 단순히 디바이스 경로를 복사하고 버퍼에서 일부 쓰레기를 정리하는 것이라고 결론을 내릴 수 있다. :))

이 작업을 마친 후에는 우리 경우의 디바이스 경로가 이미 초기화되었는지 확인하고, 그렇지 않으면 풀을 해제한다. 그러고 나서 앞서 언급한 함수의 더 깨끗한 버퍼를 반환한다.

이 함수를 끝내기 전에 또 하나 흥미로운 사실을 지적하고 싶다. 이것은 메모리에서 boot service 테이블이 어떻게 보이는지다. :) 사양에 따르면 시작 헤더를 가지고 있는 그 모습 그대로다. 덤프에서 BOOTSERVF라는 문자열을 발견하게 될 사람, 즉 기능 작업을 원하는 사람을 위해 여기에 남겨 두는 것이 흥미로울 것이라고 생각했다. 이것은 분명히 boot service 테이블이다.

\=============================================================================

좋아, 그럼 다음에는 무엇이 일어날까? 음, winload.efi 파일을 찾았는지 확인하고 메모리에 로드한다. 이것이 의사 코드다 :)

<div>

<img src="https://assets.kitploit.com/production/public/readmes/44336/b59f211cb997e5ad783cbb6421833c23bea4ef4f7f21743577cd8aba4656ad2f.png" alt="1">


<figure><img src="https://assets.kitploit.com/production/public/readmes/44336/a96f7410f6bd6f7e207b76dff36a411f3c17a3f40dcb1a9433d5292b46f775e2.png" alt=""><figcaption></figcaption></figure>

</div>

그리고 이것이 메모리에서 보이는 모습이다.

<div>

<img src="https://assets.kitploit.com/production/public/readmes/44336/e3ee7b08fdc84433a08e60c7065c74692fb3a4e26eb81def063b662aa5229558.png" alt="1">


<figure><img src="https://assets.kitploit.com/production/public/readmes/44336/445d40332ba97516eebf129d17c56a38e28688858515d787ebf90a99580daa51.png" alt=""><figcaption></figcaption></figure>

</div>

rax는 무엇일까? rax는 이미지에 대한 핸들이다. :) 처음에 이것이 메모리 영역이라고 생각했던 나처럼 바보가 되지 말라. :)

좋아, 좀 더 들어가기 전에 winload.efi가 도대체 무엇인지 잠깐 설명하겠다. 자, `with the development of computers, the traditional BIOS boot is outdated, and the security confrontation about UEFI boot has started. From the flow chart below, we can see that MBR and VBR no longer exist in UEFI, but UEFI itself is responsible for loading bootmgr, which also means safer and faster`

<div>

<img src="https://assets.kitploit.com/production/public/readmes/44336/d2443977ce3d56790e424fd6236d1d0594db283caa9357ed4e6abb9b8b30b8ed.png" alt="1">


<figure><img src="https://assets.kitploit.com/production/public/readmes/44336/1259e1f45b2d2bb8edcb12609e057d089f7c1dcf907677973d799049c58bee4a.png" alt=""><figcaption></figcaption></figure>

</div>

그럼 일반 Windows PC는 어떻게 부팅할까? BDS 이후, SPI에 저장된 UEFI 펌웨어 코드가 작업을 완료하면, UEFI 펌웨어 부트 매니저는 먼저 NVRAM UEFI 변수를 조회하여 ESP를 찾고, OS별 부트 매니저인 bootmgfw.efi를 찾아 그 엔트리 함수(DXE 드라이버)를 호출한다.

이 함수는 먼저 EfiInitCreateInputParametersEx 함수를 호출하는데, 이 함수는 주로 EfiEntry 매개변수를 bootmgfw.efi가 기대하는 매개변수 형식으로 변환하는 데 사용된다.

그런 다음 Windows Boot Manager 엔트리 포인트인 BmMain 함수를 호출한다.

이 함수에서는 BmFwInitializeBootDirectoryPath를 호출하여 시작 애플리케이션(BootDirectory) 경로(\EFI\Microsoft\Boot)를 초기화한다.

그런 다음 BootMgr는 시스템 부팅 구성 문자(BCD)를 읽는다. 부팅 옵션이 여러 개 있으면 BmDisplayGetBootMenuStatus를 호출하여 부팅 메뉴를 표시한다.

그런 다음 BmpLaunchBootEntry 함수를 호출하여 애플리케이션(winload.efi)을 시작한다.

물론 bootmgfw.efi는 그 외에도 부팅 정책 검증, 코드 무결성, 보안 부팅 구성 요소 초기화 등을 수행하므로 자세한 내용은 다루지 않겠다.

Windows Boot Manager(BootMgr)의 마지막 단계에서 BmpLaunchBootEntry 함수는 이전 BCD 값에 따라 올바른 부팅 항목을 선택한다. 전체 볼륨 암호화(BitLocker)가 활성화된 경우 시스템 파티션이 먼저 해독된 다음 제어권이 winload.efi로 전달될 수 있다.

다음으로 BmTransferExecution 함수가 호출되고, 시작 옵션이 확인된 후 실행 흐름이 BlImgStartBootApplication 함수로 전달된다.

그런 다음 BlImgStartBootApplication 함수는 ImgFwStartBootApplication 함수를 호출하고, 마지막으로 ImgArchStartBootApplication 함수를 호출한다. 그 안에서 winload.efi의 메모리 보호 모드가 초기화된다. 그런 다음 BlpArchTransferTo64BitApplication 함수를 호출하고, BlpArchTransferTo64BitApplication은 Archpx64TransferTo64BitApplicationAsm 함수를 호출하여 마침내 제어권을 winload.efi에 넘긴다.

이 함수는 새 GDT와 IDT를 활성화한 다음 완전히 제어권을 winload.efi에 넘긴다. 이 시점에서 BootMgr는 임무를 완료하고 Winload가 작동하기 시작한다. - 중국 웹사이트에서 가져온 인용문 끝(자세한 내용은 여기에서 확인하라 https://bbs.kanxue.com/thread-268267.htm )그리고 거기서부터 winload.efi는 자신의 역할을 수행합니다. 즉, Windows를 로드하고 커널에 제어권을 넘기기 전에 몇 가지 하드웨어 작업을 더 처리하는 것입니다.

이제 이 정도로 간단히 설명했으니, 앞서 말했듯이

<div>

<img src="https://assets.kitploit.com/production/public/readmes/44336/65537ae888c278e8e487029f93d909fb1e4699069699cf1b7d5ad8fa1f9e0d69.png" alt="1">


<figure><img src="https://assets.kitploit.com/production/public/readmes/44336/3b00c68a215f4568fca5d672ea6f892fecf9809e671c68795c067d2660fa3f1f.png" alt=""><figcaption></figcaption></figure>

</div>

메모리로의 로딩이 성공했는지 추가로 확인한 다음, ati\_analysis\_rdtsc\_aia\_cu\_4e1f라는 함수를 호출합니다. 이 분석의 첫 번째 부분을 이미 읽었다면 이 함수에 익숙할 것입니다.

이제 재미 삼아, 해당 함수 분석에 실패하여 탐지되었다고 가정해 봅시다. sub\_180002A08이 어떻게 생겼는지 살펴보겠습니다.

<div>

<img src="https://assets.kitploit.com/production/public/readmes/44336/4eb3ae379ab937e19e6a699339d992b2a5fd1fcb33202ca67355f62a5b1203b4.png" alt="1">


<figure><img src="https://assets.kitploit.com/production/public/readmes/44336/a4b252df16a31b5bf165d2a500ebe3c54ad5dad3c58cf9fe88a8a1da11ed6b63.png" alt=""><figcaption></figcaption></figure>

</div>

<div>

<img src="https://assets.kitploit.com/production/public/readmes/44336/dd594955a663274e25603804c348b516ca22755886b2732ef81dc8e1e0177544.png" alt="2">


<figure><img src="https://assets.kitploit.com/production/public/readmes/44336/6fba01328584e8abb254912b81b048e8dcf80bda6d3eadc11573a52a5e84dd15.png" alt=""><figcaption></figcaption></figure>

</div>

여기서 다시 gEfiSystemTable + 64가 보입니다. 그런데 이번에는 타입이 달라서 실제로 무엇인지 알 수 없습니다. 이번에는 bootservices 타입이 아니라 efisystemtable 타입입니다. 그다음 memcpy와 우리가 알 수 없는 또 다른 함수 호출 3개가 이어집니다. 이제 루프가 시작될 때까지 실행해 보면

<div>

<img src="https://assets.kitploit.com/production/public/readmes/44336/20e0db7308860023b613310ea14e0880529a588540d9dabac2218b52dc93cefb.png" alt="2">


<figure><img src="https://assets.kitploit.com/production/public/readmes/44336/b8f498165a4016c19d8d5797517680fc32dea241d343b38fcc613620270d58dd.png" alt=""><figcaption></figcaption></figure>

</div>

그리고 memcpy의 이전 인자들을 검사해 보면

<div>

<img src="https://assets.kitploit.com/production/public/readmes/44336/21f546fbfb10a39e0e603186c8c505a3ae0679e8c7bad40f31643022f9ebfbcd.png" alt="2">


<figure><img src="https://assets.kitploit.com/production/public/readmes/44336/2ef8c97938b8f961abf92c03937ca15d5a48cd03eb58a0169891559fad27dde5.png" alt=""><figcaption></figcaption></figure>

</div>

그리고 qemu의 출력 화면을 검사하면 다음과 같은 결과를 얻습니다.

<div>

<img src="https://assets.kitploit.com/production/public/readmes/44336/e4325617bfda31fb45f7920d0d1d977103fd6b85260e590fc7cfdca1efacb787.png" alt="1">


<figure><img src="https://assets.kitploit.com/production/public/readmes/44336/04e29142b4cf543a6e5b8f55de2c27d1f3f0034707a6d19e2b1ea45b8251e899.png" alt=""><figcaption></figcaption></figure>

</div>

좋습니다. 이제 이 내용을 이해해 봅시다. 솔직히 저도 여기서 길을 잃었기에, 다시 그 아시아 연구자의 블로그 게시물을 참조하겠습니다.

그의 블로그에 따르면 그 두 함수는 실제로```
ConOut->ClearScreen(ConOut);
ConOut->OutputString(ConOut, String);

좋아, 그런데 도대체 conOut이 뭐지? 또한 그는 conout이 EFI_SIMPLE_TEXT_OUTPUT_PROTOCOL 타입이고, ConOut = gEfiSystemTable->ConOut; 으로 얻어진다고 말한다. 좋아, 그럼 코드에서 이게 무슨 의미일까??

좋아, 그럼 파고들어 보자

정의는

1

그리고 GUID

2

자, 내 똑똑한 척하는 머리가 사실 이걸 디버거에서 캡처하는 걸 깜빡했다. 처음에 이걸 분석할 때 efisystemtable과 bootservices의 데이터 타입을 혼동해서 이게 사실 allocatepool이라고 생각했기 때문이다.

이제 저 함수들은 뭘 하는 걸까?

음, ClearScreen은 말할 필요도 없이 명확하고 OutputString도 마찬가지다. 연구자는 어떻게 그 변수가 EFI_SIMPLE_TEXT_OUTPUT_PROTOCOL 타입이라는 결론을 내렸을까? 아마 디버거에서 GUID 바이트를 봤기 때문일 것이다.

그럼 마지막 함수는 어떨까?

그의 블로그 게시물에서는 마지막 함수가 gEfiBootServices->Stall이라고 한다. 그럼 이게 도대체 뭘 하는 걸까? UEFI 스펙에 따르면 The Stall() function stalls execution on the processor for at least the requested number of microseconds. Execution of the processor is not yielded for the duration of the stall.

그래서 기본적으로 CPU를 얼려버린다. 얼마나 오래? 0x1C9C380 초. 내 생각엔 엄청나게 긴 시간이다. 게다가 이건 무한 루프 안에 또 박혀 있으니, 그래, 우리는 끝났다 :)))

그리고 디버거에서는 이렇게 보인다

1

이제 메인 함수로 계속 가보자

1

bootmgfrw.efi를 로드하는 데 성공하면(여기서 bc winload.efi가 실제 Windows 부트로더이다) sub_180002538을 호출한다

============================================================================= sub_180002538

그래프 관점에서 보면

1

어셈블리 관점에서 보면

2
3
4
5
6

혹시 뭔가 떠오르는 게 있나? 아직 아니라면 잠깐 기다려 보자, 곧 감이 올 거다. 그 사이에 pseudo code 관점에서 한번 보자

1
2

EXE를 파싱하는 모습이 보인다 :) 이전 파트(part1)의 것과 얼마나 같은지는 잘 모르겠지만, 한번 보자 :)

그래서 메모리 내 바이너리(bootmgfrw.efi) 버전을 전형적인 MZ 헤더(0x5A4D)와 비교한다. 보이는 것처럼

1
1

좋아, 다음은 PE 헤더를 찾을 수 있는지 확인하는 또 다른 전형적인 검사다

1

좋아, 다음에는 sub_1800024C4()를 호출하는데, 이건 이렇게 생겼다

1
2

좋아, 여기서 일어나는 일은 메모리에서 특정 값들을 찾고, 찾으면 그 값을 반환한다는 것이다. 에뮬레이션은 sub_180002538.py.py를 참고하라.

어쨌든 여기 sub_180002464이 있다

1

sub_1800024C4를 성공적으로 실행하면 더 큰 함수로 돌아가 몇 가지 추가 검사를 수행한다. 좋아, 이제 이것들이 무슨 의미인지 파악해 보자

1

좋아, 그럼 rax+0xe에 있는 값을 0x64와 추가로 비교한다. 흠, 재미있네. rax+0xe를 살펴보자

1

이 특정 검사에 특별한 이유가 있을까? 솔직히 나도 모르겠다. 아마도? 만약 알게 된다면 풀 리퀘스트를 보내서 이 문서를 수정해 줘.

덧셈을 조금 더 수행한 다음 비교를 한다

1

여기서 잠깐 멈춰서, 길을 잃을 때마다 참고했던 이 글의 이전 영감 소스를 다시 인용하겠다. 그의 블로그에서는 값을 비교하는 함수를 RtlpImageDirectoryEntryToDataEx로 이름 지었는데, 검색해 보면 결과가 나오지 않는다. 하지만 그의 이름과 충분히 가까운 것이 있는데, 바로 RtlImageDirectoryEntryToData다. 이 함수는 기본적으로 다음과 같은 일을 한다. Given the base address of a kernel module and the index of an entry in the data directory, RtlImageDirectoryEntryToData() returns the virtual address and the size of the directory entry(https://codemachine.com/articles/top\_ten\_kernel\_apis.html) 우리의 경우 EFI/UEFI 앱에 있으므로, 여기서 보이는 50은 이 경우 루트 파티션의 바이트/MB 크기라고 볼 수 있고, rax에 있는 그 주소는 우리 디렉터리의 항목이라고 볼 수 있다.

더 진행하기 전에 설명해야 할 흥미로운 세부 사항이 하나 더 있다. 그의 연구에서는 RtlImageDirectoryEntryToData의 출력을 다음 구조체로 변환한다.``` typedef struct _IMAGE_RESOURCE_DIRECTORY_ENTRY { union { struct { DWORD NameOffset : 31; DWORD NameIsString : 1; }; DWORD Name; WORD Id; }; union { DWORD OffsetToData; struct { DWORD OffsetToDirectory : 31; DWORD DataIsDirectory : 1; }; }; } IMAGE_RESOURCE_DIRECTORY_ENTRY, *PIMAGE_RESOURCE_DIRECTORY_ENTRY;

root@kitploit:~
이제 이 구조는 도대체 뭐지?

음, 그 구조에 대해 빠르게 검색해 보면 여기(http://www.brokenthorn.com/Resources/OSDevPE.html)에 도달하는데, 거기서는 \`Parsing resources is a bit more complex then the other directory types, however. Like the other sections, there is a base IMAGE_RESOURCE_DIRECTORY structure that can be obtained from the DataDirectory member of the optional header: blah blah\`라고 알려준다. 또한 \`\`\`This structure doesnt have much of any interesting fields, except the last three.

If you have worked with Win32 resources, you might know that resources can be idenitified by ID or name. Two of the members in this structure will let us know the number of these entries, and the total amount of entries (NumberOfNamedEntries + NumberOfIdEntries), which is useful in looping through all of the entries. As you can probably guess, the entries are in the DirectoryEntries array. DirectoryEntries consists of an array of IMAGE\_RESOURCE\_DIRECTORY\_ENTRY structures, which follow the format:\`\`\`

그러니까 기본적으로 이건 내부적으로 무언가를 파싱하기 위해 내부적으로 사용되는 것이고, 우리가 리소스가 있는 디렉터리를 다루는 맥락에서는 말이 된다. 좋아.

더 알려줘!

그래서 다음은

<div>

<img src="https://assets.kitploit.com/production/public/readmes/44336/137d3d2aebf0db9501f550b09baddf01c3e50bf703ca8d13386a7185a567f19a.png" alt="1">


<figure><img src="https://assets.kitploit.com/production/public/readmes/44336/045c3a8a2bab306f516cdc7e9a59954e3c1ff16efe4189273c50f54b9e84f3e6.png" alt=""><figcaption></figcaption></figure>

</div>

이게 하는 일은 기본적으로 디렉터리의 모든 리소스를 반복하면서 문자열 타입인지 확인하는 것이다.

솔직히 왜 그랬는지 모르겠다. 내가 틀렸다면 미안하고, 맞다면 건배!

다음

<div>

<img src="https://assets.kitploit.com/production/public/readmes/44336/a57c5815ee8b5498fed6d8dde92f48b9fc2bdfd2d4f4e231796ba96e5e28bea9.png" alt="1">


<figure><img src="https://assets.kitploit.com/production/public/readmes/44336/bd4513fdf1f8f165fc404b8462d6bc36644de4937e42d560d54f1a5f1c0e8799.png" alt=""><figcaption></figcaption></figure>

</div>

그래서 여기서 일어나는 일은 오프셋을 더해서 중국 연구자가 말하는 두 번째 리소스 테이블에 도달하는 것이다. 보시다시피.

<div>

<img src="https://assets.kitploit.com/production/public/readmes/44336/8f6655fb8117abf8a4d38b5173d51e4bc3ce67b86803c57cce36d47b73cd1e76.png" alt="1">


<figure><img src="https://assets.kitploit.com/production/public/readmes/44336/ebdf5a9a749f2cb1b7a656be5f2d99419edfc9cd2a737e15c6845f2c008e3f11.png" alt=""><figcaption></figcaption></figure>

</div>

그리고 나서 오프셋을 얻기 위해 같은 과정을 반복한다.

<div>

<img src="https://assets.kitploit.com/production/public/readmes/44336/faa12c96d0b22e6128ef1cdf14110c31cc9ebca89325f28a07fc6a0a064daeba.png" alt="2">


<figure><img src="https://assets.kitploit.com/production/public/readmes/44336/216539eaf48a407a7f691d10cca06679a545471c3e54f25fedb31c38f0c61a66.png" alt=""><figcaption></figcaption></figure>

</div>

그리고 같은 과정을 반복하는데, 이번에는 VS\_VERSION\_INFO 타입을 확인한다.

<div>

<img src="https://assets.kitploit.com/production/public/readmes/44336/ac2d2e82085f4ddbc3f5ae1ce35528dd8420924b0298c65db056d0837c3e4b6d.png" alt="1">


<figure><img src="https://assets.kitploit.com/production/public/readmes/44336/23788c642b82988c14654e9dac2afd2504cd22846be0487efce96cae4d6fe094.png" alt=""><figcaption></figcaption></figure>

</div>

그래서 VS\_VERSION\_INFO가 도대체 뭐냐? 음, 마이크로소프트(https://learn.microsoft.com/en-us/windows/win32/menurc/versioninfo-resource)에 따르면 \`Defines a version-information resource\`라고 한다. 아마 단순히 bootmgfrw.ef의 버전을 말하는 것 같다.

그리고 마지막으로 VS\_VERSION\_INFO를 찾으면 같은 알고리즘을 반복한다.

<div>

<img src="https://assets.kitploit.com/production/public/readmes/44336/4f00ecf2c2c9b32b2d25fcbf3c62e9bb45679df1390a085371f5166a70d67933.png" alt="1">


<figure><img src="https://assets.kitploit.com/production/public/readmes/44336/facd25069491b5d7826500e4f2c04cafe213191075012ddb4c1fa9a8bc97c4c5.png" alt=""><figcaption></figcaption></figure>

</div>

이번에는 약간의 변형이 있는데, 그 변형은 빌드 ID를 반환한다는 것이다 :) 보시다시피.

그래서 결론적으로 여기서 실제로 무슨 일이 일어난 거냐? 중국 연구자가 사용한 이름(GetPeFileVersionInfo\_BuildNumber\_)을 보면 실제로 부트로더의 빌드 번호를 얻는다는 것을 알 수 있다. 첫 번째 이미지에서 볼 수 있듯이.

<div>

<img src="https://assets.kitploit.com/production/public/readmes/44336/b28007dda110fc31d53233931ff077ac42fc81146d803b91999069e204020a4d.png" alt="1">


<figure><img src="https://assets.kitploit.com/production/public/readmes/44336/d19f1311c2ee242ced63da8334db384929ada3acae147009becc0dbf34d2b7fb.png" alt=""><figcaption></figcaption></figure>

</div>

여기서는 메모리에 로드된 부트로더를 볼 수 있다.

두 번째 이미지에서는

<div>

<img src="https://assets.kitploit.com/production/public/readmes/44336/2000f17c51ccc65267b46ac2c1d191bd033b3bc6e6b655973423dbbd8a1fc77e.png" alt="2">


<figure><img src="https://assets.kitploit.com/production/public/readmes/44336/7c47fe45fe4b422618a400f2c26c28cd33fea9416f2b24086a2c852d08f1614b.png" alt=""><figcaption></figcaption></figure>

</div>

rcx에 있는 정수를 볼 수 있는데, 이는 빌드 번호이거나 pefileversion일 수 있다.

그리고 세 번째 이미지

<div>

<img src="https://assets.kitploit.com/production/public/readmes/44336/41729b1d4a4701480d64f058f421cd2ad8a8b9b871bf17675fd7b537cec3dd85.png" alt="3">


<figure><img src="https://assets.kitploit.com/production/public/readmes/44336/d2b17725eeb9af2336d725be9c556565fba221fd2a3517912c942f411f9ed33b.png" alt=""><figcaption></figcaption></figure>

</div>

ebx가 rax로 이동되므로 빌드 번호로 추측할 수 있는 것이다 :)

이 함수에 대한 마지막 한마디: 와, 놀라운 엔지니어링이다.

\=============================================================================

이제 다음 과제로 :) 이전 단계의 출력에 따라 v10을 sub\_180001D80 또는 sub\_180001D48로 설정한다. 보시다시피.

<div>

<img src="https://assets.kitploit.com/production/public/readmes/44336/33581031e03f29b5997d46b708c467bfd49ce58625e99381dd28c109cadae7d3.png" alt="1">


<figure><img src="https://assets.kitploit.com/production/public/readmes/44336/6647119081cffb664dcca365392271398b2572ee04c24a0456141f33cbaaeecf.png" alt=""><figcaption></figcaption></figure>

</div>

그리고 우리 경우에는 v10 = sub\_180001D80이다.

<div>

<img src="https://assets.kitploit.com/production/public/readmes/44336/2af043a1449f6bf10e2925f06697438716976d24a1539a61ab42c4301c4a8435.png" alt="1">


<figure><img src="https://assets.kitploit.com/production/public/readmes/44336/0769d4dff6e1da51acaf9c5bac3a9a9b4b446aae9d7c593e7e54d865ec13c2ea.png" alt=""><figcaption></figcaption></figure>

</div>

\=============================================================================

그런 다음 부트로더 관리자와 그 바이트 배열 사이에서 strcmp를 수행한다.

<div>

<img src="https://assets.kitploit.com/production/public/readmes/44336/59164794afc69304133f0a4c008b9e4755671e8d57bd8dc4ea5a2b2e6ae54164.png" alt="1">


<figure><img src="https://assets.kitploit.com/production/public/readmes/44336/03b00f7c18ff7db73dfd5253f02d6966955e38732fa7d1cfb4840366c17355a1.png" alt=""><figcaption></figcaption></figure>

</div>

여기서 잠시 멈추고 싶다. 눈치챘겠지만 중국 연구자의 블로그 글에서 흥미로운 것을 봤다. 그는 그 바이트 배열을 SigImgArchStartBootApplication이라고 불렀다. 그래서 SigImgArchStartBootApplication은 도대체 뭐고, 누구의 것이며, 대체 왜 그 배열이 그렇게 불리는 거지(migos)? 구글(구루구루)에서 SigImgArchStartBootApplication을 검색해도 아무것도 나오지 않는다. 현재 컨텍스트가 Windows 부트로더 관리자를 사용한다는 점을 고려해서 IDA로 열어보자. C:\Windows\Boot\EFI로 가서 IDA에서 바이너리를 열고 SigImgArchStartBootApplication을 검색해도 아무것도 없다. ImgArchStartBootApplication을 검색하면 다음과 같은 것이 나온다.

<div>

<img src="https://assets.kitploit.com/production/public/readmes/44336/1ad42d5236e8ca4da08688fe3d4c72e6b3de01fdce633a1bdaa870de421cdc40.png" alt="1">


<figure><img src="https://assets.kitploit.com/production/public/readmes/44336/d6e211aa12b37dfba0244d48516a08703248484c070f8d7ffcf0a28f08e8a833.png" alt=""><figcaption></figcaption></figure>

</div>

그래서 ImgArchStartBootApplication .... 도대체 뭐 하는 거야...!? 음... 이건 \`@_xeroxz\`에게서 훔쳐오겠다(그를 팔로우해라, 그의 작업을 팔로우하지 않는다면 도대체 뭐 하는 거냐....). 기본적으로 그는 한 기사에서 \`bootmgfw.ImgArchStartBootApplication between windows versions 2004-1709 is invoked to start winload.efi\`라고 말한다. 그의 이미지에서도 볼 수 있듯이(https://guidedhacking.com/threads/hyper-v-hacking-framework-works-on-every-version-of-windows-10-2004-1511-amd-intel.16251/).

<div>

<img src="https://assets.kitploit.com/production/public/readmes/44336/4967559cb05e49785841a2dc216e13fc0b94fe8be8f17d9bceaf1914722156ff.jpg" alt="1603213912596">


<figure><img src="https://assets.kitploit.com/production/public/readmes/44336/4967559cb05e49785841a2dc216e13fc0b94fe8be8f17d9bceaf1914722156ff.jpg" alt=""><figcaption></figcaption></figure>

</div>

그것으로 충분히 명확하지 않다면 한 기사()에서는 \`ImgArchStartBootApplication to catch the moment when the Windows OS loader (winload.efi) is loaded in the memory but still has not been executed\`라는 것을 볼 수 있다(https://rustrepo.com/repo/rusty-bootkit--uefi-bootkit-in-rust).

좋아, 그럼 strcmp는 ImgArchStartBootApplication과 무슨 상관이 있을까? 음, IDA를 자세히 살펴보면 곧 답을 알게 될 것이다. 부트로더 코드에서 바이트 41 b8 09를 검색하면 곧 범인을 만나게 된다.

<div>

<img src="https://assets.kitploit.com/production/public/readmes/44336/91050c01f95eb88488cbc575c21af7f453228eeb13c665b94d415eecf5682a55.png" alt="1">


<figure><img src="https://assets.kitploit.com/production/public/readmes/44336/7239d85f2dc9e220a2eab80f79b5db9705285a17c074f85958c041d122bfaf8e.png" alt=""><figcaption></figcaption></figure>

</div>

그리고 메모리 내 부트로더 이미지 바이트가 그 바이트 시그니처와 일치하면 sub\_180002398을 실행한다.

그리고 보시다시피 우리는 패턴을 찾았고, eax에 바이트가 있는 메모리 영역을 반환받았으며, 안전하게 sub\_180002398을 실행한다.

\=============================================================================

sub\_180002398

"어셈블리 관점"

<div>

<img src="https://assets.kitploit.com/production/public/readmes/44336/5aa624d92161499019e7ce6597bf46853c59ba89d37fec483a8ac7ee168ddbeb.png" alt="1">


<figure><img src="https://assets.kitploit.com/production/public/readmes/44336/afbf940a1eb535d73dce744606cc63c568c2b447c9cf85034c422a8e900859f4.png" alt=""><figcaption></figcaption></figure>

</div>

<figure><img src="https://assets.kitploit.com/production/public/readmes/44336/6468513a220946bbccfab53328c056a620755e1fe94ad3e36d8c8958ed777794.png" alt=""><figcaption></figcaption></figure>

<figure><img src="https://assets.kitploit.com/production/public/readmes/44336/c5c36e7c29f1cdea6f42d55d7605ad3c2044d66397c867c221da6c0bf74f8d6a.png" alt=""><figcaption></figcaption></figure>

"의사 코드 관점"

<div>

<img src="https://assets.kitploit.com/production/public/readmes/44336/5b1d8a264dad55f34a0cc958a2f4a26014a31987af5b66754e754589ea085097.png" alt="3">


<figure><img src="https://assets.kitploit.com/production/public/readmes/44336/1d3db7165e0f71a3fa76862ba8afb3869f821f59db6fc5a5c5e99d5002ecfba1.png" alt=""><figcaption></figcaption></figure>

</div>

<figure><img src="https://assets.kitploit.com/production/public/readmes/44336/ae65504884fa2881cb50af2f88e846a0ad029c9431ee6296b28993de8f2e4a0d.png" alt=""><figcaption></figcaption></figure>

그래서 이게 도대체 뭐 하는 거지? 솔직히 몇 가지 계산과 덧셈, 뺄셈을 할 뿐이고 정말 중요한 건 없다. 왜냐? 그다지 흥미롭지 않기 때문이다. 우리가 관심 있는 것은 함수에서 반환된 후에 무슨 일이 일어나는지다. rax를 보자.

<div>

<img src="https://assets.kitploit.com/production/public/readmes/44336/4eae862955421b2b1629c120bb09970714cf085e9255590d6cfa36a77bbc69e9.png" alt="1">


<figure><img src="https://assets.kitploit.com/production/public/readmes/44336/43917bf46096449ad92172baa282fd3e70ec0bec67fec2bbf2a276285d878b52.png" alt=""><figcaption></figcaption></figure>

</div>

좋아, 그래도 이해가 안 간다. 음, rax = 0x5eec108이고 이는 0x48c48b48을 가리킨다. 그래서 뭐? 나도 너만큼 혼란스러워서 다시 중국 블로그로 돌아갔다. 그 연구자가 설명하는 바로는 여기서 일어나는 일은 이것이다: ImgArchStartBootApplication 함수의 시작 부분으로 돌아간다. 그런데 그가 이걸 대체 어떻게 알아냈을까? 앞서 언급했듯이 rax =\
0x48c48b48이고, booloadermnfr.efi를 검사해 보면 다음과 같은 것을 볼 수 있다.

<div>

<img src="https://assets.kitploit.com/production/public/readmes/44336/2dbe283fa0b0dd9cf837e79f1f42eaeb6dcd61252e76979c0a4af3cf2f68e8d8.png" alt="1">


<figure><img src="https://assets.kitploit.com/production/public/readmes/44336/624e1927cac5a0011d6fabea0f2ce4740b8dfd14102509656d6e5c0395a9c08d.png" alt=""><figcaption></figcaption></figure>

</div>

이것은 0x5eec108에 있는 바이트 시퀀스와 정확히 같다. 좋아, 이제 그거 멋지다 :)

이 동작을 에뮬레이션하려던 내 실패한 시도를 보려면 sub\_180002398.py를 참조하라 :)

\=============================================================================

좋아, 다음?

<div>

<img src="https://assets.kitploit.com/production/public/readmes/44336/432ad1832fa35743bc5676f7f8362ad9e2043e17387121136a1f6dfe1bdf16f1.png" alt="1">


<figure><img src="https://assets.kitploit.com/production/public/readmes/44336/aab798c5c80621b1c367ea6eecfff0d7caf9ecc368ae2fe2e947538e4f0e2b0c.png" alt=""><figcaption></figcaption></figure>

</div>

<div>

<img src="https://assets.kitploit.com/production/public/readmes/44336/f04ebd9c650ddadb5553e4f2c43c72af8a5ccbef372a4dbdc811600e9583b0c9.png" alt="1">


<figure><img src="https://assets.kitploit.com/production/public/readmes/44336/3411e1620450739ea98f6db634346748487377106547324591b148cefe358df2.png" alt=""><figcaption></figcaption></figure>

</div>

그래서 다음에 일어나는 일은 RaiseTPL이다. 좋아, 이게 뭘 하는 거지? 현재 실행 중인 태스크의 우선순위를 올리고 이전 우선순위 레벨을 반환한다. 우리 경우에는 최고 실행 권한으로 실행될 것이다.

다음으로 우리는 내가 patch\_something이라고 부른 것을 호출하는데, 이는 다음과 같이 생겼다.

<div>

<img src="https://assets.kitploit.com/production/public/readmes/44336/0a31b0c154406b340e9bb044c4211afd6494bcac6ec197c99a10a6d0effb6a31.png" alt="1">


<figure><img src="https://assets.kitploit.com/production/public/readmes/44336/3fcff1b34a5d9af3cdd70e4dac1188abd3edd13e74d11e4f0bba5d667d4f53a1.png" alt=""><figcaption></figcaption></figure>

</div>

<div>

<img src="https://assets.kitploit.com/production/public/readmes/44336/c2f9bb8ca36961def04d4a3111a7d4213bb219949d13094b525a1a906ab788f7.png" alt="2">


<figure><img src="https://assets.kitploit.com/production/public/readmes/44336/accdd93e3428b9b03132eafceda3ec5e1cfda742a978f1cd7f2c6bcf1904ceaa.png" alt=""><figcaption></figcaption></figure>

</div>

<div>

<img src="https://assets.kitploit.com/production/public/readmes/44336/e0f6c806d296e47269b9908ceab7b90954bbd219d3d9c13462ebee8344f854f3.png" alt="1">


<figure><img src="https://assets.kitploit.com/production/public/readmes/44336/1ed164077989d04273ae3b40ec6daf7cf9b93ec42d917533b1e9758525231b7b.png" alt=""><figcaption></figcaption></figure>

</div>

정적 분석을 통해 이것이 훅킹으로 알려진 것임을 알 수 있다. :) 기본적으로 ImgArchStartBootApplication의 바이트를 패치하여 sub\_180001D80을 가리키게 하고, ImgArchStartBootApplication의 원본 함수를 byte\_180015C78에 저장한다.

보시다시피 정확히 sub\_180001D80으로 변경된다.

<div>

<img src="https://assets.kitploit.com/production/public/readmes/44336/6c48bf4c9126a9a1466493aed943113cc27b4bbf9f7d68cdd251d0e14303ad8a.png" alt="1">


<figure><img src="https://assets.kitploit.com/production/public/readmes/44336/633d84a62c16dba91229fe6bb73ed0318719fc06f63f7f2a9d19adba0d0e8cfe.png" alt=""><figcaption></figcaption></figure>

</div>

다음으로 권한을 재설정하고 거기서부터 제어권을 boomgrfw.efi에 넘긴다 :)

이것으로 공식적으로 분석의 전반부가 끝난다 :) 다음 부분에서는 sub\_180001D80과 boomgrfw.efi(우리의 경우 winload.efi)를 더 디버깅하는 방법을 배울 것이다. 그러니 분석 2부를 위한 환경을 준비하는 법을 배울 때까지 꼭 앉아서 기다려라.

\=============================================================================

이제 분석의 후반부로.... boomgrfw.efi를 어떻게 디버깅할까?
도구 다운로드