 renatus-cartesius/reconswarm
클라우드의 힘으로 리콘을 확장하세요

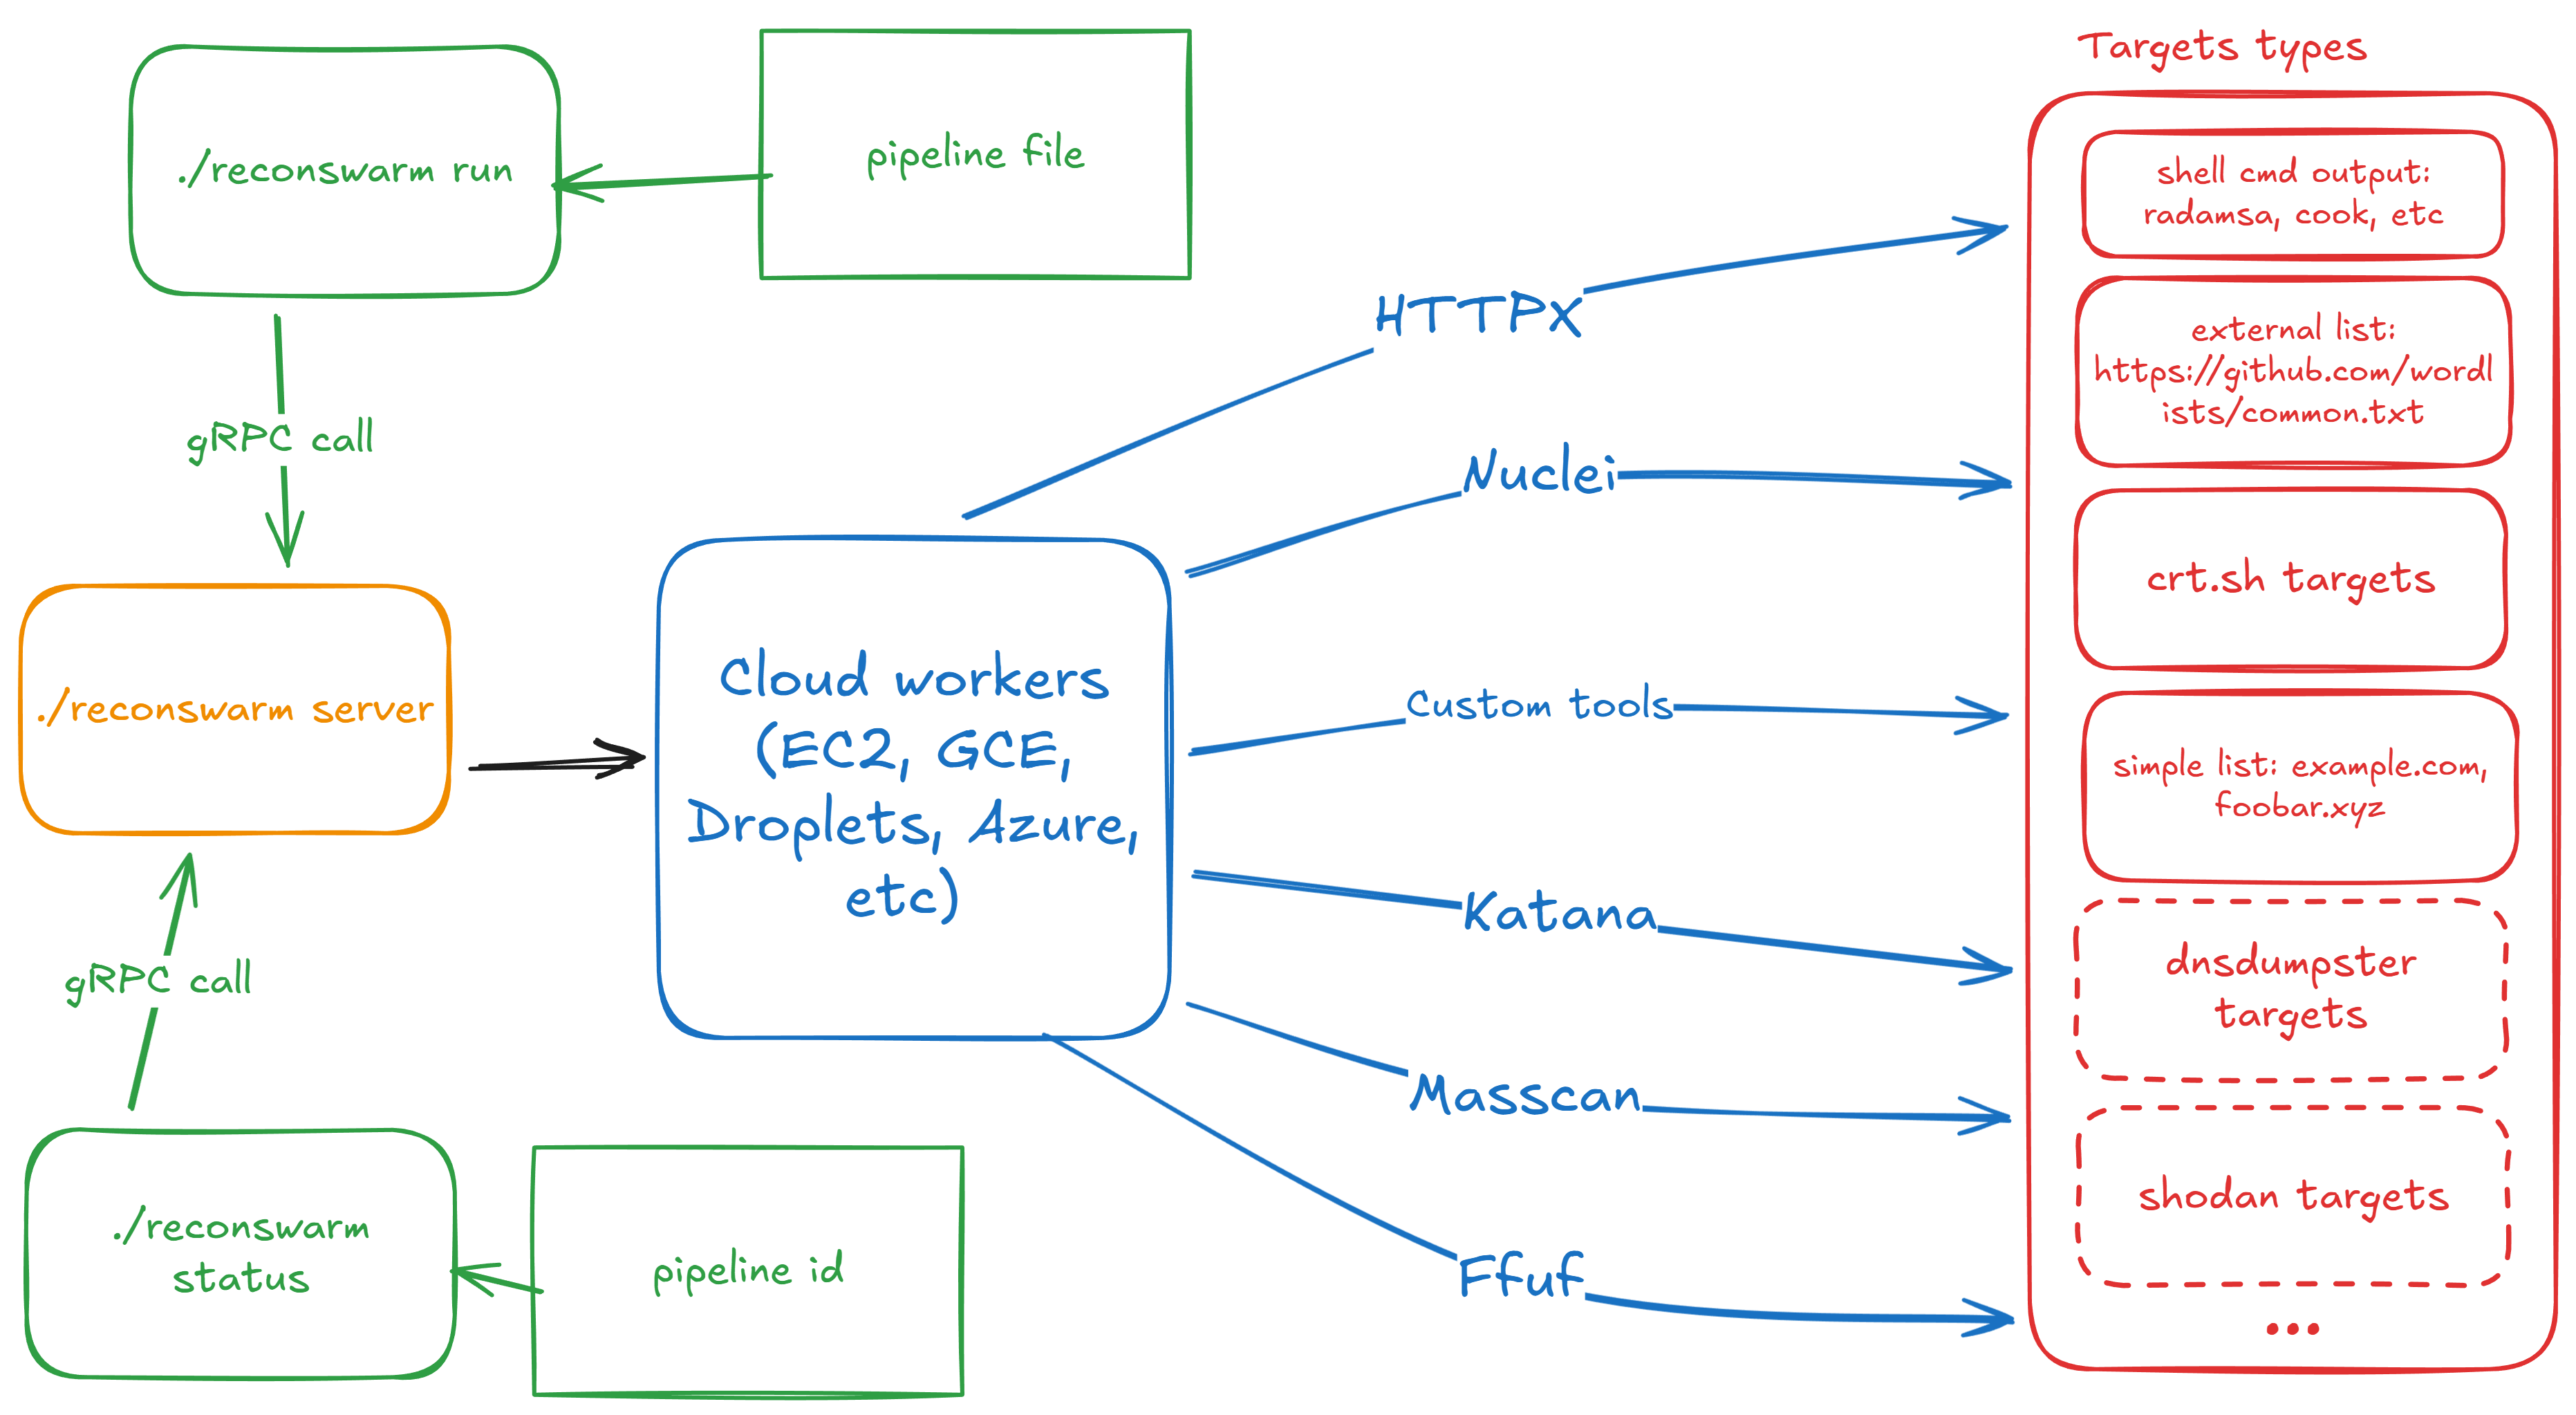
ReconSwarm은 분산 보안 테스트를 위해 설계된 모듈식 정찰 자동화 프레임워크입니다. 최소한의 구성 오버헤드로 클라우드 인프라를 프로비저닝하고, 병렬 정찰 파이프라인을 실행하며, 결과를 수집합니다.
ReconSwarm은 수동 인프라 관리 없이 확장 가능하고 자동화된 정찰 워크플로우가 필요한 버그 바운티 헌터, 침투 테스터, DevSecOps 엔지니어 및 보안 연구자에게 적합합니다.
ReconSwarm은 클라우드 프로비저닝, 원격 시스템 제어, 파이프라인 실행 및 구성 관리 간의 관심사를 명확히 분리하는 모듈식 아키텍처를 따릅니다.
ReconSwarm은 클라우드 프로비저너에 **판별 유니온 패턴(discriminated union pattern)**을 사용합니다. provisioner.type 필드가 활성화할 공급자 구성을 결정합니다:
provisioner:
  type: yandex_cloud  # Discriminator field
  yandex_cloud:       # Active when type: yandex_cloud
    iam_token: "${YC_TOKEN}"
    # key_path: "./sa_auth_key.json"
    folder_id: "${YC_FOLDER_ID}"
    # ... provider-specific settings
추가 클라우드 공급자는 Provisioner 인터페이스를 구현하고 팩토리에 새 유형을 추가하여 통합할 수 있습니다.
스테이지는 워커 VM에서 작업을 실행하는 확장 가능한 구성 요소입니다:
모든 스테이지 필드는 템플릿 렌더링을 지원합니다. 기능을 확장하기 위해 새 스테이지 유형을 추가할 수 있습니다.
ReconSwarm 서버는 **완전히 무상태(stateless)**입니다 — 모든 상태는 etcd에 저장됩니다:
이 아키텍처는 다음을 가능하게 합니다:
| 기능 | 설명 |
|---|---|
| 수평 확장 | 로드 밸런서 뒤에서 여러 서버 인스턴스 실행 |
| 무중단 재시작 | 파이프라인 상태를 잃지 않고 서버 재시작 |
| 크래시 복구 | 새 서버 인스턴스가 이전 서버가 중단된 지점부터 이어서 실행 |
| 상태 검사 | 디버깅 및 모니터링을 위해 etcd 직접 조회 |
고가용성 구성:
                    ┌─────────────┐
                    │   Client    │
                    └──────┬──────┘
                           │
                    ┌──────▼──────┐
                    │Load Balancer│
                    └──────┬──────┘
              ┌────────────┼────────────┐
              │            │            │
       ┌──────▼──────┐ ┌───▼───┐ ┌──────▼──────┐
       │  Server 1   │ │Server2│ │  Server 3   │
       └──────┬──────┘ └───┬───┘ └──────┬──────┘
              │            │            │
              └────────────┼────────────┘
                           │
                    ┌──────▼──────┐
                    │ etcd cluster│
                    └─────────────┘
모든 서버는 동일한 etcd 클러스터를 공유하며 모든 요청을 처리할 수 있습니다. 파이프라인 실행 중 서버가 크래시되면 다른 서버가 etcd에서 상태를 읽은 후 실행을 계속할 수 있습니다.
참고: 현재 구현은 etcd에서 로드한 후 파이프라인을 메모리에서 실행합니다. 파이프라인 재개를 포함한 완전한 크래시 복구는 향후 릴리스에서 계획되어 있습니다.
git clone <repository>
cd reconswarm
go mod download
task build
ReconSwarm은 서버 구성과 파이프라인 구성을 분리합니다:
| 구성 유형 | 파일 | 설명 |
|---|---|---|
| 서버 | reconswarm.yaml | 클라우드 공급자, etcd, 워커 풀 설정 |
| 파이프라인 | 별도 YAML 파일 | 대상 및 스테이지, -f 플래그로 전달 |
서버 구성은 reconswarm.yaml에 저장됩니다(CONFIG_PATH 환경 변수로 구성 가능). 모든 문자열 값은 ${VAR} 또는 $VAR 구문을 사용한 환경 변수 확장을 지원합니다.
# Server settings
server:
  port: 50051

# Etcd connection for state management
etcd:
  endpoints:
    - "localhost:2379"
  dial_timeout: 5  # seconds
  username: ""     # optional, supports ${ETCD_USER}
  password: ""     # optional, supports ${ETCD_PASSWORD}

# Cloud provisioner (discriminated union)
provisioner:
  type: yandex_cloud  # Provider selector

  # Yandex Cloud configuration (active when type: yandex_cloud)
  yandex_cloud:
    iam_token: "${YC_TOKEN}"
    # key_path: "./sa_auth_key.json"
    folder_id: "${YC_FOLDER_ID}"
    default_zone: "ru-central1-b"
    default_image: "fd8b1cmhmncn7lt4tqn4"
    default_username: "root"
    default_cores: 2
    default_memory: 2      # GB
    default_disk_size: 20  # GB

# Worker pool settings
workers:
  max_workers: 5
  setup_commands:
    - "apt update"
    - "apt install -y docker.io"
파이프라인 구성은 별도의 YAML 파일에 저장되며 -f 플래그로 전달됩니다. 래핑된 형식과 래핑되지 않은 형식이 모두 지원됩니다:
래핑된 형식(권장):
# pipeline.yaml
pipeline:
  targets:
    - value: "example.com"
      type: crtsh
    - value: ["sub1.example.com", "sub2.example.com"]
      type: list
  stages:
    - name: "Run scanner"
      type: exec
      steps:
        - "nmap -sC -sV -iL {{.Targets.filepath}} -oN /opt/recon/scan.txt"
    - name: "Collect results"
      type: sync
      src: "/opt/recon/scan.txt"
      dest: "./results/{{.Worker.Name}}.txt"
래핑되지 않은 형식(지원됨):
# pipeline.yaml
targets:
  - value: "example.com"
    type: crtsh
stages:
  - name: "Run scanner"
    type: exec
    steps:
      - "nmap -iL {{.Targets.filepath}} -oN /opt/recon/scan.txt"
구성 값은 두 가지 형식의 환경 변수 치환을 지원합니다:
${VAR} — 중괄호로 감싼 전체 변수 이름$VAR — 단순 변수 이름환경 변수가 설정되지 않은 경우 리터럴 문자열(${VAR} 또는 $VAR 포함)이 사용됩니다.
Yandex Cloud 통합에는 제공된 설정 스크립트를 사용하세요:
Yandex Cloud CLI 설치(아직 설치되지 않은 경우):
# Follow official Yandex Cloud documentation for CLI installation
Yandex Cloud CLI 구성:
yc config profile create <profile-name>
yc config set cloud-id <your-cloud-id>
yc config set folder-id <your-folder-id>
자격 증명 내보내기:
source ./secrets-setup.sh
이 스크립트는 다음을 내보냅니다:
YC_TOKEN — 인증용 IAM 토큰YC_FOLDER_ID — 리소스 관리를 위한 폴더 IDYC_CLOUD_ID — 클라우드 ID(필요한 경우)구성에서 참조:
provisioner:
  type: yandex_cloud
  yandex_cloud:
    iam_token: "${YC_TOKEN}"
    # key_path: "./sa_auth_key.json"
    folder_id: "${YC_FOLDER_ID}"
secrets-setup.sh 스크립트는 실행될 때마다 새로운 IAM 토큰을 자동 생성하므로 자격 증명을 하드코딩하지 않고도 안전한 인증을 보장합니다.
서비스 계정 생성:
환경 구성:
export GCP_PROJECT_ID="your-project-id"
export GCP_CREDENTIALS_PATH="/path/to/key.json"
구성에서 참조:
provisioner:
  type: gcp
  gcp:
    project_id: "${GCP_PROJECT_ID}"
    credentials_path: "${GCP_CREDENTIALS_PATH}"
    default_zone: "us-central1-a"
IAM 사용자 생성:
환경 구성:
export AWS_ACCESS_KEY_ID="your-access-key"
export AWS_SECRET_ACCESS_KEY="your-secret-key"
구성에서 참조:
provisioner:
  type: aws
  aws:
    region: "us-east-1"
    access_key_id: "${AWS_ACCESS_KEY_ID}"
    secret_access_key: "${AWS_SECRET_ACCESS_KEY}"
    default_zone: "us-east-1a"
토큰 생성:
환경 구성:
export DO_TOKEN="your-token"
구성에서 참조:
provisioner:
  type: digitalocean
  digitalocean:
    token: "${DO_TOKEN}"
    default_region: "nyc1"
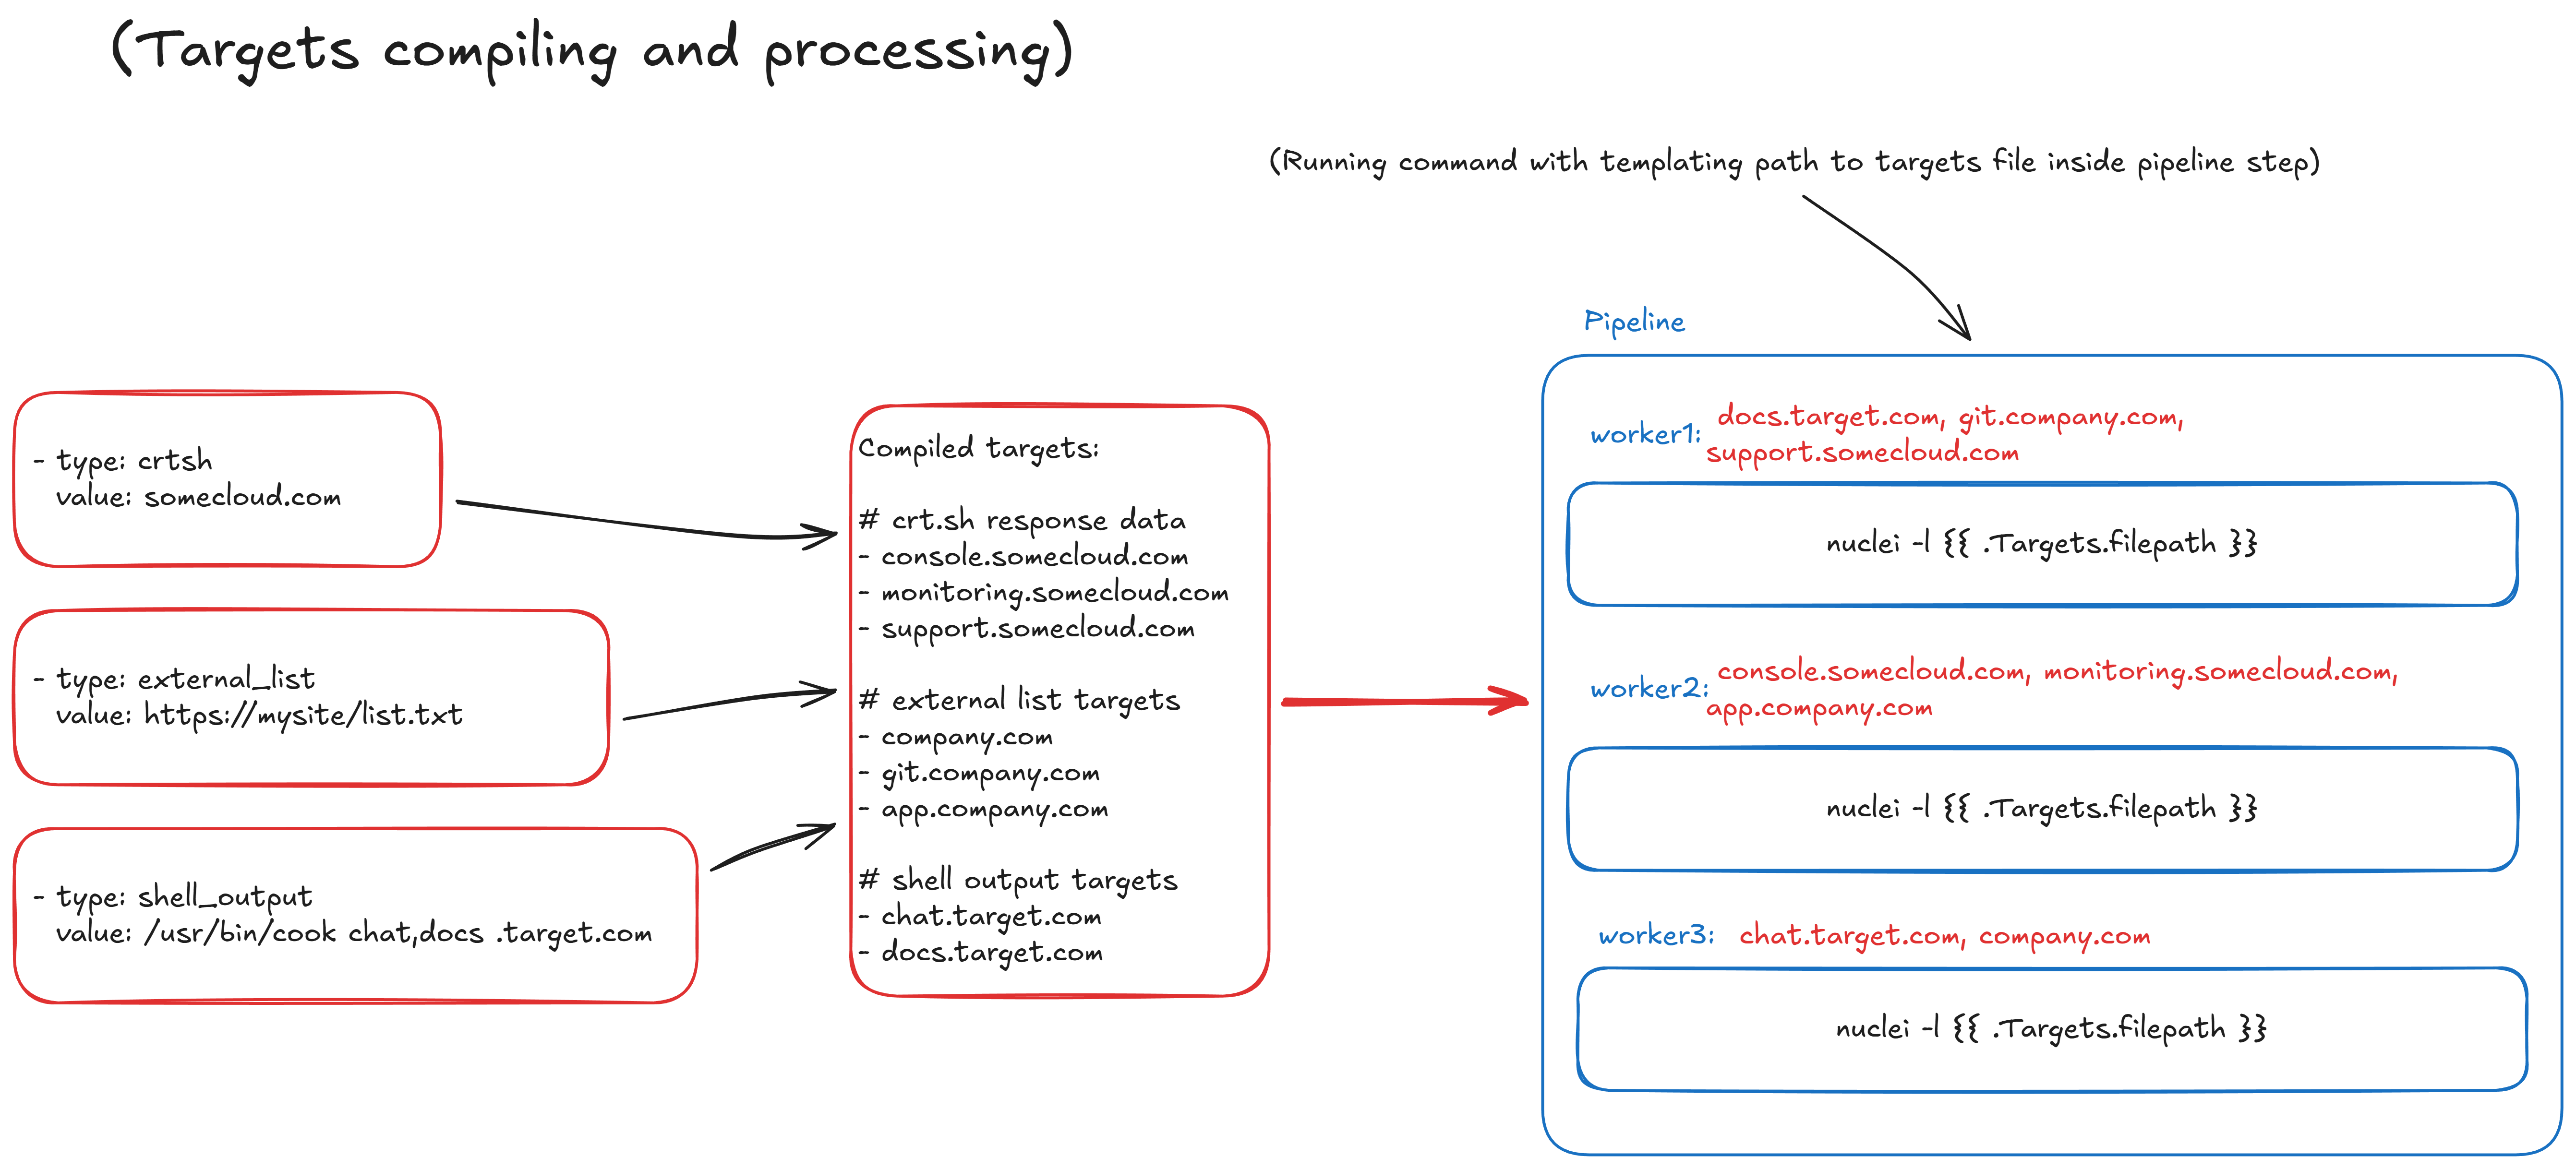
crt.sh 열거:
targets:
  - value: "example.com"
    type: crtsh
수동 목록:
targets:
  - value: ["sub1.example.com", "sub2.example.com"]
    type: list
