
TLS 기반 데이터 수집에 중점을 둔 빠르고 구성 가능한 TLS 그래버.
기능 • 설치 • 사용법 • tlsx 실행 • Discord 참여
TLS 기반 데이터 수집 및 분석에 중점을 둔 빠르고 구성 가능한 TLS 그래버입니다.
tlsx를 설치하려면 Go 1.24가 필요합니다. 설치하려면 아래 명령을 실행하거나 릴리스 페이지에서 사전 컴파일된 바이너리를 다운로드하세요.```console go install github.com/projectdiscovery/tlsx/cmd/tlsx@latest
## 사용법```console
tlsx -h
이 도구에 대한 도움말이 표시됩니다. 지원하는 모든 스위치는 다음과 같습니다.```console TLSX is a tls data gathering and analysis toolkit.
Usage: tlsx [flags]
Flags: INPUT: -u, -host string[] target host to scan (-u INPUT1,INPUT2) -l, -list string target list to scan (-l INPUT_FILE) -p, -port string[] target port to connect (default 443)
SCAN-MODE: -sm, -scan-mode string tls connection mode to use (ctls, ztls, openssl, auto) (default "auto") -ps, -pre-handshake enable pre-handshake tls connection (early termination) using ztls -sa, -scan-all-ips scan all ips for a host (default false) -iv, -ip-version string[] ip version to use (4, 6) (default 4)
PROBES: -san display subject alternative names -cn display subject common names -so display subject organization name -tv, -tls-version display used tls version -cipher display used cipher -hash string display certificate fingerprint hashes (md5,sha1,sha256) -jarm display jarm fingerprint hash -ja3 display ja3 fingerprint hash (using ztls) -wc, -wildcard-cert display host with wildcard ssl certificate -tps, -probe-status display tls probe status -ve, -version-enum enumerate and display supported tls versions -ce, -cipher-enum enumerate and display supported cipher -ct, -cipher-type value ciphers types to enumerate. possible values: all/secure/insecure/weak (comma-separated) (default all) -ch, -client-hello include client hello in json output (ztls mode only) -sh, -server-hello include server hello in json output (ztls mode only) -se, -serial display certificate serial number
MISCONFIGURATIONS: -ex, -expired display host with host expired certificate -ss, -self-signed display host with self-signed certificate -mm, -mismatched display host with mismatched certificate -re, -revoked display host with revoked certificate -un, -untrusted display host with untrusted certificate
CONFIGURATIONS: -config string path to the tlsx configuration file -r, -resolvers string[] list of resolvers to use -cc, -cacert string client certificate authority file -ci, -cipher-input string[] ciphers to use with tls connection -sni string[] tls sni hostname to use -rs, -random-sni use random sni when empty -rps, -rev-ptr-sni perform reverse PTR to retrieve SNI from IP -min-version string minimum tls version to accept (ssl30,tls10,tls11,tls12,tls13) -max-version string maximum tls version to accept (ssl30,tls10,tls11,tls12,tls13) -cert, -certificate include certificates in json output (PEM format) -tc, -tls-chain include certificates chain in json output -vc, -verify-cert enable verification of server certificate -ob, -openssl-binary string OpenSSL Binary Path -hf, -hardfail strategy to use if encountered errors while checking revocation status -proxy string socks5 proxy to use for tlsx
OPTIMIZATIONS: -c, -concurrency int number of concurrent threads to process (default 300) -cec, -cipher-concurrency int cipher enum concurrency for each target (default 10) -timeout int tls connection timeout in seconds (default 5) -retry int number of retries to perform for failures (default 3) -delay string duration to wait between each connection per thread (eg: 200ms, 1s)
UPDATE: -up, -update update tlsx to latest version -duc, -disable-update-check disable automatic tlsx update check
OUTPUT: -o, -output string file to write output to -j, -json display output in jsonline format -dns display unique hostname from SSL certificate response -ro, -resp-only display tls response only -silent display silent output -nc, -no-color disable colors in cli output -v, -verbose display verbose output -version display project version
PDCP: -pd, -dashboard upload or view output in the PDCP UI dashboard -pdu, -dashboard-upload string upload tlsx output file (JSONL format) to the PDCP UI dashboard -auth string PDCP API key for authentication -tid, -team-id string upload asset results to a specified team ID -aid, -asset-id string upload new assets to an existing asset ID -aname, -asset-name string asset group name
DEBUG: -health-check, -hc run diagnostic check up
## Using tlsx as library
tlsx를 라이브러리로 사용하는 예제는 [examples](https://github.com/projectdiscovery/tlsx/blob/HEAD/examples/) 폴더에서 제공됩니다.
## Running tlsx
### Input for tlsx
**tlsx**는 TLS 연결을 위해 **ip**가 필요하며, 아래 나열된 것처럼 여러 형식을 허용합니다:```bash
AS1449 # ASN input
173.0.84.0/24 # CIDR input
93.184.216.34 # IP input
example.com # DNS input
example.com:443 # DNS input with port
https://example.com:443 # URL input port
입력 호스트는 -host / -u 플래그를 사용하여 제공할 수 있으며, 여러 값을 쉼표로 구분된 입력으로 제공할 수 있습니다. 마찬가지로 파일 입력은 -list / -l 플래그를 사용하여 지원됩니다.
쉼표로 구분된 호스트 입력 예시:```console $ tlsx -u 93.184.216.34,example.com,example.com:443,https://example.com:443 -silent
파일 기반 호스트 입력의 예:```console
$ tlsx -list host_list.txt
포트 입력:
tlsx는 기본적으로 443 포트에 연결되며, -port / -p 플래그를 사용하여 사용자 정의할 수 있습니다. 단일 또는 여러 포트는 쉼표로 구분된 입력 또는 연결할 포트 목록이 포함된 줄바꿈 구분 파일을 사용하여 지정할 수 있습니다.
쉼표로 구분된 포트 입력 예:``` $ tlsx -u hackerone.com -p 443,8443
파일 기반 포트 입력 예시:```
$ tlsx -u hackerone.com -p port_list.txt
참고:
입력 호스트에 포트가 포함된 경우(예:
8.8.8.8:443또는hackerone.com:8443), 호스트와 함께 지정된 포트가 기본 포트 또는-port / -p플래그로 제공된 포트 대신 TLS 연결에 사용됩니다.
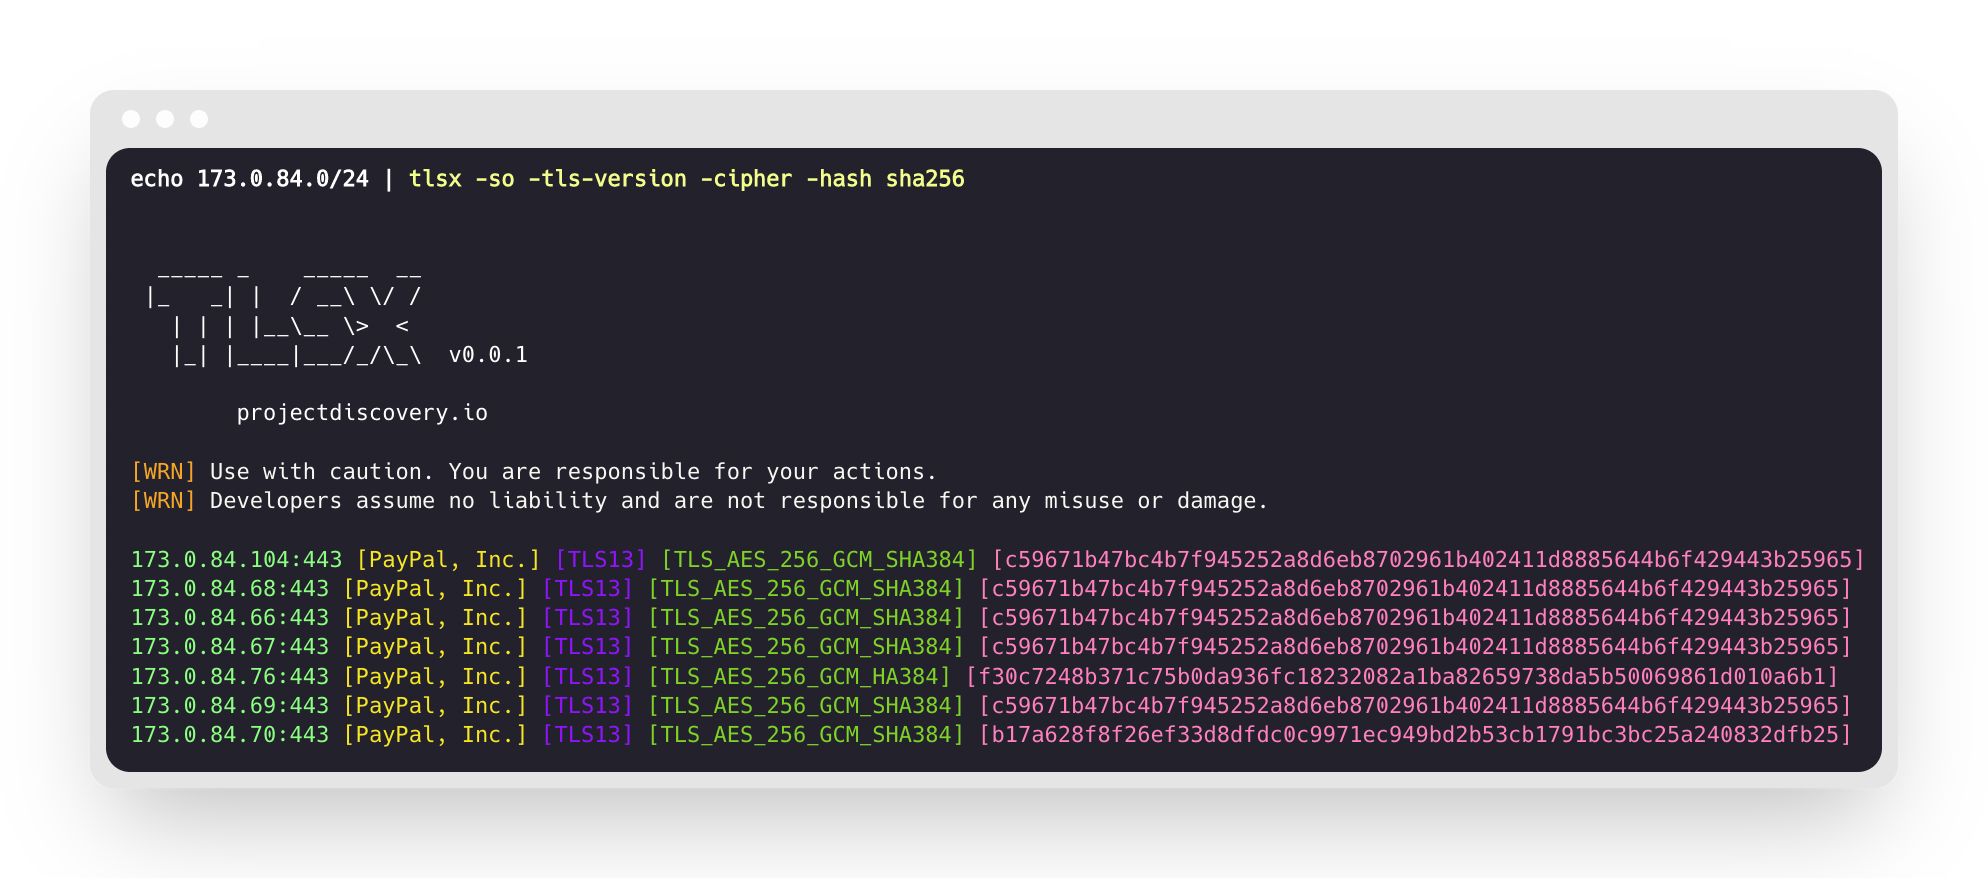
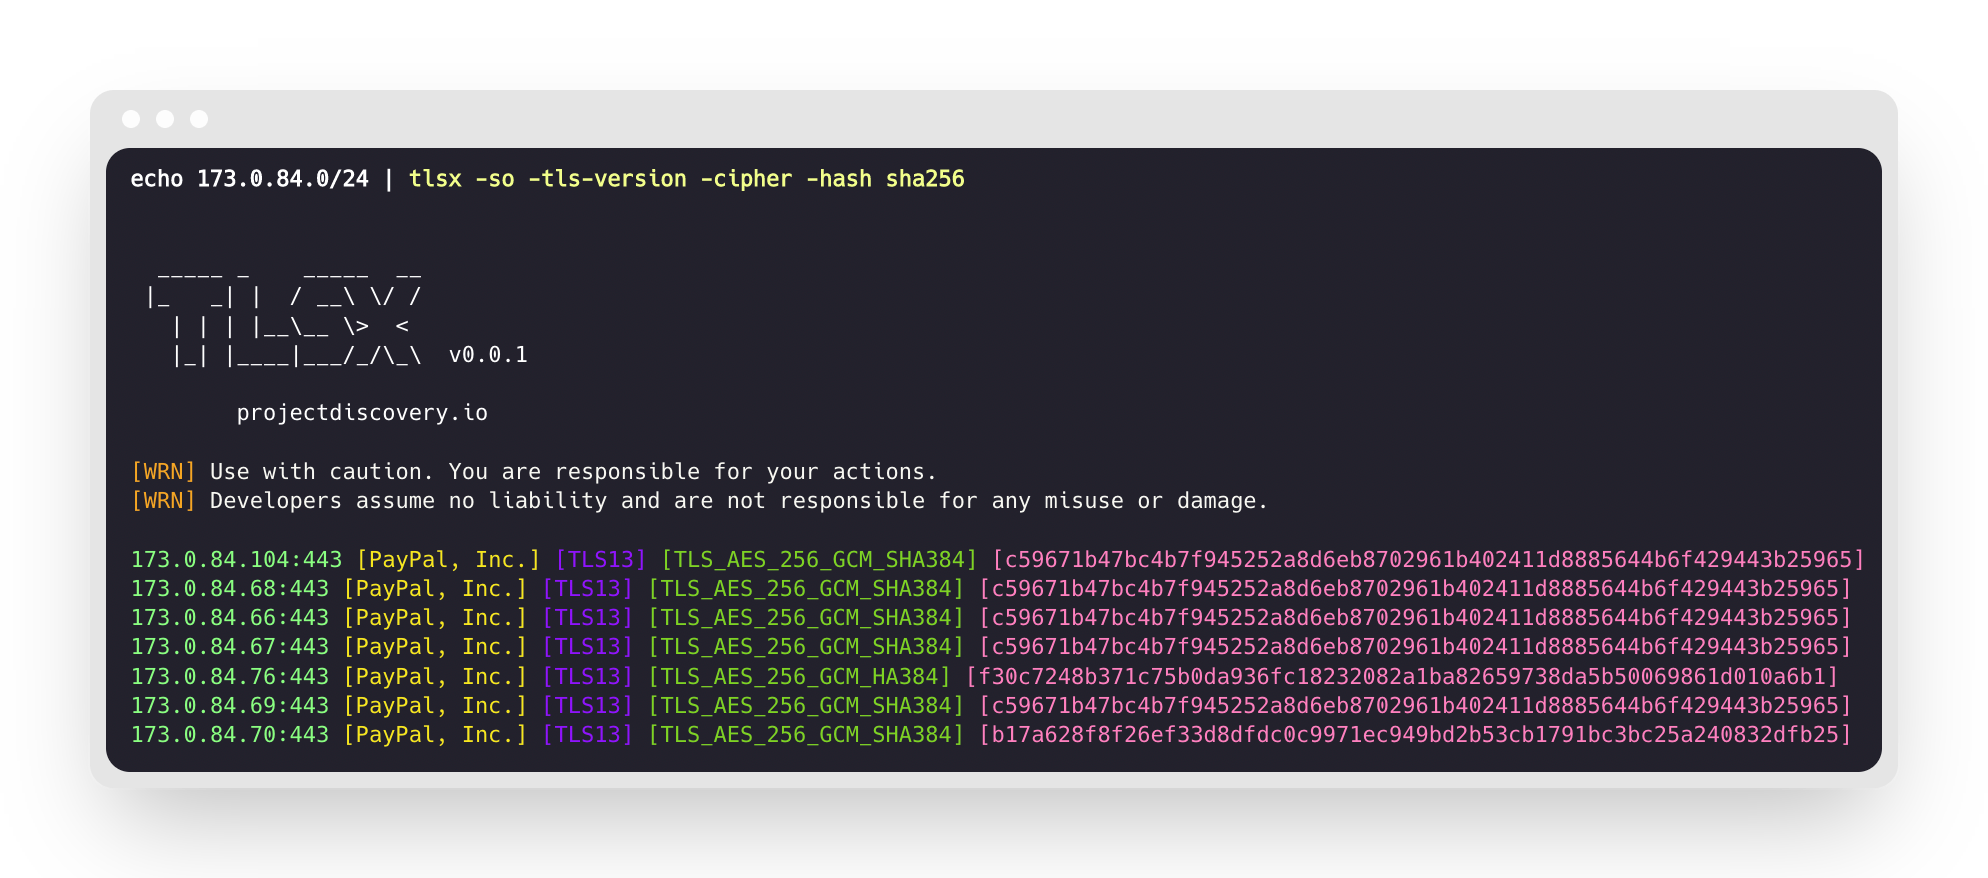
이 도구는 주어진 CIDR 범위에 대해 실행되어 포트 443에서 TLS 연결을 허용하는 호스트를 반환합니다.```console $ echo 173.0.84.0/24 | tlsx
|_ | | / \ / / | | | |_ > < || ||/_/_\ v0.0.1
projectdiscovery.io
[WRN] Use with caution. You are responsible for your actions. [WRN] Developers assume no liability and are not responsible for any misuse or damage.
173.0.84.69:443 173.0.84.67:443 173.0.84.68:443 173.0.84.66:443 173.0.84.76:443 173.0.84.70:443 173.0.84.72:443
### SAN/CN 프로브
TLS 인증서에는 **subject alternative name** 및 **common name** 필드 아래에 DNS 이름이 포함되어 있으며, `-san`, `-cn` 플래그를 사용하여 추출할 수 있습니다.```console
$ echo 173.0.84.0/24 | tlsx -san -cn -silent
173.0.84.104:443 [uptycspay.paypal.com]
173.0.84.104:443 [api-3t.paypal.com]
173.0.84.104:443 [api-m.paypal.com]
173.0.84.104:443 [payflowpro.paypal.com]
173.0.84.104:443 [pointofsale-s.paypal.com]
173.0.84.104:443 [svcs.paypal.com]
173.0.84.104:443 [uptycsven.paypal.com]
173.0.84.104:443 [api-aa.paypal.com]
173.0.84.104:443 [pilot-payflowpro.paypal.com]
173.0.84.104:443 [pointofsale.paypal.com]
173.0.84.104:443 [uptycshon.paypal.com]
173.0.84.104:443 [api.paypal.com]
173.0.84.104:443 [adjvendor.paypal.com]
173.0.84.104:443 [zootapi.paypal.com]
173.0.84.104:443 [api-aa-3t.paypal.com]
173.0.84.104:443 [uptycsize.paypal.com]
자동화의 편의를 위해, 선택적으로 -resp-only 플래그를 사용하여 CLI 출력에서 DNS 이름만 나열할 수 있습니다.```console
$ echo 173.0.84.0/24 | tlsx -san -cn -silent -resp-only
api-aa-3t.paypal.com pilot-payflowpro.paypal.com pointofsale-s.paypal.com uptycshon.paypal.com a.paypal.com adjvendor.paypal.com zootapi.paypal.com api-aa.paypal.com payflowpro.paypal.com pointofsale.paypal.com uptycspay.paypal.com api-3t.paypal.com uptycsize.paypal.com api.paypal.com api-m.paypal.com svcs.paypal.com uptycsven.paypal.com uptycsven.paypal.com a.paypal.com api.paypal.com pointofsale-s.paypal.com pilot-payflowpro.paypal.com
**하위 도메인** TLS 인증서에서 얻은 **하위 도메인**은 추가 검사를 위해 다른 PD 도구로 파이프할 수 있습니다. 다음은 TLS 하위 도메인을 **[dnsx](https://github.com/projectdiscovery/dnsx)**로 파이프하여 패시브 하위 도메인을 필터링하고, 이를 **[httpx](https://github.com/projectdiscovery/httpx)**로 전달하여 활성 웹 서비스를 실행 중인 호스트를 나열하는 예입니다.```console
$ echo 173.0.84.0/24 | tlsx -san -cn -silent -resp-only | dnsx -silent | httpx
__ __ __ _ __
/ /_ / /_/ /_____ | |/ /
/ __ \/ __/ __/ __ \| /
/ / / / /_/ /_/ /_/ / |
/_/ /_/\__/\__/ .___/_/|_|
/_/ v1.2.2
projectdiscovery.io
Use with caution. You are responsible for your actions.
Developers assume no liability and are not responsible for any misuse or damage.
https://api-m.paypal.com
https://uptycsize.paypal.com
https://api.paypal.com
https://uptycspay.paypal.com
https://svcs.paypal.com
https://adjvendor.paypal.com
https://uptycshap.paypal.com
https://uptycshon.paypal.com
https://pilot-payflowpro.paypal.com
https://slc-a-origin-pointofsale.paypal.com
https://uptycsven.paypal.com
https://api-aa.paypal.com
https://api-aa-3t.paypal.com
https://uptycsbrt.paypal.com
https://payflowpro.paypal.com
http://pointofsale-s.paypal.com
http://slc-b-origin-pointofsale.paypal.com
http://api-3t.paypal.com
http://zootapi.paypal.com
http://pointofsale.paypal.com
$ subfinder -d hackerone.com | tlsx -tls-version -cipher
mta-sts.hackerone.com:443 [TLS1.3] [TLS_AES_128_GCM_SHA256] hackerone.com:443 [TLS1.3] [TLS_AES_128_GCM_SHA256] api.hackerone.com:443 [TLS1.3] [TLS_AES_128_GCM_SHA256] mta-sts.managed.hackerone.com:443 [TLS1.3] [TLS_AES_128_GCM_SHA256] mta-sts.forwarding.hackerone.com:443 [TLS1.3] [TLS_AES_128_GCM_SHA256] www.hackerone.com:443 [TLS1.3] [TLS_AES_128_GCM_SHA256] support.hackerone.com:443 [TLS1.2] [TLS_ECDHE_RSA_WITH_AES_128_GCM_SHA256]
# TLS 구성 오류
### 만료 / 자체 서명 / 불일치 / 폐기 / 신뢰할 수 없는 인증서
호스트 목록을 tlsx에 제공하여 **만료 / 자체 서명 / 불일치 / 폐기 / 신뢰할 수 없는** 인증서를 탐지할 수 있습니다.```console
$ tlsx -l hosts.txt -expired -self-signed -mismatched -revoked -untrusted
_____ _ _____ __
|_ _| | / __\ \/ /
| | | |__\__ \> <
|_| |____|___/_/\_\ v0.0.1
projectdiscovery.io
[WRN] Use with caution. You are responsible for your actions.
[WRN] Developers assume no liability and are not responsible for any misuse or damage.
wrong.host.badssl.com:443 [mismatched]
self-signed.badssl.com:443 [self-signed]
expired.badssl.com:443 [expired]
revoked.badssl.com:443 [revoked]
untrusted-root.badssl.com:443 [untrusted]
$ echo hackerone.com | tlsx -jarm -silent
hackerone.com:443 [29d3dd00029d29d00042d43d00041d5de67cc9954cc85372523050f20b5007]
### [JA3](https://github.com/salesforce/ja3) TLS 지문```console
$ echo hackerone.com | tlsx -ja3 -silent
hackerone.com:443 [20c9baf81bfe96ff89722899e75d0190]
tlsx는 특정 데이터를 쿼리하기 위해 여러 프로브 플래그를 지원하지만, 모든 정보는 항상 JSON 형식으로 제공됩니다. 자동화 및 후처리를 위해서는 -json 출력을 사용하는 것이 가장 편리한 옵션입니다.```console
echo example.com | tlsx -json -silent | jq .
I don't see any content provided after "INPUT:" — the chunk text appears to be missing, so there is nothing to translate. Please provide the chunk content.```json
{
"timestamp": "2022-08-22T21:22:59.799053+05:30",
"host": "example.com",
"ip": "93.184.216.34",
"port": "443",
"probe_status": true,
"tls_version": "tls13",
"cipher": "TLS_AES_256_GCM_SHA384",
"not_before": "2022-03-14T00:00:00Z",
"not_after": "2023-03-14T23:59:59Z",
"subject_dn": "CN=www.example.org, O=Internet Corporation for Assigned Names and Numbers, L=Los Angeles, ST=California, C=US",
"subject_cn": "www.example.org",
"subject_org": [
"Internet Corporation for Assigned Names and Numbers"
],
"subject_an": [
"www.example.org",
"example.net",
"example.edu",
"example.com",
"example.org",
"www.example.com",
"www.example.edu",
"www.example.net"
],
"issuer_dn": "CN=DigiCert TLS RSA SHA256 2020 CA1, O=DigiCert Inc, C=US",
"issuer_cn": "DigiCert TLS RSA SHA256 2020 CA1",
"issuer_org": [
"DigiCert Inc"
],
"fingerprint_hash": {
"md5": "c5208a47259d540a6e3404dddb85af91",
"sha1": "df81dfa6b61eafdffffe1a250240db5d2e6cee25",
"sha256": "7f2fe8d6b18e9a47839256cd97938daa70e8515750298ddba2f3f4b8440113fc"
},
"tls_connection": "ctls",
"sni": "example.com"
}
tlsx는 스캔 결과를 ProjectDiscovery Cloud Platform(PDCP) 대시보드에 업로드하여 시각화 및 분석을 지원합니다.
결과가 발견되는 즉시 자동으로 업로드되도록 대시보드 업로드를 활성화하세요:```console $ tlsx -u example.com -pd -json
결과는 PDCP에 자동으로 업로드되며, 확인할 수 있는 대시보드 URL을 받게 됩니다.
#### 기존 파일 업로드
이전에 저장된 JSONL 출력 파일을 PDCP에 업로드하세요:```console
$ tlsx -pdu results.jsonl -tid your-team-id -aname "My Scan"
-pd, --dashboard: PDCP 대시보드로 실시간 업로드 활성화-pdu, --dashboard-upload <file>: 특정 JSONL 파일을 PDCP에 업로드-auth <key>: PDCP API 키 (환경 변수 또는 자격 증명 처리기를 통해서도 설정 가능)-tid, --team-id <id>: 업로드용 팀 ID 지정-aid, --asset-id <id>: 기존 자산 ID에 업로드-aname, --asset-name <name>: 자산 그룹의 사용자 지정 이름 설정모든 옵션 사용 예시:```console $ tlsx -u example.com -pd -json -tid team123 -aname "Production Scan"
## 구성
### 스캔 모드
tlsx는 TLS 연결을 위해 여러 모드를 제공합니다 -
- `auto` (실패 시 다른 모드로 자동 폴백) - **기본값**
- `ctls` (**[crypto/tls](https://github.com/golang/go/blob/master/src/crypto/tls/tls.go)**)
- `ztls` (**[zcrypto/tls](https://github.com/zmap/zcrypto)**)
- `openssl` (**[openssl](https://github.com/openssl/openssl)**)
특정 모드/라이브러리에 대한 몇 가지 참고 사항은 [링크된 논의](https://github.com/projectdiscovery/tlsx/discussions/2)에서 강조되어 있습니다. `auto` 모드는 최대 적용 범위를 보장하고 이전 버전의 TLS를 실행하는 호스트를 스캔하기 위해 지원되며, 연결 오류 발생 시 `ztls` 및 `openssl` 모드를 사용하여 연결을 재시도합니다.
`ztls` 모드를 사용하여 오래된/구식 TLS 버전을 사용하는 웹사이트를 스캔하는 예시입니다.```console
$ echo tls-v1-0.badssl.com | tlsx -port 1010 -sm ztls
_____ _ _____ __
|_ _| | / __\ \/ /
| | | |__\__ \> <
|_| |____|___/_/\_\ v0.0.1
projectdiscovery.io
[WRN] Use with caution. You are responsible for your actions.
[WRN] Developers assume no liability and are not responsible for any misuse or damage.
tls-v1-0.badssl.com:1010
openssl 연결 모드를 사용하려면 시스템에 openssl이 설치되어 있어야 합니다. 대부분의 최신 시스템에는 openssl이 사전 설치되어 있지만, 시스템에 없는 경우 수동으로 설치할 수 있습니다. openssl version 명령을 실행하여 openssl이 설치되어 있는지 확인할 수 있습니다. openssl이 설치되어 있다면 이 명령은 버전 번호를 표시합니다.
Pre-Handshake (조기 종료)tlsx는 SSL 연결을 조기에 종료하는 것을 지원하여 더 빠른 스캔과 더 적은 연결 요청(TLS 자세한 내용은 @erbbysam이 작성한 Hunting-Certificates-And-Servers를 참조하십시오. |
|_ | | / \ / / | | | |_ > < || ||/_/_\ v0.0.1
projectdiscovery.io
[WRN] Use with caution. You are responsible for your actions. [WRN] Developers assume no liability and are not responsible for any misuse or damage.
example.com:443
> **참고**:
> **pre-handshake** 모드는 `ztls` (**zcrypto/tls**)를 활용하며, 이는 `ztls` 라이브러리가 `TLS v1.3`을 지원하지 않으므로 지원 범위가 `TLS v1.2`까지로 제한된다는 의미이기도 합니다.
</table>
</tr>
</td>
### TLS 버전
**최소** 및 **최대** TLS 버전은 `-min-version` 및 `-max-version` 플래그를 사용하여 지정할 수 있으며, 기본적으로 이 값은 사용 중인 기본 라이브러리에 의해 설정됩니다.
TLS 버전에 허용되는 값은 아래와 같습니다.
- `ssl30`
- `tls10`
- `tls11`
- `tls12`
- `tls13`
다음은 `max-version`을 사용하여 이전 버전의 TLS, 즉 **TLS v1.0**을 지원하는 호스트를 스캔하는 예입니다.```console
$ tlsx -u example.com -max-version tls10
_____ _ _____ __
|_ _| | / __\ \/ /
| | | |__\__ \> <
|_| |____|___/_/\_\ v0.0.1
projectdiscovery.io
[WRN] Use with caution. You are responsible for your actions.
[WRN] Developers assume no liability and are not responsible for any misuse or damage.
example.com:443
지원되는 사용자 지정 암호는 -cipher-input / -ci 플래그를 사용하여 제공할 수 있으며, 각 모드에 대해 지원되는 암호 목록은 위키 페이지에서 확인할 수 있습니다.```console
$ tlsx -u example.com -ci TLS_AES_256_GCM_SHA384 -cipher
Please provide the Markdown content to translate.```console
$ tlsx -u example.com -ci cipher_list.txt -cipher
이 프로그램은 선택적으로 다음을 사용합니다:
tlsx는 projectdiscovery 팀이 ❤️로 만들었으며 MIT License 하에 배포됩니다.
tlsx는 공개 인증서 투명성 생태계에서 새로 발급된 TLS 인증서를 지속적으로 스트리밍하는 fire-hose 모드로 작동하여 호스트 이름과 메타데이터를 거의 실시간으로 제공할 수 있습니다.
-ctl 스위치를 통해 CT 로그 모드를 활성화합니다(입력이 제공되지 않을 때 기본값):```bash
tlsx -ctl -silent | jq .subject_an
#### 시작 오프셋
이 도구는 다음 플래그로 제어되는 세 가지 상호 배타적인 시작 동작을 제공합니다:
| Flag | 동작 |
|------|-----------|
| _default_ | 지금 **시작** (시작 시 트리 크기) – 미래 인증서만 스트리밍됩니다 |
| `-cb, --ctl-beginning` | 모든 로그에 대해 인덱스 **0**부터 시작 (전체 기록 재생) |
| `-cti, --ctl-index <log>=<n>` | 사용자 지정 로그별 인덱스 (반복 가능). 지정된 로그 URL/ID에 대해 시작 인덱스를 _n_으로 설정합니다. 예: `--ctl-index https://ct.googleapis.com/logs/argon2023=123456` |```bash
# Replay the entire history
$ tlsx -ctl -cb -silent > all_certs.jsonl
# Resume at custom positions for two logs
$ tlsx -ctl -cti https://ct.googleapis.com/logs/argon2023=987654 -cti cloudflare-nimbus2024=543210 \
-silent | jq -r .ct_source
기본적으로 중복 항목은 대규모 inverse bloom filter를 사용하여 필터링됩니다. -v를 전달하면 상세 통계를 확인할 수 있습니다.
-pre-handshake 모드를 사용하는 예시: