 oros42/imsi-catcher
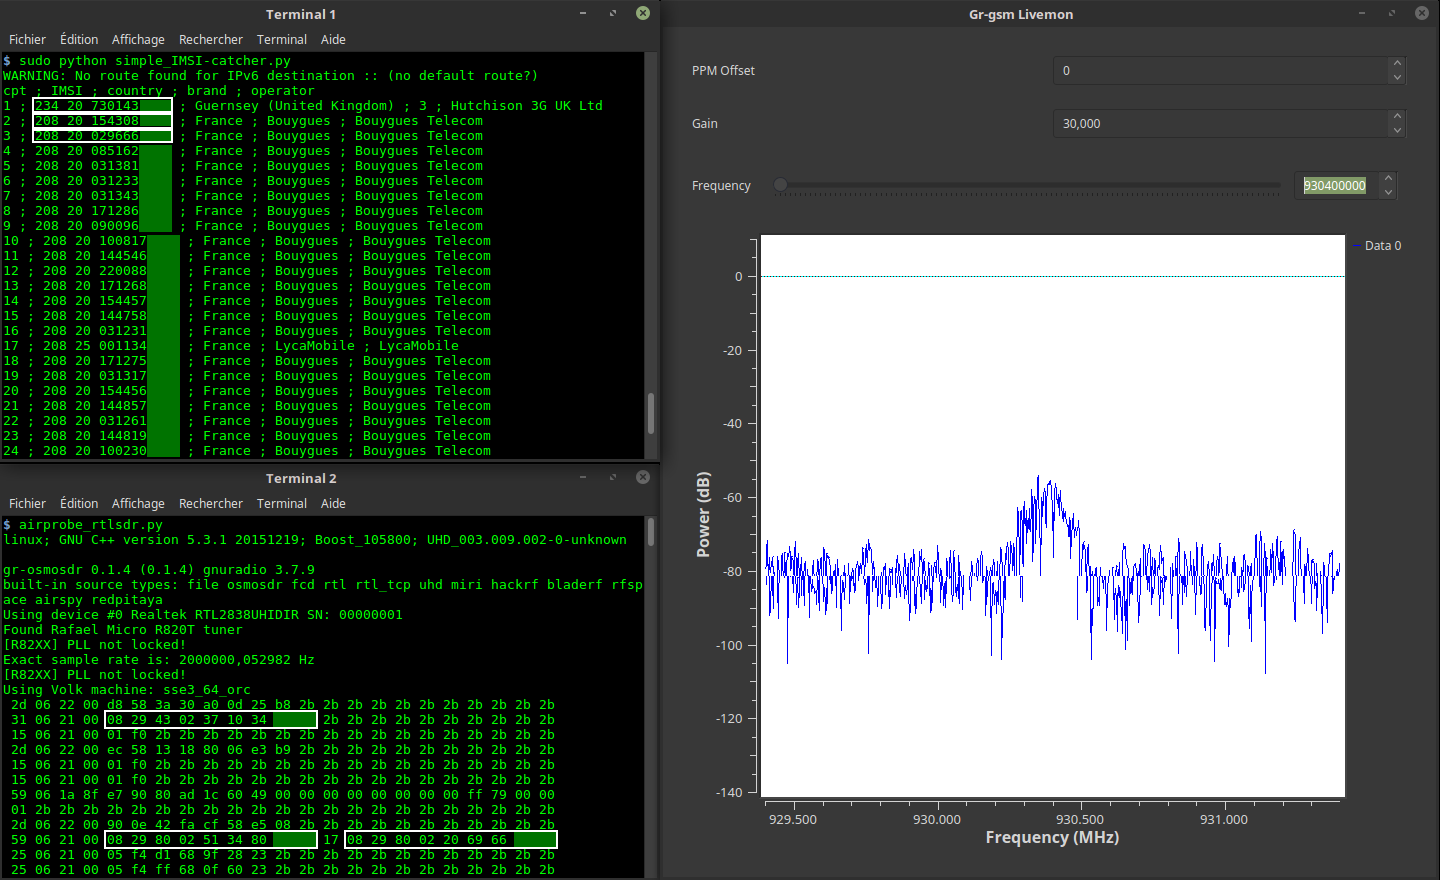
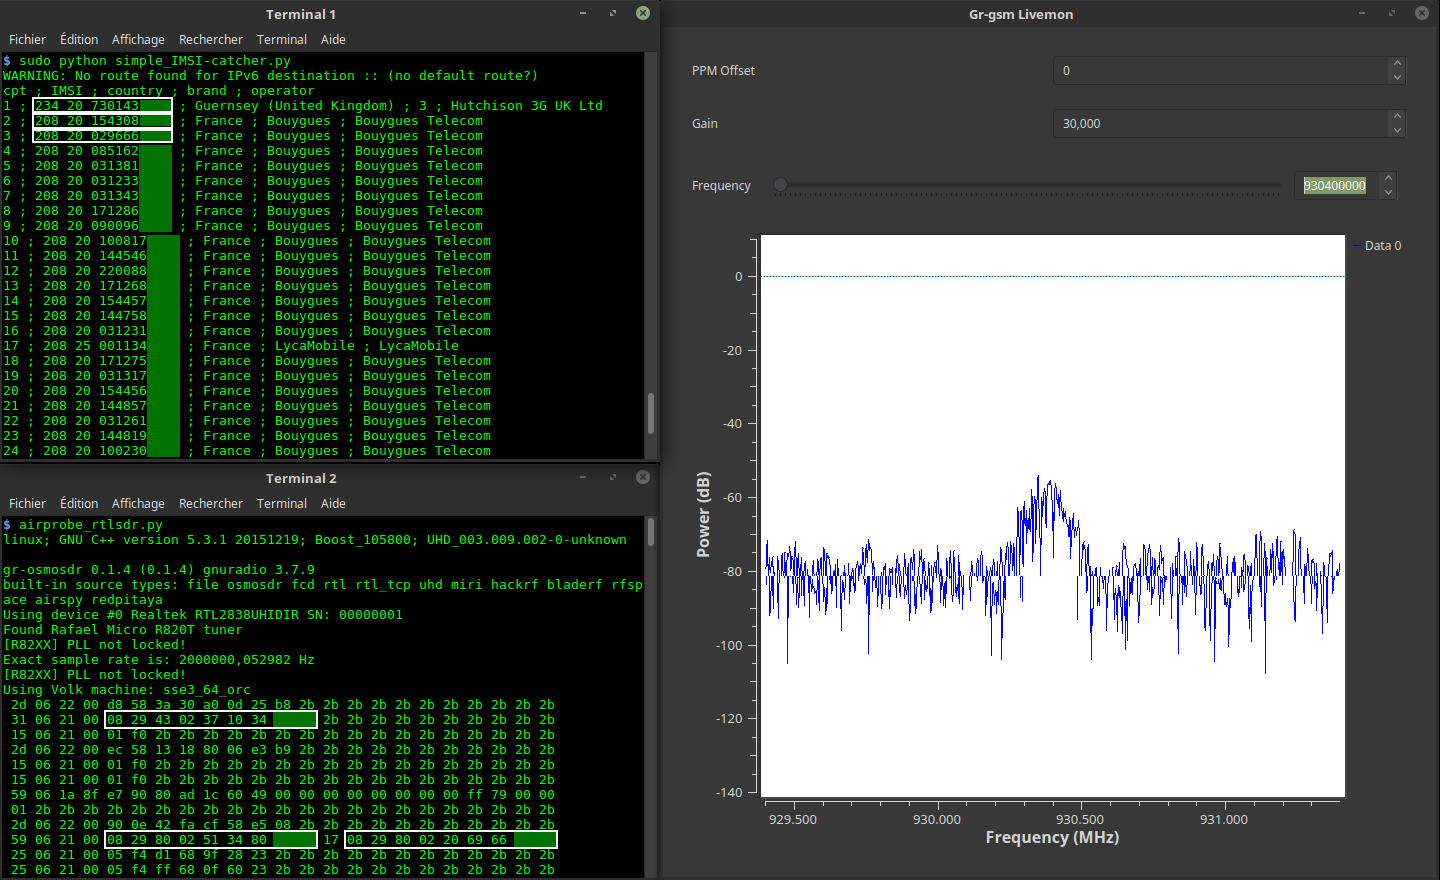
이 프로그램은 주변 휴대폰의 IMSI 번호를 보여줍니다.

이 프로그램은 주변 휴대전화의 IMSI 번호, 국가, 브랜드 및 통신사를 보여줍니다.
/!\ 이 프로그램은 GSM 네트워크 작동 방식을 이해하기 위해 만들어졌습니다. 나쁜 해킹을 위한 것이 아닙니다!
Gnu/Linux가 설치된 PC 1대. 다음에서 테스트 완료:
SDR 수신기 1대. 다음에서 테스트 완료:
git clone https://github.com/Oros42/IMSI-catcher.git
cd IMSI-catcher
또는
wget https://github.com/Oros42/IMSI-catcher/archive/master.zip && unzip -q master.zip
cd IMSI-catcher-master
sudo apt install python3-numpy python3-scipy python3-scapy gr-gsm
경고 : python 3.9를 사용하지 마세요 (ctypes 버그)!
Python 3.1부터 Imp는 importlib로 대체되었습니다. Imp는 Python 3.11에서 더 이상 사용되지 않으며, 새로운 요구 사항은 다음과 같이 충족됩니다.
apt install python3-pip
pip install importlib
sudo xhost +local:docker
docker pull atomicpowerman/imsi-catcher
docker run -ti --net=host -e DISPLAY=$DISPLAY --privileged -v /dev/bus/usb:/dev/bus/usb  atomicpowerman/imsi-catcher bash
이 도커에서 모든 grgsm_*를 실행하세요.
GSM 신호를 디코딩하기 위해 grgsm_livemon을 사용하고 IMSI를 찾기 위해 simple_IMSI-catcher.py를 사용합니다.
python3 simple_IMSI-catcher.py -h
Usage: simple_IMSI-catcher.py: [options]

Options:
  -h, --help            show this help message and exit
  -a, --alltmsi         Show TMSI who haven't got IMSI (default  : false)
  -i IFACE, --iface=IFACE
                        Interface (default : lo)
  -m IMSI, --imsi=IMSI  IMSI to track (default : None, Example:
                        123456789101112 or "123 45 6789101112")
  -p PORT, --port=PORT  Port (default : 4729)
  -s, --sniff           sniff on interface instead of listening on port
                        (require root/suid access)
  -w SQLITE, --sqlite=SQLITE
                        Save observed IMSI values to specified SQLite file
  -t TXT, --txt=TXT     Save observed IMSI values to specified TXT file
  -z, --mysql           Save observed IMSI values to specified MYSQL DB (copy
                        .env.dist to .env and edit it)
2개의 터미널을 엽니다.
터미널 1에서
sudo python3 simple_IMSI-catcher.py -s
터미널 2에서
grgsm_livemon
이제 터미널에 다음과 같은 내용이 표시될 때까지 주파수를 변경하세요:
15 06 21 00 01 f0 2b 2b 2b 2b 2b 2b 2b 2b 2b 2b 2b 2b 2b 2b 2b 2b 2b
25 06 21 00 05 f4 f8 68 03 26 23 2b 2b 2b 2b 2b 2b 2b 2b 2b 2b 2b 2b
49 06 1b 95 cc 02 f8 02 01 9c c8 03 1e 57 a5 01 79 00 00 1c 13 2b 2b
Wireshark로 GSM 패킷을 볼 수 있습니다.
sudo apt install wireshark
sudo wireshark -k -Y '!icmp && gsmtap' -i lo
grgsm_scanner
ARFCN:  974, Freq:  925.0M, CID:     2, LAC:   1337, MCC: 208, MNC:  20, Pwr: -41
ARFCN:  976, Freq:  925.4M, CID:  4242, LAC:   1007, MCC: 208, MNC:  20, Pwr: -45
이제 grgsm_livemon의 주파수를 설정할 수 있습니다:
grgsm_livemon -f 925.4M
또는 HackRF의 경우 다음과 같이 kalibrate-hackrf 도구를 가져옵니다:
sudo apt-get install automake autoconf libhackrf-dev
git clone https://github.com/scateu/kalibrate-hackrf
cd kalibrate-hackrf/
./bootstrap
./configure
make
sudo make install
실행
kal -s GSM900
kal: Scanning for GSM-900 base stations.
GSM-900:
	chan:   14 (937.8MHz + 10.449kHz)	power: 3327428.82
	chan:   15 (938.0MHz + 4.662kHz)	power: 3190712.41
...
db-example.sql을 사용하여 데이터베이스를 생성하세요.
cp .env.dist .env
nano .env
# set your config
sudo apt install python-decouple python3-mysqldb
sudo python3 simple_IMSI-catcher.py -s --mysql
주파수를 스캔하고 처음 발견된 주파수를 청취합니다:
터미널 1에서
python3 scan-and-livemon
터미널 2에서
python3 simple_IMSI-catcher.py
Gr-Gsm 설정: https://osmocom.org/projects/gr-gsm/wiki/Installation and https://github.com/velichkov/gr-gsm
주파수: http://www.worldtimezone.com/gsm.html and https://fr.wikipedia.org/wiki/Global_System_for_Mobile_Communications
이동 통신망 코드: https://en.wikipedia.org/wiki/Mobile_Network_Code
Scapy: http://secdev.org/projects/scapy/doc/usage.html
IMSI: https://fr.wikipedia.org/wiki/IMSI
Realtek RTL2832U: https://osmocom.org/projects/sdr/wiki/rtl-sdr and http://doc.ubuntu-fr.org/rtl2832u and http://doc.ubuntu-fr.org/rtl-sdr
제 작업을 지원하려면 팁이 좋을 것입니다 ;-)
https://liberapay.com/Oros/
