
Skip to content
KitploitKITPLOIT
도구블로그
제출
도구블로그
제출

해킹, 침투 테스트 및 사이버 보안 도구를 당신의 보안 무기고에!

Kitploit은 해킹, 사이버 보안 및 침투 테스트 도구 디렉토리입니다. 최신 프로젝트 업데이트를 발견하여 취약점을 찾고, 시스템을 분석하고, 테스트를 자동화하고, 보안을 강화하세요.

··피드·문의·개인정보·© 2026 Kitploit

도구 디렉토리

카테고리

모든 카테고리 보기
Loading categories
netlas-cookbook — 이 가이드의 목표는 매우 간단합니다. 사이버 보안에 관심이 있는 사람이라면 누구든, 지식 수준에 관계없이 Netlas.io를 최대한 활용하는 방법을 가르치는 것입니다. | Kitploit
도구/GitHubGitHub/netlas-io/netlas-cookbook
OSINT (Open Source Intelligence)ReconnaissanceIoT SecurityVulnerability AnalysisInformation GatheringWeb SecurityDigital ForensicsPenetration TestingThreat IntelligenceLearning & EducationCurated ResourcesLearning Paths & Courses
8881051년 전Kitploit 검토 완료

인기

모두 보기 →

커뮤니티에서 가장 많이 사용되는 도구를 찾아보세요.

모든 도구 탐색

도구 컬렉션을 둘러보세요

모든 도구 보기 →
공유
GitHubnetlas-io/netlas-cookbook

netlas-cookbook

이 가이드의 목표는 매우 간단합니다. 사이버 보안에 관심이 있는 사람이라면 누구든, 지식 수준에 관계없이 Netlas.io를 최대한 활용하는 방법을 가르치는 것입니다.

저장소 보기

Netlas 요리책

GitHub stars GitHub forks


이 가이드의 목표는 사이버 보안에 관심 있는 모든 사람이 지식 수준에 관계없이 Netlas 검색 도구를 최대한 활용할 수 있도록 하는 것입니다. 긴 내용입니다. 가능한 한 많은 간단한 사용 사례를 모았으며 이를 자동화하는 방법을 보여드립니다.

⭐️ 감사의 표시로 별표를 눌러주세요.
👁️ 업데이트를 구독하세요.

Netlas는 인터넷에서 사용 가능한 모든 IP 주소와 도메인에 대한 정보를 찾고 분석하기 위해 설계된 검색 엔진입니다. Netlas에는 몇 가지 공격 표면 관리 기능이 있지만, 이 가이드는 주로 Netlas 검색 도구와 이를 자동화에 사용하는 방법에 초점을 맞춥니다.

목차

  • 간단한 사용 예
    • IP 또는 도메인 정보 가져오기
    • 비라틴 도메인 검색
    • 제목에 특정 단어가 포함된 웹사이트 찾기
  • 검색 쿼리 구문
    • 필터(필드)
    • 논리 연산자
    • 범위
    • 와일드카드
    • 퍼지 검색
    • 정규 표현식
    • 기타 Netlas.io 검색 기능
  • API 요청
    • API 키를 찾는 방법?
    • API 요청 디버깅 도구
    • Netlas API JSON 응답 구조
    • JSON 형식 데이터 작업 도구
    • Netlas Python 라이브러리
    • 유용한 데이터를 얻기 위한 응답 키 예제
    • Netlas Python 응답 데이터 유형
    • Netlas CLI 도구
    • 검색 vs 다운로드 vs 호스트 메서드
    • 추가 요청 매개변수
    • Python으로 요청하기(Netlas Python 라이브러리 없이)
    • 다른 프로그래밍 언어 예제
    • JQ 유틸리티
    • 코드 작성을 위한 AI 도구
    • 코드 검사기
  • OSINT(오픈 소스 인텔리전스)에 Netlas.io 사용
    • WHOIS 연락처에서 개인 닉네임 또는 이메일 검색
    • 웹 페이지 제목 및 본문에서 개인 닉네임 또는 이메일 검색
    • 회사 웹사이트의 서브도메인에서 "Juicy Info Files" 검색
    • 전화번호 언급 검색
    • 파일 언급 검색(저작권을 침해할 수 있는 콘텐츠 찾기)
    • 도메인 WHOIS 정보 수집
    • <address> 태그 내 위치 검색
    • 메타 태그에서 작성자 이름 검색
    • HTML 문서의 메타 태그에서 어떤 흥미로운 것을 찾을 수 있나요?
    • FTP 서버 배너 텍스트로 검색
    • SSL 인증서에서 연락처 정보 검색
    • WayBack Machine의 대안으로 Netlas 사용
    • 관련 웹사이트 검색 9가지 방법
  • 스크래핑(웹 페이지 본문에서 데이터 추출)
    • Beautifulsoup 패키지
    • Re 패키지
    • 스크래핑을 위한 기타 Python 패키지
  • 암호 관련 조사에 Netlas.io 사용
    • 채굴 팜 검색
    • 암호화폐 채굴기에 감염된 웹사이트 검색
    • 취약한 비트코인 노드 검색
  • Neltas를 펜테스트에 사용
    • 서브도메인 검색
    • 특정 취약점이 있는 사이트 검색
    • 설명에 특정 단어가 포함된 취약점이 있는 사이트 검색
    • 서버 HTTP 헤더로 검색
    • 파비콘 해시로 취약한 서버 검색
    • 태그 이름으로 취약한 서버 검색
    • 가까운(또는 다른 위치의) 취약한 서버 및 장치 검색
    • 로그인/관리자 패널 검색
    • 취약한 데이터베이스 관리자 패널 검색
    • SQL 인젝션에 취약한 사이트 검색
  • IoT 검색: 9가지 기본 방법
    • 제목으로 검색
    • 본문 내 검색
    • 포트 번호로 검색
    • 배너로 검색
    • 파비콘으로 검색
    • 서버 헤더로 검색
    • 쿠키로 검색
    • 태그로 검색
    • 추가 검색 필터
  • 다크넷 연구에 Netlas.io 사용
    • Tor 종료 노드 검색
    • .onion 사이트 링크 수집
  • 파일, 백업 및 로그 디렉터리 검색
  • 디지털 포렌식 및 사고 대응에 Netlas.io 사용
    • SMTP 서버 정보 수집
    • 피싱에 사용될 가능성이 있는 도메인 검색
    • 파비콘 검색
    • 특정 서브넷과 연결된 도메인 검색
    • 악성 소프트웨어가 있는 서버 검색
  • 기술 및 코드 예제 검색
  • 재미 또는 Netstalking을 위한 Netlas.io 사용
  • 일반적인 문제
    • 오류 429 - 너무 빈번한 요청
    • KeyError
    • 요청 목록 작업 자동화
    • CSV 형식으로 데이터 저장
    • 다른 형식으로 데이터 저장
    • 퓨니코드 도메인 디코딩
    • 검색 쿼리가 결과를 반환하지 않으면 어떻게 하나요?
    • HTTP 본문에서 HTML 태그 제거
  • 공격 표면 관리
  • 매우 많은 양의 데이터 작업
  • 감사의 말

간단한 사용 예

Netlas는 여러 검색 도구를 포함합니다:

  • IP/도메인 정보 →
  • 응답 검색 →
  • DNS 검색 →
  • IP WHOIS 검색 →
  • 도메인 WHOIS 검색 →
  • 인증서 검색 →

주로 응답 검색(인터넷 스캔 결과)을 사용하지만, 모든 도구는 동일한 방식으로 작동합니다. 응답 검색 도구 사용법을 이해하면 다른 도구도 다룰 수 있습니다.

기술적 세부 사항을 살펴보기 전에 몇 가지 간단한 예제를 통해 Netlas.io가 어떻게 작동하는지 알아보겠습니다.
IP 또는 도메인 정보 가져오기

도메인 정보 수집

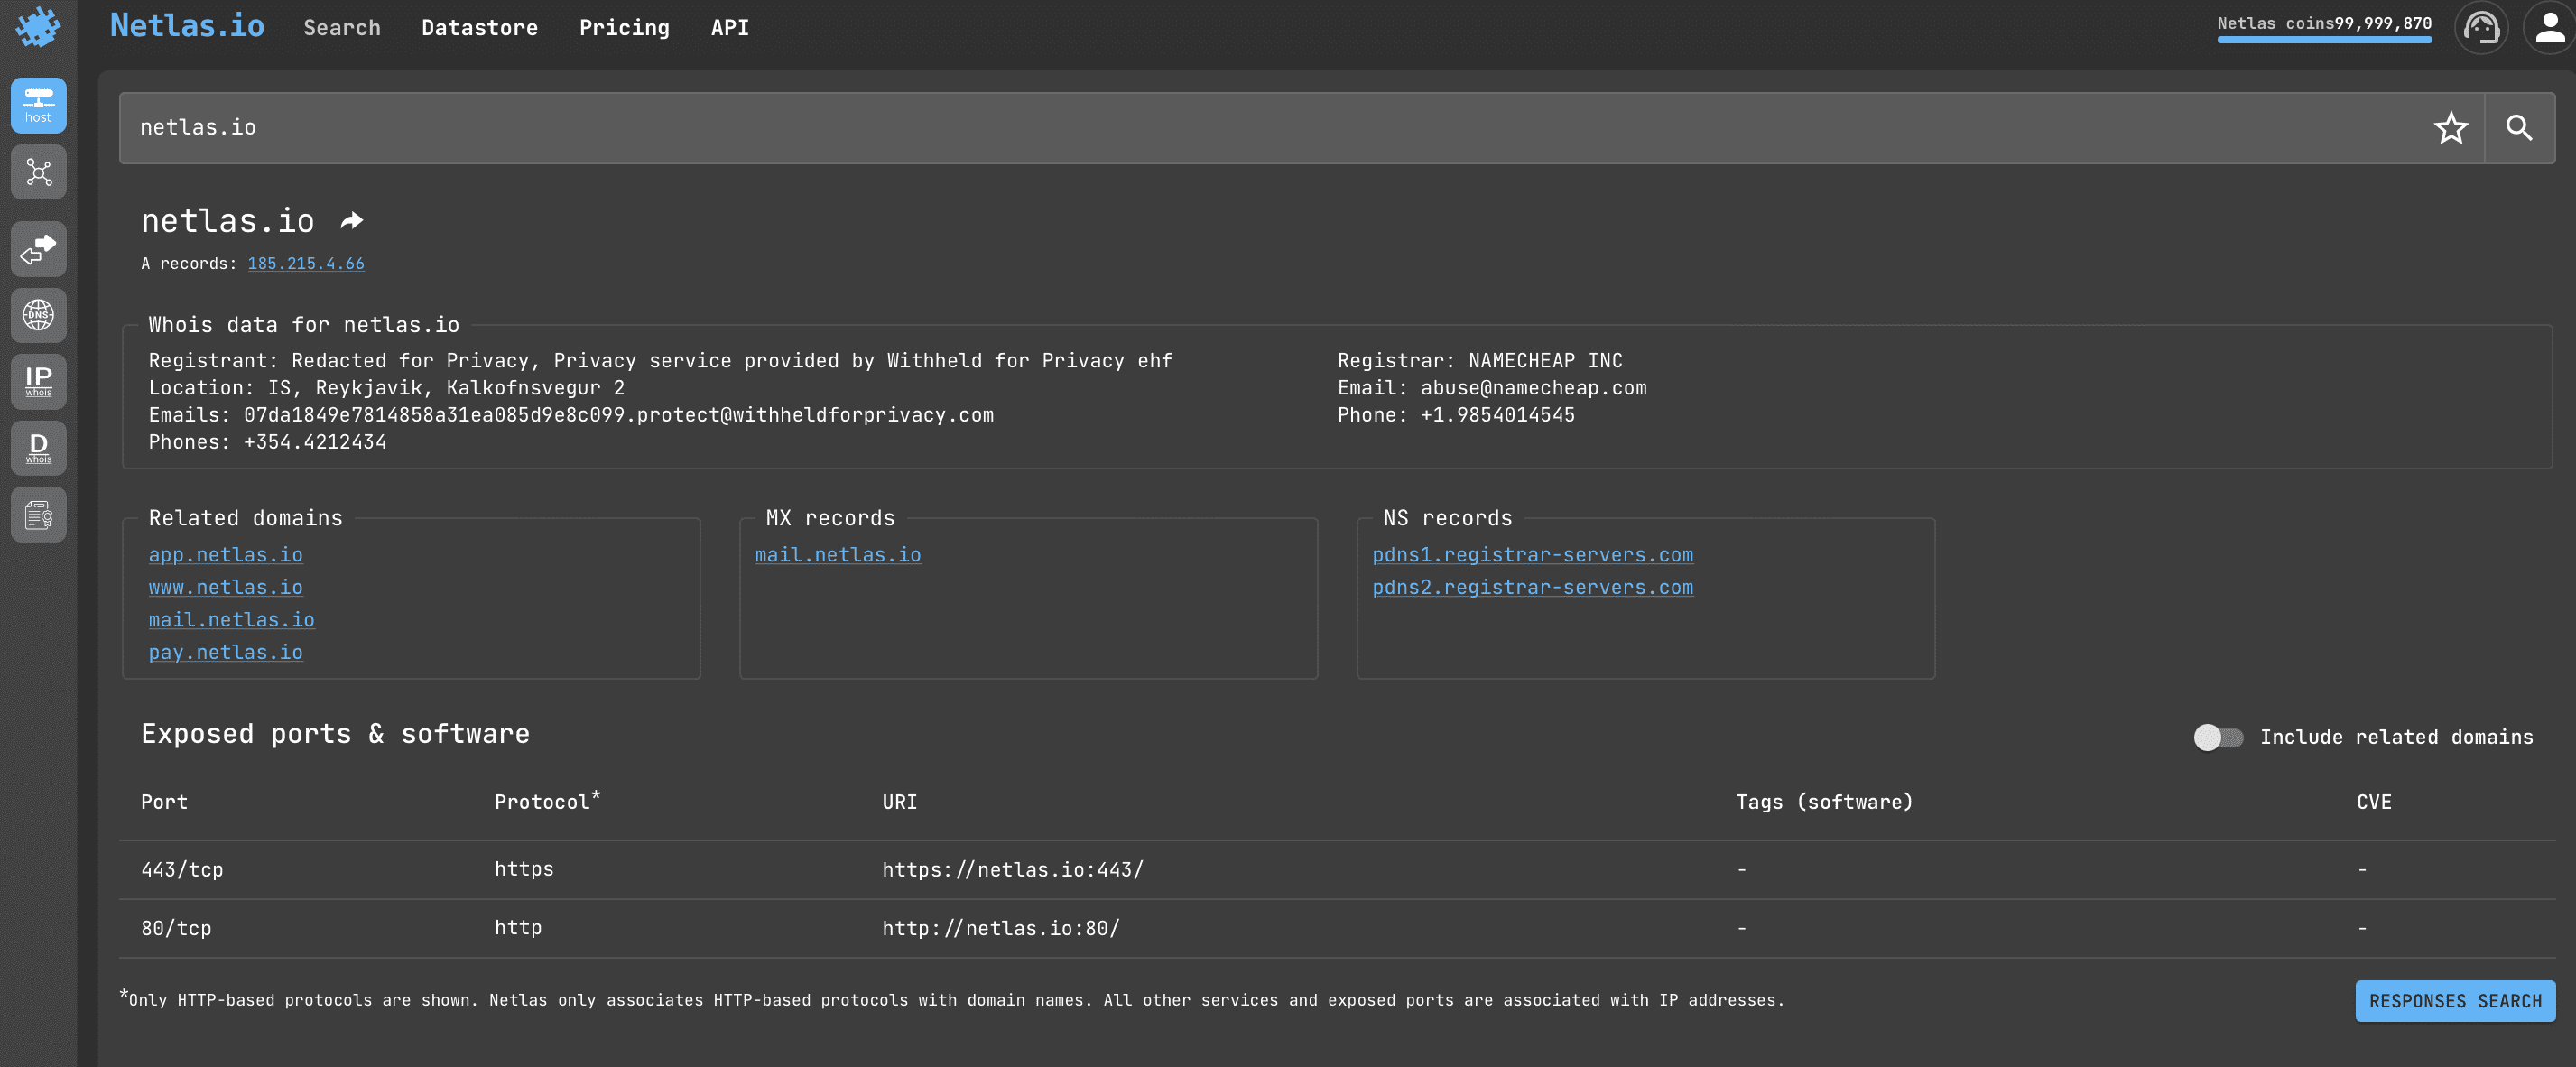
Netlas.io IP/도메인 정보를 열고 도메인 이름이나 IP를 입력하세요. 결과적으로 다음 정보가 표시됩니다:
  • whois 데이터(등록자, 위치, 이메일, 전화번호)
  • 관련 도메인
  • MX 및 NS 레코드
  • 노출된 포트 및 소프트웨어(때로는 취약점에 대한 정보도 추가로 표시됨)

비라틴 도메인 검색

퓨니코드 변환

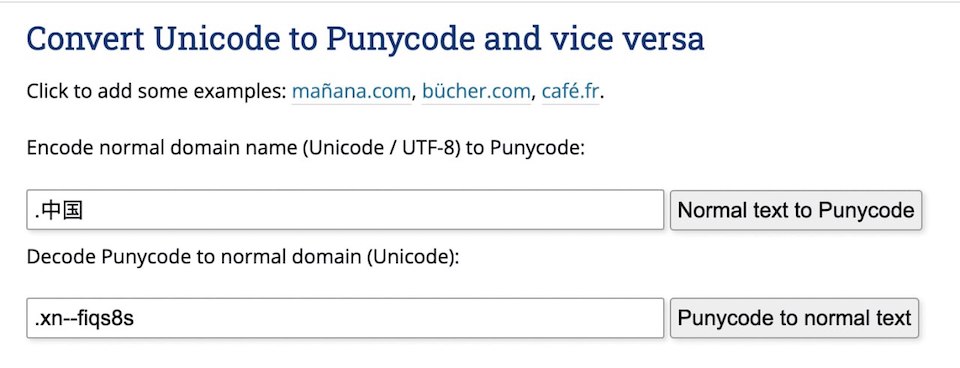
중국어 또는 기타 국제화된 도메인 이름을 찾아야 한다면, 이를 퓨니코드로 변환하세요. 예를 들어:``` domain:*.xn--fiqs8s

root@kitploit:~
이 작업은 특별한 온라인 도구의 도움을 받아 할 수 있습니다. 예를 들어 - [Charset.org](https://www.charset.org/punycode)

### 제목에 특정 단어가 포함된 웹사이트 찾기

![Search by http title](https://assets.kitploit.com/production/public/readmes/6659/9da0445843c6567eefba0f415852126719123c24992f7b85d1e2eee96110d64e.png)

[Netlas.io 응답 검색](https://app.netlas.io/responses/)을 열고 다음을 입력하세요:```
http.title:g*thub

Netlas에서 시도해 보기

이것은 HTTP 제목에 'g'로 시작하고 'thub'로 끝나는 단어를 포함하는 모든 서버를 찾습니다. 아래에서 별표 사용에 대해 자세히 알아보세요.

검색 쿼리 구문

이제 Netlas.io에서 검색 쿼리가 어떻게 작동하는지 자세히 알아보겠습니다.

Netlas.io는 무료 오픈 소스 분산 RESTful 검색 엔진인 Elasticsearch를 기반으로 합니다. Netlas.io의 검색 방법은 다른 Elasticsearch 기반 데이터베이스의 검색 방법과 매우 유사합니다.

필터(필드)

검색 필터

응답, DNS, IP 및 인증서 검색에서는 검색 쿼리에 필터(필드)를 사용할 수 있습니다. 예:``` http.body:netlas

root@kitploit:~
[Try in Netlas](https://app.netlas.io/responses/?q=http.body%3Anetlas&page=1&indices=)

이 쿼리를 사용하여 <body> HTML 태그 내에 "netlas"라는 단어가 포함된 페이지를 찾을 수 있습니다.

각 검색 유형에 사용 가능한 필터 목록이 페이지 오른쪽에 표시됩니다.

![필터 매핑 이미지](https://assets.kitploit.com/production/public/readmes/6659/00c8d6c829ff1de74f4fbdc26df13f8db07114a5830d9f6a8d9ad0011e817045.png)

필터를 사용하면 다양한 매개변수를 기반으로 서버를 검색할 수 있습니다. 예를 들어:

* `domain`
* `ip`
* `protocol`
* `certificate`
* `cve`
* `geolocation` (`city`, `continent`, `country`)

그 외 여러 가지.

### 논리 연산자

단일 쿼리에서 여러 필터를 사용하고 논리 연산자 `AND`, `OR`, `NOT`을 사용하여 결합할 수 있습니다. 예를 들어:```
http.title:netlas NOT port:443

Try in Netlas

쿼리에서 여러 조건을 결합하려면 괄호를 사용하세요:``` http.title:(netlas OR shodan) NOT port:443

root@kitploit:~
[Try in Netlas](https://nt.ls/OrFOY)


### 범위

필드 값으로 숫자 값을 사용하는 경우, 값의 범위(극한값)를 지정할 수 있습니다:```
ip:[173.194.222.0 TO 173.194.222.255] 

Netlas에서 시도

또는 값의 상한 또는 하한만 표시하십시오:``` host:"1.1.1.1" port:<=1000

root@kitploit:~
[Try in Netlas](https://app.netlas.io/responses/?q=host%3A%221.1.1.1%22%20port%3A%3C%3D1000&page=1&indices=)

### 와일드카드

쿼리에서 특정 문자의 정확한 설명을 모르는 경우(예: 도메인의 정확한 영역이나 이름의 철자를 모르는 경우), 별표로 대체할 수 있습니다:```
domain:google.*

Netlas에서 시도해보기

물음표도 사용할 수 있습니다:``` domain:google.?

root@kitploit:~
[Netlas에서 시도해보세요](https://app.netlas.io/responses/?q=domain%3Agoogle.%3F&page=1&indices=)

`*` - 여러 기호, `?` - 한 기호.

필터에서 별표를 사용할 수도 있습니다. 예를 들어:```
\*.banner:database

이 쿼리는 모든 배너 유형을 동시에 검색하며 여러 필터를 대체합니다: amqp.banner:, ftp.banner:, dns.banner:, telnet.banner: 등.

퍼지 검색

퍼지 검색

정확한 값이 아닌 필드의 대략적인 값으로 검색해야 하는 경우(예: 제목에 Joseph과 유사한 모든 이름이 포함된 페이지), 쿼리에 ~를 추가하세요:``` http.title:Joseph~

root@kitploit:~
[Netlas에서 시도하기](https://app.netlas.io/responses/?q=http.title%3AJoseph~&page=1&indices=)

### 정규 표현식

정규 표현식은 특정 패턴과 일치하는 소스 문서의 텍스트 조각을 검색, 추출 및 대체할 수 있는 문자 시퀀스입니다. 예를 들어:

* 모든 이메일 주소:  ```text
  ([a-zA-Z0–9+._-]+@[a-zA-Z0–9._-]+\.[a-zA-Z0–9_-]+)
  • 모든 HTML 태그: ```text <.*?>
    root@kitploit:~
  • 모든 전화번호: ```text ^[+]?[(]?[0-9]{3}[)]?[-\s.]?[0-9]{3}[-\s.]?[0-9]{4,6}$
    root@kitploit:~
  • 모든 비트코인 주소: ```text ^[13][a-km-zA-HJ-NP-Z1-9]{25,34}$
    root@kitploit:~

정규 표현식 사용에 대한 자세한 내용은 Netlas Cookbook(지금 읽고 있는 문서)의 예제와 아래 링크를 참조하세요.

Elasticsearch 문서의 Regex 구문 매뉴얼

OSINT에서 정규 표현식이 유용할 수 있는 방법. Google Sheets를 사용한 이론과 실제 예제

기타 Netlas.io 검색 기능

결과 다운로드

Download results

결과(전체 또는 선택한 필드)를 JSON 및 CSV 형식으로 저장하여 원하는 형식으로 보거나 여러 도구로 자동 분석할 수 있습니다.

결과 그룹화

Group results

검색 시간을 단축하기 위해 도메인 이름이나 지리적 위치와 같은 다양한 필드 값으로 결과를 그룹화할 수 있습니다.

결과 공유

Share results

검색 결과에 대한 링크를 자유롭게 공유할 수 있습니다(사용자가 50회 무료 제한을 초과하지 않는 한 열람에 등록이 필요하지 않습니다).

검색 기록

Request history

또한 지금까지 수행한 모든 쿼리는 프로필 페이지(오른쪽 상단 링크)에서 확인할 수 있습니다.

API 요청

Netlas.io의 가장 중요한 기능은 사람들이 사이버 보안 연구를 더 빠르고 효율적으로 수행할 수 있도록 돕는 것입니다. 이 서비스에는 다양한 요청 실행을 자동화할 수 있는 API(응용 프로그래밍 인터페이스)가 있습니다.

이는 몇 줄 길이의 간단한 Python 또는 Bash 스크립트부터 복잡한 다기능 애플리케이션까지 구현할 수 있습니다.

Netlas API 사용에 대한 자세한 내용은 Netlas Cookbook(지금 읽고 있는 문서) 또는 공식 문서에서 확인할 수 있습니다:

API 문서 →

API 키를 찾는 방법?

API를 시작하는 가장 첫 번째 단계입니다. 구독료를 지불할 필요도 없습니다(하루 50회 요청 무료). 프로필 페이지로 이동하기만 하면 됩니다.

Profile page

API 요청 디버깅 도구

Netlas API 사용을 시작하기 위해 스크립트를 작성하거나 애플리케이션을 만들 필요가 없습니다. 즐겨 사용하는 API 클라이언트를 사용하여 간단히 테스트할 수 있습니다. 여기 지침을 참조하세요.

Netlas API JSON 응답 구조

JSON API response

다른 API와 마찬가지로 Netlas API 응답은 헤더와 JSON(JavaScript Object Notation) 형식의 응답 본문으로 구성됩니다. JSON 파일은 키-값 형식의 데이터를 포함하며 거의 모든 프로그래밍 언어로 분석할 수 있습니다.

Swagger를 사용하는 경우 응답 본문을 복사하거나 다운로드하여 텍스트 편집기나 JSON 분석기에서 볼 수 있습니다.

JSON 형식 데이터 작업 도구

JSON Eveluator

Netlas API를 사용하여 코드를 작성할 때 유용한 작은 팁입니다. JSON 파일의 구조를 더 빨리 이해하고 특정 값을 얻기 위한 경로를 찾으려면 다음과 같은 특수 도구를 사용하세요:

  • JSON Path Online Evaluator
  • JSON Path Finder

Netlas Python 라이브러리

Netlas API에 대한 요청을 자동화하는 가장 쉬운 방법은 특별히 설계된 Python 라이브러리(패키지)를 사용하는 것입니다.

Netlas-Python 라이브러리 GitHub 저장소

간단한 예제를 통해 어떻게 작동하는지 살펴보겠습니다. Netlas Cookbook의 모든 코드 샘플은 scripts 폴더에 있습니다. 이 저장소를 복제하여 자신의 장치에서 실행할 수 있습니다:```shell git clone https://github.com/netlas-io/netlas-cookbook

root@kitploit:~
If you haven't run a Python scripts before today and don't know how to do it, you can start by open Netlas CookBook repository in Gitpod.
Gitpod is a cloud development environment based on Ubuntu (Linux distribution). Just open this link in your browser (log in with your Github account):

[Run Netlas Cookbook in Gitpod](https://gitpod.io#https://github.com/netlas-io/netlas-cookbook)

![Netlas Github](https://assets.kitploit.com/production/public/readmes/6659/20c7d3841932ff04a4f4dc7b9ca2ae667e23e9d0af7b034342bd7db6d7efccfe.png)


Install Netlas Python library using pip (package installer for Python). Enter in the command line:```shell
pip install netlas

설치를 확인하세요. 명령줄에 입력하세요:```shell netlas --help

root@kitploit:~
netlas_python_example.py 실행:```shell
python3 scripts/netlas_python_example.py

물론, 코드를 복사하여 파일로 저장할 수도 있습니다. 첫 번째 예제의 코드는 다음과 같습니다:```python import netlas

apikey = "YOUR API KEY"

create new connection to Netlas

netlas_connection = netlas.Netlas(api_key=apikey)

retrieve data from responses by query port:7001

netlas_query = netlas_connection.query(query="port:7001")

iterate over data and print: IP address, port, path and protocol

for response in netlas_query['items']: print(f"{response['data']['ip']}:{response['data']['port']}{response['data']['path']} [{response['data']['protocol']}]")

root@kitploit:~
### 유용한 데이터를 얻기 위한 응답 키 예시

원하는 데이터를 얻기 위해 API 응답의 JSON 패치를 찾으려면 특수 온라인 애플리케이션(JSON-evaluators)을 사용할 수 있다고 위에서 언급했습니다. 사용자 편의를 위해 가장 자주 필요한 Python 라이브러리 응답 키의 작은 예시 목록을 제공합니다.```python
# Main domain/ip info
response['data']['uri']
response['data']['ip']
response['data']['http']['title']
response['data']['http']['meta']
response['data']['http']['body']

# Geo info
response['data']['geo']['continent']
response['data']['geo']['country']
response['data']['geo']['city']
response['data']['geo']['location']['lat']
response['data']['geo']['location']['long']

# Whois geo info
response['data']['whois']['net']['country']
response['data']['whois']['net']['address']
response['data']['whois']['net']['city']
response['data']['whois']['net']['contacts']['emails']
response['data']['whois']['net']['contacts']['phones']

# Http status and favicon ico info
response['data']['port']
response['data']['http']['status_code']
response['data']['http']['status_line']
response['data']['http']['favicon']['image']
response['data']['http']['favicon']['path']

# Basic CVE info
response['data']['cve'][0]['name']
response['data']['cve'][0]['description']
response['data']['cve'][0]['base_score']
response['data']['cve'][0]['has_exploit']
response['data']['cve'][0]['exploit_links']

Netlas Python 응답 데이터 유형

Python Netlas datatypes

Netlas Python 라이브러리로 작업할 때 검색하려는 데이터 유형을 올바르게 지정하는 것이 매우 중요합니다. 기본적으로 response 유형이 반환되며 많은 Netlas CookBook 예제에서 이를 사용합니다.

그러나 도메인의 whois 정보를 가져오거나 서브넷에서 도메인을 검색하는 등의 일부 작업에서는 다른 데이터 유형을 사용해야 합니다. 예를 들어:```python netlas_query = netlas_connection.query(query='a:"163.114.132.0/24"',datatype="domain")

root@kitploit:~
일부 쿼리가 예상과 달리 결과를 반환하지 않는다고 생각되면 **datatype** 매개변수의 값을 변경해 보세요. 이렇게 하면 문제가 해결될 가능성이 높습니다.

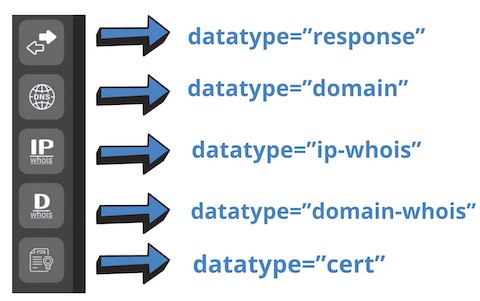
사용 가능한 데이터 유형:

- **datatype="response"**는 [Netlas Responses Search](https://app.netlas.io/responses/)에서 얻을 수 있는 결과에 해당합니다.
- **datatype="domain"**는 [Netlas DNS search](https://app.netlas.io/domains/)에서 얻을 수 있는 결과에 해당합니다.
- **datatype="domain-whois"**는 [Netlas Domain Whois Search](https://app.netlas.io/whois_domains/)에서 얻을 수 있는 결과에 해당합니다.
- **datatype="ip-whois"**는 [Netlas IP Whois Search](https://app.netlas.io/whois_ip/)에서 얻을 수 있는 결과에 해당합니다.
- **datatype="cert"**는 [Netlas Certificates Search](https://app.netlas.io/certs/)에서 얻을 수 있는 결과에 해당합니다.


### Netlas CLI 도구

![Netlas CLI 도구](https://assets.kitploit.com/production/public/readmes/6659/88c2402f9da5a3ece87a4459de9b967691428d60df86f828d83722c50bde9d44.png)

Netlas Python 라이브러리를 명령줄에서 직접 사용할 수도 있습니다. 예를 들어:```bash
netlas search "http.title:johnsmith" -f json >results.json

이 간단한 명령은 헤더에 'johnsmith'라는 단어가 있는 모든 서버를 검색하고, 결과를 JSON 형식으로 반환하며, 결과를 resutls.json 파일에 저장합니다.

Netlas API의 다른 모든 기능도 같은 방식으로 사용할 수 있습니다. 이에 대한 자세한 내용은 도움말(-h 명령) 및 Netlas Cookbook(지금 읽고 계신 문서)의 예제를 통해 확인할 수 있습니다.``` Usage: netlas [OPTIONS] COMMAND [ARGS]...

Options: -h, --help Show this message and exit.

Commands: count Calculate count of query results. download Download data. host Host (ip or domain) information. indices Get available data indices. profile Get user profile data. savekey Save API key to the local system. search (query) Search query. stat Get statistics for query.

root@kitploit:~
다양한 Netlas CLI Tools 명령을 실행하기 전에 설정에서 API 키를 저장하십시오:```bash
netlas savekey YOUR_API_KEY

우리는 또한 bash 스크립트와 Netlas CLI 도구를 사용하여 다양한 작업을 자동화하는 몇 가지 예제가 포함된 Github 저장소를 보유하고 있습니다:

Netlas Scripts

Search vs Download vs Host 메서드

Netlas API에는 많은 메서드가 있지만 가장 일반적으로 사용되는 메서드는 search와 download입니다. 이들은 서로 매우 유사하지만 여전히 몇 가지 차이점이 있습니다.

search 메서드는 한 번에 한 페이지의 결과(20개 항목)를 로드하며 최대 200페이지까지 로드할 수 있습니다(20*200=4000개 항목). download 메서드는 모든 결과를 다운로드합니다(단, 실행에 더 많은 리소스가 필요함).

또한 특정 도메인이나 IP에 대한 가장 기본적인 정보를 반환하는 host 메서드가 있습니다(다른 메서드와 마찬가지로 데이터 유형을 지정할 필요가 없습니다):```bash netlas host "51.159.153.170"

root@kitploit:~
### 추가 요청 매개변수

Netlas API를 사용하면 추가 매개변수를 통해 요청에서 반환되는 데이터를 유연하게 조정할 수 있습니다. 예를 들어:

* indices - 특정 인덱싱 날짜에 해당하는 ID입니다. 특정 날짜의 ID를 확인하려면 app.netlas.io를 열고 검색어 입력란 오른쪽에 있는 달력을 클릭한 다음 관심 있는 날짜를 선택하고 브라우저 주소 표시줄의 URL에서 indices 매개변수가 어떻게 변경되는지 확인하세요.
* start - 결과 페이지 번호 (기본값 0)
* fields - 결과에 포함할 필드 이름 (기본값은 모든 필드). 요청이 많은 경우 코드 속도를 높이고 최적화하는 데 유용합니다.

### Python으로 요청하기 (Netlas Python Library 없이)

일부 경우에는 Netlas Python Library를 사용하는 대신 많은 개발자에게 친숙한 표준 Python request 패키지를 사용하는 것이 더 쉬울 수 있습니다:

명령줄에 입력하세요:```bash
python scripts/python_example.py

python_example.py의 소스 코드:```python import requests

response = requests.get("https://app.netlas.io/api/domains/?q=ivanov.com&source_type=include&start=0&fields=*",{'X-API-Key': 'YOUR API KEY'})

print(response.json())

root@kitploit:~
하지만 Netlas Python 라이브러리는 여전히 선호되는데, 이는 쿼리 처리 중 발생하는 다양한 문제(오류, 긴 대기 시간 등)를 처리하도록 설계되었기 때문입니다.


### 다른 프로그래밍 언어를 위한 예제

Netlas 검색을 자동화하기 위해 Python 라이브러리를 사용할 것을 권장하지만, Netlas API는 다양한 기술 스택을 가진 대부분의 애플리케이션에 내장될 수 있다는 점을 주목할 가치가 있습니다. 가장 중요한 것은 **REST 요청**을 보내고 **JSON 데이터**를 파싱할 수 있어야 한다는 것입니다.

다음은 다양한 인기 프로그래밍 언어로 작성된 몇 가지 예제입니다.


#### NodeJS <!-- omit in toc -->

![Node JS Netlas](https://assets.kitploit.com/production/public/readmes/6659/b4dd5d1eb33fafddfe44c22062b6e7e9b4e1471123ef6410a9fc3a5a8bc34a78.png)

명령줄에 입력:```bash
node scripts/node_example.js

Gitpod을 사용하지 않는다면, 사용자 기기에 NodeJS를 설치해야 합니다.

nodejs_example.js의 소스 코드:```javascript fetch('https://app.netlas.io/api/domains/?q=ivanov.com&source_type=include&start=0&fields=*', { headers: { "X-API-Key": "YOUR_API_KEY", }, }) .then((response) => response.text()) .then((body) => { var jsonArray = JSON.parse(body); console.log(jsonArray['items'][0]); });

root@kitploit:~
#### Ruby <!-- omit in toc -->

![Ruby Netlas](https://assets.kitploit.com/production/public/readmes/6659/7237511c7ee0f39e270569af8b0ae12974684ad3087b8ea373a2df2719a03cdf.png)

명령줄에 입력하세요:```bash
ruby scripts/ruby_example.rb

Gitpod을 사용하지 않는 경우, 장치에 Ruby가 설치되어 있어야 합니다.

ruby_example.rb의 소스 코드:```ruby require 'net/http' require 'uri' require 'json'

uri = URI("https://app.netlas.io/api/domains/?q=ivanov.com&source_type=include&start=0&fields=*") req = Net::HTTP::Get.new(uri) req['X-API-Key'] = "YOUR_API_KEY"

res = Net::HTTP.start(uri.hostname, uri.port, use_ssl: uri.scheme == 'https') { |http| http.request(req) }

jsonArray = JSON.parse(res.body)

puts jsonArray['items'][0]['data']['domain']

root@kitploit:~
#### Bash <!-- omit in toc -->

![Bash Netlas](https://assets.kitploit.com/production/public/readmes/6659/c2f52fa6cb554433ae4b234636cd4b06702691d45b23a7d0e0ebc951ab3c6b06.png)

명령줄에 입력하세요:```bash
bash scripts/bash_example.sh

bash_example.sh의 소스 코드:``` curl -X 'GET'
'https://app.netlas.io/api/domains/?q=ivanov.com&source_type=include&start=0&fields=*'
-H 'accept: application/json'
-H 'X-API-Key: YOUR_API_KEY' | jq .items[0].data.last_updated

root@kitploit:~
### JQ 유틸리티

위 예제에서는 JQ 유틸리티를 사용하여 JSON 데이터에서 필드를 추출했습니다.  

JQ는 종종 "JSON 데이터를 위한 sed"라고 불리기도 합니다.  모든 JSON 데이터를 다루는 데 놀랍도록 유용한 도구입니다. 다음은 구문 예제 몇 가지입니다.

JSON 배열의 첫 번째 항목 출력:```
.items[0] 

JSON-배열의 모든 항목 출력:``` .items[]

root@kitploit:~
JSON 배열의 첫 번째 항목에서 모든 'data' 하위 항목을 출력합니다:```
.['items'][0]['data'][]

JSON 배열의 각 항목에 대한 모든 하위-하위 항목을 출력합니다:``` .items[].data.technical[]

root@kitploit:~
JQ에 대해 더 알아보려면 여기를 참조하세요(데이터 필터링에 특히 주의를 기울이는 것을 권장합니다): [JQ 유틸리티 문서](https://jqlang.github.io/jq/)


### 코드 작성을 위한 AI 도구

![You.com](https://assets.kitploit.com/production/public/readmes/6659/6d2992d2f27d7aeb930c9b970363604d510c46b2cda53cc2f87d25bb0ab757e7.png)

Netlas Cookbook 예제를 사용자 정의할 때 문제가 발생하면 코드 개선 및 작성을 위해 AI 도구의 도움을 구하는 것이 좋습니다. 예를 들면:

[ChatGPT](https://chatgpt.com)  
[Code Llama](https://huggingface.co/spaces/codellama/codellama-playground)  
[You.com](https://you.com/)  

이러한 서비스를 사용할 때는 코드를 통해 해결하려는 작업을 단어로 설명하기만 하면 됩니다.


### 코드 검사기
![파이썬 코드 검사](https://assets.kitploit.com/production/public/readmes/6659/6622b278b508349c7921d1208ce2267fcc77090c17189613c87f690200a07119.png)

Netlas Cookbook 예제를 목적에 맞게 재작업할 때, 일부 오류로 인해 코드가 실행되지 않을 수 있습니다. 특수 온라인 도구를 사용하면 이러한 오류를 찾고 수정할 수 있습니다:

[ExtendsClass Python Tester](https://extendsclass.com/python-tester.html)
[Snyk](https://snyk.io/code-checker/python/)

코드를 타사 서비스에 복사하고 싶지 않다면, Pylint(정적 코드 분석기)를 사용하여 기기에서 오류를 확인할 수 있습니다:

[Pylint Python 패키지](https://pypi.org/project/pylint/)


## Netlas.io를 OSINT(오픈소스 인텔리전스)에 사용하기

![OSINT 흐름도](https://assets.kitploit.com/production/public/readmes/6659/b433d1e7a92497c03bf05b19f663f7fa8643480533b961801bfc93ad6bad4927.png)

Netlas.io는 도메인이나 회사에 대한 데이터를 수집하고, 인터넷에서 개인(또는 누구든)의 언급을 찾는 데 도움을 줄 수 있습니다.

또한 웹 페이지의 이전 버전(Wayback Machine의 아날로그)을 찾는 데 사용할 수도 있습니다.

### WHOIS 연락처에서 개인의 닉네임 또는 이메일 검색

대부분의 WHOIS 데이터에는 도메인을 등록하는 회사의 연락처 정보만 포함됩니다. 그러나 때로는 관심 대상자의 개인 연락처가 있을 수도 있습니다. 이 쿼리는 이를 찾는 데 도움이 됩니다.

*이 방법은 유료 구독이 필요할 수 있습니다.* [가격 보기](https://netlas.io/pricing/)

**검색 쿼리 예제**

![Whois 이메일 검색 예](https://assets.kitploit.com/production/public/readmes/6659/43eb2a871fe128cecbee6cb6b4164a1876053d8e12699c72a53e36c229f266f7.png)```
whois.related_nets.contacts.emails:sweetwater

Netlas에서 시도하기

API 요청 예제

Netlas CLI 도구:```bash netlas search "whois.related_nets.contacts.emails:sweetwater*" -f json

root@kitploit:~
Curl:```bash
curl -X 'GET' \
  'https://app.netlas.io/api/responses/?q=whois.related_nets.contacts.emails%3Asweetwater*&fields=' \
  -H 'accept: application/json' \
  -H 'X-API-Key: aqkd8L4MR93Tkcaz2UXDXrRleV8Vlvbv' | jq .items[].data.uri

코드 예제 (Netlas Python 라이브러리)

Whois 이메일 검색 예제 Python

명령줄에서 실행:```bash python scripts/osint/whois_email_search.py

root@kitploit:~
scripts/osint/whois_email_search.py의 소스 코드:```python
import netlas

apikey = "YOUR_API_KEY"

# create new connection to Netlas
netlas_connection = netlas.Netlas(api_key=apikey)

# retrieve data from responses by query `whois.related_nets.contacts.emails:sweetwater`
netlas_query = netlas_connection.query(query="whois.related_nets.contacts.emails:sweetwater*")


# iterate over data and print: URL, Country, Related nets data
for response in netlas_query['items']:
    print (response['data']['uri'])
    print (response['data']['geo']['country'])
    print (response['data']['whois']['related_nets'])

웹 페이지 제목 및 본문에서 사람의 닉네임 또는 이메일 검색

Netlas를 사용하면 웹 페이지의 제목과 HTML 코드에서 특정 단어의 언급을 검색할 수 있습니다. 정확히 일치하는 단어, 근사 일치(퍼지 쿼리 섹션 참조)로 단어를 검색하거나 확실하지 않은 문자를 별표로 대체할 수 있습니다.

검색 쿼리 예시

제목/본문 검색 예시``` http.title:sweetwater OR http.body:sweetwater

root@kitploit:~
[Netlas에서 시도해보기](https://app.netlas.io/responses/?q=http.title%3Asweetwater%20OR%20http.body%3Asweetwater&page=1&indices=)

**API 요청 예제**

Netlas CLI Tools:```bash
netlas search "http.title:sweetwater OR http.body:sweetwater" -f json

Curl:```bash curl -X 'GET'
'https://app.netlas.io/api/responses/?q=whois.related_nets.contacts.emails%3Asweetwater*&fields='
-H 'accept: application/json'
-H 'X-API-Key: YOUR_API_KEY' | jq .items[].data.uri

root@kitploit:~
**코드 예제 (Netlas Python 라이브러리)**

![Whois 이메일 검색 예제 Python](https://assets.kitploit.com/production/public/readmes/6659/8678cf14e22a1a44cc2c44c846b86ec2ad24b1eadef130a4eade7696ff88b061.png)

명령줄에서 실행:```bash
python scripts/osint/title_body_search.py

scripts/osint/title_body_search.py의 소스 코드:```python import netlas

apikey = "YOUR_API_KEY"

create new connection to Netlas

netlas_connection = netlas.Netlas(api_key=apikey)

retrieve data from responses by query http.title:sweetwater OR http.body:sweetwater

netlas_query = netlas_connection.query(query="http.title:sweetwater OR http.body:sweetwater*")

iterate over data and print: IP,URL,web page title

for response in netlas_query['items']: print (response['data']['ip']) print (response['data']['uri']) print (response['data']['http']['title'])

root@kitploit:~
### 회사 웹사이트 서브도메인에서 "Juicy Info Files" 검색

![Juicy info files search](https://assets.kitploit.com/production/public/readmes/6659/c14d7be4acd47fb0ede930eb0ecbb06f3f362179fd4bca46747f0ce7d0caeb7d.png)

Metagoofil은 수년간 OSINT 실무자들 사이에서 인기 있는 도구였습니다. 이 도구는 회사 웹사이트에서 문서 파일(pdf, xlsx, docx 등)을 Google에서 검색하고 메타데이터를 분석합니다.

그리고 Google에 색인되지 않은 것은 Netlas로 찾은 후 컴퓨터에 다운로드하여 [MetaDetective](https://github.com/franckferman/MetaDetective) 도구로 분석할 수 있습니다.```
uri:*lidl.* AND http.body:pdf

Netlas에서 시도하기

uri: 필터를 domain: 및 host:로 대체할 수 있습니다 (이 세 필터를 사용할 때는 항상 결과를 비교하는 것을 권장합니다).

찾고자 하는 내용에 따라 다양한 파일 확장자를 검색할 수도 있습니다. 예를 들어:``` http.body:xls http.body:xlsx http.body:doc http.body:docx http.body:ppt http.body:pptx http.body:mdb http.body:csv http.body:sql http.body:sqlite

root@kitploit:~
**API 요청 예제**

Netlas CLI Tools:```bash
netlas search "uri:*lidl.* AND http.body:pdf"

Curl:```bash curl -X 'GET'
'https://app.netlas.io/api/responses/?q=uri%3A*lidl.*%20AND%20http.body%3Apdf&source_type=include&start=0&fields=*'
-H 'accept: application/json'
-H 'X-API-Key: 'YOUR_API_KEY' | jq .items[].data.domain

root@kitploit:~
**코드 예제 (Netlas Python 라이브러리)**

![유용한 정보 검색](https://assets.kitploit.com/production/public/readmes/6659/faec884f54484c0cc6dd5ef76a79b9ca2e5ef372078289e8f3c3cf2cf4af9fac.png)

명령줄에서 실행:```bash
python scripts/osint/juicyinfo_search.py

scripts/osint/juicyinfo_search.py의 소스 코드:```python import netlas

apikey = "YOUR_API_KEY"

create new connection to Netlas

netlas_connection = netlas.Netlas(api_key=apikey)

retrieve data from responses by query uri:*lidl.* AND http.body:pdf

netlas_query = netlas_connection.query(query='uri:lidl. AND http.body:pdf')

iterate over data and print: uri, body

for response in netlas_query['items']: print (response['data']['uri']) print (response['data']['http']['body'])

root@kitploit:~
자동으로 웹 페이지 본문에서 PDF 문서로 연결되는 링크를 생성하려면 Python [Re](https://docs.python.org/3/library/re.html) 패키지를 사용할 수 있습니다.


### 전화번호 언급 검색

닉네임 및 이메일과 마찬가지로 웹 페이지 코드나 WHOIS 연락처 정보에서 전화번호 언급을 검색할 수도 있습니다.

이 작업을 별도의 예제로 구분하는 이유는 전화번호가 다양한 형식으로 작성될 수 있기 때문에 검색이 복잡하기 때문입니다.

**검색 쿼리 예제**  

![전화번호 검색 예제](https://assets.kitploit.com/production/public/readmes/6659/92872d57f9ac03e90323f35d9d8303364050f36aa748a26eadb8996d10ce66b9.png)```
http.body:1?234?567?89?99 OR http.body:12345678999 OR http.body:1234?5678?999

Try in Netlas

요청을 보낼 때는 관심 있는 전화번호가 속한 국가에서 허용되는 전화번호 기록 형식을 고려해야 합니다.

API 요청 예제

Netlas CLI Tools:```bash netlas search "http.body:1?234?567?89?99 OR http.body:12345678999 OR http.body:1234?5678?999" -f json

root@kitploit:~
페이지 본문뿐만 아니라 WHOIS 연락처 정보에서도 전화번호를 검색할 수 있다는 점을 잊지 마세요. 이는 필터 **whois.related_nets.contacts.phones:**를 사용하여 수행할 수 있습니다.

Curl:```bash
curl -X 'GET' \
  'https://app.netlas.io/api/responses/?q=http.body%3A1%3F234%3F567%3F89%3F99%20OR%20http.body%3A12345678999%20OR%20http.body%3A1234%3F5678%3F999&source_type=include&start=0&fields=*' \
  -H 'accept: application/json' \
  -H 'X-API-Key: YOUR_API_KEY' jq .items[].data.uri

코드 예제 (Netlas Python 라이브러리)

Phone number search example Python

명령줄에서 실행:```bash python scripts/osint/phonenumber_search.py

root@kitploit:~
scripts/osint/phonenumber_search.py의 소스 코드:```python
import netlas

apikey = "YOUR_API_KEY"

# create new connection to Netlas
netlas_connection = netlas.Netlas(api_key=apikey)

# retrieve data from responses by query `http.body:1?234?567?89?99 OR http.body:12345678999 OR http.body:1234?5678?999`
netlas_query = netlas_connection.query(query="http.body:1?234?567?89?99 OR http.body:12345678999 OR http.body:1234?5678?999")


# iterate over data and print: ip, url
for response in netlas_query['items']:
    print (response['data']['ip'])
    print (response['data']['uri'])

파일 언급 검색 (저작권을 침해할 수 있는 콘텐츠 찾기)

여러분이 음악가이고 자신의 트랙이 게시된 모든 사이트를 찾고 싶다고 가정해 봅시다. 이름이 언급된 페이지 중 .mp3 확장자를 가진 파일 링크가 있는 페이지를 검색하면 이를 수행할 수 있습니다.

검색어 예시

Title/body search example``` (http.title:alla OR http.body:alla) AND http.body:*.mp3

root@kitploit:~
[Netlas에서 시도하기](https://nt.ls/HEhJj)

**API 요청 예시**

Netlas CLI 도구:```bash
netlas search "(http.title:alla OR http.body:alla) AND http.body:*.mp3" -f json

Curl:```bash curl -X 'GET'
'https://app.netlas.io/api/responses/?q=(http.title%3Aalla%20OR%20http.body%3Aalla)%20AND%20http.body%3A*.mp3&source_type=include&start=0&fields=*'
-H 'accept: application/json'
-H 'X-API-Key: YOUR_API_KEY' | jq .items[].data.http.title

root@kitploit:~
**코드 예제 (Netlas Python 라이브러리)**

![File mentions search example Python](https://assets.kitploit.com/production/public/readmes/6659/919f820c21d9cda328524722b820783c3941447f3d447f9a72f5224d4cfd9ac1.png)

명령줄에서 실행:```bash
python scripts/osint/file_mentions_search.py

scripts/osint/file_mentions_search.py의 소스 코드:```python import netlas

apikey = "YOUR_API_KEY"

create new connection to Netlas

netlas_connection = netlas.Netlas(api_key=apikey)

retrieve data from responses by query (http.title:alla OR http.body:alla) AND http.body:*.mp3

netlas_query = netlas_connection.query(query="(http.title:alla OR http.body:alla) AND http.body:*.mp3")

iterate over data and print: IP, URL,web page title

for response in netlas_query['items']: print (response['data']['ip']) print (response['data']['uri']) print (response['data']['http']['title'])

root@kitploit:~
### 도메인 WHOIS 정보 수집

WHOIS는 전 세계에 등록된 모든 도메인에 대한 정보를 저장하는 전 세계 공개 데이터베이스입니다. 

**검색어 예시**  

![제목/본문 검색 예시](https://assets.kitploit.com/production/public/readmes/6659/88c9654440e88b387d2422ac397334793daa8600d434d99d457b908e8abe154b.png)

사용 [WHOIS 도메인 검색](https://app.netlas.io/whois_domains/)```
github.com

API 요청 예시

Netlas CLI 도구:```bash netlas host github.com -f json

root@kitploit:~
Curl:```bash
curl -X 'GET' \
  'https://app.netlas.io/api/whois_domains/?q=github.com&source_type=include&start=0&fields=*' \
  -H 'accept: application/json' \
  -H 'X-API-Key: YOUR_API_KEY' |  jq .items[].data.technical.street

코드 예제 (Netlas Python Library)

WHOIS example Python

명령줄에서 실행:```bash python scripts/osint/whois_search.py

root@kitploit:~
scripts/osint/whois_search.py의 소스 코드:```python
import netlas

apikey = "YOUR_API_KEY"

# create new connection to Netlas
netlas_connection = netlas.Netlas(api_key=apikey)

# retrieve data from whois for google.com domain
netlas_query = netlas_connection.query(query="google.com",datatype="whois-domain")


# iterate over data and print: owner name
for response in netlas_query['items']:
    print (response['data']['technical']['name'])  

<address> 태그에서 위치 검색

<address> 태그는 웹 페이지의 <head> 태그 내부에 위치하며 물리적 주소를 포함할 수 있습니다. 이 태그를 사용하여 검색하면 특정 거리, 때로는 특정 건물과 관련된 사이트를 찾을 수 있습니다.

검색 쿼리 예시

작성자 메타 검색``` http.contacts.address:kirby

root@kitploit:~
[Netlas에서 시도해보기](https://app.netlas.io/responses/?q=http.contacts.address%3Akirby&page=1&indices=)

이메일 검색을 위해 http.contacts.email:을 사용할 수도 있습니다.

**API 요청 예제**

Netlas CLI 도구:```bash
netlas search "http.contacts.address:kirby" -f json

Curl:```bash curl -X 'GET'
'https://app.netlas.io/api/responses/?q=http.contacts.address%3Akirby&source_type=include&start=0&fields=*'
-H 'accept: application/json'
-H 'X-API-Key: 'YOUR_API_KEY' | jq .items[].data.http.contacts

root@kitploit:~
**코드 예제 (Netlas Python Library)**

![연락처 주소 검색 Python](https://assets.kitploit.com/production/public/readmes/6659/aa659130f38a0287850a28fc0e37e93bd89939346049e855652cebb8ed7fcba3.png)

명령줄에서 실행:```bash
python scripts/osint/contacts_search.py

scripts/osint/contacts_search.py의 소스 코드:```python import netlas

apikey = "YOUR_API_KEY"

create new connection to Netlas

netlas_connection = netlas.Netlas(api_key=apikey)

retrieve data from responses by query http.contacts.address:kirby

netlas_query = netlas_connection.query(query="http.contacts.address:kirby")

iterate over data and print: URL, Contacts

for response in netlas_query['items']: print (response['data']['uri']) print (response['data']['http']['contacts'])

root@kitploit:~
###  메타 태그에서 작성자 이름 검색

`<meta>` 태그는 웹 페이지의 `<head>` 태그 내에 위치하며, 가장 중요한 키워드, 설명, 기타 서비스 정보 및 작성자 이름을 포함합니다.

메타 태그(http.meta)에서 닉네임과 이름/성을 검색하면 전체 HTML 코드(http.body)를 검색하는 것보다 특정 인물과 관련된 사이트를 더 빨리 찾을 수 있습니다.


**검색 쿼리 예시**  

![작성자 메타 검색](https://assets.kitploit.com/production/public/readmes/6659/059e767c5fa7d63af4548d77c1ac1b01c4f3a79cef1c1d91320f86f6e11a1ba9.png)```
http.meta:nazar

Netlas에서 시도해보기

API 요청 예시

Netlas CLI 도구:```bash netlas search "http.meta:nazar" -f json

root@kitploit:~
Curl:```bash
curl -X 'GET' \
  'https://app.netlas.io/api/responses/?q=http.meta%3Anazar&source_type=include&start=0&fields=*' \
  -H 'accept: application/json' \
  -H 'X-API-Key: YOUR_API_KEY' | jq .items[].data.http.meta

코드 예제 (Netlas Python 라이브러리)

Author meta search Python

명령줄에서 실행:```bash python scripts/osint/author_meta_search.py

root@kitploit:~
scripts/osint/author_meta_search.py의 소스 코드:```python
import netlas

apikey = "YOUR_API_KEY"

# create new connection to Netlas
netlas_connection = netlas.Netlas(api_key=apikey)

# retrieve data from responses by query `http.meta:nazar`
netlas_query = netlas_connection.query(query="http.meta:nazar")


# iterate over data and print: ip, url
for response in netlas_query['items']:
    print (response['data']['uri'])
    print (response['data']['http']['title'])
    print (response['data']['http']['meta'])

HTML 문서의 메타 태그에서 찾을 수 있는 다른 흥미로운 정보는 무엇인가요?

저자 이름 외에도 메타 태그에는 인코딩, 언어, 검색 엔진 로봇의 페이지 색인 허용 여부, 소셜 네트워크의 링크 카드용 텍스트, OpenGraph 메타데이터 등 다양한 정보가 포함될 수 있습니다. 다음은 조사에 유용한 정보를 포함할 수 있는 메타 태그의 몇 가지 추가 예시입니다:

  • <meta name="description"> - 웹 페이지 콘텐츠에 대한 설명.
  • <meta name="keywords"> - 웹 페이지 콘텐츠를 설명하는 키워드.
  • <meta name="generator"> - 페이지 콘텐츠를 생성하는 데 사용된 도구 이름(CMS 및 호스팅 플랫폼 검색에 유용).
  • <meta name="copyright"> - 웹 페이지 콘텐츠에 대한 저작권을 소유한 개인 또는 회사의 이름.

FTP 서버 배너 텍스트 검색

개인이나 회사에 대한 정보를 찾는 또 다른 중요한 단계는 FTP 서버 배너 텍스트에서 해당 정보를 검색하는 것입니다. 발견된 서버의 IP 주소는 관심 있는 개인이나 회사와 관련된 다른 사이트를 찾는 열쇠가 될 수 있습니다. 그리고 운이 매우 좋다면 (FTP 서버가 열려 있는 경우) 게시된 파일에서 흥미로운 것을 발견할 수도 있습니다.

검색 쿼리 예시

태그 이름으로 CVE 검색``` ftp.banner:"Collado"

root@kitploit:~
FTP 서버를 다른 매개변수(예: 도시 또는 IP 주소 범위)로 검색해야 하는 경우 prot7:ftp 필터를 사용하세요.

[Netlas에서 시도해보기](https://app.netlas.io/responses/?q=ftp.banner%3A%22Collado%22%20&page=1&indices=)

**API 요청 예시**

Netlas CLI Tools:```bash
netlas search 'ftp.banner:"Collado"' -f json

쿼리에서 큰따옴표를 사용할 경우, 쿼리 자체는 작은따옴표 안에 작성됩니다.

Curl:```bash curl -X 'GET'
'https://app.netlas.io/api/responses/?q=ftp.banner%3A%22Collado%22&source_type=include&start=0&fields=*'
-H 'accept: application/json'
-H 'X-API-Key: YOUR_API_KEY' | jq .items[].data.uri

root@kitploit:~
**코드 예제 (Netlas Python 라이브러리)**

![Favicon hash search Python](https://assets.kitploit.com/production/public/readmes/6659/099cc2e0a7ca8c242476fe9e27e8c9441e0c95ce82ae143a7f66289a13c21588.png)

명령줄에서 실행:```bash
python scripts/osint/ftp_banner_search.py

scripts/osint/ftp_banner_search.py의 소스 코드:```python import netlas

apikey = "YOUR_API_KEY"

create new connection to Netlas

netlas_connection = netlas.Netlas(api_key=apikey)

retrieve data from responses by query ftp.banner:"Collado"

netlas_query = netlas_connection.query(query='ftp.banner:"Collado"')

iterate over data and print: IP, URL, ftp banner text

for response in netlas_query['items']: print (response['data']['ip']) print (response['data']['uri']) print (response['data']['ftp']['banner'])

root@kitploit:~
### SSL 인증서에서 연락처 정보 검색

![Certificates search](https://assets.kitploit.com/production/public/readmes/6659/5f3d32db37a70b5a8f9f08efe11c978b950e00c2841d44f63f4e709c711e909a.png)

SSL 인증서는 웹사이트를 인증하고 암호화된 연결을 사용할 수 있도록 하는 디지털 인증서입니다. 소유자에 대한 정보(연락 담당자 이름, 조직 이름, 국가, 때로는 주소 및 우편번호)를 포함할 수 있습니다. 다음 필터(및 기타 여러 필터)를 사용하여 이 정보를 검색할 수 있습니다:

- `certificate.issuer.email_address`
- `certificate.issuer.given_name`
- `certificate.issuer.organization`
- `certificate.issuer.postal_code`
- `certificate.issuer.street_address`
- `certificate.issuer.surname`

인증서의 거리 주소에 특정 단어가 포함된 IP 주소를 찾아보겠습니다:```
certificate.issuer.street_address:*mcgill*

Netlas에서 시도하기

API 요청 예제

Netlas CLI Tools:```bash netlas search "certificate.issuer.street_address:mcgill" -f json

root@kitploit:~
Curl:```bash
curl -X 'GET' \
  'https://app.netlas.io/api/responses/?q=certificate.issuer.street_address%3A*mcgill*&source_type=include&start=0&fields=*' \
  -H 'accept: application/json' \
  -H 'X-API-Key: YOUR_API_KEY' jq .items[].data.uri

코드 예제 (Netlas Python 라이브러리)

Certificates search Python

명령줄에서 실행:```bash python scripts/osint/certificates_search.py

root@kitploit:~
scripts/osint/certificates_search.py의 소스 코드:```python
import netlas

apikey = "YOUR_API_KEY"

# create new connection to Netlas
netlas_connection = netlas.Netlas(api_key=apikey)

# retrieve data from responses by query `certificate.issuer.street_address:*mcgill*`
netlas_query = netlas_connection.query(query="certificate.issuer.street_address:*mcgill*")


print (type(netlas_query))

# iterate over data and print: ip, url, cetificate issuer 
for response in netlas_query['items']:
    print (response['data']['uri'])
    print (response['data']['certificate']['issuer'])  

Netlas를 WayBack Machine의 대안으로 사용하기

Archive.org는 OSINT 전문가들이 웹사이트와 소셜 미디어 프로필 페이지의 과거 버전을 검색하여 현재는 삭제된 연락처 및 기타 정보를 찾는 데 사용되어 왔습니다.

하지만 불행히도 archive.org는 모든 사이트의 복사본을 저장하지 않으며, 그렇게 자주 저장하지도 않습니다 (일부 사이트의 경우 1년에 두세 번 이하로만 저장됩니다).

하지만 Netlas는 2021년부터 사이트의 과거 버전도 저장하고 있습니다!

사이트 검색에 가장 자주 사용되는 필터는 다음과 같습니다:``` http.title:"github.com"

root@kitploit:~

domain:github.com

root@kitploit:~

host:github.com

root@kitploit:~
![스캔 선택](https://assets.kitploit.com/production/public/readmes/6659/6fb8d1ed55265153faebb6ed93a9a5a184d8a6b54f0cf9fa12b92a304939f062.png)

검색어 입력 필드 옆 오른쪽 끝 아이콘을 클릭하면 스캔 날짜 선택 메뉴가 나타납니다. 이를 사용하여 특정 날짜에 저장된 사이트의 html 코드를 필터링할 수 있습니다.

![응답 본문 복사](https://assets.kitploit.com/production/public/readmes/6659/b59544af96ce2c341761eb5cd6f4b36ed2e271c14957a6ecb373a2b972fbeff6.png)

사이트가 어떻게 보이는지 확인하려면 "body" 필드(응답 탭)의 내용을 텍스트 편집기에 복사하고 html 코드에서 \t\r\n 문자를 삭제하세요.

![HTML 뷰어](https://assets.kitploit.com/production/public/readmes/6659/f1b8a6983795f5b608b8d2ec37f5069c588749655a361d70b250ca8c0df24967.png)

그런 다음 코드를 [Code beautify](https://codebeautify.org/htmlviewer)와 같은 온라인 html 프로모터 중 하나에 복사하세요. 또는 파일을 html 형식으로 저장한 다음 브라우저에서 여세요.


### 관련 웹사이트를 검색하는 9가지 방법

![관련 웹사이트 검색](https://assets.kitploit.com/production/public/readmes/6659/354bf2e8695fd9255ce513dba2685cc7c6595e8cb06d1c6f9e4d48bd3dcccb72.png)

개인이나 회사에 대한 정보를 수집할 때 어떤 식으로든 그들과 관련될 수 있는 사이트를 최대한 많이 찾는 것이 중요할 수 있습니다. Netlas를 사용하여 이를 수행하는 방법은 적어도 5가지가 있습니다.

1. 다양한 서비스의 ID(분석, 광고 시스템, 소셜 네트워크 및 게시 시스템과의 통합을 위한 애플리케이션). 이들의 중복은 한 사람 또는 팀이 관여했음을 나타낼 수 있습니다. 몇 가지 예:

Google Analytics:```
http.tracker.google_analytics:"G-X82FSVSMTV"

Google Tag Manager:``` http.tracker.google_analytics:"GTM-N6462KFQ"

root@kitploit:~
AddThis:```
http.body:"AT-ra-500bcd681b192302"

Facebook Pixel:``` http.tracker.facebook_pixel:317853189093681

root@kitploit:~
Yandex Metrika```
http.tracker.yandex_metrica:89723437

Amazon Publisher Servies:``` http.body:APS-XXXX

root@kitploit:~
예, 일부 사이트의 코드에서 모두 찾을 수 있습니다.
 
그리고 HTML 코드 상단(때로는 코드 전체)에서 가장 자주 찾을 수 있는 다양한 식별자가 있습니다.

[Netlas에서 시도하기](https://nt.ls/BCrw9)


2. 제휴 프로그램의 ID (검색 시 http.body를 사용하세요). 사람이 다른 사이트나 소셜 네트워크에 게시하는 제휴 링크에서 찾을 수 있습니다. 이는 다음과 같은 URL 매개변수(및 유사한 것)일 수 있습니다:```
aff_fcid=
user_id=
partner_id=
ref_id=
  1. Domain Whois Netlas 검색에서 조직 이름으로 검색

WHOIS에서 조직 검색``` "GitHub, Inc."

root@kitploit:~
[Netlas에서 시도해보기](https://app.netlas.io/whois_domains/?q=%22GitHub%2C%20Inc.%22&page=1&indices=)

4. DNS Netlas 검색에서 메일 서버로 검색

![DNS에서 메일 서버 검색](https://assets.kitploit.com/production/public/readmes/6659/28cbe86f74bbf0959803083816d8da4819e41aed6b8cd56a58fadc479e1fab34.png)```
mx:*.parklogic.com

Netlas에서 시도하기

  1. DNS Netlas 검색에서 네임 서버로 검색

DNS에서 네임 서버 검색``` ns:ns?.parklogic.com

root@kitploit:~
[Netlas에서 시도하기](https://app.netlas.io/domains/?q=mx%3A*.parklogic.com&page=1&indices=)

6. 파일(주로 사용자 로고 및 아바타) 언급 검색 [->](https://github.com/netlas-io/netlas-cookbook#search-file-mentions-looking-for-content-that-may-be-infringing-on-copyrights)

7. 서브도메인 검색 [->](https://github.com/netlas-io/netlas-cookbook#search-subdomains)

8. Whois 연락처 검색(Netlas 응답 검색에서) [->](https://github.com/netlas-io/netlas-cookbook#search-persons-nickname-or-email-in-whois-contacts)

9. 파비콘 검색 [->](https://github.com/netlas-io/netlas-cookbook#favicon-search)

## 스크래핑 (웹 페이지 본문에서 데이터 추출)

Netlas API는 연락처 및 기타 웹사이트 데이터를 수집하는 데 훌륭한 도구입니다. 첫째, 빠르게 작업할 수 있습니다. 둘째, 프록시를 사용할 필요가 없습니다. 셋째, 현재 사용할 수 없는 사이트에서도 데이터를 수집할 수 있습니다.

하지만 몇 가지 단점이 있습니다: Netlas는 사이트의 메인 페이지만 스캔하며, 일부 드문 사이트는 보호로 인해 데이터베이스에 포함되지 않습니다. 그래도 매우 유용할 수 있습니다.

스크래핑에는 세 가지 주요 접근 방식이 있습니다: HTML 태그와 CSS 선택자에서 정보 수집, 정규 표현식을 사용한 데이터 추출, AI 스크래핑입니다. 처음 두 가지를 자세히 살펴보겠습니다.

### Beatifulsoup 패키지

[Beatifulsoup](https://pypi.org/project/beautifulsoup4/)는 HTML 코드와 XML 파일을 파싱하기 위한 세계에서 가장 인기 있는 Python 패키지 중 하나입니다. 이를 사용하여 페이지 제목(\<h1> 태그에서, \<title> 태그가 아님)을 추출해 보겠습니다.

먼저 패키지를 설치합니다:```bash
pip install beautifulsoup4

그리고 실행하세요 scripts/osint/scraping_beatifulsoup.py:```bash python scripts/osint/scraping_beatifulsoup.py

root@kitploit:~
![Beautiful Soup 스크래핑](https://assets.kitploit.com/production/public/readmes/6659/2a56f2848aeac7180d0257067b18148c4ba13cf9dfdc3916a39a0247ee07a584.png)

스크립트 `scripts/osint/scraping_beatifulsoup.py`의 소스 코드:```python
import netlas
from bs4 import BeautifulSoup

apikey = "YOUR_API_KEY"

# create new connection to Netlas
netlas_connection = netlas.Netlas(api_key=apikey)

# retrieve data from responses by query `http.body:shop`
netlas_query = netlas_connection.query(query="http.body:shop")

# iterate over data and print: URL, h1 tags from body
for response in netlas_query['items']:
    print (response['data']['uri'])
    soup = BeautifulSoup(response['data']['http']['body'], "html.parser")
    try:
        print(soup.find("h1").get_text())
    except Exception:
        print("no h1 tags")
pass

웹 페이지의 다른 요소에서도 비슷한 방식으로 데이터를 추출할 수 있습니다:``` soup.find("h3").get_text() soup.find("id='loginform'").get_text() soup.find("class='forms'").get_text() soup.find("href='https://example.com'").get_text()

root@kitploit:~
특정 유형의 모든 요소를 찾으려면 find_all() 메서드를 사용하세요.

### Re 패키지

[Re](https://docs.python.org/3/library/re.html)는 정규 표현식을 사용하여 데이터를 검색하고 추출하기 위한 사전 설치된 파이썬 패키지입니다. 웹 페이지에서 연락처 정보를 추출하고 기타 많은 작업에 유용합니다. 작동 방식의 예를 살펴보겠습니다.

scripts/osint/scraping_re.py를 실행하세요:```bash
python scripts/osint/scraping_re.py

Re scraping

scripts/osint/scraping_re.py의 소스 코드:```python import netlas import re

apikey = "YOUR_API_KEY"

create new connection to Netlas

netlas_connection = netlas.Netlas(api_key=apikey)

retrieve data from responses by query http.body:shop

netlas_query = netlas_connection.query(query="http.body:shop")

iterate over data and print: URL, emails from body

for response in netlas_query['items']: print (response['data']['uri']) emails = re.findall("[a-zA-Z0-9-.]+@[a-zA-Z0-9-.]+", response['data']['http']['body']) try: print(emails) except Exception: print("no emails") pass

root@kitploit:~
Similarly, you can extract links, phone numbers, cryptocurrency wallet addresses and more. Ready patterns can be found in regular expression libraries:

[Regex Lib](https://regexlib.com/)
[UI Bakery Regex Library](https://uibakery.io/regex-library)
[Regex 101](https://regex101.com/)


### 스크래핑을 위한 기타 Python 패키지

Beaitiful soup와 Re 패키지는 Python을 사용하여 웹 페이지에서 데이터를 스크래핑하는 많은 도구 중 하나일 뿐입니다. 다음은 이러한 패키지의 몇 가지 추가 예입니다:


* [Scrapy](https://pypi.org/project/Scrapy/): 주로 크롤러(다른 페이지에서 발견된 링크를 사용하여 웹사이트 페이지를 탐색하는 도구)이며, 추가로 웹 페이지에서 데이터를 추출하는 광범위한 기능을 가지고 있습니다.
* [Selenium](https://pypi.org/project/selenium/): 브라우저 경험을 자동화하는 도구입니다. JavaScript로 생성된 콘텐츠에서 데이터를 추출할 수 있습니다.
* [Lxml](https://pypi.org/project/lxml/): XML 파일을 스크래핑하고 검증하는 도구입니다.
* [PDFtoText](https://pypi.org/project/pdftotext/) - PDF 파일에서 텍스트 콘텐츠를 추출하는 도구입니다.
* [pyChatGPT](https://pypi.org/project/pyChatGPT/) - CHATGP와 상호작용하기 위한 비공식 패키지 (OpenAI API 키 필요 없음)로, AI로 텍스트 정보를 분석할 수 있습니다.


## 암호화폐 조사를 위한 Netlas.io 사용

Netlas는 암호화폐 범죄를 전문으로 하는 연구자에게 훌륭한 기회를 제공합니다. 첫째, 지갑 주소와 거래 번호에 대한 참조를 검색하는 데 사용할 수 있습니다.  둘째, 취약한 채굴 농장, 노드 및 기타 암호화폐 인프라와 관련된 서버를 검색하는 데 사용할 수 있습니다.


### 채굴 농장 검색

![Search mining farms](https://assets.kitploit.com/production/public/readmes/6659/77f381d83fa1d1d482941093c638ccc1620adb14365831ef7d74efa51913b2ec.png)

Antminer 채굴 농장은 2013년 Bitmain에서 처음 출시된 이후로 세계에서 가장 인기 있는 채굴 농장 모델 라인 중 하나입니다. www_authenticate 헤더에 "antMiner"라는 단어가 있는지 확인하여 찾을 수 있습니다.```
http.headers.www_authenticate:antMiner

Try in Netlas

다른 유형의 마이닝 팜도 검색할 수 있습니다. 예를 들어:``` http.headers.www_authenticate:XMR-Stak-Miner

root@kitploit:~
여러 필터와 "miner/mining" 및 암호화폐 이름을 조합하여 실험해 보세요.

**API 요청 예제**

Netlas CLI Tools:```bash
netlas search "http.headers.www_authenticate:antMiner"

Curl:```bash curl -X 'GET'
'https://app.netlas.io/api/responses/?q=http.headers.www_authenticate%3AantMiner&source_type=include&start=0&fields=*'
-H 'accept: application/json'
-H 'X-API-Key: 'YOUR_API_KEY' | jq .items[].data.uri

root@kitploit:~
**코드 예제 (Netlas Python 라이브러리)**

![Maining farms search Python](https://assets.kitploit.com/production/public/readmes/6659/9b033acf5bc227191a51e0b969716bdda2540fe8a9f17373248f1494e1812164.png)

명령줄에서 실행:```bash
python scripts/crypto/mining_farms_search.py

scripts/crypto/mining_farms_search.py의 소스 코드:```python import netlas

apikey = "YOUR_API_KEY"

create new connection to Netlas

netlas_connection = netlas.Netlas(api_key=apikey)

retrieve data from responses by query http.headers.www_authenticate:antMiner

netlas_query = netlas_connection.query(query='http.headers.www_authenticate:antMiner')

iterate over data and print: uri, http headers

for response in netlas_query['items']: print (response['data']['uri']) print (response['data']['http']['headers'])

root@kitploit:~
### 암호화폐 채굴기에 감염된 웹사이트 검색

![채굴기가 주입된 웹사이트 검색](https://assets.kitploit.com/production/public/readmes/6659/0163afad4013a8a92217f48e4bb628666a6a61822a0a14f6e6cd7ab0c29138f9.png)

Coinhive는 웹사이트(주로 해킹된 사이트)가 방문자의 컴퓨터를 사용하여 암호화폐를 채굴할 수 있게 하는 서비스로, 2019년에 종료되었습니다. 그럼에도 불구하고, Coinhive에 대한 링크는 여전히 전 세계 많은 사이트에 포함되어 있습니다. 이제 그것들을 찾아보겠습니다:```
http.body:coinhive.min.js domain:*

Note that we use the domain:* filter to find sites specifically, not all devices.

Similarly, you can search for sites infected with other cryptominers (as well as other malicious code that executes on the user's side).

API 요청 예제

Netlas CLI Tools:```bash netlas search "http.body:coinhive.min.js domain:*"

root@kitploit:~
Curl:```bash
curl -X 'GET' \
   'https://app.netlas.io/api/responses/?q=http.body%3Acoinhive.min.js%20domain%3A*&source_type=include&start=0&fields=*' \
   -H 'accept: application/json' \
   -H 'X-API-Key: 'YOUR_API_KEY' | jq .items[].data.uri

코드 예제 (Netlas Python 라이브러리)

채굴 농장 검색 Python

명령줄에서 실행:```bash python scripts/crypto/search_sites_injected_with_miners.py

root@kitploit:~
소스 코드:```python
import netlas

apikey = "YOUR_API_KEY"

# create new connection to Netlas
netlas_connection = netlas.Netlas(api_key=apikey)

# retrieve data from responses by query `http.body:coinhive.min.js domain:*`
netlas_query = netlas_connection.query(query='http.body:coinhive.min.js domain:*')


# iterate over data and print: uri
for response in netlas_query['items']: 
    print (response['data']['uri'])

취약한 비트코인 노드 검색

비트코인 노드 검색

비트코인 노드는 TCP 연결을 위해 포트 8333을 사용합니다. 따라서 "port:" 검색 필터를 사용하여 쉽게 찾을 수 있습니다.``` port:8333 cve:*

root@kitploit:~
"cve:*" 필터를 사용하여 취약점이 있는 서버를 찾는다는 점에 유의하세요.

**API 요청 예제**

Netlas CLI Tools:```bash
netlas search "port:8333 cve:*"

Curl:```bash curl -X 'GET'
'https://app.netlas.io/api/responses/?q=port%3A8333%20cve%3A*&source_type=include&start=0&fields=*'
-H 'accept: application/json'
-H 'X-API-Key: 'YOUR_API_KEY' | jq .items[].data.uri

root@kitploit:~
**코드 예제 (Netlas Python Library)**

![Search bitcoin nodes Python](https://assets.kitploit.com/production/public/readmes/6659/057eebb8a7790208aeb3cea45714a5699c9c31abd83d1eb703ceee4f578986f8.png)

명령줄에서 실행:```bash
python scripts/crypto/search_bitcoin_nodes.py

scripts/crypto/search_bitcoin_nodes.py의 소스 코드:```python import netlas

apikey = "YOUR_API_KEY"

create new connection to Netlas

netlas_connection = netlas.Netlas(api_key=apikey)

retrieve data from responses by query port:8333 cve:*

netlas_query = netlas_connection.query(query='port:8333 cve:*')

iterate over data and print: uri, CVE name and description

for response in netlas_query['items']: print (response['data']['uri']) print (response['data']['cve'][0]['name']) print (response['data']['cve'][0]['description'])

root@kitploit:~
## Neltas를 침투 테스트에 사용하기

Netlas.io를 사용하면 다양한 유형의 취약점이 있는 사이트를 검색할 수 있습니다. 이는 취약점 번호(CVE-...), 서버에 설치된 소프트웨어 이름, 페이지 헤더의 특정 단어 및 기타 매개변수를 통해 수행할 수 있습니다.

가장 최근에 게시된 CVE(Common Vulnerabilities and Exposures)는 다음 사이트에서 추적할 수 있습니다:

* [CVE Details](https://www.cvedetails.com/)
* [VulDB](https://vuldb.com/)
* [OpenCVE](https://www.opencve.io/)

또한 당사는 [Twitter](https://twitter.com/Netlas_io), [Telegram](https://t.me/netlas), [Discord](https://nt.ls/discord) 피드 및 [Netlas Dorks](https://github.com/netlas-io/netlas-dorks) Github 저장소를 통해 취약한 장치와 소프트웨어를 검색하는 가장 관련성 높은 쿼리를 정기적으로 게시합니다.

이 섹션에서는 취약점이 있는 사이트와 서버를 검색하는 일반적인 원칙을 간단히 다루겠습니다.


### 서브도메인 검색

검색 쿼리에 별표를 사용하면 다양한 수준의 모든 서브도메인(이름이 특정 1차 도메인(.com) 또는 2차 도메인(google.com) 이름으로 끝나는 서브도메인)을 찾을 수 있습니다.

**검색 쿼리 예시**  

![서브도메인 검색 예시](https://assets.kitploit.com/production/public/readmes/6659/2ec8112759c93d396d8bf622ad7988833d4262aa8add2a2da46fdfe01f5aa717.png)```
domain:*.github.com OR host:*.github.com

Netlas에서 시도

API 요청 예제

Netlas CLI 도구:```bash netlas search "domain:.github.com OR host:.github.com" -f json

root@kitploit:~
Curl:```bash
curl -X 'GET' \
  'https://app.netlas.io/api/responses/?q=domain%3A*.github.com%20OR%20host%3A*.github.com&source_type=include&start=0&fields=*' \
  -H 'accept: application/json' \
  -H 'X-API-Key: YOUR_API_KEY' | jq .items[].data.uri

코드 예제 (Netlas Python 라이브러리)

서브도메인 검색 예제 Python

명령줄에서 실행:```bash python scripts/pentest/subdomain_search.py

root@kitploit:~
scripts/pentest/subdomain_search.py의 소스 코드:```python
import netlas

apikey = "YOUR_API_KEY"

# create new connection to Netlas
netlas_connection = netlas.Netlas(api_key=apikey)

# retrieve data from responses by query `domain:*.github.com OR host:*.github.com`
netlas_query = netlas_connection.query(query="domain:*.github.com OR host:*.github.com")


# iterate over data and print: ip, url
for response in netlas_query['items']:
    print (response['data']['ip'])
    print (response['data']['uri'])

특정 취약점이 있는 사이트 검색

검색 쿼리 예시

CVE search``` cve.name:CVE-2022-22965

root@kitploit:~
[Netlas에서 시도하기](https://app.netlas.io/responses/?q=cve.name%3ACVE-2022-22965&page=1&indices=)

**API 요청 예제**

Netlas CLI Tools:```bash
netlas search "cve.name:CVE-2022-22965" -f json

CVE-2022-22965 - JDK 9+에서 실행되는 Spring MVC 또는 Spring WebFlux 애플리케이션은 데이터 바인딩을 통해 원격 코드 실행(RCE)에 취약할 수 있습니다. 자세히

Curl:```bash curl -X 'GET'
'https://app.netlas.io/api/responses/?q=http.body%3A1%3F234%3F567%3F89%3F99%20OR%20http.body%3A12345678999%20OR%20http.body%3A1234%3F5678%3F999&source_type=include&start=0&fields=*'
-H 'accept: application/json'
-H 'X-API-Key: YOUR_API_KEY' jq .items[].data.uri

root@kitploit:~
**코드 예제 (Netlas Python 라이브러리)**

![CVE 검색 예제 Python](https://assets.kitploit.com/production/public/readmes/6659/56e2afbc833f063d53d416a1aa8145a8af62e8183d4367dfa365285078789eba.png)

명령줄에서 실행:```bash
python scripts/pentest/cve_search.py

scripts/pentest/cve_search.py의 소스 코드:```python import netlas

apikey = "YOUR_API_KEY"

create new connection to Netlas

netlas_connection = netlas.Netlas(api_key=apikey)

retrieve data from responses by query cve.name:CVE-2022-22965

netlas_query = netlas_connection.query(query="cve.name:CVE-2022-22965")

iterate over data and print: ip, url

for response in netlas_query['items']: print (response['data']['ip']) print (response['data']['uri'])

root@kitploit:~
### 설명에 특정 단어가 포함된 취약점이 있는 사이트 검색

특정 유형의 취약점이 있는 서버를 조사할 필요 없이 특정 그룹(예: Oracle WebLogic Server 또는 WordPress 사이트)의 취약한 서버만 확인하려면 키워드와 cve.description: 필터를 사용하여 검색할 수 있습니다.

취약점에 대해 익스플로잇이 게시된 사이트를 필터링하려면 cve.has_exploit:true를 사용하세요.

**검색 쿼리 예시**  

![CVE description search](https://assets.kitploit.com/production/public/readmes/6659/03f621bed9ea16357222f19930d309b2d8d576761726cfa1a43f3f06d0f68353.png)```
cve.description:weblogic AND cve.has_exploit:true

Netlas에서 시도하기

API 요청 예시

Netlas CLI 도구:```bash netlas search "cve.description:weblogic AND cve.has_exploit:true" -f json

root@kitploit:~
Curl:```bash
curl -X 'GET' \
  'https://app.netlas.io/api/responses/?q=cve.description%3Aweblogic%20AND%20cve.has_exploit%3Atrue&source_type=include&start=0&fields=*' \
  -H 'accept: application/json' \
  -H 'X-API-Key: YOUR_API_KEY | jq .items[].data.uri

코드 예제 (Netlas Python 라이브러리)

CVE description search Python

명령줄에서 실행:```bash python scripts/pentest/cve_description_search.py

root@kitploit:~
scripts/pentest/cve_description_search.py의 소스 코드:```python
import netlas

apikey = "YOUR_API_KEY"

# create new connection to Netlas
netlas_connection = netlas.Netlas(api_key=apikey)

# retrieve data from responses by query `cve.description:weblogic AND cve.has_exploit:true`
netlas_query = netlas_connection.query(query="cve.description:weblogic AND cve.has_exploit:true")

# iterate over data and print:  url, first CVE name first CVE description
for response in netlas_query['items']:
    print (response['data']['uri'])
    print (response['data']['cve'][0]['name'])
    print (response['data']['cve'][0]['description'])

서버 HTTP 헤더로 검색

이 방법을 사용하면 특정 회사에서 제조한 장치를 찾을 수 있습니다.

검색 쿼리 예시

서버 소프트웨어로 검색``` http.headers.server:"yawcam"

root@kitploit:~
YawCam 웹 카메라 검색.

[Netlas에서 시도하기](https://app.netlas.io/responses/?q=http.headers.server%3A%22yawcam%22&page=1&indices=)

**API 요청 예제**

Netlas CLI 도구:```bash
netlas search 'http.headers.server:"yawcam"' -f json

쿼리에 큰따옴표를 사용할 경우, 쿼리 자체는 작은따옴표 안에 작성됩니다.

Curl:```bash curl -X 'GET'
'https://app.netlas.io/api/responses/?q=http.headers.server%3A%22yawcam%22&source_type=include&start=0&fields=*'
-H 'accept: application/json'
-H 'X-API-Key: YOUR_API_KEY' | jq .items[].data.uri

root@kitploit:~
**코드 예제 (Netlas Python 라이브러리)**

![Http headers server search Python](https://assets.kitploit.com/production/public/readmes/6659/87261dd31bfd191d1eae9fe1b9f76537ae2ebfde6c44ed40dc7b67c3fa215249.png)

명령줄에서 실행:```bash
python scripts/pentest/server_name_search.py

scripts/pentest/server_name_search.py의 소스 코드:```python import netlas

apikey = "YOUR_API_KEY"

create new connection to Netlas

netlas_connection = netlas.Netlas(api_key=apikey)

retrieve data from responses by query http.headers.server:"yawcam"

netlas_query = netlas_connection.query(query='http.headers.server:"yawcam"')

iterate over data and print: IP, URL, server name

for response in netlas_query['items']: print (response['data']['ip']) print (response['data']['http']['headers']['server'])

root@kitploit:~
#### 기본 로그인 및 비밀번호 <!-- omit in toc -->

서버 헤더에서 소프트웨어 이름으로 검색하는 실용적인 응용 중 하나는 특정 공급업체의 장치를 검색하는 것입니다. 이는 특정 취약점이 있는 장치를 검색할 때와 표준 로그인 및 비밀번호를 가진 장치를 검색할 때 모두 필요할 수 있습니다.

![Default passwords](https://assets.kitploit.com/production/public/readmes/6659/1aad3e67d42397a0dd3ecf3e29e16fbc964401c962ab7482ba353578112ebe8c.png)

다양한 장치 모델에 대한 표준 로그인 및 비밀번호는 특별한 목록에서 찾을 수 있습니다. 예를 들어:

* [최고 라우터 모델을 위한 기본 라우터 로그인 비밀번호 (2023 목록)](https://www.softwaretestinghelp.com/default-router-username-and-password-list/)
* [보안 카메라를 위한 기본 사용자 이름 – 비밀번호 – IP 주소](https://www.a1securitycameras.com/blog/default-username-passwords-ip-addresses-for-surveillance-cameras/)
* [거의 모든 IP 카메라의 기본 비밀번호](https://www.hackers-arise.com/post/the-default-passwords-of-nearly-every-ip-camera)
* [Datarecovery의 기본 비밀번호 목록](https://datarecovery.com/rd/default-passwords/)

표준 로그인 및 비밀번호를 사용하여 타인의 시스템에 로그인하는 것은 윤리 규칙을 위반하며 해당 국가에서 불법일 수 있음을 기억하십시오.


### Favicon 해시로 취약한 서버 검색

특정 취약점에 노출된 웹 서버를 찾는 한 가지 방법은 특정 웹 서버 소프트웨어의 favicon ico를 검색하는 것입니다.

**검색 쿼리 예시**  

![Search CVE by favicon hash](https://assets.kitploit.com/production/public/readmes/6659/b0a93463790400a640c81c171f5a361de66eb6e6674a8cd993128c08c8199ae9.png)```
http.favicon.hash_sha256:ebaaed8ab7c21856f888117edaf342f6bc10335106ed907f95787b69878d9d9e

이 쿼리는 SecurePoint 파비콘(CVE-2023-22620)을 검색합니다.

Netlas에서 시도하기

API 요청 예제

Netlas CLI Tools:```bash netlas search "http.favicon.hash_sha256:ebaaed8ab7c21856f888117edaf342f6bc10335106ed907f95787b69878d9d9e" -f json

root@kitploit:~
Curl:```bash
curl -X 'GET' \
   'https://app.netlas.io/api/responses/?q=http.favicon.hash_sha256%3Aebaaed8ab7c21856f888117edaf342f6bc10335106ed907f95787b69878d9d9e&source_type=include&start=0&fields=*' \
  -H 'accept: application/json' \
  -H 'X-API-Key: YOUR_API_KEY' | jq .items[].data.uri

코드 예제 (Netlas Python 라이브러리)

Favicon hash search Python

명령줄에서 실행:```bash python scripts/pentest/favicon_hash_search.py

root@kitploit:~
scripts/pentest/favicon_hash_search.py의 소스 코드:```python
import netlas

apikey = "YOUR_API_KEY"

# create new connection to Netlas
netlas_connection = netlas.Netlas(api_key=apikey)

# retrieve data from responses by query `http.favicon.hash_sha256:ebaaed8ab7c21856f888117edaf342f6bc10335106ed907f95787b69878d9d9e`
netlas_query = netlas_connection.query(query="http.favicon.hash_sha256:ebaaed8ab7c21856f888117edaf342f6bc10335106ed907f95787b69878d9d9e")


# iterate over data and print: IP,URL,web page title
for response in netlas_query['items']:
    print (response['data']['ip'])
    print (response['data']['uri'])
    print (response['data']['http']['title'])

취약한 서버를 태그 이름으로 검색하기

서로 다른 소프트웨어를 실행하는 서버 간의 검색을 간소화하기 위해 Netlas는 검색 결과에 특정 태그를 자동으로 추가합니다.

태그 예시:

  • 블로그 - medium, wordpress, tumblr
  • CDN - google_cloud, cloudflare, keycdn
  • CMS - ucoz, joomla, pyrocms
  • 전자상거래 - opencart, magento, wix

"tag.name:" 필터를 사용하여 태그로 검색할 수 있습니다. "tag.category:" 필터를 사용하여 태그 카테고리로 검색할 수도 있습니다. Netlas 홈페이지에서 검색어 입력 상자 오른쪽에 있는 아이콘을 클릭하면 사용 가능한 모든 태그와 카테고리 목록이 표시됩니다.

참고: 모든 요금제에서 태그 사용을 지원하는 것은 아닙니다.

검색 쿼리 예시

Search CVE by tag name``` tag.name:"adobe_coldfusion"

root@kitploit:~
이 쿼리는 Adobe ColdFusion (CVE-2023-26359)을 검색합니다.

[Netlas에서 시도하기](https://app.netlas.io/responses/?q=tag.name%3A%22adobe_coldfusion%22&page=1&indices=)

**API 요청 예제**

Netlas CLI 도구:```bash
netlas search 'tag.name:"adobe_coldfusion"' -f json

참고: 쿼리에서 큰따옴표를 사용할 때, 쿼리 자체는 작은따옴표 안에 작성됩니다.

Curl:```bash curl -X 'GET'
'https://app.netlas.io/api/responses/?q=tag.name%3A%22adobe_coldfusion%22&source_type=include&start=0&fields=*'
-H 'accept: application/json'
-H 'X-API-Key: YOUR_API_KEY' | jq .items[].data.uri

root@kitploit:~
**코드 예제 (Netlas Python Library)**

![Favicon 해시 검색 Python](https://assets.kitploit.com/production/public/readmes/6659/df06bcb4bb2b0cd939656534bc1c2c5c94897cf699309ebf130d0fb26931c630.png)

명령줄에서 실행:```bash
python scripts/pentest/search_tag_name.py

scripts/pentest/search_tag_name.py의 소스 코드:```python import netlas

apikey = "YOUR_API_KEY"

create new connection to Netlas

netlas_connection = netlas.Netlas(api_key=apikey)

retrieve data from responses by query tag.name:"adobe_coldfusion"

netlas_query = netlas_connection.query(query='tag.name:"adobe_coldfusion"')

iterate over data and print: IP,URL

for response in netlas_query['items']: print (response['data']['ip']) print (response['data']['uri'])

root@kitploit:~
### 주변(또는 다른 지역)의 취약한 서버 및 장치 검색

![CVE location search](https://assets.kitploit.com/production/public/readmes/6659/1cc7069b697b4c21a266b05804238fe541962e7baacb2cb0c98c10128cf6b126.png)

주변에 취약한 사이트와 장치가 얼마나 있는지 알고 싶으신가요? 특정 지역에서 CVE 필드가 채워진 모든 IP 주소를 검색하기만 하면 됩니다.```
geo.city:London AND cve:*

Netlas에서 시도하기

다른 지리적 위치 필터를 사용할 수도 있습니다.

  • geo.continent
  • geo.country
  • geo.location

API 요청 예제

Netlas CLI Tools:``` geo.city:London AND cve:*

root@kitploit:~
Curl:```bash
curl -X 'GET' \
  'https://app.netlas.io/api/responses/?q=geo.city%3ALondon%20AND%20cve%3A*&source_type=include&start=0&fields=*' \
   -H 'accept: application/json' \
   -H 'X-API-Key: 'YOUR_API_KEY' | jq .items[].data.domain

코드 예제 (Netlas Python 라이브러리)

위치 CVE 검색 Python

명령줄에서 실행:```bash python scripts/pentest/cve_location_search.py

root@kitploit:~
scripts/pentest/cve_location_search.py의 소스 코드:```python
import netlas

apikey = "YOUR_API_KEY"

# create new connection to Netlas
netlas_connection = netlas.Netlas(api_key=apikey)

# retrieve data from responses by query `geo.city:London AND cve:*`
netlas_query = netlas_connection.query(query='geo.city:London AND cve:*')


# iterate over data and print: uri, cve name, location
for response in netlas_query['items']: 
    print (response['data']['uri'])
    print (response['data']['cve'][0]['name'])
    print (response['data']['geo']['city'])

로그인/관리자 패널 검색

관리자 패널 검색

많은 사이트와 서버에는 사이트나 서버에 대한 전체 제어 권한을 얻는 데 사용할 수 있는 로그인 및 비밀번호 웹 페이지가 있습니다 (기본 비밀번호 사용, 무차별 대입 공격 또는 취약점 악용을 통해).

uri: 또는/및 http.title 필터를 사용하여 찾을 수 있습니다.``` uri:login.php uri:login.aspx uri:user http.title:login uri:admin http.title:login http.title:admin http.title:panel

root@kitploit:~
조합이 매우 많습니다. 취약한 서버의 패널만 찾으려면 필터 `cve:*`를 사용하세요.

또한, 태그를 사용하여 설치된 소프트웨어로 서버를 필터링할 수 있다는 것을 잊지 마세요. 예를 들어:```
tag.1c_bitrix:*
tag.Cisco:
tag.amazon_s3:*
tag.drupal:*
tag.wordpress:*

취약한 데이터베이스 관리자 패널 검색

데이터베이스 관리자 패널 검색

취약한 phpMyAdmin 관리자 패널(MySQL 데이터베이스를 관리하는 가장 인기 있는 소프트웨어 중 하나)을 검색해 보겠습니다:``` http.title:phpMyAdmin cve:*

root@kitploit:~
그 외 인기 있는 데이터베이스 관리 도구에 대한 몇 가지 예시는 다음과 같습니다:

[Adminer](https://www.adminer.org/):```
http.title:adminer http.title:login cve:*

PostgreSQL``` http.title:(phpPgAdmin OR pgadmin) cve:*

root@kitploit:~
또한 태그나 특별 필터를 사용하여 다양한 데이터베이스용 소프트웨어가 설치된 서버를 검색할 수 있습니다:```
tag.adminer:*
tag.phpMyAdmin:*
tag.elastic:*
mongodb:*
mssql:*
mysql:*
django:*

이러한 방식으로 발견된 서버의 관리자 패널을 검색하는 것은 사이트 관리자가 표준 링크를 더 안전한 링크로 변경하는 경우가 많기 때문에 쉬운 일이 아닐 수 있습니다.

SQL 인젝션에 취약한 사이트 검색

SQL 인젝션 검색

SQL 인젝션은 URL 매개변수를 조작하여 데이터베이스 쿼리를 실행할 수 있게 하는 취약점 유형입니다(이는 잘못된 구성이나 품질이 낮은 코드로 인해 발생할 수 있습니다).

SQL 인젝션에 잠재적으로 취약한 페이지를 찾는 가장 오래된 기술 중 하나는 Google Dorks를 사용하여 MySQl 쿼리에서 오류 메시지 표시가 활성화된 페이지를 검색하는 것입니다.

Netlas에서도 유사한 검색을 수행할 수 있습니다:``` http.body:mysql_fetch_array http.body:warning

root@kitploit:~
[Try in Netlas](https://app.netlas.io/responses/?q=http.body%3Amysql_fetch_array%20http.body%3Awarning&page=1&indices=)

몇 가지 다른 예시:```
http.body:mysql_num_rows http.body:warning
http.body:mysql_connect http.body:denied
http.body:mysql_query http.body:warning
http.body:pg_connect http.body:fatal

API 요청 예제

Netlas CLI Tools:```bash netlas search "http.body:mysql_fetch_array http.body:warning" -f json

root@kitploit:~
Curl:```bash
curl -X 'GET' \
  'https://app.netlas.io/api/responses/?q=http.body%3Amysql_fetch_array%20http.body%3Awarning&source_type=include&start=0&fields=*' \
  -H 'accept: application/json' \
  -H 'X-API-Key: YOUR_API_KEY' jq .items[].data.uri

코드 예제 (Netlas Python 라이브러리)

SQL 인젝션 검색 Python

명령줄에서 실행:```bash python scripts/pentest/sql_injection_search.py

root@kitploit:~
scripts/pentest/sql_injection_search.py의 소스 코드:```python
import netlas

apikey = "YOUR_API_KEY"
 
# create new connection to Netlas
netlas_connection = netlas.Netlas(api_key=apikey)

# search in Netlas "http.body:mysql_fetch_array http.body:warning"
netlas_query = netlas_connection.query(query="http.body:mysql_fetch_array http.body:warning")

# iterate over data and print: uri, web page body
for response in netlas_query['items']:
    print (response['data']['uri'])  
    print (response['data']['http']['body'])    

You may also use the following filters to search for vulnerable MySQL servers:

  • mysql.error_code
  • mysql.error_id
  • mysql.error_message

IoT 검색: 9가지 기본 방법

Netlas는 웹사이트와 서버뿐만 아니라 인터넷에 연결된 모든 장치(스마트 홈 가전, 감시 카메라, 프린터, 라우터, 신호등, 의료 장비 등)를 검색합니다.

이러한 장치를 찾는 네 가지 주요 방법이 있습니다.

제목으로 검색

IoT 제목 검색

가장 쉬운 방법은 응답의 http 제목에서 공급업체 이름이나 장치 유형을 검색하는 것입니다.

Jeedom 홈 오토메이션 장치를 검색해 보세요:``` http.title:Jeedom

root@kitploit:~
[Netlas에서 시도해보기](https://app.netlas.io/responses/?q=http.title%3AJeedom&page=1&indices=)

또는 Avigilon 웹캠:```
http.title:"Avigilon"

Netlas에서 시도하기

이 방법에는 두 가지 단점이 있습니다. 첫째, 관련 없는 결과가 많이 나타난다는 점입니다(단지 제목에 관련 단어가 포함된 웹사이트들). 그러나 따옴표를 사용하고 port:와 같은 추가 검색 필터를 적용하면 그 수가 줄어듭니다.

둘째, 많은 IoT 장치가 http 제목에 식별 가능한 정보를 포함하지 않는다는 점입니다. 따라서 다른 검색 필터도 유용할 수 있습니다.

본문 내 검색

IoT 본문 검색

마찬가지로, http 응답 본문에서 키워드를 검색해 볼 수 있습니다. 적어도 일반적인 웹사이트 중 일부를 걸러내려면 NOT domain:* 필터를 사용하세요. Reolink 카메라를 검색해 보겠습니다:``` http.body:(clip-status) NOT domain:*

root@kitploit:~
The example isn't quite right, so these cameras can be found using tags (more on that below).


### Search by Port  Number

![Iot port search](https://assets.kitploit.com/production/public/readmes/6659/c7e51e69a0d102a1617d1eb5ed71fcfac72aa8289ef40e3da9097aa1f82155cc.png)

Different IoT devices use different ports for communication. And by the open port number, you can hypothetically assume that the IP address belongs to a certain type of device (**often the assumption is correct, but there can be inaccuracies and coincidences**).

Try to search Internet radio (port 8000):```
port:8000 http.title:radio

Netlas에서 시도해보기

또는 포트 7547이 열려 있는 모든 장치(CWMP를 통해 라우터를 원격 관리하는 데 사용됨):``` port:7547

root@kitploit:~
[Netlas에서 시도하기](https://app.netlas.io/responses/?q=port%3A7547&page=1&indices=)


### 배너로 검색

![IoT 배너 검색](https://assets.kitploit.com/production/public/readmes/6659/fb8cf3ee79c9baf3469693d364d38eb8c636e171d98523d0920cc1feb948cc9b.png)

Telnet 프로토콜을 사용하는 라우터를 찾아보겠습니다 (port:23으로 필터링할 수도 있습니다):```
telnet.banner:router

Netlas에서 시도하기

또는 모든 프로토콜의 배너 검색:``` *.banner:router

root@kitploit:~
[Netlas에서 시도해보기](https://app.netlas.io/responses/?q=%5C*.banner%3Arouter&page=1&indices=)

### 파비콘으로 검색

![IoT 파비콘 검색](https://assets.kitploit.com/production/public/readmes/6659/dde45b8e6a3dcaea41ff21dc27a5eee558c3a5e046963f1ebaeb67397314a03b.png)

특정 소프트웨어가 설치된 장치를 찾는 가장 쉬운 방법 중 하나는 파비콘으로 검색하는 것입니다. 다양한 Cisco 제품이 사용되는 곳을 찾아보겠습니다.```
http.favicon.hash_sha256:62a8461e328d5bace3780ff738d0b58f6502592c04afa564e0a8a792583a7bfb

Try in Netlas

Netlas에서 파비콘으로 검색하는 세 가지 주요 방법:

  1. 검색 결과 왼쪽에 있는 아이콘을 클릭합니다.
  2. 검색창 오른쪽에 있는 파비콘 검색 버튼을 클릭하고 팝업 창에 파비콘 링크를 붙여넣습니다.
  3. 검색창 오른쪽에 있는 파비콘 검색 버튼을 클릭하고 파비콘 파일을 업로드합니다.

서버 헤더로 검색

Iot headers search

때때로 HTTP 제목에 장치를 식별하는 정보가 없을 수 있지만, 다른 헤더에는 있을 수 있습니다. 예를 들어, http.server.header:``` http.headers.server:"i-Catcher Console"

root@kitploit:~
[Try in Netlas](https://app.netlas.io/responses/?q=http.headers.server%3A%22i-Catcher%20Console%22&page=1&indices=)

Netlas는 수십 가지 헤더 유형에 대한 검색을 지원합니다. 다양한 변형을 시도해 보세요.

### 쿠키로 검색

![Iot cookie search](https://assets.kitploit.com/production/public/readmes/6659/8ca9d08b8f1b835c8fd2a0c62908e20102b439b90aeb49a718619f125daa6b61.png)

Eco JS 주차장 검색:```
http.headers.set_cookie:(regist_carNo=)

Try in Netlas

태그로 검색

Iot tag search

이 방법은 유료 구독이 필요할 수 있습니다. 가격 보기

태그(카테고리)로 장치를 검색할 수도 있습니다.``` tag.category:"IoT" tag.category:"Web cameras"

root@kitploit:~
[Try in Netlas](https://app.netlas.io/responses/?q=tag.category%3A%22Web%20cameras%22&page=1&indices=)

태그는 자동으로 할당되며 일부 적합한 장치가 해당 카테고리에 포함되지 않을 수 있다는 점을 기억하세요.


### 추가 검색 필터

특정 지리적 위치에 있는 IoT 장치를 검색할 수 있습니다:

- `geo.city`
- `geo.country`
- `geo.continent`

IP 주소 범위로 장치 필터링:```
ip:[162.245.241.131 TO 162.245.241.133]

또는 "신규" 취약점이 있는 장치:``` cve.name:2023

root@kitploit:~
More examples of queries to search for IoT devices can be found here:

[Netlas Dorks](https://github.com/netlas-io/netlas-dorks)


## Darknet 연구를 위한 Netlas.io 사용

Netlas의 주요 장점 중 하나는 Google에 인덱싱되지 않은 항목을 검색하는 데 사용할 수 있다는 것입니다. 이것은 관례적으로 딥웹(DeepWeb)이라고 부를 수 있는 것입니다. 예를 들어, FTP 서버나 텔넷(Telnet) 서버:```
ftp.banner:*
root@kitploit:~
telnet.banner:*

하지만 불행히도 Netlas는 글로벌 IP 주소만 스캔하기 때문에 다크넷(.onion, .i2p 등)을 인덱싱하지 않습니다. 그러나 대체 네트워크 인프라를 탐색하고 .onion 사이트에 대한 링크를 찾는 데 여전히 사용할 수 있습니다.

Tor 종료 노드 검색

Tor 종료 노드는 웹 트래픽이 Tor 네트워크를 떠나 목적지로 전달되는 지점입니다. 활성 Tor 진입 노드의 IP 주소 최신 목록은 TorProject 웹사이트에서 항상 확인할 수 있습니다:

Tor Project's list of exit nodes

Netlas를 사용하여 활성 Tor 종료 노드에 대한 정보를 한 번에 수집하는 방법을 살펴보겠습니다. 이 예제는 도메인 또는 IP 주소 목록에 대한 정보를 수집해야 하는 다른 모든 작업에 유용할 것입니다.

Run scripts/darknet/tor_nodes.py:```bash python scripts/darknet/tor_nodes.py

root@kitploit:~
![Tor 출구 노드 정보 수집](https://assets.kitploit.com/production/public/readmes/6659/c1d2c2e9542694adbe3a8f1b1332e803b4ad2e39d1ae46f4a8c32a80ef5a133f.png)

scripts/darknet/tor_nodes.py의 소스 코드:```python
import netlas
import urllib
import time

apikey = 'YOUR_API_KEY'

# create new connection to Netlas
netlas_connection = netlas.Netlas(api_key=apikey)

# read file with Tor Exit Nodes IPs line by line
response = urllib.request.urlopen('https://check.torproject.org/torbulkexitlist?ip=1.1.1.1')
ip_lines = response.readlines()

# save each line to ip variable
for ip in ip_lines:
     # wait one second
     time.sleep(1)
     # conver byte string to text
     ip=ip.decode("utf-8")
     # retrieve data from responses by query `ip: + tor exit node ip`
     netlas_query = netlas_connection.query(query="ip:"+ip)

    # iterate over data and print: ip, geo data, banner text

     for response in netlas_query['items']:
         print(response['data']['ip'])
         print(response['data']['geo'])
         print(response['data']['ntp']['banner'])
     pass
pass

time 패키지와 sleep 메서드를 사용하는 것은 간단한 예제에만 좋습니다. 최선의 해결책은 요율 제한 패키지를 사용하는 것입니다.

.onion 사이트 링크 수집

위에서 언급했듯이 Netlas는 글로벌 도메인만 스캔하므로 .onion 도메인을 검색할 수 없습니다. 하지만 웹 페이지 텍스트에서 .onion 도메인에 대한 참조를 검색할 수 있습니다. 다음은 이를 수행하는 간단한 파이썬 스크립트(정규 표현식 포함)의 예입니다:

Run scripts/darknet/onion_links.py:```bash python scripts/darknet/onion_links.py

root@kitploit:~
![Onion links collecting](https://assets.kitploit.com/production/public/readmes/6659/979fff15ed6e8cc399cc755cb292978b22a93d11ee14e59bf7690365d3e2842b.png)

scripts/darknet/onion_links.py의 소스 코드:```python
import netlas
import re

apikey = "YOUR_API_KEY"

# create new connection to Netlas
netlas_connection = netlas.Netlas(api_key=apikey)

# retrieve data from responses by query `http.body:*.onion AND forum`
netlas_query = netlas_connection.query(query="http.body:(*.onion AND forum)")


# iterate over data and print: URL, .onion link from body
for response in netlas_query['items']:
    print(response['data']['uri'])
    onion_links = re.findall("[a-z-1-9]*\.onion", response['data']['http']['body'])  
    try:
         print(onion_links)
    except:
         print("no onion links")
pass

같은 방식으로 I2Pin과 같은 다른 네트워크의 링크를 수집할 수 있습니다:``` http.body:*.i2p

root@kitploit:~
## 파일, 백업 및 로그 디렉토리 검색

![Directory search](https://assets.kitploit.com/production/public/readmes/6659/27773f3dbb2ba7b3fd3be7a41262cef61c41c2a988e6ed55ce67f593c7e7a06f.png)

구성 오류(때로는 의도적으로)로 인해 파일 디렉토리를 열어 두는 사이트와 서버가 엄청나게 많습니다. 다음은 이러한 디렉토리를 찾는 데 도움이 되는 몇 가지 쿼리 예시입니다.

모든 파일 디렉토리 검색:```
http.title:Index http.title:of

로그 파일이 있는 디렉토리 검색:``` http.title:Index http.title:of http.body:logs

root@kitploit:~
데이터베이스 덤프가 있는 디렉토리 검색:```
http.title:Index http.title:of http.body:sql

보관된 백업이 있는 디렉토리 검색:``` http.title:Index http.title:of http.body:backup?zip

root@kitploit:~
SSH 접속 정보가 있는 디렉토리 검색:```
http.title:Index http.title:of http.body:("ssh_config" OR "ssh_known_hosts" OR "authorized_keys" OR "id_rsa" OR "id_dsa")

다른 권한 정보가 있는 파일이 있는 디렉토리 검색:``` http.title:Index http.title:of http.body:("pass" OR "logins" OR "config" OR "password")

root@kitploit:~
사용자가 다운로드한 파일이 있는 디렉토리 검색:```
http.title:index http.title:of http.body:downloads

Docker 구성 파일이 있는 디렉토리 검색:``` http.title:index http.title:of http.body:docker-compose

root@kitploit:~
다른 유사한 요청을 수백 가지 더 생각할 수 있습니다. 다양한 파일 이름과 확장자를 실험해 보세요.


## Netlas.io를 디지털 포렌식 및 침해 대응에 사용하기

이 섹션은 OSINT용 Netlas 섹션과 분리하기 매우 어렵습니다. 거기에 나열된 쿼리는 디지털 포렌식 관련자에게도 유용할 것이기 때문입니다.

이 섹션에서는 예를 들어 네트워크의 기술 인프라에 대한 정보를 수집하거나 피싱 공격을 조사하는 데 도움이 될 수 있는 보다 "기술적인" 쿼리를 설명합니다.


### SMTP 서버 정보 수집

SMTP(Simple Mail Transfer Protocol)는 이메일을 보내고 받을 수 있게 해주는 통신 프로토콜입니다. 대부분의 이메일 클라이언트에서 이메일을 볼 때 "원본 보기" 기능을 사용할 수 있으며, 이를 통해 이메일이 발송된 SMTP 서버의 주소를 볼 수 있습니다.

Netlas를 사용하면 다른 IP나 도메인과 마찬가지로 SMTP 서버에 대한 정보를 얻을 수 있으며, SMTP 배너의 텍스트를 검색하여 특정 도메인, 회사 또는 호스팅 제공업체와 관련된 서버를 찾을 수 있습니다.

**검색 쿼리 예시**  

![SMTP 배너 검색](https://assets.kitploit.com/production/public/readmes/6659/e97e5c301c148f4f500d3933ada00375a24ab6bafbc05647d9c227f2b2d3cbbd.png)```
smtp.banner:fornex.cloud

Netlas CLI Tools:```bash netlas search "smtp.banner:fornex.cloud" -f json

root@kitploit:~
Curl:```bash
curl -X 'GET' \
  'https://app.netlas.io/api/responses/?q=smtp.banner%3Afornex.cloud&source_type=include&start=0&fields=*' \
  -H 'accept: application/json' \
  -H 'X-API-Key: 'YOUR_API_KEY' | jq .items[].data.smtp.banner

코드 예제 (Netlas Python 라이브러리)

SMTP banner search Python

명령줄에서 실행:```bash python scripts/dfir/smtp_banner_search.py

root@kitploit:~
scripts/dfir/smtp_banner_search.py의 소스 코드:```python
import netlas

apikey = "YOUR_API_KEY"

# create new connection to Netlas
netlas_connection = netlas.Netlas(api_key=apikey)

# retrieve data from responses by query `smtp.banner:fornex.cloud`
netlas_query = netlas_connection.query(query="smtp.banner:fornex.cloud")


# iterate over data and print: SMTP banner, URL, ISP
for response in netlas_query['items']:
    print (response['data']['smtp']['banner'])
    print (response['data']['uri'])
    print (response['data']['isp'])

피싱에 잠재적으로 사용될 수 있는 도메인 검색

사기꾼의 대표적인 방법 중 하나는 유명 회사의 도메인과 철자가 매우 유사한 도메인을 사용하는 것입니다.

Netlas와 퍼지 검색을 사용하여 특정 회사에 대한 이러한 도메인을 찾을 수 있습니다.

도메인 퍼지 검색

Whois 도메인 검색을 열고 회사 도메인 이름 + ~를 입력하세요. 예:

root@kitploit:~
netlas.com~

domain:facebook.com~

root@kitploit:~
[Netlas에서 시도](https://app.netlas.io/whois_domains/?q=domain%3Afacebook.com~&page=1&indices=)

![도메인 퍼지 검색 가져오기](https://assets.kitploit.com/production/public/readmes/6659/5d4ba2bdc395a3e52bfadaf8d7bda8977e0d115e13a1a68980520ea8532ca904.png)

그런 다음 왼쪽 아이콘을 클릭하고 내보내기 파일 형식, 파일 이름 및 파일에 저장할 필드를 선택합니다. "다운로드"를 클릭하고 잠시 기다립니다.

![도메인 퍼지 검색 CSV](https://assets.kitploit.com/production/public/readmes/6659/f5ed5c4c253a3e2fb994623fe48447714b7d706496edeca527a5d53de33707c4.png)

예를 들어 CSV 파일 형식과 domain, expiration_date, status 필드를 선택할 수 있습니다. 이러한 테이블은 Excel, Numbers 또는 Google Docs에서 편리하게 볼 수 있습니다.


### 파비콘 검색

![파비콘 검색](https://assets.kitploit.com/production/public/readmes/6659/1e2761528fda75b2a240460fb07d3f77f0b2872ff504bc08759befc22e470612.png)

favicon.ico 검색에는 세 가지 주요 용도가 있습니다.

첫째, 잠재적으로 관련된 사이트와 하위 도메인을 찾을 수 있습니다. Lidl 상점과 관련된 IP를 찾아보세요:```
http.favicon.perceptual_hash:003c7e72207e3c00

Netlas에서 시도해보기

또한 인기 있는 소셜 네트워크, 온라인 스토어 등의 디자인을 사용하는 피싱 사이트를 찾는 데에도 사용됩니다.

둘째, 다양한 IoT 기기를 검색하는 것입니다. HP 제품을 찾아보세요:``` http.favicon.perceptual_hash:0c5ec8c181f37e2c

root@kitploit:~
[Try in Netlas](https://app.netlas.io/responses/?q=http.favicon.perceptual_hash%3A0c5ec8c181f37e2c&page=1&indices=)

셋째, 특정 소프트웨어가 실행 중인 서버를 검색합니다. PhpMyAdmin이 있는 서버를 찾아보세요:```
http.favicon.perceptual_hash:00084e5e5fffff8d

Try in Netlas

Netlas에서 파비콘 해시로 검색하는 세 가지 주요 방법이 있습니다:

  1. 검색 결과 왼쪽에 있는 아이콘을 클릭합니다.
  2. 검색창 오른쪽에 있는 파비콘 검색 버튼을 클릭하고 팝업 창에 파비콘 링크를 붙여넣습니다.
  3. 검색창 오른쪽에 있는 파비콘 검색 버튼을 클릭하고 파비콘 파일을 업로드합니다.

또한 다음 필터를 사용하여 파비콘으로 검색할 수 있습니다:

  • http.favicon.last_modified
  • http.favicon.last_updated
  • http.favicon.uri
  • http.favicon.path

특정 서브넷과 연결된 도메인 검색

서브넷 검색

Netlas 도메인 검색을 사용하면 특정 IP 주소 또는 주소 범위와 연결된 모든 도메인의 전체 목록을 가져올 수 있습니다. 예를 들면:``` a:"163.114.132.0/24"

root@kitploit:~
[Netlas에서 시도하기](https://app.netlas.io/domains/?q=a%3A%22163.114.132.0%2F24%22&page=1&indices=)

API 요청 예제

Netlas CLI 도구:```bash
netlas search -d domain a:\"163.114.132.0/24\"

Curl:```bash curl -X 'GET'
'https://app.netlas.io/api/domains/?q=a%3A%22163.114.132.0%2F24%22&source_type=include&start=0&fields=*'
-H 'accept: application/json'
-H 'X-API-Key: 'YOUR_API_KEY' | jq .items[].data.domain

root@kitploit:~
**코드 예제 (Netlas Python 라이브러리)**

![Subnet search](https://assets.kitploit.com/production/public/readmes/6659/167cec2c2ef94ede54088bfe94fef093af8bf58ea2de6df34a73212f5d3044b1.png)

명령줄에서 실행:```bash
python scripts/dfir/subnet_search.py

scripts/dfir/subnet_search.py의 소스 코드:```python import netlas

apikey = "YOUR_API_KEY"

create new connection to Netlas

netlas_connection = netlas.Netlas(api_key=apikey)

retrieve data from responses by query a:"163.114.132.0/24"

netlas_query = netlas_connection.query(query='a:"163.114.132.0/24"',datatype="domain")

iterate over data and print: domain

for response in netlas_query['items']: print (response['data']['domain'])

root@kitploit:~
### 악성 소프트웨어가 있는 서버 검색

![멀웨어 검색](https://assets.kitploit.com/production/public/readmes/6659/d728e7baced751038764f0895099894d154370929ac7eb11e60f80137e549f72.png)

Netlas를 사용하면 다양한 멀웨어가 설치된 서버를 찾을 수 있습니다. http.title 또는 http.body의 특정 단어 존재, favicon 해시, ssl 및 기타 매개변수를 통해 찾을 수 있습니다.

다음은 GoFish(오픈 소스 피싱 프레임워크)가 설치된 서버를 찾는 쿼리의 예입니다:```
http.title:Gophish http.title:Login

동일한 연산자를 두 번 사용하는 기법(두 단어 사이에 별표 대신)이 여기서 사용됩니다. 때로는 이 방법으로 더 많은 검색 결과를 얻을 수 있습니다.

비슷한 요청의 추가 예시는 다음과 같습니다:``` http.title:CALDERA http.title:login http.title:Deimos http.title:C2

root@kitploit:~
**API 요청 예시**

Netlas CLI Tools:```bash
netlas search "http.title:Gophish http.title:Login" -f json

Curl:```bash curl -X 'GET'
'https://app.netlas.io/api/responses/?q=http.title%3AGophish%20http.title%3ALogin&source_type=include&start=0&fields=*'
-H 'accept: application/json'
-H 'X-API-Key: YOUR_API_KEY' jq .items[].data.uri

root@kitploit:~
**코드 예제 (Netlas Python 라이브러리)**

![악성코드 검색 Python](https://assets.kitploit.com/production/public/readmes/6659/6d97f8bdcd0897b846dfa636e667cdca0cdfe8565f0aa33634934d2f7dbd2e40.png)

명령줄에서 실행:```bash
python scripts/dfif/malware_search.py

scripts/dfir/malware_search.py의 소스 코드:```python import netlas

apikey = "YOUR_API_KEY"

create new connection to Netlas

netlas_connection = netlas.Netlas(api_key=apikey)

retrieve data from whois for "http.title:Gophish http.title:Login"

netlas_query = netlas_connection.query(query="http.title:Gophish http.title:Login")

iterate over data and print: uri, title, country

for response in netlas_query['items']: print (response['data']['uri'])
print (response['data']['http']['title'])
print (response['data']['geo']['country'])

root@kitploit:~
## 기술 및 코드 예제 검색

![Netlas for web designers](https://assets.kitploit.com/production/public/readmes/6659/52b9186e6e0d5cbd123389555fc6124835065af3c45346b35003da563a76e191.png)

Netlas는 기존 검색 엔진과 달리 페이지 텍스트가 아닌 전체 HTML 코드를 검색할 수 있습니다. 이를 통해 특정 JavaScript 라이브러리를 사용하는 사이트를 찾을 수 있으며, 작업에 적합한 코드 샘플을 찾아 시간을 절약하는 데 도움이 됩니다.

예를 들어, 그래픽을 그리기 위해 오래되고 잘 알려지지 않은 라이브러리를 사용하는 사이트를 검색하는 경우:```
http.body:kinetic.js

또한 특정 테마의 사이트에서 다양한 CSS 프레임워크가 어떻게 사용되는지 확인하고 좋은 디자인 아이디어를 얻을 수 있습니다:``` http.body:bootstrap.css http.title:travel

root@kitploit:~
태그를 사용하여 특정 프레임워크와 기술을 사용하는 사이트를 필터링할 수도 있습니다:```
tag.bootstrap:*
root@kitploit:~
tag.angularjs:*
root@kitploit:~
tag.wordpress:*
root@kitploit:~
tag.nextjs:*

Netlas.io를 재미 또는 Netstalking에 사용하기

Netlas는 다른 많은 검색 엔진과 마찬가지로 특별한 목적 없이 사용할 수 있으며, 이를 통해 인터넷의 탐험되지 않은 구석을 탐험하며 흥미로운 것을 찾길 바랄 수 있습니다.

다음은 Google이 찾을 수 없는 것을 찾는 데 도움이 되는 검색어 예시입니다.

Telnet 서버 배너 텍스트 검색 (네, 아직도 살아있습니다!):``` telnet.banner:library

root@kitploit:~
![Telnet banner](https://assets.kitploit.com/production/public/readmes/6659/bc10d408431e619a74a7d0a3ba3ebe4722c5599cf3978e1ddd4d014453ebd0df.png)

FTP 서버 배너의 텍스트로 검색:```
ftp.banner:*library*

책과 문서에 대한 링크 검색:``` http.body:rowlingpdf

root@kitploit:~
음악 및 비디오 링크 검색:```
http.body:*cats*mp4

토렌트 파일 링크 검색:``` http.body:catsmp4

root@kitploit:~
Netlas는 데이터베이스에 저장된 콘텐츠를 어떤 방식으로든 검열하지 않는다는 점을 명심하세요. 불법 또는 부도덕한 내용을 발견한 경우, 도메인 정보에 나와 있는 호스팅 제공업체에 신고해야 합니다.

## 일반적인 문제

### 오류 429 - 너무 빈번한 요청

![요청 제한](https://assets.kitploit.com/production/public/readmes/6659/4dc177c632607cc952ba847f1c078c80812b388c1eb51513e3d672e8563a672b.png)

애플리케이션이 Netlas API에 여러 요청을 보내는 경우 이 오류가 발생할 수 있습니다:```json
{'detail': 'Request was throttled. Expected available in 1 second.'}

이 문제를 해결하는 한 가지 방법은 특수 Python 라이브러리를 사용하여 쿼리 실행에 시간 제한을 설정하는 것입니다. 예를 들어 Limiter Package가 있습니다.

다음은 코드에서 사용 예시입니다 (분당 60회 요청 제한). 먼저 패키지를 설치합니다:``` pip install ratelimit

root@kitploit:~
그리고 rate_limit.py를 실행하세요:```bash
python scripts/common_problems/rate_limit.py
root@kitploit:~
import netlas
from ratelimit import limits

# One second - one call
@limits(calls=1, period=1)
def netlas_query():
     apikey = "YOUR_API_KEY"

     # create new connection to Netlas
     netlas_connection = netlas.Netlas(api_key=apikey)

     # retrieve data from responses by query `cve.description:weblogic AND cve.has_exploit:true`
     netlas_query = netlas_connection.query(query="cve.description:weblogic AND cve.has_exploit:true")

     # iterate over data and print:  url, first CVE name first CVE description
     for response in netlas_query['items']:
        print (response['data']['uri'])
        print (response['data']['cve'][0]['name'])
        print (response['data']['cve'][0]['description'])

netlas_query()
```
비슷한 패키지들이 다른 인기 있는 프로그래밍 언어에도 존재합니다. 요청 한도를 초과하는 것은 거의 대부분의 API를 사용할 때 매우 흔한 문제이기 때문입니다.

정말로 초당 하나 이상의 문의를 해야 한다면 [영업팀](https://netlas.io/sales/)에 문의하실 수 있습니다.


### KeyError

![키 오류](https://assets.kitploit.com/production/public/readmes/6659/4e039dadee067f3762033f4d612fda3f7fbbac8425af0c257a9c808338ec85bc.png)

또 다른 흔한 문제는 일부 서버의 응답에 특정 키가 없는 것입니다. 예를 들어, ['data']['http']['title']이 자주 누락됩니다.

키가 누락되면 스크립트 실행이 중단됩니다. 표준 오류 처리를 사용하면 이를 방지하는 데 도움이 됩니다. 예를 들어:```python
try:
       print (response['data']['http']['title'])
    except:
        print ("no title")
```
### 요청 목록 작업 자동화

Netlas Python 또는 Netlas API를 웹 버전의 Netlas.io에서 단순히 쿼리를 입력하는 것과 비교하여 작업할 때의 주요 장점은 일괄 처리용 쿼리를 입력하는 데 드는 시간을 크게 절약할 수 있다는 점입니다. 예를 들어, 매우 간단한 Python 코드를 사용하여 긴 도메인 목록에 대한 정보를 빠르게 수집할 수 있습니다.

명령줄에서 실행:```bash
python scripts/common_problems/domain_list_search.py
```
domain_list_search.py의 소스 코드:```python
import netlas

apikey = "YOUR_API_KEY"

# create new connection to Netlas
netlas_connection = netlas.Netlas(api_key=apikey)


# read file domains.txt line by line
with open("scripts/common_problems/domains.txt") as f:
    # save each line to domain variable
    for domain in f:
         # retrieve data from responses by query `domain:domainname`
        netlas_query = netlas_connection.query(
            query=f"domain:{domain}", datatype="domain-whois"
        )


        # iterate over data and print:  ip, isp
        for response in netlas_query['items']:
            print (response['data']['ip'])
            print (response['data']['isp'])
```
마찬가지로, 인증서, IP 주소, 이메일 및 원하는 다른 모든 항목의 목록을 사용할 수 있습니다.

URL에서 로드된 목록에서 IP 주소를 검색하는 예제는 [Tor 종료 노드 검색](#tor-exit-nodes-search)에서 찾을 수 있습니다.

### 데이터를 CSV 형식으로 저장하기

![Save data in CSV](https://assets.kitploit.com/production/public/readmes/6659/200c80242c4bb1e0e360abe989ebd45c1f7e60a0a258a28735169d86936138b2.png)

기본적으로 Netlas Python 라이브러리는 Dictionary 유형의 데이터를 반환합니다(JSON과 매우 유사). 데이터를 MS Excel이나 Google Sheets로 내보내려는 경우, 쉬운 방법 중 하나는 CSV 형식으로 저장하는 것입니다.

다음은 [CSV](https://docs.python.org/3/library/csv.html) 패키지를 사용한 예제입니다. csv_export.py를 실행하세요:```bash
python scripts/common_problems/csv_export.py
```
보안 우선 문화를 구축하는 효과적인 접근 방식은 보안 인식을 개발 프로세스에 통합하는 것입니다. 안전한 코딩 가이드라인을 만들고, 보안 관점에서 코드 리뷰를 수행하며, 보안 문제가 공개적으로 제기되고 논의되는 환경을 조성함으로써 조직은 보안을 왼쪽으로 이동(shift left)할 수 있습니다. 이는 SDLC 초기에 보안을 처리하는 것을 의미하며, 비용 효율적이고 위험을 줄입니다.

---

### 이 위협의 목적은 무엇입니까?

이 위협의 목적은...```python
import netlas
import csv

apikey = "YOUR_API_KEY"

# create new connection to Netlas
netlas_connection = netlas.Netlas(api_key=apikey)

# retrieve data from responses by query `http.meta:nazar`
netlas_query = netlas_connection.query(query="http.meta:nazar")

with open('netlas_results.csv', 'w') as csv_file:
     # Create CSV writer object
     writer = csv.writer(csv_file, delimiter =';')


     # Create a list with data headers:
     header = ['IP', 'URL', 'Title']

     # Write headers to CSV file
     writer.writerow(header)

     # iterate over data and print: ip and url to CSV file
     for response in netlas_query['items']:

    # Create a list with one line of data:
          data = [response['data']['ip'], response['data']['uri']]
    # Write line to file
          writer.writerow(data)
     pass
```
netlas_results.csv를 Excel이나 텍스트 편집기에서 열 수 있습니다.


### 데이터를 다른 형식으로 저장하기

Python을 사용하면 Netlas의 데이터를 기반으로 이미지, 데이터 시각화를 삽입하고 레이아웃을 사용자 정의하는 다양한 문서를 생성할 수 있습니다. 다음은 유용한 패키지의 몇 가지 예입니다.

[XLSXWriter](https://xlsxwriter.readthedocs.io/) - Microsoft Excel 파일 생성.

[PyPDF](https://pypdf.readthedocs.io/en/stable/) - PDF 파일 생성.

[PythonPPTX](https://python-pptx.readthedocs.io/en/latest/) - Microsoft PowerPoint 프레젠테이션 생성.

[PythonDOCX](https://python-docx.readthedocs.io/en/latest/) - Microsoft Word 파일 생성.


### 퓨니코드 도메인 디코딩하기

![퓨니코드 도메인 디코딩](https://assets.kitploit.com/production/public/readmes/6659/8e16f17b72bb3dd049ee85a6318b9960a9011fea47e4ef2a45e2b17ae9f43824.png)

위에서 언급했듯이, Netlas는 라틴 문자가 아닌 도메인 이름을 원래 인코딩으로 저장하지 않고 퓨니코드로 인코딩합니다. 이는 기술적인 이유로 필요하지만, 사람이 인식하기에는 완전히 불편합니다.

하지만 이 문제는 몇 줄의 Python 코드로 쉽게 해결됩니다.

[IDNA Python package](https://pypi.org/project/idna/) 설치:

```
pip install idna
``````bash
pip install idna
```
그리고 명령줄에서 punycode.py를 실행하세요:```bash
python scripts/common_problems/punycode.py
```
입력 없음```python
import netlas
import idna

apikey = "YOUR_API_KEY"

# create new connection to Netlas
netlas_connection = netlas.Netlas(api_key=apikey)

# retrieve data from responses by query `domain:*.中国  OR host:*.中国 `
netlas_query = netlas_connection.query(query="domain:*.xn--fiqs8s OR host:*.xn--fiqs8s")


# iterate over data and print: ip, domain (decoded from punycode)
for response in netlas_query['items']:
    print (response['data']['ip'])
    decoded_domain = idna.decode(str(response['data']['domain'][0]))
    print (decoded_domain)
```
### 검색 쿼리가 결과를 반환하지 않을 경우 어떻게 해야 할까요?

때때로 쿼리에서 결과가 없거나 매우 적은 결과가 나오는 상황을 겪을 수 있습니다. 더 많은 결과가 있어야 한다고 확신하더라도 말이죠. 이 경우 쿼리를 약간 변경해보고 실험해보시길 권장합니다.

1. 키워드에 별표 두 개를 추가해보세요. 예를 들어, domain:*github.com*은 1,592,846개의 결과를 반환합니다. domain:githib.com은 7,911개의 결과만 반환합니다.
2. 동일한 목표를 달성하기 위해 다른 검색 필터를 사용해보세요. 예를 들어, uri:*github.com*, host:*github.com* 및 domain:*github.com*에 대한 결과를 비교해보세요.
3. 키워드에 공백을 사용하지 마세요. http.body에서 "Hello world" 구문을 찾아야 한다면 다음 쿼리를 사용하세요:   ```
   http.body:hello http.body:world
   ```
또는   ```
   http.body:(hello AND world)
   ```
4. 검색 필터를 최대한 세분화하세요. 예를 들어, cve:*2023* 쿼리는 결과를 반환하지 않습니다. 하지만 cve.name:*2023* 쿼리는 2,800만 개 이상의 결과를 반환합니다.
5. 웹 앱에서 작업할 때는 다양한 탭을 시도하거나, API에서 작업할 때는 다른 데이터 유형을 시도해 보세요. 예를 들어, 도메인을 검색할 때는 응답(response) 대신 Host나 Domain Whois가 더 잘 작동하는 경우가 있습니다.


### HTTP 본문에서 HTML 태그 제거

![Certificates search](https://assets.kitploit.com/production/public/readmes/6659/f9922957ccde7780d9663bf29e7df5ed6f689dedbf4e9ab7cd3ad611e2e2e59c.png)

기본적으로 Key ['data']['http']['body']는 웹 페이지의 전체 본문 텍스트(모든 HTML 태그 포함)를 반환합니다. 이 형식은 읽기에 그리 편하지 않습니다. 하지만 Python 패키지 [Html2text](https://pypi.org/project/html2text/)를 사용하면 쉽게 제거할 수 있습니다.

명령줄에서 실행:```bash
python scripts/common_problems/htmltotext.py
```
Source code of htmltotext.py:

htmltotext.py의 소스 코드:```python
import netlas
import html2text

apikey = "YOUR_API_KEY"

# create new connection to Netlas
netlas_connection = netlas.Netlas(api_key=apikey)

# retrieve data from responses by query `http.body:*phpMyAdmin*`
netlas_query = netlas_connection.query(query="http.body:*phpMyAdmin*")


# iterate over data and print: ip, web page text
for response in netlas_query['items']:
    print (response['data']['ip'])
    print (html2text.html2text(str(response['data']['http']['body'])))
```
## 공격 표면 관리

Netlas 플랫폼은 공격 표면 관리를 위한 도구를 포함하지만, 이 주제는 이 가이드의 범위를 벗어납니다. 공격 표면 관리 전반과 특히 Netlas 사용에 관심이 있다면 다음 문서부터 시작하는 것을 권장합니다:

- [공격 표면 발견에 대한 완벽 가이드](https://netlas.io/blog/attack_surface_discovery_guide/).
- [최고의 공격 표면 시각화 도구](https://netlas.io/blog/best_attack_surface_visualization_tools/).


## 매우 대량의 데이터 작업

![Datastore](https://assets.kitploit.com/production/public/readmes/6659/ca1ac5e0e1483550235a01c26abcac8e44531108c662c136ea8a81abc0a4c8b2.png)

정말 큰 과제가 앞에 있다면. 예를 들어, 수십만 개의 도메인에 대한 데이터를 수집해야 한다면, 시간과 재정적 비용 측면에서 더 합리적인 해결책은 데이터셋(csv/json)을 구매하여 자체 서버에서 작업하는 것일 수 있습니다.


[Netlas Datastore](https://app.netlas.io/datastore/)에서 다음을 찾을 수 있습니다:

* 알려진 도메인 이름 데이터셋 (20억 개 이상 항목)
* 포워드 DNS 데이터셋 (20억 개 이상 항목)
* 알려진 PTR 레코드 (10억 개 이상 항목) - 무료
* 가장 흔한 상위 1,000,000개 서브도메인

그 외 더 많은 것들.

## 감사의 말

도움을 주신 [@cyb_detective](https://twitter.com/cyb_detective) (https://cybdetective.com)님께 감사드립니다.
도구 다운로드
