Skip to content
KitploitKITPLOIT
도구블로그
제출
도구블로그
제출

해킹, 침투 테스트 및 사이버 보안 도구를 당신의 보안 무기고에!

Kitploit은 해킹, 사이버 보안 및 침투 테스트 도구 디렉토리입니다. 최신 프로젝트 업데이트를 발견하여 취약점을 찾고, 시스템을 분석하고, 테스트를 자동화하고, 보안을 강화하세요.

··피드·문의·개인정보·© 2026 Kitploit

도구 디렉토리

카테고리

모든 카테고리 보기
Loading categories
AV-Chaos-Monkey — 오디오/비디오 테스트를 위한 Chaos Monkey (webRTC 및 UDP) | Kitploit
도구/GitHubGitHub/mdsadiqmd/av-chaos-monkey
Web SecurityNetwork SecurityPenetration TestingCloud SecurityDevSecOpsChaos Engineering
GitHubmdsadiqmd/av-chaos-monkey

AV-Chaos-Monkey

오디오/비디오 테스트를 위한 Chaos Monkey (webRTC 및 UDP)

저장소 보기
5266개월 전Kitploit 검토 완료

인기

모두 보기 →

커뮤니티에서 가장 많이 사용되는 도구를 찾아보세요.

모든 도구 탐색

도구 컬렉션을 둘러보세요
모든 도구 보기 →
공유

AV Chaos Monkey

분산 카오스 엔지니어링 플랫폼으로, 화상 회의 시스템의 부하 테스트를 수행합니다. H.264/Opus 스트림으로 1500명 이상의 WebRTC 참가자를 시뮬레이션하고 네트워크 카오스 스파이크를 주입하여 저하된 조건에서 시스템 복원력을 검증합니다.

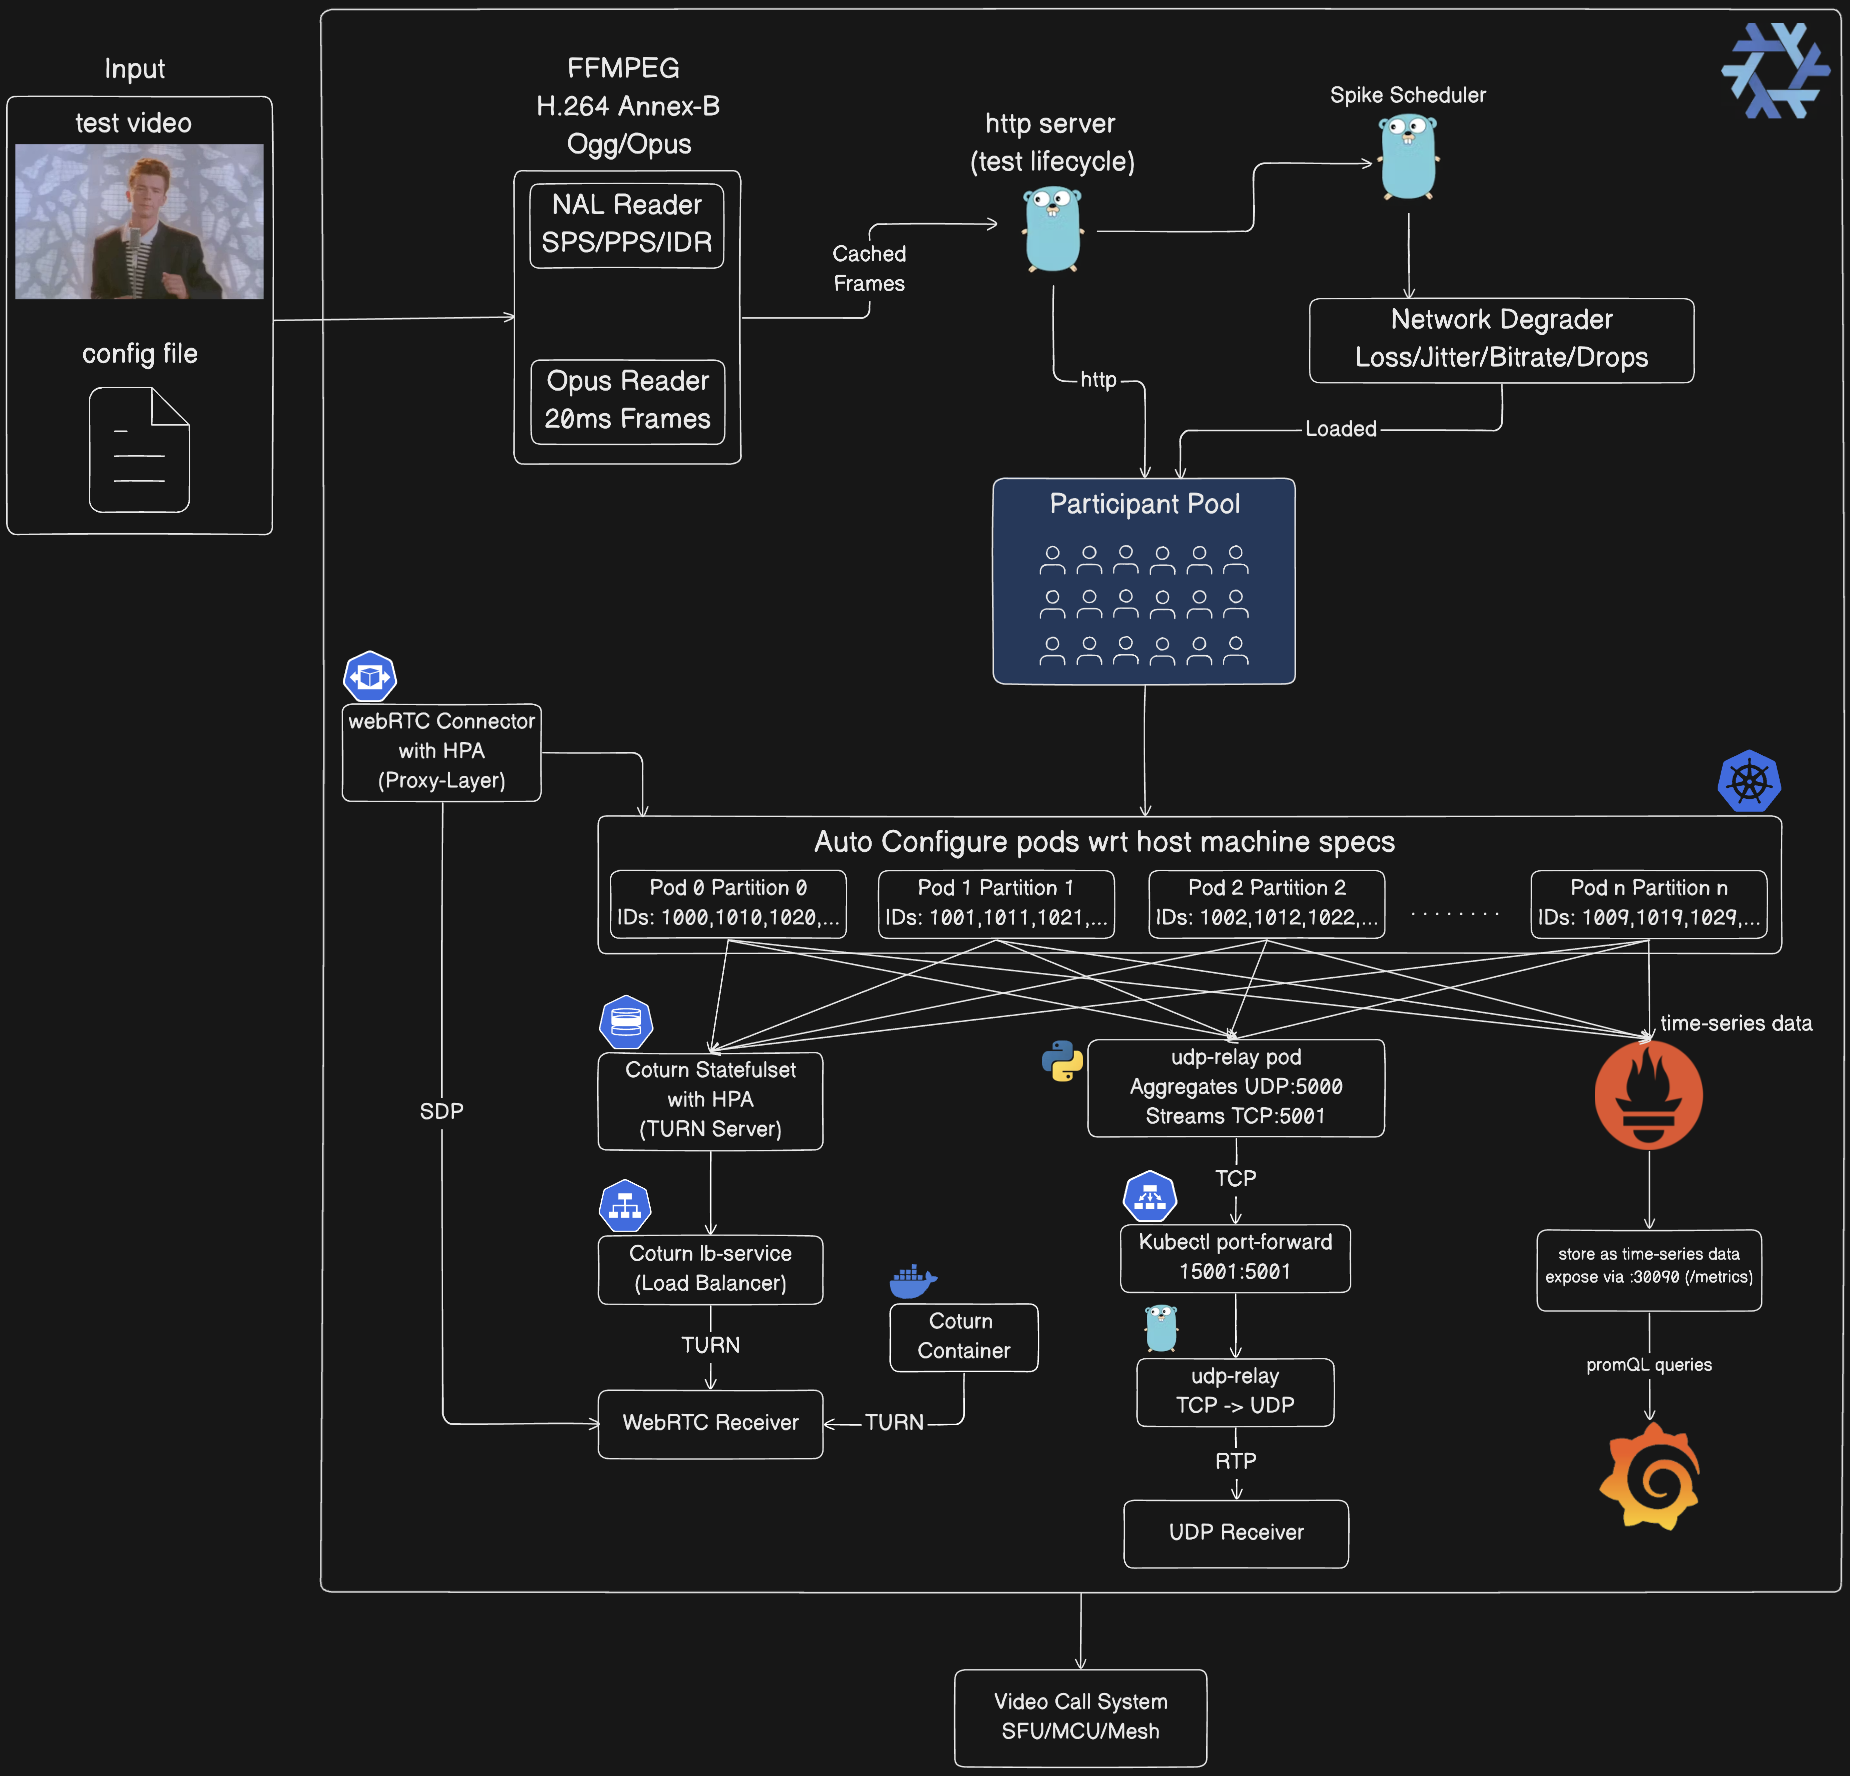
아키텍처

image
  1. 미디어 처리 파이프라인:

    • FFmpeg가 시작 시 입력 비디오를 H.264 Annex-B 및 Ogg/Opus로 변환
    • NAL Reader가 H.264 스트림을 파싱(SPS/PPS/IDR/슬라이스)
    • Opus Reader가 Ogg 컨테이너에서 20ms 오디오 프레임 추출
    • 프레임은 메모리에 캐시되어 모든 참가자 간 공유(제로 카피)
    • 참가자별 인코딩 대비 CPU 약 90% 감소
  2. 컨트롤 플레인:

    • HTTP 서버(:8080)가 REST API를 통해 테스트 수명 주기 관리
    • 스파이크 스케줄러가 카오스 이벤트 분배(균등/랜덤/전면/후면/레거시)
    • 네트워크 저하기가 카오스 적용: 패킷 손실(1-25%), 지터(10-50ms), 비트레이트 감소(30-80%), 프레임 드롭(10-60%)
    • 로드된 카오스 구성이 참가자 풀에 적용
  3. 참가자 풀:

    • 다음을 사용해 파드 간 자동 파티셔닝: participant_id % total_partitions = partition_id
    • 각 참가자가 RTP 스트림 생성(PT=96 비디오, PT=111 오디오)
    • 참가자 ID가 RTP 확장 헤더에 포함(ID=1)
    • 풀 크기: 1-100(로컬), 100-500(Docker), 500-1500(Kubernetes)
  4. Kubernetes 자동 구성:

    • 파드가 파드 이름에서 파티션 ID 자동 감지: orchestrator-3 → PARTITION_ID=3
  • 포트 할당: base_port + (partition_id × 10000) + participant_index
  • 예: 파티션 0은 5000-14999, 파티션 1은 15000-24999 사용
  • 10개 레플리카의 StatefulSet, 각각 약 150명 참가자 처리
  • 리소스: 파드당 CPU 1-4, 메모리 2-4Gi
  • 호스트 머신 사양에 따라 자동 구성
  • UDP 릴레이 체인(Kubernetes 전용):

    root@kitploit:~
    Orchestrator Pods (10×) → UDP :5000 → udp-relay Pod (Python)
    → Length-Prefixed TCP :5001 → kubectl port-forward 15001:5001
    → tools/udp-relay (Go) → UDP :5002 → Your Receiver
    
    • 이유: kubectl port-forward는 TCP만 지원, UDP 미지원
    • 클러스터 내 릴레이: Python 스크립트가 모든 파드의 UDP를 수집, 2바이트 길이 프리픽스로 TCP 스트리밍
    • 로컬 릴레이: Go 도구가 TCP 스트림을 다시 UDP 패킷으로 변환
    • 1500명 참가자 스트림을 단일 연결로 집계
  • WebRTC 인프라:

    • Coturn StatefulSet: 초기 3개 레플리카, HPA가 부하에 따라 1-10으로 스케일(레플리카당 ~500명 참가자)
    • coturn-lb Service: TURN 트래픽을 레플리카 간 부하 분산
    • webrtc-connector: 선택적 프록시 레이어(Deployment + HPA 2-10 레플리카), SDP 시그널링 처리
    • Docker 모드: 로컬 테스트용 단일 Coturn 컨테이너
    • 포트: 3478(TURN), 49152-65535(릴레이 범위)
    • 자격 증명: webrtc/webrtc123
  • 클라이언트 통합:

    • UDP 수신기: 릴레이 체인을 통해 모든 참가자의 집계 RTP 스트림 수신
    • WebRTC 수신기: TURN 서버를 통한 SDP 교환으로 1:1 WebRTC 연결 설정
    • 두 방식 모두 테스트 대상인 비디오 콜 시스템(SFU/MCU/Mesh)으로 전달
  • 관측 가능성 스택(선택 사항):

    • Prometheus: 모든 오케스트레이터 파드의 /metrics 엔드포인트를 5초마다 스크래핑
    • Grafana: 사전 구성된 대시보드로 메트릭 시각화(admin/admin)
    • 노출된 메트릭: 참가자 수, 전송 패킷 수, 전송 바이트 수, 활성 스파이크 수, 패킷 손실률, 지터, MOS 점수
    • 접근: Prometheus :30090, Grafana :30030 (NodePort)
    • 오케스트레이터 파드에 자동 발견 어노테이션: prometheus.io/scrape: "true"
  • 핵심 개념

    참가자 시뮬레이션

    각 가상 참가자가 실제 미디어 스트림을 생성:

    • 비디오: 실제 비디오 파일의 H.264 NAL 유닛, RFC 6184에 따라 패킷화
    • 오디오: Ogg 컨테이너의 Opus 프레임, RFC 7587에 따라 패킷화
    • RTP: 표준 준수 헤더에 참가자 ID 확장 포함
    • 타이밍: 프레임 정확한 타이밍(30fps 비디오, 20ms 오디오 패킷)

    카오스 주입

    다섯 가지 스파이크 유형으로 실제 네트워크 조건 시뮬레이션:

    • 패킷 손실: 애플리케이션 계층에서 RTP 패킷 드롭(1-100%)
    • 네트워크 지터: 지연 변동 추가(기본 + 가우시안 지터)
    • 비트레이트 감소: 비디오 인코딩 제한(30-80% 감소)
    • 프레임 드롭: 비디오 프레임 건너뜀(10-60% 드롭율)
    • 대역폭 제한: 총 처리량 제한

    분배 전략

    스파이크는 구성 가능한 전략을 사용해 테스트 기간에 분배:

    • 균등: 지터가 있는 균일 간격(예측 가능한 부하)
    • 랜덤: 예측 불가능한 타이밍(현실적인 카오스)
    • 전면: 초반에 dense 스파이크(복구 테스트)
    • 후면: 기준선 후 카오스(비교 테스트)
    • 레거시: 고정 간격 티커(런타임 주입)

    파티셔닝

    Kubernetes 배포는 수평 확장을 위해 참가자 파티셔닝 사용:

    • 각 파드는 participant_id % total_partitions == partition_id 처리
    • 포트 할당: base_port + (partition_id * 10000) + participant_index
    • 1-10개 파드 간 자동 부하 분산
    • 최대 1500명 이상 참가자로 확장(파드당 150명)

    시스템 실행

    1. 로컬 개발(네이티브 Go)

    적합한 경우: 개발, 디버깅, 소규모 테스트(1-100명 참가자)

    root@kitploit:~
    # Start orchestrator
    go run cmd/main.go
    
    # In another terminal: Start UDP receiver
    go run examples/go/udp_receiver.go 5002
    
    # Edit config/config.json to set num_participants: 10
    # Run chaos test
    go run tools/chaos-test/main.go -config config/config.json
    

    동작:

    • :8080에서 단일 오케스트레이터 프로세스
    • 참가자가 127.0.0.1:5002로 UDP 전송
    • HTTP API를 통해 카오스 스파이크 주입
    • 2초마다 실시간 메트릭 표시

    구성(config/config.json):

    root@kitploit:~
    {
      "base_url": "http://localhost:8080",
      "media_path": "public/rick-roll.mp4",
      "num_participants": 10,
      "duration_seconds": 300,
      "spikes": {
        "count": 20,
        "interval_seconds": 5,
        "types": { "rtp_packet_loss": {...}, "network_jitter": {...} }
      },
      "spike_distribution": {
        "strategy": "random",
        "min_spacing_seconds": 5,
        "jitter_percent": 15
      }
    }
    

    2. Docker Compose(컨테이너화)

    적합한 경우: 격리된 테스트, CI/CD, 중간 규모 테스트(100-500명 참가자)

    전제 조건:

    • Docker Desktop(메모리 8-16GB 할당)
    • docker-compose 설치
    root@kitploit:~
    # Build and start orchestrator container
    ./scripts/start_everything.sh build
    
    # In another terminal: Start UDP receiver
    go run examples/go/udp_receiver.go 5002
    
    # Edit config/config.json to set num_participants: 100
    # Run chaos test (targets container)
    go run tools/chaos-test/main.go -config config/config.json
    

    리소스 제한(docker-compose.yaml 편집):

    root@kitploit:~
    services:
      orchestrator:
        deploy:
          resources:
            limits:
              cpus: "14.0"
              memory: 6G  # Increase for more participants
    

    확장 가이드:

    Docker 메모리최대 참가자CPU 코어
    8 GB~1004
    16 GB~2508
    24 GB~40012
    32 GB~50014

    3. Kubernetes + Nix(프로덕션 규모)

    적합한 경우: 대규모 테스트(500-1500명 참가자), 수평 확장, 프로덕션 검증

    전제 조건:

    • Nix(flakes 활성화)
    • Docker Desktop 또는 kind 클러스터
    • kubectl 구성

    1단계: Nix 환경 진입

    root@kitploit:~
    # Nix provides: Go, Docker, kubectl, kind, ffmpeg
    nix develop
    
    # Or use direnv for auto-activation
    echo "use flake" > .envrc
    direnv allow
    

    2단계: Kubernetes에 배포

    root@kitploit:~
    # Auto-deploy with optimal settings (detects system resources)
    ./scripts/start_everything.sh run -config config/config.json
    
    # Or specify custom media files
    ./scripts/start_everything.sh run --media=path/to/video.mp4 -config config/config.json
    

    동작:

    1. Nix 제공 Go 툴체인으로 Docker 이미지 빌드
    2. kind 클러스터 생성/사용
    3. 10개 오케스트레이터 파드가 있는 StatefulSet 배포
    4. UDP 릴레이 파드 배포
    5. UDP 릴레이용 kubectl port-forward 설정
    6. 로컬 TCP→UDP 릴레이 시작
    7. 모든 파드에서 카오스 테스트 실행

    3단계: 집계된 UDP 스트림 수신

    옵션 A: UDP 수신기(Kubernetes에 권장)

    root@kitploit:~
    # Receives aggregated stream from all 1500 participants
    go run ./examples/go/udp_receiver.go 5002
    

    옵션 B: WebRTC 수신기(다중 참가자)

    root@kitploit:~
    # Connect to up to 150 participants via WebRTC
    go run ./examples/go/webrtc_receiver.go http://localhost:8080 <test_id> 150
    

    아키텍처 흐름:

    root@kitploit:~
    10개 파드에 걸친 1500명 참가자
      → 각 파드: 150명 참가자
      → participant_id % 10으로 파티셔닝
      → 모두 udp-relay:5000으로 UDP 전송
      → UDP 릴레이가 집계 → TCP :5001
      → kubectl port-forward 15001:5001
      → 로컬 릴레이가 TCP를 UDP :5002로 변환
      → 수신기가 1500개 스트림 모두 수신
    

    참고: start_everything.sh 스크립트가 자동으로 설정:

    • kubectl port-forward(udp-relay 15001:5001)
    • 로컬 TCP→UDP 릴레이(tools/udp-relay)
    • 수신기만 실행하면 됩니다.

    수동 Kubernetes 설정

    root@kitploit:~
    # Build and load image
    docker build -t chaos-monkey-orchestrator:latest .
    kind load docker-image chaos-monkey-orchestrator:latest
    
    # Deploy
    kubectl apply -f k8s/orchestrator/orchestrator.yaml
    kubectl apply -f k8s/udp-relay/udp-relay.yaml
    
    # Wait for pods
    kubectl wait --for=condition=ready pod -l app=orchestrator --timeout=300s
    
    # Port-forward UDP relay
    kubectl port-forward udp-relay 15001:5001 &
    
    # Start local TCP→UDP relay
    go run tools/udp-relay/main.go &
    
    # In another terminal: Start receiver
    go run ./examples/go/udp_receiver.go 5002
    
    # In another terminal: Run chaos test
    go run tools/chaos-test/main.go -config config/config.json
    

    정리

    root@kitploit:~
    # Delete Kubernetes resources
    ./scripts/cleanup.sh
    
    # Or delete entire cluster
    kind delete cluster --name av-chaos-monkey
    

    Nix로 크로스 플랫폼 빌드

    root@kitploit:~
    # Build for Linux x86_64 (most common)
    nix build .#packages.x86_64-linux.av-chaos-monkey
    
    # Build for ARM64 (Raspberry Pi, AWS Graviton)
    nix build .#packages.aarch64-linux.av-chaos-monkey
    
    # Build for macOS Intel
    nix build .#packages.x86_64-darwin.av-chaos-monkey
    
    # Build for macOS Apple Silicon
    nix build .#packages.aarch64-darwin.av-chaos-monkey
    
    # Binary location
    ./result/bin/main
    

    API 참조

    테스트 수명 주기

    root@kitploit:~
    # Create test
    POST /api/v1/test/create
    {
      "test_id": "optional_id",
      "num_participants": 100,
      "video": {...},
      "audio": {...},
      "duration_seconds": 600,
      "spikes": [...],
      "spike_distribution": {
        "strategy": "even",
        "min_spacing_seconds": 5,
        "jitter_percent": 15
      }
    }
    
    # Start test
    POST /api/v1/test/{test_id}/start
    
    # Get metrics
    GET /api/v1/test/{test_id}/metrics
    
    # Stop test
    POST /api/v1/test/{test_id}/stop
    

    WebRTC 시그널링

    root@kitploit:~
    # Get SDP offer
    GET /api/v1/test/{test_id}/sdp/{participant_id}
    
    # Set SDP answer
    POST /api/v1/test/{test_id}/sdp/{participant_id}
    {"sdp_answer": "v=0..."}
    

    카오스 주입

    root@kitploit:~
    # Inject spike
    POST /api/v1/test/{test_id}/spike
    {
      "spike_id": "unique_id",
      "type": "rtp_packet_loss",
      "duration_seconds": 30,
      "participant_ids": [1001, 1002],
      "params": {"loss_percentage": "15"}
    }
    

    구성

    스파이크 유형

    유형매개변수효과
    rtp_packet_lossloss_percentage (0-100)RTP 계층에서 패킷 드롭
    network_jitterbase_latency_ms, jitter_std_dev_ms지연 변동 추가
    bitrate_reducenew_bitrate_kbps비디오 인코딩 제한
    frame_dropdrop_percentage (0-100)비디오 프레임 건너뜀
    bandwidth_limitbandwidth_kbps총 처리량 제한

    분배 구성

    root@kitploit:~
    {
      "spike_distribution": {
        "strategy": "even",
        "min_spacing_seconds": 5,
        "jitter_percent": 15,
        "respect_min_offset": true
      }
    }
    

    클라이언트 통합

    UDP 수신기(Go)

    root@kitploit:~
    # Provided receiver with RTP parsing
    go run examples/go/udp_receiver.go 5002
    

    출력:

    root@kitploit:~
    Listening for RTP packets on UDP port 0.0.0.0:5002
    Packet #100 from 127.0.0.1:xxxxx:
      Participant ID: 1001
      Payload Type: 96 (H.264 video)
      Sequence: 1234
      Timestamp: 90000
      SSRC: 1001000
      Payload Size: 1200 bytes
    
    ═══════════════════════════════════════════════════════════
                        PACKET STATISTICS                       
    ═══════════════════════════════════════════════════════════
    Duration: 60s
    Total Packets: 180000 (3000 pkt/s)
    Total Bytes: 450 MB (60 Mbps)
    
    Media Type Breakdown:
      Video (H.264): 120000 packets (66.7%)
      Audio (Opus):  60000 packets (33.3%)
    
    Unique Streams (SSRCs): 1500
    Unique Participants: 1500
    

    WebRTC 수신기(Go)

    root@kitploit:~
    # Single participant
    go run ./examples/go/webrtc_receiver.go http://localhost:8080 <test_id>
    
    # Multiple participants (up to 150)
    go run ./examples/go/webrtc_receiver.go http://localhost:8080 <test_id> 150
    
    # Example with actual test ID
    go run ./examples/go/webrtc_receiver.go http://localhost:8080 chaos_test_1770831684 150
    

    참고: WebRTC는 1:1 연결이 필요합니다. Kubernetes의 경우 모든 참가자를 자동으로 집계하는 UDP 수신기를 사용하세요.

    커스텀 통합

    RTP 패킷 형식:

    root@kitploit:~
     0                   1                   2                   3
     0 1 2 3 4 5 6 7 8 9 0 1 2 3 4 5 6 7 8 9 0 1 2 3 4 5 6 7 8 9 0 1
    +-+-+-+-+-+-+-+-+-+-+-+-+-+-+-+-+-+-+-+-+-+-+-+-+-+-+-+-+-+-+-+-+
    |V=2|P|X|  CC   |M|     PT      |       sequence number         |
    +-+-+-+-+-+-+-+-+-+-+-+-+-+-+-+-+-+-+-+-+-+-+-+-+-+-+-+-+-+-+-+-+
    |                           timestamp                           |
    +-+-+-+-+-+-+-+-+-+-+-+-+-+-+-+-+-+-+-+-+-+-+-+-+-+-+-+-+-+-+-+-+
    |           synchronization source (SSRC) identifier            |
    +-+-+-+-+-+-+-+-+-+-+-+-+-+-+-+-+-+-+-+-+-+-+-+-+-+-+-+-+-+-+-+-+
    |  Extension ID=1 | Length=4    |    Participant ID (uint32)    |
    +-+-+-+-+-+-+-+-+-+-+-+-+-+-+-+-+-+-+-+-+-+-+-+-+-+-+-+-+-+-+-+-+
    |                         H.264/Opus Payload                    |
    +-+-+-+-+-+-+-+-+-+-+-+-+-+-+-+-+-+-+-+-+-+-+-+-+-+-+-+-+-+-+-+-+
    

    페이로드 유형:

    • 96: H.264 비디오(RFC 6184)
    • 111: Opus 오디오(RFC 7587)

    참가자 ID 추출:

    root@kitploit:~
    // Extension bit set?
    if (packet[0] & 0x10) != 0 {
        offset := 12 + int(packet[0]&0x0F)*4  // Skip CSRC
        extID := binary.BigEndian.Uint16(packet[offset:])
        if extID == 1 {
            participantID := binary.LittleEndian.Uint32(packet[offset+4:])
        }
    }
    

    성능

    리소스 요구 사항

    참가자 수메모리CPU대역폭
    1002GB2 코어250 Mbps
    5006GB8 코어1.2 Gbps
    100012GB16 코어2.5 Gbps
    150018GB24 코어3.7 Gbps

    Kubernetes 확장

    • 자동 확장: 참가자 수에 따라 최적 파드 수 계산
    • 파드 용량: 파드당 150명 참가자(구성 가능)
    • 최대 파드: 10개(StatefulSet 제한)
    • 포트 범위: 파티션당 10,000개 포트

    처리량

    참가자당(1280x720@30fps + Opus):

    • 비디오: ~2.5 Mbps(H.264)
    • 오디오: ~128 Kbps(Opus)
    • 합계: ~2.6 Mbps
    • 패킷: ~90 비디오 + 50 오디오 = 140 pkt/s

    모니터링

    Prometheus 메트릭

    root@kitploit:~
    # Exposed on /metrics endpoint
    av_chaos_monkey_participants_total
    av_chaos_monkey_packets_sent_total
    av_chaos_monkey_bytes_sent_total
    av_chaos_monkey_spikes_active
    av_chaos_monkey_packet_loss_percent
    av_chaos_monkey_jitter_ms
    

    Grafana 대시보드

    root@kitploit:~
    # Docker Mode: Start monitoring stack
    docker-compose --profile monitoring up
    
    # Kubernetes Mode: Deploy monitoring
    kubectl apply -f k8s/monitoring/prometheus-rbac.yaml
    kubectl apply -f k8s/monitoring/prometheus.yaml
    kubectl apply -f k8s/monitoring/grafana.yaml
    
    # Access Grafana
    # Docker: http://localhost:3000
    # Kubernetes: http://localhost:30030 (NodePort)
    # Default credentials: admin/admin
    
    # Access Prometheus
    # Docker: http://localhost:9091
    # Kubernetes: http://localhost:30090 (NodePort)
    

    Kubernetes 자동 발견:

    • 오케스트레이터 파드에 prometheus.io/scrape: "true" 어노테이션
    • Prometheus가 모든 파드의 /metrics를 5초마다 스크래핑
    • Grafana에 Prometheus 데이터 소스 사전 구성
    • 시작 시 대시보드 자동 프로비저닝

    실시간 통계

    root@kitploit:~
    # Get test metrics
    curl http://localhost:8080/api/v1/test/{test_id}/metrics | jq
    
    # Output
    {
      "aggregate": {
        "total_frames_sent": 45000,
        "total_packets_sent": 180000,
        "total_bitrate_kbps": 250000,
        "avg_jitter_ms": 12.5,
        "avg_packet_loss": 2.3,
        "avg_mos_score": 4.1
      }
    }
    

    문제 해결

    UDP 패킷 미수신

    root@kitploit:~
    # Check UDP target configuration
    kubectl logs orchestrator-0 | grep "UDP transmission enabled"
    
    # Verify UDP relay is running
    kubectl get pod udp-relay
    
    # Check port-forward
    ps aux | grep "kubectl port-forward"
    
    # Test UDP connectivity
    nc -u -z localhost 5002
    

    WebRTC 연결 실패

    root@kitploit:~
    # Check TURN server
    kubectl get svc coturn-lb
    
    # Verify ICE candidates
    kubectl logs orchestrator-0 | grep "ICE"
    
    # Test TURN connectivity
    turnutils_uclient -v -u webrtc -w webrtc123 <turn-server>:3478
    

    메모리 사용량 높음

    root@kitploit:~
    # Check participant count per pod
    kubectl exec orchestrator-0 -- curl -s http://localhost:8080/api/v1/test/{test_id}/metrics | jq '.participants | length'
    
    # Scale down participants or increase pod count
    go run tools/k8s-start/main.go -replicas 10 -participants 1000
    
    # Increase Docker memory (Docker Desktop)
    # Settings → Resources → Memory → 16GB
    

    UDP 수신기에서 패킷 손실

    단일 UDP 소켓은 커널 버퍼 오버플로 없이 3000개 이상의 동시 스트림을 처리할 수 없습니다. 해결 방법:

    • UDP 릴레이 사용(전달 전 집계)
    • 소켓 버퍼 증가: setsockopt(SO_RCVBUF, 8MB)
    • 기준 손실을 측정 아티팩트로 수용

    라이선스

    BSD 3-Clause License

    기여

    기여를 환영합니다! 주요 영역:

    • 추가 스파이크 유형(CPU 스로틀링, 메모리 압력)
    • 더 많은 분배 전략(웨이브, 버스트)
    • 향상된 메트릭(MOS 계산, RTCP 피드백)
    • 클라이언트 라이브러리(Python, Rust, TypeScript)

    참고 자료

    • RFC 3550 - RTP: A Transport Protocol for Real-Time Applications
    • RFC 6184 - RTP Payload Format for H.264 Video
    • RFC 7587 - RTP Payload Format for Opus
    • WebRTC Specification
    도구 다운로드
