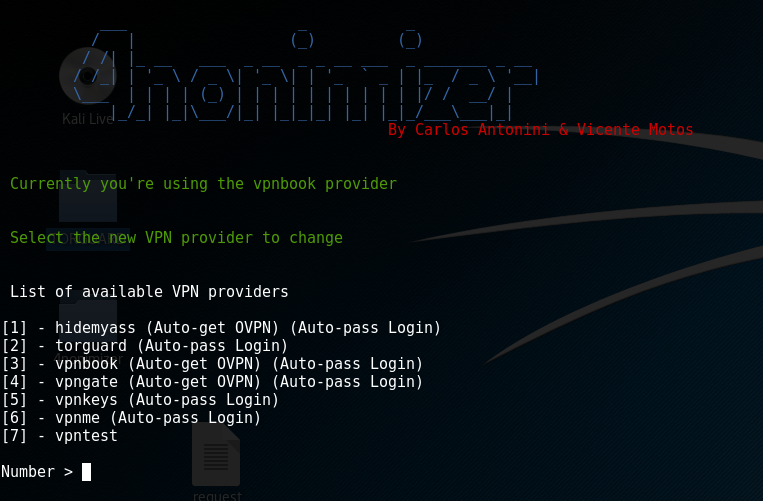

인터넷 브라우징 시 사용되는 공용 IP를 익명화하고, TOR 네트워크 및 다양한 VPN 제공업체(OpenVPN)에 대한 연결을 관리하기 위한 bash 스크립트입니다.

인터넷을 탐색하는 데 사용되는 공인 IP를 익명화하고, TOR 네트워크 및 다양한 VPN 제공업체(OpenVPN)와의 연결을 관리하기 위한 bash 스크립트입니다. 무료 또는 유료 모두 가능합니다. 기본적으로 여러 사전 구성된 VPN 연결(.ovpn 파일)을 포함하고 있으며, 해당 제공업체가 지원하는 경우 자격 증명을 다운로드합니다. 또한 300초마다 사용된 각 IP를 로그 파일에 기록합니다.
이 스크립트는 systemd 시스템에서 서비스로 활성화되며, 시스템 시작 시 기본 VPN(VPNBook)을 사용합니다.
버전 1.06부터 DNS 확인 요청은 DnsCrypt를 통해 수행됩니다(enable_dns 또는 disable_dns 옵션으로 활성화/비활성화).
버전 1.12부터 VPN 연결 로그는 /logs/에 있는 sqlite에 저장됩니다.
귀하가 제공업체이시고, OpenVPN을 지원하며, 귀하의 VPN이 4nonimizer에 통합되기를 원하신다면 개발자(hackplayers @ ymail.com)에게 연락해 주십시오.
git을 사용하여 저장소를 다운로드하고, 디렉토리에서 ./4nonimizer install 명령을 실행한 후 화면의 지시를 따르십시오. 4nonimizer는 /opt/ 디렉토리로 이동하여 서비스로 설치됩니다.
이 스크립트는 Kali Linux와 완벽하게 호환되지만, 적절히 테스트되었으며 Debian, Ubuntu, Arch(Manjaro)와 같은 다른 배포판에서도 작동해야 합니다. 그러나 일부 버그나 예상치 못한 동작이 있을 수 있습니다(발견 시 댓글 부탁드립니다!).
4nonymizer를 설치한 후, 4nonimizer help 명령을 입력하면 도움말이 나타나며 사용 가능한 모든 매개변수를 보여줍니다:
___ _ _
/ | (_) (_)
/ /| |_ __ ___ _ __ _ _ __ ___ _ _______ _ __
/ /_| | '_ \ / _ \| '_ \| | '_ ` _ | |_ / _ \ '__|
\___ | | | | (_) | | | | | | | | | | |/ / __/ |
|_/_| |_|\___/|_| |_|_|_| |_| |_|_/___\___|_|
By Carlos Antonini & Vicente Motos
Version: 1.06-beta
사용법: 4nonymizer <매개변수>
install: 스크립트를 실행 서비스에 설치
uninstall: 실행 서비스를 비활성화하고 앱 디렉토리 제거
change_provider: VPN 제공업체 변경
change_ip: 현재 VPN에서 IP 변경
vpn_status: 실행 중인 IP 및 VPN 제공업체 확인
update_vpns: 모든 VPN의 ovpn 업데이트
start: 4nonimizer 서비스 시작
stop: 4nonimizer 서비스 중지
stop_nonet: 4nonimizer 서비스를 중지하고 네트워크 인터페이스 종료
restart: 4nonimizer 서비스 재시작
update_app: git을 통해 이 프로그램 업데이트
privoxy: 포트 8118로 privoxy 설치 및 구성 (BETA)
proxychains4: 시스템 기본값으로 proxychains4 설치 및 구성
browser: privoxy -> tor 프로필로 Firefox 브라우저 실행
test_availability: 피어 가용성을 확인하고 IP/서비스에 연결할 수 없으면 ovpn 파일 삭제
location: 이제 VPN 피어의 특정 국가 또는 대륙을 선택할 수 있습니다.
enableboot: 부팅 시 서비스 활성화
disableboot: 부팅 시 서비스 비활성화
enable_dnscrypt: dnscrypt 서비스 활성화
disable_dnscrypt: dnscrypt 서비스 비활성화
help: 도움말 (이 화면)
현재 다음 VPN 제공업체를 지원합니다:
- 7Proxies https://www.7proxies.com/
- AirVPN https://airvpn.org/
- Cryptostorm https://cryptostorm.is/
- Cyberghost https://www.cyberghostvpn.com/en_US/
- ExpressVPN https://www.expressvpn.com
- FreeVPN https://freevpn.me/
- HideMyAss https://www.hidemyass.com/
- IpPVanish https://www.ipvanish.com/
- NordVPN https://nordvpn.com
- PIA https://www.privateinternetaccess.com/
- ProntonVPN https://protonvpn.com/
- Proxy.sh https://proxy.sh/
- SlickVPN https://www.slickvpn.com
- StrongVPN https://strongvpn.com/
- TorGuard https://torguard.net/
- TunnelBear https://www.tunnelbear.com/
- VPNBook (기본값) http://www.vpnbook.com/
- VPNGate http://www.vpngate.net/en/
- VPNKeys https://www.vpnkeys.com/
- VPNMe https://www.vpnme.me/
- Vyprvpn https://www.goldenfrog.com/es/vyprvpn
추가 VPN을 설치하려면 4nonimizer가 통합하고 작업을 수행할 수 있도록 다음 구조를 사용해야 합니다.
먼저 4nonimizer 경로 내에 /vpn/ 디렉토리 구조를 만들어야 합니다:
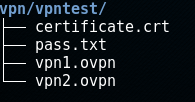
예제에서는 /vpntest/ 폴더를 만들고, 그 안에 가지고 있는 모든 .ovpn 파일을 넣었습니다. ovpn 파일에 각각 인증서가 포함되어 있지 않은 경우, 예제의 certificate.crt와 같이 같은 폴더에 넣습니다.
또한, 아래와 같이 첫 번째 줄에 사용자 이름, 두 번째 줄에 비밀번호가 포함된 pass.txt 파일을 배치해야 합니다:

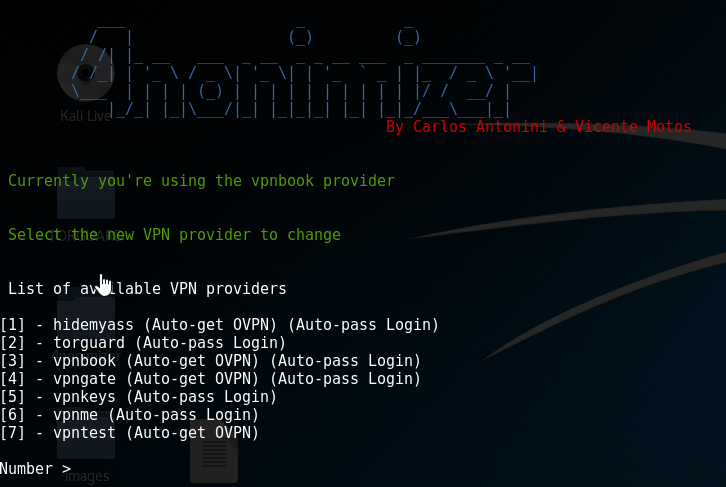
모든 단계를 올바르게 수행했다면, 4nonimizer change_provider 명령을 실행하면 메뉴에 우리 VPN이 표시됩니다:
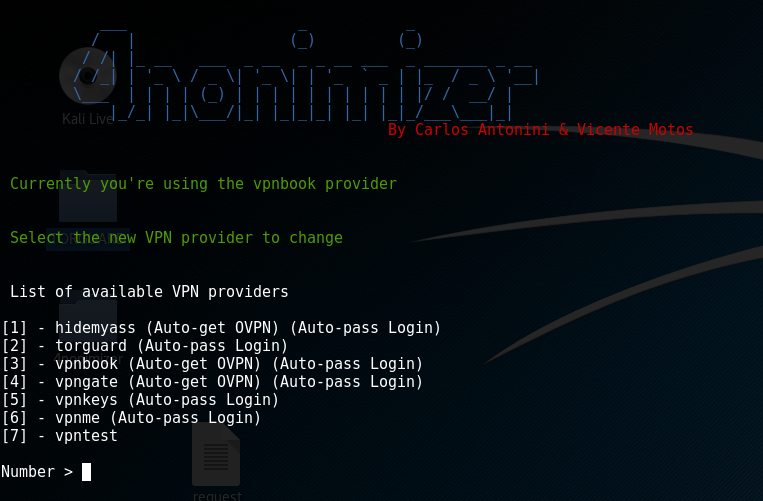
그림에서 볼 수 있듯이, 옵션 [7]은 우리가 만든 VPN입니다.
VPN 제공업체가 자격 증명 및/또는 .ovpn 파일 자동 가져오기를 허용하는 경우, 4nonimizer는 다음 스크립트 이름과 위치를 표준화했습니다:
- /opt/4nonimizer/vpn/provider/vpn-get-pass.sh

- /opt/4nonimizer/vpn/provider/vpn-get-ovpn.sh
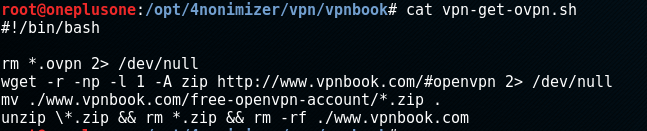
4nonimizer는 두 스크립트의 존재를 자동으로 감지하고, 각 파일의 첫 번째 줄에 수행된 작업에 따라 '#4uto' 또는 '#m4nual' 표현식이 있는 경우 (Auto-pass Login) 또는 (Auto-get OVPN)을 표시합니다.
- 매개변수 자동 완성을 활성화하려면 'source 4nonimizer'를 실행하십시오.
- .conkyrc 파일을 홈 디렉토리에 복사하여 4nonimizer 템플릿을 로드하고 conky를 실행하십시오.
- http://www.hackplayers.com/2016/08/tuto-enmascarar-ip-linux-vpn-tor.html
- http://www.hackplayers.com/2016/10/4nonimizer-un-script-para-anonimizar-ip.html
- http://www.redeszone.net//2016/10/07/4nonimizer-te-permitira-automatizar-la-conexion-diferentes-vpn-anonimizar-ip/
- http://www.kitploit.com/2016/10/4nonimizer-bash-script-for-anonymizing_10.html
- https://www.digitalmunition.me/2016/10/4nonimizer-bash-script-anonymizing-public-ip-managing-connection-tor-different-vpns-providers/
- Instalar 4nonimizer Kali Linux https://www.youtube.com/watch?v=FQRuRmMkcDg
- 4nonimizer Navegando de manera segura VPN (Kali Linux 2016.2) https://www.youtube.com/watch?v=6GApaN7fSn8
- devenir anonyme sur kali linux (4nonimizer) https://www.youtube.com/watch?v=Y3puD1Bw3xA
- Anonymizer - How To Hide Your IP address on Kali Linux 2016.2 (Change IP) https://www.youtube.com/watch?v=MNdQD0DCG0A
- Become Anonymous on kali linux 2016.2 https://www.youtube.com/watch?v=IFnhm-rrnEg
- Auto Hide IP with 4nonimizer on KALI Linux 2017 https://www.youtube.com/watch?v=HgqZCm8Wdvw
- Kali Linux - 4nonimizer | Surf Anonymously https://www.youtube.com/watch?v=_mOUQBv4sWs
4nonimize the world!
- Python으로 마이그레이션하여 도구를 멀티플랫폼화
- 코드를 더 깔끔하고 다재다능하게 만들기
- 로그를 sqlite 데이터베이스에 저장
- ovpn 파일 이름 표준화: IP(remote 라인)를 읽고, 국가를 가져와 ovpn 파일 이름을 그에 맞게 변경

Es un script en bash cuyo objetivo es anonimizar (de momento) la IP pública con la que salimos a Internet mediante la gestión del proceso de conexión a TOR y a distintos proveedores VPNs (OpenVPN), ya sean gratuitos o de pago. Por defecto incluye preconfiguradas varias VPN automatizando la conexión a distintos peers y la descarga de credenciales correspondientes (si el proveedor lo soporta). Además por defecto registra en ficheros logs la IP que usamos cada 300 segundos.
Este script se habilita como servicio en sistemas systemd y levanta la vpn por defecto (VPNBook) en el inicio del sistema.
Desde la version 1.06 las resoluciones DNS se hacen a través de DnsCrypt (habilitarlo y desabilitarlo con la opcion enable_dns o disable_dns).
Desde la versión 1.12 los registros de las conexiones vpn se guardan en sqlite en /logs/
Si eres un proveedor, soportas OpenVPN y quieres que tu VPN sea integrada en 4nonimizer contacta con los desarroladores en hackplayers @ ymail.com.
Descargar el repositorio mediante git , ejecutar la instruccion ./4nonimizer install dentro del directorio, y seguir las intrucciones por pantalla, 4nonimizer se moverá al directorio /opt/ y se instalará como servicio.
Este script tiene compatibilidad completa con Kali Linux, aunque ha sido probado y debería funcionar correctamente también en otras distribuciones como Debian, Ubuntu y Arch (Manjaro). No obstante podrían darse algunos bugs, o funcionamientos inesperados (¡por favor, comenta si encuentras alguno!).
Una vez instalado 4nonimizer, introduce el comando 4nonimizer help para obtener la ayuda, la cual nos muestra todos los parámetros disponibles:
Once installed 4nonymizer, enter the command 4nonimizer help to get the help, which shows all the available parameters:
___ _ _
/ | (_) (_)
/ /| |_ __ ___ _ __ _ _ __ ___ _ _______ _ __
/ /_| | '_ \ / _ \| '_ \| | '_ ` _ | |_ / _ \ '__|
\___ | | | | (_) | | | | | | | | | | |/ / __/ |
|_/_| |_|\___/|_| |_|_|_| |_| |_|_/___\___|_|
By Carlos Antonini & Vicente Motos
Version: 1.06-beta
Usage: 4nonymizer <parameter>
install: Install the script in run services
uninstall: Disable run service and remove app directory
change_provider: Change VPN Provider
change_ip: Change IP from VPN current
vpn_status: Check IP and provider VPN running
update_vpns: Update all ovpn of VPNs
start: Init the 4nonimizer service
stop: Stop the 4nonimizer service
stop_nonet: Stop the 4nonimizer service and shutdown network interfaces
restart: Restart the 4nonimizer service
update_app: Update this program via git
privoxy: Install and configure privoxy with port 8118 (BETA)
proxychains4: Install and configure proxychains4 for default in the system
browser: Fire up a firefox browser with profile privoxy -> tor
test_availability: Check peers availability and delete ovpn file if the IP/service is unreachable
location: Now you can select a specific country or continent of the vpn peer
enableboot: You can enable service in boot
disableboot: You can disable service in boot
*enable_dnscrypt: Enable dnscrypt service
disable_dnscrypt: Disable dnscrypt service
help: Help (this screen)
Actualmente se soportan los siguientes proveedores VPN:
- 7Proxies https://www.7proxies.com/
- AirVPN https://airvpn.org/
- Cryptostorm https://cryptostorm.is/
- Cyberghost https://www.cyberghostvpn.com/en_US/
- ExpressVPN https://www.expressvpn.com
- FreeVPN https://freevpn.me/
- HideMyAss https://www.hidemyass.com/
- IpPVanish https://www.ipvanish.com/
- NordVPN https://nordvpn.com
- PIA https://www.privateinternetaccess.com/
- ProntonVPN https://protonvpn.com/
- Proxy.sh https://proxy.sh/
- SlickVPN https://www.slickvpn.com
- StrongVPN https://strongvpn.com/
- TorGuard https://torguard.net/
- TunnelBear https://www.tunnelbear.com/
- VPNBook (por defecto) http://www.vpnbook.com/
- VPNGate http://www.vpngate.net/en/
- VPNKeys https://www.vpnkeys.com/
- VPNMe https://www.vpnme.me/
- Vyprvpn https://www.goldenfrog.com/es/vyprvpn
Para poder instalar una vpn adicional tendremos que tener en cuenta la siguiente estructura para que 4nonimizer la integre en el script y pueda realizar operaciones con ella.
Lo primero, deberemos de crear la siguiente estructura en la carpeta /vpn/ dentro de la ruta de 4nonimizer:

En nuestro ejemplo creamos la carpeta /vpntest/ y dentro de ella colocamos todos los .ovpn que dispongamos. En caso de que los ficheros ovpn no tuvieran el certificado dentro de cada uno de ellos lo deberemos poner en la misma carpeta como se muestra en el ejemplo certificate.crt.
Además de todo ésto deberemos de colocar un fichero llamado pass.txt que contenga 2 líneas: en la primera el usuario y en la segunda la contraseña, como se muestra a continuación:

Si hemos realizado correctamente todos los pasos cuando escribamos el comando 4nonimizer change_provider nos deberá de mostrar nuestra vpn :

Como se puede apreciar en la imagen la opcion [7] es la vpn que hemos creado.
Si el proveedor correspondiente permite la automatización de la obtención de credenciales y/o ficheros .ovpn, 4nonimizer tiene normalizado que los scripts correspondientes tengan la ubicación y nombres siguientes:
- /opt/4nonimizer/vpn/provider/vpn-get-pass.sh

- /opt/4nonimizer/vpn/provider/vpn-get-ovpn.sh

4nonimizer automáticamente detectará la presencia de ambos scripts e indicará (Auto-pass Login) o (Auto-get OVPN) si encuentra en la primera linea de cada fichero la expresión "4uto' o 'm4nual' dependiendo de la función que realicen.

- Ejecuta 'source 4nonimizer' para habilitar el autocompletado de parámetros.
- Copia .conkyrc en tu directorio home para cargar la plantila de 4nonimizer y ejecuta conky.
- http://www.hackplayers.com/2016/08/tuto-enmascarar-ip-linux-vpn-tor.html
- http://www.hackplayers.com/2016/10/4nonimizer-un-script-para-anonimizar-ip.html
- http://www.redeszone.net//2016/10/07/4nonimizer-te-permitira-automatizar-la-conexion-diferentes-vpn-anonimizar-ip/
- http://www.kitploit.com/2016/10/4nonimizer-bash-script-for-anonymizing_10.html
- https://www.digitalmunition.me/2016/10/4nonimizer-bash-script-anonymizing-public-ip-managing-connection-tor-different-vpns-providers/
- Instalar 4nonimizer Kali Linux https://www.youtube.com/watch?v=FQRuRmMkcDg
- 4nonimizer Navegando de manera segura VPN (Kali Linux 2016.2) https://www.youtube.com/watch?v=6GApaN7fSn8
- devenir anonyme sur kali linux (4nonimizer) https://www.youtube.com/watch?v=Y3puD1Bw3xA
- Anonymizer - How To Hide Your IP address on Kali Linux 2016.2 (Change IP) https://www.youtube.com/watch?v=MNdQD0DCG0A
- Become Anonymous on kali linux 2016.2 https://www.youtube.com/watch?v=IFnhm-rrnEg
- Auto Hide IP with 4nonimizer on KALI Linux 2017 https://www.youtube.com/watch?v=HgqZCm8Wdvw
- Kali Linux - 4nonimizer | Surf Anonymously https://www.youtube.com/watch?v=_mOUQBv4sWs
¡4nonimiza el mundo!
- migrar a Python y hacer la herramienta multiplataforma
- hacer el código más limpio y versátil
- guardar los logs en una bd sqlite
- estandarizar los nombres de los ficheros ovpn: leer la ip o el fqdn de la linea remote, obtener el país y renombrar el fichero ovpn en consecuencia
- forzar la resoluciób DNS a través del túnel VPN
| 번호 | 코드명 | 날짜 |
|---|
| 1.00-beta | .bye-world! | 5/10/2016 |
| 1.02-beta | .evol-time | 11/10/2016 |
| 1.03-beta | .using-latin-i | 17/10/2016 |
| 1.04-beta | .locateit | 22/12/2016 |
| 1.05-beta | .encrypting | 03/01/2017 |
| 1.06-beta | .1st-trial | 18/01/2017 |
| 1.07-beta | .noname | 03/05/2017 |
| 1.08-beta | .falcon | 15/08/2017 |
| 1.09-beta | .rabbit | 09/11/2017 |
| 1.10 | .fresh_air | 27/02/2018 |
| 1.11 | .shhh | 17/05/2018 |
| 1.12 | .sqliting | 18/05/2018 |
| Number | codename | date |
|---|
| 1.00-beta | .bye-world! | 5/10/2016 |
| 1.02-beta | .evol-time | 11/10/2016 |
| 1.03-beta | .using-latin-i | 17/10/2016 |
| 1.04-beta | .locateit | 22/12/2016 |
| 1.05-beta | .encrypting | 03/01/2017 |
| 1.06-beta | .1st-trial | 18/01/2017 |
| 1.07-beta | .noname | 03/05/2017 |
| 1.08-beta | .falcon | 15/08/2017 |
| 1.09-beta | .rabbit | 09/11/2017 |
| 1.10 | .fresh_air | 27/02/2018 |
| 1.11 | .shhh | 17/05/2018 |
| 1.12 | .sqliting | 18/05/2018 |